Facilitating Ventilation Patterns and Breathing Strategies

Published on 13/02/2015 by admin

Filed under Cardiovascular

Last modified 22/04/2025

Print this page

rate 1 star rate 2 star rate 3 star rate 4 star rate 5 star
Your rating: none, Average: 4 (3 votes)

This article have been viewed 12707 times

Facilitating Ventilation Patterns and Breathing Strategies

Donna Frownfelter*

Individuals with breathing impairments (whether primary or secondary in origin) require a variety of interventions to optimize ventilation and oxygen delivery, as well as improving functional outcomes. Some interventions are passive in nature, such as the positioning of the patient or the application of an abdominal binder for better diaphragmatic positioning. Other interventions require very active participation on the part of the therapist, patient, or both, such as in assisted-cough techniques, in glossopharyngeal breathing instruction, or in learning a more efficient breathing pattern. Ideally techniques are incorporated into the patient’s total physical rehabilitation program, such as the use of ventilation strategies pairing breathing with movement. All of these diverse aspects of treatment play an important role in the development of a successful rehabilitation program to meet the needs of patients with pulmonary impairments. No single intervention or approach is appropriate in all cases. Sound clinical judgment and experience must be exercised when applying these ideas in each person. The interventions identified in this chapter are not inclusive. They are meant to provide examples and guidelines and to stimulate the clinician’s creative talents in order to incorporate the interventions into a comprehensive treatment program determined by individual needs that improve the outcomes for each patient (Box 23-1).

Positioning Concerns

All patients spend some portion of the day in a horizontal position for rest or sleep. Some who are acutely ill or medically compromised spent extended time in bed, and major emphasis must be placed on the mobilization of patients early and often to prevent immobility from exerting its negative effects on all body systems (see Chapter 18). Studies have shown that patients who are medicated and spend extended time on ventilators in the ICU have developed critical illness neuromuscular syndrome or ICU-acquired weakness. Interventions shown to help prevent this problem are physical therapy/activity and daily interruptions of sedative medication.1,2,3 These studies validate the need for intervention to prevent untoward effects of immobility and sedation.

Despite these problems, the time spent in a horizontal position can be used as an opportunity to assist patients in passive drainage and preventing the retention of lung secretions. It can be a natural beginning in the development of a patient’s long-term respiratory program (e.g., the prevention of respiratory complications in a patient with tetraplegia). Specific postural drainage positions are covered under airway clearance interventions (see Chapter 21). Using a combination of these positions and the patient’s position in bed, in the hospital or at home, can help to achieve multiple goals. First, various horizontal positions can assist patients in passively clearing secretions that they may have difficulty clearing actively. Pneumonia is still the leading cause of death in patients with spinal cord injury (SCI) who are tetraplegic.4 Second, these position changes provide for skin relief and better circulation. Finally, they assist in retarding the development of joint contractures or other musculoskeletal abnormalities. A four-position rotation (i.e., supine, prone, and side-to-side) or a modified six-position rotation (supine, three-quarter supine, side-lying, three-quarter prone on each side) is usually an effective and reasonable means of incorporating these goals into a long-term prophylactic program.

Simple adaptations may make ventilation easier in each of these postures. For example, when the patient is in the supine position, placing the patient’s arms up over his or her head facilitates greater anterior upper chest expansion.5 Likewise, positioning the pelvis in a slight posterior tilt facilitates more diaphragmatic excursion. (Detailed explanations of positioning are discussed in Chapter 42.) Observation of all precautions and contraindications to passive positioning is still warranted, and positions should be modified based on the individual need of each patient.

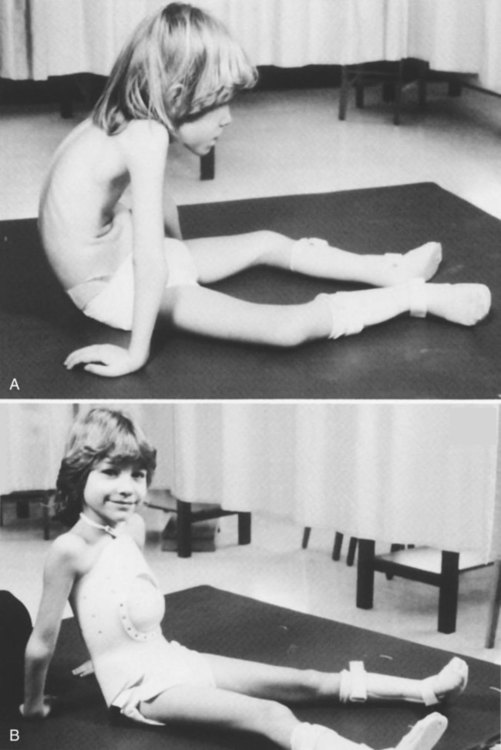
Just as passive positioning of the patient in bed helps to maintain airway clearance and improve ventilation potential, optimal passive positioning of the patient’s skeletal frame in an upright posture (sitting, standing) helps to maximize the mechanical advantages that facilitate breathing and improve cardiovascular fluid shifts. For example, patients with SCIs resulting in tetraplegia will be unable to support their intestinal contents properly under the diaphragm to allow for maximal expansion of the chest in all three planes of ventilation (see Chapter 39). The use of an abdominal support from the iliac crest to the base of the xiphoid process provides positive-pressure support to restore intestinal positioning to an upright position (Figure 23-1). Research has documented well the significant improvements in vital capacity (VC), inspiratory capacity, and tidal volume (TV) in sitting with the use of a strong abdominal support.6 These binders have also been used in nursing care to provide for better circulation and the prevention of hypotension.

The abdominal binder’s value in cosmesis may be underrated. Many patients with neurological issues were once healthy individuals with high self-esteem who took great pride in their appearance. Many now present with protruding bellies (the anterior and inferior shift of the intestines resulting from flaccid abdominal muscles), which may be psychologically disturbing to them. Thus the use of a binder may greatly aid in the restoration of these patients’ self-esteem, which should be a high-priority goal in any rehabilitation program.

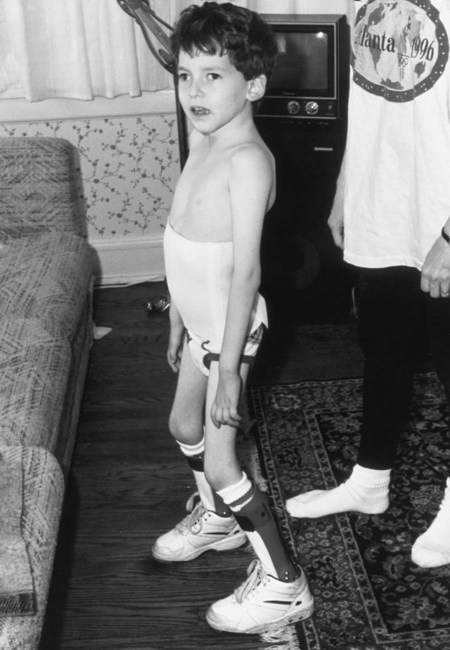
A rigid type of abdominal support can be used when the vertebral column and the abdominal viscera need support. These are called body jackets or total contact thoracic lumbar sacral orthoses (TLSOs) (Figure 23-2). A TLSO is a rigid trunk support molded individually to the shape of the patient’s entire trunk from the axilla down to the pubis. It is composed of two separate pieces, a front and a back, ideally with an anterior cutout in the abdomen to allow for normal diaphragmatic displacement of the viscera. In addition to these jackets, an elastic binder is applied around the abdomen to allow for diaphragmatic motion but minimize excessive displacement of the abdominal contents. This is particularly appropriate for a growing child who needs more spinal stability and for the completely flaccid patient with tetraplegia, who may also require the same support. Because head and neck positioning are so dependent on trunk positioning, a body jacket may make the difference for these patients between being dependent or independent in an upright posture. It may result in significantly better head control and eye contact and improved phonation. However, because the TLSO limits trunk movement, its usefulness for each patient must be assessed carefully.

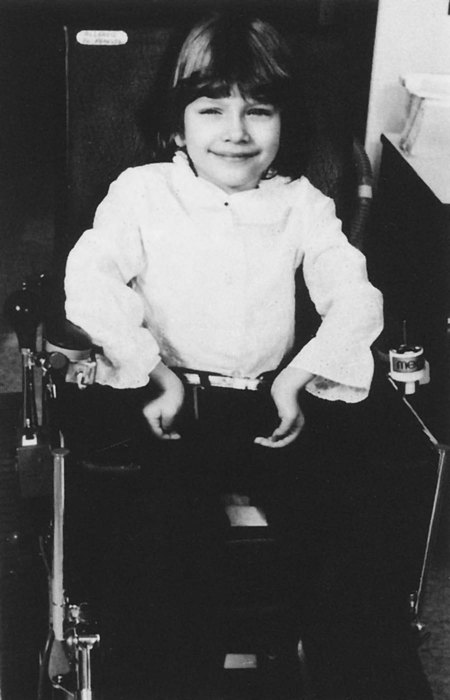
The next consideration in passive respiratory techniques is proper wheelchair positioning. Optimal performance in ventilatory functioning, as well as many other areas of rehabilitation, depends on good alignment of the body against the force of gravity. Symmetry must be strived for through the use of a body jacket, lateral trunk supports in the wheelchair, abdominal binders, or some other means (Figure 23-3). This is especially important for patients with hemiplegia in whom habitual asymmetrical posturing leads to musculoskeletal problems later. Symmetrical breathing patterns and uniform aeration of all lung segments are augmented by careful upright positioning. Therefore everything from the type of neck and trunk support to the height and width of the arm rests to the length and type of the foot supports must be carefully analyzed for each patient.

Ventilatory and Movement Strategies for Improving Functional Outcomes

Observing patient movement and ventilation is inherent in the physical therapist’s examination and evaluation of the patient. Patients often will hold their breath during activities. This will limit their ability to perform functional activities. When it is observed that breath holding is occurring or that the patient has dyspnea with activity, it is important to incorporate ventilatory strategies.

The patient is first positioned for successful ventilation. Then motor activities should be introduced. Interventions chosen will improve the patient’s ventilatory support, or the therapist should capitalize on the patient’s good ventilatory support to improve the motor activity. Using ventilatory strategies to improve motor performance or movement strategies to improve ventilation performance enables patients to achieve their functional goals sooner and have better health, including fewer respiratory complications. Generally, these simple concepts take no more than 1 to 2 additional minutes of therapy time, with no additional equipment costs other than a few extra pillows or towels. Therefore time and money are not mitigating factors. However, these ideas do require the practitioner to look carefully at the patient before beginning any treatment intervention and to ask, “Have I positioned my patient for ventilatory success?”; “Am I simply treating the patient in whatever position I found her or him in?”; and “Have I carefully chosen my verbal cues to include a ventilatory response and a functional response?” The practitioner must actively include ventilation in every activity to help the patient understand that breathing transcends all activities. Breathing is the bridge to function. A summary of the most important ventilation-movement strategies is listed in Box 23-2.

Incorporating Simple Therapy Tasks

Inspiration

After the patient has been carefully positioned for respiratory success, as described previously, begin the patient’s therapy or daily-living activities. In a study looking at rhythmic pronation and supination wrist movements, inspiration and exhalation adapted and became coordinated with the arm movement (Table 23-1).7,8 Accordingly, then, the simple task of passive range of movement (ROM) can easily include the active goal of increasing ventilation by asking the patient to breathe in and look up when his or her arm is raised up into shoulder flexion. This encourages the patient to breathe in when the chest wall muscles are being stretched and the ribs are naturally opening up, causing both activities to be more successful. It also begins to teach the patient to use ventilatory strategies to optimize potential functional movement, such as in reaching up to a kitchen cabinet. Patients need to focus on avoiding breath holding and incorporating breathing during each activity.

Table 23-1

Anatomy of Inspiration and Expiration

  Inspiration Expiration
Trunk Trunk extension Trunk flexion
Shoulders Shoulder flexion, abduction, and external rotation movements Shoulder extension, adduction, and internal rotation movements
Gaze Upward eye gaze Downward eye gaze

Exhalation

Likewise, active or passive exhalation should be coordinated with the reverse upper extremity ROM pattern (i.e., the arm returning from flexion back to the patient’s side). This can be done using all types of exhalation patterns, including the following:

Thus the therapist may ask the patient to slowly count out loud to 10 while the arm is being returned eccentrically to his or her side. The patient learns to correlate exhalation with shoulder extension while simultaneously learning a much more complex idea—that of controlling his or her rate and volume of expiration by including deliberate speech during exhalation maneuvers. Research is being done in the area of respiratory plasticity to evaluate changes with exercise and conditioning.9,10 Clinical observation demonstrates that patients will incorporate new ventilation strategies and that these strategies become less cognitive and more based in habit as they are repeated.

In a recent study of strategies for respiratory exercise patterns with upper extremity movements in patients with chronic obstructive pulmonary disease (COPD), 15 patients were instructed in the reverse pattern. For example, with shoulder flexion they performed the activity with exhalation versus inhalation. The researchers concluded that there was less chest asynchrony and that it may be an important strategy for people with COPD to use the opposite pattern.11 This study had only 15 patients with COPD; however, it may be noted that with ventilatory strategies, patients may try different ways of incorporating breathing. As long as patients are not breath holding, therapists should feel safe encouraging them to try techniques and see what works best for them.

To improve exhalation potential, increase the patient’s relative trunk flexion alignment. While the patient is still supine and performing upper extremity ROM, ask the patient to lift his or her head and watch the hand as it returns to the side, which increases abdominal and intercostal activation. Or ask the patient to increase knee flexion, which increases posterior pelvic tilting and trunk flexion. Pairing trunk flexion with exhalation completes the trunk movement strategy for better ventilation.

Combining positioning with verbal cues for ventilation, as described in ROM activities, changes passive upper extremity ROM exercises into dynamic upper extremity ROM exercises. It encourages increased inspiratory and expiratory capacities, develops early functional motor planning strategies, and facilitates trunk mobility. In this manner the patient has the opportunity to learn from the beginning of his or her rehabilitation process that movement and breathing go hand in hand. Clinically, incorporating appropriate breathing patterns with movement early in the rehabilitation process discourages the development of Valsalva patterns or shallow breathing patterns when the motor activities become more difficult and complex. Patients who are mechanically ventilated on an assist mode or during a time of sedation interruption can accomplish this as well.

Dynamic Activities

Inhalation promotes trunk extension, exhalation promotes trunk flexion, and vice versa. This basic theme occurs naturally in all motor activities but may have ceased to become spontaneous after a neuromuscular or musculoskeletal insult. Valsalva, or breath holding, maneuvers during transitional movements, such as rolling or coming to a sitting or standing position, are often noted in these patients. By teaching them strategies that incorporate breathing into their motor plans for all motor activities, Valsalva patterns can be eliminated or minimized while simultaneously promoting better cardiovascular function.

The following activities are just a few of the common daily activities. They are typical gross motor activities, but the use of ventilatory strategies is a means of improving patients’ abilities to perform them. Extrapolation of these concepts to all other motor activities should be carefully analyzed by each therapist for each individual patient, looking at the trunk patterns and type of muscle contraction that occurs in a given exercise or activity. At times there may be more than one effective ventilation strategy; there is no hard-and-fast rule. What is important is that patients breathe with the movement and not hold their breath.

Dressing

Patients often express how short of breath they become with dressing. These activities, too, can benefit from the concepts discussed here. Use of the upper extremities has been shown to involve an increase in oxygen consumption over lower extremity activities. For dressings, the recommended position is either sitting in a chair or the long-sitting position in bed for those with less trunk control (such as patients with SCI). While putting on lower extremity items such as pants, socks, and shoes in a long-sitting position, have the patient first take in a deep breath while extending his or her trunk. Then have the patient blow out, huff out, or cough while flexing the trunk to reach his or her toes. This combines the functional daily task of dressing with improving breath control, trunk control, and airway-clearance techniques.

Upper extremity dressing and upper extremity exercise can incorporate the same ideas. All movements should be coordinated with appropriate chest wall movements to maximize upper extremity tasks. Thus every time the arm is moving up above 90 degrees of shoulder flexion, the patient should be asked to breathe in, allowing for the normal shoulder/rib-cage rhythm to occur. Full shoulder flexion requires the opening of the intercostal spacing and the separation of the individual ribs.12 Many patients with neurological impairments have lost the intrinsic mobility of the chest wall and thus may have lost some functional shoulder ROM as well. Not pairing inspiration with shoulder flexion is likely to limit the patient’s shoulder ROM to approximately 140 to 150 degrees. It may also encourage Valsalva maneuvers during the activity and may cause more shoulder pain.

Coming Up to Standing

Coming up to standing requires both trunk flexion and trunk extension. Patients often use a rhythmic initiation (rocking) to begin the sit-to-stand transfer. This is a good opportunity to begin teaching breath control. Patients breathe in and then as they rock forward, they exhale; rocking backwards, they inhale as the trunk extends. There can be several cycles of rocking and breathing prior to standing before control is attained. Thus patients should initiate the forward trunk lean with exhalation and then initiate the standing phase with inhalation and trunk and neck extension. Active neck extension during assumption of standing not only facilitates greater inhalation but, along with the influence of the tonic labyrinthine reflex (TLR), also facilitates more significant contractions of the trunk and hip extensors. Clinically, this often results in a more noticeably upright posture and may make the difference between an assisted standing pivot transfer and an independent one. Returning to sitting should be accompanied by slow, controlled exhalation, such as in pursed-lips blowing or counting out loud, in order to maximize the body’s controlled descent into gravity’s influence.

Facilitating a Controlled Diaphragmatic Breathing Pattern

Why would a therapist want to change a patient’s breathing pattern? The answer is simple—when the pattern being used is ineffective. Ordinarily, people use the pattern of breathing that is the most efficient for them. However, when the work of breathing increases and musculoskeletal, neuromuscular, or pulmonary impairment is present, abnormal patterns that are not efficient may be adopted. The patient knows that it requires hard work to breathe but often does not know how to do it with greater ease, especially during stressful situations when panic is present. The patient may spontaneously do pursed-lips breathing (PLB) but often in a forceful manner that may not relieve the dyspnea.

A healthy person uses approximately 5% of total oxygen consumption and 10% of vital capacity for the muscular work of breathing. Consequently, breathing at rest is generally perceived as effortless under normal conditions.

However, in the patients physical therapists evaluate and treat (often after surgery, respiratory disease, or dysfunction secondary to neurological insult or injury), the vital capacity may be significantly decreased and the oxygen consumption may be greatly increased because of the use of accessory muscles or the extra effort needed to breathe or cough.

Many patients with lung cancer also have COPD, which increases their postoperative complications because of impaired pulmonary function before surgery. In a study of patients with COPD who needed to undergo surgical resection for cancer, it was found that a preoperative pulmonary rehabilitation program of 10 visits over a 4-week period consisting of exercise prescription, inspiratory muscle training, and slow breathing technique improved patients’ postoperative progress. The group in this program required a shorter period of time in the ICU and fewer days using a chest tube. Although this study was done with only nine patients, it has implications for improvement of postoperative success. However, in many cases, it may not be feasible to have 4 weeks of pulmonary rehabilitation before lung surgery. Some surgeons are hesitant to delay the needed surgery for pulmonary rehabilitation. A larger study would need to be conducted to demonstrate cost effectiveness, as well as the benefits and risks.13

Vital capacity is also affected in cases of tetraplegia, in which patients’ vital capacity may be reduced to 1000 to 1500 mL from their normal 3000-mL vital capacity (50%). If the normal TV (normal volume of breathing) is 500 mL, this means that with each breath the patient would use 33% to 50% of his or her vital capacity (maximal inspiration followed by maximal exhalation). This would greatly increase the work of breathing and oxygen consumption just for normal quiet breathing. The patient would have little pulmonary reserve. This can lead to respiratory muscle fatigue. During exercise or stress, the patient would have an increased subjective feeling of shortness of breath and feel an increase in the work of breathing. In addition, patients with spinal cord injury who are smokers experience excessive vital capacity losses.14 Commonly used terms to describe breathing patterns are listed in Box 23-3. A listing of indications for teaching controlled-breathing techniques is provided in Box 23-4.

It should be appreciated that breathing comfortably and in a controlled manner is associated with wellness and a sense of ease. Even normal individuals who are under stress and have increased work levels are more cognizant of the increase in their work of breathing. For a patient who struggles with every breath and wonders how it will be possible to get through the day, ventilatory strategies and breathing-control techniques can be the key to maximizing potential. A list of goals for teaching controlled-breathing techniques is found in Box 23-5.

Breathing control has long been used in yoga to focus and to promote meditation. This is a key to maximizing rehabilitation. Patients who cannot breathe cannot function! It is of primary importance to assess patients’ breathing at rest and during exercise. People often hold their breath with exertion, especially during new activities, so it is vital to assess the cardiopulmonary and neuromuscular response to each new activity. In many rehabilitation centers and health clubs, Pilates exercise regimens have been used to help patients achieve core strength and back stabilization. Pilates is a method of physical and mental conditioning combined with body, mind, and spirit integration; it has been also used by dancers and choreographers to improve postural control, increase ease of movement, and improve their performance. The first phase of Pilates incorporates diaphragmatic breathing before continuing with the steps to activate the muscles of the core (multifidus, diaphragm, pelvic floor, and transverse abdominis). The belief is that when the individual has a strong core, the posture will improve and the performance of other functional activities will be improved. This is similar to our concept of teaching diaphragmatic breathing control before functional activities in people with respiratory impairments. Joseph Pilates actually used the term contrology to define his concepts. That is what we are striving to teach our patients—breath control, then function.15

Considerations in Teaching Breathing Control to Patients with Primary Versus Secondary Pulmonary Dysfunction

Patients with primary lung disease, such as COPD, asthma, bronchitis, or cystic fibrosis, present a picture very different from that of patients with secondary pulmonary deficits, SCI, Parkinson disease, myasthenia gravis, or Guillain-Barré syndrome. In general, patients with primary lung disease tend to overuse their accessory muscles and greatly increase the work of breathing secondary to shortness of breath or coughing. They often complain that they have difficulty “getting the air out,” which demonstrates the decreased expiratory flow rates noted on pulmonary function tests. This can lead to dynamic hyperinflation, in which patients continue to gasp and increase the respiratory rate so more air is coming in, but there is not time for the air to be exhaled. Large volumes of air can get trapped in the lungs, which causes increased feelings of shortness of breath and panic. The goal with these patients is to teach them to relax the neck and chest accessory muscles and use more diaphragmatic breathing (abdominal and lateral costal breathing) to reduce the work of breathing in combination with relaxed pursed-lips breathing and prolonged exhalation. Their treatment programs focus on energy conservation, relaxation, and pacing activity with breath control. In pulmonary rehabilitation programs, exercise is a key component. Patients learn to coordinate their breathing with their activities and find that they have less dyspnea with exertion.16,17

There has been controversy in the literature about the effectiveness of diaphragmatic breathing. No standardized “norms” of how to perform diaphragmatic breathing exist. However, many skilled cardiovascular and pulmonary physical therapists would consider teaching the patient with COPD how to relax the accessory muscles and use the diaphragm as an important part of the patient’s pulmonary rehabilitation. Dechman reported that in a search of the literature, pursed-lips breathing was considered most effective by people with COPD and that the literature does not strongly support the use of diaphragmatic breathing in people with COPD.18 Cahalin found there are both positive and potentially detrimental effects to diaphragmatic breathing training.19 Each individual patient needs to be evaluated to consider whether diaphragmatic breathing may be beneficial. For example, patients with severe hyperinflation and flattened diaphragms secondarily will most likely not benefit from diaphragmatic breathing because the muscle length tension relationship is abnormal and will not result in an appropriate movement of the diaphragm. With patients who have mild to moderate COPD and are overusing the accessory muscles, diaphragmatic breathing may be very helpful; it may require less oxygen consumption, decrease the respiratory rate, and increase the tidal volume.

Patients with secondary pulmonary dysfunction, such as SCI, have a more restrictive component to inspiration. In these cases, accessory muscles may be intact, but they are not being used to facilitate deep breathing or coughing. Patients may have strong diaphragmatic breaths, but the upper chest collapses on inspiration (paradoxical breathing; see Chapter 39). The goal is to teach these patients to use the accessory muscles to balance the upper and lower chest. This facilitates an increase in vital capacity that prevents atelectasis and pneumonia by increasing the volume of ventilation and improving the cough mechanism.

The choice of appropriate ventilatory strategies is determined by the individual patient’s problem. The following questions should be considered when evaluating a patient:

Patients with primary pulmonary disease generally benefit from ventilatory strategies that relax the accessory muscles and facilitate relaxed diaphragmatic breathing. On the other hand, patients with secondary pulmonary dysfunction usually benefit from the balanced use of the diaphragm and accessory muscles to increase vital capacity and breath support for activities.

Pursed-Lips Breathing

Pursed-lips breathing is a strategy that is often spontaneously used by people with COPD during episodes of dyspnea. Many patients feel this breathing pattern helps to decrease their breathlessness. The effect of PLB is an increase in the time of exhalation, which results in a decrease in the end-expiratory volume and an increase in the total time of the respiratory cycle. This results in a decreased respiratory rate and increased TV. According to studies, a decrease in the Borg scale of perceived exertion also occurs when PLB is used.20 This technique has been acknowledged by many patients with respiratory impairments as being very easy to learn and yet very effective, quick to use, and readily incorporated into their activities to reduce dyspnea.21

When instructing a patient in PLB, emphasis should be placed on a relaxed, slow, prolonged, controlled exhalation. Often when patients initiate PLB spontaneously, they use a forceful exhalation, which tightens the neck musculature and oral area. This builds a significant pressure that can counteract the effectiveness of the technique and the subsequent relief of dyspnea. A relaxed head, neck, and mouth are essential. If patients have difficulty relaxing the mouth, they may be encouraged to try making an sssss, or hissing, sound, which will still prolong exhalation and provide back pressure.

Relationship of the Diaphragm and Posture

The respiratory action of the diaphragm and other respiratory muscles is normally coordinated with the need to provide postural control of the trunk during movement of the extremities.8 The diaphragm acts both as a muscle of respiration and as a muscle that works in providing core stability to the trunk. However, when respiratory demand increases, the diaphragm may not be able to continue to provide both of these functions.2227 Because the diaphragm is the primary muscle of respiration, postural control may be impaired. A complete discussion of this concept is provided in Chapter 39.

Diaphragmatic Controlled Breathing

Diaphragmatic breathing is the normal mode of ventilation. The diaphragm and intercostals are the normal muscles of quiet inspiration. When evaluating a patient’s breathing pattern, the use of accessory muscles during quiet breathing should be noted; the patient with primary pulmonary disease needs to be instructed in relaxation of the accessory muscles to decrease the work of breathing. However, in a patient with a spinal cord injury or other neuromuscular disorder, these accessory muscles may assist in balancing ventilation and may also be useful in increasing vital capacity, improving the ability to cough, improving breath support for speaking, and increasing the potential for functional activities.

In general, controlled diaphragmatic breathing should be emphasized in each posture and in all therapeutic activities because carry-over of the breathing pattern from one posture to another or one activity to another is not necessarily present. If the patient is shown the pattern only when in the supine position, it may not carry over to sitting or to a sliding-board transfer, when the activity becomes more complex. A helpful sequence might be to teach the breathing pattern in side-lying, supine, sitting, and standing positions and in walking, stair climbing, and other functional activities, especially in patients with COPD. Patients with neurological impairment may require modification of the breathing pattern so that it fits well with their activity levels and capabilities.

Positioning Concerns

Position of Pelvis

The first step in facilitating any breathing pattern is to position the patient for ventilatory success. The details are discussed in this chapter and in Chapter 42. Often a patient’s posture and pelvic position have dramatic effects on breathing. In general, a slight, relative posterior tilt of the pelvis facilitates diaphragmatic breathing, and a relative anterior tilt facilitates the opening of the anterior chest and upper chest breathing. It is helpful to see what difference a slight, relative change in pelvic position will do to a patient’s ability to ventilate. This is especially true in secondary pulmonary problems related to neurological and neuromuscular dysfunction. A lumbar roll or a roll under the ischial tuberosities can facilitate an anterior pelvic tilt (see Chapter 42).

Relaxation of Upper Chest and Shoulders

Jacobsen’s progressive relaxation exercises are familiar to physical therapists. Jacobsen proposed that a maximal muscle contraction would yield a maximal muscle relaxation. This technique can be applied to the upper chest and shoulders. The therapist places his or her hands on the patient’s shoulder girdle. The patient is asked to shrug his or her shoulders up into the therapist’s hands and hold it. “Don’t let me push your shoulders down,” is the therapist’s command. Then, “Let your shoulders relax, let them go.” The emphasis is on the relaxation phase. Verbal commands can be very important with this procedure. A strong command to “Raise your shoulders into my hands” is followed by a quiet, calmer, “Now relax and let them go,” repeating quietly, “That’s it, let them go, feel them relax.” The addition of counter-rotation of the shoulder girdle can make this intervention more effective. Patients can learn the techniques independently and can relax their shoulders when they begin to feel tense. In addition, making shoulder circles in both directions, forward and backwards, can loosen the shoulder girdle. Sometimes the relaxation activity is all that it takes to resume a more natural pattern of breathing, and the therapist can move on to other therapeutic activities. If the patient starts to use accessory muscles again, the technique is repeated. The patient learns to feel the difference between tension and relaxation of the shoulders and can self-monitor and perform the relaxation independently.

Repatterning Technique

If a patient needs more support to gain control of breathing and is experiencing shortness of breath, a simple repatterning technique may be beneficial. An example might be a patient with asthma who has a high respiratory rate and is feeling panicky. When the patient is asked why he or she is breathing so fast, the reply will usually be, “I am not getting enough air. I can’t catch my breath.” The patient is asked to start with exhalation: “Try to blow out easily with your lips pursed. Don’t force it; just let it come out.” A helpful technique for producing a prolonged, easy exhalation is to ask the patient to visualize a candle with a flame and then imagine exhaling in a way that makes the flame flicker but not go out. Doing this allows the respiratory rate to decrease automatically. When the patient feels some control of this step, then add, “Hold your breath at the top of inspiration just for a second or two.” Make sure the patient does not bear down as in a Valsalva maneuver or hold the breath longer. Last, ask the patient to take a slow breath in, hold it, and let it go out through pursed lips. Patients learn that when they are short of breath, this technique often helps them to gain control, making them feel less panicky.

Sniffing

If working toward a generalized controlled-breathing pattern does not improve the patient’s ventilatory pattern adequately, a technique that more specifically addresses the need to initiate breathing from the diaphragm can be attempted. Sniffing is a simple and effective means of teaching diaphragmatic breathing.28 Sniffing is accomplished primarily by the diaphragm. This technique can be used first, before attempting more specific diaphragmatic training with patients who are capable of attempting sniffing because of its simplicity.

As with all procedures, the most important step is the first step: position the patient appropriately to increase the likelihood of increased diaphragmatic breathing resulting from musculoskeletal alignment. This includes the following:

For each patient, choices will be different (e.g., the amount of knee flexion or the number of pillows). Find the right combination of positioning characteristics that best facilitates diaphragmatic movement for that particular patient. (For details on positioning, see Chapter 42.) In this manner the therapist sets up the patient for ventilatory success before beginning the manual or verbal technique.

Initially, ask the patient to place his or her hands on the abdomen for increased proprioceptive feedback and the relative extension, adduction, and internal rotation position of the shoulders. In a quiet voice, ask the patient to “sniff in three times.” Note whether the patient demonstrates more abdominal rise or lower chest expansion or both. If so, draw attention to this fact. During exhalation, tell the patient to “let it out slowly,” which helps to prolong the exhalation and slow the respiratory rate (RR) and often encourages some relaxation. Progress the training by guiding the patient to “now sniff in twice, a little deeper.” Do you still see greater diaphragmatic excursion and less upper chest excursion? If so, continue by asking for “one long slow sniff.” If successful, follow with “now do it more quietly,” then “now do it more slowly,” then “even more quietly,” or “less effort,” and so forth. By this time, the patient should be demonstrating an easy-onset, slower RR and a diaphragmatic pattern with relaxed shoulders.

Clinical experience has shown this technique to be highly successful with about 80% of patients who have primary pulmonary pathologies or neurological impairments. The key to success seems to stem from the relaxed tones and words that the therapist uses, which decrease anxiety and imply relaxation and not “effort.” Once the pattern has been established, the patient can easily be instructed to go through the training independently, as needed. The sequence (in whole or in part) may be appropriate for patients before getting out of bed if they become anxious and demonstrate excessive upper chest breathing during this activity. For other patients, it may be appropriate before or during eating or before climbing stairs. Obviously, the application of this technique will be individualized for each patient, depending on individual impairments.

Procedure for Teaching Controlled Diaphragmatic Breathing (Scoop Technique)

Minimal patient instruction is necessary to facilitate diaphragmatic breathing using the scoop technique. It allows the patient to feel the breathing pattern; then it is brought to the patient’s cognitive awareness. The patient then learns to self-cue to incorporate the breathing pattern.

The following is a suggested sequence:

1. Position the patient for success, generally side-lying in a semi-Fowler position or supine in a semi-Fowler position, with a bend in the knees to achieve a relative posterior pelvic tilt and relaxation of the abdominal muscles.

2. Place your hand on the patient’s abdomen at the level of the umbilicus. Tell the patient you want to feel his or her breathing. Follow the patient’s breathing pattern for a few cycles until you are in synchrony with his or her respiratory rhythm. Do not invade the patient’s breathing pattern; rather, at first, follow its movement.

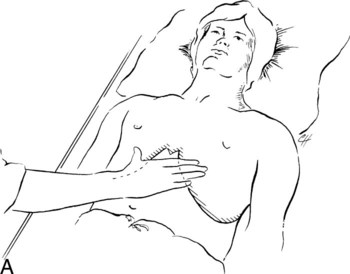
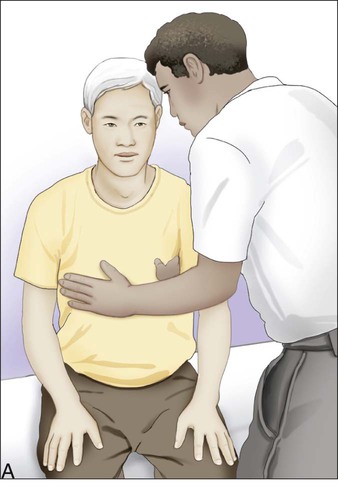
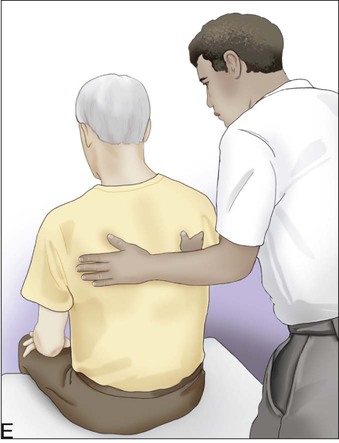
3. After the normal end of the patient’s exhalation, give a slow stretch and “scoop” your hand up and under the anterior thorax as shown in Figure 23-4, A. Then ask the patient, “Now, breathe into my hand,” as the slow scoop stretch is done.

4. As the scoop stretch is performed, instruct the patient to “breathe into my hand” during the inspiration. Give a scoop at the end of exhalation with each breath. The verbal command can be effectively replaced after a few respiratory cycles with the therapist’s audible breathing to facilitate the ventilatory pattern.

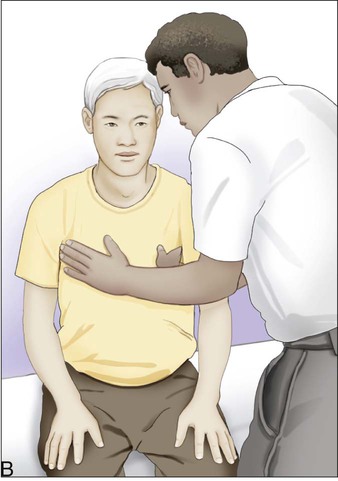
5. After achieving some success, call the patient’s attention to the awareness of the breathing pattern. For example, ask, “Can you feel how your abdomen rises as you breathe in and your ribs go up to the side?” The patient’s hand can be placed on the abdomen with the therapist’s hand on top. Reinforce the breathing pattern, then remove your hand and allow the patient to feel independently the ventilatory pattern (Figure 23-4, B).

A few things should be taken into consideration. Don’t ask patients to take too many deep breaths; they may begin to feel lightheaded because they may hyperventilate and blow off too much CO2. The fact that they are breathing more with their diaphragms is the important consideration. Note also the position of the pelvis and trunk.

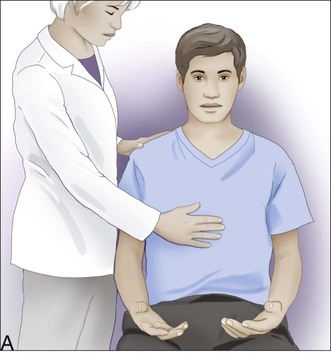
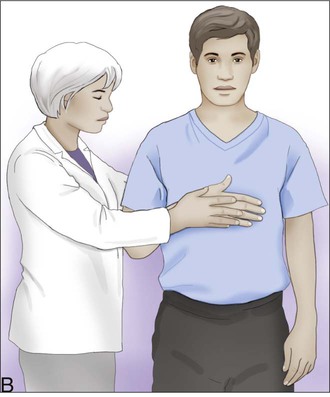
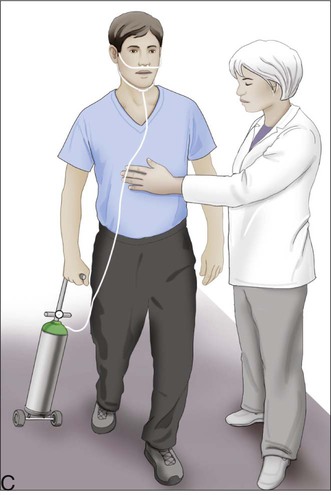
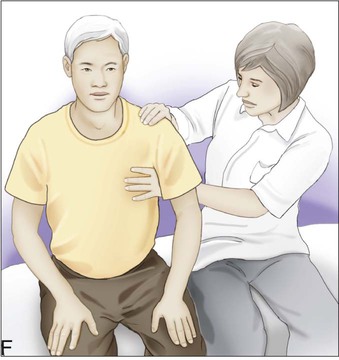
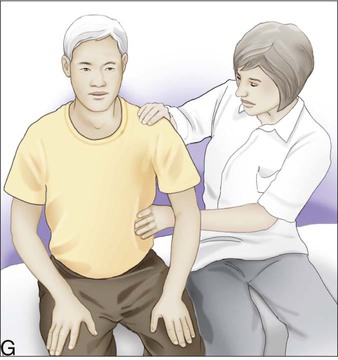
When the patient has mastered the breathing pattern in the side-lying position, try supine. Then progress to sitting (Figure 23-5, A), then standing (Figure 23-5, B), then walking (Figure 23-5, C) and, finally, stairs (Figure 23-5, D). Each position increases the difficulty in performing diaphragmatic breathing. In the side-lying or supine position, the patient is fully supported. The side-lying position is especially good for initial teaching of diaphragmatic breathing because the diaphragm is in a gravity-eliminated position. In the supine position, the patient must breathe against gravity. As he or she progresses to sitting, the patient must also provide trunk support and maintain stability against gravity, as well as relax the shoulders. In standing, the entire body must be supported, and when walking and stairs are added, the elements of breathing coordination, weight shifting, and balance increase the complexity of the activity.

Coordination of breathing for walking involves being careful not to allow the patient to hold the breath. It is important to keep inspiration and exhalation regular at a ratio of at least 1 to 1, preferably exhaling a little longer—1 to 2 or 1 to 4. In some yoga breathing techniques the exhalation is significantly longer—1 to 6, 1 to 8, or at times even longer.

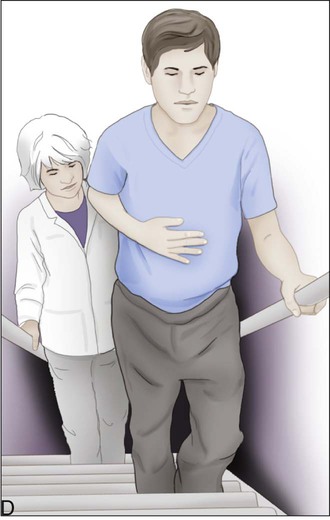
In general, the preferred pattern for a patient with primary pulmonary dysfunction is as follows:

A patient with neuromusculoskeletal issues who has lower extremity weakness may benefit from inspiration while ascending stairs and exhalation during descent. Going downstairs uses an eccentric muscle pattern, and exhalation is a relatively eccentric contraction of the diaphragm. Refer to the section on ventilatory and movement strategies in this chapter for additional information.

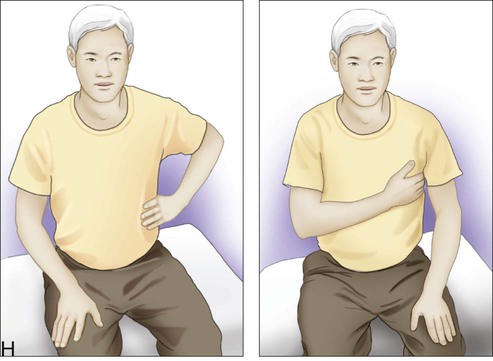
Lateral Costal Breathing

Lateral costal breathing also facilitates diaphragmatic excursion. It may be done bilaterally or unilaterally (Figure 23-6). Lower chest lateral costal expansion facilitates diaphragmatic and intercostal breathing in which the mid-chest recruits primarily intercostal activity.29

Upper Chest Inhibition

If all other manual facilitation interventions do not produce the desired increase in diaphragmatic breathing, inhibiting the upper chest during inhalation may be effective.

First, position the patient appropriately in a side-lying, three-quarter supine, or supine position. Begin by facilitating the diaphragm, usually with the diaphragm scoop. Slowly bring your other arm across the upper chest at about the level of the sternal angle. Leave it there for a couple of respiratory cycles without applying any pressure in order to feel the upper chest’s movement.

After assessing this movement, gently allow your arm to follow the upper chest back to its resting position when the patient exhales. On the patient’s next inspiratory effort, do not move your arm position. Thus your arm position will apply pressure or resistance to the expansion of the upper chest. This gentle pressure will cause postural inhibition to the anterior and superior movement of the upper chest. After each expiratory cycle, add more pressure until the patient subconsciously increases the lower chest breathing out of necessity.

When you note more diaphragmatic or lower intercostal muscle excursion, mention it to the patient. Ask the patient to try to reproduce this pattern. With your other arm, continue to facilitate the desired response, such as with the diaphragm scoop. Slowly, during each of the next series of inhalations, release your inhibition as the patient tries to maintain the improved lower chest-breathing pattern. If the patient is only partially successful, the inhibition can be partially reapplied to assist the patient. If the patient becomes anxious because the therapist’s inhibition is preventing upper chest breathing, then decrease the inhibition to a comfortable level. This technique should never cause an increase in anxiety or it will only encourage more upper chest breathing rather than less. When the pressure is released on the upper chest, continue to facilitate diaphragmatic breathing and strive to have the patient do it independently.

Normal Timing

During normal quiet inspiration (controlled breathing), the diaphragm contracts, which is seen outwardly as a gentle rise of the abdomen. The second movement is seen as lateral costal expansion of the lower chest and, usually to a lesser extent, lower anterior chest expansion. Finally, the upper chest rises slightly, primarily in a superior-anterior plane, with less lateral expansion noted. A normal timing technique adapted from the physical therapy approach of proprioceptive neuromuscular facilitation (PNF) can help the patient work on this sequence. After the patient has learned to initiate inspiration with his or her diaphragm and lower chest wall muscles more consistently, this technique can help to put the whole sequence together. The diaphragm continues to be the primary mover, but the accessory muscles are encouraged to do what they should do, which is to assist the diaphragm for better overall ventilation.

Generally, the patient is positioned symmetrically in either a supine or a supported sitting position, with a neutral pelvic position. The therapist waits until the end of an expiratory cycle and then, using the hand placement of the diaphragm scoop, asks the patient to breathe in “here.” With the other hand, the therapist moves up the chest wall to the lower sternum and touches the patient, giving instructions again to “now breathe here.” Finally, the therapist uses the first hand to move up to the upper sternum (usually around the level of the sternal angle) and asks the patient to “now breathe here.” It is important that the therapist smoothly transition from one hand to the next to assist the patient in developing a smooth motor transition from one area of the chest to the other. The manual cues provide tactile cueing rather than true motor facilitation. Because of this, the normal timing sequence is obviously a more advanced technique intended for use after success has been achieved in initial diaphragmatic training. It can address the functional need of the patient to take a quick deep breath in order to cough or a deeper breath in order to talk in longer sentences.

Mobilizing the Thorax

For some patients, controlled breathing alone may not alleviate inefficient ventilatory patterns, even with use of good positioning and appropriate ventilatory strategies. The thorax itself may be incapable of moving freely enough to allow for the adequate chest wall excursion necessary for that breathing pattern. For example, a patient with a spinal cord injury who is demonstrating an excessive diaphragmatic pattern that is unbalanced by the normal neuromuscular support of the intercostal and abdominal muscles can breathe using minimal chest wall expansion. This is often referred to as “belly breathing.” It may be necessary to mobilize individual rib segments to gain the potential for chest wall expansion in all three planes of ventilation before facilitating a specific breathing pattern. If the potential for movement is not there, the breathing pattern cannot change. Likewise, a patient having primary pulmonary dysfunction and COPD, undergoing chest surgery, having chest tubes, or suffering from acute chest trauma may also find the rib cage stiff or sore and thus limited in its potential expansion. All these patients may benefit from the inclusion of rib cage mobilization in their therapy programs. The rib cage musculoskeletal limitation may be secondary to muscular atrophy or spasticity or to pain. Thus patients with either primary pulmonary dysfunction or secondary pulmonary dysfunction can benefit from the practice of chest mobilization.

It is beyond the scope of this textbook to detail all the numerous techniques involved in musculoskeletal mobilization of the thorax, but some simple techniques and suggestions for further study are presented. A summary of mobilization techniques is found in Box 23-7.

Once again, the therapist should note that the initial step toward achieving success is positioning. Starting with the patient in the supine position, anterior chest wall mobility can be improved by placing a vertical towel roll down the length of the thoracic spine and allowing gravity to pull the shoulders back to the bed. In this position, the anterior chest is opened up, stretching the intercostal and pectoralis muscles for easier facilitation of upper chest expansion.

In the side-lying position, the lateral aspect of the chest can be passively mobilized with gravity’s assistance by placing one or more towel rolls or pillows under the lower chest (ribs 8 to 10) on the weight-bearing side. To determine an appropriate amount of side-bending, make sure that the patient’s shoulder and pelvis are still in direct contact with the surface, even with the towel rolls in place. This maximizes the stretch of the chest without placing the patient in a position that is too advanced for his or her current chest wall mobility. Patients vary from tolerating only a single thin towel roll to tolerating three pillows under the lower ribs.

In both postures, active or passive stretching can be added after positioning for success. In the supine position, the patient is asked to move arms directly up over his or her head (shoulder flexion) as far as possible while watching his or her hands. Using the appropriate ventilatory strategy, the patient is also instructed to inhale during this movement. Because both full shoulder flexion and inspiration require the opening of the individual rib segments, pairing them in this gravity-assisted position promotes a greater passive chest wall stretch than either technique alone. If straight flexion is not a viable option, use a butterfly position, raising the arms up in shoulder flexion, abduction, and external rotation with elbows bent (like butterfly wings), again pairing this with voluntary maximal inspiration and upward eye gaze. Pairing inspiration and shoulder flexion maximizes the stretch on the chest and encourages better ventilatory strategies.

Ask the patient, who is in a side-lying position, to bring his or her arm up in straight flexion to maximize anterior chest expansion or to move the arm into abduction as a way of maximizing the lateral costal expansion. Pair either movement with inspiration and upward eye gaze. If upper extremity movement is not possible, passively use counter-rotation of the trunk to mobilize the chest while the patient is in the side-lying position over a towel or pillow. Continue to ask the patient to follow the movement with his or her eyes.

The same concepts can be used in upright postures, such as sitting or standing. Use a vertical towel roll along the thoracic spine, either along the back of a chair or wheelchair or along a wall. Move the patient’s arms passively or actively up into the most extreme flexion or butterfly position possible. The patient will experience a more significant stretch in the anterior chest wall using the towel roll than without it. Precautions must be taken in patients with musculoskeletal problems along the spine and in patients with impaired skin tolerance.

If these general mobilization techniques do not produce enough chest wall mobility to allow freer breathing patterns to occur, more specific techniques must be considered, including the following:

Use the positioning and ventilatory strategies previously suggested (e.g., side-lying over a towel roll) during these specific interventions to maximize the potential gains in chest wall mobility. It is beyond the scope of this textbook to detail all the numerous techniques involved in musculoskeletal mobilization and release of the thorax. These three interventions are intended as suggestions for further study in other texts dealing primarily with musculoskeletal issues.

Facilitating Accessory Muscles in Ventilation

If the patient is still not demonstrating an optimal breathing pattern after experiencing appropriate positioning, appropriate ventilatory strategies, chest wall mobilization, and diaphragmatic retraining, specific facilitatory or inhibitory techniques should be initiated to stimulate the accessory muscles of ventilation. Specific techniques are discussed here in detail. A summary of interventions is listed in Box 23-8.

Because the diaphragm normally supplies the bulk of the inspired air during quiet breathing, diaphragmatic breathing is the preferred pattern of breathing. However, after certain neurological insults, strictly diaphragmatic breathing may not be possible or even preferred.30 Unlike pulmonary rehabilitation programs for people with COPD or asthma, in which diaphragmatic breathing is almost always encouraged and use of accessory muscles discouraged, the restoration of independent, efficient breathing patterns for people with neurological impairment may require the regular use of accessory muscles.

Positioning continues to be the single most important aspect of all ventilatory facilitation techniques. If the patient is positioned for success, the probability of a successful response is much higher. By assessing the patient’s head, upper extremity, trunk, pelvic, and lower extremity positions before every activity or technique, the therapist is empowered to use mechanical positioning and gravity to the patient’s advantage rather than disadvantage. For example, a slightly posteriorly tilted pelvis tends to facilitate diaphragmatic breathing, whereas a slightly anteriorly tilted pelvis tends to facilitate upper chest breathing. Thus when the therapist is facilitating breathing with accessory muscles, the patient would be put in an advantageous posture by slightly tilting the pelvis anteriorly. In the supine position, this could be as simple as decreasing the amount of knee flexion that is present or using a small towel roll under the lumbar spine.

Pectoralis Facilitation

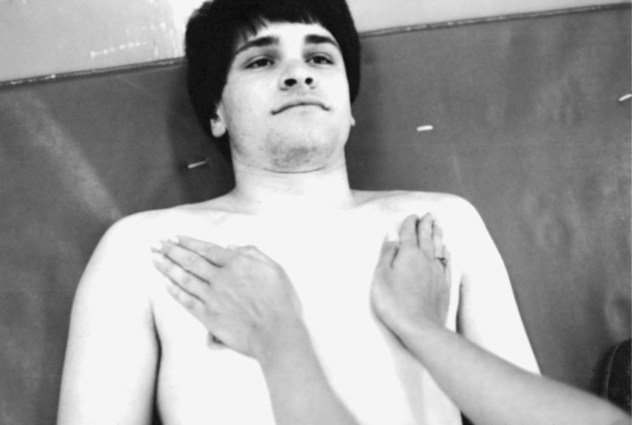
The pectoralis muscle group provides powerful anterior and lateral expansion of the upper chest and can substitute quite effectively for paralyzed intercostal muscles in the upper chest when trained to do so. Training usually begins in either a modified side-lying or a supine position. To increase the use of this muscle group during inspiration, the therapist should place his or her hand in the same direction as the contracting muscle fibers. Specific proprioceptive input is very important when facilitating a muscle, so make sure the hand is placed diagonally on the upper thorax (Figure 23-7).

The heel of the therapist’s hand should be near the sternum and the fingers aligned up and out toward the shoulder in a diagonal pattern. The patient is asked to breathe into the therapist’s hands while the therapist applies a quick manual stretch (as in repeated contractions in techniques of PNF to the muscle fibers (down and in toward the sternum). This elicits the quick stretch reflex of the muscle and simultaneously provides added sensory input, which facilitates a stronger and more specific muscle contraction. To emphasize an increase in lateral expansion, facilitation should gradually be transferred from the sternal area out toward the therapist’s fingertips by the patient’s shoulder. The verbal cues are stronger and require more effort than the quieter verbal cues for diaphragmatic breathing.

Sternocleidomastoid and Scalene Facilitation

The same principle can be applied to the sternocleidomastoid and scalene muscles.31 When the patient is in the supine position, the therapist need change only the angle of hand alignment to more specifically facilitate the sternocleidomastoid and scalene muscles. Turning the hands parallel to the trunk so that the fingers are pointing up toward the neck rather than pointing out toward the shoulder, the therapist applies the same quick stretch and uses the same verbal cues. The altered hand position now specifically facilitates the sternocleidomastoid and scalene muscles and secondarily influences the pectoralis muscles. The sternocleidomastoid and scalene muscles expand the chest primarily in a superior and anterior plane, whereas the pectoralis muscles expand the chest primarily in a lateral and anterior plane, thus accounting for the slight difference in the facilitation positioning.

Inhibition of the Diaphragm

Two techniques are described to inhibit the excessive use of the diaphragm during inspiration. Ideally, the therapist is venturing to balance the use of accessory muscles—especially the intercostal, sternocleidomastoid, scalene, and trapezius muscles—with the diaphragm’s contraction. This is done to prevent paradoxical movements of the chest, or worse, to prevent adverse musculoskeletal changes in the chest wall, such as pectus excavatum, which can result from muscle imbalance.

Inhibiting the diaphragm may be necessary during breathing retraining for some patients with spinal cord injuries, polio, spina bifida, developmental delays, head traumas, and cerebral palsy. The diaphragm may be too weak to produce an adequate TV or VC without the assistance of accessory muscles. In these cases the diaphragm-inhibiting technique is used to encourage the use of the accessory muscles to assist in independent voluntary ventilation. Patients learn to use their weakened diaphragm muscles in concert with intact accessory muscles. Not only does this allow for increased TV and VC, but it also may provide better aeration of all lung segments and better mobilization of the entire thorax.

An unusually strong diaphragm, acting without support from surrounding musculature, specifically the intercostals and abdominal muscles, may also need to be inhibited. For example, patients with paraplegia or lower-level tetraplegia with intact diaphragm but absent abdominal and intercostal muscles may demonstrate a paradoxical breathing pattern (see compensatory breathing patterns, Chapter 39). In this case, the accessory muscles must be encouraged to keep the diaphragm in check, attempting to avoid the development of a pectus excavatum. The goal of this breathing retraining method is to stop the paradoxical movements of the upper chest during inspiration by balancing the use of the upper and lower chest. In some cases, spastic intercostal muscles, found in some spinal cord injuries, may intercede to prevent this paradoxical movement by maintaining the upper chest’s position during inspiration in spite of the negative pressure within the chest and gravity’s influence on the chest. Balancing the movement of the chest should produce an increase in TV and VC potential and mobilize a greater portion of the chest.

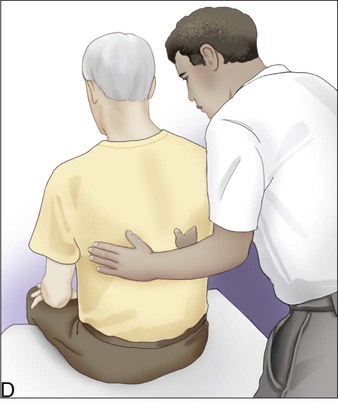
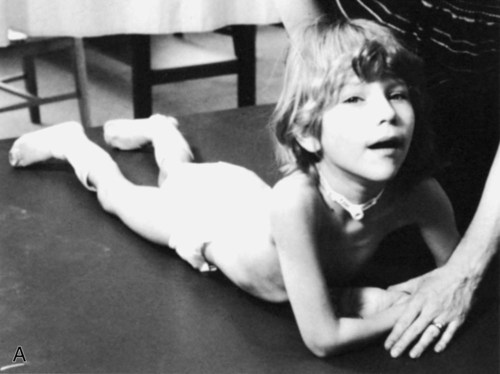
To perform the diaphragm-inhibiting technique, the patient is positioned in a supine, semi-sitting, or side-lying position, with the top arm positioned overhead or pulled back at the waist to open up the upper chest. If the patient can tolerate it, pillows are removed from under his or her head, the pelvis tilted anteriorly, and airway safety is assessed by checking to see whether the patient can still swallow comfortably. The heel of the therapist’s hand is placed lightly on the patient’s abdomen at about the level of the umbilicus. No instructions are given to the patient at this point. As the patient begins to exhale a normal breath of air, the therapist gently allows the heel of his or her hand to move up and in toward the central tendon of the patient’s diaphragm (see Figure 23-4). When the expiration of that breath is complete, the therapist strictly maintains the hand position in that shortened expiratory position. During the following inspiratory phase, the diaphragm will experience some gentle resistance to its inferior descent, causing inhibition to its full ROM. On the next expiration, the technique is repeated, with the therapist carefully pushing the heel of his or her hand further up and in, maintaining greater inhibition during each inspiratory phase. After two or three ventilatory cycles, a patient usually begins subconsciously to alter his or her breathing pattern to include more upper chest expansion in order to reconcile the diaphragm’s transient inability to produce enough chest expansion to yield an adequate TV. The therapist should carefully observe which accessory muscles the patient spontaneously chooses. Are they used symmetrically? What is the general quality of the movement? Is the onset harsh or smooth? Does the patient appear fatigued or uncoordinated?

It is not until this point that the therapist should verbally acknowledge any alteration of the patient’s breathing pattern. Without changing the hand position, the therapist tells the patient what he or she observed that is encouraging about the new breathing pattern (e.g., balance between upper and lower chest expansion or less paradoxical motion of the sternum). Then the patient is asked whether he or she notices any difference from before, bringing this breathing pattern to a conscious level. Only after some orientation to this pattern, usually no more than four to six breathing cycles in the full inhibiting pattern, should the therapist begin gradually to release the pressure being applied.

While slowly releasing pressure with each cycle of inspiration, the therapist asks the patient to try reproducing the desired pattern cognitively. It should take the same number of cycles to release the pressure as it did to apply it. This technique easily allows for gradations of inhibition, from full inhibition, when the patient is forced to use upper accessory muscles or risk becoming short of breath, to a barely proprioceptive reminder to change his or her breathing pattern. It also allows for gradation of inhibition while the patient is learning to assume control over the new breathing pattern. If, during the releasing phase of this technique, the patient begins to lose control over the new pattern, the therapist can gently reapply some pressure during the next expiratory phase to help the patient regain that control. At that point, the therapist can release or reapply pressure as necessary until the desired pattern is obtained and full release of pressure is acceptable.

This technique is particularly effective in patients who are having difficulty cognitively altering their own breathing patterns, such as small children, brain-damaged patients, or slow motor learners, because it requires no cognitive effort until success has already been achieved. Extra care must be taken to avoid initiating any applied pressure quickly because of the likelihood of eliciting unwanted abdominal contractions or spasticity32 or eliciting a stronger diaphragmatic contraction resulting from the quick stretch reflex. The technique should never be painful. The therapist must keep his or her hand on the abdomen, not the rib cage, to properly influence the diaphragm. This technique can be progressed by changing postures, which requires greater trunk control. Can the patient still maintain the overall pattern? Can the patient breathe without paradoxical movements against gravity?

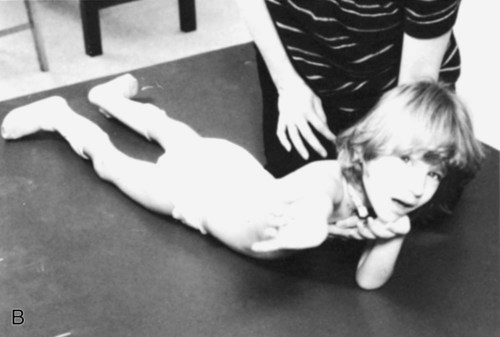
The second technique is for the more advanced patient and simply presents a physical block to diaphragmatic excursion. The patient is positioned in a prone-on-elbows position (Figure 23-8, A). In patients who are most severely impaired neurologically, the lower chest will be in direct contact with the surface, so lower anterior and inferior expansion is inhibited and lateral costal expansion is limited. The upper chest is positioned in extension and the upper extremities are fixed, optimizing the length-tension relationship of the anterior and superior accessory muscles for easy facilitation. In addition, anterior excursion of the upper chest is now in a gravity-assisted posture. Through the use of head and neck patterns, such as in PNF diagonals, or the use of static-dynamic activities, such as in weight shifting to one supporting limb while reaching out with the other extremity, the therapist can readily facilitate greater upper chest breathing (Figure 23-8, B). Therapists can use these same patterns to achieve other goals, such as increased head and neck control, increased shoulder stability, or increased upper body balance. Thus by helping patients to coordinate movement goals with ventilatory patterns, it becomes more likely that patients will incorporate these patterns functionally into their daily activities. This is the ultimate goal of any ventilatory retraining procedure.

The manual diaphragm-inhibiting technique is usually less threatening to the patient than is the prone-on-elbows inhibition technique. Prone-on-elbows position can inhibit the diaphragm so completely for neurological patients lacking spinal extensors that they become extremely short of breath. Consequently, do not position the patients in this more demanding posture until success appears likely.

Serratus Push-Up

Facilitating greater posterior chest expansion can be achieved in a prone-on-elbows position. Gravity is now assisting anterior excursion of the chest and resisting posterior excursion. To emphasize the serratus anterior muscle’s role in posterior expansion, the patient is instructed to perform an upper body push-up (with or without the therapist’s assistance). The serratus anterior muscle causes lateral scapular movement, thereby facilitating maximal posterior excursion of the thorax. The patient is instructed to take in a deep breath during the push-up and to exhale the air (passively or forcefully) when returning to the starting position. Forceful exhalation in this activity can be used as a forerunner to effective cough retraining. Gentle or controlled exhalation can be used to encourage greater breath support for vocalization or for eccentric trunk muscle training.

Emphasizing posterior chest expansion during inhalation is the only occasion in which inspiration should be paired with trunk flexion. In all other inspiratory situations, inspiration is paired with trunk extension and exhalation is paired with trunk flexion.

Patients with Asymmetrical Dysfunction

Patients with asymmetrical weakness need a different approach from the controlled or upper chest breathing patterns presented previously.33 These patients need facilitation of the weaker side to promote symmetrical chest wall expansion in both the upper and lower chest. A summary of techniques is listed in Box 23-9.

Symmetrical Positioning

Symmetrical ventilatory patterns may be effortlessly achieved by altering the patient’s position in each posture to maximize the chest wall’s potential to move in a symmetrical pattern. This is especially true in an upright position, in which asymmetry is generally more pronounced. For example, a patient with hemiplegia may lean toward the involved side when sitting because of weakness or spasticity. Likewise, after thoracic surgery, a patient with primary pulmonary impairment may lean toward the surgical side to splint the area in order to avoid the pain caused by chest movement around the incision and the chest tubes. Both situations cause asymmetrical breathing patterns and decrease ventilation on the involved side. Improving chest wall alignment may alleviate the ventilatory deficit on the involved side. This may be achieved by the use of towel rolls or pillows to support the affected side as well as by good pain management postoperatively.

Postural Inhibition

For some patients, more aggressive positioning must be used to achieve greater chest wall excursion and ventilation on the involved side. This can be accomplished by inhibiting the chest wall movements on the uninvolved, or stronger, side. Usually, the best position in which to achieve this inhibition is side-lying. When the patient lies on his or her uninvolved side, with arms positioned below 90 degrees of shoulder flexion, lateral chest expansion into that side becomes inhibited because of the physical barrier. This forces the patient to find another way to meet his or her ventilatory needs, which indirectly facilitates chest expansion on the opposite side (the uppermost side). The therapist can then supply sensory and motor input through his or her hands to the patient’s upper, middle, or lower chest on the involved or weaker side to facilitate increased ventilation on that side. Early in the rehabilitation process or soon after thoracic surgery, the patient may have difficulty performing lateral chest expansion against gravity when in a side-lying position (gravity-resisted movement). If so, place the patient in a three-quarter supine position to lessen the workload imposed by gravity. Gradually, work the patient up to a full side-lying posture to achieve the greatest strengthening benefits.

Timing for Emphasis

Another technique to promote symmetrical chest wall movements is performed in numerous postures, such as supine, sitting, or standing. The therapist places his or her hand symmetrically on the lower lateral chest wall, on the mid-chest, or on the upper anterior chest wall. At the end of exhalation, the therapist gives a quick stretch to the muscles being touched so as to facilitate a deep inspiratory effort in that area of the chest. Immediately after both sides begin to move into an inspiratory pattern, the therapist manually blocks (or inhibits) expansion of the chest on the stronger side while giving continued quick stretches to the weaker side. This facilitates greater expansion on the weak side by means of an overflow response. This technique, adapted from the PNFs timing-for-emphasis technique, uses the strength of the stronger side to facilitate movement on the weaker side. It can be applied to any area of the chest where symmetrical movements should be the norm.

Reducing Respiratory Rates

In addition to altering breathing patterns through facilitation and inhibition techniques, reducing RRs may also be necessary before arriving at an efficient breathing pattern for some patients. See Box 23-10 for a summary of techniques. Many patients with neurological impairment who have high neuromuscular tone increase their RRs to compensate for a decrease in their TVs or because of brainstem impairments that affect the respiratory centers. In addition, many patients who are anxious, such as people with asthma and those who have orthopedic or surgical conditions and are experiencing pain, may also demonstrate excessively high RRs. Attempting to restore ventilatory efficiency may require increasing TV while concurrently decreasing RR.

The techniques described in this chapter promote an increase in TV by improving the overall ventilatory patterns and often cause a secondary reduction in RR. Interventions such as PLB and repatterning, mobilization of the thorax, and upper chest breathing facilitation for neurologically impaired patients are often helpful in accomplishing slower, deeper, more controlled breathing.

Counter-Rotation

The technique described next has been developed specifically to promote a lower RR and improvement of chest wall mobility. The counter-rotation technique may help to reduce high neuromuscular tone and increase thoracic mobility, thus often resulting in an increase in TV and a simultaneous reduction in RR. This intervention is extremely effective for the following:

As described in Chapter 22, counter-rotation also can be easily adapted as a very effective assisted-cough technique. One medical contraindication for this technique, because of its rotary nature, is bony instability of the spine.

In bed or on a mat, place the patient in a side-lying position with knees bent and arms resting comfortably out in front of the head and shoulders. In this technique, the higher the upper extremities can be placed within a comfort zone, the better the result. Relaxed positioning of the patient is essential to the success of this technique, so the patient should be positioned in an open yet comfortable position. Normalizing neuromuscular tone is the first step in attempting to decrease a high RR. Patient discomfort is likely to elicit increased tone and an increased RR.

The therapist’s own position is also important because it directs the force that is applied to the patient’s chest. Initially, the therapist should stand behind the patient, perpendicular to the patient’s trunk. If the patient is lying on the left side, the therapist places his or her left hand on the patient’s shoulder and the hand on the patient’s hip. The therapist then leaves the hands in place and simply follows the patient’s respiratory cycle. This allows the therapist to assess the patient’s subjective rate and rhythm and the patient’s overall neuromuscular tone. Only after this assessment should the clinician begin the active phase of the technique. Using a PNF technique called rhythmic initiation, the patient is gently log-rolled in a small ROM in the side-lying position. The rolling is gradually increased achieving more ROM from side-lying toward prone. This progression of movement generally reduces high tone, which usually makes the second phase of the technique more effective.

During this phase, the therapist should audibly duplicate the patient’s RR. As the patient moves into greater rolling ROM and begins to slow his or her RR, the therapist needs to use the patient’s audible cuing as a facilitator for establishing a slower RR. Thus the therapist begins by having the patient establish the audible RR; then the therapist slowly takes over. Audible cues can be very strong facilitators of ventilatory rhythms.

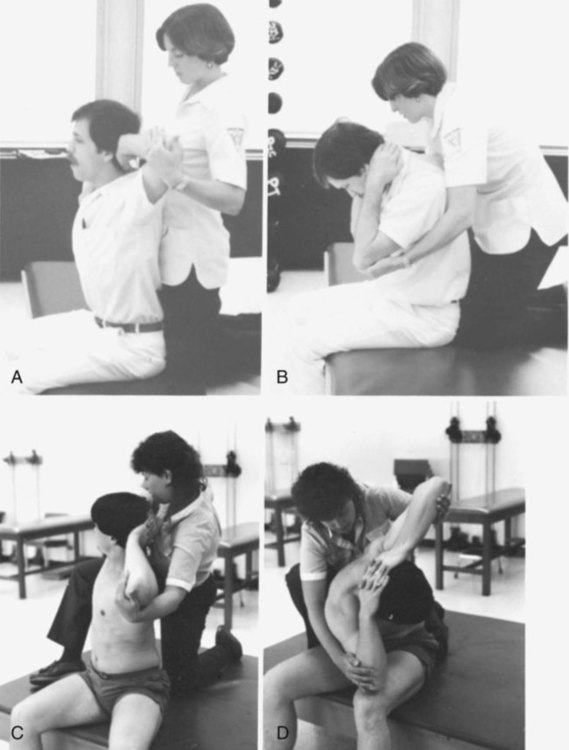
The second phase requires the therapist to slowly change position. Transitioning to a diagonal posture, the therapist then stands or half-kneels behind the patient near his or her hips, turning to a diagonal position until facing the patient’s head at roughly a 45-degree angle. Here the hand placement begins to get more specific. Assume again that the patient is side-lying on the left. At the beginning of the expiratory cycle, the therapist’s left hand slowly glides over the patient’s shoulder on the right pectoral region, with care being taken not to unintentionally use the thumb or finger tips; the right hand slowly glides back to the patient’s right gluteal fossa (the hollow of the buttocks) (see Figure 22-6, A). The therapist can then manually compress the rib cage on all three planes of ventilation at the end of exhalation by gently pulling the shoulder back and down, while simultaneously pushing the hip up and forward. This movement promotes more complete exhalation.

When the patient begins the next inspiration, the therapist switches hand placement to capitalize on the improved potential for TV. The therapist’s left hand slides back to the patient’s right scapula, and the right hand slides forward just anterior to the patient’s right iliac crest (see Figure 22-96, B). As the patient inhales, the therapist slowly stretches the chest to maximize inspiration TVs. The therapist’s left hand pushes the scapula (or the thorax if the scapula is unstable) up and away from the spine, and the right hand pulls the pelvis back and down to maximize all three planes of ventilation, resulting in greater inspiration. The therapist should use the flat or heel of the hand whenever possible to avoid unintentional patient discomfort and to maximize the facilitated area.

Initially, the therapist begins and ends the respiratory cycle according to the patient’s RR. However, as the patient’s tone is relaxed and increased TVs are promoted by the effects of counter-rotation, the therapist gradually slows down the rate of rotation, giving the patient audible breathing cues to further facilitate a slower RR. The patient generally accommodates to a slower RR as the therapist gains more control over the patient’s breathing pattern. With many patients, the results can be marked. If the patient can cognitively follow commands, he or she can be alerted to this change and encouraged to assist in voluntarily breathing at the slower rate.

The therapist can progress the technique by decreasing the manual input. The last facilitation to be removed should be the audible cues. As with the diaphragm-inhibiting technique, the therapist can reestablish control quickly if need be by simply reapplying stronger manual input. If the patient has an extremely fast RR (i.e., 50 to 60 breaths/min), the facilitation can be applied every two to three breaths to avoid fatiguing the patient or therapist.

It should be apparent that this technique need not be used exclusively for respiratory goals but rather can be incorporated into a patient’s total rehabilitation program. It is a natural precursor to active rolling; it can also be used as a vestibular stimulator.

Butterfly Technique

If a patient has good motor control, an upright version of this technique may be appropriate. In unsupported sitting, stand behind or in front of the patient, depending on his or her balance needs, and ask the patient to bring the arms up into a butterfly posture (or assist the patient to bring the arms into this posture). Starting from a comfortable ROM position for that patient, begin to breathe audibly in time with the patient’s RR. When the patient inhales, raise the arms up into slightly more shoulder flexion. When the patient exhales, lower the arms slightly. Slowly begin to move in greater and greater increments of range, while breathing loudly with your patient. Through your audible breathing cues, begin to “ask” your patient to slow down the RR and take deeper slower breaths. The use of the following concurrent ventilatory strategies promotes deeper inhalations and exhalations: (1) shoulder flexion and trunk extension paired with inspiration; and (2) shoulder extension and trunk flexion paired with exhalation. Thus it becomes possible for the patient to increase TV and decrease RR.

As in the previous technique, the therapist begins by breathing loudly at the patient’s respiratory rate and transitions to breathing audibly at a slower, more desirable pace. The patient picks up on this subtle cue and subconsciously reduces his or her own RR, even if unable to follow verbal commands.

This technique can be modified to encourage more intercostal and oblique abdominal muscle contractions by using a diagonal rather than a straight plane of movement. Have the patient look up and over one shoulder as he or she breathes in and brings arms up and behind the head. Then have the patient look down and away toward the opposite knee while breathing out and bringing arms down to the opposite knee (Figure 23-9).

Relaxed pursed-lips breathing can also be incorporated into the previously described techniques to reduce RR. By prolonging the expiratory phase through pursed lips, the patient secondarily decreases his or her RR automatically.

Glossopharyngeal Breathing

A small number of patients with neurological impairments require more than just promoting the use of accessory muscles or changing RR to meet basic ventilatory needs.34 In the past decade, more people experiencing high-level SCIs (above C4) have survived the initial trauma because of advances in medical technology. The therapist in the rehabilitation setting is then faced with the difficult task of restoring quality of life. For these patients, as well as many older adult polio patients, mastery of the glossopharyngeal breathing (GPB) technique allows for greater voluntary ventilation, which many patients say improves the quality of their lives. This augmented breathing pattern allows patients to regain some control over their lives and to regain control over their ventilation, which was lost as a result of severe neurological insult.

GPB is a technique developed in the 1950s by polio patients looking for a way to reduce their dependence on the iron lung for ventilation. It was found that by using the lips, soft palate, mouth, tongue, pharynx, and larynx, a patient could actually inhale enough air to sustain life without mechanical ventilation. Only intact cranial nerves are required. This method is sometimes referred to as “frog breathing” because it uses the principles of inspiration common to the frog. The patient learns to create a pocket of negative pressure within the buccal cavity (mouth) by maximizing that internal space, thereby causing the outside air to rush in. At that point, the patient closes off the entrance (the lips) and proceeds to force the air back and down the throat with a stroking maneuver of the tongue, pharynx, and larynx.

Research has shown consistently that use of this technique in patients who have severe neurological impairment can increase pulmonary functions significantly, especially TV and VC. If GPB is the only means of ventilation possible when a patient has been disconnected from a ventilator or phrenic nerve stimulator, mastery of this technique is critical to the patient’s survival in case of mechanical or electrical failure. All attempts should be made to teach GPB to this patient population.

A clinical example may help to illustrate the usefulness of GPB. A 14-year-old male sustained a C1 complete SCI while racing in front of a train. After he was medically stable, two phrenic nerve stimulators were implanted in his chest. The patient had no unassisted means of ventilation. Neuromuscularly, the patient had limited use of one trapezius, the sternocleidomastoid, and intrinsic neck muscles. The patient and family worried that long-term nursing home placement would be inevitable because of their fear that his phrenic nerve stimulator would malfunction or a battery would wear out, causing immediate respiratory distress. The family believed it could not bear the psychological burden placed on them if the patient went home to live. GPB instruction was suggested and was begun slowly because the patient stated that he learned motor skills slowly. After a painstaking 2-month period, the patient learned to breathe without the use of his phrenic nerve stimulator for 3 to 5 minutes before becoming fatigued and hypoventilating. Within the next 1 to 2 months, he learned to breathe for up to 2 hours off of his stimulator, using GPB only. To the staff’s surprise, he even learned to talk and operate his sip-and-puff wheelchair while using GPB. The patient was then successfully discharged to his home. This was not the only factor considered in his discharge planning, but it was perhaps the most significant.

Instruction in GPB takes time and concentration. It is best to start off in small time blocks of 10 to 15 minutes because it can be very fatiguing. However, for successful learning of the technique, it is also important that the patient get consistent, preferably daily, training. Once the patient has mastered the technique, practice sessions can be lengthened considerably, and the patient can be taught self-monitoring techniques. The specific goals of GPB training must be explained to the patient before the beginning of treatment in order to gain his or her support and cooperation. In addition to providing the ventilator- or stimulator-dependent patient with a TV necessary for gaining independence from mechanical assists, GPB has many other benefits. For the patient with tetraplegia who has a partially intact diaphragm (C3 to C4) or the loss of essential accessory muscles (C5 to C8), GPB can accomplish the following:

The muscles used in this technique do not have the same internal proprioceptive, sensory, or visual feedback mechanisms as the trunk and limb muscles, so necessary adjustments in the technique are sometimes difficult to perceive. The patient cannot see his or her tongue pushing the air back or truly feel the pharynx swallowing the air into the lungs, so the therapist’s external feedback system is very influential. Use of a mirror can greatly enhance the visual component of feedback. Small changes, like adjustments in posture or the suggestion of another sound to imitate, may be all that is needed for the patient to learn the stroking maneuver correctly. Success in GPB can be assessed objectively with a spirometer and a pulse oximeter. For patients incapable of breathing independently, any TV reading will indicate successful intake of air. For patients who are not ventilator dependent, a VC reading that is greater than 5% over the baseline indicates successful use of GPB. Patients with low-level tetraplegia (C5 to C8) have demonstrated increases in VC by as much as 70% to 100%.

Therapists can monitor their own successes with this technique by taking VC readings with and without GPB or by subjective analyses. Maximal inhalation, followed by three or four successful GPB strokes, will cause a feeling that the chest will burst if an attempt is made to inhale more air. Likewise, the sensation of “needing to cough” is another subjective indication of successful GPB. Conversely, a feeling of indigestion is usually indicative that air has been swallowed into the stomach instead of the lungs.

During the initial treatment session, the therapist demonstrates several times what a stroking maneuver looks like, giving the patient an idea of the motion required. The therapist continues to mimic the pattern as the patient attempts to duplicate it. This gives the patient an active model to mimic and decreases feelings of uneasiness surrounding the necessary but somewhat silly facial grimaces. If the patient is able to breathe independently, his or her ability to breath-hold and to close off the nasal passageway should be checked because air leakage is a common cause of failure. The patient is then instructed to take in a maximal inspiration before attempting the stroking maneuvers in order to eliminate the possibility of using other accessory muscles during the technique.

If possible, the patient is positioned in an upright or at least a symmetrical position. Specifically, the patient is instructed to bring the jaws down and then forward as if reaching the bottom lip up for a carrot dangling just in front and above the upper lip (Figure 23-10, A). Slight cervical hyperextension is necessary to allow for maximal temporal mandibular joint (TMJ) excursion. (A contraindication for this technique is a TMJ disorder.) The lips should be shaped as if they were making the sound oop. The patient is then told to close the mouth, reaching the bottom lip up to the top lip (Figure 23-10, B). The tongue and jaw are drawn back toward the throat, with the mouth and tongue formed as though saying up or ell (see Figure 23-10, B). The lower jaw moves in a roughly rectangular pattern. Most patients learn the stroking maneuvers by making the sounds; as they become more proficient, the sounds and excessive head and neck motions diminish. Often, the students (patients) outperform the teachers (therapists) because through consistent use, they learn all of the technique’s finer subtleties.

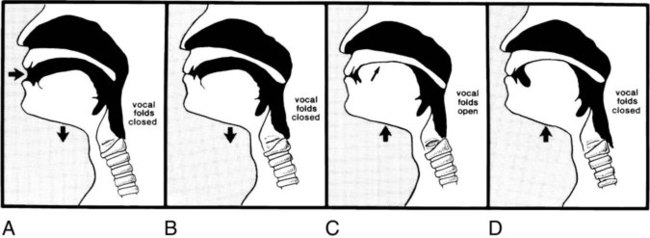
Although this technique can be broken down into several stages, as it has been here for the purpose of description, most of the literature cautions the therapist against doing so.35 Simple, minimal instructions seem to accomplish more, perhaps because the continuity of movement is so essential to the success of the inhalation. Specific instructions can be given later if necessary.

Common problems encountered with GPB instruction can be found in Box 23-11. Avoiding any instruction for the tongue seems to produce better results. Concentrate on assisting the patient in learning the external physical movements.

Tolerance of GPB can be increased when mastery of a single stroke becomes consistent. For patients using it as an assist to their own voluntary ventilation, three to four strokes on top of a maximal inspiration is usually sufficient. Ventilator- or stimulator-dependent patients may need to use as many as 10 to 14 strokes per breath. These figures should be used only as rough guidelines. Each patient will use a slightly different technique and a different number of strokes; the only important factor is a method that works for the individual. Fatigue after long trials of GPB can be monitored effectively by an oximeter. The oxygen saturation level should stay above 90% to maintain adequate PaO2 levels. For example, if the patient begins the GPB session with an oxygen saturation level in the upper 90s, fatigue can be monitored and anticipated by watching to see whether the oxygen level decreases. If the level begins to fall to the mid-90s and then the low 90s, you can anticipate when they will reach 90%. At that point, end the GPB training and put the patient back on the previous ventilatory support system. Pulse oximetry not only allows for accurate monitoring but also provides an objective means of monitoring progress over time. In addition, a spirometer objectively measures improvements in using GPB. It gives the patient concrete indications of success or failure in mastering the technique.

Enhancing Vocalization Skills

In contrast to procedures that assist a patient in inhalation, procedures intended to improve a patient’s phonation skill must focus on elongating the expiration phase. Coughing is a gross-motor skill that relies more on force than on fine control of the ventilatory muscles for its effectiveness. Conversely, phonation requires precise, fine-motor control of these muscles and demands that the vocal folds provide a consistent air flow through the larynx. Both are expiration activities and they depend on the preceding inspiration for optimal performance; however, coughing uses concentric contractions of the expiratory muscles to force the air out, whereas quiet talking uses primarily eccentric contractions of the inspiratory muscles to slowly release the air during expiration. Because of these differences, procedures to improve coughing and phonation are different in focus. Considering the relationship between speaking and breathing and the concepts of shared respiratory control, it is notable that speaking can lead to shortness of breath and shortness of breath can alter speaking ability.36 Previous discussions of posture and use of abdominal binders in patients with spinal cord injury should also be considered when speaking is impaired.37 A summary of techniques is listed in Box 23-12. Coughing is covered in detail in Chapter 22.

Because the patient’s TV and total inspiratory capacity are the power source for phonation, they become important concerns in a phonation program. Generally, a normal TV is adequate for conversational speech. However, larger volumes of air, thus greater inspiratory capacities, are required for singing, loud talking, or professional speaking. Therefore the breathing pattern facilitation techniques described earlier in this chapter are ideal for use before instructing the patient in better expiration control. For example, facilitating diaphragmatic and accessory-muscle breathing techniques, along with the use of quick stretches or repeated contractions, can facilitate the desired deeper inhalation.

Manual Techniques

Several simple techniques can be used to improve eccentric control of the diaphragm and intercostal muscles in preparation for speech. Vibration or shaking of the lower chest during expiration helps to produce a slower, more controlled recoil of the diaphragm. Why this occurs is not fully understood. It may be that the sensory and proprioceptive stimulation that the vibration or shaking provides augments the patient’s concentration on those muscles, resulting in longer phonation. The patient is instructed to phonate an ah or oh sound for as long as possible. The therapist simultaneously vibrates the patient’s chest with an even and gentle force throughout and slightly beyond the full expiration phase, placing his or her hands on the lateral costal borders of the thorax, the mid-chest, or the pectoral area, depending on which area of the chest needs the most help in controlling exhalation. This is very different from the rapid, forceful pressure that is applied to the patient’s chest when promoting a deep cough. Be certain that the patient understands this important difference. Emphasize that the patient should not let air escape before vocalizing and should try to keep voice intensity consistent throughout the procedure. This will promote slow, eccentric release of the inspiratory muscles during the entire course of the vocalization. Progress can be readily monitored by timing the patient’s vocalization before, during, and after this technique. About 10 to 12 seconds of vocalization at 8 to 10 syllables per breath is generally considered adequate for functional use in speech.

For a child, this technique can be modified. The child is asked to say ah or oh for as long as possible while the therapist percusses or taps lightly with his or her hands on the child’s upper or lower chest so as to produce a series of staccato sounds. Usually, a child enjoys the new sound that this makes and tries repeatedly to phonate longer and louder to accentuate the different intensities. Therapeutically, this requires the child to take a deeper inhalation before vocalizing, followed by an elongated expiratory phase, both of which are necessary for functional speech. As the child becomes more adept at it, the therapist can apply more pronounced clapping over the chest, accomplishing a wider range of voice intensities and doubling as a means of percussion for postural drainage.

Eccentric Resistance Techniques

More specific facilitation can be used to increase breath support. Ideally, the patient is positioned symmetrically in a supine or supported-sitting position, allowing for maximal chest wall expansion. The patient is instructed to visualize his or her chest being pulled up toward the ceiling and held there. Next, the patient is told to vocalize slowly, trying not to let the chest “fall.” Meanwhile, the therapist is applying consistent pressure to the patient’s chest to try to force a quicker exhalation. The patient is told to resist this motion by trying to control and prolong expiration. As with the antagonistic reversal technique described in PNF, the therapist is resisting the patient’s attempt to eccentrically contract and control the trunk muscles. This strengthens the eccentric phase of exhalation and promotes greater breath control for vocalization.

The same concept can be applied to functional tasks. Moving into gravity (i.e., coming down to sitting from a standing posture, lying down from a sitting posture, or bringing an arm down from reaching into a high cabinet) requires eccentric control of the muscles involved in the activity in order to slow the body’s descent into gravity’s influence. Because quiet speech uses a similar muscular contraction, teaching the patient to count out loud or otherwise vocalize when performing an overall eccentric activity usually improves both activities. For example, the patient can be instructed to reach up to a high shelf while inhaling. Then, using gravity to provide the eccentric resistance, the patient is asked to bring the arm back down to his or her lap or side while slowly counting out loud and controlling the rate of the arm’s descent. The activity can be progressed several ways. The activity can include lifting something heavy off the shelf and controlling it along with the arm and trunk while lowering the object to a table or to the patient’s lap. Or the postural demands of the activity can be increased. The patient could be asked to lift the same heavy object but to do so while standing, which increases the demands on the musculoskeletal system.

Verbal Techniques

Speech activities that do not require a therapist’s physical assistance can be done in a group or individual setting. Singing, for instance, promotes strong and prolonged vocalization with maximal inspiration, which is a significant goal in a phonation program. Similarly, whistling or playing a kazoo or harmonica promotes long, even exhalations but is nonverbal. Both are easily incorporated into a group activity on the nursing floor, in therapy, or in the community.

Along recreational lines, games that promote controlled blowing further the refinement of motor control of the respiratory muscles. This can be accomplished by blowing bubbles (especially large ones), blowing out candles (especially trick candles), blowing a ping-pong ball through a maze, or blowing air hockey disks across the table rather than pushing them with the hand. Patients with musical inclinations should be encouraged to learn to play wind or brass instruments, in which refined breath control is mandatory for success. Obviously, the possibilities in recreational activities are endless and simply require imagination on the part of the therapist.

Further refinement of breath control for speech can be promoted by interrupting the outgoing air flow. This procedure is geared toward improving functional communication skills. Functional speech is a series of vocal stops and starts. The therapist tells the patient to take a deep breath and count out loud to 100. After a few numbers, the patient is told to “hold it” and is then told to start up where he or she left off; the therapist periodically interrupts. Because this activity requires the patient to stop and start the inhalation and exhalation phases at will in all aspects of the ventilatory cycle, it is more advanced and should be used only after some control of exhalation has been mastered.

Summary

The use of appropriate choices in positioning, together with use of an appropriate ventilatory and movement strategy for any given task, will make success in mastering that task all the more likely. If these simple, time-efficient methods of facilitation do not produce adequate ventilatory changes by themselves, it is then appropriate to add the next layer of facilitation—manual facilitation techniques. Specifically, the techniques that are described in this chapter assist in facilitating the following:

Obviously, not all techniques are appropriate for any single patient. It is up to the therapist to determine which techniques will best address a particular patient’s deficits.

Positioning is vital to increasing ventilation potential and functional skills. From the beginning of the patient’s respiratory program, optimizing ventilation and breath control through passive and active positioning techniques should be a priority of all health team members, not just the physical therapist. As patients progress, the clinician can and should assist them in developing better and more efficient movement strategies for higher-level activities by coordinating appropriate breathing patterns, such as trunk extension-inhalation or trunk flexion-exhalation strategies, into all activities. After these quick and easy suggestions are used, a therapist who has been exposed to numerous methods of manual facilitation and techniques to promote more effective and efficient breathing patterns can choose the most appropriate interventions. In some cases, increasing diaphragmatic breathing may be the desired outcome. In other patients, increased upper chest breathing or increased movement on one side of the chest may be more desirable. Some may benefit even more from techniques to reduce the high RR or to mobilize the thorax. For a select patient population, instruction in GPB may be necessary to support breathing without mechanical ventilatory support. Finally, the therapist can choose to use techniques to assist the patient in developing adequate breath support for vocalization and communication.

As therapists come to understand how profound the influence of effective ventilation can be on a patient’s recovery from disease or trauma, they will incorporate breathing and ventilation strategies into all patient treatment. Understanding that facilitating effective ventilation goes far beyond diaphragmatic exercises, therapists can be empowered to incorporate other techniques and strategies to help their patients become healthier more quickly and to assist them in reaching their highest potential and prevent future respiratory complications.

The take-home message is that the cardiovascular and pulmonary system will be either an asset or a detriment to a patient’s function. Examination and evaluation of breathing patterns and breath control will promote improved patient outcomes.