Examining the Head and Neck

Published on 10/06/2015 by admin

Filed under Pediatrics

Last modified 22/04/2025

Print this page

rate 1 star rate 2 star rate 3 star rate 4 star rate 5 star
Your rating: none, Average: 0 (0 votes)

This article have been viewed 3336 times

chapter 7 Examining the Head and Neck

A major challenge in accurate pediatric physical diagnosis is completion of a thorough head and neck examination. If the child cries or resists, your examination may be incomplete and the findings unreliable. When you can complete this examination consistently without upsetting your young patients, you may be confident that your clinical skills are developing satisfactorily.

Observations of the child’s general appearance and some specific aspects of the head and neck should begin as soon as you enter the room. Hands-on examination can be deferred until the end of the assessment. Many infants and younger children cry when approached by strangers, particularly those carrying an otoscope, ophthalmoscope, or the dreaded tongue depressor. The order in which the examination is conducted is not critical, so make a conscious decision about the sequence with each child, based on your observations. Let the child set the pace, with input from the parents. In some young school-aged children, I find it best to get the throat or ear examination out of the way first. The child can then relax, cooperate, and enjoy the rest of our interactions.

Proficiency with an ophthalmoscope, otoscope, and tongue depressor requires knowledge of relevant anatomy, hand-eye coordination, and lots of practice. Develop your skills by examining colleagues, family members, and friends, who will provide instant feedback if your examination causes pain.

General Observations

Your initial impression of the child’s appearance is extremely important. The facial expression and level of animation indicate alertness, social awareness, mood, or neurologic dysfunction. The effort required to breathe, the quality of crying (if any), the characteristics of speech (if any), and the presence of a cough are important clinical clues. Cyanosis, pallor, jaundice, or unusual skin lesions are readily apparent. Your “gestalt” impression of the child determines the order of the examination. Continue to observe the child throughout the history-taking process. How does he or she interact with parents, respond to your voice, play, or explore the environment? Visual and auditory function often are better assessed during play than during a specific hands-on examination. Asymmetry of the face may only become apparent when the child smiles broadly, laughs or cries.

Initial observations of facial features are important: Does the head look proportional to the face? Is the shape abnormal? Are the left and right sides of the face symmetrical? Are the eyes too close together or too far apart? Are the ears normally placed? Is the chin appropriately developed? Does the child look like the parents? The ability to describe visual observations is an essential clinical skill that takes practice to master. The range of “normal” in pediatric physical examination is extremely broad. Never, ever use offensive, demeaning terms such as “funny looking kid” to describe dysmorphic children. Describe the noted differences or asymmetries precisely. The child may look like a parent because they both have an autosomal dominant dysmorphic syndrome (see Chapter 5).

Approach to the Physical Examination of the Head

Examining the head

Head Shape

Children’s heads, like those of adults, come in a wide range of sizes and shapes. The variation is greatest in younger infants because newborns have pliable heads. The intense pressures applied during vaginal delivery mold the head. Most babies enter the world “occiput first” (occiput anterior), resulting in marked occipital prominence. Overlapping of some skull bones is common. The head remolds spontaneously within days. Premature infants have characteristic head shapes, flattened along the temporal aspects, leading to a long, narrow appearance due to the increased pliability of their bones.

The newborn skull examination includes careful palpation of the entire skull. Meticulously follow each suture with a finger. Two common abnormalities resulting from birth pressures may be present: caput succedaneum and cephalhematoma. A caput succedaneum is a diffuse area of edema over the presenting part of the head. It does not follow any bony landmarks. A cephalhematoma is a subperiosteal hemorrhage, usually found over the parietal bones posteriorly. When present bilaterally, it appears as though the child has two horns. These hematomas heal partly through ossification, which starts around the edges where the periosteum has been lifted away from the skull. Parents need considerable reassurance because a cephalhematoma feels, on palpation, like a hole in the bone surrounded by a hard ridge around the base. Cephalhematomas are harmless, never cross suture lines, and may take many months to resolve.

Since implementation of the successful Back to Sleep campaign to decrease sudden infant death syndrome (SIDS), it is not uncommon to encounter young infants with markedly flattened occipital bones. In other infants, asymmetric flattening develops as they lie with the head turned to one side or the other, preferentially toward the main light source, for example, a window. Parents must be encouraged to spend “tummy time” with their infant (i.e., supervised prone positioning for short periods several times a day while the infant is awake). Infants with lateral skull flattening must be examined carefully to rule out any tightening of the sternocleidomastoid muscle or other neck mobility anomaly. By alternating placement of infants in their cribs, pressure on the soft infantile skull bones will spontaneously be distributed more evenly in most cases, which allows for remodeling. In the final analysis, the most powerful factor in the spontaneous improvement or resolution of postural cranial distortion is the child’s assumption of the upright posture.

Brain growth is the prime determinant of head size. Other important factors include genetic influence, intracranial pressure, and bony abnormalities. Hydrocephalus, that is, the abnormal accumulation of cerebrospinal fluid, leads to increased intracranial pressure and rapid expansion of the infant skull. Craniosynostosis, the premature closure of sutures, limits skull growth. Skull bones grow relatively independently, usually symmetrically, along the suture lines in a direction perpendicular to the lines.

Craniosynostosis of the sagittal suture limits the skull’s width. As a result, compensatory excess growth occurs along the anteroposterior axis and possibly in the height of the skull, which produces a scaphocephalic shape, that is, a long, narrow skull (Fig. 7-1). Premature closure of the coronal suture results in a tall, wide head. When a suture closes prematurely, a palpable firm bony ridge sometimes is present along the suture line. Do not confuse this finding with normally overlapped sutures that are felt soon after birth.
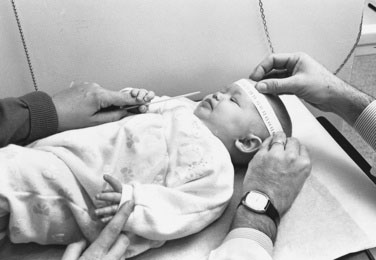
Case History

The parents of a 10-day-old baby boy bring him in for evaluation because of lumps at the back of his head and extra soft spots. Joshua was delivered vaginally at 42 weeks’ gestation. The labor lasted 20 hours, and delivery was assisted by both vacuum extractor and outlet forceps. It has been difficult to establish breastfeeding, and Joshua is described by his first-time parents as crying excessively. Both grandmothers are present, and they are concerned that Joshua experienced brain damage from birth trauma.

The experienced clinician will try to establish the root causes for the family’s concerns. For example, the family may be comparing Joshua with another child who has cerebral palsy or developmental delays. It also is essential to give the parents the necessary space and permission to frankly discuss their feelings about the grandmothers’ concerns, the grandmothers’ acceptance of the parents’ decisions regarding pregnancy, delivery, and child rearing, and ongoing expectations for involvement of the grandmothers in key medical decisions regarding Joshua’s health.

There is a wide range of normal variation in head size and shape of normal babies at birth. Cephalhematomas and edema caused by vacuum extractors frequently are interpreted by brand-new parents as signs of skull fractures and brain trauma. The result is excessive anxiety and concern, which can lead to disturbed infant-parent bonding.

Many of the most common scalp and head shape anomalies are described in this chapter, with tips on how to distinguish the results of normal vaginal delivery pressures from signs of significant injuries.

Head Measurement

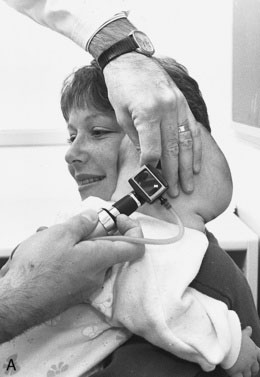
Accurate measurement of head circumference is surprisingly difficult. Measure the largest circumference possible by wrapping the tape around the most prominent parts of the forehead and occiput (Fig. 7-2). You should routinely take three measurements. If these measurements differ, you need to refine your technique. Even a slight variation in the position of the measuring tape changes the result significantly. Many infants and young children actively dislike head circumference measurement. Because a calm, cooperative child may become fretful, fearful, and oppositional when you attempt to obtain this measurement, it is best to leave it until the end of the examination. A parent’s assistance may be essential. I have found that the task is easier to accomplish when the infant is fed or cuddled and when the young child distracted with a toy or play activity.

The head circumference measurement must be plotted on a standardized head circumference graph. As with all standardized charts and graphs, no single value represents a “normal” head circumference (see Chapter 3). Measurements of new immigrants from various ethnic and racial groups may plot in the lower percentiles. Remember that, by definition, 3% of the normal population will have head circumferences that are below the third percentile or above the ninety-seventh percentile.
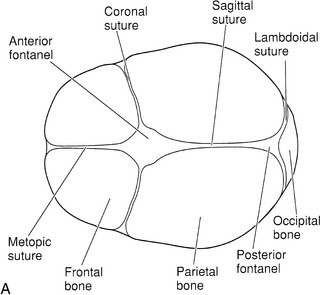
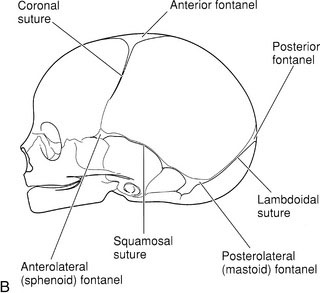
Also, head sizes tend to follow familial patterns. Measure the head circumferences of both parents and be sure to enquire about grandparents or any family member with an unusual shaped or sized head. Family photographs found on cell phones have made assessment of familial patterns much easier for the clinician.

A single measurement of head circumference may identify significant microcephaly or macrocephaly. Of greater value is the pattern of growth over time. Accurate measurement and charting is critical. An increase in measurement from the 25th to the 75th percentile over a month may lead to early detection of hydrocephalus or to a distressed, angry family if either measurement is inaccurate. More importantly, computed tomography (CT) studies of the infant brain have been implicated in decreased cognitive and intellectual outcomes and increased lifetime risks of cancer. Diagnostic imaging of the young brain should be ordered only when there is reasonable evidence of a significant problem.

Fontanels

The fontanels are the gaps between bones in the infant skull where three skull bones meet (Fig. 7-2, A and B). Gentle palpation of the fontanels is a routine part of the newborn examination.

The posterior fontanel usually closes by 6 to 8 weeks of life. Closure of the anterior fontanel is much more variable and usually occurs between the ages of 12 to 18 months. In some infants, normal closure does not occur until age 24 months. Remember, variations in shape, size, and development are to be expected in children. Be very cautious about your body language and vocal tone when asking parents about the shape of their child’s head.

Four other fontanels are routinely present, though they rarely have an impact on clinical assessment: two anterolateral (sphenoid) fontanels where the coronal and squamosal sutures meet, and two posterolateral (mastoid) fontanels where the squamosal and lambdoid sutures meet. Occasionally the anterior fontanel seems to extend between the frontal bones. The metopic fontanel is actually a widening of the metopic suture. Other extra fontanels may be palpated. The parietal fontanels, that is, persistent parietal foramina, are located along the sagittal suture between the anterior and posterior fontanels. These symmetrical holes on either side of the sagittal suture once were mistakenly thought to be evidence of trephining by ancient Egyptians in well-preserved mummy skulls.

The anterior fontanel may vary in size from that of an adult fingertip to several centimeters in width and length. Persistent delays in closure or an unusually large size may indicate increased intracranial pressure or pathological delay in bone growth. When the posterior fontanel persists, hypothyroidism must be ruled out.

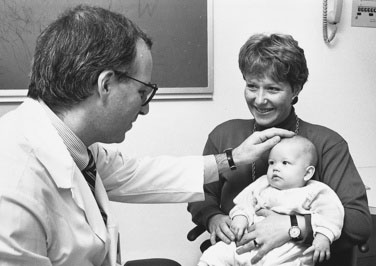
Increases in intracranial pressure, such as in meningitis, are reflected by changes in palpable tension of the fontanel and loss of normal venous pulsations (Fig. 7-3). A normal fontanel may feel full when the infant lays flat, cries, or struggles. It is best to assess anterior fontanel tension only when the infant is calm and held upright. With dehydration, the fontanel will appear sunken. Practice and palpation of dozens of fontanels will educate your fingers to detect abnormalities in size and tension. Each infant is his or her own standard. Serial assessments with careful descriptions of findings facilitate early detection of raised intracranial pressure.

Transillumination

See Chapter 4 for a detailed discussion of transillumination.

Hair

Characteristics of normal hair differ widely between ethnic and racial groups. Examination of hair includes distribution, loss, broken strands, texture, color, and variation from the family norm. The scalp also must be inspected to detect problems such as seborrheic dermatitis, psoriasis, or ectodermal dysplasia, which may affect the hair. Normal newborns may have a full head of soft, silky hair or be completely bald. Excess scalp and facial hair associated with facial anomalies may indicate a genetic syndrome such as cri du chat. Infants of diabetic mothers often have excess scalp and body hair compared with infants of nondiabetic mothers. Newborn hair tends to fall out by approximately 3 months and is replaced by hair that may differ markedly in texture, color, and distribution.

Young infants often lose hair over the occiput and other pressure points. Be aware of possible infant neglect and insufficient changes of position as causes of this hair loss. Patchy areas of loss may be associated with fungal infection or twirling or pulling of the hair (trichotillomania). Again, excess hair loss may indicate child maltreatment. Be cautious in your approach because many young children twirl the forelock as a self-soothing routine (a behavior frequently associated with thumb or finger sucking). An idiopathic cause of hair loss is alopecia areata. Focal loss of hair may be the result of head shaving in the neonatal intensive care unit, cultural and religious practices, or ectodermal defects. General hair loss may follow severe febrile illnesses, such as typhoid fever.

Extremely sparse, fine hair is associated with ectodermal dysplasia. Coarse hair is seen in persons with hypothyroidism. In Menkes syndrome, a degenerative neurologic condition that results in kinky hair, the hair shafts grow twisted and brittle, breaking off a few centimeters from the scalp. The abnormal hairs are called “pili torti.”

In persons who are severely malnourished, the hair becomes fine and brittle, and in persons who are black, it frequently changes to a reddish color. The same phenomenon is seen in children presenting with untreated HIV/AIDS. A white forelock may be seen in children with Waardenburg syndrome. This dominantly inherited condition is usually associated with deafness. Albinos lack pigment in their hair, skin, and irises, leading to teasing, bullying, and, at times, rejection by the family.

Examining the ears

Shape and Position

Start with a close inspection of the external ears. Are both present and normally formed, or do they fit the criteria for low-set ears? (See Chapter 5.) Do not be fooled by posteriorly rotated ears. If the vertical axis of the pinna is tilted posteriorly, the ear may appear to be low set. Minor anomalies of the ears such as skin tags, pits, or fistulas just anterior to the tragus are common and usually are of no major significance. Inspect and palpate the mastoid and postauricular areas. Gently move the pinna and tragus; any tenderness suggests otitis externa.

The Otoscope

The confidence and skill with which you use the otoscope will be reflected in the child’s cooperation. For an adequate examination, use a halogen light with a good bulb and fully charged batteries; an AC power source is even better. The speculum should be the largest that fits comfortably into the auditory canal. Pediatric wards and clinics are notorious for having speculums available in every size but the one needed, so it may be worthwhile to carry a personal set.

With toddlers and older children, explain that you are going to use the light to look into their ears, and then demonstrate that the instrument is no more than a flashlight by shining the light on their hands. Children often become interested if you shine the light in front of them and ask them to blow it out; as they blow, deftly turn the rheostat dial to achieve the desired effect. You also can demonstrate how the otoscope is used by placing it at the entrance to your own auditory canal so the child can see what the procedure involves; then do the same to the child.

Most young children are anxious about the ear examination. I have found that giving them a choice (“Ok, buddy, which ear shall we examine first?”) often helps these apprehensive patients gain a sense of control, and most children then will be cooperative.

Positioning the Child

Examination of an infant’s ears is a two-person procedure. The infant’s head must be immobilized and his or her hands kept out of the way. Many new parents are reluctant to restrain their baby. Explain carefully that appropriate positioning and restraint actually reduces discomfort and facilitates a shorter, more accurate examination. A variety of effective positions and techniques may be used. At each encounter, you will need to choose a combination of techniques to match the child’s age, variation of mood, level of anxiety, and ability to cooperate.

It often is easier to examine infants placed supine on a table with the parent or your assistant holding the arms at the sides and immobilizing both the arms and the body. The examiner then uses one hand to hold the infant head against the table and the other to hold the otoscope. If the examiner needs both hands to manipulate the external ear for successful completion of the examination (or to remove wax), a second person must immobilize the baby’s head. Many older infants and young children can be held by the parent against their shoulder or chest with one hand while holding the head steady with the other hand.

Some infants and toddlers are amazingly cooperative during an ear examination. Never subject any infant or child to more restraint than is absolutely necessary. Before beginning the examination, ask the parents the following questions:

Remember that distractions such as stickers and blowing soap bubbles are effective anxiolytic adjuncts.

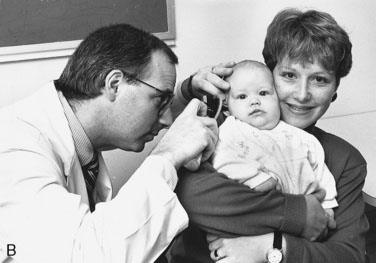
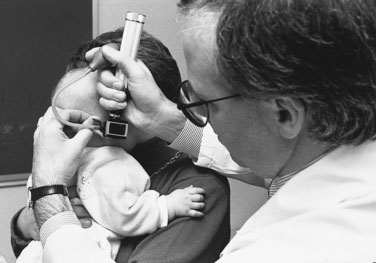
The otoscope should be held in either the “forehand” or “backhand” position—that is, with the thumb pointing either toward the light or toward the handle (Fig. 7-4, A–D). The advantage of the latter position is that it allows the back of your hand to lay against the face and, with any sudden movement, your hand moves with the child’s face. In other words, the position of the speculum relative to the ear does not change when the baby moves, and you avoid causing pain. Many examiners use the forehand position with equal comfort, especially if they use their opposite hand to stabilize the baby’s head.

The otoscope is held with the right hand, using the left thumb and forefinger to grasp the pinna and gently apply traction away from the head and slightly posteriorly. This position straightens the normally curved external auditory canal, enabling you to see better. Depending on your level of manual dexterity, it also may be helpful to use the third finger of the left hand to gently push the tragus anteriorly, thereby opening the auditory canal further.

Inspect the external auditory meatus and gently place the tip of the otoscope there. Your head will be away from the otoscope as you are not yet looking through it. Once the otoscope tip is in position at the meatus, move your head up close to the otoscope and look through it; gently aim the otoscope to see the ear canal beyond. Your head should move with the otoscope as it is aimed in different directions.

Once the lumen is clearly visualized, gently advance the instrument. The external auditory canal is exquisitely sensitive even in the absence otitis externa or a furuncle. Observe carefully for the presence of a foreign body or signs of inflammation. You may be able to work around small amounts of wax. If your view is obstructed, the wax will have to be removed. Never rest the instrument’s weight against the auditory canal or you may cause bleeding in addition to pain. The ability to guide the otoscope through the canal without touching the walls only comes with practice.

Tympanic Membrane

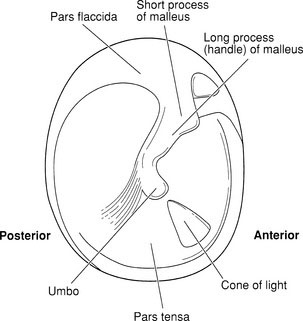
Study Figure 7-5 to acquaint yourself with the visual landmarks of the tympanic membrane. Textbook and atlas photographs do not do justice to the full range of normal appearance or the changes in color seen with wax, fever, or crying. It is essential to examine as many ears as possible to appreciate the range of normal.

Because you usually have only a few seconds in which to inspect the eardrum, you must know what you are looking for. The most easily recognized landmark is the long process (handle) of the malleus, which runs from the anterior superior area to the center of the membrane, ending in the umbo. The light source is reflected from the umbo as a narrowed cone starting at the center and expanding in an inferior–anterior direction. The normal tympanic membrane (TM) is most concave at the umbo. Changes in middle ear pressure result in alterations to the concavity of the membrane and the diffusion of the light cone. The TM is thinner in the anterosuperior quadrant, the pars flaccida, because of the absence of the fibrous membrane present in the pars tensa. Early signs of inflammation may be observed in the pars flaccida.

Pressure changes are best assessed by pneumatic otoscopy. With practice, you can learn much from visual inspection:

Think of the eardrum as a plastic wrap over the ossicles. If negative pressure develops in the middle ear, which is frequently associated with Eustachian tube blockage or chronic effusions, the membrane is sucked inward, wrapping more tightly over the bones, which appear more prominent. If middle ear pressure increases, as in acute bacterial otitis media, the TM bulges outward and the bony landmarks are poorly demarcated or not seen at all.

Color changes in the tympanic membrane are notoriously unreliable. Particularly in infants, the vascular changes seen on the cheeks with fever or crying are also observed in the TMs. There is a real risk of overdiagnosis of otitis media. It is essential to focus on the TM shape and landmarks; if they are normal, the infant does not have otitis media. Other causes of fever and crying then must be considered, especially serious bacterial infections such as pyelonephritis and meningitis.

Pneumatic Otoscopy

Pneumatic otoscopy, which is a relatively simple procedure, can yield important information about middle ear pressure. It works on a simple principle. Remember the example of the plastic wrap and the effect of changes in middle ear pressure? Now imagine that the pressure changes are imposed from the other side of the membrane (i.e., from the external auditory canal). To perform this procedure, use an otoscope with a pneumatic bulb attachment(it is best to carry your own) and a special speculum with an expanded tip that forms an airtight seal in the external canal without the application of pressure. As an alternative, a small piece of rubber tubing placed over the tip of a standard speculum provides an excellent seal. Look through the otoscope while squeezing and releasing the rubber bulb (Fig. 7-6).

The normal tympanic membrane moves medially (away from you) when you apply external pressure by squeezing and moves laterally (toward you) when you create negative pressure by releasing the bulb. If middle ear pressure is already significantly negative and the eardrum is retracted medially, this pneumatic maneuver may produce only slight lateral motion of the drum when the bulb is released. If the middle ear pressure is abnormally positive, you may produce only slight medial movement when you apply positive pressure. If the pressure changes are significant, the drum may be immobile. Experience brings an appreciation of the nuances of these changes. As with every other aspect of the examination, you must see many eardrums move before you can recognize slightly reduced mobility.

Wax

To evaluate an eardrum, you must be able to see it adequately. Wax is a normal constituent of the ear canal and causes no harm; however, if it obstructs your view, it must be removed. Carefully explain to the parents that your only reason for removing the wax is to attain visual access. The routine use of cotton-tipped swabs and other devices at home to clean the ears should be strongly discouraged.

Wax can be removed either by curettage or by use of a syringe. Children (and parents) dislike both procedures, so defer wax removal to the end of the examination. If the wax is truly impacted and the child is not acutely ill, it is preferable to have the parent instill a few drops of ear wax softener (plain mineral oil will do) for a few days to facilitate cleaning. It also is possible to refer the child to an otolaryngologist to have the wax removed.

The less traumatic method of wax removal is through use of a syringe. Because this procedure is messy, it is necessary to have access to towels, a kidney basin to catch water as it runs out of the ear, and knowledgeable assistants. The child can be gently restrained in either the lying or sitting position. Older children can be encouraged to participate by holding the kidney basin. Carefully explain what you plan to do and why. A calm tone of voice, a gentle touch, running commentary, constant reassurance, and encouragement can make syringing a very tolerable procedure.

First ensure that the water is lukewarm (i.e., comfortable to touch). In infants, I use a 10- to 20-mL syringe attached to butterfly tubing (with the needle cut off). In children, a 20- to 50-mL syringe or an ear syringe can be used. Flushing out the wax may require multiple squirts of water. The TM may appear flushed or unusually pink after irrigation.

Curettage requires skill, appropriate equipment, and total restraint of the patient. However, curettage is more effective than the use of a syringe for wax removal. Remember, only clean out the wax that obscures your view of the TM. To acquire skill in curettage, you must learn from an expert and practice under supervision. Reading a book will not prepare you for the task.

A blunt ear curette and an otoscope with an operating head are essential equipment. Carefully explain to parents why the procedure is necessary and why the child must be totally restrained. They need to know that the lining of the ear canal is sensitive, fragile, and bleeds easily. Warn them that some blood may drain from the ear after the procedure. Once you see the auditory canal, carefully advance the curette so the tip is just beyond the wax and pull gently, drawing the wax out.

Examining the mouth

Position for Examination

The approach to examination of the oral cavity is similar to that of the examination of the ear. It requires excellent knowledge of the anatomy of the mouth, skill, appropriate equipment, and proper positioning and restraint.

Most children will cooperate during the examination. Relatively young children are able to open their mouth widely on request. However, a significant number of children are absolutely terrified of the tongue depressor and oral examination. Many of these children have had previous painful experiences during such an examination or possess an overly sensitive gag reflex.

It is best to approach the examination positively. Show the child the flashlight or otoscope light without a tongue depressor in sight. Allowing some children to assist by placing a hand on the light or even on the tongue depressor gives them a sense of control. Infants are best examined supine with the arms restrained (Fig. 7-7). Beyond early infancy, it is best to examine infants and children in the sitting position (Fig. 7-8). Encourage the child to open his or her mouth widely and vocalize “aaahhh.” In many children, the soft palate rises and the tongue descends spontaneously when the mouth is fully opened, allowing a clear view, which may include the epiglottis. In other children, even with their full cooperation, it will be necessary to depress the base of the tongue with the tongue depressor to view the full oral cavity. Any pressure at the base of the tongue results in a brief gagging response, which causes the soft palate to rise and allows brief inspection of the posterior pharyngeal wall.
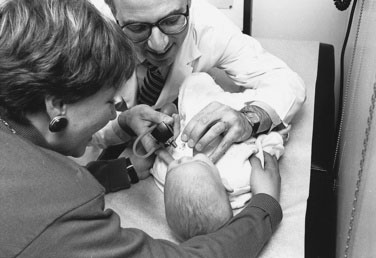
If the child refuses to open his or her mouth, it is still possible to complete the inspection. You will need willing assistants to ensure appropriate restraint of the child (with similar positioning as in the ear examination) and ongoing calming conversation to distract from the examination. Insert the tongue depressor behind the posterior teeth and quickly slip it medially to depress the base of the tongue. This procedure will allow a few seconds of full vision and may result in a gag response and/or vomiting. A typical gurgle precedes an episode of vomiting, which may be aborted by rapid withdrawal of the tongue depressor, closure of the mouth, and tilting the chin upwards. Always reassure the child that he or she was very good and brave. Future cooperation with any part of the physical examination depends on your ability to relate to the child after a painful or resisted examination has been completed.

Teeth

Inspection of the gums should include close inspection of the teeth. The normal age of first tooth eruption is extremely variable from intrauterine life (natal teeth) until 12 months of age. Most children start teething between 3 to 4 months of age. A marked delay in eruption may indicate hypothyroidism or a general delay in skeletal maturation.

Note carefully the shape of the teeth, their alignment, the condition of the gums around erupted teeth, and signs of trauma to the lips, tongue, or buccal mucosa adjacent to the teeth.

Characteristic peg-shaped teeth are seen in persons with ectodermal dysplasia. Children with mal-aligned secondary teeth resulting from the presence of persistent primary teeth should be referred promptly for dental care. Likewise, children with chipped or broken teeth and significant lip or mucosal trauma due to mal-aligned teeth deserve prompt dental care. Rarely, extraction of lower incisors is indicated in persons with oral self-abusive conditions, such as Lesch-Nyhan syndrome.

Do the gums look healthy or inflamed? Do they bleed on touch with your tongue depressor? Periodontal disease can have a significant adverse effect on chronic medical conditions, such as nephrotic syndrome and congenital heart disease. Gum changes may result from the use of medications. Candida gingivitis is a common complication of broad-spectrum antibiotic use. Typical gum hypertrophy is seen in children who take the anticonvulsant drug phenytoin for extended periods. Next note the dental enamel color, formation, and the presence of caries. There are many congenital/genetic causes for abnormal enamel. Describe your observations accurately and ask the parents if they have noted any changes. Initial carious lesions are opaque white spots that may progressively demineralize, producing typical caries. The complex interactions of dietary sugars and cariogenic oral organisms (for example, Streptococcus mutans) result in a lowered dental plaque pH which, in turn, facilitates caries formation.

Oral health in infants has been a major preventive focus for health care professional associations in recent years. Poor dental hygiene, caries, and the associated chronic morbidities constitute one of the leading preventable health care issues in developed countries. All parents should commence routine dental care by the child’s first birthday.

Tongue

Most toddlers and older children will protrude their tongue on request. Note the relative size of the tongue compared with the oral cavity in particular. Does the tongue protrude from the mouth at rest? This characteristic is seen with congenital hypothyroidism and the Beckwith-Widemann syndrome. The normal healthy tongue is wet and glistening. Dehydrated children tend to have sticky, stringy secretions. Note unusual color changes. Enlargement and reddening of the papillae (“strawberry tongue”) is seen with streptococcal infections. The presence of sharply demarcated areas of differing color as a result of cyclic irregular desquamation of the tongue surface is called a “geographic tongue.”

Inspect the lateral margins of the tongue for signs of trauma, which can be associated with poorly aligned teeth or dental caries. The underside of the tongue and the floor of the mouth may be the site of mucoceles or a ranula (due to injury to the duct of the sublingual or submandibular salivary glands or one of the minor salivary glands in the floor of the mouth). A ranula is usually a soft, bluish swelling on one side of the floor of the mouth. It may enlarge to the point that it herniates through the mylohyoid muscle to involve the neck.

The tongue is attached to the floor of the mouth anteriorly by a thick fibrous membrane of varied length called the frenulum. It used to be routine to cut the frenulum in the delivery room to avoid “tongue-tie.” Over the years this routine has been discontinued because there is no evidence that the length of the frenulum either influences speech development or causes any speech impediment.

The base of the tongue is the site of ectopic lingual thyroid glands. Gentle pressure on the anterior two thirds of the tongue may be sufficient to allow full inspection of the base and posterior pharynx. If your view is obstructed, gently advance the tongue depressor and press briefly on the posterior third of the tongue. The gag reflex elicited will cause the mouth to open widely and the soft palate to rise, allowing you a clear view of the posterior structures. Beware of children who vomit readily.

Tonsils

Following the soft palate laterally, you will observe two vertical webs of tissue known as the anterior and posterior tonsillar pillars. Between them lie the tonsils. These lymphoid glands vary tremendously in size. Hardly visible at birth, they tend to grow steadily in early childhood, reaching maximum size between 6 and 9 years of age. After that age, they involute and are usually hardly visible in adulthood. Variation in tonsil size often leads to great parental and physician distress. Most children whose tonsils touch on gagging have absolutely no difficulty swallowing or breathing. It is normal to observe pits and white concretions on tonsil surfaces for months following an infection.

Assess carefully the size, color, and shape of the tonsils, along with the presence of any exudates, vesicles, lesions, or changes in the adjacent soft tissues (the soft palate, uvula, tonsillar pillars, and buccal mucosa). Normally the tonsils and tonsillar fossae are slightly redder than the buccal mucosa and posterior pharynx. Once again, unless you have observed many normal tonsils, you will be unable to decide whether the tonsil fits within normal variation or whether an inflammatory/infectious process is present. It used to be fashionable to blame tonsils for most childhood complaints. It is now common knowledge that the vast majority of tonsils involute spontaneously and tonsillectomy is rarely indicated.

Examining the nose

The nose is the most prominent part of the face and is easily examined. Observe it for shape, deformity, or deviation to one side. Ask the child to tilt his or her head upward so that you can observe the septum and the presence of nasal discharge. A foul-smelling unilateral discharge indicates that the child may have a foreign body in that nostril or an obstruction due to a polyp or other anomaly. Nasal discharge colors are not predictive of viral versus bacterial infections. Develop the habit of observing the alae nasi during quiet breathing. Flaring of the alae nasi is a subtle sign of respiratory distress and may indicate the presence of pneumonia or congestive cardiac failure. A horizontal crease across the lower part of the nose is frequently seen in children with allergies who rub the tip of the nose by pushing it upward with the palm or heel of their hand, the so-called “allergic salute.”

Next, inspect inside the nose. You will need a nasal speculum and light or a regular otoscope with a large nasal speculum. Remember that the anterior septum, Little’s area, is extremely vascular and sensitive. Any trauma to this area will induce pain and possibly bleeding, as well as an uncooperative child and an upset family. Insert the speculum slowly, being careful to follow the floor of the cavity that runs toward the occiput. Gentle pressure against the lateral wall will expose the nasal turbinates and mucosa. Observe the presence of edema, pallor, inflammation, bleeding, or secretions. Swollen, pale turbinates that obstruct the nasal airways partly or completely are the hallmarks of nasal allergy. Polyps may be seen as pale boggy masses that occlude posteriorly. Note if the nares are patent and allow equal air passage through both. In newborns, it is essential to determine bilateral patency. Choanal atresia on both sides may lead to cyanotic episodes and apnea in infants who are all obligate nasal breathers (see Chapter 4).

Approach to the physical examination of the neck

Examination of the neck is usually brief. However, in a febrile or sick child, it may yield the diagnosis. Many young children are excessively ticklish and resist palpation of the neck. If the child is old enough, first test neck mobility by asking the child to move his or her head in the full range of normal movement. For many children, this is a fun game. To check neck mobility, you can give a child the following instructions:

You may need a toy or bright light to distract the child into participating in the range of motion exercise. For infants or those who are unable to cooperate, lie the child flat on his or her back and then gently attempt to flex the neck by placing a palm under the occiput and lifting. The presence of neck stiffness (nuchal rigidity) is a cardinal sign of meningitis in children beyond infancy; it also is observed in the presence of meningeal irritation (subarachnoid hemorrhage).

Pain on neck movement is not synonymous with meningitis. The presence of inflamed lymph nodes, a sore throat, or tonsillar abscess also will induce pain on flexion. Ask the child to indicate where it hurts and visualize the area carefully for the presence of swollen glands, erythema, or skin changes before you palpate or move the neck.

Thyroid

See Chapter 15 for a detailed description of how to conduct a thyroid examination.