[level-membership-for-obstetrics-gynecology-category]CHAPTER 80
Episiotomy
In the United States, episiotomy had been performed routinely when coupled with preterm or full-term obstetric delivery. Recently, the benefits of this operation have been questioned. The risk of third- or fourth-degree lacerations has been shown to be significantly greater, particularly with midline (median) episiotomies versus no episiotomy. No conclusive evidence has yet been published showing that routine (nonselective) episiotomy performance is associated with significantly diminished risks of later pelvic floor dysfunction. A large volume of data verifies that selective episiotomy is beneficial insofar as it avoids anal sphincter injury and diminishes later pelvic floor problems. Most recent reports favor mediolateral over medial (midline) episiotomy because of the decreased risk of third- and fourth-degree tears. Although cutting an episiotomy is an “operation,” its historical performance at best can be described as rugged, and its repair most charitably depicted as casual. For this operation, acceptable precepts appropriate for every surgical procedure should be followed. The latter include knowledge of anatomy, sterile technique, careful tissue handling, sharp and minimally traumatic dissection, control of bleeding, avoidance of tissue devitalization, and anatomic-physiologic reconstruction.
The goal of the surgeon under all circumstances should be to cut an episiotomy when required to implement easy, atraumatic delivery while minimizing the risk(s) for third- or fourth-degree lacerations. The bizarre practice of purposely cutting a midline episiotomy and extending it into the rectum should be relegated to the archives of past history.
Mediolateral Episiotomy
This procedure cuts or creates an incision directed from the right or left lower vagina (at the level of the hymenal ring), through the vestibule, and through the lowest margin of the labium majus, where it joins the perineum, and into the ischiorectal fossa. The operation may include any portion of the structures noted earlier. It is vectored in a direction approximately 45° to 50° from the midline and may include all of the previously mentioned structures (Fig. 80–1). The lower portion of the bulbocavernosus muscle is always cut, and if the incision is extended, the transverse perineal muscle will also be cut (Fig. 80–2). During pregnancy, every one of these structures has an excellent blood supply. Cut vessels in the subcutaneous tissues, fascia, and muscles can bleed briskly and therefore must be clamped and ligated to avoid moderate or even substantial blood loss.
The episiotomy cut is usually made with scissors. The operator’s fingers should be inserted between the vagina/vestibule and the baby’s head to protect the latter from injury.
The incision, if made correctly and according to previously cited instructions, will clearly avoid injury to the anal sphincter muscle and rectum. It is directed away from those structures.
Following delivery of the infant while placental separation is awaited, the incision should be tamponaded with pressure via an abdominal pad(s). Bleeding vessels should be clamped and suture-ligated with 3-0 Vicryl. The cut bulbocavernosus muscle margins should be secured with Allis clamps. Fascial edges at the level of the transverse perineal muscle should be secured with Allis clamps. After the placenta has been delivered, the wound is closed with 2-0 or 3-0 Vicryl sutures approximating the muscles and fascia; 3-0 Vicryl closes Colles’ fascia and subcutaneous tissue, and 3-0 Vicryl is placed through the skin (Figs. 80–3 and 80–4).
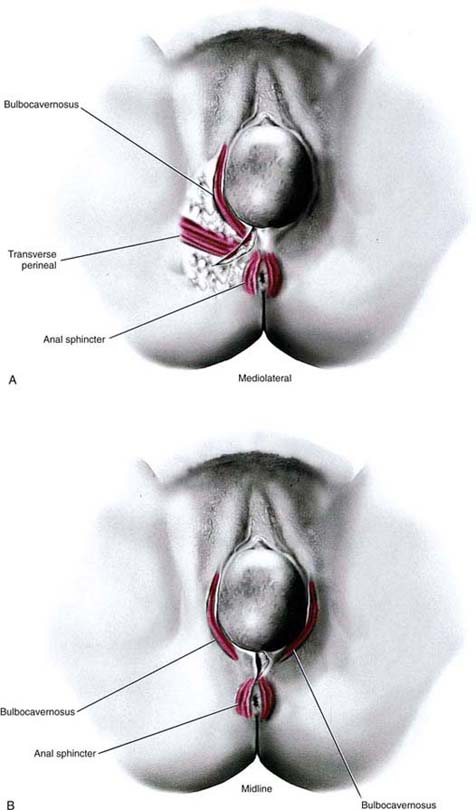
FIGURE 80–1 The two types of episiotomy, which may be cut at the time of vaginal birth, are illustrated here. Key perineal muscles have been superimposed. A. Mediolateral approach. B. Midline approach.
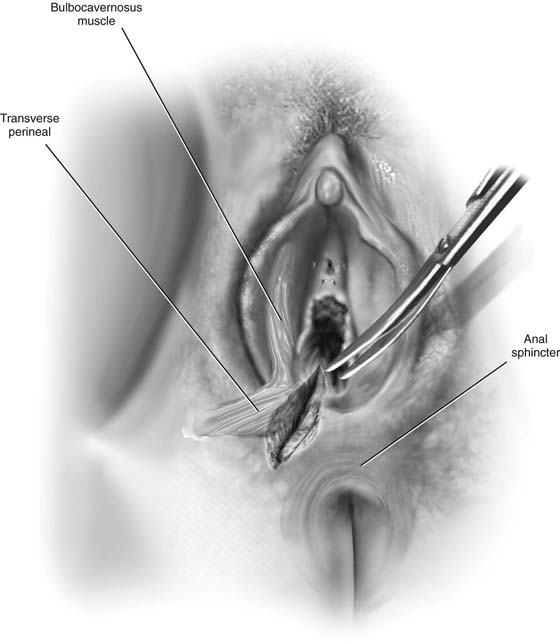
FIGURE 80–2 A right mediolateral episiotomy has been cut. The superimposed bulbocavernosus and transverse perineal muscles have been cut as a result of the direction of the incision. If the episiotomy extends, it will be vectored into the ischiorectal fossa and not into the external sphincter ani.
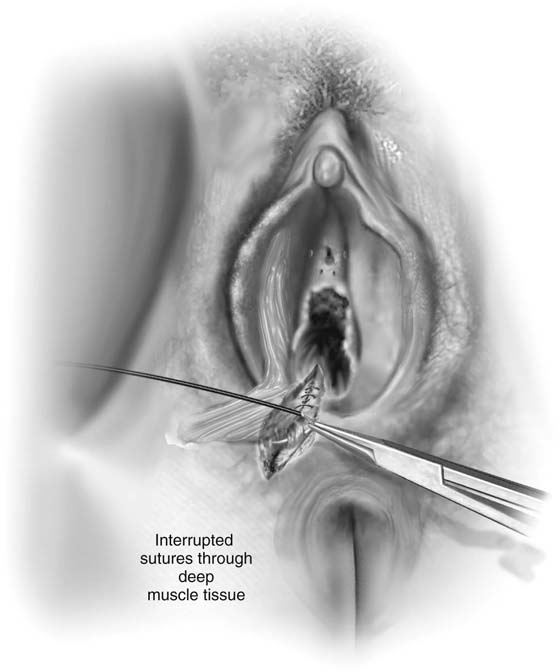
FIGURE 80–3 The severed muscles are sutured with interrupted 2-0 Vicryl stitches.
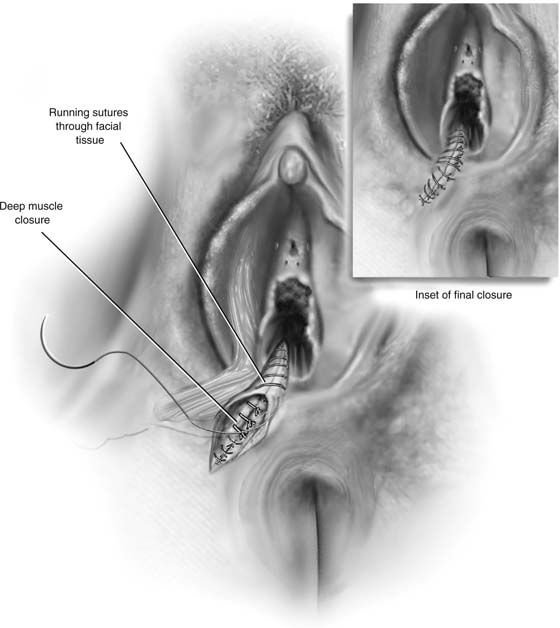
FIGURE 80–4 Colles’ fascia is closed with a running 3-0 Vicryl continuous stitch. The skin is closed with an interrupted or running stitch of 3-0 Vicryl. Alternatively, a subcuticular stitch may be placed.
Midline Episiotomy
The cut is made into the lower, posterior vaginal midline just superior to the hymenal ring and extends through the vestibule at the level of the fossa navicularis, through the posterior fourchette to the perineal-vestibular junction (see Fig. 80–1). In previous descriptions, the cut continues into the “perineal body,” which older anatomy texts and drawings depict as a grand central terminus of various muscles into a defined structure (“tendon”). In fact, cadaver dissections utilizing both fixed and fresh specimens fail to show such a defined central tendon or body. These dissections demonstrate that the external sphincter and to some extent the levator ani structurally form the deeper perineal substructure lying beneath the skin, superficial fat, and Colles’ fascia. Inevitably, a midline episiotomy will cut into some of the external sphincter ani. If this impingement is limited to a few fibers, then the functional outcome is minimal. If a quantitatively greater volume of external sphincter is cut, retracts, and remains unrecognized, then the patient suffers some impairment of anal sphincter control, for example, difficulty controlling flatus and leaking stool. If 50% or more of the sphincter is cut, the patient will have fecal incontinence of moderate to severe degree. Complete transection always translates to severe fecal incontinence.
Finally, the risk of severing the sphincter and extending through the anterior rectal wall is great with the midline episiotomy because significant pressure created by the head exiting the vagina can spread and uncontrollably extend the midline cut, which naturally vectors directly toward the external sphincter and the anorectum.
Repair of Third-Degree Laceration
For this type of repair to be successful, the surgeon must have current and thorough knowledge of perineal anatomy. The external anal sphincter is a wide but relatively thin structure in vivo. The internal sphincter in reality is the most external portion of the rectal muscularis at the level of the anus and the lowest portion of the rectum. Anatomic dissection of the anal sphincter demonstrates that the mean width of the external sphincter is 1 inch.
Vital reconnaissance should be carried out before any repair is done. Hemostasis should be obtained with mosquito clamping and suture-ligatures of 3-0 Vicryl. A thorough inspection of the wound is performed to identify the degree of sphincter injury, and to ensure that the anal and rectal mucosa has not been entered or damaged.
Next, the retracted edges of the external sphincter are grasped and held with multiple Allis clamps (Fig. 80–5). The examiner should double-glove and place his or her index finger into the rectum while simultaneously having an assistant create countertraction with the Allis clamps. This examiner should feel the sphincter tightening as the assistant pulls the Allis clamps in a crossover-like maneuver. The sphincter is sutured while a finger is maneuvered in the anus (Fig. 80–6). Although some surgeons prefer mattress sutures, the author uses a simple wide bite with 3-0 Vicryl. Approximately five to six stitches are required to adequately approximate a completely torn sphincter (see Fig. 77–6). After sphincter repair, the operator’s finger is withdrawn from the anus, and the outer double glove is removed and discarded. Colles’ fascia is closed with interrupted 3-0 Vicryl. The fat is closed with 3-0 or 4-0 Vicryl running stitches, the skin with interrupted 3-0 Vicryl stitches (Fig. 80–7). Alternatively, the new skin may be closed with a subcuticular running suture.
Postoperatively, nothing is placed in the rectum. The patient is clearly advised to take no enemas, to insert no suppositories, and to avoid straining at stool. She should be instructed to take 1 oz daily of mineral oil or one capsule of docusate and casanthranol (Peri-Colace) twice a day and seawater (Instant Ocean) baths once or twice daily, and to apply Silvadene cream to the wound 2 or 3 times a day. The patient should drink a minimum of four to six glasses of water per day and should be placed on a diet high in fiber and fruit.
Repair of Fourth-Degree Laceration
The occurrence of a fourth-degree perineal laceration creates a significant risk for fistula formation. A compulsive, precise repair is essential to avoid that complication.
As with the third-degree laceration, extensive and thorough pre-repair inspection is an essential step for successful repair (Fig. 80–8). Hemostasis should be complete before inspection is begun. Fine clamping and ligatures are the best way of achieving hemostasis and avoiding tissue devitalization. The cut edges of the anorectal mucosa are grasped with Babcock clamps, beginning at the anal verge and extending upward (cranially) to the junction of the intact rectal mucosa. A 2-0 or 3-0 chromic catgut stitch is placed through the rectal wall at this point as a marker stitch.
Next, the rectum is repaired with a single layer of or interrupted 2-0 chromic catgut sutures. Each stitch is placed through the entire rectal wall thickness and tied down (Fig. 80–9). When the rectal wall has been completely repaired, the external sphincter is grasped with Allis clamps and repaired as previously described with 3-0 Vicryl sutures (Fig. 80–10). Finally, Colles’ fascia, fat, and skin are repaired with 3-0 Vicryl. A final finger examination rechecks the completeness of the repair.
Postoperatively, nothing is placed into the rectum. No enemas and no suppositories are ordered. Stool softeners and a high-fiber diet are prescribed. The author prefers that the patient take 1 oz of mineral oil by mouth once per day. Additionally, ciprofloxacin (Cipro) 500 mg twice daily is administered for 7 days. The patient should take a 10-minute Instant Ocean bath per day and cleanse her perineum and perianal area daily with Phisohex; Silvadene or Cleocin cream is applied to the wound 3 times a day.
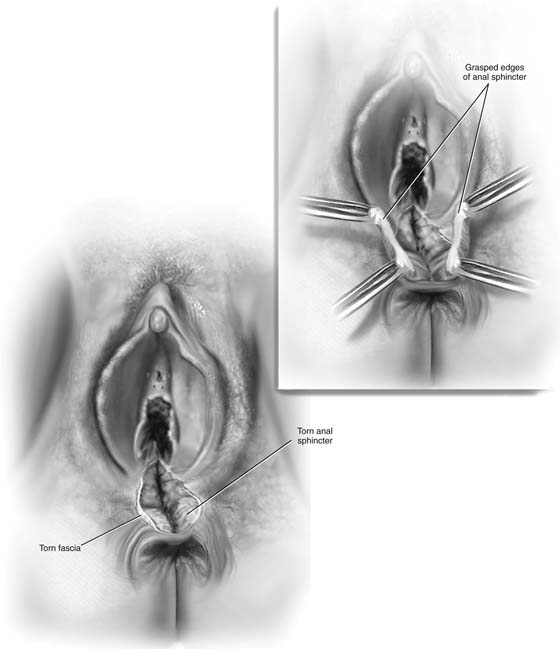
FIGURE 80–5 In this drawing, a midline episiotomy has extended through the external anal sphincter. The inset shows the application of Allis clamps and the upper and lower margins of the sphincter injury. Note that the anal mucosa is intact.
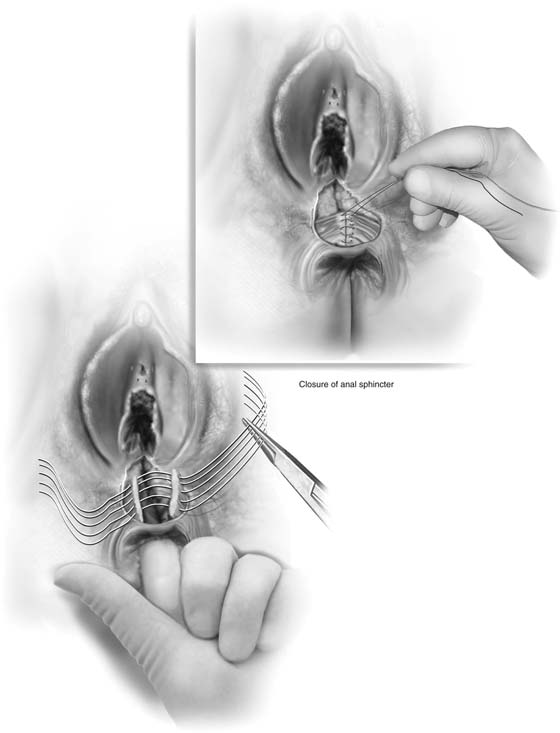
FIGURE 80–6 With a gloved finger in the rectum, interrupted 2-0 or 3-0 Vicryl sutures are placed through the entire width (in the case illustrated, a complete sphincter tear) of the external sphincter ani. Approximately five or six stitches are usually required. The stitches are tied into place, and a gloved finger in the rectum can feel the tightening of the sphincter after closure. This examination will ensure that overcorrection has been avoided.
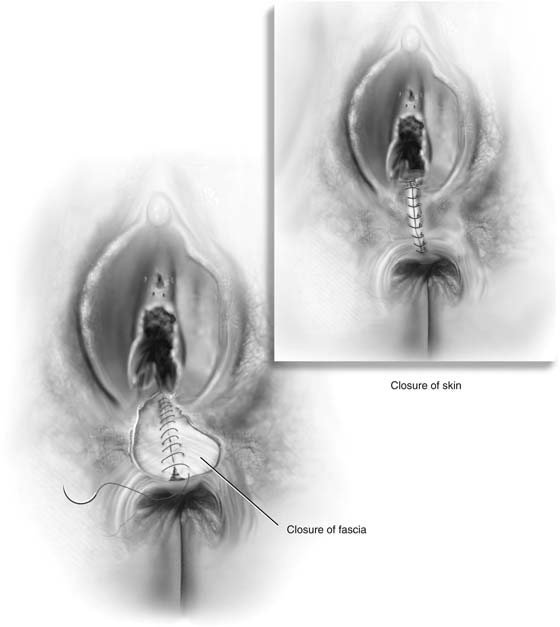
FIGURE 80–7 The fascia is closed with a running 3-0 Vicryl, and the vagina and vestibular and perineal skin are closed with running or interrupted 3-0 Vicryl sutures. Alternatively, a subcuticular closure may be performed with a 3-0 or 4-0 running Vicryl suture (see inset of Fig. 80–10).
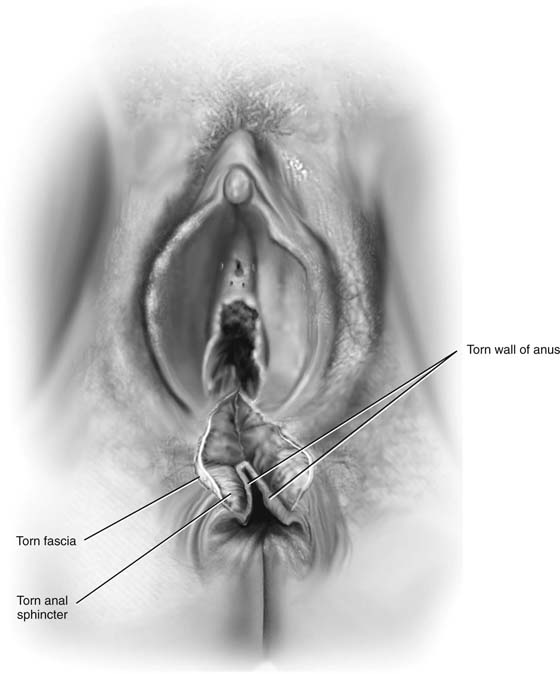
FIGURE 80–8 A complete perineal laceration is shown in this illustration. The anterior anal sphincter is completely separated, and the wound further extends through the anal wall with disruption of the anal mucosa.
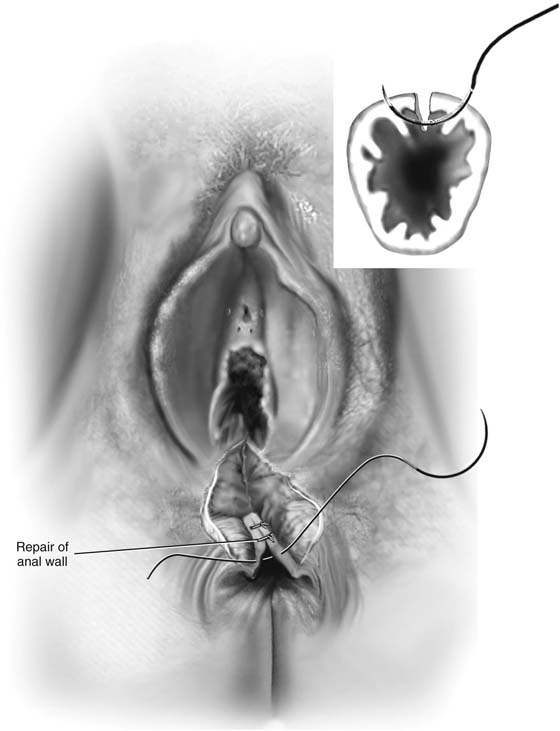
FIGURE 80–9 After the upper and lower margins of the injury are secured, interrupted 2-0 chromic sutures are placed through the full thickness of the anorectal wall as illustrated. The wound is closed without tension on the suture line.
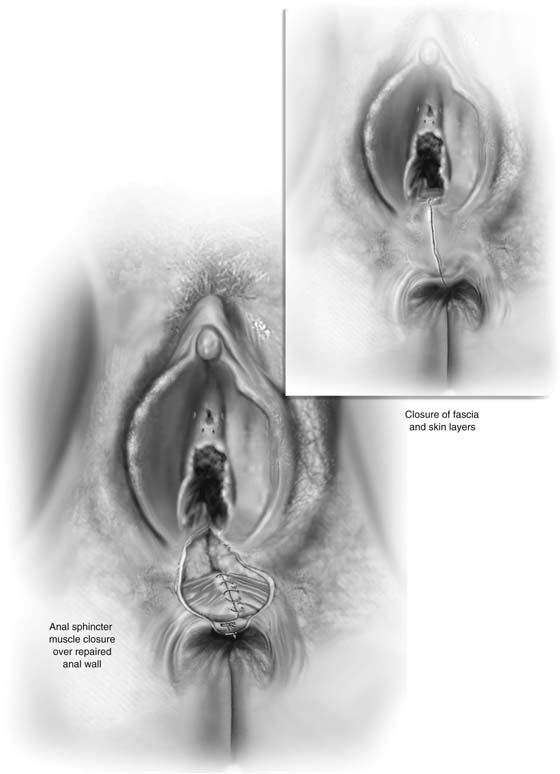
FIGURE 80–10 The anal sphincter is closed as described in Figure 80-6. Although a gloved finger need not be placed into the repaired anus until the repair has been completed, it is preferable that the sphincter repair suture line not overlie the anal repair suture line.
[/level-membership-for-obstetrics-gynecology-category][not-level-membership-for-obstetrics-gynecology-category]CHAPTER 80
Episiotomy
In the United States, episiotomy had been performed routinely when coupled with preterm or full-term obstetric delivery. Recently, the benefits of this operation have been questioned. The risk of third- or fourth-degree lacerations has been shown to be significantly greater, particularly with midline (median) episiotomies versus no episiotomy. No conclusive evidence has yet been published showing that routine (nonselective) episiotomy performance is associated with significantly diminished risks of later pelvic floor dysfunction. A large volume of data verifies that selective episiotomy is beneficial insofar as it avoids anal sphincter injury and diminishes later pelvic floor problems. Most recent reports favor mediolateral over medial (midline) episiotomy because of the decreased risk of third- and fourth-degree tears. Although cutting an episiotomy is an “operation,” its historical performance at best can be described as rugged, and its repair most charitably depicted as casual. For this operation, acceptable precepts appropriate for every surgical procedure should be followed. The latter include knowledge of anatomy, sterile technique, careful tissue handling, sharp and minimally traumatic dissection, control of bleeding, avoidance of tissue devitalization, and anatomic-physiologic reconstruction.
The goal of the surgeon under all circumstances should be to cut an episiotomy when required to implement easy, atraumatic delivery while minimizing the risk(s) for third- or fourth-degree lacerations. The bizarre practice of purposely cutting a midline episiotomy and extending it into the rectum should be relegated to the archives of past history.
Mediolateral Episiotomy
This procedure cuts or creates an incision directed from the right or left lower vagina (at the level of the hymenal ring), through the vestibule, and through the lowest margin of the labium majus, where it joins the perineum, and into the ischiorectal fossa. The operation may include any portion of the structures noted earlier. It is vectored in a direction approximately 45° to 50° from the midline and may include all of the previously mentioned structures (Fig. 80–1). The lower portion of the bulbocavernosus muscle is always cut, and if the incision is extended, the transverse perineal muscle will also be cut (Fig. 80–2). During pregnancy, every one of these structures has an excellent blood supply. Cut vessels in the subcutaneous tissues, fascia, and muscles can bleed briskly and therefore must be clamped and ligated to avoid moderate or even substantial blood loss.
The episiotomy cut is usually made with scissors. The operator’s fingers should be inserted between the vagina/vestibule and the baby’s head to protect the latter from injury.
The incision, if made correctly and according to previously cited instructions, will clearly avoid injury to the anal sphincter muscle and rectum. It is directed away from those structures.
Following delivery of the infant while placental separation is awaited, the incision should be tamponaded with pressure via an abdominal pad(s). Bleeding vessels should be clamped and suture-ligated with 3-0 Vicryl. The cut bulbocavernosus muscle margins should be secured with Allis clamps. Fascial edges at the level of the transverse perineal muscle should be secured with Allis clamps. After the placenta has been delivered, the wound is closed with 2-0 or 3-0 Vicryl sutures approximating the muscles and fascia; 3-0 Vicryl closes Colles’ fascia and subcutaneous tissue, and 3-0 Vicryl is placed through the skin (Figs. 80–3 and 80–4).
FIGURE 80–1 The two types of episiotomy, which may be cut at the time of vaginal birth, are illustrated here. Key perineal muscles have been superimposed. A. Mediolateral approach. B. Midline approach.
FIGURE 80–2 A right mediolateral episiotomy has been cut. The superimposed bulbocavernosus and transverse perineal muscles have been cut as a result of the direction of the incision. If the episiotomy extends, it will be vectored into the ischiorectal fossa and not into the external sphincter ani.
[/not-level-membership-for-obstetrics-gynecology-category]
