CHAPTER 17 Endoscopic component separation
Step 1. Surgical anatomy
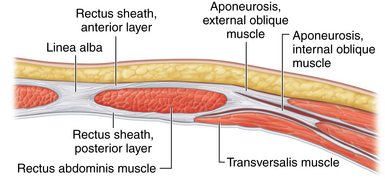
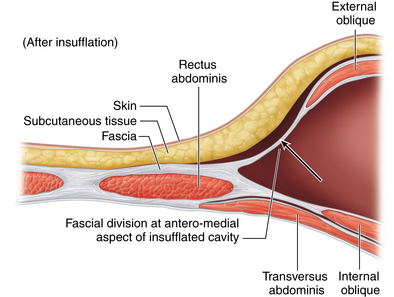
♦ The rectus abdominis muscle is a paired muscle running vertically from the costal margin to the inguinal ligament. It is separated in the midline by the linea alba. Along its lateral borders are the fused aponeuroses of the external oblique, internal oblique, and transversus abdominis muscles.
♦ Abdominal wall hernias often occur in the midline at the linea alba. Often, a great distance separates the rectus muscle bellies. During repair, there may be excessive tension when the muscles are pulled together to re-create the midline. One technique that can be helpful is to release the rectus abdominis muscle from some of its lateral attachments to pull it medially.
♦ To separate the rectus abdominis muscle from the external oblique muscle, an incision needs to be lateral to the fused aponeuroses of the external and internal oblique muscles. This will allow the internal oblique/transversus abdominis/rectus abdominis unit to “release” medially. Full separation of the flimsy fibroareolar connective tissue between the oblique muscles will maximize mobilization of the rectus muscle bellies medially (Figure 17-1).
Step 2. Preoperative considerations
Patient preparation
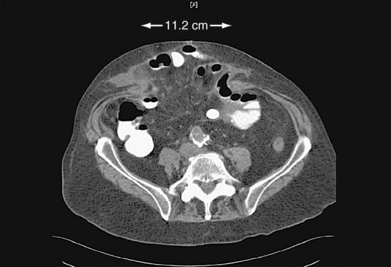
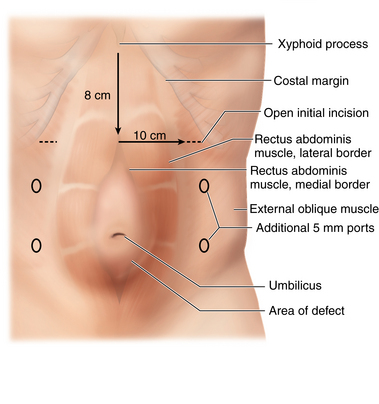
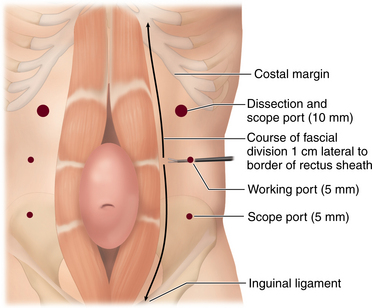
♦ Endoscopic component separation (ECS) is most useful for patients with midline defects of more than 5 to 8 cm in width as measured between the medial borders of the rectus muscle bellies (Figure 17-2).
♦ Symptoms associated with large defects that can be improved with component separation include a large abdominal wall deformity, difficulty leaning forward, difficulty fitting clothes, and discomfort related to pressure pushing the skin outward. Less clearly associated symptoms include inability to carry out activities of daily living or work, skin ulceration, and difficulties with an ostomy appliance if present.
♦ Component separation can be incorporated with open, laparoscopic, or laparoscopic-assisted hernia repair. Patient selection for each approach is based on the specific clinical characteristics, most of which can be determined preoperatively with a physical examination and computed tomography (CT). Open and laparoscopic-assisted approaches have the advantage of suturing the midline together with more accuracy and strength, compared to laparoscopic techniques.
 An open approach is typically planned for those requiring scar revision (because of ulcers, thin skin, previous skin graft, or unsightly scar) or explantation of a large prosthetic.

♦ Preoperative CT is useful for operative planning if considering a laparoscopic or laparoscopic-assisted approach. The exact dimensions of the defect can be ascertained, along with the calculated location of the lateral border of the rectus abdominis muscle. The latter measurement is particularly important if performing ECS as the initial portion of the operation (Figure 17-3).
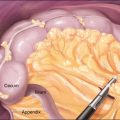
♦ Prior abdominal access in the vicinity of the rectus and oblique muscles pose potential difficulty because of adhesions between fascial planes. Examples include open appendectomy or laterally based ostomy sites.
Equipment and instrumentation
♦ A standard handheld Bovie is adequate for dissection of the space between the oblique muscles. Deep thin retractors such as S-retractors are also useful during this part of the procedure.
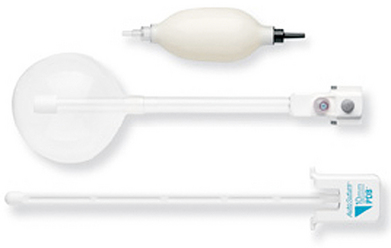
♦ A dissecting balloon (OMSPDB 1000 Covidien, Mansfield, Massachusetts) facilitates the creation of the space between the oblique muscles prior to insufflation (Figure 17-4).
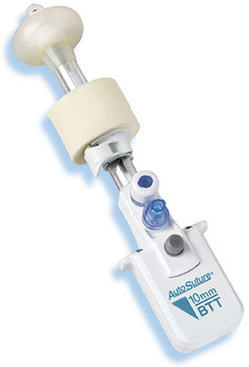
♦ A port with a balloon at the distal end (OMST10BT Covidien, Mansfield, Massachusetts) or a valveless port (AirSeal; Surgiquest, Orange, CT) helps prevent leakage during insufflation. There is limited space between the muscles. This port can be pulled all the way back to the tip, and the balloon tip prevents inadvertent removal of the port. This gives the best view of the small space (Figure 17-5).
Anesthesia
♦ Regardless of the exact operative approach, general anesthesia is required. Consideration should also be given for epidural catheter placement to assist with postoperative pain management.
♦ Antibiotics: routine prophylactic antibiotics to cover gram-positive organisms should be administered prior to surgery. In longer cases, antibiotic redosing may be necessary. Postoperative antibiotics are not routinely required.
♦ A three-way bladder catheter is useful to avoid injury to the urinary bladder when dissecting in the pelvis. The bladder is filled with approximately 300 cc of saline and the catheter clamped. Once this portion of the dissection is complete, the clamp is removed.
Room setup and patient positioning
♦ The patients are in the supine position, being sure to have the costal margins and lateral abdominal wall prepped in the area of the surgical field.
♦ Tucking both arms at the patient’s sides is helpful for the laparoscopic approaches, as both the surgeon and assistant stand on the same side. This is particularly useful when working in the pelvis.
♦ A sterile adhesive drape is utilized to hold the drapes in place and prevent significant contact between the skin and prosthetic.
Step 3: Operative steps
Port placement and creation of plane beneath the external oblique muscle
♦ A 2- to 4-cm transverse incision is made inferior to the costal margin, approximately 3 cm lateral to the lateral border of the rectus abdominis muscle.
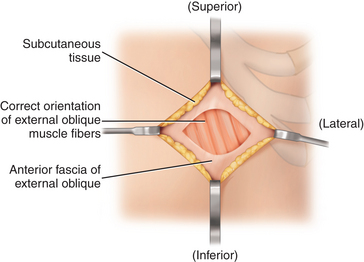
♦ Completely clean off and divide the thin anterior fascia overlying the external oblique muscle body, and definitively identify the correct orientation of its fibers (Figure 17-6).
♦ The muscle fibers are bluntly separated until the plane between the oblique muscles is confirmed and entered, taking care not to go too deep into or through the internal oblique. The internal oblique aponeurosis is smooth and whitish in color.
♦ While elevating and holding the external oblique muscle fibers apart with a small retractor, place the balloon dissector in this plane between the oblique muscles, and gently push the tip toward the inguinal ligament inferior to the level of the anterior superior iliac spine. The balloon dissector is serially inflated and deflated, each sequence pulling the balloon more cephalad. Two to three sequences are usually adequate to fully separate the muscles.
♦ The balloon is too large to separate the muscles medial and superior to the initial access incision. This portion of the dissection is easily accomplished with the surgeon’s finger. Palpation of the costal margin also confirms the correct plane of dissection in this area.
♦ The balloon dissector is then removed, replaced with a balloon-tipped or AirSeal port, and the space between the oblique muscles insufflated with carbon dioxide. If the correct plane has been dissected, the initial inspection will reveal a cavity with external oblique anterior and internal oblique posterior, each with the normal orientation of their fibers. Both the medial and lateral aspects of the cavity will be fused together, and flimsy fibroareolar connective tissue is seen along these attachments. The medial boundary represents the lateral border of the rectus sheath.
♦ Two 5-mm transverse incisions are then made inferior to the initial access site, evenly spaced in the craniocaudad direction. The additional port sites should be lateral enough to allow for instrument and scope manipulation. The instrument used to divide the aponeurosis will be placed through the middle port, and the scope will be placed through the ports in the upper and lower quadrants.
Division of the external oblique aponeurosis
♦ Blunt dissection is performed to free up any remaining fibroareolar connective tissue and completely separate the internal and external oblique muscles.
♦ The division of the external oblique aponeurosis is usually associated with minimal bleeding as the plane is avascular. Laparoscopic Metzenbaum scissors are adequate in most circumstances except when nearby subcutaneous and muscular blood vessels are injured. We encourage the use of monopolar cautery to supplement the shears or a 5-mm energy source such as an ultrasonic coagulator if needed (Figure 17-7).
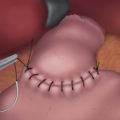
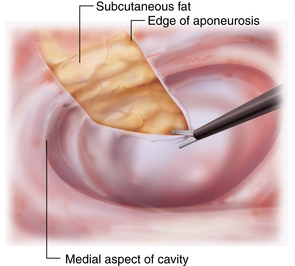
♦ The internal oblique/transversus abdominis/rectus abdominis unit will visibly “release” medially as the aponeurosis is divided. You should immediately see subcutaneous fat above the fascia (Figure 17-8).
♦ The aponeurotic division should begin almost directly medial to the middle port, approximately 5 to 10 mm lateral to the rectus-external oblique junction. The incision is continued vertically parallel to this junction all the way to the inguinal ligament inferiorly and above the costal margin superiorly. It is common to view and divide muscle fibers above the costal margin (Figure 17-9).
♦ Once the aponeurosis is divided, gentle dissection of the connective tissue in the subcutaneous space should be performed to gain significant additional mobility.
♦ The ports are then removed under direct vision, and the carbon dioxide is allowed to escape. No drain is left in place.
Options for hernia repair
♦ Open hernia repair (laparotomy first). Begin with laparotomy and adhesiolysis first in order to accurately define the medial border of the rectus muscle and determine if the midline can be closed without tension. If the midline cannot be brought together, then switch to BECS. Once adequate release is achieved, then finish with retromuscular prosthetic placement and closure of abdominal wall over prosthetic.
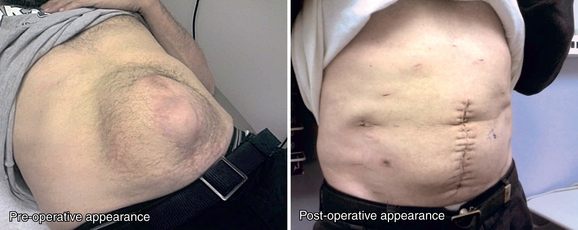
♦ Open (BECS first). A preoperative CT scan is critical to accurately identify the lateral border of the rectus. The lateral border is marked in the operating room by measurements acquired from CT scan and physical exam. Once the BECS is completed, then move to open laparotomy and adhesiolysis, retromuscular prosthetic placement, and closure of abdominal wall over prosthetic. This is usually necessary when the defect is greater than 10 to 12 cm in width and extends the full length of the previous midline incision. Despite the difficulty identifying lateral border of rectus abdominis muscles, this is the preferred approach because the laparotomy incision is open for less time compared to the sequence described in the first option (Figure 17-10).
♦ Laparoscopic assisted. Begin with laparoscopic adhesiolysis and identification of lateral border of rectus abdominis muscle, then proceed with BECS. Or BECS could be done first (using CT scan data to locate the lateral border of the rectus muscles) followed by laparoscopic adhesiolysis. Once the BECS, adhesiolysis, and measurement of the defect is complete, then create a small laparotomy in center of defect, pass the prosthetic through the midline incision/defect, and close the midline. The final step is laparoscopic fixation of prosthetic to cover the defect. It is critical to place the laparoscopic ports lateral to the anticipated edge of the prosthetic. This can be used for defects that are relatively small, between 5 and 12 cm, and do not extend the full length of the previous incision.
♦ Totally laparoscopic. Begin with laparoscopic adhesiolysis and identification of lateral border of rectus abdominis muscle, then proceed with BECS. The closure of the abdominal wall is done with percutaneous transfascial fixation sutures. The closure is reinforced with a retromuscular prosthetic placement and fixation. This allows for abdominal wall closure without an incision; rather a series of small incisions. This is generally better for narrow defects in the range of 5 to 8 cm in width that run the complete length of the old incision.
Step 4. Postoperative care
♦ Overall postoperative care is the same as for hernia repair patients without component separation.
♦ If there is tension on the fascial closure, keeping the patient’s trunk slightly flexed for the first 4 to 5 days helps to reduce this tension. The tissues should stretch to accommodate the tension within the first week.
♦ An abdominal wall binder is worn for the first few weeks postoperatively for patient comfort and to potentially prevent seroma formation in the space between the oblique muscles.
Step 5. Pearls and pitfalls
♦ Locate the lateral border of the rectus abdominis muscle by manual palpation, laparoscopy, or CT measurements from known landmarks (such as midline and costal margin). Incorrectly identifying the lateral border of the rectus abdominis muscle will result in separation of the wrong muscle layers. Errors in identifying the lateral border of the rectus abdominis muscle usually occur because the surgeon has anticipated that this landmark is more medial than it actually is. In other words, it is often more lateral than one would expect.
♦ Missing the plane between external and internal oblique on initial open access usually occurs because the dissection was too deep. To rectify the situation, enlarge the incision slightly and move to a more lateral location on the external oblique. Slowly spread the external oblique muscle fibers with a blunt instrument to positively identify the whitish fascia or aponeurosis of the internal oblique.
♦ If the initial access incision is placed too close to either the costal margin or the lateral border of the rectus sheath, the balloon-tipped port will interfere with division of the external oblique aponeurosis. Partial deflation of the balloon can give additional room to assist in this situation. Use of the AirSeal port eliminates this problem.
♦ Using an energy source too close to a balloon-tipped port can break the balloon. Evacuate some of the air from the balloon, and have the assistant hold the tip of the port lateral to help avoid this problem.
♦ Lateral abdominal port sites can be shared for both the laparoscopic portion of the procedure and the ECS. If the initial access site for the ECS was also used for an intraperitoneal port, extra care must be taken to ensure that the correct plane for dissection is accessed. Gas may escape into the peritoneal cavity during ECS. All port sites used for intraperitoneal laparoscopy that traverse the component separation should be closed to avoid port site hernia.
♦ If the defect cannot be closed completely, leave the middle portion open. This will be determined by the tension experienced during closure. The remaining defect will be significantly smaller than the original defect, and it will be covered by the prosthetic. Flexing the patient’s trunk during closure can alleviate some tension.
♦ Patients with significant loss of domain may exhibit abdominal compartment syndrome with midline fascial closure, even after completion of component separation. This is unusual, but the surgeon should ask the anesthesia staff about airway pressures during and after closure of large defects or those associated with massive hernia sacs.
Lowe JB, Garza JR, et al. Endoscopically assisted “components separation” for closure of abdominal wall defects. Plast Reconstr Surg. 2000;105(2):720-729. quiz 730
Ramirez OM, Ruas E, Dellon AL. “Components separation” method for closure of abdominal-wall defects: an anatomic and clinical study. Plast Reconstr Surg. 1990;86;3:519-526.
Rosen MJ, Jin J, et al. Laparoscopic component separation in the single-stage treatment of infected abdominal wall prosthetic removal. Hernia. 2007;11(5):435-440.