Chapter 20 Emergency Airway Management
For online-only figures, please go to www.expertconsult.com 
Airway Anatomy
Internally, the airway is composed of many structures and well-defined spaces. It originates in the nasal and oral cavities (Figure 20-1). The nasal cavity extends from the nostrils to the posterior nares or choanae. Because resistance to airflow through the nose is almost twice that of the mouth, patients who require high flow rates (e.g., during exercise) often breathe through their mouths. The nasopharynx extends from the end of the nasal cavity to the level of the soft palate. Tonsillar lymphoid structures are the primary impediments to airflow through the nasopharynx. The oral cavity is bounded by the teeth anteriorly, hard and soft palates above, and the tongue below. The oropharynx, which communicates with the oral cavity and the nasopharynx, extends from the soft palate to the tip of the epiglottis. The tongue is the principal source of obstruction in the oropharynx.
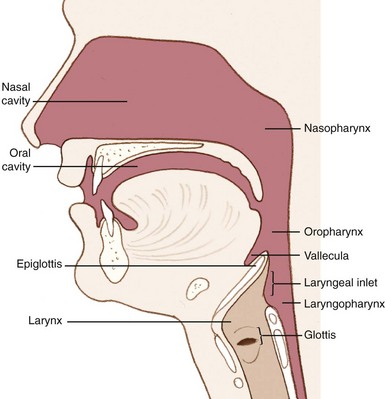
FIGURE 20-1 Lateral airway anatomy.
(Redrawn from Mahadevan SV, Garmel GM, editors: An introduction to clinical emergency medicine: Guide for practitioners in the emergency department, Cambridge, UK, 2005, Cambridge University Press. Courtesy Chris Gralapp. http://www.biolumina.com.)
Externally identifiable landmarks are also important to airway assessment and management (Figure 20-2). The mentum is the anterior aspect of the mandible that forms the tip of the chin. The hyoid bone forms the base of the floor of the mouth. The thyroid cartilage forms the laryngeal prominence (i.e., the “Adam’s apple”) and the thyroid notch. The cricoid cartilage, which lies inferior to the thyroid cartilage, forms a complete ring that provides structural support to the lower airway. The cricothyroid membrane lies between the thyroid and cricoid cartilages and serves as an important site for surgical airway management.
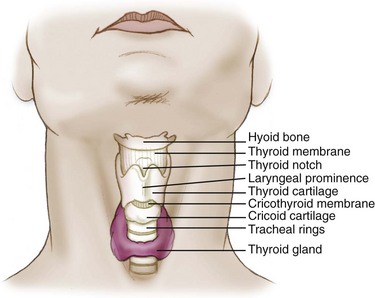
FIGURE 20-2 External airway anatomy.
(Redrawn from Mahadevan SV, Garmel GM, editors: An introduction to clinical emergency medicine: Guide for practitioners in the emergency department, Cambridge, UK, 2005, Cambridge University Press. Courtesy Chris Gralapp. http://www.biolumina.com.)
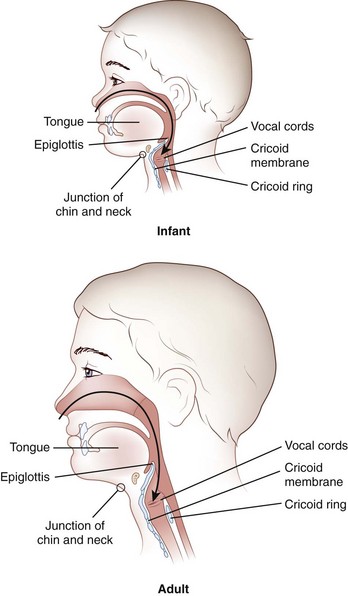
Knowledge of the anatomic differences between adults and infants is integral to effective pediatric airway management. These important differences are summarized in Table 20-1 and Figure 20-3.
TABLE 20-1 Anatomic Airway Differences Between Children and Adults
| Anatomy | Clinical Significance |
|---|---|
| Large intraoral tongue that occupies a relatively large portion of the oral cavity | High anterior airway position of the glottic opening as compared with that of an adult |
| High tracheal opening: C1 in infancy as compared with C3 or C4 at the age of 7 years and C4 or C5 in adulthood | Straight blade preferred over curved blade to push distensible anatomy out of the way to visualize the larynx |
| Large occiput that may cause flexion of the airway; large tongue that easily collapses against the posterior pharynx | Sniffing position is preferred; the large occiput actually elevates the head into the sniffing position in most infants and children; a towel may be required under the shoulders to elevate the torso relative to the head in small infants |
| Cricoid ring is the narrowest portion of the trachea as compared with the vocal cords in adults | Uncuffed tubes provide an adequate seal, because they fit snugly at the level of the cricoid ring; correct tube size is essential, because variable expansion cuffed tubes are not used |
| Consistent anatomic variations with age, with fewer abnormal variations related to body habitus, arthritis, or chronic disease | <2 yr old, high anterior |
| 2-8 yr old, transition | |
| >8 yr old, small adult | |
| Large tonsils and adenoids may bleed; more acute angle between the epiglottis and the laryngeal opening results in nasotracheal intubation attempt failures | Blind nasotracheal intubation not indicated for children; nasotracheal intubation failure |
| Small cricothyroid membrane | Needle cricothyroidotomy difficult and surgical cricothyroidotomy impossible in infants and small children |
Modified from Walls RM, Murphy MF, Luten RC, et al, editors: Manual of emergency airway management, ed 2, Philadelphia, 2004, Lippincott Williams & Wilkins.
Opening the Airway
Head Positioning
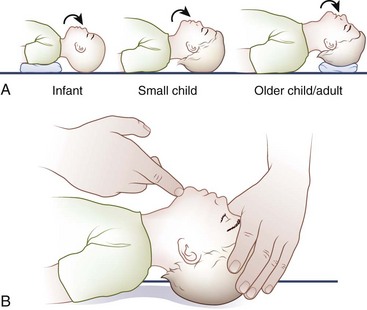
The optimal head position for airway alignment and patency varies with age. A supine infant’s large occiput contributes to flexion of the head and neck and resultant airway obstruction; this may be alleviated by elevating the shoulders with a small towel (Figure 20-4). In children, slightly extending the head into the sniffing position helps to relieve airway obstruction. In adults, placing a folded towel or article of clothing under the occiput, which flexes the neck at the torso, followed by gentle hyperextension of the head at the atlanto-occipital joint, provides for the optimal alignment of the airway axes.
Manual Airway Techniques
Head Tilt With Chin Lift
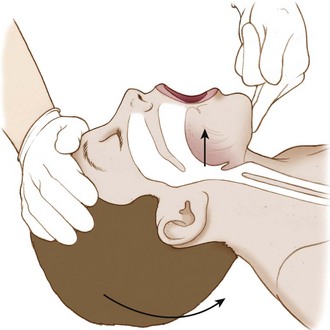
The head tilt with chin lift (Figure 20-5) is a simple and effective technique for opening the airway. The palm of one hand is placed on the victim’s forehead and applies firm backward pressure to tilt the head back. Simultaneously, the fingers of the other hand are placed under the bony part of the chin and lifted to bring the chin forward. These fingers support the jaw and maintain the head-tilt position. This maneuver extends the neck and should not be used if cervical spine injury is a concern.
Jaw Thrust Without Head Tilt
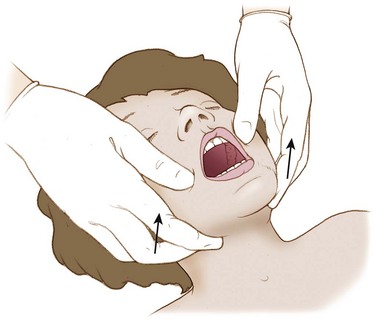
If a cervical spine injury is suspected or cannot be excluded, the jaw thrust without head tilt (Figure 20-6) can be performed while maintaining neutral cervical spine alignment. With this maneuver, the jaw thrust is performed without extending or rotating the neck.
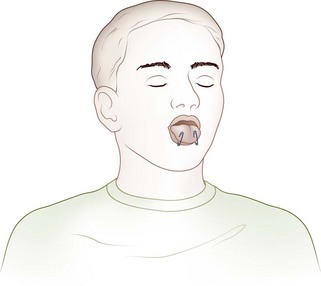
Tongue Traction
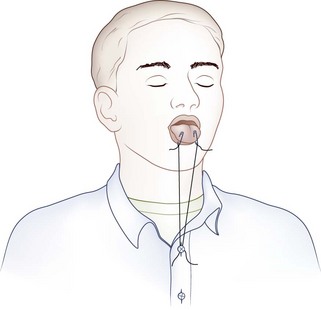
If the patient is unconscious or in extremis, the airway may be opened temporarily by attaching the anterior aspect of the victim’s tongue to the lower lip with two safety pins (Figure 20-7). An alternative to piercing the patient’s lower lip is to pass a string through the safety pins and then secure the end of the string to the victim’s shirt button or jacket zipper (Figure 20-8), thereby exerting traction on the tongue.
Mechanical Airway Adjuncts
Oropharyngeal Airway
The oropharyngeal airway (OPA) is an S-shaped device that is designed to hold the tongue away from the posterior pharyngeal wall (Figure 20-9). When the OPA is properly placed, it prevents the tongue from obstructing the glottis, and also provides an air channel and suction conduit through the mouth. These devices are most effective for unconscious and semiconscious victims who lack a gag reflex or cough. Use of an OPA in a victim with a gag reflex or cough is contraindicated, because the OPA may stimulate retching, vomiting, or laryngospasm.
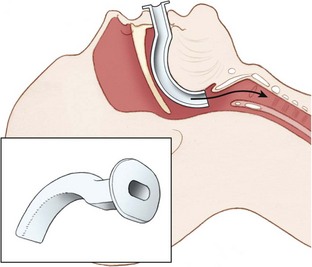
FIGURE 20-9 Oropharyngeal airway.
(Redrawn from Mahadevan SV, Garmel GM, editors: An introduction to clinical emergency medicine: Guide for practitioners in the emergency department, Cambridge, UK, 2005, Cambridge University Press. Courtesy Chris Gralapp. http://www.biolumina.com.)
Technique for insertion
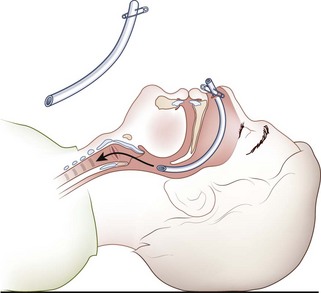
Nasopharyngeal Airway
The nasopharyngeal airway (NPA) is an uncuffed trumpet-like tube that provides a conduit for airflow between the nares and the pharynx (Figure 20-10). The NPA is inserted through the nose rather than the mouth, and it has a flange at the outer end to prevent displacement or slippage beyond the nostril. These devices are better tolerated than are OPAs, and they are commonly used with intoxicated or semiconscious victims. They are also effective when trauma, trismus (i.e., clenched teeth), or other obstacles (e.g., wiring of the teeth) preclude OPA placement. NPAs are contraindicated in victims with basilar skull or facial fractures, because inadvertent intracranial placement may occur.
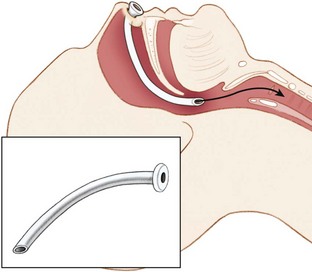
FIGURE 20-10 Nasopharyngeal airway.
(Redrawn from Mahadevan SV, Garmel GM, editors: An introduction to clinical emergency medicine: Guide for practitioners in the emergency department, Cambridge, UK, 2005, Cambridge University Press. Courtesy Chris Gralapp. http://www.biolumina.com.)
Technique for insertion
Any flexible tube of appropriate diameter and length can be used as an improvisational substitute for the NPA. Examples include a Foley catheter, radiator hose, solar shower hose, siphon tubing, or an inflation hose from a kayak flotation bag or sport pouch. An endotracheal tube (ETT) can be shortened and then softened in warm water to substitute for a commercial nasal trumpet. The flange can be improvised with the use of a safety pin through the nostril end of the tube (Figure 20-11).
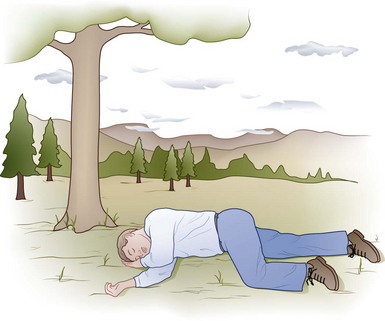
Recovery Position
In the spontaneously breathing unconscious victim who is not at risk for cervical spine injury, the recovery position (Figure 20-12) allows for airway patency while reducing the risk of aspiration. In the recovery position, the tongue is less likely to fall back and occlude the airway, and vomitus is more likely to be expelled than inhaled. Even a diminutive rescuer can place a large person in the recovery position if the proper technique is employed.
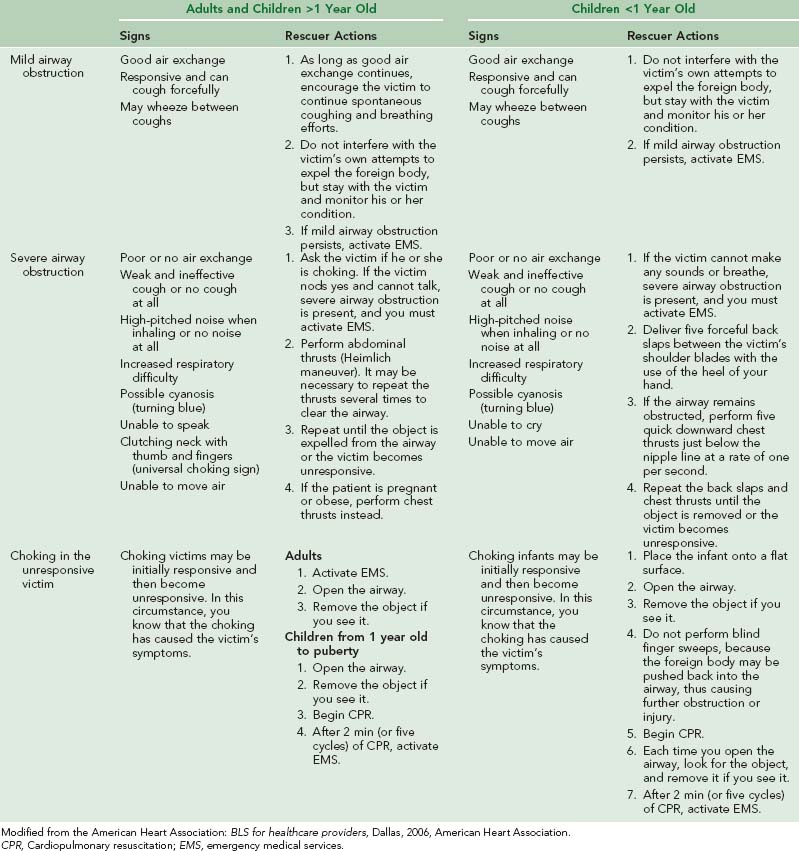
Foreign-Body Airway Obstruction
A complete summary of the treatment for complete airway obstruction caused by foreign bodies in adults and children is provided in Table 20-2.
Suction
Portable suction devices, which are available from a number of manufacturers, are ideal for the wilderness setting. These portable units should provide enough vacuum flow for adequate pharyngeal suction. Portable devices may be powered by oxygen, air, or electricity, or they may be manually powered (Figure 20-13, online). Hand-operated units are popular because they are lightweight, compact, reliable, and inexpensive. All units should have large-bore, nonkinking suction tubing, an unbreakable collection container, and a sterile disposable suction catheter.
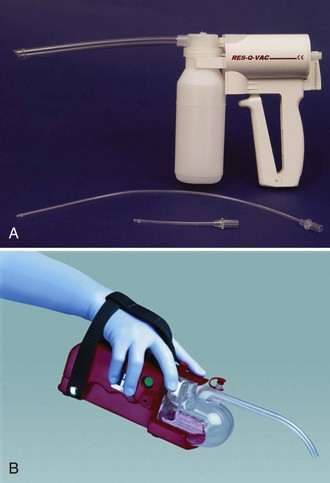
FIGURE 20-13 A, RES-Q-VAC suction device. B, S-SCORT Jr Quickdraw battery-powered handheld device.
(A from Repro-Med Systems, Inc. product information; B redrawn from SSCOR, Inc. product information.)
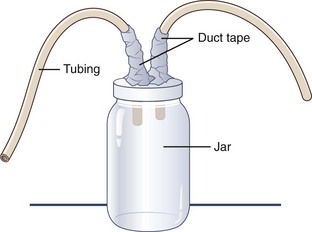
If time permits and supplies are available, a “mucus trap” suction device can be improvised from a jar with two holes poked in its lid and two tubes or straws duct taped into the holes (Figure 20-14). One straw goes to the rescuer, who provides suction, and the other is directed toward whatever has accumulated in the airway. The jar serves to trap the removed secretions, thereby preventing the rescuer from suctioning bodily fluids or foreign substances (e.g., mud) directly into his or her mouth.
Supplemental Oxygen
A variety of oxygen delivery techniques may be employed, depending on the desired oxygen concentration and clinical circumstances (see Chapter 76).
Ventilation
Rescue Breathing
Mouth-to-Mouth Ventilation
Technique
Mouth-to-Nose Ventilation
Technique
Mouth-to-Mask Ventilation
Mouth-to-mask ventilation is the safest and most effective technique for rescue breathing (Figure 20-15). The pocket face mask or a similar barrier device allows the rescuer to provide ventilation without making direct contact with the victim’s mouth and nose. The mask has a one-way valve in the stem to prevent exhaled gases and bodily fluids from reaching the health care provider. In addition, a disposable high-efficiency particulate air filter may be inserted into the pocket mask to trap infectious air droplets and secretions.
Technique
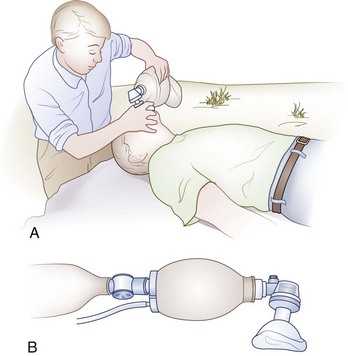
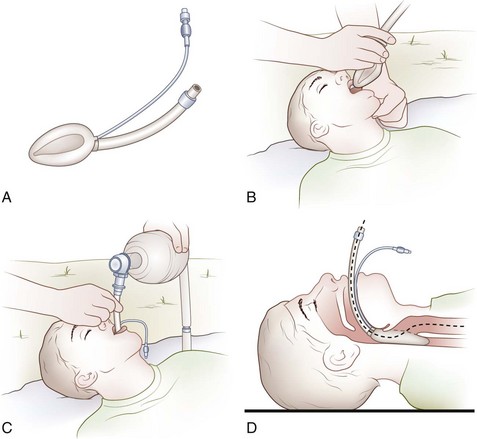
Bag-Mask Ventilation
The self-inflating ventilation bag with face mask (i.e., the BMV device) provides a means for emergency ventilation with high concentrations of oxygen. The device is equipped with several valves that allow coordinated airflow into and out of the victim. This includes a one-way valve that prevents exhaled air from reentering the victim’s lungs (Figure 20-16). When it is attached to a high-flow oxygen source (15 L/min), the BMV device can supply an oxygen concentration of nearly 100%. The adapter of the face mask is interchangeable with an ETT, so the same bag can be used after intubation.
Definitive Airway Management
Rapid Sequence Oral Intubation
To perform RSI, the victim is first preoxygenated to allow for a period of apnea without interposed assisted ventilation. Sequential administration of an induction agent and a rapidly acting neuromuscular blocking agent induces a state of unconsciousness and paralysis, respectively. This allows the victim to be intubated without the need for BMV. The steps that make up RSI can be thought of as “the eight P’s” (Table 20-3).
| Time | Action |
|---|---|
| Zero minus 10 min | Preparation |
| Zero minus 5 min | Preoxygenation |
| Zero minus 3 min | Pretreatment |
| —Time zero— | Paralysis with induction |
| Zero plus 20-30 sec | Protection and positioning |
| Zero plus 45 sec | Placement |
| Zero plus 45 sec | Proof |
| Zero plus 1 min | Postintubation management |
Preparation
Before RSI, careful preparation is essential to achieve success. The mnemonic SOAP ME summarizes the necessary preparatory steps and essential equipment (Table 20-4).
| Suction | Suction should be tested and readily available at the bedside. |
| Oxygen | A high-flow oxygen mask and a bag-valve ventilation device should be ready for use. |
| Airway equipment | At least two functioning laryngoscope handles and the appropriately sized and shaped laryngoscope blades should be obtained. The anticipated blade of choice should be clicked into position to ensure that the light functions properly. An endotracheal tube (ETT) should be chosen on the basis of the patient’s anatomy, and one of a smaller size should be prepared as well. The average adult male will require a 7.5- or 8.0-mm ETT, and the average adult female will need a size 7.0 or 7.5 mm. In children, the ETT size in mm may be estimated by the formula 4 + (age in years/4). The ETT cuff should be inflated to test for an air leak. A stylet should be inserted within the ETT to shape it into a configuration that will facilitate insertion into the airway. Care must be taken to ensure that the tip of the stylet does not protrude from the end of the ETT or through the small distal side port (i.e., Murphy’s eye). |
| Pharmacy | The patient should have at least one intravenous line placed, and patency of the line should be verified. The specific rapid sequence intubation medications, proper dosing, and sequence of administration should be determined, and the agents should be drawn up and labeled. |
| Monitoring Equipment | Cardiac monitoring, blood pressure monitoring, and pulse oximetry are mandatory for all patients. If available, an end-tidal carbon dioxide monitor should be readied as well. In a wilderness setting, many of these hospital-based amenities may not be available. |
Pretreatment
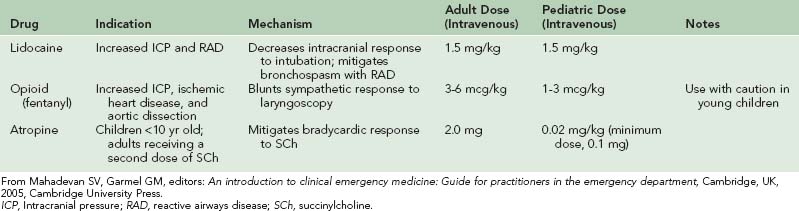
During RSI, the act of laryngoscopy as well as use of succinylcholine, which is a depolarizing neuromuscular blocking agent, can lead to a number of adverse effects, such as bronchospasm in patients with reactive airway disease, increased intracranial pressure, increased intraocular pressure, increased intragastric pressure, increased sympathetic discharge, and bradycardia (especially in children). Certain pretreatment medications may be administered before laryngoscopy to mitigate these adverse effects. These medications and their indications, mechanisms of actions, and doses are summarized in Table 20-5.
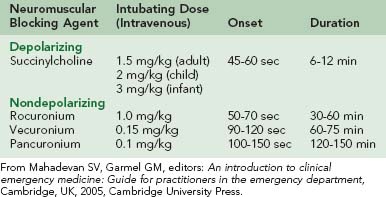
Paralysis with Induction
Induction agents
There is no single induction agent of choice for RSI in the field or emergency department. The choice of an induction agent is based on the clinical circumstances and the agent’s attributes. The clinical characteristics of the most commonly used induction agents are summarized in Table 20-6.
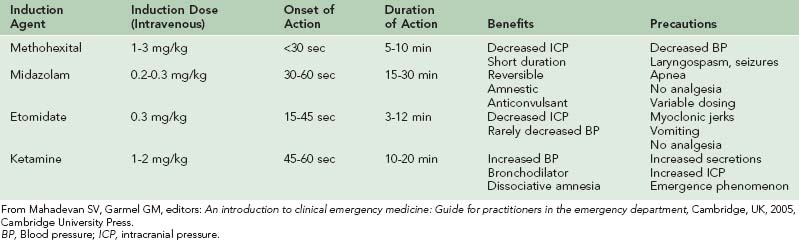
Neuromuscular blockade
Nondepolarizing NMBAs (e.g., rocuronium) cause paralysis by competing with acetylcholine for receptors at the neuromuscular junction. Although these agents are most commonly used for postintubation patient paralysis, they may also be used as the primary RSI paralytic agent for specific patient populations or for patients who have a contraindication to SCh. Although they possess fewer side effects than SCh, these agents are generally less effective for intubation because of their delayed time to paralysis, prolonged duration of action, or both. Specific attributes of both depolarizing and nondepolarizing NMBAs are listed in Table 20-7.
Protection
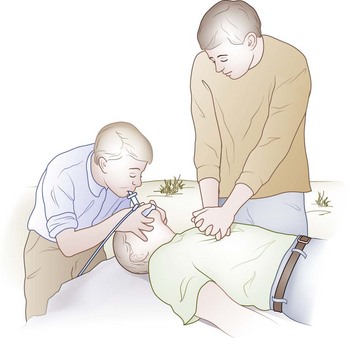
After sequential administration of the induction and paralytic agents, the patient will predictably lose consciousness and become apneic. Application of Sellick’s maneuver (i.e., approximately 10 lb of manual pressure to the cricoid cartilage) just as the patient is noted to lose consciousness will compress the esophagus, thereby preventing aspiration and passive regurgitation of gastric contents (Figure 20-17). Sellick’s maneuver should be maintained until the ETT has been inserted into the trachea, its position verified, and the cuff inflated. If Sellick’s maneuver is applied too early, the patient may find it uncomfortable or vomit. If the patient begins actively vomiting, Sellick’s maneuver should be discontinued, and the patient should be logrolled and suctioned.
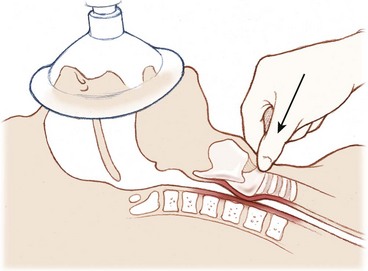
FIGURE 20-17 Cricoid pressure (Sellick’s maneuver).
(Redrawn from Mahadevan SV, Garmel GM, editors: An introduction to clinical emergency medicine: Guide for practitioners in the emergency department. Cambridge, UK, 2005, Cambridge University Press. Courtesy Chris Gralapp. http://www.biolumina.com.)
Positioning
The airway may be thought of as having three separate axes: oral, pharyngeal, and laryngeal. Proper positioning of the head before laryngoscopy can help to align these three axes, thereby improving visualization of the glottis and greatly increasing the likelihood of a successful intubation. In the neutral position, these axes are misaligned (Figure 20-18).
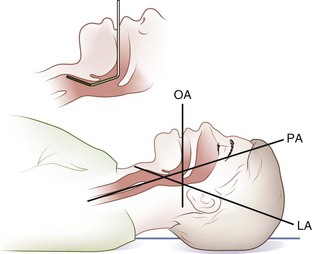
FIGURE 20-18 Head on a bed, neutral position. LA, Laryngeal axis; OA, oral axis; PA, pharyngeal axis.
(Redrawn from Walls RM, Murphy MF, Luten RC, et al, editors: Manual of emergency airway management, ed 2, Philadelphia, 2004, Lippincott Williams & Wilkins.)
Placing a small pillow or a similar-sized object under an adult’s occiput flexes the lower cervical spine relative to the torso and aligns the pharyngeal and laryngeal axes (Figure 20-19). Positioning the patient in the sniffing position with the extension of the head on the neck aligns all three axes (Figure 20-20).
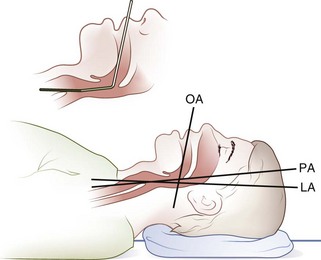
FIGURE 20-19 Head elevated on pad, neutral position. LA, Laryngeal axis; OA, oral axis; PA, pharyngeal axis.
(Redrawn from Walls RM, Murphy MF, Luten RC, et al, editors: Manual of emergency airway management, ed 2, Philadelphia, 2004, Lippincott Williams & Wilkins.)

FIGURE 20-20 Head elevated on a pad, head extended on neck. LA, Laryngeal axis; OA, oral axis; PA, pharyngeal axis.
(Redrawn from Walls RM, Murphy MF, Luten RC, et al, editors: Manual of emergency airway management, ed 2, Philadelphia, 2004, Lippincott Williams & Wilkins.)
Patients with potential cervical spine injury should be maintained in the neutral position.
Placement
If the glottic aperture is not readily visible, the intubator or an assistant may elect to perform the BURP maneuver: this involves placement of the right hand on the thyroid cartilage and is followed by application of backward, upward, rightward pressure to help to bring the glottis into view (Figure 20-21). The resulting displacement of the thyroid cartilage backward against the cervical vertebrae, upward or as superiorly as possible and laterally to the right, has been found to significantly improve the view of the glottis during laryngoscopy.
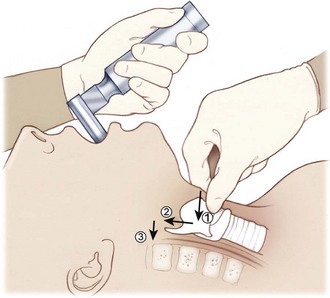
FIGURE 20-21 The BURP maneuver (backward, upward, rightward pressure).
(Redrawn from Mahadevan SV, Garmel GM, editors: An introduction to clinical emergency medicine: Guide for practitioners in the emergency department, Cambridge, UK, 2005, Cambridge University Press. Copyright Chris Gralapp. http://www.biolumina.com.)
Nasotracheal Intubation
Technique
Alternative Airway Adjuncts and Techniques
Laryngeal Mask Airway
The laryngeal mask airway (LMA) is a modified ETT with an inflatable oval cuff (i.e., the laryngeal mask) at its base (Figure 20-22). The LMA is blindly inserted into the pharynx and advanced until resistance is felt as the distal portion of the tube locates in the laryngopharynx. Inflation of the collar provides a seal around the laryngeal inlet to facilitate tracheal ventilation.
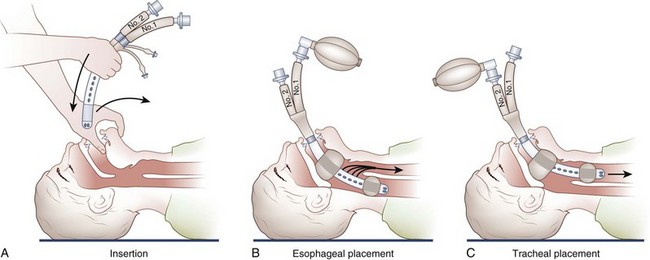
Combitube
The Combitube is a double-lumen, dual-cuffed airway; one lumen functions as an esophageal airway, whereas the other performs as a tracheal airway (Figure 20-23). The Combitube is typically blindly inserted and advanced until the victim’s teeth lie between two guide marks that are printed on the tube. The distal end of the tube most commonly finds its way into the esophagus. The pharyngeal and distal balloons are then inflated, thus isolating the oropharynx above the upper balloon and the esophagus or trachea below the lower balloon. The location (i.e., esophagus or trachea) of the distal orifice is then ascertained, and the victim is ventilated through the appropriate opening. One lumen contains ventilating side holes at the hypopharyngeal level and is closed at the distal end; the other lumen has a distal open end with a cuff that is similar to that of a tracheal tube.
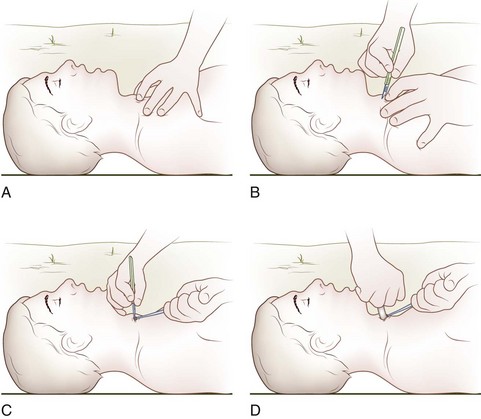
Surgical Airway Management
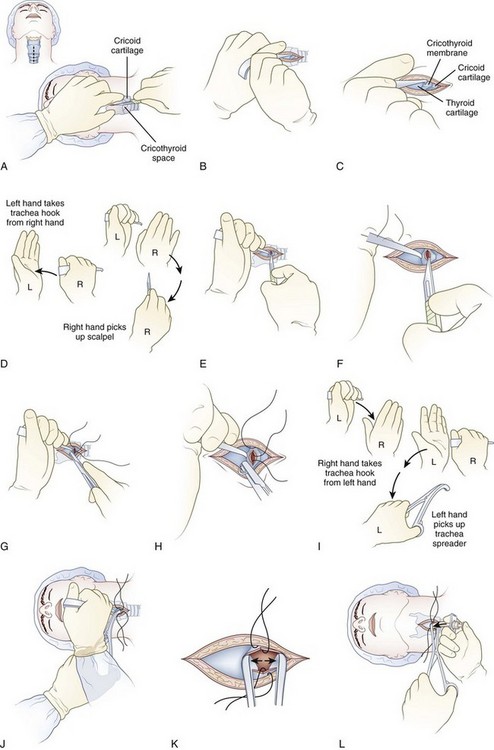
Cricothyrotomy
Standard Surgical Cricothyrotomy
Technique (Figure 20-24)
Rapid Four-Step Cricothyrotomy
Technique
Improvised Cricothyrotomy
For circumstances in which formal cricothyrotomy equipment is not available, a knife and a hollow device (as a substitute for the tracheostomy tube) may be used. An improvised cricothyrotomy could be performed using a modified intravenous macro drip chamber or the cut barrel of 1- or 3-mL syringe (see Chapter 23). Any small hollow object (e.g., a ballpoint pen casing, a sports-bottle straw) may be employed as the cricothyrotomy tube; however, devices with an internal diameter of at least 3 mm (0.12 inch) provide the best gas exchange.
Needle Cricothyrotomy with Percutaneous Transtracheal (Translaryngeal) Jet Ventilation
Technique
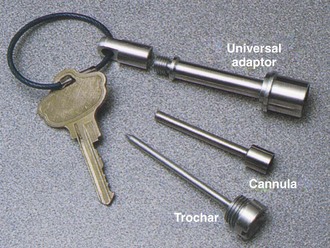
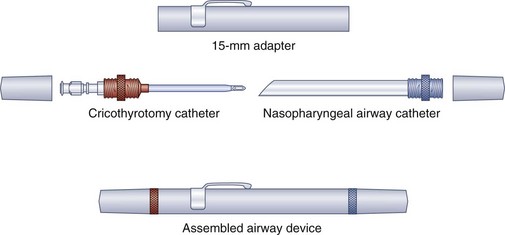
In terms of expedition kit portability, three transtracheal puncture emergency airway devices deserve special mention. LifeStat manufactures a keychain emergency airway set that consists of a sharp-pointed metal trocar introducer that fits through a straight metal cannula that screws into a metal extension with a universal 15-mm (0.6 inch) male adaptor. Lightweight and less than 7.6 cm (3 inches) long, the three-component apparatus is attached to a separate and detachable keychain (Figure 20-26). Cook Critical Care offers a 6-Fr reinforced-catheter emergency transtracheal airway catheter (order number C-DTJV-6.0-7.5-BTT) with a molded Luer-Lok connection for jet ventilation or the added assembly of a 15-mm (0.6 inch) adaptor for standard modes of positive-pressure ventilation. Cook Critical Care also offers the Wadhwa Emergency Airway Device (order number C-WEAD-100). This lightweight and impact-resistant assembly disassembles to yield a 12-Fr Teflon-coated cricothyrotomy catheter with a removable metal stylet, a molded plastic Luer-Lok connection for oxygen or jet ventilation, and a flexible nasopharyngeal airway adhered to a molded plastic flange (Figure 20-27). Both the cricothyrotomy catheter and the NPA screw into the Wadhwa case to provide a low-resistance extension and a 15-mm (0.6 inch) male connection for standard positive-pressure ventilation equipment.
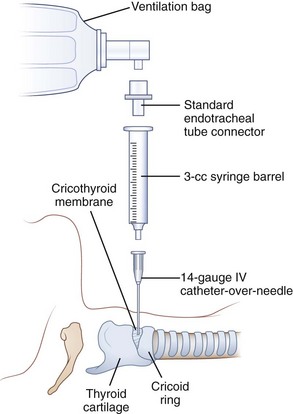
For circumstances in which a jet ventilator is not readily available, the clinician in the wilderness may improvise by using a self-inflating bag-valve device to ventilate the victim through the transtracheal catheter. The bag-valve device may be connected to a 3.0-mm-ID ETT adapter that is inserted directly into the transtracheal catheter or to a 7.5-mm-ID ETT adapter that is inserted into a 3-mL (0.1-oz) syringe barrel and then into the transtracheal catheter (Figure 20-28). Ventilation using such an apparatus is temporary at best, but it may have usefulness in children who are younger than 5 years old.
Airway Equipment for the Wilderness
Although it is neither practical nor possible to bring every type of airway device to the wilderness, the airway equipment listed in Box 20-1 is worth considering. Emergency medical kits with basic or advanced airway equipment (e.g., the StatKit) are commercially available.
Adams BD, Whitlock WL. Bystander cricothyroidotomy performed with an improvised airway. Mil Med. 2002;167:76.
American Heart Association; International Liaison Committee on Resuscitation. Guidelines 2000 for cardiopulmonary resuscitation and emergency cardiovascular care. Part 6: Advanced cardiovascular life support. Section 3: Adjuncts for oxygenation, ventilation and airway control. Circulation. 2000;102:I95.
ATLS. Advanced trauma life support for doctors. Chicago: American College of Surgeons; 1997.
Bergeron JD, Bizjak G. First responder, ed 6. Upper Saddle River, NJ: Prentice Hall; 2000.
Blanda M, Gallo UE. Emergency airway management. Emerg Med Clin North Am. 2003;21:1.
Butler KH, Clyne B. Management of the difficult airway: Alternative airway techniques and adjuncts. Emerg Med Clin North Am. 2003;21:259.
Cummins RO, editor. ACLS provider manual. Dallas: American Heart Association, 2002.
Daniel JW, Pinosky ML. A simple suction device to aid in transportation of the critically ill pediatric patient. Anesthesiology. 1996;85:220.
Danzl DF. Tracheal intubation and mechanical ventilation. In Tintinalli JE, editor: Emergency medicine: A comprehensive study guide, ed 5, New York: McGraw-Hill, 2000.
Dickson AE. Emergency airway management. In Auerbach PS, editor: Wilderness medicine: Management of wilderness and environmental emergencies, ed 4, St Louis: Mosby, 2001.
Dieckmann R, editor. Pediatric education for prehospital providers. Elk Grove Village, Ill: American Academy of Pediatrics, 2000.
Doak SA. Airway management. In Hamilton G, editor: Emergency medicine: An approach to clinical problem-solving, ed 2, Philadelphia: WB Saunders, 2003.
Hazinski MF, editor. PALS provider manual. Dallas: American Heart Association, 2002.
Kaide CG, Hollingsworth JH. Current strategies for airway management in the trauma patient, parts 1 and 2. Trauma Report. 4, 2003.
Mahadevan SV, Sovndal S. Airway management. In: Mahadevan SV, Garmel GM, editors. An introduction to clinical emergency medicine: Guide for practitioners in the emergency department. Cambridge, UK: Cambridge University Press, 2005.
McGill JW, Clinton JE. Tracheal intubation. In Roberts JR, Hedges JR, editors: Clinical procedures in emergency medicine, ed 3, Philadelphia: WB Saunders, 1998.
Miller RD. Miller’s anesthesia, ed 6. Philadelphia: Elsevier/Churchill Livingstone; 2004.
Owens D, Greenwood B, Galley A, et al. Airflow efficacy of ballpoint pen tubes: A consideration for use in bystander cricothyrotomy. Emerg Med J. 2010;27:317.
Parr MJA, et al. Airway management. In Skinner D, Swain A, Peyton R, Robertson C, editors: Cambridge textbook of accident and emergency medicine, ed 5, Cambridge, UK: Cambridge University Press, 1997.
Platts-Mills T, Lewin MR, Wells J, et al. Improvised cricothyrotomy provides reliable airway access in an unembalmed human cadaver model. Wilderness Environ Med. 2006;187:81.
Roman AM. Non-invasive airway management. In Tintinalli JE, editor: Emergency medicine: A comprehensive study guide, ed 5, New York: McGraw-Hill, 2000.
Rubin M, Sadovnikoff N. Pediatric airway management. In Tintinalli JE, editor: Emergency medicine: A comprehensive study guide, ed 5, New York: McGraw-Hill, 2000.
Sanders MJ. Mosby’s paramedic textbook, ed 2. St Louis: Mosby; 2001.
Stoy WA. Mosby’s EMT-basic textbook, ed 2. St Louis: Mosby; 1996.
Vanstrum GS. Airway. In: Vanstrum GS, editor. Anesthesia in emergency medicine. Boston: Little, Brown, 1989.
Walls RM. Airway. In Marx JA, editor: Rosen’s emergency medicine: Concepts and clinical practice, ed 5, St Louis: Mosby, 2002.
Walls RM, Murphy MF, editors. Manual of emergency airway management, ed 3, Philadelphia: Lippincott Williams & Wilkins, 2008. (This book is the standard companion manual for the airway course administered by the Airway Management Education Center www.theairwaysite.com
Ward KR. Trauma airway management. In Harwood-Nuss A, editor: Clinical practice of emergency medicine, ed 3, Philadelphia: Lippincott Williams & Wilkins, 2001.
Weiss EA, Donner HJ. Wilderness improvisation. In Auerbach PS, editor: Wilderness medicine: Management of wilderness and environmental emergencies, ed 5, St Louis: Mosby, 2007.