Emergency Airway Management
Recognition of Airway Obstruction
Additional Signs and Symptoms
1. Labored respirations are typified by a rate that is forcefully rapid, irregular, or gasping.
2. Unusual sounds or noisy respirations may be present.
3. Accessory muscles of the chest wall, shoulders, neck, and abdomen strain with the effort. If respiratory effort causes chest wall retractions, there may be increased work of breathing and respiratory distress.
4. In the obstructed airway, expiration tends to be prolonged.
5. Partial obstruction can be recognized by the following:
a. Decreased volume exchange (decreased air entry by auscultation or decreased chest rise by inspection)
6. No pause between breaths is an ominous sign. This suggests that there is a significant airway obstruction.
Head and Tongue Positioning
The most common causes of upper airway obstruction are the following:
1. A floppy tongue and lax pharyngeal muscles from decreased muscle tone of the genioglossus muscle, which contracts to move the tongue forward during inspiration and dilate the pharynx
2. Soft tissue enlargement from infection, edema, or hypertrophy
3. Teeth. These play an important role in preserving the size and patency of the oropharynx. Edentulous persons (the young, older adults, persons with poor dentition, and recently traumatized persons) are vulnerable to upper airway obstruction.
Treatment of Airway Obstruction
1. Open the mouth of an unconscious person.
2. Note the position of the tongue and the presence of vomitus, foreign debris, or pooled secretions. Suction the airway if required and available (see Suctioning, later).
3. Listen to the quality and consistency of lung and airway sounds.
4. In the obtunded infant or small child, the site of upper airway obstruction is usually between the tip of the tongue and the hard palate in the front of the mouth.
5. In an obtunded adult, the site of upper airway obstruction is usually between the base of the tongue and the posterior oropharynx (Fig. 10-1).
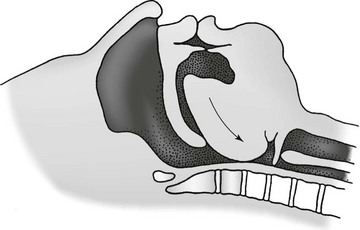
6. When the tongue is retrodisplaced, it causes the epiglottis to fold over and close off the tracheal opening, which results in a secondary site of upper airway obstruction.
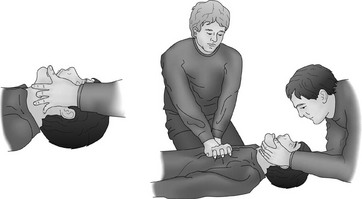
7. Relief of both of these sources of obstruction can be obtained by lifting the jaw forward (Fig. 10-2) to simultaneously open the mouth and move the tongue from obstructing the oropharynx.
8. The optimal head position for airway alignment and patency varies with age. However, no matter the person’s age, the most desirable posture is maintaining a “neutral” (neither flexion nor hyperextension) head position with the chin jutted forward: nose in the “sniffing” position, mouth open, tongue resting on the floor of the mouth, and angle of the mandible perpendicular to the ground.
9. The least desirable head position in any age-group is with the neck flexed and chin pointed toward the chest. Flexion also increases unfavorable stresses on a potentially unstable cervical spine.
10. Extreme hyperextension of the head in any age-group stresses ligaments and angulates the airway and is to be avoided.
11. Because of prominence of the cranial occiput in an infant, an infant’s airway is best supported with a shoulder roll or built-up surface for the back.
12. The child does best without a pillow or with a built-up cushion for the back and only a small pad for the occiput.
13. The adult’s airway is best supported in the “sniffing” position with a small pillow under the head, the chin pointed in the air, and preserved natural lordosis of the cervical spine.
14. If the mechanism of injury or physical examination suggests a possible cervical spine injury, efforts to stabilize the neck and head should be undertaken. The patient should be spared neck flexion, hyperextension, or lateral rotation. Fortunately, the best head position for the airway is also good for the cervical spine. If a cervical spine immobilization method is employed, the airway should be evaluated for obstruction both before and after application.
Body Positioning
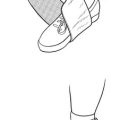
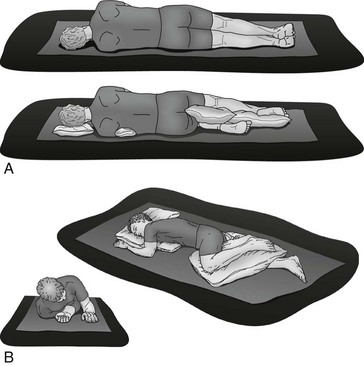
The supine position may be neither desirable nor achievable. Because of gravity, some airways are better maintained in a side-lying or prone position. Nontraditional positioning for stabilization and transport may be necessary because of burns, vomiting, management of secretions, or location of impaled objects. Principles of transport for patients in nonsupine positions relate to preservation of good perfusion and mechanical alignment in all body parts under pressure, maintaining neck straightness, and ensuring the ability of the rescuer to monitor airway patency. In a nonsupine position, the same airway posture is desireable: minimal torsion of the cervical spine, neck in a sniffing position, mouth open, and tongue on the floor of the mouth (Fig. 10-3).
Manual Airway Techniques
1. The simplest is the head tilt, chin lift. The heel of one of the rescuer’s hands is pressed down on the patient’s forehead, and the fingers of the other hand are placed under the chin to lift it up. The intended result is the sniffing position. Problems arise if the mouth is closed or soft tissues are folded inward because of the chin lift. In addition, downward pressure on the forehead tends to lift the eyebrows and open the eyelids, so measures may need to be taken to protect the eyes. This technique should not be employed in patients suspected of having a cervical spine injury.
2. A second maneuver is the jaw thrust (Fig. 10-4, A). Pressure is applied to the angle of the mandible to move it upward while forcefully opening the mouth. This is painful, and the conscious or semiconscious patient will object by clamping down or writhing.
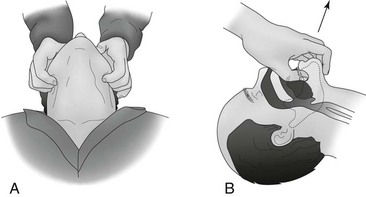
FIGURE 10-4 A, External jaw thrust. B, Internal jaw lift.
3. A third maneuver is the internal jaw lift (Fig. 10-4, B). The rescuer’s thumb is inserted into the patient’s mouth under the tongue, and the mandibular mentum (chin) is lifted, thus stretching out the soft tissues and opening the airway. This is the best maneuver for the unconscious patient with a shattered mandible. The internal jaw lift is dangerous to the rescuer if the patient is semiconscious and can bite.
4. A fourth noninvasive airway maneuver takes some practice but serves several purposes and is the best maneuver if done correctly. In this two-handed maneuver, the head is held between two hands to prevent lateral rotation and maintain neck control. The fourth and fifth fingers are hooked behind the angle of the mandible to dislocate the jaw upward, and the thumbs ensure that the mouth is maintained open (see Fig. 10-2). The third finger may be positioned over the facial artery as it comes around the mandible so that the pulse can be monitored at the same time. For greatest stability, the rescuer’s elbows should rest on the same surface on which the patient is lying.
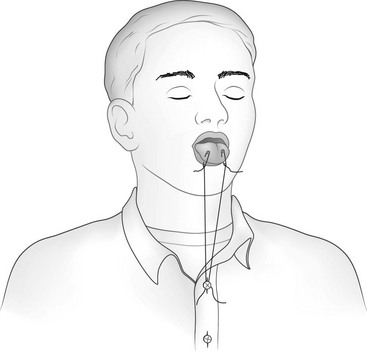
Improvised Tongue Traction Technique
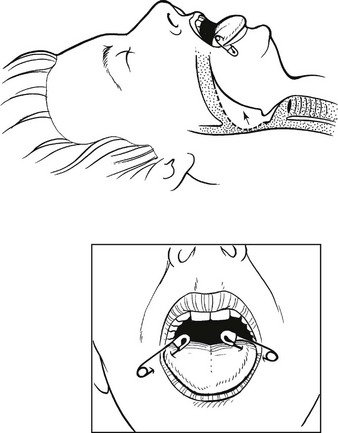
If the patient is unconscious, the airway may be opened temporarily by attaching the anterior aspect of the patient’s tongue to the lower lip with one or two safety pins (Fig. 10-5). An alternative to piercing the lower lip is to pass a string through the safety pins and exert traction on the tongue by securing the end of the string to the patient’s shirt button or jacket zipper (Fig. 10-6).
Mechanical Airway Adjuncts
Oropharyngeal Airway
The oropharyngeal airway (OPA) is an S-shaped device designed to hold the tongue off the posterior pharyngeal wall (Fig. 10-7). When properly placed, it prevents the tongue from obstructing the glottis. These devices are most effective in unconscious and semiconscious patients who lack a gag reflex or cough. The use of an OPA in a patient with a gag reflex or cough is contraindicated because it may stimulate retching, vomiting, or laryngospasm.
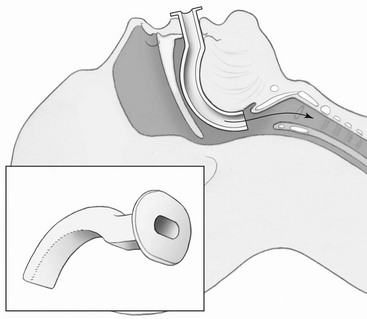
FIGURE 10-7 Oropharyngeal airway. (Redrawn from Mahadevan SV, Garmel GM, editors: An introduction to clinical emergency medicine, Cambridge, UK, 2012, Cambridge University Press. Copyright Chris Gralapp, http://www.biolumina.com.)
Technique for Insertion of Oropharyngeal Airway
1. Open the mouth, and clear the pharynx of any secretions, blood, or vomitus.
2. Insert the OPA upside down or at a 90-degree angle to avoid pushing the tongue posteriorly during insertion. Slide it gently along the roof of the mouth. As the oral airway is inserted past the uvula or crest of the tongue, rotate it so that the tip points down the patient’s throat.
3. The flange should rest against the patient’s lips, and the distal portions should rest on the posterior pharyngeal wall.
Nasopharyngeal Airway
The nasopharyngeal airway (NPA) is an uncuffed, trumpet-like tube that provides a conduit for airflow between the nares and pharynx (Fig. 10-8). It is inserted through the nose rather than the mouth. This device is better tolerated than an OPA and is a better choice for wilderness airway management. It should be avoided in patients suspected of having skull or facial fractures because intracranial placement may occur.

FIGURE 10-8 Nasopharyngeal airway. (Redrawn from Mahadevan SV, Garmel GM, editors: An introduction to clinical emergency medicine, Cambridge, UK, 2012, Cambridge University Press. Copyright Chris Gralapp, http://www.biolumina.com.)
Technique for Insertion of Nasopharyngeal Airway
1. Lubricate the NPA with a water-soluble lubricant.
2. Place the NPA in the nostril with the bevel directed toward the nasal septum.
3. Gently push the NPA straight back along the floor of the nasal passage. As the NPA passes through the turbinates, there will be mild resistance, but once the tip has entered the nasopharynx, there will be sensation of a “give.”
4. If you meet persistent resistance, rotate the tube slightly, reattempt insertion through the other nostril, or try a smaller-diameter tube. Do not force the tube in.
5. Following insertion, the flange should rest on the patient’s nostril and the tube should be visible in the oropharynx as it passes behind the tonsils. The tip should come to rest behind the base of the tongue but above the vocal cords.
6. Complications of NPAs include failure to pass through the nose (usually resulting from a deviated septum), epistaxis, accidental avulsion of adenoidal tissue, mucosal tears or avulsion of a turbinate, submucosal tunneling (the tube tunnels out of sight behind the posterior pharyngeal wall), and creation of pressure sores.
7. If the NPA or any nasal tube is left in place for more than several days, impedance to normal drainage may predispose the patient to sinusitis or otitis media.
Improvised Mechanical Airways
Any flexible tube of appropriate diameter and length can be used as an improvisational substitute for the NPA. Examples include a Foley catheter, radiator hose, solar shower hose, siphon tubing, or inflation hose from a kayak flotation bag or sport pouch. An endotracheal tube can be shortened and softened in warm water to substitute for a commercial nasal trumpet. The flange can be improvised using a safety pin through the nostril end of the tube (Fig. 10-9).
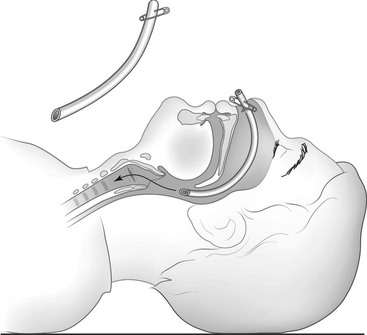
FIGURE 10-9 Improvised nasal trumpet.
Foreign Body Aspiration
Foreign bodies may cause partial or complete airway obstructions. A patient with a partial airway obstruction can usually phonate or produce a forceful cough to expel the foreign body. A person with a complete airway obstruction cannot speak, exchange air, or cough. Failure to relieve the obstruction can lead to respiratory collapse and cardiac arrest. For techniques in relieving an airway obstruction, see Chapters 10 and 25.
Suctioning
1. Gloves and a face barrier (plastic square with a small one-way valve to place over the patient’s face) can be carried in a 35-mm film container or one of the small pouches marketed specifically for this purpose.
2. A plastic baggie with a slit for the mouth and nostrils can be placed over the patient’s face for rescue breathing.
3. Debris can be swept from the mouth with a finger wrapped in a T-shirt or other available cloth.
4. The patient can be positioned so that gravity facilitates drainage of blood, vomit, saliva, and mucus. Something absorbent or basin-like can be placed at the side of the mouth to catch drained effluvia.
5. Turkey basters can be included in an expedition first-aid kit for extraction of secretions and for gentle wound irrigation and moisturizing burn dressings or wet compresses. The rubber self-inflating bulbs marketed for infant nasal suctioning can also be used to suction out debris from the mouths and noses of adults.
6. If time permits and the supplies are available, a “mucus trap” suction device can be improvised from a jar with two holes poked in its lid and two tubes or straws duct-taped into the holes. One straw goes to the rescuer, who provides suction, and the other is directed toward whatever has accumulated in the airway. The jar serves to trap the removed secretions so that the rescuer is protected from bodily fluids or foreign substances.
7. Secretion removal by gravity or suctioning is key to the management of epistaxis and for maintaining the airway of a patient with mandibular fractures (see Chapter 17).
Rescue Breathing
Technique
1. Open the airway using the head tilt with chin lift approach if cervical spine trauma is not suspected.
2. If needed, clear the airway of vomitus, secretions, and foreign bodies.
3. Pinch the patient’s nostrils closed with the finger and thumb of one hand; the heel of that same hand may be placed on the forehead to maintain the head tilt.
4. Support the patient’s chin with the other hand, and hold the patient’s mouth slightly open.
6. Place your mouth over the properly placed barrier device (or around the patient’s mouth if a barrier device is unavailable), and make a tight seal with your lips against the patient’s face.
7. Exhale slowly into the valve or patient’s mouth until you see the patient’s chest rise and feel resistance to the flow of your breath.
8. Break contact with the patient to allow passive exhalation.
Mouth-to-Mask Ventilation
1. Transparent and easily bendable mask body materials that retain little “memory” of residing in their carrying positions and that do not become stiff, brittle, or nondeformable in cold temperatures
2. An inflatable cushion seal that can be adjusted for changes in temperature and altitude
3. A flexible, high-volume, low-pressure cushion seal able to conform to many different face sizes and shapes
4. A mask span that can be used on both small and large patients, tough materials resistant to cracks and punctures, and a compact mask or carrying case that does not take up disproportionate space in the first-aid kit
Technique
1. Open the airway using the head tilt with chin lift approach if cervical spine trauma is not suspected.
2. Connect the one-way valve to the mask.
3. If available, connect oxygen tubing to the inlet port, and set the flow rate at 15 L/min.
4. Position yourself at the head of the patient.
5. Clear the patient’s airway of vomitus, secretions, and foreign bodies, if necessary.
6. Insert an oral or nasopharyngeal airway.
7. Place the mask on the patient’s face.
8. Apply pressure to both sides of the mask with the thumb side of the palms to create an airtight seal. Apply upward pressure to the mandible (i.e., jaw thrust) using the index, middle, and ring fingers of both hands while maintaining a head tilt.
9. Take a deep breath, exhale into the port of the one-way valve, and observe for chest rise.
Bag-Mask Ventilation
The self-inflating ventilation bag with face mask (i.e., bag-mask ventilation [BMV] device) provides a means for emergency ventilation with high concentrations of oxygen. When it is attached to a high-flow (15 L/min) oxygen source, the BMV device can supply an oxygen concentration of nearly 100% (see Chapter 11). The adapter of the face mask is interchangeable with an endotracheal tube (ETT), so the same bag can be used after intubation. The BMV device can be used by a single rescuer but is easier and more successful when used by two persons. Successful ventilation depends on an adequate mask seal and patent airway. Placement of an oral airway should always be considered before BMV. Slow and gentle ventilation minimizes the risk for gastric inflation and subsequent regurgitation. Smaller BMV devices are employed for infants and children to prevent overinflating the lungs and subsequent barotrauma.
Supraglottic/Alternative Airway Devices
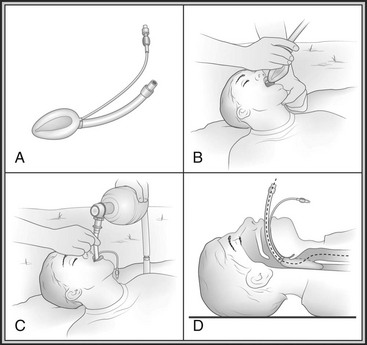
Laryngeal Mask Airway
The LMA is a modified ETT with an inflatable, oval cuff (“laryngeal mask”) at its base (Fig. 10-10). It is ideal for wilderness use. The LMA is inserted blindly into the pharynx and advanced until resistance is felt as the distal portion of the tube locates in the laryngopharynx. Inflation of the collar provides a seal around the laryngeal inlet, facilitating tracheal ventilation. The LMA provides ventilation equivalent to that with a tracheal tube. The LMA may have advantages over traditional endotracheal intubation when access to the patient is limited, when the possibility of unstable neck injury exists, or when appropriate patient positioning for tracheal intubation is impossible.
Cricothyrotomy
Technique
1. The cricothyrotomy hole may be made percutaneously with a trocar or needle, or surgically with a knife blade.
2. If a syringe containing 1 mL of water or lidocaine is attached to the needle used for puncture, bubbles may be seen during gentle aspiration as the needle tip enters the trachea.
3. When the trachea is successfully entered, a gush of air will exit, often with a cough.
4. Once the cricothyroid membrane is punctured, it is essential to maintain patency of the tract and identify the hole with a tube, stylet, obturator, tweezers, wire, or another temporary place marker. It is very easy to lose the tract and create a false passage while trying to instrument or cannulate the route.
5. Making a small (1- to 1.5-cm [0.4 to 0.6 inches]) vertical incision in the skin over the cricothyroid membrane facilitates the ease of the next step: puncture through the lower third of the dime-sized membrane. Vertical skin incisions have advantages over horizontal incisions because vertical incisions tend to be more controlled and better positioned in reference to landmarks.
6. The needle/catheter is advanced in the midline of the neck at a 45-degree angle aiming toward the lower back.
7. Once the needle or introducer aspirates air, the catheter is slid off the stylet and the stylet is withdrawn.
8. Taking care not to kink a flexible catheter at the insertion site, the hub may be secured in place with tape or sutures or may be attached to a Luer-Lok syringe-adapter mechanism.
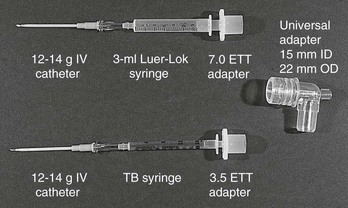
9. With anything other than a commercial cricothyrotomy set or endotracheal tube, provision of positive pressure ventilation requires creative assembly of an adapter connecting the apparatus in the trachea to the female connector on an Ambu bag. Figure 10-11 shows an example of the step-up series of connections needed for this type of extension.
10. If the catheter in the trachea is to be replaced by a stiffer or bigger cannula, a guidewire is inserted through the catheter several centimeters down the trachea, the catheter is withdrawn with the guidewire remaining, and a dilator is advanced over the guidewire and then withdrawn.
11. Next, the intended cannula is threaded over the guidewire until it is seated with its flanges flush to the skin. The Seldinger technique is the process of identifying a lumen with an introducer, marking the lumen with a guidewire, dilating the entry site, and placing the final apparatus over the guidewire. The procedure of replacing a smaller tube with a larger one is termed a dilational cricothyrotomy.
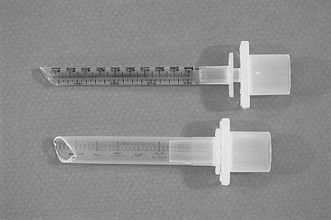
12. A temporary cricothyrotomy trocar and tube can be fashioned from a tuberculin or 3-mL syringe that has been cut on the diagonal and then forcefully inserted through the cricothyroid membrane (Fig. 10-12). Because the improvised trocar point of the syringe is sharp and irregular, insertion is likely to be traumatic. Care must be taken to not lacerate the posterior tracheal wall or create a tracheoesophageal fistula.
13. Even with a universal adapter (15/22-mm [0.6/0.9-inch]) connection, without a jet ventilation device or cricothyrotomy tube of the proper diameter, curvature, and length, it is extremely difficult to ventilate a patient with positive pressure through a needle catheter or improvisational substitute. The patient has the best chances for survival if spontaneous respiratory effort can be preserved; it is easier for the patient to draw air in through a critically small opening than it is for a rescuer to generate the pressure needed to force air in through the same aperture. Pressures sufficient to make the chest rise can be generated by a rescuer blowing through the needle catheter, but such efforts rapidly lead to rescuer fatigue.
14. Temporary transtracheal oxygenation and ventilation through a 12- or 14-gauge needle can be provided using a flow rate of 15 L/min or by jet ventilation (40 psi) at a slow intermittent rate of 6 breaths/min and an inspiratory-to-expiratory ratio of 1 : 14. The very long expiratory time is necessary to allow passive expiration through a restrictive channel.
15. Packaged dilator cricothyrotomy sets such as those manufactured by Melker and Arndt contain a scalpel blade, syringe with an 18-gauge over-the-needle catheter and/or a thin introducer needle, guidewire, appropriately sized dilator, and a polyvinyl airway cannula. The Patil set, Portex Mini-Trach II, and military version of the Melker set are sold without the guidewire and appeal to prehospital providers unfamiliar with the Seldinger technique. The Pertrach is similar in concept, except the guidewire and dilator are forged as a single unit so that a finder catheter cannot be used and the introducer must be peeled away. The Nu-Trake device is complicated to use, has a rigid airway that risks trauma to the posterior trachea, and is difficult to secure.
16. In terms of expedition kit portability, three transtracheal puncture emergency airway devices deserve special mention:
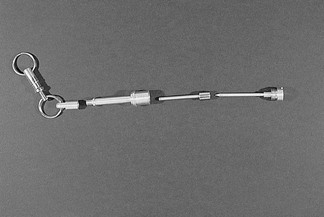
a. Lifestat manufactures a key-chain emergency airway set that consists of a sharp-pointed metal trocar introducer that fits through a straight metal cannula that screws into a metal extension with a universal 15-mm (0.6-inch) male adapter. Lightweight and less than 76 mm (3 inches) long, the three-component apparatus is attached to a separate and detachable key chain (Fig. 10-13).
b. Cook Critical Care offers a 6-French reinforced-catheter emergency transtracheal airway catheter with a molded Luer-Lok connection for jet ventilation or added assembly of a 15-mm (0.6-inch) adapter for standard modes of positive pressure ventilation.
c. Cook Critical Care also offers the Wadhwa Emergency Airway Device. This lightweight, impact-resistant assembly is 184 mm (7.25 inches) long and the diameter of a highlighter pen (Fig. 10-14). It disassembles to yield a 12-French Teflon-coated cricothyrotomy catheter with removable metal stylet (with a molded plastic Luer-Lok connection for oxygen or jet ventilation), plus a flexible nasopharyngeal airway adhered to a molded plastic flange. Both the cricothyrotomy catheter and the NPA screw into the Wadhwa case to provide a low-resistance extension and a 15-mm (0.6-inch) (male) connection for standard positive pressure ventilation equipment.