Ear, nose and throat
FOREIGN BODY IN THE EAR
Action
1. Remove insects to relieve pain. Fill the ear with olive oil to asphyxiate it, or kill it with alcohol. Gently remove it by syringing the ear with water at body temperature.
2. Inanimate foreign bodies may yield to gentle syringing, but those that occlude, or nearly occlude, the meatus cannot be removed by syringing so they need to be extracted with an instrument. Commonly inserted small pieces of sponge rubber can be removed using crocodile forceps if they lie close to the external auditory meatus. Unless you are expert, do not attempt to remove solid foreign bodies, since you risk damaging the middle ear, including the ossicular chain. A general anaesthetic may be required.
3. If the child is cooperative, examine the ear in a good light, initially without, then with, an auroscope. When the child is relaxed and quiet, touch the foreign body with a fine probe to confirm its shape and texture. You may not need to insert an aural speculum to do this. Look for a graspable edge; if you can seize it with very fine Hartmann’s crocodile forceps you may be able to remove it.
DIFFICULTY
1. If the object is smooth and rounded, such as a bead, do not apply forceps; they cannot grasp the object, and risk pushing it deeper into the meatus, through the drum, ossicular chain and possibly into the facial nerve and labyrinth.
2. The safest way to remove an occluding foreign body is under general anaesthesia, using an operating microscope. If this is not available, use illuminating loupes and the largest aural speculum the meatus will accept. Insinuate a stapedectomy hook beyond the object anteroinferiorly unless there is an obvious space above it, turn the hook to engage it, and ease it out by rolling or sliding. Alternatively, try the effect of using a small sucker.


REMOVAL OF NASAL FOREIGN BODY
Appraise
1. Suspect a self-inserted foreign body in any young child with unilateral nasal discharge. The discharge is usually foul smelling, causing obstruction and often contains blood.
2. The foreign body is commonly a screwed-up fragment of paper, vegetable matter, a plastic or metal bead, or rubber sponge.
Prepare
1. As with aural foreign bodies, first gain the child’s cooperation. You may succeed if the foreign body is graspable and if you have appropriate instruments, clear visibility, a headlight, and are skilful in using a nasal speculum. If any of these are lacking, it needs to be removed under general anaesthesia by a specialist with oral, not nasal, intubation.
2. Ask the anaesthetist to avoid inflating the lungs with a face-mask, since this could force a nasal foreign body backwards.
 Place the patient in the tonsillectomy position, which is supine with the neck extended. Use a Boyle-Davis gag to prevent the foreign body slipping backwards into the nasopharynx, where it will stay because this is the most dependent part.

4. If the object is graspable use fine forceps; otherwise, use a small hook that can be passed above the foreign body, easing it downwards and forwards for delivery.

MANIPULATION OF FRACTURED NOSE
Appraise
1. Realignment of displaced nasal bones is not only a cosmetic operation. Nasal fractures are frequently associated with nasal obstruction and many nasal fractures have an associated fracture of the nasal septum.
2. Nasal fractures may be associated with other facial injuries such as a fractured maxilla or ‘blow-out’ fracture of the orbit. Do not fail to examine the patient for other facial injuries.
3. Try to manipulate nasal fractures within 2 weeks of the injury. The most suitable times to do so are either very early, before there has been much nasal swelling, or at about 7 days when much of the swelling around the fracture site has subsided. If you try to manipulate the nasal bones while there is much swelling, it is difficult to see whether or not the nose is straight.
Action
1. It may be possible to straighten the nose by digital pressure, easing the nasal skeleton back into the midline. You can often manipulate it without anaesthesia within the first hour or two after injury. Alternatively re-align the nasal bones under local anaesthesia. You may feel a click as the fragments move into place.
2. If you cannot reduce the fracture in these ways you need the aid of general anaesthesia.


3. First, attempt manual reduction, pressing with your thumbs against the more prominent of the nasal bones. If this succeeds, over-reduce the fracture, and then mould the mobilized fragments into the desired symmetry.
4. If this fails, insert one blade of a Walsham’s forceps into the nostril and grasp one nasal bone. The rubber cuff on the other blade of Walsham’s forceps should lie on the skin, protecting it from damage by the forceps. Rotate and displace the nasal bone laterally to disimpact the fractured nasal bone. Then grasp the other nasal bone with the other Walsham’s forceps and rotate it laterally also. The nasal fragments are now mobile and can be centralized with digital moulding. Take great care to protect the skin from injury during manipulation with these instruments.
5. If the septum is displaced, or the bridge-line is depressed, pass the blades of Asch forceps into the nostrils, grasp the septum, and bring it into the midline, while lifting up the dorsum.

FOREIGN BODIES IN THE THROAT
Appraise
1. Fish bones lodge at any level, often in the tonsil or vallecula (diminutive of Latin: vallis = valley). More substantial bones (e.g. from chicken, rabbit or chops) usually stick in the postcricoid region or upper oesophagus.
2. Rarely, occluding foreign bodies such as sweets or a meat bolus can cause airway obstruction, leading to sudden death.
3. Dentures, which are often broken, impact in the mid-oesophagus.
4. A benign or malignant stricture may become occluded by a small bolus such as a pea or piece of potato.
Action
1. Inspect the throat carefully, using a headlight and tongue depressor. Look for the tip of a buried fish bone in the tonsil or base of tongue. Remove it with a fine pair of angled forceps, if necessary anaesthetizing the throat with a lidocaine topical spray.
2. If you cannot see the foreign body directly, use a laryngeal mirror, in the same manner as in indirect laryngoscopy, to examine the back of tongue and laryngopharynx. You can often retrieve a bone in these sites under indirect vision, using angled forceps. Have the patient grasp his own tongue with a gauze swab and draw it forward as far as possible. Hold the mirror in your non-dominant hand and the forceps in your dominant hand.

3. If on examination with a mirror you see the foreign body deep in the pyriform fossa or postcricoid space, or if a radiograph demonstrates that it is in the hypopharynx or upper oesophagus, then you need to remove it by direct endoscopy under general anaesthesia. Use a laryngoscope or short oesophagoscope and suitable forceps to bring the foreign body into the lumen of the endoscope. Take care not to push a sharp object through the visceral wall. Try to rotate it so that its most traumatic aspect is disimpacted and either trails harmlessly or can be drawn within the endoscope as it is withdrawn.
INCISION OF QUINSY (PERITONSILLAR ABSCESS)
Appraise
1. Suspect the diagnosis of quinsy (Greek: kynos = dog + anchien = to throttle) or peritonsillar abscess from a history of an extremely sore throat in a toxic patient. The patient has trismus (Greek: trizein = to grate, gnash) and dysphagia for solids and liquids, often with drooling because swallowing saliva is too painful.
2. Although inspection may be difficult because of the trismus, a swelling of the soft palate may be seen in association with a contralateral tonsillitis.
3. Although incision of peritonsillar abscess is frequently described in textbooks, it is rarely performed because it usually responds to broad-spectrum systemic antibiotics. Treat early disease with high-dose antibiotics given intravenously, and reviewed after 24–36 hours. Incise it only if the swelling is not subsiding or if there is a fluctuant peritonsillar abscess.
Action
1. Inject local anaesthetic into the palatal mucosa at the intersection of a horizontal line through the base of the uvula with a vertical line along the anterior pillar of the fauces. Preferably use a dental syringe and needle with 2% lidocaine and 1:80 000 adrenaline (epinephrine). Allow at least 5 minutes for it to take effect.
2. Use a Bard-Parker handle with a no. 15 blade which can be wrapped in adhesive tape with only the last 1 cm exposed, preventing too deep penetration of the pharynx. Insert the knife blade backwards through the mucosa to a depth of 1 cm (Fig. 40.1). When pus gushes out, widen the track with sinus forceps.
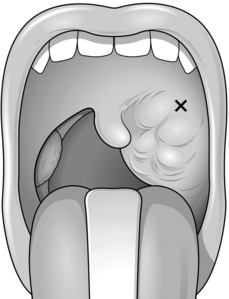
Fig. 40.1 Quinsy. ‘X’ shows the point of incision.
3. Take a swab for culture. Quite often, however, no pus is obtained, because the quinsy is not sufficiently mature.

4. As an alternative to incising the abscess use a large-bore hypodermic needle. You can dispense with local anaesthesia.
INCISION OF RETROPHARYNGEAL ABSCESS
Appraise
1. As a cause of acute illness with respiratory obstruction in infants and toddlers, this abscess tends to be to one side of the midline.
2. In older patients the abscess may be truly prevertebral, strictly midline and, usually, tuberculous in nature, secondary to tuberculous osteomyelitis of a cervical vertebra, in which case treatment is not primarily surgical.
3. If significant respiratory obstruction develops in spite of intravenous versatile antibiotic treatment in a young child or infant, you should incise a pyogenic abscess.
4. Lateral retropharyngeal abscesses in particular are often associated with a foreign body. Consequently, carry out a careful search for one when incising the abscess.
Action
Lateralized pyogenic abscess
1. Have the child anaesthetized by an experienced anaesthetist because, if the abscess is ruptured during intubation, the patient may inhale the pus. Have the patient held in a head-down position when being intubated and until the airway is protected by a cuffed endotracheal tube.
2. When the tube is in place the abscess contents can be aspirated with a per-oral needle. Alternatively, it can be incised through a pharyngoscope or using a Boyle-Davis gag.
3. Having incised the abscess send specimens of the abscess wall for histology and culture.
RELIEF OF UPPER AIRWAY OBSTRUCTION
Appraise
1. Immediately relieve respiratory obstruction from major facial or laryngeal trauma, laryngopharyngeal tumours and impacted foreign bodies.
2. Ensure that there is a clear airway if the patient is comatose. If necessary, assist respiration with mouth-to-mouth breathing, Ambi bag, a laryngeal mask or endotracheal intubation. If necessary, ventilate the patient.
3. An obstructed airway can frequently be expanded using positive pressure by mouth-to-mouth respiration or through a face-mask or oral tube, thus providing an adequate passage for air or oxygen.


LARYNGOTOMY
1. Lie the patient supine with extended neck.
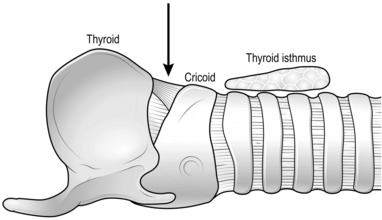
2. Make a horizontal stab incision between the cricoid and thyroid cartilages. Press the blade backwards until you feel the point enter the airway and air begins to hiss in and out through the wound with respiration (Fig. 40.2).
3. With no loss of time, remove the knife and insert a small tube, curved downwards, inside the tracheal lumen. A correctly designed laryngotomy tube is flattened somewhat, so as to lie neatly between the cartilages, but if none is available use any type of tube – metal, rubber or plastic – even unsterile, if it maintains the airway.
4. An improvised tube is difficult to keep in a correct position so control it manually until you can establish a stable airway.
5. Unless the cause of acute asphyxia is quickly curable by removing an impacted foreign body or reducing angioneurotic oedema, perform an elective tracheostomy within 48 hours and close the laryngotomy incision.
EMERGENCY TRACHEOSTOMY
Appraise
1. Always prefer laryngotomy to tracheostomy because the former can be performed more quickly with less haemorrhage.
2. Rarely, if, for example, a subglottic lesion makes it impossible to perform laryngotomy and defies attempted incubation even through a rigid bronchoscope, you must perform emergency tracheostomy.
Prepare
1. Lie the patient supine with extended neck by placing a sandbag or a 1-L bag of fluid for intravenous infusion beneath the shoulders. Ensure the head is in a central position.
2. Deliver oxygen by face-mask to give a few more minutes of operating time.
3. If there is time, inject local anaesthetic such as 1% lidocaine with 1:100 000 adrenaline (epinephrine).
Action
1. Cut vertically from the lower border of the thyroid cartilage in the midline, to the suprasternal notch. Deepen the incision and extend it between the strap muscles. Feel the first tracheal ring with the left index finger.
2. Then divide the thyroid isthmus to expose the anterior tracheal wall. Control bleeding, which can be profuse, by pressure from an assistant. Decide quickly whether there is time to clamp major bleeding points before incising the trachea vertically through the second, third and fourth rings.
3. Insert a tracheal dilator to secure an airway. Introduce a tracheostomy tube. A cuffed tube prevents further aspiration of blood and allows ventilation, but is slightly more difficult to insert.
4. Now control the worst of the bleeding. Use a tracheal suction catheter through the tube to clear blood that has already been aspirated into the trachea.
Postoperative
1. Subsequent decisions and procedures depend upon the cause of the obstruction and the patient’s general condition.
2. Monitor respiration and pulse during, and for several hours after, such a crisis.
3. Institute assisted ventilation and/or cardiac resuscitation immediately postoperatively if necessary.
ELECTIVE TRACHEOSTOMY
1. This procedure is considerably easier to perform in controlled conditions on an appropriately prepared and anaesthetized patient. Use either local or general anaesthesia.
2. Ensure that you have available a correct-sized tracheostomy tube. If it has a cuff, test it for leaks. If you intend to ventilate the patient, use a plastic cuffed tube, not a metal one. Check the patency and security of connections from tube to anaesthetic equipment.
Action
1. Inject the surgical area with a solution of 1:200 000 adrenaline (epinephrine) to help achieve haemostasis. Make a horizontal skin crease incision halfway between the cricoid cartilage and the suprasternal notch.
2. Separate the pretracheal muscles vertically and divide the thyroid isthmus between artery clips. Seal with diathermy the pretracheal vessels just below the cricoid. Ligate the inferior thyroid veins, since diathermy is unreliable. Ligate or oversew the edges of the thyroid isthmus and expose the anterior tracheal wall.
3. Having established haemostasis, make a 1–2-cm vertical incision, centred on the third or fourth tracheal ring (Fig. 40.3). Do not excise segments or cut flaps because there is a risk of subsequent stenosis or obstruction from a displaced tracheal cartilage flap. In addition, a tracheal flap may obstruct the passage of a tracheostomy tube.
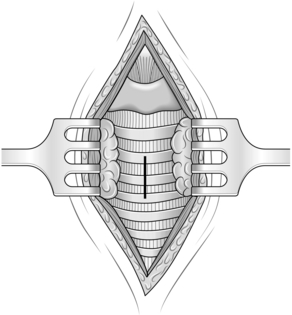
Fig. 40.3 Elective tracheostomy.
KEY POINTS
Avoid extubation


4. Hold the tracheal incision open with a tracheal dilator. Ask the anaesthetist to remove the endotracheal tube to the subglottic level. Now insert, for example, a cuffed plastic tracheostomy tube. Inflate the cuff just sufficiently to prevent leakage around it when the anaesthetist inflates the patient’s lungs. Overinflation of the cuff can lead to subsequent tracheal stenosis. The anaesthetist can now connect the tubing to the tracheostomy tube and withdraw the endotracheal tube. Have the endotracheal tube left in situ until now, so that if there is any difficulty in inserting the tracheostomy tube, or if the cuff bursts, the anaesthetist can continue to ventilate the patient through the endotracheal tube.
5. Close the skin loosely around the tube. Loose suturing allows drainage of any blood and also helps prevent air emphysema around the incision.