Chapter 87 Disorders of Nails and Skin
Anatomy
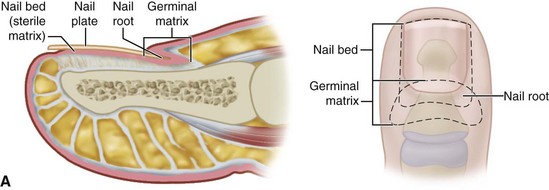
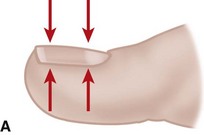
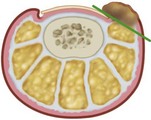
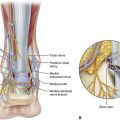
The normal nail complex consists of the nail plate, the nail bed, and the surrounding skin. The nail plate is the nail proper and consists of two components: the root, the portion of the nail plate that is beneath the skin, and the body, the exposed portion of the nail plate. The nail bed, has two components, the sterile matrix and the germinal matrix. In the skeletally mature foot, the germinal matrix extends from just distal to the lunula 5 to 8 mm proximally and deep to the eponychium or proximal nail fold. It is smoother and paler than the sterile matrix, unless the nail has recently been avulsed. The germinal matrix sends projections into the adjacent soft tissue that make complete nail ablation difficult. The germinal matrix contributes to longitudinal growth of the nail plate (Fig. 87-1A). The skin surrounding the nail plate includes the nail walls (labia ungues), the margins of skin that overhang the two lateral borders of the nail body; eponychium (proximal nail fold), the distal extension of the stratum corneum of skin that covers the nail root; and cuticle, the distal edge of the eponychium. It is doubtful that the eponychium, lateral nail folds, or nail bed (sterile matrix) contribute to longitudinal new growth of the nail plate, but this issue is not completely settled. Finally, the hyponychium is the horny thickening of the skin at the distal margin of the nail.
Ingrown Toenail (Onychocryptosis, Unguis Incarnatus)
Etiology
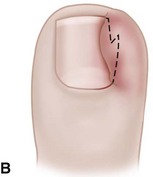
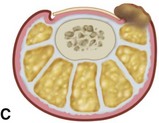
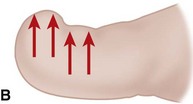
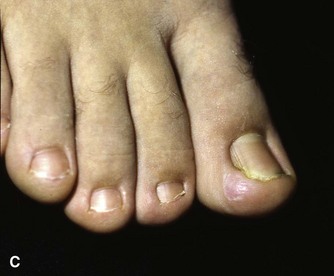
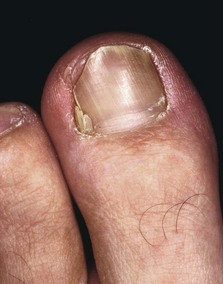
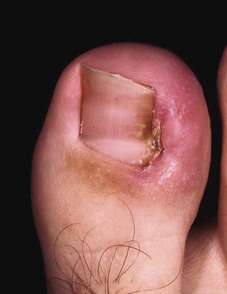
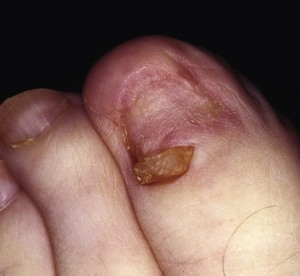
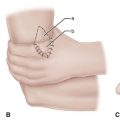
The term ingrown toenail is misleading. If used to designate a hook of nail caused by improper nail care growing into an overlapping nail fold that has obliterated the lateral nail groove, the term is acceptable (Fig. 87-1B). The most probable cause of the symptom complex is a combination of factors, however, only one of which may be an improperly trimmed nail. The condition is rare in people who do not wear shoes, and the most likely explanation is the absence of extrinsic pressure. Within the confines of the shoe toe box, the great toe is pushed toward the second toe, resulting in pressure against the lateral border of the nail, while the shoe itself exerts pressure on the medial side of the nail. This extrinsic pressure causes the nail fold to push into the sharp edge of an improperly cut nail, breaking the skin. The bacterial and fungal flora on the skin enter the open wound, albeit a small one, and inflammation results. A bottlenecked, poorly draining abscess follows, causing erythema, edema, hyperhidrosis, and tenderness. Finally, hypertrophic granulation tissue completes the clinical picture of the familiar infected ingrown toenail (Fig. 87-1C). The hypertrophic granulation tissue is slowly covered by epithelium, further inhibiting drainage and promoting edema. This process makes the nail even more vulnerable to injury by extrinsic pressure, and the cycle repeats itself.
Nonoperative Management
Stage I (Inflammatory Stage)
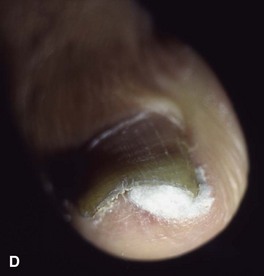
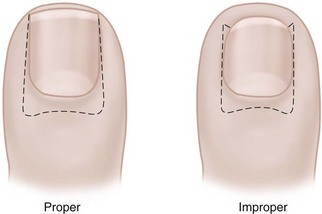
In stage I, the patient has mild erythema, swelling, and tenderness along the lateral nail fold. The treatment involves lifting the lateral edge of the nail plate from its embedded position in the dermis of the lateral nail fold. This is easier to perform if done after soaking the foot, which makes the nail softer and more pliable. Nonabsorbent cotton, wool, or acrylic mesh is passed beneath the corner of the nail (Fig. 87-1D). This is done gently because it is frequently painful. The patient may need a few days of intermittent warm soaks, a cutout shoe, and modification of activity before the local inflammation is reduced enough to allow this treatment. Once begun, however, the patient usually can introduce more material beneath the nail corner than can the physician. The patient repeats the treatment daily until the nail grows out and can then be trimmed properly. Proper trimming of the nail at right angles to the distal edge of the nail plate is shown in Figure 87-2, with the goal being a squared nail with corners protruding distal to the hyponychium. This treatment usually is successful in 2 to 3 weeks if as much material as is comfortable to the patient is placed beneath the nail edge each day.
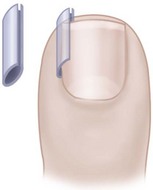
Another conservative treatment option is nail splinting, which separates the nail plate from the soft tissue to provide a channel in which the nail can grow. A “gutter splint” that is affixed to the ingrown nail edge with adhesive tape or a formable acrylic resin such as cyanoacrylate can be fashioned from a sterilized vinyl intravenous drip infusion tube slit from top to bottom with one end cut diagonally for smooth insertion (Fig. 87-3). Gutter splints can be used with or without the application of an acrylic nail. The use of a resin splint also has been reported to be successful, although the duration of application was lengthy (9 months). Reported recurrence rates with various splinting techniques range from 8% to 48%.
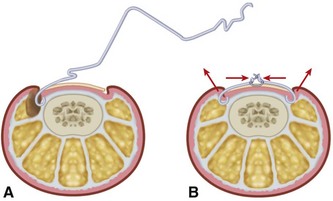
A dynamic correction technique, orthonyxia, uses direct force to lift the nail from the nail fold and release the pressure exerted on the inflamed soft tissue. Generally, orthonyxia devices consist of two hooks placed on the sides of the nail and connected under tension by wire (Fig. 87-4), “super-elastic” wire, or shape-memory segments. Correction of the nail deformity has been reported to occur within 3 weeks in most patients. Cited advantages of splinting and orthonyxia techniques over operative treatment are less postoperative morbidity, shorter time to recovery, and better cosmetic results.
Total Nail Plate Removal
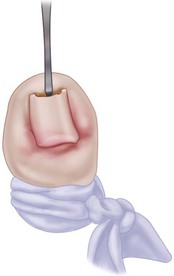
 When the great toe has been anesthetized, pass a straight, thin hemostat or small, flat nasal elevator beneath the nail in the midline from the hyponychium several millimeters proximal to the nail fold adjacent to the lunula (Fig. 87-5).
 Do not shift the hemostat or elevator back and forth; withdraw and insert it in a similar longitudinal manner beneath each lateral margin of the nail adjacent to the lateral nail fold.
 The nail should become loose enough to extract with a distal pull, unless the nail root still adheres to the eponychium. In this instance, instead of forcefully jerking the nail root loose, sharp dissection with a small blade between the nail plate and eponychium, would allow the former to be gently lifted from its bed with little chance of damage to the germinal matrix and would reduce bleeding from the nail bed.
 Another choice to remove the last moorings of the nail is the use of a wide, flat, nasal elevator.
Postoperative Care
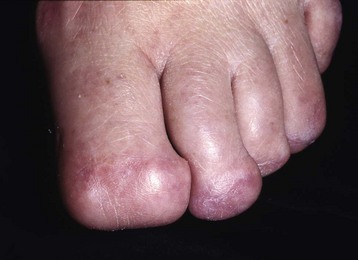
A nonadherent, single-layer dressing is applied to the nail bed followed by a gently wrapped compression bandage. The foot is elevated for 24 hours, and then the dressing is removed and warm soaks are begun. No constricting hosiery or shoes should be worn for 1 week. The nail takes 4 to 6 months to re-form completely, depending on the patient’s age. The patient must be informed of this before surgery and forewarned that an upward-turned deformity of the distal nail bed and pulp may develop. This deformity is more likely to occur if the patient has had multiple nail avulsions (Fig. 87-6).
Partial Nail Plate Removal
Partial nail plate removal differs little from total nail plate removal.
 Lift the lateral fourth of the nail from its bed with a small, angled probe or one arm of a narrow, smooth, straight hemostat, and remove it. Do not lift too firmly to avoid detaching the nail from its bed in a lateral direction.
 Using straight scissors, cut the nail plate longitudinally, while lifting the lateral fourth off its bed. A curved tip on the scissors is less likely to damage the matrix.
 The nail must be incised to its proximal end beneath the eponychium (Fig. 87-7).
 Remove the granulation tissue by gently scraping with a scalpel or by removing it totally by elliptically excising part of the nail fold.
The recurrence rate is even higher after partial nail plate removal than after complete removal. In adolescents, however, this minor procedure, even if it must be repeated, is an attractive alternative to changing the appearance of the nail permanently. The patient, and especially the parents of an adolescent, must be told that the nail-forming matrix may be injured, and some permanent deformity, even if minor, may result (Fig. 87-8).
Removal of the Nail Edge and Ablation of the Nail Matrix
 All personnel involved in the procedure should wear gloves to avoid direct contact with phenol, which is caustic.
 Place a tourniquet (Tourni-cot; Mar-Med Company, Grand Rapids, MI), Penrose drain, or a gloved finger at the base of the great toe to ensure a relatively dry dissecting area after placement of local anesthesia. Elevate the lateral fourth to fifth of the nail edge longitudinally from distal to proximal, including the few millimeters of nail that are beneath the eponychium (Fig. 87-9A).
 When the nail plate has been removed, place antibiotic gel around the nail fold to protect the skin from the effects of the phenol (Fig. 87-9B and C). Place a small piece of cotton pledget that has been dipped in 80% to 89% phenol solution into the nail groove, extending beneath the eponychium to ensure that the pocket of germinal matrix is exposed to the phenol (Fig. 87-9D).
 Rotate the cotton applicator for 30 to 40 seconds, and repeat two more times. This is followed by application of 70% isopropyl alcohol to neutralize the phenol.
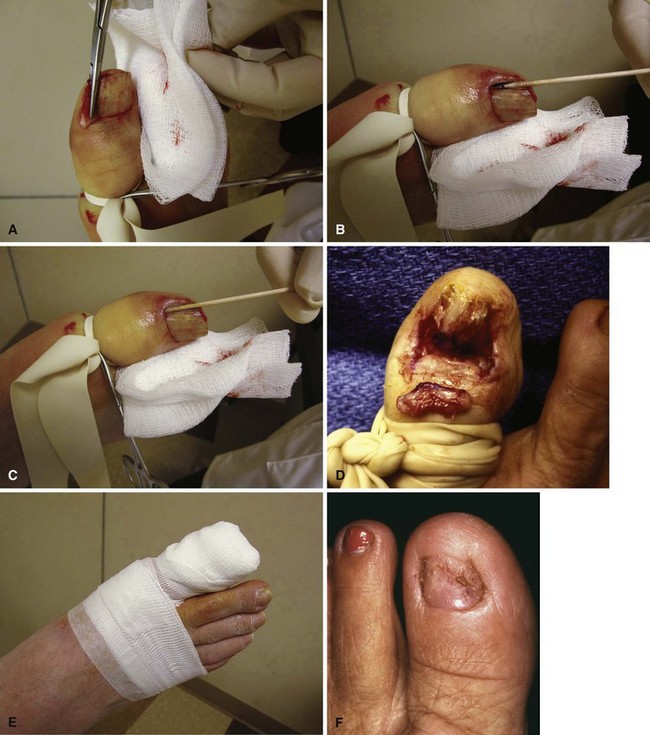
FIGURE 87-9 Removal of the nail edge and ablation of the nail matrix. A, Nail edge is elevated longitudinally. B and C, Antibiotic gel is placed around the nail fold to protect the skin. D, Cotton pledget dipped in phenol solution is placed in the nail groove. E, Nail is covered with nonadherent gauze and toe dressing is applied. F, Appearance of nail after phenol ablation. SEE TECHNIQUE 87-3.
Postoperative Care
The nail edge is covered with nonadherent gauze and a toe dressing (Fig. 87-9E), followed by release of the tourniquet. The patient is placed in a postoperative shoe and instructed to elevate the foot. The patient should be warned about the charred appearance of the skin that is evident when they remove their dressing after 2 to 3 days. Warm Epsom salt soaks are started once the dressing is removed, until the tissues have healed. Nonconstricting shoes are worn until all tenderness and drainage have ceased (Fig. 87-9F).
Partial Nail Plate and Matrix Removal
Technique 87-4
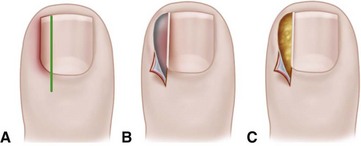
FIGURE 87-10 Winograd technique. A, Incision through nail plate and root. B, Removal of nail plate with exposure of nail matrix. C, Nail plate and adjacent matrix are excised. SEE TECHNIQUE 87-4.
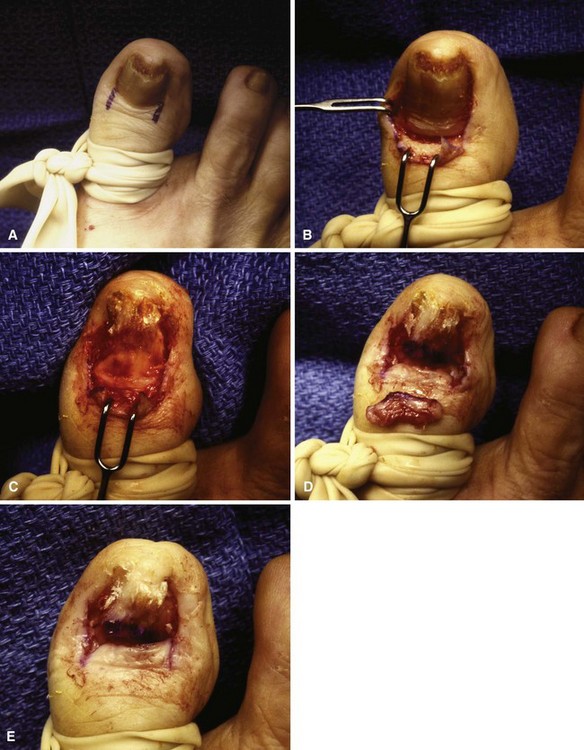
 Beginning 5 to 8 mm proximal to the lunula, make a longitudinal incision in the eponychium extending distally (Fig. 87-11A), while scoring, but not penetrating, the nail plate until its distal edge is reached (Fig. 87-11B).
 Lift the eponychial flap by sharp dissection to reveal the nail root overlying the lateral margin of the germinal matrix. The remainder of the eponychium should be left undisturbed.
 Using a small nasal elevator or small, straight hemostat, lift the lateral border of the nail out of the nail fold by passing the instrument beneath the lateral fourth of the exposed nail.
 Incise this nail margin with a nail splitter (Fig. 87-11C) along the previously scored mark, being sure to reach the most proximal edge of the nail plate.
 With its eponychial cover already reflected, and the undersurface of the nail plate lifted off its bed (Fig. 87-11D), gently remove this segment of nail, exposing the underlying matrix (Fig. 87-11E).
 Remove the exposed matrix by sharp dissection using the scalpel.
 Retract the lateral nail fold to expose the lateral margin of the matrix. Remove the entire matrix, the sterile and germinal portions; take special care to remove the proximal portion of the germinal matrix to reduce the likelihood of recurrent nail formation (Fig. 87-11F).
 Even after great care, the patient occasionally develops a tiny nail remnant that may or may not be symptomatic. An attempt to bring the lateral margin of the nail fold to the remaining nail is optional; Heifetz recommended excision of part of the nail fold. The surgeon should be certain that the periosteum of the phalanx has been removed with the matrix (Fig. 87-11G) because this is the most certain means of matrix ablation.
 Return the proximal eponychial flap to its original location. Sutures to hold it there are optional (Fig. 87-11H).
 Apply a nonadherent dressing over the exposed phalanx, followed by a nonconstricting gauze wrap (Fig. 87-11I).
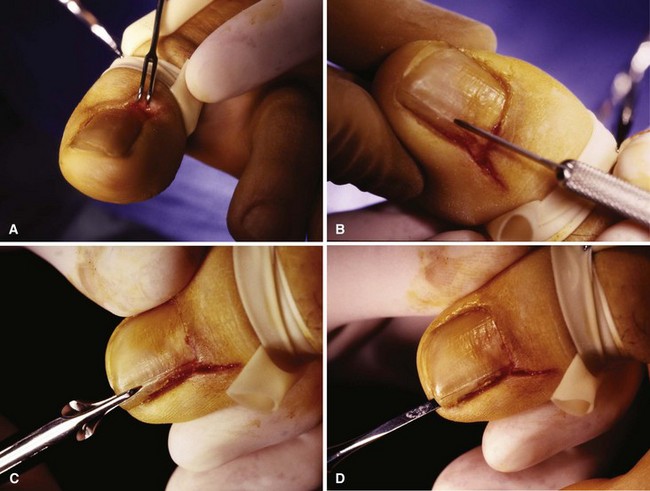
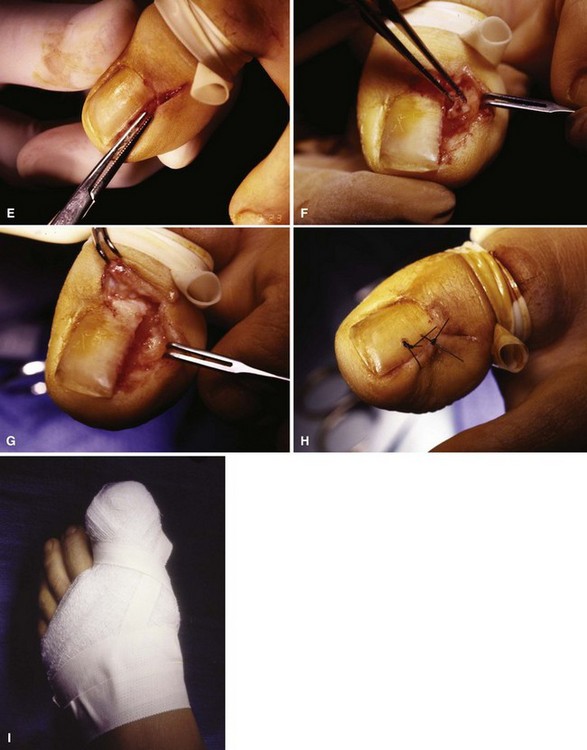
FIGURE 87-11 Winograd technique. A, Eponychium is incised. B, Nail plate is scored. C, Nail splitter is used to divide nail. D, Small elevator lifts plate atraumatically from underlying matrix. E, Entire portion of plate, which has been removed from body of nail, is removed using straight hemostat. F, Pearly colored matrix is exposed. Matrix curves on undersurfaces of paronychium and eponychium. This must be thoroughly removed. G, Germinal matrix folding on eponychium and paronychium must be removed by sharp dissection from around nail horns. Nail plate and matrix have been removed completely. H, Closing wound is optional, but convalescence is shortened. I, Dressing remains in place for 24 to 48 hours. SEE TECHNIQUE 87-4.
Nail Plate and Germinal Matrix Removal
The procedure for nail plate and germinal matrix removal was originally described by Quenu in 1887 and popularized by Wilson in 1944. The essentials of this procedure are removal of the entire nail plate and germinal matrix while not disturbing the sterile matrix distal to the lunula (Fig. 87-12). The sterile matrix does not form true nail but continues to form flaky cornifications that might be cosmetically displeasing (Fig. 87-13). This procedure is rarely used but can be employed in middle-aged or elderly patients with multiple occurrences of nail problems from a variety of causes (incurvatum, onychogryposis, onychomycosis). Younger patients (usually male) with less concern for cosmesis who have had multiple operations for ingrown toenail also are good candidates for this procedure. It is often a good alternative to the terminal Syme procedure.
 Remove the nail plate initially in the same manner as previously described (see Fig. 87-5).
 Raise the eponychium as a full-thickness flap by extending oblique incisions from both corners of the proximal nail fold approximately 1 cm proximally (Fig. 87-14A).
 Excise the inner 1 or 2 mm of nail fold on both sides of the nail.
 Excise the germinal matrix (Fig. 87-14B). Begin this incision 1 to 2 mm distal to the lunula or, if the lunula is indistinct, begin the incision one third the distance from the cuticle to the distal nail edge, and make it transverse across the sterile matrix.
 Retracting the lateral nail fold, remove each edge of the matrix from the distal phalanx by sharp dissection, being careful not to leave any germinal matrix in the recesses of the lateral grooves. The matrix follows the lateral curvature of the phalanx almost to the midlateral line, and this must be kept in mind during the lateral dissection to remove the matrix.
 With the distal edge and both lateral margins of the germinal matrix detached from the phalanx, the proximal edge and corners can be seen better. Retract the proximal nail fold proximally, and complete the removal of the matrix by sharp dissection (Fig. 87-14C).
 The extensor hallucis longus insertion centrally and fat and subcutaneous tissue at the corners must be exposed before adequate excision of the germinal matrix is possible. In addition, the periosteum on the dorsal and lateral borders of the distal phalanx should be removed by sharp dissection when the germinal matrix is excised.
 Return the eponychial flap to its previous location (Fig. 87-14C and D). Usually, it does not reach the remaining nail bed, but the gap is small and quickly closes with wound contraction. The use of sutures is optional.
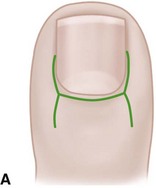
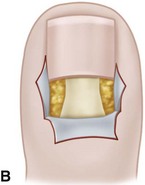
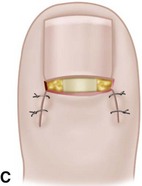
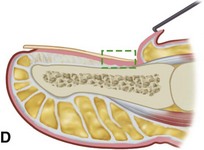
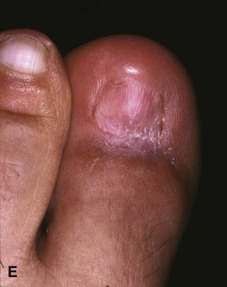
FIGURE 87-14 Nail plate and germinal matrix removal by Quenu technique (Fowler; Zadik). A, Skin incision. B, Eponychium is raised, and germinal matrix is exposed. C, Germinal matrix is removed. D, Sagittal section of germinal matrix. E, Five years after Quenu technique. SEE TECHNIQUE 87-5.
Postoperative Care
A nonadherent dressing and gently rolled gauze wrap are placed over the wound, and the foot is elevated for 48 hours, at which time the dressing is changed. Warm soaks are started, and an open toe shoe is worn with a light dressing over the phalanx. If the procedure is performed in the presence of gross infection, healing may be delayed but should be complete by 6 to 8 weeks. The patient must be informed before surgery that the new “nail” over the sterile matrix will not look like or grow like the previous normal nail (Fig. 87-14E).
Partial Nail Fold and Nail Matrix Removal
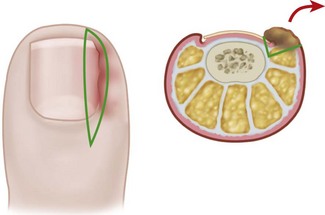
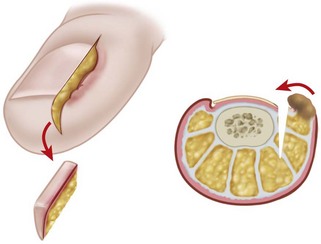
The rationale for partial nail fold and matrix removal and its modifications is to eliminate all parts of the pathological condition that are causing the symptoms yet leave the normal nail and soft tissue intact. The procedure involves wedge resection of the nail, nail bed, and nail fold (Fig. 87-15A). The chief complication of wedge resection has been recurrence of nail spicules (Fig. 87-16). The crucial factor in preventing spicules is removal of the germinal matrix. As Figure 87-17 shows, however, the apex of the wedge and the narrowest area of resection is at the most crucial tissue requiring removal—the matrix. The portion of the nail plate and lateral nail fold removed with the wedge is adequate. We have had no experience with the procedure, but believe it to be based on sound reasoning. If the patient understands that a part or all of the nail may regrow and be mildly deformed, the procedure is an acceptable treatment.
Technique 87-6
(WATSON-CHEYNE AND BURGHARD; O’DONOGHUE; MOGENSEN)
 Remove the lateral fourth of the nail plate by lifting it from its bed with a small, flat dissector that reaches the most proximal end of the nail root. Using straight scissors, remove this portion of the nail.
 With a knife, make a linear incision parallel to the lateral nail fold, extending from 1 cm proximal to the lunula to the hyponychium. Carry this incision to bone.
 Begin the second incision 2 to 3 mm lateral to the inner edge of the lateral nail fold, and curve it obliquely at a 45-degree angle to the initial incision to reach the most lateral margin of the germinal matrix. Exposure and removal of this corner of the germinal matrix is important. The whitish hue of the germinal matrix usually contrasts with the reddish color of the sterile matrix, helping delineate the lateral border of the entire nail bed.
 Remove the periosteum with the matrix, and expose the fat and subcutaneous tissue in the proximal corner to ensure removal of the germinal matrix.
 When the wedge of nail plate, matrix, and nail fold is removed, cover the wound with a nonadherent dressing followed by a sterile compression wrap.
Nail Fold Removal or Reduction
 Nail fold removal or reduction procedures consist of either removal of the nail fold and a small border of normal tissue with it or resection of a wedge of normal tissue at a distance from the involved nail fold. By closing the wedge, the nail fold is pulled from the lateral nail border, allowing free drainage if infection is present or reducing the source of irritation if the part is only inflamed. In addition, it is assumed that with reduction in the size of the nail wall, unobstructed growth of the nail is allowed. By reducing the convexity of the nail fold and displacing it laterally, the nail plate grows over its underlying plate, rather than penetrating the nail fold (Fig. 87-18).
 Collect cultures of the material in patients with seropurulent drainage before surgery (Staphylococcus aureus is the most common organism identified.)
 Mark an ellipse of skin beginning 4 mm lateral to the nail fold (Fig. 87-19A) to maintain viability of the nail fold.
 Completely remove the nail plate and all granulation tissue (Fig. 87-19B).
 Remove the outlined wedge-shaped ellipse of skin and subcutaneous tissue, with the apex of the wedge deep in the subcutaneous layer.
 Approximate the margins of the resulting defect, everting the nail fold and reducing its convexity (see Fig. 87-18B). The width of the ellipse and consequently the extent of the eversion depend on the size of the nail fold.
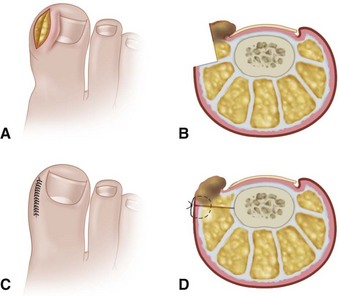
 Beginning 4 to 5 mm from the lateral nail margin near the midlateral line of the digit, remove a wedge of tissue through an elliptical skin incision (Fig. 87-20A).
 Take the incision down to bone dorsally and plantarward. The widest diameter of the ellipse of tissue is 4 to 5 mm and should be in normal, noninflamed, noninfected tissue (Fig. 87-20B).
 When the plantar half of the elliptical incision is made, avoid damage to the plantar digital nerve.
 Use interrupted nonabsorbable sutures to close the defect (Fig. 87-20C), pulling the nail fold from the nail margin (Fig. 87-20D). The lateral 2 to 3 mm of nail edge might be removed after the nail fold is retracted.
 In neither the Jansey nor the Bose technique is the nail or nail bed disturbed.
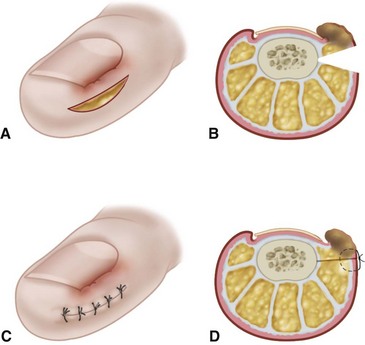
 For the Jansey technique, insert the point of a No. 11 blade under the nail fold along the midportion of the lateral nail border. The tip of the blade penetrates the skin 5 to 7 mm plantarward to the nail fold (Fig. 87-21A).
 Advance the blade distally in a straight line, removing the nail fold and exposing the distal half of the lateral edge of the nail plate.
 Reverse the direction of the blade, and remove the nail fold at the base of the nail (Fig. 87-21B to D).
 Bleeding usually is brisk and can be controlled by local pressure or electrocautery.
 Trim any nail spike flush with the lateral nail margin.
 Cover the wound with a nonadherent dressing, and wrap the toe in sterile gauze.
 For the Bose technique, no nail or matrix is removed. A wedge, consisting of the nail fold, is removed as shown in Figure 87-22.
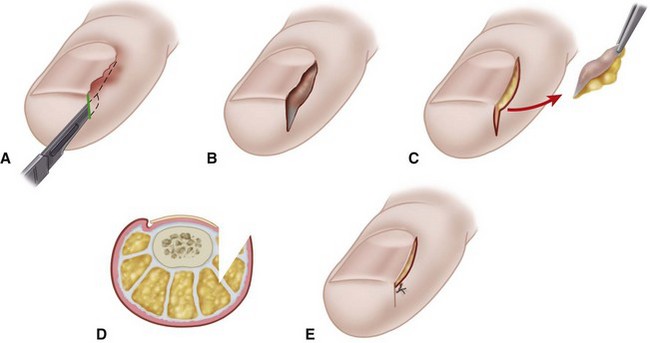
FIGURE 87-21 Nail fold removal (Bose and Jansey). A, Incision into nail fold. B, Neither nail matrix nor nail plate is disturbed. C, Wedge of nail fold is excised. D, Coronal view of amount of tissue removed. E, Closure is optional. SEE TECHNIQUE 87-9.
Long-Term Follow-Up
Long-term follow-up data on these two procedures are difficult to find, although Jansey stated that he had used his procedure for more than 20 years with minimal complications. One report of partial nail avulsion and elliptical lateral nail fold excision had a recurrence rate of 16.6%. Another study of nail fold excision without nail plate excision had no recurrences in 23 patients. We have had no experience with the nail fold procedures without concomitant nail plate or matrix removal. The procedures would seem to be indicated more with incurvated nails (Fig. 87-23), however, in which the nail plate is usually narrow, and further reduction in size by nail plate procedures might not be cosmetically pleasing.
Terminal Syme Procedure
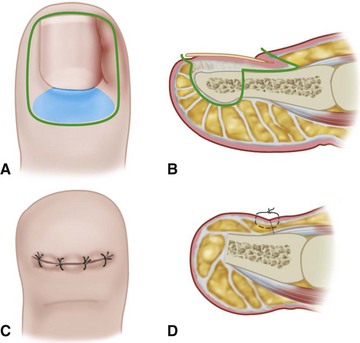
Complications of the terminal Syme procedure include osteomyelitis of the distal phalanx, epidermal inclusion cysts along the suture line, and troublesome nail spicules. In our experience, however, this is a dependable procedure, producing an excellent functional and acceptable cosmetic result in most patients (Fig. 87-24). Although the tip of the toe is initially bulbous and unattractive, the final appearance is rarely offensive to the patient. Meticulous technique and attention to detail are mandatory to avoid nail horns. In the presence of an abscess, drainage should be instituted first, and the local wound condition should be improved before performing the procedure. This step should not delay the procedure for more than 2 weeks and usually less.
 Use sharp dissection throughout the procedure except during the use of a bone cutter or saw to transect the distal phalanx 1 to 2 mm distal to the extensor and flexor hallucis longus insertions. The skin incision is illustrated in Figure 87-25A and B.
 Thompson and Terwilliger recommended that a skin margin of 4 mm be removed with the entire nail bed and transected part of the phalanx. The proximal margin of skin overlying the germinal matrix may extend more than 4 mm proximal to the cuticle, and it is recommended that the skin margin proximally measure 6 to 7 mm because the plantar flap would be long enough to reach the skin dorsally, and the extrinsic tendon insertions lie proximal to this point. In addition, a 2- to 3-mm skin margin distal to the hyponychium would suffice. The goal is to remove the matrix, nail, and bone in one piece and reduce the chance of troublesome nail recurrence.
 Make the incision straight to bone proximally, but on the sides do not bevel the blade toward the center until plantar to the lateral flares of the phalanx.
 Using a clamp, firmly grasp the phalanx and, with skin hooks retracting the plantar flap, continue sharp dissection along the plantar surface of the phalanx in a distal-to-proximal direction.
 Transect the phalanx and release any soft tissue remaining to complete the amputation (Fig. 87-25C and D). This method of dissection is similar to removing the heel pad from the calcaneus in a Syme amputation, which is how it got the name terminal Syme procedure.
 Smooth any irregularity of the remaining phalanx with a rongeur.
 Maintain strict hemostasis, and close the wound with nonabsorbable sutures without trimming the “dog ears.”
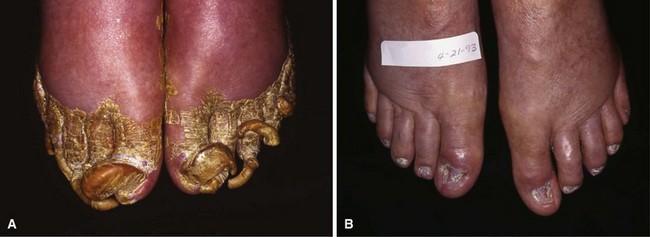
Dystrophic Nails (Onychogryposis, Onychomycosis)
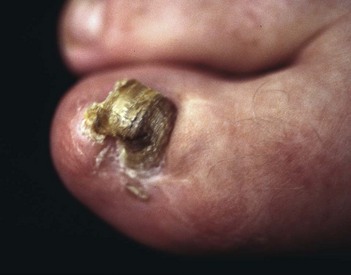
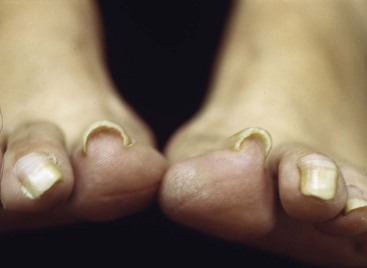
Deformed nails in elderly and diabetic patients can be difficult to manage at best and catastrophic at worst, especially when associated with an insensitive foot. Having a small double-action rongeur and nail splitter-cutter in the office is recommended. These nails can be reduced quickly and safely with these instruments (Fig. 87-26).
Other Lesions of the Nails
Subungual Exostosis
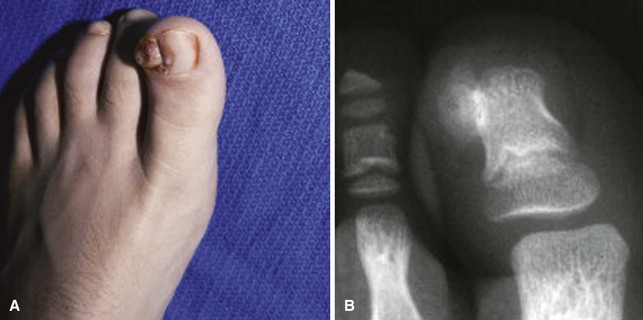
Strictly speaking, this entity is not a primary nail abnormality; however, it usually is presented as a painful and deformed nail, leaving the examiner perplexed as to the cause of the pain and deformity (Fig. 87-27). In an adolescent, it is a sessile osteochondroma of the distal phalanx of the toe that has eroded through the nail matrix and frequently the nail plate. Routine radiographs of the feet may not show the exostosis because the technique does not emphasize the distal phalanx. Radiographs taken at oblique angles and magnified are helpful. Surgical excision is the treatment of choice.
 After the administration of general anesthesia (young children) or ankle block (adolescents), apply a toe or ankle tourniquet.
 Remove a narrow strip of nail (less than one fourth of the nail width) on the medial side of the toe (Fig. 87-28A) to expose the exostosis.
 Carefully dislodge part of the remaining nail from its proximal attachments at the larger side of the exostosis, leaving the remainder of the nail in place, to expose fully the exostosis abutting and penetrating the nail bed.
 Make a small osteotomy paralleling the distal phalanx to remove the exostosis in one piece (Fig. 87-28B).
 Use a fine rongeur or a burr to produce a smooth surface, and remove any residual osteochondroma tissue.
 Irrigate the wound with saline, relocate the elevated nail, and suture the nail fold with two small absorbable stitches (Fig. 87-28C) to cover the raw bone of the phalanx.
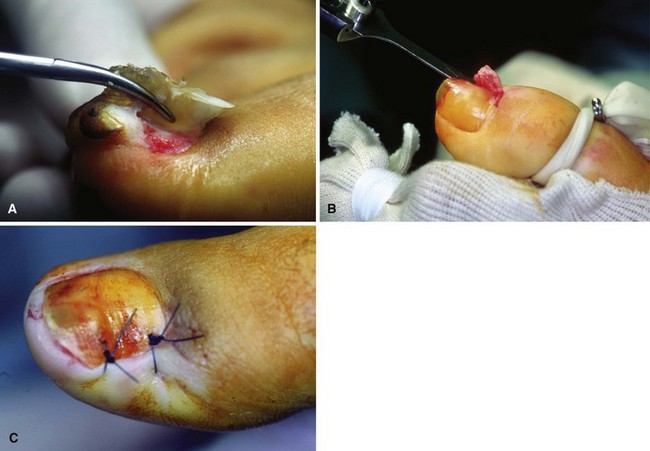
FIGURE 87-28 A, Narrow strip of nail over medial side of exostosis is removed, and nail is dislodged to expose exostosis. B, Small osteotome paralleling distal phalanx removes exostosis in one piece. C, Nail is relocated to cover raw phalanx bone and stitched in place. SEE TECHNIQUE 87-11.
(From Lokiec F, Ezra E, Krasin E, et al: A simple and efficient surgical technique for subungual exostosis, J Pediatr Orthop 21:76, 2001.)
(MULTHOPP-STEPHENS AND WALLING)
 Expose the lesion by removing a portion of the nail, or the entire nail if necessary (Fig. 87-29A and B).
 Ellipse the exostosis, and carry dissection down to the phalanx where the stalk or base is attached. Do not try to preserve the overlying nail bed (Fig. 87-29C).
 Remove the exostosis, including the cartilaginous cap and the overlying nail bed at its base from the distal phalanx.
 Use a small burr to remove 1 to 2 mm of normal bone at the base of the lesion, and smooth the contour of the distal phalanx (Fig. 87-29D).
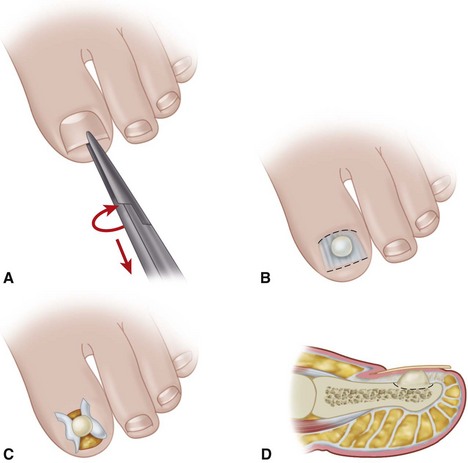
FIGURE 87-29 Surgical excision of subungual exostosis. A, Toenail is completely avulsed to expose exostosis. B, Longitudinal incision is made in nail bed, avoiding injury to nail matrix. C, Nail bed is reflected. D, Exostosis is excised with wide margins, and nail bed is repaired. SEE TECHNIQUE 87-12.
(From Walling AK: Soft tissue and bone tumors. In Coughlin MJ, Mann RA, Saltzman CL, editors: Surgery of the foot and ankle, ed 8, Philadelphia, 2007, Elsevier.)
Subungual and Periungual Fibromas
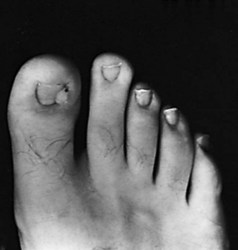
Subungual and periungual fibromas can be most difficult to diagnose preoperatively. A history of long-standing symptoms, several physicians having seen the patient, local tenderness beneath a particular portion of the nail, and a frustrated patient all reinforce the suspicion of this diagnosis. If the mass is readily seen, as it occasionally is, the diagnosis is straightforward (Fig. 87-30). A high index of suspicion for this rare tumor is warranted in patients with tuberous sclerosis, because up to 80% may have ungual fibromas.
 If the mass is beneath the nail, remove the portion overlying the area of tenderness.
 Magnification and high-intensity lighting are helpful for locating a small, pearly whitish change in color compared with the surrounding matrix. Excise this portion down to the phalanx with a small margin of what appears as normal matrix, and then section the tissue. It has a gritty feel when sectioned.
 Send the specimens to pathology with the suspected diagnosis.
Glomus Tumor
The glomus tumor is an enigmatic, painful tumor that is rarely seen and represents a proliferation of the normal capsular-neural glomus apparatus. Patients commonly present with a painful, exquisitely tender mass beneath the nail that is accompanied by a faint bluish hue. Except for the slight change in color of the nail overlying the tumor, the nail may appear normal (Fig. 87-31). The nail is normal, and the mass seen through the nail plate is abnormal.
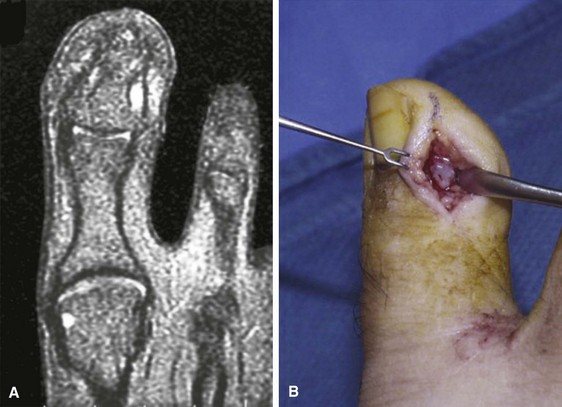
FIGURE 87-31 A, T2-weighted MRI scan shows glomus tumor on lateral side of distal phalanx. B, Exposure of glomus tumor.
(From Walling AK: Soft tissue and bone tumors. In Coughlin MJ, Mann RA, Saltzman CL, editors: Surgery of the foot and ankle, 8th edition, Philadelphia, 2007, Elsevier.)
 Make an inverted-L–shaped incision around the nail with the short leg of the L parallel to and 5 mm distal to the distal end of the nail and the long leg of the L 5 mm medial or lateral to the nail, extending proximal to the nail matrix, usually all the way to the joint (Fig. 87-32A).
 Create a full-thickness flap down to bone, and sharply elevate it without injuring the nail matrix (Fig. 87-32B).
 Reflect the skin and matrix flap, and inspect the interior side. Usually the glomus tumor is obvious within the tissue or nail matrix as a ball-shaped or egg-shaped opaque, semielastic structure (Fig. 84-32C). Occasionally, the tumor has eroded into the distal phalanx.
 Excise the tumor (which usually is well encapsulated) with a small knife or curet.
 Release the tourniquet, control bleeding with bipolar electrocautery, and close the wound in one layer with nylon interrupted suture.
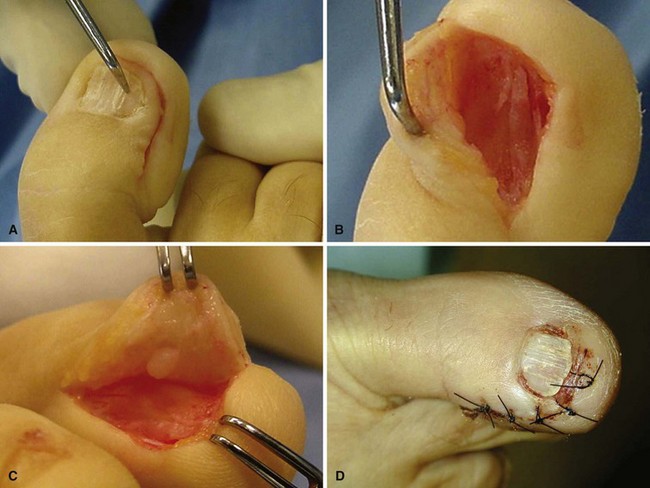
FIGURE 87-32 A, L-shaped full-thickness flap. B, Elevation of nail with nail matrix and glomus tumor. C, Glomus tumor in epithelial bed underneath flap. D, Postoperative photograph. SEE TECHNIQUE 87-14.
(A-C from Horst F, Nunley JA: Technique tip: glomus tumors in the foot: a new surgical technique for removal, Foot Ankle Int 24:949, 2003.)
Malignant Melanoma
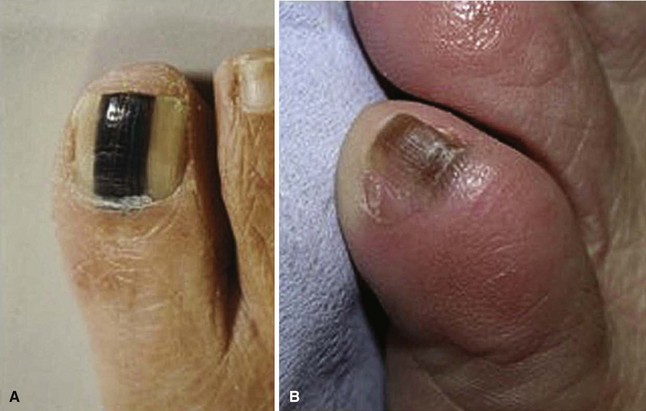
The orthopaedist seldom makes the initial diagnosis of malignant melanoma. To overlook this diagnosis, however, or not have this diagnosis in the differential could lead to a poor prognosis because a delay in treatment leads to worse outcomes. Only 2% to 3% of melanomas occur in the nail apparatus, and the occurrence is more common in individuals of Asian or African descent, groups that have a lower incidence of melanoma at other sites. Subungual melanomas are usually painless black discolorations under the nail, but they can also be amelanotic, and they may or may not involve nail plate changes. Warning signs that may indicate a subungual melanoma as opposed to subungual hematoma or onychomycosis include Hutchinson’s sign (Fig. 87-33), in which discoloration of the nail bed involves the proximal nail fold. Another indication is discoloration that does not move distally as the nail grows. When diagnosis and staging are finalized, the surgical treatment is a proximal amputation at the metatarsophalangeal joint or proximal metatarsal. For those techniques, see Chapter 15.
Aksakal AB, Oztas P, Atahan C, Gurer MA. Decompression for the management of onychocryptosis. J Dermatol Treatment. 2004;15:108.
Aksoy B, Aksoy HM, Civas E, et al. Lateral foldplasty with or without partial matricectomy for the management of ingrown toenails. Dermatol Surg. 2009;35:462.
Aldrich SL, Hong CH, Groves L, et al. Acral lesions in tuberous sclerosis complex: insights into pathogenesis. J Am Acad Dermatol. 2010;3:244.
Altinyazar HC, Dermirel CB, Koca R, Hosnuter M. Digital block with and without epinephrine during chemical matricectomy with phenol. Dermatol Surg. 2010;36:1568.
Bos AM, van Tilburg MW, van Sorge AA, Klinkenbijl JH. Randomized clinical trial of surgical technique and local antibiotics for ingrowing toenail. Br J Surg. 2007;94:292.
Bostanci S, Ekmekci P, Gurgey E. Chemical matricetomy with phenol for the treatment of ingrowing toenail: a review of the literature and follow-up of 172 treated patients. Acta Derm Venereol. 2001;81:181.
Bristow IR, de Berker DAR, Acland KM, et al. Clinical guidelines for the recognition of melanoma of the foot and nail unit. J Foot Ankle Res. 2010;3:25.
Cohen T, Busam KJ, Patel A, Brady MS. Subungual melanoma: management considerations. Am J Surg. 2008;195:244.
Córdoba-Fernández A, Rayo-Rosado R, Juárez-Jiménez JM. The use of autologous platelet gel in toenail surgery: a within-patient clinical trial. J Foot Ankle Surg. 2010;49:385.
Córdoba-Fernández A, Ruiz-Garrido G, Canca-Cabrera A. Algorithm for the management of antibiotic prophylaxis in onychocryptosis surgery. Foot (Edinb). 2010;20:140.
El-Shaer WM. Lateral fold rotational flap technique for treatment of ingrown nail. Plast Reconstr Surg. 2007;20:2131.
Espensen EH, Nixon BP, Armstrong DG. Chemical matrixectomy for ingrown toenails: is there an evidence basis to guide therapy? J Am Podiatr Med Assoc. 2002;92:287.
Farrelly PJ, Minford J, Jones MO. Simple operative management of ingrown toenail using bipolar diathermy. Eur J Pediatr Surg. 2009;19:304.
Finch JJ, Warshaw EM. Toenail onychomycosis: current and future treatment options. Dermatol Ther. 2007;20:31.
Gerritsma-Blecker CLE, Klaase JM, Geelkerken RH, et al. Partial matrix excision or segmental phenolization for ingrowing toenails. Arch Surg. 2002;137:320.
Goldberg LH. Chemical matricectomy of nails. Dermatol Surg. 2010;36:1572.
Grassbaugh JA, Mosca VS. Congenital ingrown toenail of the hallux. J Pediatr Orthop. 2007;27:886.
Hassel JC, Hassel AJ, Löser C. Phenol chemical matricectomy is less painful, with shorter recovery times but higher recurrence rates, than surgical matricectomy: a patient’s view. Dermatol Surg. 2010;36:1294.
Heidelbaugh JJ, Lee H. Management of the ingrown toenail. Am Fam Physician. 2009;79:303.
Herold N, Houshian S, Riegels-Nielsen P. A prospective comparison of wedge matrix resection with nail matrix phenolization for the treatment of ingrown toenail. J Foot Ankle Surg. 2001;40:390.
Horst F, Nunley JA. Technique tip: glomus tumors in the foot: a new surgical technique for removal. Foot Ankle Int. 2003;24:949.
Imai A, Takayama K, Satoh T, et al. Ingrown nails and pachyonychia of the great toes impair lower limb functions: improvement of limb dysfunction by medical foot care. Int J Dermatol. 2011;50:215.
Islam S, Lin EM, Drongowski R, et al. The effect of phenol on ingrown toenail excision in children. J Pediatr Surg. 2005;40:290.
Kim JY, Park JS. Treatment of symptomatic incurved toenail with a new device. Foot Ankle Int. 2009;30:1083.
Kim SH, Ko HC, Oh CK, et al. Trichloroacetic acid matricectomy in the treatment of ingrowing toenails. Dermatol Surg. 2009;35:973.
Kose O, Celiktas M, Kisin B, et al. Is there a relationship between forefoot alignment and ingrown toenail? A case-control study. Foot Ankle Spec. 2011;4:14.
Kruijff S, van Det RJ, van der Meer GT, et al. Partial matrix excision or orthonyxia for ingrowing toenails. J Am Coll Surg. 2008;206:148.
Kuru I, Sualp T, Ferit D, et al. Factors affecting recurrence rate of ingrown toenail treated with marginal toenail ablation. Foot Ankle Int. 2004;25:410.
Lee SK, Jung MS, Lee YH, et al. Two distinctive subungual pathologies: subungual exostosis and subungual osteochondroma. Foot Ankle Int. 2007;28:595.
Li J, Chen J, Hong G, et al. Clinical study of treatment for recalcitrant ingrown toenail by partial distal phalanx removal. J Plast Reconstr Aesthet Surg. 2009;62:1327.
Lokiec F, Ezra E, Krasin E, et al. A simple and efficient surgical technique for subungual exostosis. J Pediatr Orthop. 2001;21:76.
Matsumoto K, Hashimoto I, Nakanishi H, et al. Resin splint as a new conservative treatment for ingrown toenails. J Med Invest. 2010;57:321.
Mayser P, Freund V, Budihardja D. Toenail onychomycosis in diabetic patients: issues and management. Am J Clin Dermatol. 2009;10:211.
Mitchell S, Jackson C, Wilson-Storey D. Surgical treatment of ingrown toenails in children: what is best practice? Ann R Coll Surg Eng. 2010. Nov 12 [Epub ahead of print]
Nandedkar-Thomas MA, Scher RK. An update on disorders of the nails. J Am Acad Dermatol. 2005;52:877.
Noël B. Surgical treatment of ingrown toenail without matricectomy. Dermatol Surg. 2008;34:79.
Ozawa T, Nose K, Harada T, et al. Partial matricectomy with a CO2 laser for ingrown toenail after nail matrix staining. Dermatol Surg. 2005;31:302.
Ozdil B, Eray JC. New method alternative to surgery for ingrown nail: angle correction technique. Dermatol Surg. 2009;35:990.
Persichetti P, Simone P, Vecchi GL, et al. Wedge excision of the nail fold in the treatment of ingrown toenail. Ann Plast Surg. 2004;52:617.
Peyvandi H, Robarti RM, Yegane RA, et al. Comparison of two surgical methods (Winograd and sleeve method) in the treatment of ingrown toenail. Dermatol Surg. 2011;37:331.
Rounding C, Bloomfield S. Surgical treatments for ingrowing toenails. Cochrane Database Syst Rev. 18, 2005. CD001541
Sarifakioglu E, Sarifakioglu N. Crescent excision of the nail fold with partial nail avulsion does work with ingrown toenails. Eur J Dermatol. 2010;20:822.
Shaath N, Shea J, Whiteman I, Zarugh A. A prospective randomized comparison of the Zadik procedure and chemical ablation in the treatment of ingrown toenails. Foot Ankle Int. 2005;26:401.
Suga H, Mukouda M. Subungual exostosis: a review of 16 cases focusing on postoperative deformity of the nail. Ann Plast Surg. 2005;55:272.
Tan KB, Moncrieff M, Thompson JF, et al. Subungual melanoma: a study of 124 cases highlighting features of early lesions, potential pitfalls in diagnosis, and guidelines for histologic reporting. Am J Surg Pathol. 2007;31:1902.
Tomczak RL. Embryology of the nail unit. In: Myerson, MS, ed. Foot and ankle disorders. Philadelphia: Saunders, 2000.
Vaccari S, Dika E, Balestri R, et al. Partial excision of matrix and phenolic ablation for the treatment of ingrowing toenail: a 36-month follow-up of 197 treated patients. Dermatol Surg. 2010;36:1288.
Yabe T, Takahashi M. A minimally invasive surgical approach for ingrown toenails: partial germinal matrix excision using operative microscope. J Plast Reconstr Aesthet Surg. 2010;63:170.
Yang G, Yanchar NL, Lo AY, Jones SA. Treatment of ingrown toenails in the pediatric population. J Pediatr Surg. 2008;43:931.
Andrew T. Nail bed ablation, excise or cauterize? A controlled study [abstract]. J Bone Joint Surg. 1981;63B:634.
Anger MT. Treatment of ingrown toenail. Gaz d’Hop. 1889;62:760.
Bartlett R. A conservative operation for the cure of so-called ingrown toenail. JAMA. 1937;108:1257.
Bose B. A technique for excision of nail fold for ingrowing toenail. Surg Gynecol Obstet. 1971;132:511.
Burzotta JL, Turri RM, Tsouris J. Phenol and alcohol chemical matrixectomy. Clin Podiatr Med Surg. 1989;6:453.
Byrne DS, Caldwell D. Phenol cauterization for ingrowing toenails: a review of five years’ experience. Br J Surg. 1989;76:598.
Ceilley RI, Collison DW. Matricectomy. J Dermatol Surg Oncol. 1992;18:728.
Claeys R. The analysis of ground reaction forces in pathological gait secondary to disorders of the foot. Int Orthop. 1983;7:113.
Clarke BG, Dillinger KA. Surgical treatment of ingrown toenail. Surgery. 1947;21:919.
Cotting BE. In-fleshed toe nail: a new operation for radical relief. Boston Med Surg J. 1873;88:5.
Dixon GL, Jr. Treatment of ingrown toenail. Foot Ankle. 1983;3:254.
Dowd CN. Report of twenty-nine cases of in-growing toenail. Can Med Assoc J. 1935;32:298.
DuVries HL. Hypertrophy of the unguilabia. Chir Record. 1933;16:13.
Fortin PT, Freiberg AA, Rees R, et al. Malignant melanoma of foot and ankle. J Bone Joint Surg. 1995;77A:1396.
Fowler AW. Excision of the germinal matrix: a unified treatment for embedded toe-nail and onychogryphosis. Br J Surg. 1958;45:382.
Greig JD, Anderson GH, Ireland AJ, et al. The surgical treatment of ingrowing toenails. J Bone Joint Surg. 1991;73B:131.
Hashimoto K. Ultrastructure of the human toenail: I. Proximal nail matrix. J Invest Dermatol. 1971;56:235.
Heifetz CJ. Operative management of ingrown toenail. J Missouri Med Assoc. 1945;42:213.
Hettinger DF, Valinsky MS, Nuccio G, et al. Nail matrixectomies using radio wave technique. J Am Podiatr Med Assoc. 1991;81:317.
Jansey F. Etiologic therapy of ingrowing toenail. Q Bull Northwestern Univ Med Sch. 1955;29:358.
Kenerson V. Operations for ingrowing toe-nail and hallux valgus. N Y Med J. 1905;82:682.
Keyes EL. The surgical treatment of ingrown toenails. JAMA. 1934;102:1458.
Kojima T, Nagano T, Uchida M. Periungual fibroma. J Hand Surg. 1987;12A:465.
Lapidus PW. Complete and permanent removal of toe nail in onychogryphosis and subungual osteoma. Am J Surg. 1933;19:92.
Lewis BL. Microscopic studies of fetal and mature nail and surrounding soft tissue. Arch Dermatol Syphilol. 1954;70:732.
Lloyd-Davies RW, Brill GC. The aetiology and out-patient management of ingrowing toe-nails. Br J Surg. 1963;50:592.
Mogensen P. Ingrowing toenail. Acta Orthop Scand. 1971;42:94.
Multhopp-Stephens H, Walling AK. Subungual exostosis: a simple technique of excision. Foot Ankle Int. 1995;16:88.
Murray WR. Onychocryptosis: principles of non-operative and operative care. Clin Orthop Relat Res. 1979;142:96.
Murtagh J. Patient education: ingrowing toenails. Aust Fam Physician. 1993;22:206.
Ney GC. An operation for ingrowing toe nails. JAMA. 1923;80:374.
O’Donoghue DH. Treatment of ingrown toe nail. Am J Surg. 1940;50:519.
Pearson HJ, Bury RN, Wapples J, et al. Ingrowing toenails: is there a nail abnormality? J Bone Joint Surg. 1987;69B:840.
Persichetti P, Simone P, Vecchi GL, et al. Wedge excision of the nail fold in the treatment of ingrown toenail. Ann Plast Surg. 2004;52:617.
Pettine KA, Cofield RH, Johnson KA, et al. Ingrown toenail: results of surgical treatment. Foot Ankle. 1988;9:130.
Quenu P. Des limites de la matrice de l’ongle incarné: applications au traitement de l’ongle incarné. Bull Mém Soc Chir. 1887;13:255.
Samman PD. The human toe nail: its genesis and blood supply. Br J Dermatol. 1959;71:296.
Scott P. Ingrown toenails. Med J Aust. 1968;1:48.
Siegle RJ, Stewart R. Recalcitrant ingrowing nails: surgical approaches. J Dermatol Surg Oncol. 1992;18:744.
South DA, Farber EM. Urea ointment in the nonsurgical avulsion of nail dystrophies: a reappraisal. Cutis. 1980;25:609.
Stilwell G. On the treatment of ingrowing toe-nail. BMJ. 1872.
Thompson TC, Terwilliger C. The terminal Syme operation for ingrowing toenail. Surg Clin North Am. 1951;31:575.
Townsend AC, Scott PR. Ingrowing toenail and onychogryposis. J Bone Joint Surg. 1966;48B:354.
Watson-Cheyne W, Burghard FF. A manual of surgical treatment. London: Longmans, Green; 1912.
Wilson TE. Treatment of ingrowing toenails. Med J Aust. 1944;2:33.
Winograd AM. A modification in the technique of operation for ingrown toe-nail. JAMA. 1929;92:229.
Wright G. Laser matricectomy in the toes. Foot Ankle. 1989;9:246.
Zadik FR. Obliteration of the nail bed of the great toe without shortening the terminal phalanx. J Bone Joint Surg. 1950;32B:66.
Zaias N. The nail in health and disease. New York: SP Medical & Scientific Books; 1980.
Zook EG, Van Beek AL, Russell RC, et al. Anatomy and physiology of the perionychium: a review of the literature and anatomic study. J Hand Surg. 1980;5:528.
Zuber TJ, Pfenninger JL. Management of ingrown toenails. Am Fam Physician. 1995;52:181.

