CHAPTER 25 Discography
INTRODUCTION
Discography was developed in the late 1940s for diagnosing lumbar intervertebral disc herniation.1,2 In contemporary practice, discography refers to provocation discography in which the most important component is the evaluation of pain reproduction caused by pressurizing the disc with contrast medium. Discography is conceptually an extension of clinical examination, tantamount to palpating for tenderness.3 A precision injection of contrast dye into the disc nucleus stimulates nerve endings4 (via two mechanisms: chemical stimulus from contact between contrast dye and sensitized tissues, and a mechanical stimulus resulting from fluid-distending stress).
Discography is a potential solution to the diagnostic dilemma concerning which patients to treat surgically and at what segmental level. In 1995, the North American Spine Society stated that discography, especially followed by CT scanning, may be the only study capable of providing a diagnosis or permitting precise description of the internal anatomy of a disc and the integrity of disc substructures.5 Although new diagnostic imaging tools have been developed and are widely used, discography is still practiced. Discography remains particularly useful in problematic cases unresolved by MRI or myelography and in patients for whom surgery is contemplated.6
In this chapter, the technical considerations and complications of discography are discussed.
INDICATIONS AND CONTRAINDICATIONS
According to the position statement on discography by the North American Spine Society:5
PREPROCEDURAL EVALUATION AND PATIENT PREPARATION
Patient preparation
Since the disc is avascular, there is an increased risk of disc space infection and most discographers use prophylactic antibiotics.3 Animal studies have shown that intradiscal and intravenous antibiotics prevent discitis, and prophylactic intravenous antibiotics 20 minutes prior to the procedure are recommended.7,8 In addition, many discographers add 2–6 mg/mL of a cephalosporin antibiotic to the nonionic contrast solution.8 All procedures should be performed under sterile conditions, including sterile scrub and double gloves.
TECHNIQUE OF LUMBAR DISCOGRAPHY
Disc puncture
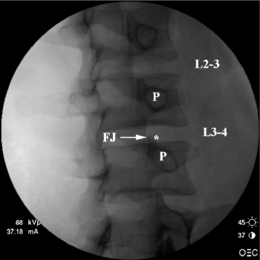
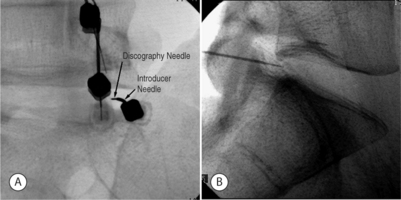
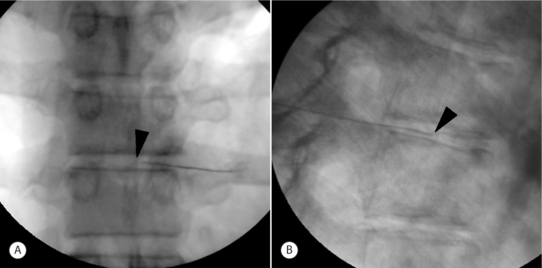
Prior to injection, a fluoroscopic examination of the spine is performed to confirm segmentation and determine the appropriate level for needle placement. Using AP view, the beam should be parallel to the inferior vertebral endplate. After selecting the target disc using AP view, the fluoroscopic beam is axially rotated until the facet joint space is located midway between the anterior and posterior vertebral margins. In this view, the insertion point is 1 mm lateral to the lateral margin of the superior articular process (Fig. 25.1).
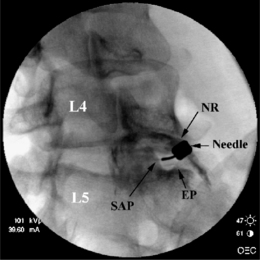
To avoid potential neural injury, the needle should be directed into the safe triangle. The borders of the safe triangle include the nerve root for the superior tangential border, the vertebral endplate of the target disc for inferior border, and the lateral margin of the superior articular process for the medial side line (Fig. 25.2). To minimize nerve trauma, one should use a needle with a short, noncutting bevel or blunt-pointed tip with a side port.
Puncture of T12–L1 through L4–L5 intervertebral discs
In the double-needle technique, a styletted 25-gauge, 6-inch needle is placed into each disc through a 20-gauge 3.5-inch introducer needle under fluoroscopic guidance. To protect the discographer’s hand from radiation exposure, forceps may be used to grasp the introducing needle. The introducer needle is advanced parallel to the fluoroscopic beam using an oblique fluoroscope view (Fig. 25.3).
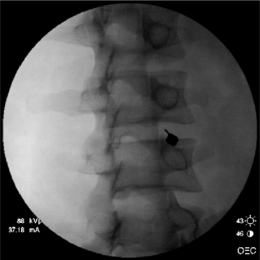
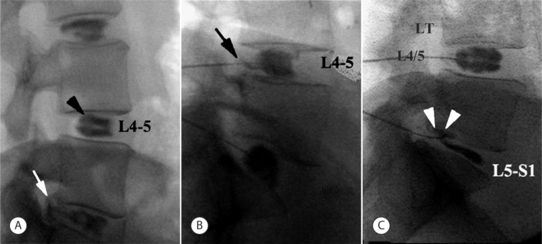
A slight ‘hockey-stick’ bend at the end of the introducer needle can improve navigation. If bony obstruction is encountered, the physician should confirm whether the needle has contacted the superior articular process or the vertebral body. If necessary, the needle may be slightly withdrawn and its trajectory modified. The introducer needle can be either advanced just over the lateral edge of the superior articular process or advanced to the margin of the disc. At the L5–S1 level, advancement may proceed just over the lateral edge of the superior articular process. When the introducer or discogram needle contacts the disc margin, the ideal position in the AP projection is on a line drawn between the midpoints of the pedicles above and below (Fig. 25.4A).
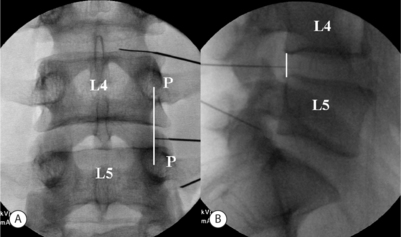
In no case should one advance the introducer or discogram needle medial to the inner pedicle margins before contacting the intervertebral disc. In the lateral view the needle should contact the disc between the posterior vertebral margins (Fig. 25.4B).
L5–S1 intervertebral disc
Due to increased facetal width and the presence of the iliac crest diacrest, puncture of the lumbosacral disc is more challenging. Instead of a direct lateral approach, once the introducer needle is advanced to the anterior border of the superior articular process of S1, a slight curve or ‘hockey-stick’ bend is needed to advance the discogram needle in a medial and slightly posterior direction around the SAP to contact the disc just anterior to the vertebral margin as viewed in the lateral fluoroscopy projection. Less experienced operators may find an 18/23-gauge needle combination easier to direct than the 20/25-gauge combination used for upper levels. Longer needle combinations may be required in muscular or obese patients. The fluoroscopy tube is rotated until about 1–2 cm of the L5–S1 disc is visualized between the superior articular process of S1 and the sacral ala (Fig. 25.2).
Using the oblique fluoroscopic view, the guide needle is introduced toward the bony notch between the sacral ala and superior articular process of S1 until the needle tip lies immediately adjacent to the anterolateral aspect of the superior articular process of the sacrum (Fig. 25.5A). The needle tip should not be handled directly, but should be wrapped in sterile gauze. The distal 2–3 cm of the needle should be bent in a direction opposite the bevel. The degree of curve is determined by the operator on the basis of how much deflection is required in the patient at hand for the needle to approach the target disc center. In a lateral fluoroscopic projection, the 25-gauge discogram needle is passed through the guide needle while the guide needle is held firmly in position. The inner needle is advanced until the tip emerges from the guide needle. The inner needle is advanced under direct fluoroscopic vision. As it emerges, the guide needle is retracted slightly (Fig. 25.5A). This unsheathes the procedure needle, which should be turned so that the curve or bend bows the introducer needle in a medial and posterior direction through the safe triangle. Once the needle encounters the anulus fibrosus, its position is checked and confirmed in both AP and lateral fluoroscopy views. In the lateral view the needle should contact the disc 2–3 mm anterior to the vertebral margin (Fig. 25.5B) and in the AP view the needle should ideally be on a line bisecting the midpoint of the L5 and S1 pedicles.
Provocation using pressure manometry
Imaging
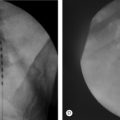
The appearance of the normal nucleus following the injection of contrast medium is unmistakable: the contrast medium assumes a lobular pattern or a bilobed ‘hamburger’ pattern (Fig. 25.6A). A variety of patterns may occur in abnormal discs.9 Contrast medium may extend into radial fissures of various lengths but remain contained within the disc (Fig. 25.6B), or it may escape into the epidural spaces through a torn anulus (Fig. 25.6A). In some cases (Fig. 25.6C), the contrast medium may escape through a defect in the vertebral endplate.3 However, none of these patterns alone is indicative of whether the disc is painful; that can be ascertained only by the patient’s subjective response to disc injection.
Immediately after discography, CT–discography may be performed to define fissures extending to the outer third of the anulus and extending circumferentially within the anulus fibrosus. Radial annular tears can be found by discography, but only the postdiscogram CT axial view clearly shows the location and size of fissures within the anulus fibrosus.3 Sachs et al.10 developed the Dallas discogram scale, in which annular disruption is graded on a 4-point scale. Grade 0 describes contrast medium contained wholly within a regular nucleus pulposus. Grades 1 to 3 describe the extension of contrast medium along radial fissures into the inner third, middle third, and outer third of the anulus fibrosus, respectively. Aprill and Bogduk11 proposed a modified Dallas description scale which includes grade 4, distinguished from grade 3 by the spread of contrast medium circumferentially within the substance of the anulus fibrosus and subtending a >30° arc at the disc center.
Interpretation
Adding pressure monitoring to provocative discography improves interobserver reliability and, as a result, reproducibility. A positive discogram requires an abnormal disc, pain response =6/10 (numeric rating scale; NRS), pressure level =50 psi, pain described by the participant as ‘familiar,’ and at least one negative control disc. One must, however, be aware that transient pain is often provoked when fissures are suddenly opened. In most cases, such pain should not be used as evidence of a true-positive response unless pain >6/10 is sustained for more than 30 seconds. Most experienced discographers will perform a confirmatory re-pressurization once a suspected positive response is provoked. If re-pressurization does not again provoke significant concordant pain at 50 psi or less above opening pressure, then the initial response will remain indeterminate. These criteria for positive response were reconfirmed in a study performed in 13 normal asymptomatic volunteers.11a,11b When the operational criteria for discography were set to pressure =50 psi and evoked pain intensity >4, the expected false-positive rate was <10%. However, a false-positive rate of zero could be secured either if the pain score was held at 4 and the injection pressure lowered to 20 psi, or if the pressure was held at 50 psi and the required pain score was raised to 6. To increase discography specificity, local anesthetic may be injected into the positive disc in an effort to obtain prolonged relief of pain from that disc (analgesic discography). In a preliminary study investigating the reliability of analgesic discography, 78% of patients showed significantly prolonged pain relief after local anesthetic injection. Those patients underwent fusion surgery and were followed to observe surgical outcome (T. Alamin, personal communication, 2004).
In addition to these criteria for positive discography, disc anulus sensitivity may also be graded. Using the protocol of Derby et al.,12 four disc categories may be defined: (1) chemical discs, which provoke pain at 15 psi above opening pressure, (2) mechanical discs, which provoke pain at pressures between standing and lying, or 15–50 psi above opening pressure, (3) indeterminate discs, which provoke pain at 51–90 psi above opening pressure, and (4) normal discs, with no pain provocation. If a disc is painful at >50 psi, the response cannot be considered clinically significant, since it is difficult to distinguish from the effect of mechanically stimulating a normal or subclinically symptomatic disc.13 Excessive stimulation involving pressures >50 psi above opening pressure and uncontrolled, high injection speeds increase false-positive responses.
TECHNIQUE OF CERVICAL DISCOGRAPHY
Disc puncture
Midline approach
Once the levels are identified, the fluoroscopy tube is rotated in a cephalad–caudal direction to bring the endplates parallel to the beam. Pressure is applied with the index finger to the space between the trachea and the medial border of the sternocleidomastoid. Firm but gentle pressure will displace the great vessels laterally and the laryngeal structures and trachea medially. Below C4, the right common carotid artery and the internal carotid artery above C4 artery are palpated. The fingers are insinuated until they encounter the anterior surface of the vertebral column. The patient is monitored closely for vasovagal signs, which may be caused by compression of the catrotid artery during manual displacement with needle entry.14
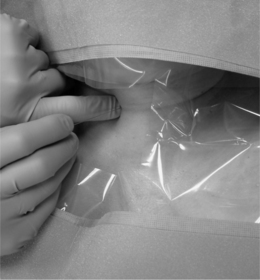
The spinal needle or metal instrument can be used as a guide for needle insertion. The instrument is placed on the skin parallel to the disc space using fluoroscopic guidance and a marker pen is used to draw the lines on the skin over the intervertebral disc spaces. The needle entry point should be medial to the medial border of the sternocleidomastoid, and not through that muscle. The declination of the sternocleidomastoid ensures that at C3–4 the puncture point lies more laterally and will avoid the pharynx, whereas at C7–T1 it will be more medial and avoid the apex of the lung. One should use the shortest needle possible to reach the center of the target disc. Longer needles are more difficult to hold and direct and easier to inadvertently pass through the disc. A 23- or 25-gauge, 2.5-inch spinal needle is typically used for the procedure. With the point of the needle just medial to or under the index finger, both the needle and index finger can be moved in unison. The trachea is pushed medially by the fingernail of the index finger, and when the needle overlies the disc at a 20–40° angle, the needle is introduced through the skin directed toward the anterior lateral aspect of the disc (Fig. 25.7). In some patients, the discs can be directly palpated and the finger moved almost perpendicular to the disc center. Patients with short, thick necks or a large, immobile larynx are a challenge. On contact with the anulus, the patient may experience transient pain. The needle is advanced into the substance of the disc under direct AP fluoroscopic visualization. All movements of the needle should be slow and deliberate. One must be very careful not to pass the needle through the disc and into the epidural space or spinal cord. Use of a short needle may be helpful. Novice discographers may want to touch the anterior disc body just above or below the disc margin to help judge the depth of penetration. Once the needle is passed several millimeters into the disc, the lateral view is used to guide further advancement.
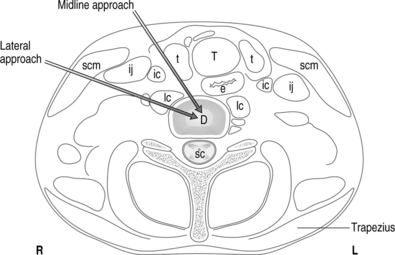
Lateral approach
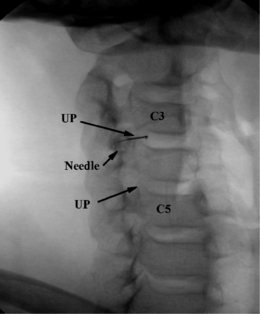
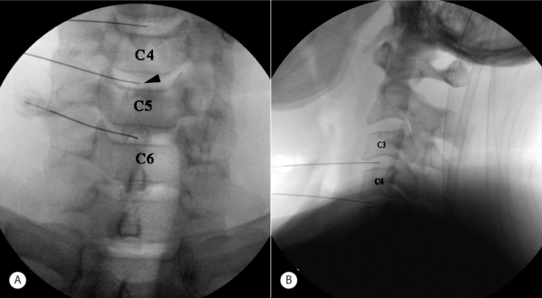
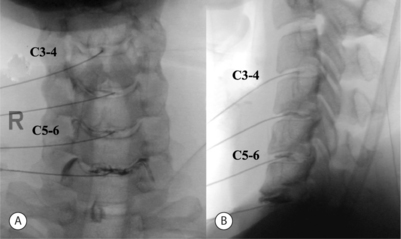
Although in the medial approach the needle traverses the same tissue plane used by surgeons to gain access to the cervical intervertebral disc during open and percutaneous surgical procedures, many nonsurgeon interventionists have been trained to use a more lateral approach. In this approach, the disc level is identified by fluoroscopy, and the AP view is adjusted until the vertebral endplates of the target level show parallel lines on the fluoroscopic image. The fluoroscopic beam is then axially rotated until the anterior margin of the uncinate process is moved approximately one-quarter of the distance between the anterior and posterior lateral vertebral margins. In this view, the target insertion point is 1–2 mm medial to the anterior margin of the uncinate process (Fig. 25.8). The skin entry point will be over the lateral neck muscles and posterior to the great vessels or trachea (Fig. 25.9). Pressure displacement of the great vessels is difficult and usually not done. However, this anatomic region is highly vascular and one should carefully observe patients for signs of hematoma during and after the procedure. A 25-gauge, 2.5-inch spinal needle is directed toward the anterior aspect of the uncinate process and should enter the disc 1–2 mm anterior to the process, then slowly advanced to the center of the disc. One should use a needle no longer than is required to reach the center of the target disc. Before injection of contrast, the needle position within the disc is confirmed with both AP and lateral fluoroscopic images (Fig. 25.10). At C7–T1 the medial approach is preferred to avoid puncturing the apex of the lung.
Provocation and interpretation
The utility of discography for solving puzzling presentations of atypical pain resulting from cervical lesions has been demonstrated. In such cases, MRI did not disclose the pain-producing lesion.14,15 Normal cervical discs accept fairly small volumes (0.25–0.5 mL) and intradiscal injection of normal discs is not painful.15,16 Schellhas et al.15 studied the accuracy of discography and MRI in the identification of source(s) of cervical discogenic pain. The results showed that discographically normal discs were never painful, significant cervical disc anulus tears often escape MRI detection, and that MRI cannot reliably identify the sources of cervical discogenic pain.15
Pain questioning and fluoroscopic imaging are performed as in lumbar discography. However, pressure-controlled injections are usually not used. If the tip of the needle has been correctly placed in the center of the disc, a 1 mL or 3 mL syringe containing contrast media is attached. Manual syringe pressure is increased slowly until the intrinsic disc pressure is exceeded. Volumes as small as 0.2 mL may cause visible separation of the vertebrae, which should be monitored by fluoroscopy. Concordancy and pain intensity are recorded at 0.2 mL increments.
Use of an NRS can help the patient quantify the intensity of pain experienced relative to the intensity of pain during the injection of adjacent discs. In healthy adults, the intervertebral discs of the cervical spine have a structure similar to that of the lumbar discs, consisting of an anulus fibrosus and nucleus pulposus. However, it has been observed that in the first and second decades of life before complete ossification occurs, lateral tears occur in the anulus fibrosus. Tears are most probably induced by motion of the cervical spine in the bipedal posture.17 In childhood, the uncovertebral joints begin to undergo an ongoing transformation.18 Tears in the lateral part of the disc tend to enlarge toward the medial aspect of the intervertebral disc. The development of such tears, uncinate fissures, through both sides may result in a complete transverse splitting of the disc. Such a process may be observed in the second and third decades of life in the lower cervical spine when the intervertebral disc is split in the middle into equal halves.17 These uncinate fissures are a normal finding, and rarely will one see a ‘normal’ nucleogram.
A normal cervical disc offers firm resistance, and accepts less than 0.5 mL of solution with little discomfort at the time of distention. In most patients there will be transient pain when the uncinate fissures fill with contrast (Fig. 25.11). Pain provocation should be ignored unless persistent, concordant, and significant pain can be reproduced by repeated gentle manual pressurizations. Approximately 1 mL of injected contrast medium is usually enough to opacify the nucleus and fill lateral or posterior annular fissures. A positive response requires provocation of significant (>6/10) concordant pain during a confirmatory repeat injection of another 0.1–0.2 mL of contrast medium. One should also consider retesting adjacent levels to compare pain intensities and concordance of pain. It is not uncommon to provoke concordant pain at multiple levels. In addition, one often will cause separation of the endplates during pressurization, and this movement may cause pain secondary to a symptomatic z-joint.
In addition to provocative testing, analgesic discography may be a useful technique for the evaluation of chronic cervical pain.14 Patients whose clinical pain pattern is reproduced or provoked during the injection of contrast media may benefit from analgesic discography. Once a painful disc has been identified in the course of discography, and once all discographic radiographs have been taken, 0.5 mL of bupivacaine can be injected into the disc to test pain relief. The patient’s accustomed pain should be relieved by this action. The duration of relief should be monitored and recorded by the patient. Relief of accustomed pain for a period consistent with the expected duration of action of the local anesthetic agent used constitutes strong evidence that the disc in question is the pain source. In practice, however, pain relief following multiple-level provocation discography is difficult to assess. Analgesic discography is probably best evaluated at a separate session, and only the one disc in question should be injected with local anesthetic.
TECHNIQUE OF THORACIC DISCOGRAPHY
Disc puncture
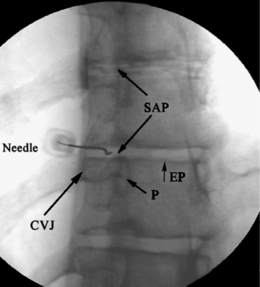
The current standard technique of thoracic discography was described by Shellhas et al.19 in 1994. Prior to the procedure, a fluoroscopic examination of the thoracic spine is performed to confirm segmentation and determine the safest and most accessible route to each disc. After the discographer selects the target disc on AP view, the fluoroscope is rotated in a cephalad–caudal direction to align the endplates. The fluoroscopic beam is then rotated ipsilaterally until the corner of the intervertebral disc space is visualized between the superior articular process and the costovertebral joint. Typically, this degree of ipsilateral rotation will superimpose the tip of the spinous process on the edge of the contralateral vertebral body. In this view, the insertion point is just lateral to the interpedicular line (Fig. 25.12) and approximately 3 cm lateral to the spinous process. Prior to needle placement, the skin and subcutaneous and deep muscular tissues along the trajectory of each needle are infiltrated with local anesthetic. Most discographers prefer a single-needle technique using either a 23- or 25-gauge, 3.5-inch needle. A slight bend placed on the end of the needle will facilitate changing directions by needle rotation.
The trajectory of the needle is roughly parallel and behind the rib as it passes anterior to attach to the spine at the costovertebral joints. One aims at a round to square section of the posterior lateral disc that can be seen through a 1–3 mm opening between the superior articular process and the rib (Fig. 25.13). The needle should be advanced in short increments and the direction changed as necessary by needle rotation. If one stays behind the rib there is no chance of penetrating the lung. Although passage of the needle behind the rib is usually uneventful, passage of the needle between the rib and superior articular process may be difficult. The needle often contacts either the superior articular process or the body of the rib, and it is often difficult to tell which structure obstructs needle advancement. The bend on the needle can be rotated one way or the other and readvanced to assist a needle direction change and allow passage through the small aperture. Once the needle has passed anterior to the superior articular process using a lateral fluoroscopic view, the needle bend is turned posteriorly to facilitate advancing the needle in a more posterior direction (Fig. 25.13).
POTENTIAL RISKS AND COMPLICATIONS
Lumbar discography
The main complications of lumbar discography include infection (e.g. discitis) and neural injury.20 Discitis following lumbar discography has been more frequently documented and studied than cervical discitis. Causative organisms have been identified as Staphylococcus aureus, S. epidermis, and E. coli,21,22 suggesting inoculation with surface organisms or misadventure through bowel perforation. To prevent discitis, prophylaxis with antibiotics before and after the procedure may be used; however, this practice remains controversial. To avoid infection, stringent attention to aseptic technique is critical. Some authors consider discitis a rare complication of lumber discography,23–25 whereas others have found overall rates of 2.3% per patient and 1.3% per disc7 or 0.1% per patient and 0.05% per disc.22 Discitis incidence is higher for single, large-gauge needles and much lower for double-needle techniques.26 The authors have avoided discitis in all but one case in over 2000 lumbar discograms over a 10-year period. Animal studies have shown that intradiscal8 and intravenous7 antibiotics prevent discitis. The recommended regimen is 1 mg of cefazolin per mL of contrast medium injected into the disc at the time of discography.8 However, many discographers use 3–6 mg cefazolin (or equivalent antibiotic) per mL of contrast. Even with prophylactic antibiotics, epidural abscess after discography have been reported.27,28
Other complications include spinal cord or nerve root injury, cord compression or myelopathy, urticaria, retroperitoneal hemorrhage, nausea, convulsions, headache, and most commonly, increased pain.5 Disc herniation following discography is very rare,29 and there is little evidence that discography damages the disc.30 Freeman et al.31 recently reported no histological damage following needle insertion into sheep discs.
Cervical discography
Penetration of viscera such as the pharynx and esophagus is not a problem per se, but increases the risk of infection such as epidural abscess, retropharyngeal abscess, and discitis.22,32–34 Introduced organisms may be external, or from the pharynx or esophagus if penetrated. The reported incidence of cervical discitis is 0.1–0.5%.22,33 The most common presentation is severe exacerbation of axial pain, usually beginning 5–21 days following the procedure.22 Although the patient usually experiences chills, fever is an inconsistent finding. Administering preoperative intravenous antibiotics and adding antibiotics to the contrast solution will help minimize this risk. However, significant increases in pain following cervical discography should be investigated with tests that include a minimum of sedimentation rate and C-reactive protein. Any elevation in the former should be investigated with a contrast-enhanced MRI scan.
Passage of a 23- or 25-gauge needle though the carotid artery may occur in patients with heavy, short necks where displacement of the medial structures is difficult. Although this event may result in a hematoma, the swelling usually causes minor discomfort to the patient. Continued bleeding due to a genetic- or medication-related bleeding disorder could cause airway obstruction. Cervical discography is not an inherently unsafe procedure and can be performed with few complications when performed in sterile conditions by those well experienced with cervical disc injections.35
Thoracic discography
The main complications of thoracic discography include pneumothorax, discitis, and neural injury. Pneumothorax can complicate cervical, thoracic, or lumbar discography, but usually occurs in the thoracic spine with traumatic pleural puncture during discography, paravertebral block,36 or needle biopsies.37 Since Shellhas et al.19 described, and experts quickly adopted, the technique of accessing the thoracic disc behind the rib, pneumothorax has been a rare event. A small traumatic pneumothorax after percutaneous needle procedures without other significant injuries can be treated conservatively and usually does not need chest tube insertion.38 The complications with infection or neural injury at thoracic spine should be similar to those of the lumbar spine. To prevent discitis at thoracic spine, stringent attention to aseptic technique is critical, and prophylaxis with antibiotics before and after the procedure may be used.
CLINICAL TRIALS: LITERATURE REVIEW
Discography has been proposed as a potential solution to the diagnostic dilemma concerning which patients to treat surgically and at what segmental level. Lumbar discography for the diagnosis of abnormalities involving intervertebral discs has been used extensively as a diagnostic tool for evaluating low back pain (LBP) since the 1950s. Although new diagnostic imaging tools have been developed and are widely used, discography is still practiced. Discography remains particularly useful in problematic cases unresolved by MRI or myelography, and for patients for whom surgery is contemplated.6 In 1992, Osti and Fraser39 compared MRI with discography in disc disease and found that, using the current standard techniques, MRI failed to demonstrate some structural changes in the anulus that were visualized by discography. A similar result was obtained in a comparison of high-resolution CTs with discography.40 Several studies have demonstrated that MRI cannot reliably predict which discs are painful upon discography, at least not to the level of confidence required to rely solely on MRI for surgical decision making.41,42 A high intensity zone (HIZ) in the posterior anulus visualized by MRI has been proposed as a marker for painful discs.11,43 While highly specific, the sensitivity of this finding is only 26%, limiting the usefulness of the HIZ in selecting patients for surgery.44
While numerous papers have examined the usefulness of discography, some physicians still question its reliability.45,46 Critics point towards mismatches between morphological features and clinical complaints and false-positive rates. Discography, especially combined with CT scanning, is exquisitely sensitive for identifying morphologic disc abnormalities, and the frequency of discography-detected abnormal discs in the LBP population is quite high. For example, Grubb et al.29 found that in 78% of their patients with LBP, discography afforded positive findings for abnormality at one or more levels, whereas plain radiography and myelography demonstrated no such disease. Brodsky and Binder23 also found that discography revealed abnormalities in many patients with normal-appearing myelograms. The frequency of morphologic abnormalities revealed via discography in the back pain population is high, and increases with age,47,48 putatively due to painless degenerative changes.48 In addition, the location of an annular tear and the location of pain appear to be uncorrelated.49 Discrepancies between morphological appearance and pain provocation have also been described.50 Millete and Melanson51 reported retrospectively that concordant pain was evoked by injection in only 37% of patients with a morphological abnormality documented by discography. Antti-Poika et al.52 reported only a 52.8% concordant pain provocation rate in discs where discography showed abnormal morphological changes. There have been some reports that only anulus tears may be reliably associated with pain provocation, and that other degeneration patterns were not necessarily associated with a pain response. It is clear that abnormal morphological structures revealed by discography are considered too non-specific to be clinically useful, and that positive results should be limited to those eliciting concordant pain.46,53
Several series of asymptomatic patients have shown abnormal morphological findings using discography and CT–discography.53–55 Sachs et al.10 reported a 13% incidence of abnormal disc structure detected by postdiscography CT scanning without pain provocation in a large series of patients. Several authors have also discussed that severe back pain may be elicited by discography in patients without a prior history of such pain.45,54,55 Early work by Holt55 reported a 36% rate of positive discography in asymptomatic subjects, although this study contained methodological flaws. These findings were subsequently refuted by Walsh et al.,53 who demonstrated a 0% rate of positive discography in asymptomatic volunteers and established reproducible criteria for positive discography. Walsh studied 10 asymptomatic subjects and 7 patients with chronic LBP. Criteria for a positive result included 3/5 pain intensity (using a pain thermometer), similar distribution of pain, two types of pain behavior assessed by videotape review, and structural degeneration. Antti-Poika et al.52 reported in a prospective study of 279 injected discs in 100 patients that injection elicited concordant pain in >13% of patients with normal disc anatomy.
Caragee et al.54 expanded on Walsh’s study of asymptomatic subjects by examining a cohort without LBP but with clinical characteristics closely matching those of patients with LBP. Results showed that, in individuals with normal psychometrics without chronic pain, the rate of false positives is very low if strict criteria are applied, and that false-positive rates increase with abnormal psychometrics and increased annular disruption.
Surgical fusion has been used for pain relief in discogenic LBP unresponsive to conservative therapy. The identification of exact pain generators has been challenging, and many studies have investigated the reliability of discography for determining pain sources in LBP patients. Colhoun et al.56 studied 195 patients with axial pain and reported that of 137 patients with a discogram positive for disc disease and provoked concordant pain, 89% derived significant, sustained clinical benefit from operation. Twenty-five patients showed morphologic disc abnormalities, but no provocation of concordant pain on discography. Among this group, only 52% had clinical success. Blumenthal et al.57 reported that 74% of patients with internal disc disruption returned to work following anterior lumbar fusion performed based upon discography. In a multicenter surgical and nonsurgical outcome study after pressure-controlled discography, Derby et al.12 stated that precise prospective categorization of positive discographic diagnoses may predict treatment outcomes, surgical or otherwise, thereby greatly facilitating therapeutic decision-making. In addition, patients with highly sensitive discs at low pressure appear to achieve significantly better long-term outcomes with interbody/combined fusion than with intertransverse fusion. Finally, although imperfect, discography is relatively safe, shows substantial sensitivity for identifying painful discs, and may predict surgery-related outcomes.
SUMMARY
Lumbar discography has been widely used for evaluating discogenic LBP. However the diagnostic power of discography remains controversial.58 Walsh et al.53 showed that the use of strict criteria for a positive test, including review of videotaped responses, affords excellent accuracy for the diagnosis of discogenic LBP. When excluding patients with somatization, applying more precise criteria for determining a positive level, and using a manometric grading scale, the specificity of lumbar discography increases 80–100%.3 Based on these data, Caragee et al.45 concluded that in individuals with normal psychometrics without chronic pain, false-positive rates increase with abnormal psychometrics and increased annular disruption, and that the rate of false positives is very low if strict criteria are applied. False-positive rates of 40–50% in discogram studies of patients without a history of LBP have been obtained.54,59,60
Since these studies, there have been advances in discography techniques and diagnostic criteria. One important recent advance has been the introduction of pressure-controlled manometric discography, which permits control of intradiscal pressure and the rate of contrast dye injection. Previous discogram studies assessing false-positive rates have limitations which include use of manual injections, uncontrolled injection rates, unrecorded and/or unreported opening and dynamic pressures, volumes, and maximal volumes. The authors have examined the diagnostic power of lumbar discography in select participants without present low back symptoms using advanced discogram techniques and criteria (R Derby et al., unpublished work, 2004). Results have shown that when using pressure-controlled techniques and precise criteria for positive discography (e.g., reproducible VAS pain > 6/10 with <50 psi intradiscal pressure, and <3.5 mL total volume) no false positives may be obtained for the diagnosis of discogenic LBP. Accordingly, discographers should carefully scrutinize positive responses obtained without pressure-controlled manometric discography and precise criteria. Strict attention and adherence to operational criteria reduces the risk of false-positive responses.13 The authors recommend positive criteria for lumbar pressure-controlled manometric discography as follows: numeric rating scale of pain above 6/10, <50 psi intradiscal pressure above opening pressure, <3.5 mL total volume, and at least one negative control disc.
Further, cervical discography is a safe and valuable diagnostic procedure if done by the highly trained and competent interventionist with expertise in the procedure.14 It is not a screening procedure but rather a confirmatory one. Even MRI is a useful adjunct to cervical discography; there are some MRI patterns that cannot be considered pathologic, and discography is required to diagnose discogenic pain syndrome.61 In a ‘select group’ of patients with chronic intractable neck pain but negative or indeterminate imaging findings who are being considered for surgical intervention, it can help localize the symptomatic level and potentially benefit the patients by surgical intervention.62 Finally, thoracic discography can be performed safely by experienced interventionists as a reliable tertiary diagnostic procedure to determine if degenerated discs on MR studies are related to clinical complaints.19 It can reveal the true source of pain and thus lead to precise and effective treatment.63
1 Lindblom K. Technique and results in myelography and disc puncture. Acta Radiol. 1950;34:321-330.
2 Lindblom K. Technique and results of diagnostic disc puncture and injection (discography) in the lumbar region. Acta Orthop Scand. 1951;20:315-326.
3 Bogduk NC, April C, Derby R. Discography. In: White A, Schofferman A, editors. Spine care. diagnosis and conservative treatment. St. Louis: Mosby; 1995:219-236.
4 O’Neill C, Derby R. Percutaneous discectomy using nucleoplasty. In: International 21st course for percutaneous endoscopic spinal surgery and complementary techniques. Zurich, Switzerland: 2003.
5 Guyer RD, Ohnmeiss DD. Lumbar discography. Position statement from the North American Spine Society Diagnostic and Therapeutic Committee [see comments]. Spine. 1995;20:2048-2059.
6 Greenspan A, Amparo EG, Gorczyca DP, et al. Is there a role for discography in the era of magnetic resonance imaging? Prospective correlation and quantitative analysis of computed tomography–discography, magnetic resonance imaging, and surgical findings. J Spinal Disord. 1992;5:26-31.
7 Fraser RD, Osti OL, Vernon-Roberts B. Iatrogenic discitis: the role of intra-venous antibiotics in prevention and treatment. An experimental study. Spine. 1989;14:1025-1032.
8 Osti OL, Fraser RD, Vernon-Roberts B. Discitis after discography. The role of prophylactic antibiotics. J Bone Joint Surg [Br]. 1990;72:271-274.
9 Adams MA, Dolan P, Hutton WC. The stages of disc degeneration as revealed by discograms. J Bone Joint Surg [Br]. 1986;68:36-41.
10 Sachs BL, Vanharanta H, Spivey MA, et al. Dallas discogram description. A new classification of CT/discography in low-back disorders. Spine. 1987;12:287-294.
11 Aprill C, Bogduk N. High-intensity zone: a diagnostic sign of painful lumbar disc on magnetic resonance imaging. Br J Radiol. 1992;65:361-369.
11a Derby R, Lee SH, Kim BJ, et al. Pressure-controlled lumbar discography in volunteers without low back pain symptoms. Pain Med. 2005;6:213-221.
11b Derby R, Kim BJ, Lee SH, et al. Comparison of discographic findings in asymptomatic subject discs and the negative discs of chronic LBP patients: can discography distinguish asymptomatic discs among morphologically abnormal discs. Spine J. 2005;5:389-394.
12 Derby R, Howard MW, Grant JM, et al. The ability of pressure-controlled discography to predict surgical and nonsurgical outcomes. Spine. 1999;24:364-371. discussion 371–372
13 Endres S, Bogduk NC. Lumbar disc stimulation. In: International spinal injection society practice standards and protocols. San Francisco: ISIS; 2003.
14 Singh V. The role of cervical discography in interventional pain management. Pain Physician. 2004;7:249-255.
15 Schellhas KP, Smith MD, Gundry CR, et al. Cervical discogenic pain. Prospective correlation of magnetic resonance imaging and discography in asymptomatic subjects and pain sufferers. Spine. 1996;21:300-311. discussion 311–312
16 Smith GW, Nichols PJr. The technique of cervical discography. Radiology. 1957;68:718-720.
17 Dvorak J. Epidemiology, physical examination, and neurodiagnostics. Spine. 1998;23:2663-2673.
18 Taylor JR, Twomey LT. Acute injuries to cervical joints. An autopsy study of neck sprain. Spine. 1993;18:1115. 1112
19 Schellhas KP, Pollei SR, Dorwart RH. Thoracic discography. A safe and reliable technique. Spine. 1994;19:2103-2109.
20 Thomas PS. Image-guided pain management. Philadelphia: Lippincott-Raven, 1997.
21 Agre K, Wilson RR, Brim M, et al. Chymodiactin postmarketing surveillance. Demographic and adverse experience data in 29 075 patients. Spine. 1984;9:479-485.
22 Guyer RD, Collier R, Stith WJ, et al. Discitis after discography. Spine. 1988;13:1352-1354.
23 Brodsky AE, Binder WF. Lumbar discography. Its value in diagnosis and treatment of lumbar disc lesions. Spine. 1979;4:110-120.
24 Simmons EH, Segil CM. An evaluation of discography in the localization of symptomatic levels in discogenic disease of the spine. Clin Orthop. 1975;108:57-69.
25 Wiley JJ, Macnab I, Wortzman G. Lumbar discography and its clinical applications. Can J Surg. 1968;11:280-289.
26 Fraser RD, Osti OL, Vernon-Roberts B. Discitis after discography. J Bone Joint Surg [Br]. 1987;69B:26-35.
27 Junila J, Niinimaki T, Tervonen O. Epidural abscess after lumbar discography. A case report. Spine. 1997;22:2191-2193.
28 Tsuji N, Igarashi S, Koyama T. [Spinal epidural abscess – report of 5 cases]. No Shinkei Geka. 1987;15:1079-1085.
29 Grubb SA, Lipscomb HJ, Guilford WB. The relative value of lumbar roentgenograms, metrizamide myelography, and discography in the assessment of patients with chronic low-back syndrome. Spine. 1987;12:282-286.
30 Johnson RG. Does discography injure normal discs? An analysis of repeat discograms. Spine. 1989;14:424-426.
31 Freeman BJ, Walters RM, Moore RJ, et al. Does intradiscal electrothermal therapy denervate and repair experimentally induced posterolateral annular tears in an animal model? Spine. 2003;28:2602-2608.
32 Lownie SP, Ferguson GG. Spinal subdural empyema complicating cervical discography. Spine. 1989;14:1415-1417.
33 Roosen K, Bettag W, Fiebach O. [Complications of cervical discography (author’s transl)]. ROFO Fortschr Geb Rontgenstr Nuklearmed. 1975;122:520-527.
34 Vogelsang H. [Cervical intervertebral discitis after discography (author’s transl)]. Neurochirurgia (Stuttg). 1973;16:80-83.
35 Guyer RD, Ohnmeiss DD, Mason SL, et al. Complications of cervical discography: findings in a large series. J Spinal Disord. 1997;10:95-101.
36 Lall NG, Sharma SR. ‘Clicking’ pneumothorax following thoracic paravertebral block. Case report. Br J Anaesth. 1971;43:415-417.
37 Kattapuram SV, Khurana JS, Rosenthal DI. Percutaneous needle biopsy of the spine. Spine. 1992;17:561-564.
38 Johnson G. Traumatic pneumothorax: is a chest drain always necessary? J Accid Emerg Med. 1996;13:173-174.
39 Osti OL, Fraser RD. MRI and discography of annular tears and intervertebral disc degeneration. A prospective clinical comparison [published erratum appears in J Bone Joint Surg Br 1992; 74(5):793] [see comments]. J Bone Joint Surg Br. 1992;74:431-435.
40 Milette PC, Raymond J, Fontaine S. Comparison of high-resolution computed tomography with discography in the evaluation of lumbar disc herniations. Spine. 1990;15:525-533.
41 Simmons JW, Emery SF, McMillin JN, et al. Awake discography. A comparison study with magnetic resonance imaging. Spine. 1991;16:S216-S221.
42 Zucherman J, Derby R, Hsu K, et al. Normal magnetic resonance imaging with abnormal discography. Spine. 1988;13:1355-1359.
43 Schellhas KP, Pollei SR, Gundry CR, et al. Lumbar disc high-intensity zone. Correlation of magnetic resonance imaging and discography. Spine. 1996;21:79-86.
44 Saifuddin A, Braithwaite I, White J, et al. The value of lumbar spine magnetic resonance imaging in the demonstration of annular tears. Spine. 1998;23:453-457.
45 Carragee EJ, Chen Y, Tanner CM, et al. Provocative discography in patients after limited lumbar discectomy: A controlled, randomized study of pain response in symptomatic and asymptomatic subjects. Spine. 2000;25:3065-3071.
46 Resnick DK, Malone DG, Ryken TC. Guidelines for the use of discography for the diagnosis of painful degenerative lumbar disc disease. Neurosurg Focus. 2002;13:1-9.
47 Smith SE, Darden BV, Rhyne AL, et al. Outcome of unoperated discogram-positive low back pain. Spine. 1995;20:1997-2000. discussion 2000–2001
48 Vanharanta H, Sachs BL, Ohnmeiss DD, et al. Pain provocation and disc deterioration by age. A CT/discography study in a low-back pain population. Spine. 1989;14:420-423.
49 Slipman CW, Patel RK, Zhang L, et al. Site of symptomatic annular tear and site of low back pain: is there a correlation? Spine. 2001;26:E165-E169.
50 Maezawa S, Muro T. Pain provocation at lumbar discography as analyzed by computed tomography/discography. Spine. 1992;17:1309-1315.
51 Milette PC, Melanson D. A reappraisal of lumbar discography. J Can Assoc Radiol. 1982;33:176-182.
52 Antti-Poika I, Soini J, Tallroth K, et al. Clinical relevance of discography combined with CT scanning. A study of 100 patients. J Bone Joint Surg [Br]. 1990;72:480-485.
53 Walsh TR, Weinstein JN, Spratt KF, et al. Lumbar discography in normal subjects. A controlled, prospective study. J Bone Joint Surg [Am]. 1990;72:1081-1088.
54 Carragee EJ, Tanner CM, Khurana S, et al. The rates of false-positive lumbar discography in select patients without low back symptoms. Spine. 2000;25:1373-1380. discussion 1381
55 Holt EPJr. The question of lumbar discography. J Bone Joint Surg [Am]. 1968;50:720-726.
56 Colhoun E, McCall IW, Williams L, et al. Provocation discography as a guide to planning operations on the spine. J Bone Joint Surg [Br]. 1988;70:267-271.
57 Blumenthal SL, Baker J, Dossett A, et al. The role of anterior lumbar fusion for internal disc disruption. Spine. 1988;13:566-569.
58 Carragee EJ. Prevalence and clinical features of internal disk disruption in patients with chronic low back pain [letter; comment]. Spine. 1996;21:776-777.
59 Carragee EJ, Alamin TF, Grafe M, et al. Provocative discography in volunteer subjects with mild persistent low back pain. In: 29th Annual meeting of international society for the study of the lumbar spine. Cleveland, USA. 2002:3.
60 Carragee EJ, Tanner CM, Yang B, et al. False-positive findings on lumbar discography. Reliability of subjective concordance assessment during provocative disc injection. Spine. 1999;24:2542-2547.
61 Motimaya A, Arici M, George D, et al. Diagnostic value of cervical discography in the management of cervical discogenic pain. Conn Med. 2000;64:395-398.
62 Parfenchuck TA, Janssen ME. A correlation of cervical magnetic resonance imaging and discography/computed tomographic discograms. Spine. 1994;19:2819-2825.
63 Winter RB, Schellhas KP. Painful adult thoracic Scheuermann’s disease. Diagno-sis by discography and treatment by combined arthrodesis. Am J Orthop. 1996;25:783-786.