CHAPTER 3 Diagnostic upper endoscopy
Introduction
Esophagogastroduodenoscopy (EGD) is one of the commonest procedures that a gastroenterologist performs. This chapter covers how to perform a diagnostic upper endoscopy. Therapeutic interventions in upper endoscopy are discussed in Chapter 7.
1 Upper gastrointestinal anatomy
1.1 The esophagus
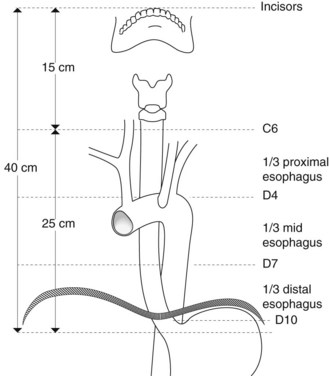
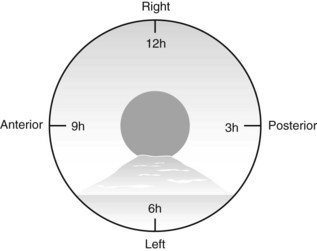
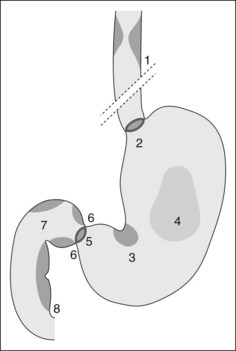
The cervical segment of the esophagus begins at the upper esophageal sphincter, which is 15 cm from the incisors and is 6 mm long (Fig. 1). The thoracic segment of the esophagus is approximately 19 cm long. Its lumen is open during inspiration and closed during expiration. The imprint of the arch of the aorta is sometimes apparent at 25 cm from the incisors on the left. How to describe where a lesion is in terms of anterior, posterior, right, left, is very important and is shown in Figure 2. The transition between the esophagus and gastric epithelium (Z line) is identified by the change in color of the mucosa from pale-pink to reddish-pink.
1.2 The stomach
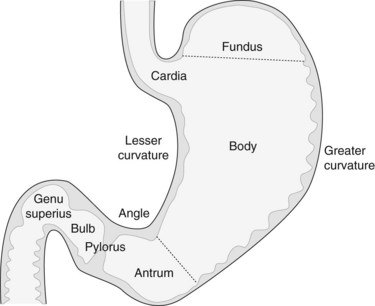
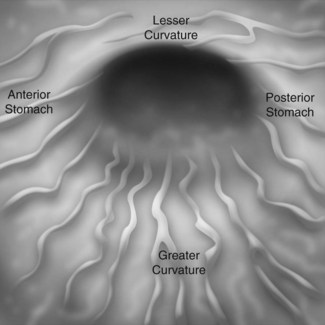
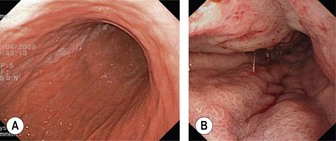
The stomach extends from the cardia to the pylorus (Fig. 3). The fundus is the portion of the stomach above the horizontal line that passes through the cardia and that is visible in a retroflexed endoscopic view. The body is the remainder of the upper part of the stomach and is delimited at its lower edge by the line that passes through the angular notch. Endoscopically, the transition from the body to the antrum is seen as a transition from rugae to flat mucosa (Fig. 4). The pylorus is a circular orifice, which leads to the first part of the duodenum.
 Clinical Tip
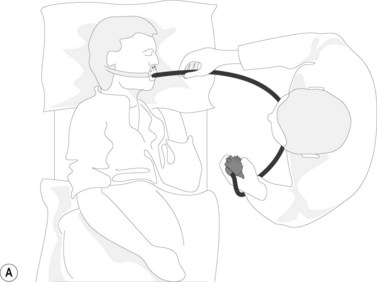
When the patient is in the lateral left decubitus position, the greater curvature is at the bottom, the lesser curvature at the top, the posterior stomach wall on the right, and the anterior stomach wall is on the left (Fig. 4). The anterior wall can be visualized with transillumination, a technique used for PEG insertion (see Ch. 4). A normal stomach distends fully with insufflation, with the rugae flattening out (Fig. 5).
1.3 The duodenum
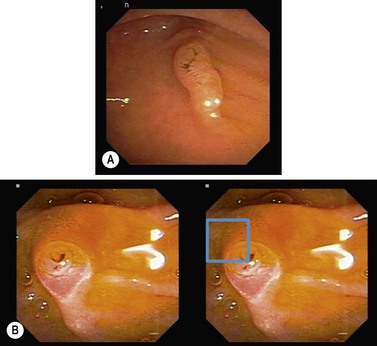
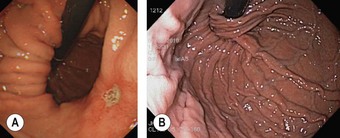
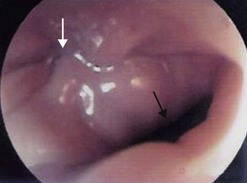
The duodenum extends from the pylorus to the duodeno-jejunal angle. The duodenal bulb extends from the pylorus to the genu superius. The second portion (D2) extends from the genu superius to the genu inferius. The ampulla of Vater is usually found in a horizontal fold in the middle of the second portion of the duodenum (Fig. 6). The accessory papilla is a small protuberance, which is usually found just superior and proximal to the ampulla of Vater.
1.4 Postoperative endoscopy of the stomach and duodenum
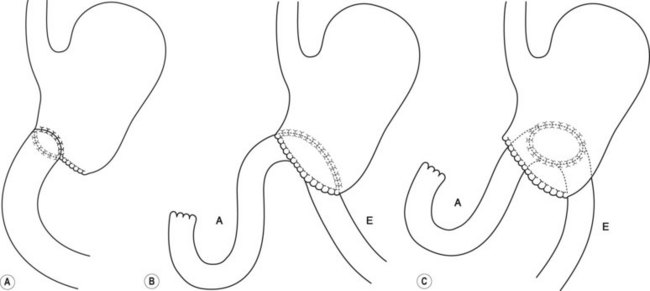
Common post-surgical anatomy includes a Billroth I (Fig. 7), where only one lumen is present. In a Polya or Billroth II (Fig. 7), two gastrojejunal orifices are visible. The afferent limb leads to the duodenum, while the efferent limb leads to the colon.
 Clinical Tip
2 Indications
Box 1 Indications for upper endoscopy
Box 2 Upper endoscopy is not indicated
2.1 Dyspepsia
Age ≥50 with new onset dyspepsia:
 Clinical Tips
2.2 Dysphagia or odynophagia
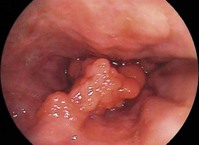
Unless there is a clear history pointing to a neurological cause or ENT origin for dysphagia, all patients should undergo urgent EGD as their first investigation (Fig. 8). Note, patients with GERD can present with atypical symptoms including laryngitis, chronic cough or bronchospasm.
2.3 Gastroesophageal reflux
2.5 Assessment and treatment of upper gastrointestinal bleeding
2.6 Investigation of chronic anemia and/or iron deficiency
2.7 When to obtain duodenal biopsies
Duodenal biopsies during upper endoscopy are indicated in the following situations:
 Clinical Tip
2.8 To assess portal hypertension
2.9 Screening or surveillance in patients at risk of upper GI malignancy
Upper endoscopy is also indicated for screening pre-malignant lesions.
2.9.1 Gastroduodenal ulcers
 Clinical Tip

2.11 Gastric epithelial polyps
2.12 Gastric intestinal metaplasia
2.13 Pernicious anemia
2.14 Gastric/bariatric surgery patient
2.14.1 Pre-surgery
2.15 Familial adenomatous polyposis (See Box 4 in Chapter 1.11)
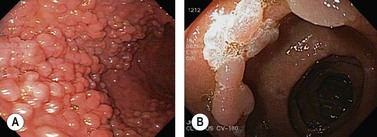
Table 1 Spigelman classification of duodenal polyps in patients with FAP
| Polyp (n) | 1–4 | 1 point |
| 5–20 | 2 points | |
| >20 | 3 points | |
| Size (mm) | 1–4 | 1 point |
| 5–10 | 2 points | |
| >10 | 3 points | |
| Histology | Tubulous | 1 point |
| Tubulovillous | 2 points | |
| Villous | 3 points | |
| Degree of dysplasia | Low | 1 point |
| High | 3 points |
| Spigelman stage | Management | Endoscopic surveillance |
|---|---|---|
| 0 (0 points) | Endoscopic surveillance | 4 years |
| I (1–4 points) | Endoscopic surveillance | 2–3 years |
| II (5–6 points) | Endoscopic surveillance | 2–3 years |
| III (7–8 points) | Surgery or endoscopic management | 6–12 months |
| IV (9–12 points) | Consider referral for surgery | 3–6 months |
 Warning!
3 Contraindications


4 Equipment
4.1 Gastroscope


5 Endoscopy technique
5.1 Handling the endoscope
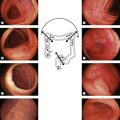
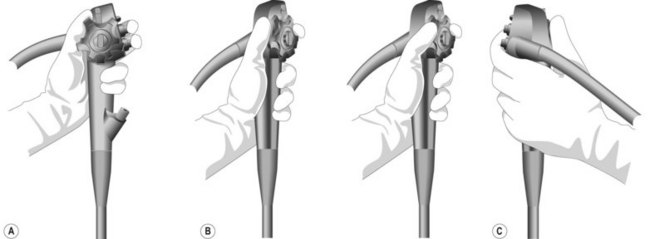
The control section of the endoscope should rest comfortably in the palm of the left hand, in the V formed between the thumb and index finger (Fig. 15). The left hand controls up/down (large wheel), right/left angulation (small wheel), insufflation, water, and suction buttons, while the right hand is responsible for advancing and withdrawing the endoscope, and its axial rotation.

5.1.1 Problems with intubating the esophagus (Table 3)
Table 3 Potential problems faced in upper endoscopy and how to manage them
| Problem | Cause | Action required |
|---|---|---|
| Respiratory distress, cyanosis | Incorrect endoscopy path with intubation of the trachea | Remove endoscope |
| Desaturation associated with the following | Remedy the respiratory problem by the following: | |
| Respiratory insufficiency | Remove endoscope | |
| Cardiac insufficiency | Clear out airways | |
| Or abnormal cardiac rhythm | Aspirate buccal cavity | |
| Or laryngeal spasm | Oxygenation (mask ventilation, intubation if necessary) | |
| Regurgitation of gastric contents | Elevate the patient’s head | |
| Place them in the recovery position | ||
| Assess for bronchial aspiration | ||
| Consider chest X-ray | ||
| Unable to intubate the upper esophagus | Zenker diverticulum | Withdraw the endoscope and reinsert it under visual control; if necessary use a wire guide under fluoroscopy to direct the endoscope |
| High esophageal stricture | Dilate | |
| Looping in esophagus | Diverticulum | Withdraw. If necessary, pass a guidewire to the cardia under fluroscopic guidance |
| Hiatal hernia | ||
| Achalasia or stenosis (benign, malignant or due to external compression) | Gentle dilation or use a small caliber gastroscope | |
| Looping in stomach | J-shaped stomach | Withdraw to the GEJ and follow the lesser curve |
| Altered anatomy post-surgery | Exert external pressure on the stomach | |
| Pyloric stenosis | Insert a guide wire through the pylorus and use this to guide the endoscope passage. This may require fluoroscopy if there is a complex stricture | |
| Dilation is sometimes required |
 Warning!
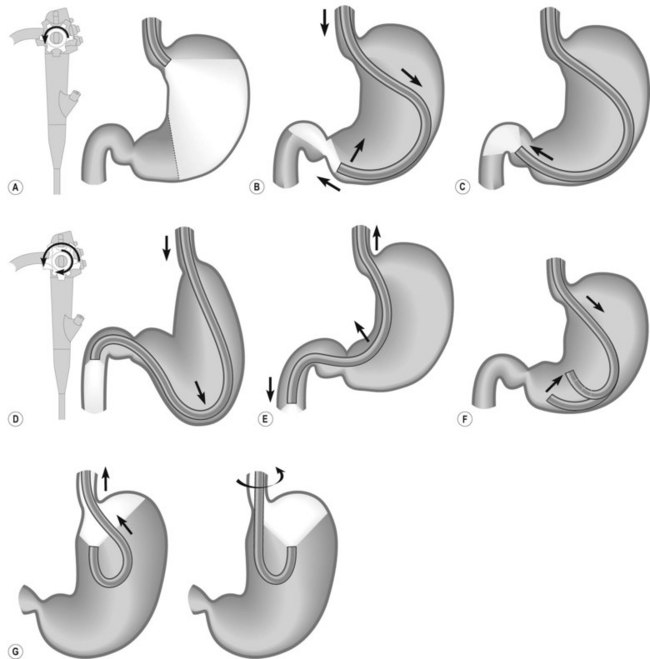
5.1.2 Advancing the gastroscope
 Warning!
The following areas may not be viewed clearly. They should be examined carefully by the endoscopist:
From Ginsberg GG, Kochman ML, Norton ID, et al., editors: Clinical gastrointestinal endoscopy. London, 2005, Elsevier.
 Clinical Tip
5.2 Special situations
5.2.1 Gastroesophageal reflux disease
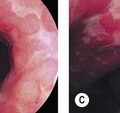
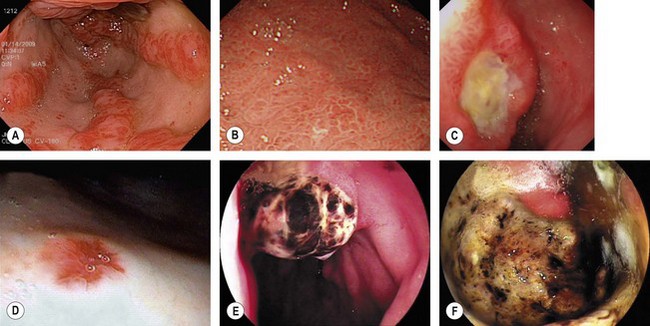
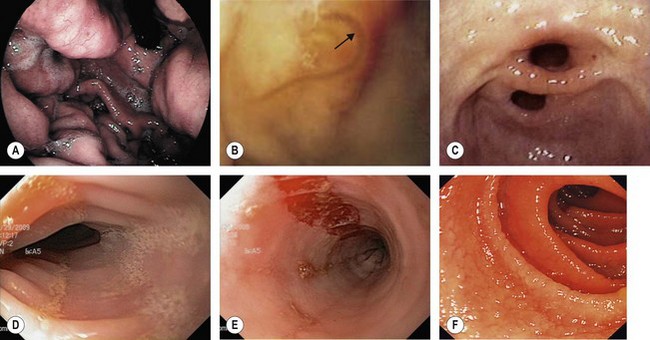
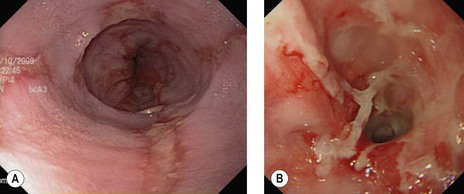
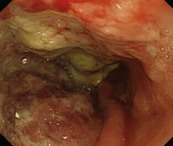
Gastroesophageal reflux disease (GERD) should be classified using the Savary–Miller (Table 5) or Los Angeles (Table 4) classification (Fig. 19). Longstanding or severe GERD can result in peptic stricture formation (Fig. 20) and is associated with the development of Barrett’s esophagus (Fig. 21).
| Grade I | Single or isolated erosive lesion, oval or linear, only affecting one longitudinal fold |
| Grade II | Eerosive and exudative lesions in the distal esophagus that may be confluent, but not circumferential |
| Grade III | Circumferential erosions in the distal esophagus, covered by hemorrhagic and pseudomembranous exudate |
| Grade IV | Chronic lesions including ulcer, stricture ± short esophagus, or associated with lesions of grades I–III |
Table 4 Los Angeles classification of GERD
| Grade | Description |
|---|---|
| A | ≥1 mucosal break ≤5 mm that does not extend between the tops of two mucosal folds |
| B | ≥1 mucosal break >5 mm that does not extend between the tops of two mucosal folds |
| C | ≥1 mucosal break that is continuous between the tops of ≥2 mucosal folds but involves <75% of the circumference |
| D | mucosal break that involves ≥75% of the esophageal circumference |
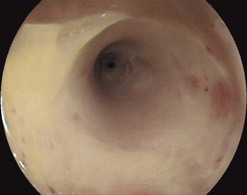
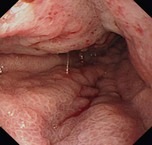
5.2.2 Barrett’s esophagus
Patients with longstanding GERD symptoms, particularly Caucasian males aged over 50, should be considered for an upper endoscopy to assess for Barrett’s esophagus (Fig. 21).
Box 3 gives guidelines for screening and follow-up of Barrett’s esophagus.
Box 3 Screening for Barrett’s esophagus
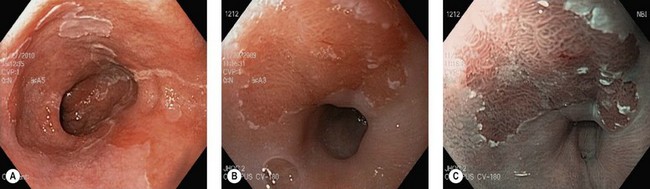
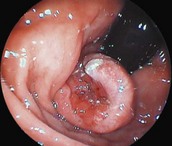
5.2.3 Eosinophilic esophagitis
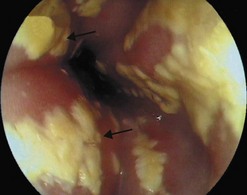
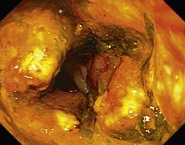
Eosinophilic esophagitis should be suspected in an atopic patient with dysphagia or food bolus obstruction, in whom no cause for the obstruction or dysphagia is evident. It can also present with GERD-like symptoms, esophageal dysmotility or abdominal pain. Endoscopically, the esophagus can be normal or sometimes esophageal rings or stricture can be seen (Fig. 10d). Biopsies should be taken along the length of the esophagus. Great care should be taken with strictures associated with eosinophilic esophagitis as they are at increased risk of perforation (Fig. 10e).
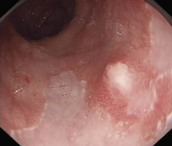
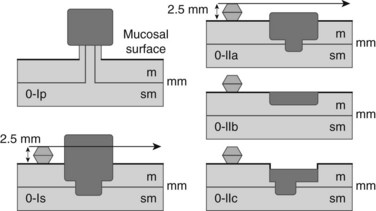
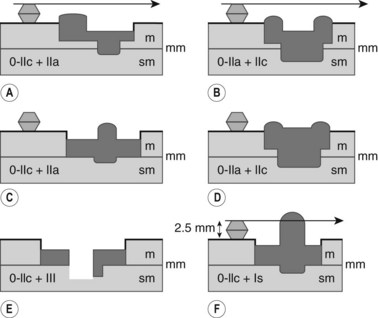
5.3 Endoscopic classification of early or superficial cancers
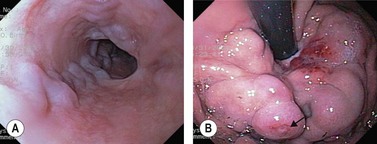
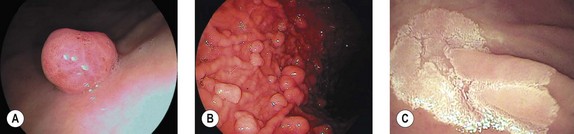
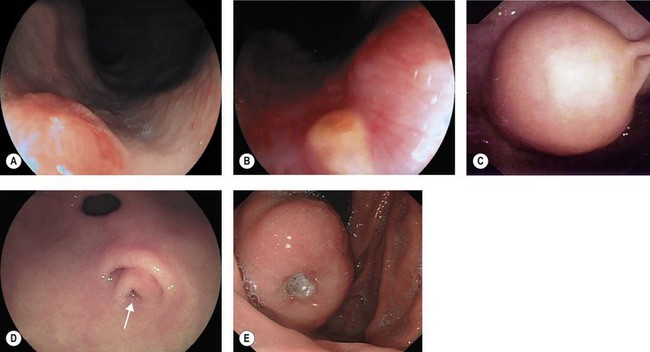
Cancers should be classified endoscopically using the Paris classification as Type 0–5 (Table 6). Type 0 are superficial cancers, whose endoscopic appearance suggests that the depth of penetration into the wall is not more than into the submucosa (Figs 22). Type 0 are subdivided further into I, II and III. Lesions can combine several different types of lesions which are shown in Figures 23 and 24). The clinical relevance of classifying these lesions is that it predicts the likelihood of submucosal invasion and lymph node metastases.
| Type | Description | Endoscopic image |
|---|---|---|
| Type 0 | Superficial lesion which can be polypoid, flat/depressed, or excavated |
 |

 Clinical Tips
6 Complications
A detailed discussion of the management of complications of endoscopy can be found in Chapter 8.
Complications (Table 3) associated with upper endoscopy include:


7 Upper endoscopy in children
7.2 Preparation for upper endoscopy
7.3 Indications


7.4 Technique
7.5 Complications
In addition to the complications listed above, the following can occur:
ASGE Standards of Practice Committee. The role of endoscopy in the assessment and treatment of esophageal cancer. Gastrointest Endosc. 2003;57:817-822.
ASGE Standards of Practice Committee. ASGE guideline: the role of endoscopy in the surveillance of premalignant conditions of the upper GI tract. Gastrointest Endosc. 2006;63:570-580.
ASGE Standards of Practice Committee. The role of endoscopy in dyspepsia. Gastrointest Endosc. 2007;66:1071-1075.
ASGE Standards of Practice Committee. Role of endoscopy in the bariatric surgery patient. Gastrointest Endosc. 2008;68:1-10.
Cohen J, Safdi MA, Deal SE, et al. ASGE/ACG Taskforce on Quality in Endoscopy. Quality indicators for esophagogastroduodenoscopy. Am J Gastroenterol. 2006;101:886-891.
Eisen GM, Baron TH, Dominitz JA, et al. ASGE. Complications of upper GI endoscopy. Gastrointest Endosc. 2002;55:784-793.
Goddard AF, James MW, McIntyre AS, et al. Guidelines for the management of iron deficiency anemia. Gut. 2000;46(Suppl 4):iv1-iv5.
Jacobson BC, Hirota W, Baron TH, et al. ASGE. Obscure gastrointestinal bleeding. Gastrointest Endosc. 2003;57:817-822.
Paris Workshop Participants. The Paris endoscopic classification of superficial neoplastic lesion. Gastrointest Endosc. 2003;58:S1-S43.
Standards of Practice Committee. Role of endoscopy in the management of GERD. Gastrointest Endosc. 2007;66:219-224.