Diagnostic and Therapeutic Procedures
Jane Sanders Bellet
Introduction
Diagnostic and therapeutic procedures are a standard part of the evaluation and management of dermatologic conditions in neonates and infants. Performing procedures on younger children can be technically challenging, and requires knowledge of differences in approach and other special considerations due to the child’s young age. This chapter discusses the most common of these diagnostic and therapeutic procedures.
Diagnostic procedures
Bacterial culture
Bacterial culture is a frequently performed diagnostic test. Purulent material draining from a pustule or nodule can easily be obtained with a bacterial swab. If the material is dry or crusted, wetting the swab with water prior to rubbing the area increases the likelihood of obtaining material to grow an organism. The results of a Gram stain performed by the microbiology laboratory are usually available within a few hours, while the final bacterial culture result with drug susceptibilities may not be known for 48–72 h. The laboratory should be notified when Gram-negative or anaerobic bacterial infections are suspected, so that specific culture media may be used.
Bacteria causing certain infections such as necrotizing fasciitis may not be easily cultured from superficial skin samples, so that a skin biopsy for frozen section may be necessary for a rapid diagnosis (see ‘Skin biopsy’, below). A bacterial stain such as Brown–Brenn performed on the histologic sections can differentiate Gram-positive from Gram-negative organisms.
KOH preparation
Potassium hydroxide (KOH) preparations are useful to identify the presence of fungi and yeast. They can be performed on samples of skin, hair, and nails. The skin should be scraped such that adequate material is available for microscopic examination (Box 6.1). If the KOH preparation is negative or equivocal, the skin scales may be placed onto fungal culture plates or sent for culture in an appropriate container, such as a sterile urine cup or wax paper envelope (see ‘Fungal culture’, below).
A scalp sample may be obtained by wetting a cotton-tipped applicator with water and rubbing the suspected area of involvement.1 Another technique is to use a toothbrush2 or gynecologic viral collection brush.3 The material from the swab is plated directly onto the fungal culture plate. Hairs can be plucked for culture, but this is not usually recommended in infants because of the pain caused by pulling hairs. Usually enough hairs can be gathered by scraping the scalp with a glass slide or #15 blade.
For nail samples, a sharp instrument, such as a Skeele curette, is used to collect debris from underneath the nail plate and this material can be stabbed directly onto the fungal plate. Nail clippings can be obtained by using a nail nipper. In young infants with soft nails, a cuticle nipper is sometimes sharp enough. The clippings can either be placed directly on the culture medium or in a sterile cup for the laboratory to plate. In addition, nail clippings can be placed in formalin and sent directly to pathology so that a periodic acid Schiff (PAS) stain4 can be performed; the results are usually known within 2–3 days compared with 30 days, which is the standard for fungal cultures in a microbiology laboratory. This method has been shown to be more reliable than KOH preparation and fungal culture in detecting the presence of organisms; however, fungal culture remains the gold standard for identifying the organism and determining drug susceptibilities.4
Fungal culture
Mycosel™ agar and mycobiotic agar are two types of fungal culture media that are frequently used. They contain Sabouraud dextrose agar with chloramphenicol and cycloheximide to decrease bacterial overgrowth.
For deep fungal infections of the skin, a skin biopsy is necessary so that material from the dermis, and sometimes the subcutaneous fat, can be cultured, since the organism is not present in the superficial epidermal scales (see ‘Skin biopsy’, below).
Direct fluorescent antibody test for diagnosis of herpes virus infection
Direct fluorescent antibody (DFA) testing uses mouse monoclonal antibodies to detect herpes viruses such as herpes simplex virus (HSV) 1 and 2 and varicella-zoster virus (VZV).5 Specimens are best obtained from the base of a ruptured vesicle, erosion, or ulcer. The likelihood of a positive result is much lower if the lesions are crusted or already healing. A Dacron® swab with a plastic shaft is used to rub the lesion and the swab is placed in viral transport medium. A calcium alginate swab should not be used because the chemicals are toxic to the virus. The laboratory can prepare the slide after cytospin preparation; however, a slide can also be prepared at the bedside by careful rubbing of the swab onto the slide, which is allowed to air dry prior to transport to the laboratory.
Viral culture
Using a Dacron® tipped swab, the fluid from an intact vesicle is absorbed and the swab is rubbed over the base of the lesion prior to placement in viral transport medium (buffered isotonic saline solution, often with antibiotics added to prevent bacterial contamination). The results are usually available in 2–3 days for herpes simplex viruses and 7–14 days for varicella-zoster virus.
Viral culture has historically been the gold standard for isolating viral pathogens, such as herpes viruses; however, this is likely to change with improved polymerase chain reaction (PCR) techniques.6
Polymerase chain reaction (PCR) test for diagnosis of herpes virus infection
Polymerase chain reaction (PCR) is now used by many laboratories to definitively identify herpes virus infections as well as other viral infections. Compared with viral culture, this test is more sensitive and the result is available more rapidly.7 The swab obtained for viral culture that has been placed in viral transport medium can be used for PCR.8
Scabies preparation
Scabies infestation is frequently seen in young infants. Sensitization after primary infestation takes 3–4 weeks before symptoms occur. With recurrent infestation, symptoms appear immediately. Performing a scabies preparation can confirm the diagnosis. Detection of evidence of scabies infestation is most likely by scraping linear burrows, vesicles, or papules that have not been excoriated. Interdigital spaces of the hands and feet, wrists, and axillae are often high-yield locations. Sometimes parents or other caregivers have papules or burrows that can be scraped as well.
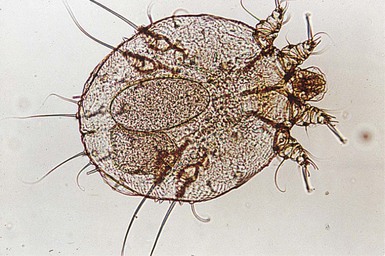
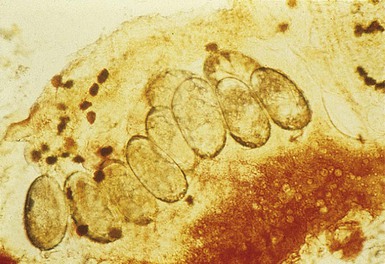
The finding of mites, eggs, or feces on a scabies preparation using a microscope with a 10× objective confirms the diagnosis (Box 6.2). Mites have eight legs (Fig. 6.1); eggs are oval in shape and ten times smaller than mites; and feces, which are even smaller, appear as golden-brown clumps (Fig. 6.2). Air bubbles are round, which helps distinguish them from eggs or feces. Dermoscopy can also be useful in the diagnosis of scabies infestation (see below).
Dermoscopy
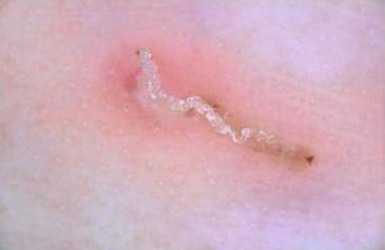
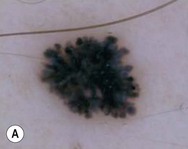
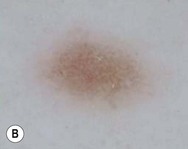
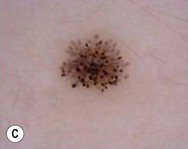
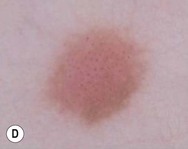
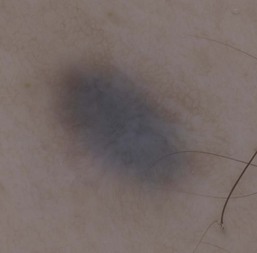
Dermoscopy (dermatoscopy or epiluminescence microscopy) is the examination of skin lesions with a handheld dermatoscope. Most dermatoscopes utilize polarized light to eliminate skin surface reflection. Specific patterns can be seen that help confirm a suspected diagnosis. Dermoscopy can be useful in the identification of a broad set of conditions and lesions such as scabies mites or burrows; congenital and acquired melanocytic nevi including Spitz and blue nevi; and juvenile xanthogranuloma. The ‘triangle’ sign is the pigmented anterior portion of the scabies mite, which includes the head and first two pairs of legs,9 while ‘the jetliner with contrail’ sign represents the head of the mite along with the trailing burrow (Fig. 6.3).10,11 Typical Spitz nevi have four distinct dermoscopic patterns: starburst, globular, negative network, and homogeneous (Fig. 6.4).12,13 Histiocytes laden with lipid give juvenile xanthogranulomas their characteristic yellow-orange color. Dermoscopy can show this orange-yellow background with an erythematous border, the ‘setting sun’ sign.14 Pale yellow ‘clouds’ can also be seen, which are thought to be lipid-laden histiocytes in the superficial dermis.14 Blue nevi have homogeneous, structureless pigment patterns of different colors (white or blue most commonly) or a combination of colors (Fig. 6.5).
Microscopic hair examination
A number of hair shaft abnormalities can be detected by microscopic hair examination using a standard light microscope with and without a polarizing lens. Sharp iris scissors can be used to obtain hairs without the need to pluck them. A mounting medium such as Permount™, or immersion oil, and a cover slip may be used to mount the hairs on a glass slide. Only rarely is the hair bulb needed for diagnosis, such as with suspected loose anagen syndrome, in which case the hairs need to be gently pulled. Usually, an examination of scalp hair demonstrates the findings necessary for diagnosis; however, Netherton syndrome can be an exception, in which only eyebrow or eyelash hairs may have the characteristic findings. See Chapter 31 for a discussion of hair disorders.
Wood’s light examination
A Wood’s lamp is a handheld device fitted with a mercury lamp and a filter made of nickel oxide and silica. The light emitted from the device has wavelengths from 320 to 400 nm, which is the range in which melanin absorbs ultraviolet radiation. The lamp should be used in a dark room, so that ambient light does not interfere with the examination. Loss of melanin (depigmentation) appears as a ‘bright white’ area compared with surrounding normal skin. A Wood’s lamp can be useful in the identification of vitiligo, tuberous sclerosis (ash leaf macules), and incontinentia pigmenti. Also, infected hairs fluoresce bright yellow-green in tinea capitis caused by Microsporum canis. The urine of neonates with congenital erythropoietic porphyria fluoresces coral red.15
Skin biopsy
A skin biopsy can be very useful in determining a diagnosis. The tissue can be examined microscopically and it can also be cultured (bacterial, viral, fungal, mycobacterial). When the lesion is <6 mm in diameter, the entire skin lesion can be removed using a punch technique for both diagnostic and therapeutic purposes. The depth of the pathologic process determines how deep the skin specimen needs to be. Usually, a punch biopsy can be performed, since epidermis and dermis will be obtained, as well as the top layer of fat in some body locations (Box 6.3).
If a process or lesion involving the subcutaneous fat, such as panniculitis, is suspected, a ‘double punch’ method may be employed. One specimen is obtained and through the same defect, a second, deeper specimen is also obtained. This is often done with a larger sized punch trephine followed by a smaller one through the same defect, so that the hub does not become stuck on the epidermal rim of the initial defect. For example, a 6 mm punch trephine can be used followed by a 4 mm punch trephine to obtain the second specimen. The specimens may be placed in separate formalin bottles.
If the pathologic process appears to have multiple morphologies, it may be necessary to obtain specimens from each type of lesion seen. When a specimen is needed for tissue culture, the tissue and instruments should not come in contact with formalin because the formalin will kill any organism, rendering the culture useless. Therefore, if specimens are needed for culture as well as histology, the culture specimen should be obtained first, so that no contamination occurs.
Once the specimen has been obtained, hemostasis is usually achieved with placement of sutures. In a neonate or young infant, a 5–0 non-absorbable suture such as nylon or polypropylene can be used. Some providers prefer to place Gelfoam® (Pharmacia and Upjohn Company, Kalamazoo, Michigan) in lieu of sutures depending on the size, location and type of lesion biopsied; however, the time to place one or two sutures is minimal and can result in a wound that heals more rapidly and a final smaller scar.
Shave procedures, also known as ‘scoop biopsies’ or ‘saucerization biopsies’ can be used instead of a punch trephine for biopsy or excision of superficial lesions that involve only the epidermis and superficial dermis. Either a DermaBlade® (Personna, Verona, Virginia) or #15 scalpel blade can be used to obtain the specimen.
Electron microscopy
Electron microscopy requires extremely thin (one micrometer, 1 µm) tissue sections and a special microscope to allow visualization of cellular ultrastructure. It is most useful in neonates to localize the cleavage plane in epidermolysis bullosa (EB). When the diagnosis of EB is suspected, twisting a new, clean pencil eraser on normal-appearing skin just prior to skin biopsy is helpful to form a microscopic cleavage plane. Specimens should be obtained using the punch biopsy method outlined in ‘Skin biopsy’, above. Instead of placing the specimen in formalin, it should be placed in glutaraldehyde fixative. With the advent of genetic testing for EB with a blood specimen, electron microscopy is not necessary in many cases, especially if the mutation in the family is already known.
Immunofluorescence
Immunofluorescence testing relies on the fluorescing of dyes to help localize immunoreactants in the skin or to determine their presence in the blood.
Direct immunofluorescence (DIF) may be useful in the diagnosis of immunobullous disorders, lupus erythematosus, and leukocytoclastic vasculitis. A skin biopsy should be taken from a perilesional location and placed in immunofluorescence transport medium (Michel’s medium: ammonium sulfate, N-ethylmaleimide, magnesium sulfate in a citrate buffer). The specimen can be placed on saline-soaked gauze, as long as it is immediately transported to the laboratory and processed. The sample is incubated with antibodies to IgG, IgA, IgM, and C3 that have been labeled with a fluorescent marker. Fluorescence indicates the presence of the specific immunoglobulin or complement component.
Indirect immunofluorescence (IIF) is most useful in the diagnosis of immunobullous disorders such as pemphigus vulgaris and bullous pemphigoid. The patient’s serum is incubated with an epithelial substrate to determine the circulating antibody titer. A modified IIF method on a skin specimen helps determine the ultrastructural level of antibodies in epidermolysis bullosa, which would be the most common use of the test in neonates. Laminin, type IV collagen, and bullous pemphigoid antigen are used, as well as other markers. Skin samples for this test are obtained in the same manner as for electron microscopy; a cleavage plane is induced with rotating pressure prior to obtaining the skin biopsy and the sample is placed in appropriate transport medium (i.e. Michel’s or Zeus’) prior to delivery to a laboratory skilled in antigenic mapping.
Therapeutic procedures
A number of therapeutic cutaneous procedures are commonly performed on neonates and young infants. These include skin biopsy (<6 mm in diameter), excision of cutaneous lesions, laser surgery, and injections. Proper immobilization and adequate anesthesia (topical, local and/or general) is required.
Immobilization
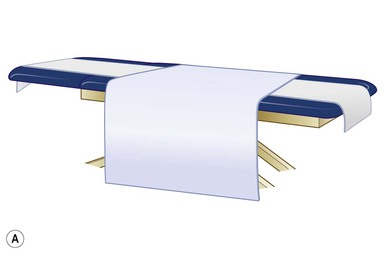
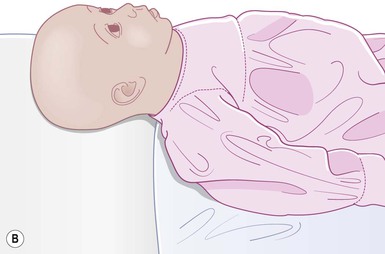
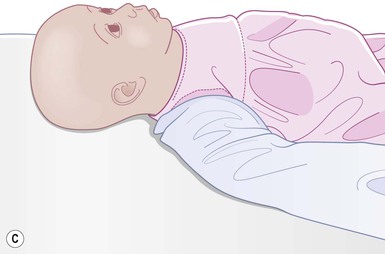
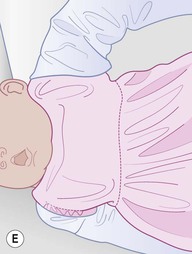
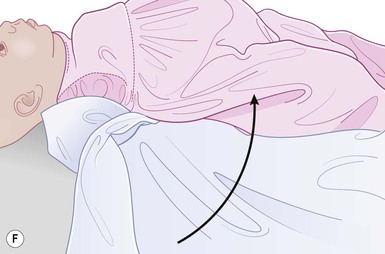
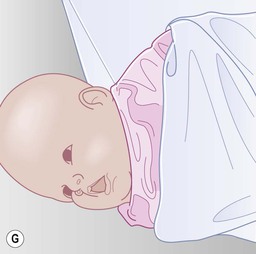
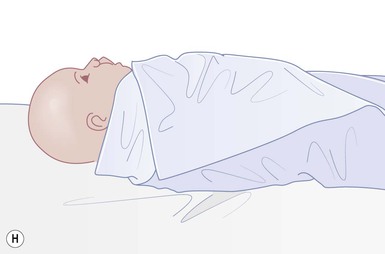
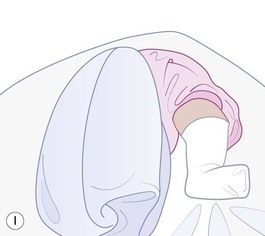
Even with the use of topical and/or injectable local anesthetics, neonates and young infants will move during a procedure, and it is advisable to prevent as much movement as possible. There are a number of ways to do this. Restraining achieved by a staff member holding the infant is often adequate; however, supplemental techniques for immobilization are sometimes necessary. Some providers use wrapping techniques with cloth sheets, while others use a papoose board. Using a soft, cloth sheet is often viewed by parents as ‘gentle’ (Box 6.4, Fig. 6.6). In general, parents should not assist in the restraint of their child, but they often feel better if they can talk with their child; sometimes singing or playing music can be soothing. Distraction techniques used for older children such as reading a story or watching a video are not usually useful in this age group.

Topical anesthetics
Topical anesthetics can be useful in diminishing the pain of certain dermatologic procedures such as local anesthetic injection. They are usually safe with minimal side-effects. The most commonly used topical anesthetics are EMLA® (eutectic mixture of local anesthetics: 2.5% lidocaine and 2.5% prilocaine; Astra Zeneca, Wilmington, DE) and liposomal lidocaine (LMX® 4% or 5%, formerly ELA-Max®; Ferndale Healthcare Inc, Ferndale, MI).16
EMLA®
Application of EMLA® should be for 1 h with an occlusive dressing, yet adequate anesthesia can be achieved after 25 min on the face and other thin skin sites.17 Application on the mucosa may achieve anesthesia in 5–15 min due to faster absorption (Box 6.5, Table 6.1).18 EMLA® is available by prescription only.
TABLE 6.1
EMLA® guidelines
| Age and weight of child | Maximum EMLA® dose (g) | Maximum area (cm2) | Maximum application time (h) |
| <37 weeks’ gestational age | Use not recommended | – | – |
| >37 weeks’ gestational age | 1 | 10 | 1 |
| Up to 3 months OR <5 kg | 1 | 10 | 1 |
| >3 months and 5–10 kg | 2 | 20 | 4 |

From: EMLA®: Prescribing information. Wilmington, DE 19850: AstraZeneca LP; 2005.
Most infants tolerate EMLA® well. Side-effects such as vasoconstriction and blanching are common and more likely to occur with mucosal or broken skin application. They are self-limited and usually resolve within 3 h of removal.19 Erythema, edema, and dermatitis may also occur. Although petechiae and purpura can occur, these manifestations seem to be toxin-mediated and not allergic-mediated.20,21 They do not appear to be related to dose or to the duration of the application. Purpuric reactions have not been reported with topical lidocaine alone. While EMLA® has been used in the same individuals after this type of reaction without recurrence of purpura,22 repeat applications are generally avoided.
Methemoglobinemia can occur with exposure to local anesthetics containing prilocaine, such as EMLA®, especially in young infants because of their limited capacity to reduce methemoglobin.23 This is why it is not recommended for infants who are of <37 weeks’ gestation. Infants with hemoglobinopathies or glucose-6-phosphate dehydrogenase deficiency may also be at greater risk for the development of methemoglobinemia;24,25 so may infants <3 months of age who are taking acetaminophen, sulfonamides, phenobarbital, phenytoin, or antimalarial drugs.24 Methemoglobinemia should be suspected in an infant with cyanosis who has no evidence of respiratory or cardiac disease and whose cyanosis does not improve with oxygen administration. Pulse oximetry is not accurate in this setting. Respiratory distress can occur with blood methemoglobin levels >20%, while levels >50% can produce seizures and coma. Treatment with methylene blue is necessary for symptomatic patients.
Topical lidocaine (LMX®, formerly ELA-Max®)
Liposomal lidocaine (LMX®) is available in both 4% and 5% (as a rectal cream) over-the-counter preparations. An application time of 30 min without occlusion is recommended, although occlusion can be used to keep the cream in place. Because prilocaine is not in the product, the risk of methemoglobinemia is avoided. However, lidocaine toxicity can still occur and thus, small volumes of cream (<100 cm2 for children <10 kg, or 1 g for infants from 37 weeks’ gestational age to 3 months) and short application times are recommended for young infants. One study used 2 g of liposomal lidocaine applied for 20 min prior to circumcision, with good results.26
Injectable anesthetics
The most commonly used injectable local anesthetics include lidocaine (Xylocaine®) and bupivacaine (Marcaine®, Sensorcaine®). They are available in a variety of strengths, as well as with and without epinephrine. For most dermatologic procedures, 1% lidocaine (10 mg/mL) with 1 : 100 000 epinephrine can be used. The onset of action is rapid – almost as soon as it is infiltrated, and vasoconstriction due to the epinephrine allows for ease of performing the procedure with decreased bleeding. Bupivacaine can be used for post-procedure pain with infiltration at the end of the procedure. Though it has a relatively slower onset of action (5–10 min), it lasts longer (3–4 h).
Lidocaine toxicity is rare as long as the dose is appropriate (Table 6.2). Knowledge of weight-based dosage limits is vital to ensure safe usage. Neonates are likely to be more susceptible to toxicity compared with older children because of increased bioavailability of the drug at a given serum concentration.27 Detecting the signs of toxicity in neonates can be difficult. Confusion and agitation can progress to seizures, loss of consciousness, and respiratory depression.
Table 6.2
Lidocaine dosage for intralesional injection
| Maximum dose | Example: maximum dose of 1% lidocaine (10 mg/mL) for 5 kg infant | |
| Without epinephrine | 4.5 mg/kg | 2.25 mL |
| With epinephrine | 7 mg/kg | 3.5 mL |
For neonates and young infants, using an injectable anesthetic without prior topical anesthesia is acceptable and in some cases, preferable. The physician should forewarn the parents that infants undergoing a procedure often start to cry with restraining. Actual pain begins with injection of the needle and lasts only about 10–20 s during administration of the injectable anesthetic. After infiltration of local anesthetic and the provision of adequate anesthesia, infants will likely continue to cry, even though they are not experiencing any pain, simply because they dislike being restrained. It is important to inform the parents that even though the child may be crying while the biopsy is being obtained and sutures are being placed, they are not experiencing any pain.
Giving an injection
Injections may be needed for a variety of reasons in young infants. Infiltration of local anesthetic prior to a procedure and intralesional corticosteroid injection of a hemangioma, are two examples. The best way to perform an injection is to ensure that the child is restrained in a way that is not harmful, but maximizes stability and therefore safety (see ‘Immobilization’, above). When giving an injection, there should be three points of contact (the syringe and two other points, which are usually the non-dominant hand and the fifth finger of the injecting hand). This method decreases any movement to prevent injecting the wrong area on the child or delivering a needle-stick to assistants or surgeon.
General anesthesia
General anesthesia is required in order to perform some procedures on neonates and young infants. When making the decision whether a procedure should be done under general anesthesia, a number of factors are taken into consideration. The body location involved in the surgery is an important consideration, particularly when safety and/or the outcome could be compromised if the infant is awake. A biopsy near the eyelid margin would be one example. Another consideration is the length of the procedure. If the infant cannot be restrained for the time needed to perform the procedure, general anesthesia or sedation is likely indicated. Because dermatologic procedures usually take much less time than many other surgical procedures, exposure to general anesthesia is minimal and therefore the risk of general anesthesia is very low.28,29
Wound care following a procedure
After a skin biopsy or excision has been performed, the wound must be cared for. Some providers recommend daily gentle cleansing of the site with plain water30 or soap and water31 followed by application of petroleum jelly32 or an antibiotic ointment such as bacitracin.33 The cleansing is followed by application of a fresh dressing each day. Typically, neomycin-containing ointments are not recommended due to the risk of developing allergic contact dermatitis. Other providers take a ‘hands off’ approach. In this method, a sterile dressing is applied over the wound immediately following the procedure. It remains in place and kept dry until the sutures are removed in the office. When using this method, the dressing is not altered in any way at home. Suture removal is usually recommended at 10–14 days for the body and scalp and 5–7 days for the face. For most small biopsy wounds, keeping the area moist with petroleum jelly and covered with a bandage, with a dressing change once a day is a reasonable approach.
Laser surgery
Laser (Light Amplification by Stimulated Emission of Radiation) light is used to treat a number of dermatologic disorders. The primary indication for its use in neonates and infants is for the treatment of capillary vascular malformations (CVM) (often termed port-wine stains) and for infantile hemangiomas. The flashlamp-pumped, pulsed dye laser (PDL) with a wavelength of 585–595 nm used with cooling spray is the most commonly used laser for these conditions. Oxyhemoglobin flowing through blood vessels has an absorption peak at 577 nm and is used as the chromophore. The settings usually range from 4 to 12 J/cm2 fluence with a 1.5–10 ms pulse duration and 7–10 mm spot size. Cryogen settings are often changed depending on the Fitzpatrick skin type, which is a classification schema of skin color.34 Treatment of CVM at a young age (<6 months) has been shown to yield better results,35,36 most likely due to thinner skin and more superficial vessels.37 By starting laser surgery at a young age, multiple treatments can be performed just by using restraining methods in the laser suite (see ‘Immobilization’, above) prior to the need for general anesthesia, and fewer total treatments may be needed.38
Prior to laser treatment, the CVM can be outlined with a white eyeliner pencil39 or a white gel pen.40 This can be useful when the infant is in the laser suite where crying may produce erythema of the entire face or when under general anesthesia where fading of the stain due to possible vasodilation peripheral to the stain makes it more difficult to discern the lesion.41,42
When laser treatment of the eyelids within the bony orbit is necessary, an eye shield needs to be placed to protect the globe. To place an eye shield in an awake infant, the globe must be anesthetized with a drop of an ophthalmic anesthetic such as proparacaine and an eye shield of appropriate size can be placed using ophthalmic lubricant, such as methylcellulose 1% ophthalmic drops or GenTeal® ophthalmic lubricant ointment (Novartis International AG, Basel, Switzerland). To place an eye shield in an infant under general anesthesia, only the lubricant is needed because there is no active resistance to placement of the eye shield.
Pulsed dye laser is useful in the treatment of residual telangiectasias and erythema following involution of hemangiomas.43 Involution usually starts between 9 and 12 months of age and can continue for as long as 10 years. Pulsed dye laser treatment can also be helpful in individuals of any age with an ulcerated hemangioma.44 Though most hemangiomas reach 80% of their ultimate size by 3 months of age during the proliferative phase,45 the use of pulsed dye laser during this phase remains controversial. Some authors report good efficacy with minimal side-effects,46 while others discuss complications such as ulceration and scarring when used to treat hemangiomas during the proliferative phase.47
When counseling parents and guardians about possible laser treatment, it is helpful for them to see pictures of infants and children who have had laser treatment with ‘before’ and ‘after’ photographs, as well as pictures immediately after a laser treatment. Thus, they can have more realistic expectations of the procedure. For providers who perform pulsed dye laser treatment frequently, taking the time to make such a book of photographs is useful. Consent should be obtained from the parents to show pictures of their child in this way.
Access the full reference list at ExpertConsult.com 
