Cranial Nerves
The Eye 1 – Pupils, Acuity, Fields
BACKGROUND
Examination of the eye can provide very many important diagnostic clues for both general medical and neurological diseases.
Examination can be divided into:
2 Pupils
The pupillary light reaction
3 Acuity
Abnormalities may arise from:
It is essential to test acuity with the patient’s correct glasses.
4 Fields
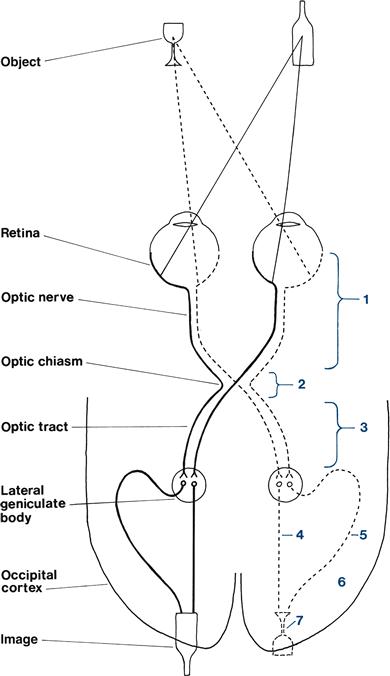
The organisation of the visual pathways means different patterns of visual field abnormality arise from lesions at different sites. The normal visual pathways are given in Figure 7.1.
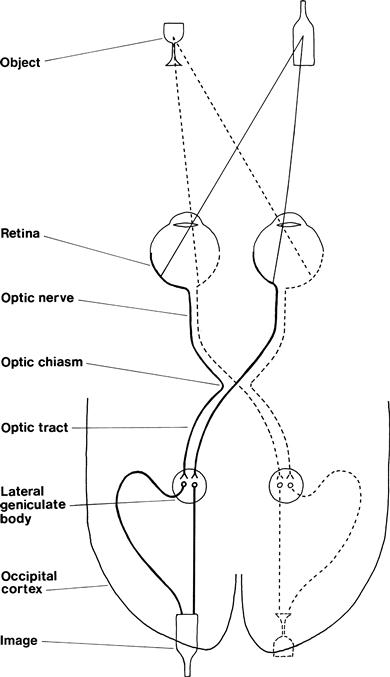
Figure 7.1 Visual pathways
The visual fields are divided vertically through the point of fixation into the temporal and nasal fields. Something on your right as you look ahead is in the temporal field of your right eye and the nasal field of your left eye.
The visual fields are described from the patient’s point of view.
Field defects are said to be homonymous if the same part of the visual field is affected in both eyes. This can be congruous (the field defects in both eyes match exactly) or incongruous (the field defects do not match exactly).
Testing the fields is very useful in localisation of a lesion (Table 7.1).
Table 7.1
| Type of defect | Site of lesion |
| Monocular field defect | Anterior to optic chiasm |
| Bitemporal field defect | At the optic chiasm |
| Homonymous field defect | Behind the optic chiasm |
| Congruous homonymous field defect | Behind the lateral geniculate bodies |
The normal visual fields for different types of stimuli are very different. The normal field for moving objects or large objects is wider than for objects held still or small objects. The normal field for recognition of coloured objects is more limited than for monochrome. It is useful to test this on yourself. Look straight into the distance in front of you and put your hands out straight to your side. Wiggle your fingers and, keeping your arms straight, gradually bring your arms forward until you can see your moving fingers. Repeat this holding a small white object, and then with a red object until you can see that it is red. You will appreciate the different normal fields for these different stimuli.
1 GENERAL
WHAT TO DO
Look at the patient’s eyes and note any difference between the two sides.
Look at the level of the eyelid; particularly note asymmetry.
Look at the position of the eye.
Beware the false eye—usually obvious on closer inspection.
WHAT IT MEANS
2 PUPILS
WHAT TO DO IN A CONSCIOUS PATIENT
(For pupillary changes in an unconscious patient, see Chapter 27.)
Look at the pupils.
• Are they regular in outline?
• Are there any holes in the iris or foreign bodies (e.g. lens implants) in the anterior chamber?
Shine a bright light in one eye.
Place your finger 10 cm in front of the patient’s nose. Ask the patient to look into the distance and then at your finger.
Look at the pupils for their reaction to accommodation.

FURTHER TESTING
Swinging light test
What to do
Shine a bright light into one eye and then the other at about 1-second intervals. Swing the light repeatedly between the two. Observe the pupillary response as the light is shone into the eye.
What you find and what it means
3 ACUITY
WHAT TO DO AND WHAT YOU FIND
Can the patient see out of both eyes?
Acuity can be tested in several ways.
(i) Using Snellen’s chart
For example: 6/6 when the letter is read at the correct distance or 6/60 when the largest letter (normally seen at 60 m) is read at 6 m, or 20/20 and 20/200 when these acuities are measured in feet.
(ii) Using a near vision chart (Fig. 7.3)
• Hold the chart 30 cm from patient and ask him to read sections of print.
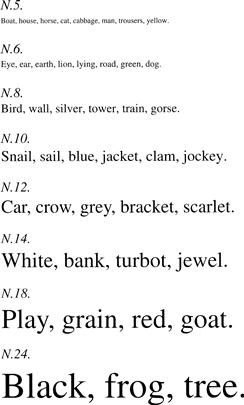
Figure 7.3 Near vision chart
(iii) Using bedside material such as newspapers
Test as in (ii) and record the type size read (e.g. headlines only, all print).
If unable to read largest letters:
See if the patient can:
• Count fingers. Ask how many fingers you are holding up.
• See hand movements. Ask him to say when you move your hand in front of his eye.
• Perceive light. Ask him to say when you shine a light in his eye.
Ask the patient to look through a pinhole made in a card.
If acuity improves, the visual impairment is refractive in origin and not from other optical or neurological causes.
A new development
Ophthalmologists are increasingly using LogMAR (logarithm of the minimum angle of resolution) charts to measure acuity. There are a number of different LogMAR chart designs. They are read in the same way as a Snellen chart. However, the result is expressed as the logarithm of the minimum angle or resolution, which in turn is the inverse of the Snellen ratio. For example, for Snellen acuities:
4 FIELDS
WHAT TO DO
Assess major field defects
• Ask the patient to look with both eyes at your eyes.
• Put your hands out on both sides approximately 50 cm apart and approximately 30 cm above eye level. Extend your index finger (Fig. 7.4). Your fingers should now be in the patient’s upper temporal fields on both sides.
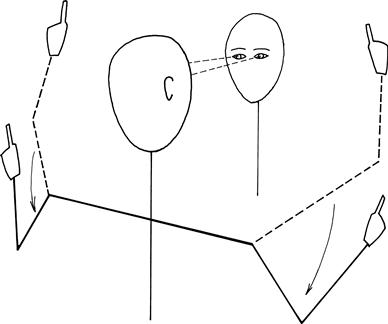
Figure 7.4 Screening for gross visual field defects
• Ask the patient to indicate which index finger you move: right, left or both.
If one side is ignored when both fingers are moved together but is seen when moved by itself, then there is visual inattention.
Test each eye individually
What to test with?
Large objects are more easily seen than small objects; white objects are more easily seen than red. Thus, fields will vary according to the size and colour of the target used.
Central vision is colour (cones) and peripheral vision is monochrome (rods).
A combination of wiggling fingers (described above) and red pin provide the most sensitive and specific bedside test for field defects.
• Sit just under one arm’s length away from the patient at the same level.
• Tilt the patient’s head to get the eyebrows and nose out of the way.
Using a red pin (recommended):
• Imagine there is a plane, like a vertical sheet of glass, halfway between you and the patient (Fig. 7.5A). You are going to compare your visual field on that plane with the patient’s visual field on that plane. The field to red is about 30–40 degrees from the point of fixation.
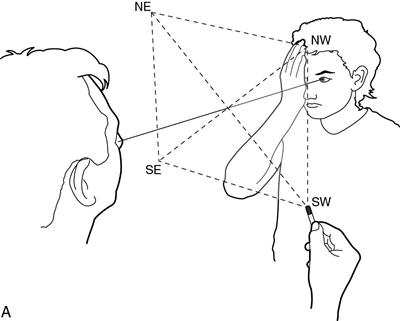
Alternative technique using a white pin:
Once you find a field defect
Define the edges.
Bring the pin from where it cannot be seen to where it can be seen.
 TIP
TIP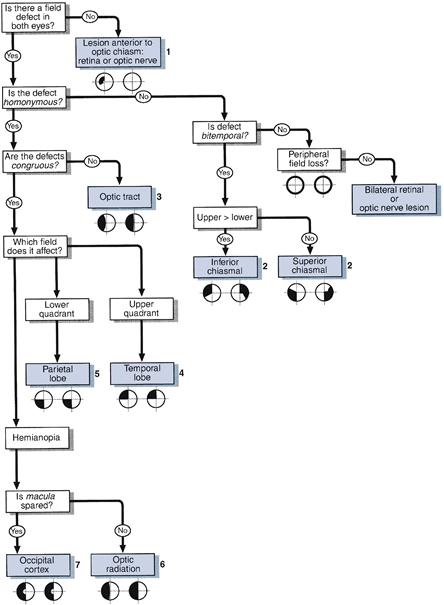
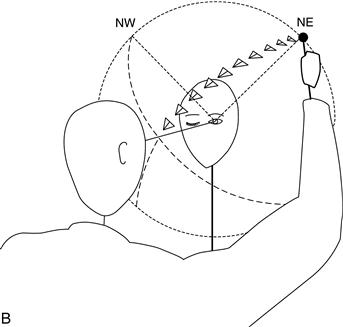
When there is a homonymous hemianopia
The macula needs to be tested.
Bring the pin horizontally from the side with the defect towards the point of fixation.
• If the pin is seen before it gets to the midline, there is macular sparing.
• If the pin is only seen once it crosses the midline, there is no macular sparing.
Describe the field loss from the patient’s point of view.
Central field defects—scotomas—and the blind spot (the field defect produced by the optic disc) are usually found using a red pin.
 TIP
TIP
If a patient complains of a hole in his visual field, it is often easier to give him the pin and ask him to place it in the hole in his vision.
WHAT YOU FIND
See Figure 7.7.
(i) Defect limited to one eye
Constricted field
(ii) Defect affecting both eyes
Describe your findings: for example, ’This man has normal pupillary response to light and accommodation. His visual acuities are 6/6 on the right and 6/12 on the left. He has a right homonymous hemianopia which is congruous and macula-sparing.‘
WHAT IT MEANS
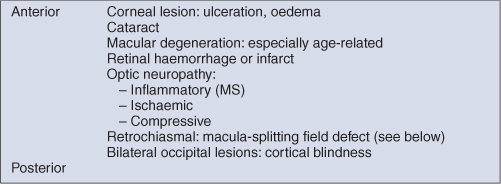
See Figures 7.6 and 7.7.
(i) Defect limited to one eye: indicates ocular, retinal or optic nerve pathology.
• Constricted field: chronic papilloedema, chronic glaucoma.
• Tubular vision: does not indicate organic disease—suggests conversion disorder.
• Scotoma: MS, toxic optic neuropathy, ischaemic optic neuropathy, retinal haemorrhage or infarct.
• Enlarged blind spots: papilloedema.
• Altitudinal defects: suggest vascular cause (retinal infarcts or ischaemic optic neuropathy).
– Upper quadrant > lower: inferior chiasmal compression, commonly a pituitary adenoma
– Lower quadrant > upper: superior chiasmal compression, commonly a craniopharyngioma.
The common causes for the lesions referred to below are cerebral infarcts, haemorrhages, tumours or head injuries.