Contact lens assessment
5.3 Corneal diameter, pupil and lid aperture measurement
5.5 Determination of contact lens power
5.6 Preliminary slit-lamp biomicroscopy and tear film assessment
5.8 Selecting a spherical trial lens
5.9 Assessment of spherical soft lens fit
5.11 Presbyopic soft lens fitting
5.12 Fitting RGP contact lenses
Contact lenses are preferred over glasses by some patients because of perceived improvements in appearance, ability to wear for certain sports and various convenience issues (e.g., can wear off-the-shelf sunglasses, they don’t fog up like glasses, can see better in rain, etc).1 There is a relatively high discontinuation of contact lens wear (~16% US, ~30% Europe), but patients are more likely to be successful if you manage their expectations, fit them with lenses that suit their eyes and lifestyle and achieve better compliance with lens care.2,3 Worldwide, the majority of new lens fits are soft lenses but it is important to maintain RGP lens skills because they remain the first choice lens for a proportion of patients and account for around 8% of new fits (e.g. 2% UK, 4% Canada, 11% New Zealand, 21% Netherlands) and a significantly higher proportion of refits.4 It is not uncommon to fit a patient with more than one lens type, e.g. RGP lenses for day-to-day use with a small supply of soft single-use lenses for swimming and other sport. Some of you may wish to develop your skills further to offer more specialist care to those requiring complex lenses for therapeutic purposes, corneal irregularity, orthokeratology, etc. However, discussion of such lenses falls outside the scope of this book.
5.1 Contact lens fitting
The purpose of the preliminary contact lens fit examination is to:
1. Quantify ocular parameters to aid selection of the first trial lens.
2. Confirm the normality of the ocular tissues and to record for future reference any acceptable abnormality (such as a corneal scar resulting from a historical eye injury).
3. Discover issues that potentially preclude or limit contact lens wear, (and manage or refer if necessary), or issues that indicate the need for a particular type of contact lens.
4. Allow the recording of baseline data against which to judge possible contact lens induced changes.
1. A pre-fit case history to determine what the patient wants from contact lenses, what they know about them and to help determine whether they are suitable.
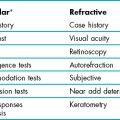
2. Measurements to help determine lens parameters: Horizontal visible iris diameter, pupil diameter (average and mesopic), palpebral aperture and lid position, corneal curvature and regularity and subjective refraction (unless a recent refraction has taken place).
3. Assessments to help determine suitability for lens wear: Anterior eye health and tear film quality. Examination of the posterior segment is only included in the pre-fit examination if any new symptoms or signs indicate that further investigation is warranted or if there has been a significant time period since the last assessment.
4. Choose the trial lenses: After the preliminary assessment, you need to summarise your findings and discuss how they influence the choice of lens type. There may be a clear indication for a particular type of lens, such as single-use lenses for a patient who only wants to wear lenses 2–3 times a week; or there may be a range of possible options and you should discuss the pros and cons of each lens type (including cost and impact of lens care use) with the patient, so that they can make an informed decision.
5. Post-trial assessment: Assess the performance of the trial lenses in terms of fit, compatibility with the eye/tear film and visual acuity
(a) It may be necessary to trial more than one lens to meet the patient’s needs.
(b) Remove the lenses and check the eyes using the slit-lamp.
6. Teach the patient to handle and care for the lenses: Ensure the patient fully understands the dos and don’ts of lens wear and the importance of lens and lens case maintenance.
7. Final check of trial lenses: Allow the patient to trial the lenses for a few days. Undertake the first follow-up check up with the lenses in situ and if everything is satisfactory, order the final lenses and provide the patient with a copy of their contact lens specification. Further changes to the lens and an extended trial may be required before the fitting can be considered complete, particularly for some toric, multifocal or complex lens fits.
5.2 Pre-fitting case history
Many of the issues covered in section 2.1 also apply during a contact lens examination, such as the importance of communication and putting the patient at ease. Trying contact lenses for the first time can be a very daunting process for some patients; a common worry is that the lenses will cause pain when they are placed on their eyes. Assure them that at worst the sensation is similar to having an eyelash in their eyes and at best they are simply not aware the lens has gone in. Spending sufficient time fully understanding a patient’s wants with respect to contact lenses, determining what they know about them, explaining the issues and managing their expectations are important to limit contact lens drop outs.5 Make it clear from the start that a successful fit may require more than one appointment, particularly in the case of toric, lenses for presbyopia or more complex lenses, and that regular aftercare is essential. It is often useful, in the case of the potential wearer, to combine questions to the patient with a tutorial approach embracing areas such as lens types, hygiene, wearing times, etc., thereby exchanging information. The information gained should be considered to determine patient suitability and motivation. Suitability may be determined by clinical, social or financial constraints. Motivation may depend on social, occupational, sports, refractive, visual or psychological factors.6
5.2.1 Procedure for pre-fitting contact lens case history
1. Start with a general observation of the patient. Particularly note the patient’s ability to speak and articulate, intellectual capacity, emotional state, cleanliness, length of fingernails, use of eye make-up, size of fingers, roughness of skin and dexterity.
2. Age and gender information allows you to think about the most likely contraindications or challenges to contact lens wear, and their association with these factors, for example, older females are more likely to have poorer tear quality, indicating careful lens material selection and perhaps the use of ocular lubricants.
3. Ask the following questions:
(a) Why do you want to wear contact lenses? Start by finding out what has sparked an interest in contact lenses. Any previous history of contact lens wear should be investigated thoroughly to determine the types of lenses worn, and any reasons for discontinuing lens use. Don’t be afraid of refitting a patient who has failed to wear contact lenses successfully in the past as many contact lens drop-outs are due to poor compliance, or associated with older lens designs and materials, rather than a lack of patient suitability.7
(b) What would you like to wear the lenses for? This will range from a complete replacement for spectacles through to occasional social wear. Others may want to sleep in their lenses for convenience or practical reasons (e.g. travelling abroad, antisocial working hours). If they don’t want to sleep in their lenses overnight, are they likely to occasionally nap in their lenses, for example, on the train home from work? Dumbleton et al. reported over 60% of single use soft lens wearers had napped or slept in their lenses.8
(c) What do you know about lenses? This is an opportunity to explain the different types of lenses and the pros and cons of each. This could be an opportune time to introduce the cost of the different types of lens. For those that wear their lenses four or more days a week, monthly or fortnightly disposable lenses are more cost effective than daily disposable lenses.9 It is important that the patient understands from the start the cost of the lenses, fitting and aftercare appointments, along with the importance of regular aftercare to maximise healthy and successful contact lens wear. Explain that there are some risks involved in contact lens wear but if they follow instructions carefully, these are exceedingly small. Direct them to an independent website that provides unbiased, generic information on contact lenses, such as the British Contact Lens Association, American Academy of Optometry, the Cornea and Contact Lens Society of Australia or Contact Lens Update.
(d) How do you feel about inserting lenses and touching your eye? Patients can be very motivated but those that cannot bear to hold their lids apart will generally not succeed. Usually females are more comfortable touching their eyes as they are used to applying cosmetics. If the patient is nervous, demonstrate how they can gently touch the conjunctiva in the lower fornix with their finger, while they look up and suggest they do this a couple of time over the next few days, prior to the fitting visit. This will give them confidence.
(e) Are you willing to clean the lenses after each wearing episode, or is convenience a major factor? You will have to outline what is involved in lens care as they may have preconceived ideas having watched a family member cleaning their lenses inadequately.
4. Medical and ocular history. If the patient has recently undergone an eye examination in your practice, check all the points mentioned on their record card, record them again on the contact lens record and ask open questions to ensure nothing has changed since the eye examination. For those who attend for a contact lens fit with a spectacle prescription from elsewhere, a full history routine is required, as for a standard eye examination but modified to take account of previous or potential contact lens wear. Questions should cover:
(a) General health including whether the patient suffers from cold sores that may impact on contact lens handling at times. The medical history may reveal contraindications to contact lens wear, or the need for a particular type of lens or more regular aftercare check-ups (e.g. diabetes). Include a question about smoking as it is known to increase the risk of contact lens inflammatory events and would therefore direct you away from extended wear lenses.10
(b) Use of systemic medication particularly long-term treatment, e.g. steroids, beta-blockers, psychotropic agents (anti-depressants), regular use of over the counter pain medication. The main way in which medication can affect contact lens is through changes to the tear film.
(c) Ocular history indicates whether the patient has had previous ocular treatment or surgery, or contact lens problems in the past. A history of an ocular abnormality directs you to look for the manifestations of the disorder that may impact on suitability for contact lenses, or channel you towards a particular type of lens (e.g. RGP for an irregular cornea associated with a previous corneal injury). Previous surgery may dictate the lens type to be used, for example, RGP lenses post corneal refractive surgery. Are they prone to styes or chalazion that might be associated with recurrent blepharitis? Is the patient’s refraction stable? If not, they should be advised that frequent changes to their contact lenses may be needed with financial implications depending on the type of lens.
(d) Family history information determines if there are any hereditary ocular and/or medical conditions that may be relevant.
(e) Information regarding the patient’s occupation and hobbies is very useful, particularly when the patient is presbyopic as you need to ensure the lens chosen will give them good vision for the required working distances. Patients who spend a lot of time looking at a display screen are more likely to suffer from dryness associated with a reduced blink rate.11 You should ask specifically about water sports as the patient may require additional, single use lenses if they swim regularly, and should be advised regarding the use of goggles.12 Contact sports also require careful lens selection with single use soft lenses most commonly providing the best option.
(f) Environmental factors include regular exposure to a smoky atmosphere, an environment that is dusty, contains fumes, is of low humidity (associated with heating or air conditioning), or is unhygienic in some other way.
5.2.2 Patient records
Both positive and negative patient responses must be recorded. Remember that from a legal viewpoint, if the response was not recorded the question was not asked. Use standard abbreviations (Table 2.1) and avoid personal ones. Using the patient’s own words, recorded in quotation marks, can be useful. An example is given below.
32-year-old Px. Caucasian, teacher
RFV: Wants CLs for rugby and occ. social use. Girlfriend wears SCL which she cleans daily. Happy to clean lenses. No previous CL wear. Happy c Rx for work. Good DV and NV with Rx. No HA. No other Sxs.
OH: Wears Rx constantly. This Rx 2 yrs old. Blunt rugby injury to RE 1/12 ago, seen by HES – all clear. No other OH. LEE: 1/12, Mr Brown, Smith’s Opticians, Manchester. FOH: none.
GH = OK, occ. cold sores, no meds. No allergies. LME: 4 yrs, Dr Patel, Didsbury. FMH: mat grandfather has Type II DM.
Hobbies: rugby (no Rx worn), hiking, swimming 1/7. Uses PC ~ 4 /24, 6/7. Driver.
5.2.3 Interpretation
Selecting the most suitable lens modality, replacement schedule and lens type depends on:
• The patient’s requirements including lifestyle.
• The patient’s ocular characteristics.
• The financial position of the patient.
• The lenses you have available in your clinic. 3–4 types of single use lenses covering a range of materials and prices is useful.
Interpretation of the case history example in section 5.2.2 suggests that the patient wants lenses for occasional use only, specifically for contact sports (rugby), and therefore a single use lens would be the best option if available in his prescription. This will avoid the issue of lenses sitting in solution for extended periods between wearing episodes. In addition, mud in the eye and lens loss are common in rugby and therefore single use lenses are preferred for hygiene reasons. Regular swimming is yet another indicator for single use lenses, and tight fitting goggles over the top will reduce the risk of complications from swimming in lenses. The patient will need to be advised not to wear their lenses when they are suffering from a cold sore or at least to take extra precautions in terms of hygiene before handling the lenses. This patient may need more time spent with them for insertion/removal training due to their large fingers and possible squeamishness.
5.2.4 Common errors
1. Not gaining a full understanding of what the patient wants from contact lenses.
2. Not recording all information obtained from the patient.
3. Assuming the same information is still current from the last eye examination.
4. Not applying all the information gathered to the selection of trial lens.
5. Agreeing to undertake a contact lens fit when the patient does not have a valid spectacle prescription (within recall date).
5.3 Corneal diameter, pupil and lid aperture measurement
Palpebral aperture (PA) height is the vertical distance in millimetres between the upper and lower lid margins at the widest point. Horizontal visible iris diameter (HVID) is a surrogate measure of the actual corneal diameter. HVID aids the selection of lens total diameter for both an RGP and soft lens. PA in relation to lens size determines whether an RGP fit will be interpalpebral or lid attached, and has an influence on the stability of soft toric lenses.13 Pupil size has an impact on the selection of presbyopic lens options and determines the size of the back optic zone diameter of an RGP lens.
5.3.1 Comparison of tests
Palpebral aperture height, HVID and pupil size are most commonly measured using a contact lens rule (Figure 5.1), with direct measurement of PA height and by matching the semicircles to the visible iris or pupil. Semi-circular templates and mm rules are equally accurate in estimating pupil size and measurements can be made in average and dim office illumination, but are not possible in scotopic illumination.14
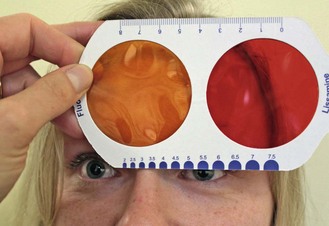
Pupillometers are an expensive alternative and can provide pupil measurements at very low light levels, but the accuracy at higher light levels is similar to simple rulers and they are generally restricted to refractive surgery clinics, where pupil diameter measurements under controlled scotopic conditions are important.14
5.3.2 Procedure for PA height, HVID and pupil size measurement
1. Ask the patient to remove any spectacles.
2. Ask the patient to look directly at your dominant eye or an object held just below your eye.
3. Measure the palpebral aperture height using the mm rule on the contact lens rule held vertically, with the zero line aligned with the lower lid margin. Read off the average position of the upper lid with the patient looking in the primary position of gaze.
4. Position the contact lens rule on their forehead so that the semicircles are facing downwards and the rule bisects the iris. Move the rule horizontally until the semicircle on the rule and the visible semicircle of the iris match in size and create a continuous circle. It is often easier to judge when the diameter is slightly too large and slightly too small and take the HVID value as the reading in between.
5. For pupil measurement, ask the patient to fixate an unlit distant object. Ensure that you do not get in the way of this fixation.
6. Measure the pupil size using the contact lens rule, similar to point 4.
5.3.3 Adaptation for pupil size measurement
1. For maximum pupil size: To measure under low illumination, a Burton lamp on the blue light setting is useful for providing sufficient illumination to view the pupil without causing significant pupil constriction, as the crystalline lens fluoresces under the UV light.
2. Minimum pupil size: Additional local lighting directed towards a near reading chart, can be used to measure the minimum pupil size at near, which is of interest when considering lens options for a presbyopic patient.
5.3.4 Interpretation
The average HVID value is 11.6 mm with a range of 10.2 mm to 13.0 mm.15 The rule-of-thumb for calculating corneal RGP total diameter is at least 2 mm smaller than HVID and for soft lenses is at least 2 mm greater than HVID. It is also useful to consider the corneal diameter when selecting the first soft trial lens as lens fit is most closely related to the sagittal height of the cornea, which is dependent on a number of factors including curvature and diameter. Larger corneas generally need a flatter base curve and smaller corneas, a steeper base curve.16
The angle of the lids, both in the stationary position and with a blink, should also be noted as this can influence the rotation of toric soft and front surface toric RGP lenses. An eye with oblique lid alignment or an unusual lid movement on blink is more likely to suffer from rotational instability if fitted with a soft toric lens.13
5.4 Corneal topography
5.4.1 Comparison of tests
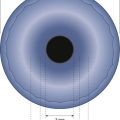
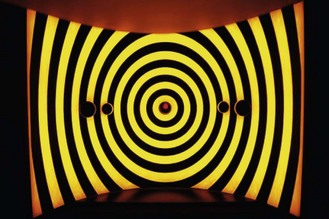
The traditional method to assess corneal topography was using a keratometer. This is an instrument that projects a symmetrical image onto the corneal apex, using it as a reflective surface and applying the optical principles of a convex mirror to estimate the radius of curvature at two assumed perpendicular principal meridians. When more information is needed an instrument called a corneal topographer or videokeratographer or videokeratoscope is used. To collect more data points from the corneal surface these instruments project a Placido image (series of concentric rings) onto the cornea (Figure 5.2) and the reflected image is captured by a high resolution CCD camera and the data are processed by a computer. In addition to providing more detailed information, the area covered by these projected rings is wider than that of a keratometer, up to 10mm compared to 3.0 to 3.5 mm. Topographers will also calculate nominal primary meridian values for the two principal meridians for RGP lens fitting, negating the need to use a keratometer as well as a topographer. The increased accuracy and information obtained with a corneal topographer and their lowering price tag mean the days for keratometers are numbered. Anterior segment optical coherence tomography (OCT; section 7.11) provides valuable information about the real sagittal height of the cornea which is more predictive of soft contact lens fits than either keratometry or topography measurements.17 Knowledge of the profile of the corneo-scleral junction is helpful when fitting gas permeable scleral and semi-scleral lenses, both of which are seeing a resurgence in use for both irregular and regular corneae. OCT is likely to become more widely used in contact lens practice in the future.
5.4.2 Procedure: corneal topography
1. Explain the procedure to the patient: ‘I am going to measure the shape of the front of your eye, the cornea.’ You may add: ‘… so that I will know which contact lens to fit’, etc.
2. Ask the patient to be seated in front of the topographer and to remove their glasses or contact lenses. If a contact lens wearer keeps their lens on, then you will measure the topography of the contact lens.
3. Most topographers hold patient information on their self-contained database, so complete these details before measurements begin.
4. The instrument’s next prompt screen will have a selection of options; to review existing data or to collect data. Once you have selected collect new data the camera will turn on and the Placido rings will illuminate (Figure 5.2).
5. Ask the patient to place their chin on the chin rest at this point. This avoids unnecessary photophobia as the rings are already illuminated and the patient will have adjusted to the light levels. Either you adjust the instrument to align the camera with the cornea or it is automatic. The fine focusing to align the alignment targets will allow you to capture the image, either manually (pressing the button) or automatically. Before the image is captured ask the patient to blink a few times and then to hold from blinking.
6. Switch eyes, again this may be automatic or manual; usually the instrument moves, not the patient. Align and focus the targets and capture the image of the second eye.
7. The patient can now rest their head back while you confirm the captured images are acceptable and the instrument processes the data and generates the colour maps.
5.4.3 Procedure: Bausch and Lomb one-position keratometer
1. Seat the patient comfortably in front of the keratometer, and ask them to remove any spectacles. Sit opposite the patient, across the instrument table, and dim the room lighting.
2. Explain the procedure to the patient: ‘I am going to measure the shape of the front of your eye, the cornea’. You may add: ‘… so that I will know which contact lens to fit’ or ‘… so that I can tell whether the contact lens is changing the shape of your cornea.’
3. Adjust the eyepiece of the instrument by directing the telescope to a distant object (such as the cubicle wall), turning the eyepiece anti-clockwise as far as it will go and then turning the eyepiece clockwise until the black cross hair just comes into sharp focus.
4. Adjust the height of the patient’s chair and the keratometer to a comfortable position for both you and the patient. Ask the patient to lean forward and place their chin in the chin rest and forehead against the headrest. Occlude the eye not being tested by swinging the keratometer’s occluder into place. Then adjust the chin rest so that the outer canthus aligns with the headrest marker.
5. Ask the patient to look at the reflection of their own eye in the centre of the keratometer and to open the eye wide after a full blink. If a high refractive error prevents the patient seeing their own eye, then ask them to look down the centre of the keratometer. Make vertical adjustments of the keratometer if the patient is unable to see into the centre or shine a pen torch through the observation eyepiece on to the patient’s face – adjust the keratometer’s height until the light shines on their eye.
6. Align the keratometer so that the lower right mire image is centred on the crosshairs, and lock it into place.
7. Adjust the focusing of the keratometer by turning the focusing knob until the mires are clear and the lower right mire is no longer doubled. You will need to keep one hand on the focusing knob and constantly adjust it to exclude doubling of the lower right mire.
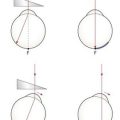
8. Measure the principal meridian that is closest to the horizontal first. Rotate the instrument so that the plus signs are set ‘in step’ (Figure 5.3) and the minus signs are parallel. This ensures that the instrument is aligned precisely on a principal meridian. This is easier to judge when the mires are adjusted to be relatively close to the end point. Use one hand to adjust the focusing knob to ensure a single, clear plus sign. Note that you will need to constantly adjust the keratometer’s position to maintain image focus, so keratometric measurements are always a two-handed operation. Note the radius of curvature (or dioptric power) and orientation of this meridian.
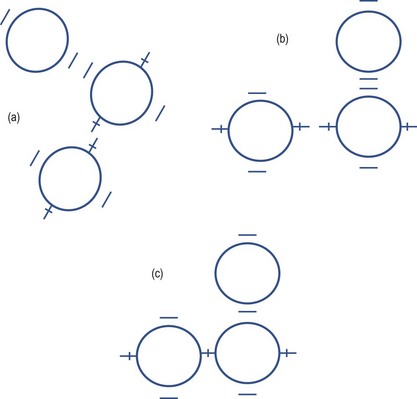
Fig. 5.3 Alignment of the mires on a Bausch and Lomb keratometer. (a) The view when the mires are off the principal meridians. (b) The view when the mires are on the principal meridians. (c) The view when the plus and minus signs are overlapping to measure the ‘horizontal’ and ‘vertical’ radii of curvature/equivalent power.
9. Measure the second principal meridian, which is theoretically 90° to the primary one. Adjust the focusing knob to give the best focus for the minus signs and then adjust the vertical alignment wheel until the minus signs are superimposed (Figure 5.3). Note the radius of curvature (or dioptric power) and orientation of this meridian. On a toric cornea, the plus signs will be out of focus and not superimposed, but this does not matter as you have completed your measurement of the near horizontal principal meridian.
5.4.4 Procedure: two position variable doubling type keratometer
1. Set up the patient and the instrument as described in steps 1–8 above.
2. Move the telescope forward by adjusting the focusing knob or joystick appropriately. You may need to make minor adjustments both horizontally and vertically to centre the mire images and achieve a view as depicted in Figure 5.4. If the blocks and staircase are in step (Figure 5.4a), then the orientation of the instrument arc is aligned to one of the two principal meridians and you can now proceed to step 4.
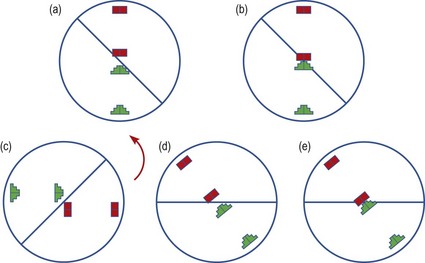
Fig. 5.4 The mire images as seen on the Javal-Schiotz keratometer. (a) Aligned mire images along the horizontal. (b) Mires from ‘a’ touching with no overlap. (c) Non-aligned mire images. (d) Mire images from ‘c’ brought into alignment along an oblique meridian. (e) Mires from ‘d’ touching with no overlap.
3. If the mires you see are similar to Figure 5.4c, where the blocks and staircase are out of step, then the angle of the instrument arc is not aligned along a principal meridian. Move the arc slowly until the staircase and block mires are in step and are able to be brought into contact by turning the knurled knob situated below the arc as in Figure 5.4d. This is easier to judge when the mires are relatively close together.
4. Ask the patient to blink and then keep their eyes as wide open as possible. Turn the knurled knob situated below the arc until the staircase and block mires are just touching. You must simultaneously adjust the instrument position with your other hand to maintain focus of the mire images. If you turn the knob too much and the mires overlap, a yellow/white area of overlap will be seen. Adjust the position of the mires until they are just touching with no overlap. If the hair wire does not pass through the middle of the touching mires, make final horizontal and vertical adjustments to achieve this.
5. Read off the angle of the arc from the degree scale of the instrument and the radius of curvature along this meridian from the mm scale.
6. Turn the arc through 90° and make adjustments as in steps 4 and 5 to achieve a picture similar to Figure 5.4b or 5.4e. Note the reading off the scales. This is the corneal radius along the other meridian.
5.4.5 Recording
Topography results are usually printed and attached to the records (Figure 5.5). Many topographers display the corneal curvature data in a variety of ways:
Keratometry results
The @ nomenclature can be replaced by ‘along’ or ‘al’. A degree sign ( ° ) should not be used after the axis direction. It is possible for the ° to be confused with a 0, so that 15 degrees could become 150 degrees. If the mires are distorted, this must be recorded.
| e.g. | OD: 42.00 @ 175/43.75 @ 85, −1.75 × 175, mires distorted. |
| OS: 43.50 @ 180/44.25 @ 90, −0.75 × 180, mires clear. |
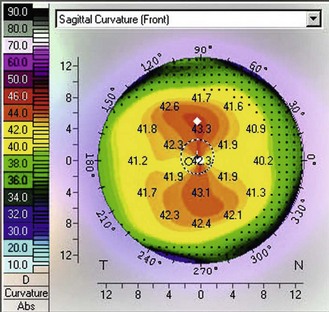
5.4.6 Interpretation of corneal curvature measurements
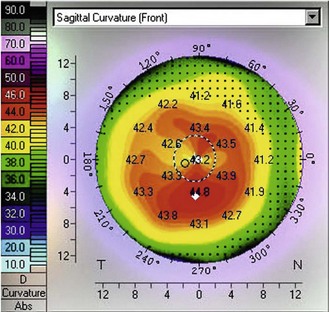
Corneal topography: This has the advantage of showing the corneal height over a wide range of locations, making it easier to differentiate between symmetrical astigmatism and asymmetrical astigmatism. This can be easily observed by viewing the colour map. Astigmatism is represented on the map by the appearance of a bow-tie pattern. For symmetrical astigmatism this bow-tie pattern is seen as even bows on both sides (Figure 5.5). As the asymmetry increases, the disparity in the size of the bows increases. Increasing asymmetry in the pattern could be an indicator for correcting this astigmatism with soft toric lenses rather than RGP lenses, which may decentre due to the profile asymmetry. A pattern indicative of early keratoconus has an apex that is decentred inferior nasal (Figure 5.6). However, kerataconus can produce a range of different topographical patterns. Large changes in the degree of astigmatism within a short time can be indicative of keratoconus, lid neoplasms, pterygium, or a chalazion. Large changes in spectacle astigmatism without corneal astigmatic changes in the elderly are likely due to cortical cataract. Corneal curvature measurements can also be used to help indicate whether ametropia is refractive or axial. For example, a patient with increasing myopia but no change in corneal curvature probably has axial myopia. An anisometrope with different curvature readings probably has refractive anisometropia, while an anisometrope with similar curvature readings probably has axial anisometropia.
5.4.7 Most common errors
1. Poor centration: not aligning the visual axis with the instrument’s camera.
2. Poor focusing of the corneal reflection resulting in blurred ring edges.
3. Misaligning the alignment target, which displaces the Placido ring image.
4. Not getting the patient to keep their eyes wide apart so that the Placido ring image is obscured by the shadow from the lids.
5.5 Determination of contact lens power
5.5.1 Comparison of tests
To minimise error and reduce unnecessary chair time during the fitting of contact lenses, it is prudent for the patient to have undergone a recent eye examination prior to contact lens fitting, so they should attend with a copy of their spectacle prescription, which can be used as the starting point. If the visual acuity is similar in the two eyes and the patient is binocular, a binocular refraction is a quick way of confirming the prescription (section 4.12). Prescriptions greater than ±4.00 DS will require a correction for back vertex distance before selecting a trial contact lens power.
Wavefront aberrometry allows the higher-order optical errors of the eye to be measured in addition to sphere and cylinder. In eyes with corneal irregularity as a result of keratoconus, for example, higher-order aberrations have a much more significant impact on visual quality. Wavefront aberrometry is likely to play a more prominent role in custom contact lens fitting in the future as lenses capable of correcting some higher order aberrations become available for keratoconic patients.18
5.5.2 Determination of power for a correction greater than 4.00 DS
For spectacle refractions of >±4.00 D, a correction for back vertex distance (section 4.12.3) is required.
The power of the required contact lens FCL is given by the equation:
FCL = Fsp/(1−dFsp), where Fsp is the back vertex power of the spectacles and d is the vertex distance in metres.
Spectacle prescription: bvd 12 mm (0.012 m)
e.g., RE, FCL = Fsp/(1−dFsp) = −6.00/[1−(0.012× −6.00)] = −6.00/1.072 = −5.60.
5.5.3 Determination of power for a soft contact lens
When fitting a spherical RGP lens to an eye with corneal astigmatism, the toric tear lens trapped between the lens and the eye neutralises the astigmatism, and therefore the trial lens power should be that of the spectacle sphere power alone, rather than the mean spherical error. In the above example, the trial lens power would be −2.00 DS.
5.6 Preliminary slit-lamp biomicroscopy and tear film assessment
The slit-lamp examination prior to lens fitting serves a number of purposes:
1. To examine the health of the anterior portion of the eye and adnexa.
2. To look for issues that potentially preclude or limit contact lens wear, or indicate the need for a particular type of contact lens.
3. To allow the recording of baseline data against which to judge changes over time, contact lens induced or otherwise.
The tear film and the way it interacts with the lens surface is very important in successful contact lens wear. A large proportion of contact lens drop-outs cite discomfort and symptoms of dryness as reasons for ceasing lens wear.19 A thorough assessment of the tear film and how it impacts on the ocular surface allows you to select a more suitable lens material, such as one with low water content (to limit dehydration) and high lubricity (to minimise friction). It also allows better management of the patient’s expectations.
5.6.1 Procedure for preliminary slit-lamp and tear film assessment
For a detailed description of slit-lamp examination and tear film assessment, see sections 7.2 and 7.3. This section describes the procedures for assessing the tear film, which are generally undertaken as an additional component in the slit-lamp biomicroscopy examination. The tests shown to best predict contact lens induced dry eye in new wearers are symptoms, such as late in the day dryness. These symptoms can be reliably quantified using questionnaires.20,21 The signs useful as predictors are non-invasive tear break up time and grading of lid parallel conjunctival folds.22
5.6.2 Recording
It is useful to record and grade everything seen to provide baseline information. For example, grade 1 papillae on the lateral margins of the superior lid (online video 5.1) would not be considered abnormal but it is invaluable to note this prior to contact lens fitting. A number of grading scales are available but the most commonly used scales are from the Brien Holden Vision Institute (www.contactlensupdate.com/wp-content/uploads/2011/05/Grading_Scales_web.pdf) and the Efron grading scales, which are standardised images of common complications at different levels of severity.23 Try to use just one grading scale, as this will improve your grading accuracy and repeatability over time. The detection of clinical differences can be improved by recording findings in 0.1 steps as these scales are generally quite coarse.23
5.7 Soft contact lens fitting
Patients will be anxious about lenses being applied to their eyes for the first time and you need to try to put the patient at ease (section 2.1). Patients need to be comfortable and feel part of the process, this must involve an appropriate informed consent process, where explaining what you do at each stage and answering any questions they may have is key.
1. Wash your hands thoroughly as per the World Health Organization (WHO) guidelines (www.who.int/gpsc/clean_hands_protection/en/): rub both sides of the hands, in between the fingers and the finger tips. Rinse thoroughly and dry with a lint free towel.
2. Check the lens specification on the container and expiry date.
3. Remove the lens from the container, place on your index finger (finger next to the thumb) tip and check whether the lens is inside out or the correct way round by:
(a) Checking the lens profile, which should be slightly bowl-shaped rather than saucer-shaped (Figure 5.7), and gently pinching the lens should result in the edges curving inwards rather than outwards.
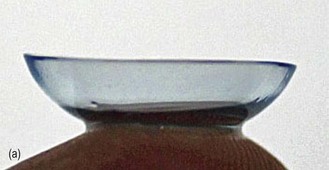
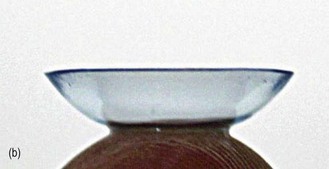
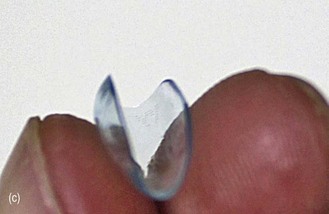
Fig. 5.7 Profiles of contact lenses (a) the correct way round (bowl shaped); (b) inside out (saucer shaped); (c) edges curving inwards when gently pinched.
(b) Using the crease test, which involves placing the lens in the palm of your hand along the main crease, cupping the hand slightly so that the lens is partially folded and looking to see if the edges roll inwards (correct) or outwards.
(c) Some lenses have inversion indicator engravings. Make sure you know from which side of the lens the engraving should be correctly viewed.
(d) If incorrect, simply pick up the lens and turn it over, repositioning it on your finger tip.
4. Check for debris or defects. Any debris should be rinsed off with saline or multipurpose solution. Defective lenses should be disposed of.
5. You should make sure you have your three key fingers reasonably dry; the index finger where the lens is resting, the middle finger of the same hand and the index finger (or thumb) of the other hand, these two ‘extra’ fingers will hold the eyelids apart during the application of the lens. If the lens or finger is too wet, there will be too much contact between the two and it will not be easy to apply the lens. Too little contact, usually as a result of lens dehydration, may result in the lens falling off the finger during application.
6. Stand slightly to the side of the patient on the side that you are going to apply the lens to first. This may necessitate rotating the patient’s chair away from you. The following instructions assume that you will apply the right lens first using your right hand.
7. Ask the patient to rest their head against the head-rest of the chair, turning their head slightly away from you for the right eye application to make the process easier.
8. Explain that you are going to gently hold the lids apart and place the lens on the eye. Make it clear that once the lens is on, they will hardly feel it.
9. Ask the patient to look down and use the thumb (or index finger) of your left hand to lift their superior eyelid from just behind the lashes, and hold it firmly against the brow bone. Do not push in to the orbital cavity.
10. Ask them to look straight ahead and use the middle finger of your right hand to pull the lower lid down from just behind the lashes.
11. Gently place the lens on the eye in one of the following ways:
(a) On the inferior conjunctiva whilst the patient looks up;
(b) On the temporal conjunctiva whilst the patient looks nasally;
(c) Directly on the cornea whilst the patient looks straight ahead.
12. The lens will most likely have a bubble of air underneath it when first applied, particularly if the lens has been placed on the conjunctiva, which is flatter than the cornea. Keep your finger in position initially and ensure the lens has adhered to the surface of the eye rather than sticking to your finger. A very gentle massaging motion will help this. Slowly withdraw your finger, asking the patient to gradually look straight ahead to centre the lens.
13. Release the lower lid then ask the patient to look down before slowly releasing the top lid to cover the lens.
14. They should now be encouraged to make slow, gentle blinking movements whilst looking down.
15. Repeat for the left eye, standing on the other side of the patient and using your left hand to apply the lens.
16. These instructions assume that you are able to use both your dominant and non-dominant hands for lens application, and will therefore use your right hand for the right eye, and left hand for the left eye. If this is not the case, you will have to use your dominant hand for one eye and reach over the patient, taking care not to touch their nose, in order to apply the lens to the other eye.
5.7.2 Problem solving
1. If lens application produces a sensation of grittiness or discomfort, ask the patient to look up, displace the lens down and/or temporal with your index finger and allow it to recentre. If the grittiness persists, remove the lens, check for debris and defects and reapply or replace as appropriate.
2. If lens application results in a stinging sensation and watering of the eye, remove the lens, rinse with saline and reapply. Profuse watering on lens application can be indicative of something on the lens, such as soap from hand washing, or a difference in tonicity or pH of the patient’s tears and the solution on the lens. Significant lacrimation tends to give an apparently tight fitting lens on assessment; the hypertonic tears cause the lens to adhere to the surface of the eye, especially lenses fabricated with ionic materials.
3. If a patient is very motivated to wear contact lenses but is very unsure with you placing a lens on their eye, teach them to apply and remove the lenses themselves during the fitting appointment.
5.7.3 Removal procedure
1. Wash your hands thoroughly as per the WHO guidelines.
2. Position yourself and the patient as for lens application (section 5.7.1).
3. Explain that you are going to gently hold the lids and slide the lens off the eye.
4. Ask the patient to look down and use the thumb (or index finger) of your left hand to lift their superior eyelid from just behind the lashes, and hold it firmly against the brow bone. Do not press into the orbital cavity.
5. Ask them to look up and nasal and use the middle finger of your right hand to pull the lower lid down from just behind the lashes.
6. Gently place the index finger of your right hand on the lens, slide it firmly down and temporal until it is completely clear of the cornea.
7. Bring your right thumb in and pinch the lens between thumb and index finger.
9. Repeat for the left eye, standing on the other side of the patient and using your left hand to displace the lens and pinch it off.
5.7.4 Most common errors
1. Having fingernails that are too long and/or dirty.
2. Approaching the eye from the front rather than the side, resulting in less contact between fingers and lids and therefore poorer lid control.
3. Not holding the lids firmly enough, therefore allowing the patient to blink during the application process.
4. Holding the lids right at the base of the lashes, or in front of the lashes, causing discomfort to the patient and increasing the risk of touching the cornea/conjunctiva.
5. Not ensuring that both your fingers and the patient’s lids are dry before trying to handle them. The patient’s eye may water during the procedure and the lids may need to be dried with a tissue before reattempting application.
6. Not positioning the lens on the very tip of the finger. This is particularly important for practitioners with large fingers.
7. Lens too wet, such that surface tension draws it to the finger rather than the ocular surface.
Application
1. Allowing the patient to blink while there is still a large bubble under the lens. The lens is likely to be propelled out of the eye.
2. Not instructing the patient to blink slowly and gently once the lens has been applied. A hard, quick blink is more likely to propel the lens out of the eye if it is not completely in apposition with the cornea.
5.8 Selecting a spherical trial lens
1. Lens replacement frequency: The majority of soft lenses are disposable and replaced either daily, two-weekly or monthly. Deciding the replacement frequency starts the process of restricting your choice of lens material.
2. Lens material: Due to their increased oxygen transmissibility, silicone hydrogel lenses are now the preferred option. When a silicone hydrogel lens material is not selected, this is usually because a parameter needed to fit that patient is not available. It may be that the best option is a daily disposable lens and a parameter is only available in a hydrogel material.
3. Lens power: This will be based on the patient’s refraction, remember to convert the spectacle refraction to the ocular refraction when the back vertex distance change impacts the refractive result (>±4.00 D; section 5.5.2).
4. Base curve: While traditionally the lens base curve selection is driven by the patient’s keratometry results, most soft lenses are available only with one or two base curves. For soft lens fitting, keratometry is therefore only really useful to establish normality as the lens with the flattest base curve is trialled first. You should change to the steeper base curve only if lens fit was not acceptable or if the patient complains of lens awareness.
5. Total diameter: The lens edge must always rest on the conjunctiva well clear of the limbus. Lens edges that align with the limbus will result in complications, reduced wearing times and discomfort. This parameter is theoretically determined by measuring the horizontal visible iris diameter (HVID) although lenses are rarely available in more than one diameter. So if the lens you have selected is too small, you are likely to have to select another lens brand. Lenses that are too large may simply be too hard to remove.
5.9 Assessment of spherical soft lens fit
 Lens assessment has two phases, the initial brief phase followed by a detailed assessment.
5.9.1 Initial brief assessment of lens fit
1. Initial gross observation: The first assessment is observational. Is the patient comfortable? Soft lenses are comfortable devices, even to the naïve wearer. If the patient has issues, follow the problem solving procedure in section 5.9.5.
2. Initial patient assessment: Ask how the patient feels and if they can see, anticipating a positive response.
3. Closer inspection: Having established that the patient is comfortable and their vision is good, the next step is to make a close assessment of the lens fit, either with the naked eye or the slit-lamp. The basic need is to make sure the lenses are in the correct position and have not decentred.
4. First vision assessment: Lens centration can also be confirmed by assessing the patient’s visual acuity; good acuity levels for a myope not wearing spectacles indicates the lens must be in place.
At this point the lens has probably not settled sufficiently to make an accurate assessment and it is often preferable to send the patient out of the consulting room, let them try the lens and see the world. If your risk assessment has determined that the patient is wearing a well-centred lens with acceptable acuity, say 6/9 (20/30) or better, then send the patient out for a walk, or if the vision or fit is questionable let them have a seat in the waiting room. The settling period should be for at least 10 minutes but may be longer if it fits better with your appointment schedule and the patient.24
5.9.2 Detailed assessment of lens fit
 As part of the detailed assessment you will need to carefully measure the vision and assess how the lens is fitting. As both of these are interlinked, the order will be determined on how the patient is doing.
1. When taking the patient back into your consulting room, ask how the lenses feel and how their vision is.
(a) If their response to both is positive then assess the vision first, followed by the assessment of fit.
(b) If they are uncomfortable, assess the fit first and then the vision.
(c) If they complain that the vision has deteriorated, this could be due to an adjustment need to the lens power or to the fit and the order of assessment is your choice. Degraded vision may also indicate a poor wetting surface. Using a retinoscope is a great way to get an instant impression; a poor wetting surface will develop shadows post blink.
2. Gross assessment of lens fit: While the patient is sat in the chair, observe the lens on the eye without magnification. You want to make sure the lens is still correctly centred and see if you can observe lens movement on a natural blink. Next, using your index finger, push the lower lid over the lens edge while the patient looks straight ahead, again observing to see if you can see lens movement.
3. Slit-lamp assessment of lens fit: The slit-lamp should be set up for direct illumination with low magnification (×10):
(a) With the patient looking straight ahead, observe how the lens moves with 2–3 blinks, this should only take 15–20 seconds. Sweep the observation microscope across the lens to observe movement temporally and nasally. You should also observe the lens size in relation to the HVID, making sure of good even coverage of the cornea and limbus.
(b) Post blink movement: Ask the patient to look up so you can see the inferior edge of the lens. Observe lens movement in this position with continued blinking as it is a good determination of overall lens movement.25
(c) The push up: Place your thumb or index finger against the lower lid and use it to displace the lens, again observing the lens movement. It should displace easily and return to its former position in a smooth and rapid manner.25 This is the single most valuable assessment of the fit of a soft lens.26
(d) Finally, with the eye back in the primary position, ask the patient to look left and right, again observing the lens movement.
(e) During all of these assessments, the lens should demonstrate movement over the surface of the eye and the lens edge should not encroach the limbus. The patient’s blinks should appear natural and not as if they are experiencing discomfort.
4. Assess lens movement: Most slit-lamps allow you to generate a very small circular spot of light, which is usually 1 mm in diameter. You can use this spot of light as an indicator of size when you are making observations through your slit-lamp using moderate magnification (×16 to ×20). While the patient is either in the primary position of gaze or looking up, place the edge of the spot on the outer edge of the limbus or the inner edge of the lens and ask your patient to blink and observe the lens movement, estimate the amount of movement in relation to the size of the spot of light and record in mm. You should expect to record movement of no more than 0.5 mm.
5. Assess lens centration: While the patient is in the primary position of gaze, observe the lens through low magnification (×10 or less) and using a diffuse light source. This will allow you to gauge the lens position in reference to the centre of the pupil or the HVID. Record whether the lens is centred or has de-centration, recording the direction of that de-centration, i.e. superior, nasal, inferior, temporal. The grading system could simply record centration as ideal, good (+1), acceptable (+2) or poor (+3), with all except ideal having a direction indicator, e.g. +1T is good with temporal decentration.
5.9.5 Solving lens fitting problems
1. Too tight, loose or decentred: A tight lens shows no movement with the push up test. A loose lens can be seen to move in the absence of a provocative test such as the push up test and/or it decentres on upward gaze alone or it does not smoothly re-centre. A lens with excessive decentration encroaches the limbus with the lens edge. Lens centration is usually assessed in the primary position of gaze but excessive decentration on upward gaze should also be a cause for concern and indicates that a change in fit is needed. You can alter the fit by:
• Changing the base curve – flatter if too tight and steeper if too loose or decentred.
• Changing the lens diameter – smaller if too tight and larger if too loose or decentred.
• Altering the lens thickness – thicker if too tight and thinner if too loose or decentred.
• Switch to a silicone hydrogel material if your initial hydrogel lens was too loose and to a hydrogel lens if the initial silicone hydrogel lens was too tight or decentred.
In order for you to make any of the above changes, you generally have to change brand as most lenses are only available in one or two different base curves with no option to change lens diameter or thickness.
2. Too large: If the patient is having difficulty removing them, either flatten the lens fit and/or reduce the lens diameter.
3. Too small: If the lens is encroaching the limbus, then you should increase the lens diameter. You may improve the fit as well if you reduce the lens sagittal height by flattening the base curve.
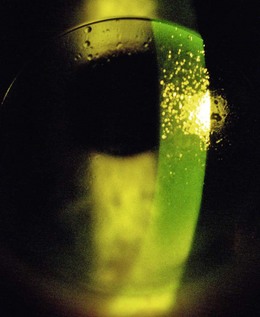
4. Complaints of transient blur following a blink: You should anticipate the appearance of non-wetting areas (Figure 5.8) observable with a slit-lamp and using a retinoscope. The greatest challenge to manufacturers of silicone hydrogel lenses is to ensure the surface of the lens has been correctly produced and so if a faulty lens occurs, it is likely to have a surface defect. These defects usually present as non-wetting areas and will impact a patient’s vision and comfort.
5.9.6 Over-refraction, VA and ocular motor balance
1. Over-refraction: In the majority of cases the trial contact lens power is selected to be as close as possible to the spectacle prescription, leaving a small over-refraction if any. In a patient with good binocularity, this allows the use of the quicker binocular over-refraction (section 4.12) rather than monocular followed by binocular balancing. Refraction is generally restricted to spheres only because patients with small degrees of astigmatism (<0.50 DC) in their spectacles are likely to be fitted with spherical soft contact lenses, leaving their astigmatism uncorrected, or spherical RGP lenses which will correct corneal astigmatism using the tear lens trapped behind the contact lens. Measurement of astigmatism should be undertaken if the visual acuity does not reach the expected level.
2. Visual acuity: With the over-refraction in place, distance and near VA should be assessed (sections 3.2 and 3.3). Also record the stability of VA after a blink. Vision that blurs immediately after a blink and then clears, suggests that the lens is loose; the blink causes lens movement. Vision that clears briefly immediately following a blink suggests the lens is tight, the blink flattens the lens against the cornea for a moment or that there are areas of non-wetting on the lens surface. Visual instability is less obvious for hydrogel soft lenses even when the fit is very poor, because the lenses are so thin and flexible.
3. Muscle balance: The ocular muscle balance should be checked for comparison with the preliminary measurement, particularly in patients known to have a heterophoria at distance and/or near. Control of a heterophoria may differ between spectacles and contact lenses (section 6.2). A cover test at distance and near is usually sufficient. Higher myopes may complain of asthenopia during the adaptation phase, due to a transitory associated exophoria.
5.9.7 Post-fit health check
See online videos 5.9-5.11. Having removed the trial lenses, the final act before writing the lens order is to check the eyes for unwanted signs of contact lens wear. This involves a slit-lamp biomicroscope examination of the cornea and conjunctiva, looking for fluorescein and lissamine green staining (section 7.3). The findings should be recorded in a diagram and graded using the CCLRU or other grading scale, and compared with the preliminary assessment prior to lens insertion. Very occasionally the findings of the post-fit check indicate that the lens fitting process must begin all over again: circumlimbal staining of the conjunctiva indicates an interaction between the lens edge profile and the conjunctiva.27 Lens edge designs vary significantly and swapping to a rounder edge profile can eliminate the staining. Alternatively, the high modulus of the lens may be the cause and a less stiff material can be trialled. A tight fitting lens can also cause such staining but this should have been identified during the fit assessment.
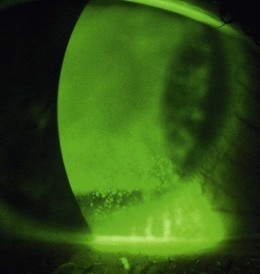
Another finding that would indicate the need to refit would be signs of corneal (punctuate fluorescein staining) and conjunctival (lissamine green staining) desiccation, as the result of a lens material incompatible with a poor quality tear film. Don’t confuse solution-induced staining with a lens fitting staining appearance (Figure 5.9) as the management to resolve either is different, i.e. with the first, you need to change the lens care system; with the second, you need to change the lens material or design.28 With careful history taking and a thorough ocular and tear assessment informing the trial lens choice, this should be avoided.
5.9.8 Most common errors
1. Allowing the wearer to look up too high when assessing post blink movement.
2. Push up test: Positioning your thumb or fingers such that the lower lid rolls out during the push up test, resulting in minimal contact between the posterior lid margin and lens edge and hence little or no movement on push up.
3. Overestimating lens movements having not used a small 1 mm spot to judge sizes, or estimated lens movement by comparing the HVID with the lens diameter.
4. Using the slit-lamp to assess lens fit with the rheostat set too high, such that the patient’s eyes water and the fit is affected.
5.10 Toric soft lens fitting
See online videos 5.12-5.14. When a patient has 0.75 DC or more of astigmatism in their spectacle prescription, they will most likely need this correcting in order to have optimised visual acuity with contact lenses. Around 47% of patients are estimated to have 0.75 DC or more of astigmatism in at least one eye.29 Correction can be achieved using a toric soft contact lens regardless of the origin of the astigmatism. A spherical RGP lens (section 5.12.6) can also be used if the astigmatism is corneal in nature. A soft toric lens corrects the astigmatism by having a different lens thickness in each principle meridian. The lens must then be stabilised to prevent it from rotating. This is achieved using a number of different techniques including prism ballast and various forms of dynamic stabilisation in which raised areas of the lens interact with the eyelids. Modern soft toric designs generally work very well and provide stable vision. There are some patients in whom rotational stability with soft torics can be challenging, including those with particularly angled eyelids or unusual lid movements on blink, or an oblique axis of astigmatism.
5.10.1 Trial lens selection
The trial lens power will require the spectacle prescription to be adjusted for back vertex distance (BVD) if one or both meridians have a power greater than 4.00 D. To do this, the power of each individual meridian is calculated, the BVD adjustment is applied to each meridian and the resulting powers are recombined (see section 5.5.2). The initial trial lens is selected in much the same way as a spherical trial lens with the frequency of replacement determined by the initial discussion of patient needs, the lens material determined by the history and preliminary examination (section 5.2), the diameter determined by the HVID measurement (section 5.3) but also the availability of a suitable cylinder power and axis. The method of stabilisation is also a factor and in patients with a similar prescription in each eye, it can be informative to trial a lens with a different stabilisation method in each eye.
5.10.2 Toric lens fit assessment
See online videos 5.12-5.14. The fit of a soft toric lens is assessed in the same way as a spherical soft lens (section 5.9). The only differences are that the lens should be left to settle for around 10–15 minutes before assessing and the orientation of the lens must also be examined.30 Rotational stability is essential for good vision with toric lenses, and the lens must remain reasonably stable as the eye moves around to avoid inducing astigmatism and blurring vision. It can be worth examining the fit and orientation before over-refraction as there is no point in checking the power of a lens that has poor rotational stability. To check the orientation:
1. Identify the location of the orientation marker or markers using diffuse light. The markings vary with lens brand and can be a single line at 6 o’clock, three lines centred on 6 o’clock or markers at 3 and 9 o’clock.
2. Note the position of the marker(s) as the patient blinks and with eye movements in a number of different directions of gaze.
3. Narrow the beam to a wide optic section (1–2 mm) and rotate it until it lines up exactly with the marker(s) on the lens. On a Haag-Streit type slit-lamp this is done by rotating the top of the illumination tower.
4. Read off the degree of rotation and note the direction and stability of rotation.
If the rotational stability of the lens is poor and varies with eye movements, a lens brand that uses a different stabilisation mechanism should be trialled instead. A lens that consistently rotates by the same amount in the same direction is perfectly acceptable as the axis of astigmatism can be adjusted using two possible methods:
• LARS (Left Add, Right Subtract): As you observe the patient, if the rotation is toward your left then you add the degree of rotation to the cylinder axis. If the rotation is toward your right then you subtract the degree of rotation to the cylinder axis.
• CAAS (Clockwise Add, Anticlockwise Subtract): As you observe the patient, if the rotation is clockwise then you add the degree of rotation to the cylinder axis. If the rotation is anticlockwise then you subtract the degree of rotation to the cylinder axis.
Whether you use LARS or CAAS the result is the same. This allows a contact lens to be ordered with an axis of astigmatism that differs from that of the spectacle prescription, knowing that this lens design will rotate to position the astigmatic power correctly.

Fig. 5.10 CAAS rule drawing showing how the lens order can be altered to compensate for consistent rotation of a soft toric lens.
• Lens specification: Brand X 8.50:14.50/−2.00/−1.25 × 20.
• In the eye the orientation marking on the lens consistently rotates 10° anticlockwise from the 6 o’clock position where it should be, taking the cylinder power of the lens from the planned axis of 20° to 30°.
• A rotation of the marker from 6 o’clock in an anticlockwise direction indicates subtraction so the following lens is ordered:
• The lens is expected to rotate by 10° anticlockwise, taking the axis of the cylinder from 10° to the intended 20°.
5.11 Presbyopic soft lens fitting
The mushrooming of the ageing population is also reflected in the contact lens wearing population so that the need to correct presbyopia with contact lenses is increasing and will continue to do so.31 Fitting contact lenses that correct presbyopia can be challenging and you must adopt a philosophy of precision as the smallest level of uncorrected ametropia or miscalculation in reading addition will likely lead to a higher level in symptoms than expected. Be precise. As with non-presbyopes the preferred choice is to fit them with disposable lenses, to avoid the disadvantages associated with continued use of ageing lenses. As the required reading addition increases, the visual compromise needed to provide both distance and near vision increases and it is very likely you have to change the correction type you use.
5.11.1 Comparison of correction options
Using distance contact lenses with reading spectacles (known as over-readers in this situation) is probably the most commonly used option and as long as the patient accepts wearing reading spectacles, it is very successful. Morgan et al. reported 63% of presbyopes wearing contact lenses were not wearing a multifocal contact lens or monovision.31 Wearers do not have to be refitted with new contact lenses, just provided with over-readers, in the form of reading spectacles or half eyes (both of these can be in the form of ready readers and thus at relatively little cost) or spectacle multifocals (i.e. with a plano distance portion). There is no additional visual compromise unlike other contact lens corrections for presbyopia and this is the obvious choice for patients who have a high visual demand, whether for distance or at near, e.g. a patient who drives at night for a living. However, some patients will not appreciate the ‘ageing’ appearance and/or inconvenience of wearing over-readers and will prefer other options. Monovision provides a correction for distance viewing in one eye (the dominant eye) and near viewing in the other and so they are simple to fit. Current contact lens wearers only need a change in lens power in one eye and no refitting into a new design or material is required and lens costs are the same as distance only contact lenses. Patients who wear toric lens designs are ideal for monovision because although there are some custom designed soft lenses that provide correction for both astigmatism and presbyopia, these are not available as disposable contact lenses. Monovision is successful so long as the patient can tolerate the induced blur, reduced stereopsis and possible retinal rivalry.32 As the reading addition increases, this blur increases and particularly when above +2.00 D may lead to symptoms especially when driving at night, where it is difficult to suppress the bright myopic blur circles seen by the non-dominant eye. Introducing modified monovision may solve these problems or refitting with a pair of distance contact lenses with over-readers. Monovision used to be the preferred option for correcting presbyopia mainly due to the poor optical designs and poor reproducibility of multifocal contact lenses, but significant improvements in design and manufacture of multifocal contact lenses has changed that preference.31
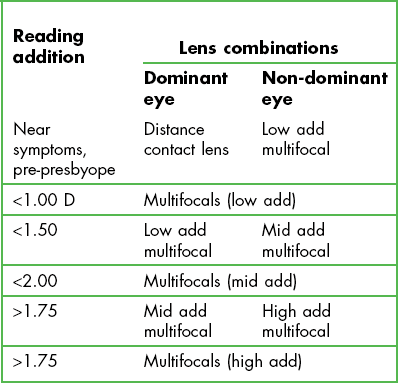
Studies comparing multifocal lenses with monovision now report patient preference toward multifocals and away from monovision.33,34 The most commonly used multifocal lenses use a simultaneous lens design and are typically distance biased lenses, where the central portion of the lens contains the distance power and is surrounded by an increased relative positively powered region providing the near element. When a high reading add is required, near biased design lenses (the central portion contains the near power and is surrounded by an increased relative negatively powered distance vision region) will need to be used resulting in a marked reduction in distance correction and explains why a multifocal design has a reduction in performance for distance vision as the reading addition increases.34
These optical portions can be formed by two distinct spherical zones but are usually aspheric and create a multifocal progression from the distance portion to the near portion. The majority of lens designs are the latter: aspheric and centre distance. Another multifocal approach uses multiple concentric rings of alternating distance and near powers and are available in both low, medium and high reading additions. Situ et al., reported on the success of this lens design when refitting existing monovision wearers, with 53% still wearing the multifocal contact lens after one year.35 Multifocal contact lenses have high levels of subjective preference and are very successful for lower reading adds, but there is a greater compromise in vision as the reading addition increases.36 As a consequence, it is likely that distance contact lenses and over-readers become the preference as the reading addition increases. Disadvantages include the increased cost compared to single vision lenses and the fact that the multifocal design that works for your patient may not be available in the material that works for that patient.
An additional method to correct presbyopia with contact lenses uses translating designs where the contact lens has a distance correcting area and a near correcting area. In the primary position of gaze the distance vision area aligns with the primary visual axis and on downward gaze the lens translates such that the near vision area aligns with the visual axis of the eye. Translating soft lenses are only available in one design, which is not available as a disposable contact lens.37 This limited availability restricts their usefulness and possibly reflects the limited success achieved with them; they are not frequently fitted due to their poor translation (limited unpredictable movement), increased discomfort (lenses are thicker and usually prism ballasted) and are only available as custom designs. These lenses are complex to fit and beyond the scope of this book. However, translating designs lend themselves well to being manufactured in RGP materials.
5.11.2 Fitting contact lenses for presbyopia
When assessing the performance of multifocal contact lenses or monovision it is important to let the patient have an extended trial with the lens and let them take them away for a few days. The optimum trial length need not be longer than 2–3 days.38 Papas and colleagues also concluded that the reliability of clinical measures to determine success was limited and subjective responses were more reliable; ask the patient what they think about their vision.38 Do they think it is successful? The assessment of visual acuity is used to optimise the lens power and to act as a safety measure, i.e. the driving standard.38
Fitting the lenses is otherwise the same as that described in sections 5.9 and 5.10. In addition, note that:
1. Over-Readers: A reading addition (section 4.14) should be determined with the distance contact lenses in place. Do not use the reading addition determined with the spectacle prescription.
2. Monovision: you need to determine which eye will wear the distance contact lens and which will wear the reading lens; generally more success is found when the non-dominant eye wears the near powered lens.32 There are several methods to determine ocular dominance and two are recommended here:
• Hole in the card technique.39 A card is fabricated with a hole in the middle, the patient is asked to hold the card with both hands and to look through the hole at a distant target. They then close their right eye, if they adjust the position of the card, their right eye is distant dominant, if they do not their left eye is dominant.
• Blur acceptance.40 With the patient corrected for distance get them to observe the small letters of the distance acuity chart and place a +0.75 D lens over the right eye and then the left. Ask them which they prefer and when they can see the letters more clearly. They will prefer to have the +0.75 D trial lens placed over their non-dominant eye.
For example:
Reading add +1.50 Dominance test: Right eye dominant
Trial soft lens powers selected: R −2.00 D; L −1.00 D. i.e. Distance power in the dominant right eye and near in the left, with the small cylinders ignored.
3. Monovision: When you explain to the patient how monovision works, they may start covering one of their eyes to see the difference in vision. Ask the patient not to do this as it increases their awareness of the one aspect that results in monovision failing: the unacceptable blur from the near lens when looking in the distance. Remind the patient that they have never done that before wearing monovision.
4. Multifocal soft lenses: These are available in a variety of designs, but all have the same fitting requirement of precise centration. As these lenses are generally aspheric in nature, a decentred lens will induce visually compromising aberrations such as astigmatism, coma and curvature. Decentred lenses can be assessed using the slit-lamp. A decentred lens is likely to result in poor distance visual acuity that cannot be improved. It is recommended that you follow the fitting guide developed by the manufacturer; all of the designs have subtle variations and a one fitting philosophy will not work. The following guide to supplement manufacturers’ instructions is recommended to increase fitting success.41 It is summarised by the mnemonic RISONS:
R – Refraction: Do not use a current contact lens prescription as the starting point, perform a binocular refraction, with the reading addition determined at the patient’s habitual working distance.
I – Initial trial lens: Base the lens power on the new ocular refraction, adjusting for any cylinder as necessary, select the reading addition using the manufacturer’s guideline.
S – Settling time: This should be 15 to 20 minutes, i.e. longer than the time for single vision lenses.
O – Over-refraction: use full aperture lenses in a trial frame with the monocular fogging technique (section 4.12) in a trial frame to keep the binocularity, pupil size and gaze position (i.e. downgaze when checking near vision) as close to normal as possible. If the initial over-refraction is greater than 0.50 D, do not order the lenses but try a different diagnostic lens and repeat the over-refraction.
N – Near vision: Do not assess monocularly, maintain binocularity and only make unilateral adjustments when assessing distance vision.
S – Send away: Once the final trial lens is selected, allow an extended wearing trial of up to 4 days.
5.11.3 Solving problems
Poor near vision: Check to make sure the distance vision is correct and then assess whether the reading addition power is appropriate for the patient’s habitual working distance(s).
(a) Poor distance (or near) vision: Make sure the distance vision is optimised, including the correction of small cylinders. Reducing the reading addition in the eye corrected for near vision may improve the distance vision but at the expense of reducing the vision at near. The reverse could be considered with poor near vision symptoms. You may need to consider refitting with multifocals or modified monovision.
(b) Distance ghosting: This may be due to uncorrected astigmatism or the patient may have weak or variable dominance and not be able to suppress their non-dominant eye.
(a) Poor distance vision: Make sure the distance vision is correct. If it is not, an increase in the distance power (−0.25 D) may improve the distance vision. However, this is likely to have a significant effect on near vision. This could be tried in the dominant eye alone. Reducing the reading addition in both eyes or in the dominant eye alone may improve distance vision but again at the expense of reducing the vision at near.
(b) Poor near vision: Make sure the distance vision is optimised. A reduction in the distance power (−0.25 D) may improve near vision with marginal change in distance vision. This could be tried in the non-dominant eye alone. Increasing the reading addition in both eyes or only in the non-dominant eye may improve near vision but possibly at the expense of reducing vision in the distance.
(c) Distance ghosting: Likely to occur when the reading add is high, less so when aspherical designs are used and more so for the alternating concentric ring design.
If you have a patient who has been successful with either monovision or multifocal lenses and subsequent to an increase in reading addition has developed symptoms, refitting with modified monovision may resolve those symptoms. Ultimately refitting with distance contact lenses and over-readers may be the final solution.
5.12 Fitting RGP contact lenses
Corneal lenses are also known as hard contact lenses, GP lenses or rigid gas permeable (RGP) lenses. For convenience and consistency we will refer to them as RGP lenses. RGP lens use has gradually diminished to about 5–10% of lenses fitted because they need a significantly longer adaptation period compared to soft lenses, characterised by discomfort, possible vision fluctuations and the need to increase wearing time gradually during this adaptation period.4 They can be used to correct simple refractive error, but due to their rigid nature and hence their ability to trap tears behind the lens, they can also be used for more complex conditions such as irregular astigmatism, keratoconus, post-keratoplasty and refractive surgery as well as orthokeratology. This chapter offers a simplified approach to fitting RGP contact lenses and assumes you will be fitting standard lens designs and not custom ones.
5.12.1 Comparison of lens types
All RGP lenses have posterior (back surface) curves that are classified as follows:
• Back Optical Zone Radius (BOZR) – this is the primary central curve of the lens that establishes a relationship with the cornea to optimise vision.
• Mid-peripheral radii – these curves create the area of the lens (mid periphery) that establishes the lens fitting relationship with the cornea and controls lens stability.
• Edge lift – the final peripheral curve forms the outer portion of the lens that creates a band of edge clearance. The curves are significantly flatter than the cornea. The purpose of this area is to optimise the tear pump and aid lens removal.
The cornea has a shape that is similar to an oblate ellipse; the curvature progressively flattening from the corneal apex out to its peripheral area at the limbus. RGP lens back surface designs try to mimic this shape change and do so generally using one of two approaches:
• Spherical designs: A spherical optical curve followed by spherical peripheral curves progressively increasing in flatness. These designs usually have three or four zones: the optical zone, mid-peripheral zone (one or two curves) and the edge band (one curve).
• Aspheric designs: True aspheric designs have the aspheric progression starting at the apex of the lens. The rate of flattening of the peripheral portion of the lens may have a consistent degree of eccentricity or a progressively increasing degree of eccentricity. Alternately the BOZR starts as a spherical curve and transitions through an aspheric curve of increasing asphericity. Regardless of the design the edge band is a flatter spherical curve. The edge band will appear narrow for aspheric designs compared to a spherical lens design.
Spherical designs have the advantage that you can change any curve to change the fit of the lens. This allows you greater control in designing the lens, for example, changing the optical area of the lens, increasing or reducing the edge lift, width or height. It is not possible to change an aspheric design other than the BOZR or the lens total diameter. However, the differing zones of a spherical design will have visible demarcations and these may present problems for patients with larger pupil diameters as the edge of the optical zone may lay within the pupil area and result in symptoms of blur or glare. The junctions between the different zones may compromise corneal physiology and leave concentric rings or compressions where lens and cornea touch. These do not occur with aspheric lenses unless the lens itself is too small. These lenses also generally show a closer alignment fitting relationship between the back surface of the lens and the cornea, which some consider to be desirable, although too close alignment in fit may cause the lens to bind.
5.12.2 Observing how an RGP lens fits
The basic goal when fitting an RGP lens is to ensure:
1. That the central apex of the cornea and lens either fit in alignment or demonstrate marginal apical clearance; an even, low level of fluorescence or a very slight gradual reduction in fluorescence centrally to the mid periphery of the lens will be seen.
2. The mid region of the lens should be aligned with the corneal surface, an even lower level of fluorescence compared to the BOZR area.
3. The edge of the lens has a band of high fluorescence, the edge lift.
5.12.3 Simplified fitting approach
1. BOZR: this should either equal or be 0.05 mm flatter than the flattest keratometry value (real or simulated), for example:
7.80 mm along 180; 7.90 mm along 90.
BOZR selected 7.90 mm or 7.95 mm. You have to decide if you find it easier to assess the fit of an RGP lens that has apical clearance or apical alignment. If you prefer definite clearance as your starting point, you may start with a trial lens with a BOZD of 7.85 mm. Some aspheric designs are only available in 0.10 fitting steps, in which case the starting point would be 7.90 mm.
2. BOZD: this should be larger than the maximum (mesopic) pupil diameter of the patient (not needed if fitting aspheric lens designs). For a pupil diameter measuring 7 mm, the required BOZD should be 7.50 mm, not 6.50 mm. Some lens designs link the BOZD to the TD and so you may need to increase the TD to achieve the desired BOZD. This would obviously not be the case if you vary the parameters yourself – a level of complexity beyond the scope of this book and standard lens designs.
3. TD: should be about 2 mm smaller than the HVID (section 5.3). It is common for lens designs to have three lens diameters. They could be 9.50 mm, 9.80 mm and 10.20 mm, or 9.00 mm, 9.40 mm and 9.80 mm. So one approach would be to assess the patient’s eye and decide if they have a small, medium or large HVID and select accordingly.
1. Advise the patient you are going to place a lens on their eye. This first lens allows you to decide what changes will be needed so that the lens fits their eye more accurately.
2. Instil a local anaesthetic into both eyes (section 7.8) and allow the patient to settle.
3. While the patient settles, place the selected trial lens on the tip of the index finger of your right hand. If you want to pre-wet the lens, place a small drop of saline on the lens but do not use a lens conditioning drop as these drops can affect how easily the fluorescein spreads in the tears.
4. The lens insertion method is the same as for soft lenses, section 5.7.1.
5. Allow the lenses to settle, as there is little sensation for the patient the lens should settle quickly, 3–5 min.
6. Instil fluorescein and assess the lens fit, using a Burton lamp or slit-lamp.
5.12.4 Assessment of lens fit
See online videos 5.15-5.18. You are interested to know whether you have the desired fluorescein fitting pattern and how dynamic the fitting pattern is. Having instilled the fluorescein (section 7.3.2), assess the fit using a slit-lamp as follows (Figures 5.11 to 5.14).
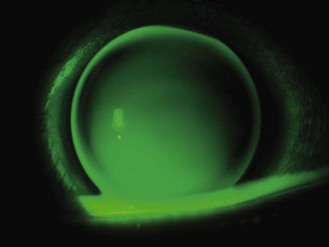
Fig. 5.11 Fluorescein tear film pattern with cobalt blue illumination and a yellow barrier filter for a steep fit for an RGP lens; marked apical clearance, mid peripheral bearing, narrow edge clearance.
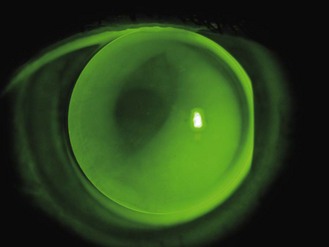
Fig. 5.12 Fluorescein tear film pattern with cobalt blue illumination and a yellow barrier filter for a flat fitting RGP lens; apical bearing, mid peripheral pooling, irregular excessive edge clearance associated with decentration.
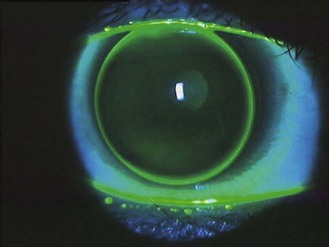
Fig. 5.13 Good alignment fit for an aspheric lens design; slight fluorescein haze at the corneal apex and in the mid periphery with an even narrow edge clearance.
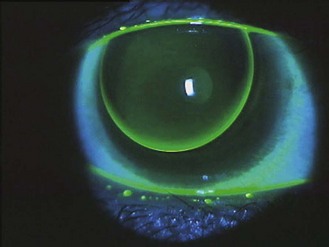
Fig. 5.14 Good lid attachment fit. Superior edge of the lens inherently rests under the upper lid. Slight fluorescein appearance at the corneal apex and in the mid periphery with an increasing edge clearance inferiorly.
1. Ask the patient to place their chin on the rest and their head against the headrest of the slit-lamp and get them looking straight ahead.
2. Advise them to blink as and when they need to.
3. Observe the appearance of the fluorescein behind the centre of the lens and see how it changes with a blink. The goal is to get an even level of fluorescence and/or just apical clearance. Too much fluorescence indicates a steep fit and unstable dark areas within the optical area are suggestive of a flat fit.
4. The fluorescence in the mid periphery of the lens should be darker than in the centre and appear even. A steep lens will have touch in the mid periphery of the lens and a flat fit will have too much fluorescein spilling from the optical area into the mid periphery. Changing the BOZR will change the mid periphery fit. There should be a bright band of fluorescence around the edge of the lens. If you consider it to be too wide, you will need to try a design with a reduced edge lift; the ideal is a width of 1 mm. Changing the design to an aspheric will have that effect. Absence of an edge band of fluorescein is very uncommon, but can be increased by changing from an aspheric design to a C4 spherical design, or to a design of known increased edge lift.
5. Observe the lens movement on blink. This should be smooth and vertical. If the lens does not move very well it may be steep fitting. If the lens appears to rock around the corneal apex after a blink as it drops, it may be too flat.
6. Make your decision about the lens fit and adjust one of the three parameters accordingly: BOZR: a lens that is too steep, increase by 0.1 mm. A lens that is too flat, reduce it by 0.1 mm; BOZD: increasing the BOZD increases the sagittal depth on the lens and makes the fit steeper, reducing this makes the lens flatter; TD: if the lens looks too small, go bigger. Bigger lenses are likely to be more comfortable and more stable.
5.12.5 Assessment of lens (and tear film) power
Once you have a lens that appears to have an acceptable fit for each eye, perform a spherical over-refraction and measure VA (sections 4.6 or 4.7). Alterations in the fit of an RGP lens can have very subtle changes to the patient’s vision and you may find two fits that you think would work but the patient reports a preferable visual performance. Where you find this, go with the lens of optimum fit and preferred vision, alternatively select the lens with the steep BOZR.
Tear lens power: When you change the fitting relationship between an RGP lens and the cornea, the tear film behind the lens (the tear lens) will change; a steeper fitting RGP lens results in increased separation between the lens and the cornea and creates a more positive tear lens. Generally increasing the sagittal depth of an RGP lens increases the positive tear lens power and therefore affects the over-refraction. The following rules of thumb apply:
Decrease the BOZR by 0.05 mm changes the tear lens power by +0.25 D, changing the over-refraction by −0.25 D.
Increasing BOZD by 0.50 mm changes the tear lens power by +0.25 D, changing the over-refraction by −0.25 D.
For aspheric designs, increasing the TD by 0.5 mm changes the tear lens power by +0.25 D, changing the over-refraction by −0.25 D.
5.12.6 Correcting astigmatism with RGP lenses
BOZR is steeper than the flattest keratometry value by ⅓ of the difference between the keratometry values, e.g.: K readings: 7.80 mm along 180, 7.50 mm along 90.
7.80 mm −7.50 mm = 0.30 mm; ⅓ of difference is 0.10 mm, 0.1 mm more than flattest (7.50 mm) is 7.60 mm.
1. Toric RGP lens: Compromising the fit of a spherical RGP lens to enable centration on an increasing toriodal cornea will result in corneal physiological compromise (3 and 9 o’clock staining), corneal moulding and spectacle blur.42,43 Compromised fits can also lead to increased discomfort, so that fitting a toric RGP lens may be more appropriate and is recommended once corneal astigmatism exceeds 1.50 D. Some authors recommend using toric lenses only when the corneal astigmatism is 2.00 D or higher.44 Fitting toric lenses can be complex but here is a simple approach:
Transpose to cylindrical form: −2.00 × 90/−3.50 × 180
K readings: 7.50 mm (or 45 D) along 90; 7.80 mm (or 43.25 D ) along 180
7.55/7.85 (BOZR): 7.80 (BOZD) C4 design 9.80 (TD) −3.50/−2.00
2. Irregular corneas: Fitting irregular corneas is very challenging and requires a high level of skill and experience. Low levels of irregular astigmatism or early keratoconus can be fit using conventional RGP lens designs and you can try progressing to these fits as you gain confidence but be aware that at some point, standard designs will not work and very special designs will be needed. Before you get to that stage you need to attend specific courses on fitting complex lenses.
5.12.8 Common problems
1. Adaptation: The biggest problem when fitting RGP lenses is encouraging the patient to get over the adaptation phase. You should optimise the fit of the lens as soon as possible and be encouraging to the patient. The initial wearing time may need to be shorter than is desirable and then gradually increased. If adaption is hard keep the wearing time reduced. Be prepared to accept that some patients cannot adapt to RGP lenses and that soft lenses may be preferable.
2. Glare at night: When a patient presents with the symptoms of glare at night with RGP lenses they are likely wearing a spherical lens design. The BOZD is likely too small and should be increased. If you cannot increase the BOZD any more then you should consider changing the design to an aspheric design.
3. Fluctuating vision with blink: When vision fluctuates after a blink the lens is likely to be fitting too steep, if it changes and is corrected by a blink the fit is likely to be too flat. Confirm this by reviewing the fit of the lens with fluorescein on the slit-lamp and reordering the lens with the corrected BOZR.
4. Lenses dislodge: If a blink causes the lens to occasionally dislodge, the lens could be too small (so increase TD), too steep (flatten the fit) or the edge lift is too high (reduce it or refit with an aspheric lens).
5.13 Patient instruction for contact lens care
5.13.2 Contact lens application and removal training
Spending the necessary time to teach a patient to handle their lenses correctly is an important part of the lens fitting procedure. It is an activity that is often delegated to support staff, which is fine as long as they are well trained and able to answer the patient’s questions. Contact lens handling should be taught in a quiet area with good quality diffuse lighting that is away from the communal areas of the practice, to avoid putting pressure on the patient to perform in front of others. The patient should not be allowed to take the lenses away until they can safely apply and remove them and they have demonstrated a full understanding of the importance of hygiene, the cleaning regime and how to minimise the risk of complications.45 With all aspects of compliance, it is important to give patients reasons why certain steps should be included, to encourage them not to drop them from their regime.46 Do not simply give them a list of instructions. Areas to cover include hand washing, lens inspection, lens application technique, lens removal technique, lens cleaning, case cleaning, lens and case replacement, recommended wearing times, minimising risks: contact with water, napping, illness and when to seek advice.
The lens application procedure for a patient is almost identical to that for the practitioner (section 5.7.1), but the patient should lean over a mirror or use a mirror stood on a clean surface; for their right eye, they should position the lens on the very tip of the right index finger and use their right middle finger to pull down the lower lid and the left hand to lift the upper lid and it can be easier to place the lens directly on the cornea rather than on the conjunctiva and sliding the lens.
5.13.3 Cleaning lenses
With the exception of single use lenses, all contact lenses require cleaning after every wearing period. The current recommendation is for lenses to be rubbed and rinsed with the cleaning fluids prior to storage, so as not to leave the storage solution with too much to do in terms of microbial load.47 Specific instructions vary between brands and types of lens solution but are summarised below:
2. Remove one lens, place it in the palm of your hand and use a finger tip to gently rub the surface of the lens with contact lens cleaning solution (multipurpose or specific cleaning solution). Cupping the hand stops the lens from sliding around.
3. Turn the lens over and rub the other side.
4. Transfer the lens to the palm of the opposite hand and rinse thoroughly.
5. Place the lens in a dry case and fill with solution (multipurpose, hydrogen peroxide or other specific storage solution).
6. Place lids tightly on the vials and leave for 4–6 hours depending on the manufacturer’s instructions.
7. Before applying lenses, the solution should be neutralised if required (hydrogen peroxide). In the case of multipurpose solutions, it is advisable to rinse the lenses with fresh solution prior to insertion.
5.13.4 Case cleaning and replacement
This is just as important as good lens care but frequently overlooked.48 The patient should be shown how to clean their case and the importance of removing the biofilm should be explained.
1. Following lens application, empty the case and rinse it out with fresh solution.
2. Rub the case thoroughly with a clean, lint free tissue.49
3. Rinse the case again to remove any debris and leave to air dry, upside-down in a room other than the lavatory.
5.14 Contact lens aftercare
The purpose of a contact lens aftercare examination is to:
• Identify any difficulties the patient may have with their eyes and lenses.
• Ensure that the patient’s needs are met by the current contact lenses.
• Consider the lens parameters and make changes where indicated.
• Ensure that the lenses are not having an adverse effect on the eyes and manage where necessary.
• Check patient compliance with lens wear and care instructions and re-educate where required, to maximise healthy, successful lens wear and reduce the risk of future complications.
For a summary of aftercare routine, see Box 5.1.
5.14.1 Patient discussion – aftercare history taking
(a) Determine the reason for visit (chief complaint if any). This is undertaken using the same form of questioning as used in the eye examination and involves the use of LOFTSEA to gather all the appropriate information about the complaint (section 2.3). It is also important to determine whether lens removal is associated with cessation of the complaint or whether symptoms persist. Remember, it is possible that the complaint is completely unrelated to contact lens wear.
(b) The patient should be questioned specifically about other symptoms, which again may or may not be related to contact lens wear: distance vision, near vision, eyestrain, headaches, ocular pain, discomfort, dryness and diplopia.
(c) A complete description of the contact lenses currently worn is needed. This may just be a matter of confirming that the practice notes are correct:
(i) ‘What type of lens (or lenses) do you use?’(soft, gas permeable, toric, multifocal, etc.), brand and specification if known and recommended frequency of replacement (single use, two weekly, monthly, etc.). Note that some patients may use more than one type, for example monthly disposable toric lenses for general use and single use lenses for swimming, or a presbyope might be wearing single vision lenses with reading glasses for work and single use multifocal lenses for socialising.
(ii) ‘Who prescribed the lenses?’
(iii) ‘How long have you been wearing this type of lens?’
(iv) ‘How old is your current pair of contact lenses?’
(v) ‘How often do you replace your lenses?’ (as opposed to ‘How often are you supposed to replace your lenses?’)
(i) ‘How long have you worn contact lenses in total and have you tried any other lens types in the past?’ If other types have been worn or trialled, it is important to ask further questions to ascertain why a particular lens type was abandoned, to avoid wasting time retrialling a lens type in the future that failed to provide satisfaction in the past.
(ii) ‘Have you ever had to stop contact lens wear for any reason, even for a short time?’ If a positive answer is given, further questioning will be required to ascertain the reason for ceasing lens wear.
(i) ‘When did you put your contact lenses on today?’
(ii) ‘How many days per week do you tend to wear your lenses?’
(iii) ‘How many hours of comfortable lens wear do you achieve on average in a day?’, ‘When do you generally take your lenses out at night?’ and ‘How long would you like to wear them for?’ If there is a mismatch between these two periods of time, the current lenses are not meeting the patient’s needs and another lens should be trialled.
(iv) ‘What is the longest time that you wear your lenses for?’
(v) ‘How often do you sleep or nap in your lenses?’
(vi) ‘Do you ever shower in your lenses or use them for water sports, including swimming?’
(i) ‘When was your last contact lens aftercare?’
(ii) ‘When was your last eye examination?’
(iii) ‘Do you have an up to date pair of spectacles that you could wear should you be unable to wear your lenses for a few days?’
(g) Questioning should also cover more general aspects of ocular and systemic health (section 2.3) as these issues can impact on contact lens wear. In addition, you should remember that you remain responsible for the health of the whole eye, even during a contact lens aftercare, and you must not become blinkered and assume that a particular symptom is contact lens related. It is particularly pertinent in contact lens wearers to ask ‘Do you smoke?’ since this significantly increases the risk of microbial keratitis.10
(h) During a contact lens aftercare appointment, you will also need to ascertain how compliant the patient is. Studies show that up to 90% of patients are non-compliant.8 In some cases, this is because they do not know or understand how they should be looking after their lenses, while in other cases, they know what they should be doing but do not follow the full instructions due to laziness or a lack of understanding of the purpose of a particular stage and they will tend to give the correct answer if they know they are being tested. Questioning should cover:
(i) ‘What cleaning solutions do you use?’ (assuming the lenses are not single use lenses).
(ii) ‘How do you clean your lenses?’ If time allows, it is generally more informative to ask the patient to demonstrate lens handling and cleaning than describe it.
(iii) ‘Do you always wash your hands and dry them thoroughly, prior to handling your lenses and/or case?’
(iv) ‘How do you store your lenses if you are not wearing them?’
(v) ‘How frequently do you replace your lens case?’ and ‘What do you do with your lens case once you have applied your lenses?’ and ‘How do you clean your case and how often?’
(vi) With all patients, it is essential to reinforce instructions regarding lens and case care along with healthy wearing habits, but to also explain why certain steps are included, to improve compliance.
(i) Occupation, hobbies, computer use and driving (section 2.4.3). You should ask specifically about water sports because of the increased risk of microbial keratitis associated with allowing lenses to come into contact with water.50
Example case history – Graphic designer, driver
CC: ‘Eyes become gritty during the day at work’ c CLs since starting new job 6/12 ago. Affects OU equally and gives gen. feeling of eyestrain. VDU all day. Becomes a problem after ~5 hrs. Eases when CLs removed. DV and NV c CL and specs OK. No H/A. No other Sxs.
OH: SCLs for last 6 yrs. 6/7 for ~8 hrs, 16 hrs max. Monthly disp hydrogel, brand X. No previous CL wear. Fitted by Dr Andrew, Bradford. CLs replaced ~1/12. Current 5 weeks old! Lenses in for 6 hrs today. Never sleeps in CL. No previous probs c CL.
Last AC 11/12 ago. LEE: 18/12. Has up to date specs – good DV and NV. No other OH. Dr Keirn, Bradford. FOH: parents both myopic.
GH = OK, no meds. No allergies. Non-smoker. LME: 12/12, Dr Patel, Bradford. No FMH. Hobbies: Swimming 2×/week (monthly CL c goggles), climbing. Uses PC ~7/24.
Sol’n: multipurpose brand Y. Washes hands superficially. Rubs lens each side for 30 seconds and rinses with soln each time worn. Rubs lens case with tissue and leaves to air dry each day. Replaces case every 2 /12.
5.14.3 Assessment of lens and lens fit
See online videos 5.19-5.21. Assess the fit as described in sections 5.9 (soft lenses) and 5.12 (RGP lenses). An unacceptable fit requires you to trial a different lens or book the patient in as a matter of urgency for a refit.
Whilst the patient is on the slit-lamp biomicroscope, the integrity of the contact lens and the condition of the lens surface can be examined. Specular reflection off the pre-lens tear surface can be very informative (section 7.2.3) and using the placebo disc from a topographer is also useful to assess the global impact surface deposits are having on the tear film stability, by observing the disruptions in the quality of the placebo disc image as well as measuring the non-invasive break-up time (NIBUT; section 7.3.5). All lenses need to interact with the tear film and it is inevitable that the lens surface will become deposited; in fact some of the interactions and deposition are desirable as they help condition the lens and contribute to its wettability. Clinically observable lens surface deposition has been shown to occur within minutes of wear and significant amounts after just one day of wear.51,52 The level, composition and appearance of deposition on the lens surface is influenced by the tear film, environmental variables such as air quality, lens care products used, cosmetic and skin care products and industrial environments (particles and vapours), the replacement frequency of the lens and the lens material.53,54
5.14.4 Management of deposition
1. Change lens material: For hydrogel materials Group II (ISO system of contact lens materials classification BS EN ISO 18369-1: 2006/DAM1) tend to have increased levels of lipids and Group III the least.55 Silicone hydrogels have an increased level of lipid deposition (least on lotrafilcon A and B, moderate level with asmofilcon A and most with galyfilcon A and balafilcon A).56
2. Change lens care system: If the patient is not rubbing and rinsing their lenses on removal, instruct them on this procedure. Newer dual disinfecting multipurpose solutions contain ingredients to increase surface hydrophilicity, which should reduce deposition. The introduction of a peroxide system may also be effective.57
3. Change frequency of replacement: Increasing the frequency of lens replacement will reduce the level of deposition, while daily disposable contact lenses do deposit the level of deposition is much reduced compared to 2-weekly or monthly replacement contact lenses.57,58
5.14.5 Observation of lens removal
1. Is their hand washing technique adequate?
2. Did the patient dry their hands sufficiently before handling the lenses?
3. Do they have a safe lens removal technique and are they confident, or do they need some pointers?
4. Do they have a good lens cleaning technique and was it undertaken for long enough?
5. Do they rinse the lenses thoroughly?
6. What is the condition of their lens case?
7. At the end of the examination, do they wash their hands before lens insertion?
8. Do they have a safe lens application technique and are they confident, or do they need some pointers?
5.14.6 Check ocular health
Following removal of the lenses, perform a slit-lamp biomicroscope examination of the anterior segment (section 7.2), including staining with fluorescein sodium and lissamine green, lid eversion (see online video 5.22) and tear assessment.
Topography or keratometry (section 5.4) should be undertaken to assess the corneal shape to look for changes, particularly in terms of regularity. Unlike the days of hard polymethylmethacrylate lenses and thick hydrogel soft lenses, corneal warpage is now rare but it occasionally occurs with RGP and tight fitting, high modulus silicone hydrogel lenses.59
Examine the posterior segment of the eye (section 7.10) unless it has been undertaken during a recent eye examination and nothing to raise suspicion, such as unexplained symptoms or visual acuity loss, has occurred since. Be mindful of the possibility of pathology in contact lens patients. For example, do not making protracted changes to a patient’s contact lens specification over a period of weeks in response to a symptom like ‘vision not quite right’, without checking the whole eye for signs of pathology.
5.14.7 Summary of outcomes and re-education of patient
1. The procedures that have been undertaken during the examination and what has been found if anything.
2. Any action required in light of what has been found.
3. Reinforce healthy lens wearing, good hygiene and lens care habits. Talking through a written check list and indicating to patients where they are doing well and where they could improve is a useful way of communicating such information (www.bcla.org.uk and www.aoa.org/x8024.xml).
4. Give the patient a new, dated lens specification.
5. Ensure they have a new supply of lenses of the correct specification. They may wish to take the specification and buy the lenses online, in which case highlighting the importance of regular aftercare is particularly important.
6. Inform the patient when their next aftercare and eye examinations are due.
7. Remind the patient to remove their lenses and contact you if their eyes no longer ‘see good, feel good, look good’.
References
1. Pesudovs, K, Garamendi, E, Elliott, DB. A quality of life comparison of people wearing spectacles or contact lenses or having undergone refractive surgery. J Refract Surg. 2006;22:19–27.
2. Rumpakis, J, New data on contact lens dropouts: an international perspective. Review of Optometry 2010. www.revoptom.com/content/d/contact_lenses_and_solutions/c/18929.
3. Dumbleton, KA, Woods, CA, Jones, LW, Fonn, D. The relationship between compliance with lens replacement and contact lens-related problems in silicone hydrogel wearers. Cont Lens Ant Eye. 2011;34:216–222.
4. Morgan, PB, Woods, CA, Tranoudis, Y, et al. International contact lens prescribing in 2011. Cont Lens Spect. 2012;26:26–31.
5. Bennett, ES, Stulc, S, Bassi, CJ, et al. Effect of patient personality profile and verbal presentation on successful rigid contact lens adaptation, satisfaction and compliance. Optom Vision Sci. 1998;75:500–505.
6. Gupta, N, Naroo, SA. Factors influencing patient choice of refractive surgery or contact lenses and choice of centre. Cont Lens Ant Eye. 2006;29:17–23.
7. Young, G. Why one million contact lens wearers dropped out. Cont Lens Ant Eye. 2004;27:83–85.
8. Dumbleton, K, Richter, D, Woods, CA, et al. Compliance with contact lens replacement in Canada and the United States. Optom Vision Sci. 2010;87:131–139.
9. Efron, SE, Efron, N, Morgan, PB, Morgan, SL. A theoretical model for comparing UK costs of contact lens replacement modalities. Cont Lens Ant Eye. 2012;34:28–34.
10. Stapleton, F, Edwards, K, Keay, L, et al. Risk factors for moderate and severe microbial keratitis in daily wear contact lens users. Ophthalmology. 2012;119:1516–1521.
11. Patel, S, Henderson, R, Bradley, L, et al. Effect of visual display unit use on blink rate and tear stability. Optom Vision Sci. 1991;68:888–892.
12. Wu, YT, Tran, J, Truong, M, et al. Do swimming goggles limit microbial contamination of contact lenses? Optom Vision Sci. 2011;88:456–460.
13. Young, G, Hunt, C, Covey, M. Clinical evaluation of factors influencing toric soft contact lens fit. Optom Vision Sci. 2002;79:11–19.
14. Twa, MD, Bailey, MD, Hayes, J, Bullimore, M. Estimation of pupil size by digital photography. J Cataract Refract Surg. 2004;30:381–389.
15. Martin, DK, Holden, BA. A new method for measuring the diameter of the in vivo human cornea. Am J Optom Physiol Opt. 1982;59:436–441.
16. Young, G. Ocular sagittal height and soft contact lens fit. J Brit Cont Lens Assoc. 1992;15:45–49.
17. Hall, LA, Young, G, Wolffsohn, JS, Riley, C. The influence of corneoscleral topography on soft contact lens fit. Invest Ophthalmol Vis Sci. 2011;52:6801–6806.
18. Sabesan, R, Jeong, TM, Carvalho, L, et al. Vision improvement by correcting higher-order aberrations with customized soft contact lenses in keratoconic eyes. Opt Lett. 2007;32:1000–1002.
19. Richdale, K, Sinnott, LT, Skadahl, E, Nichols, JJ. Frequency of and factors associated with contact lens dissatisfaction and discontinuation. Cornea. 2007;26:168–174.
20. Simpson, TL, Situ, P, Jones, LW, Fonn, D. Dry eye symptoms assessed by four questionnaires. Optom Vision Sci. 2008;85:692–699.
21. Chalmers, RL, Begley, CG, Moody, K, Hickson-Curran, SB. Contact lens dry eye questionnaire-8 (CLDEQ-8) and opinion of contact lens performance. Optom Vision Sci. 2012;89:1435–1442.
22. Pult, H, Murphy, PJ, Purslow, C. A novel method to predict the dry eye symptoms in new contact lens wearers. Optom Vision Sci. 2009;86:1042–1050.
23. Efron, N, Morgan, P, Katasara, S. Validation of grading scales for contact lens complications. Ophthalmic Physiol Opt. 2001;21:17–29.
24. Maldonado-Codina, C, Efron, N. Impact of manufacturing technology and material composition on the clinical performance of hydrogel lenses. Optom Vision Sci. 2004;81:442–454.
25. Wolffsohn, JS, Hunt, OA, Basra, AK. Simplified recording of soft contact lens fit. Cont Lens Ant Eye. 2009;32:37–42.
26. Young, G. Evaluation of soft contact lens fitting characteristics. Optom Vision Sci. 1996;73:247–254.
27. Maïssa, C, Guillon, M, Garofalo, RJ. Contact lens-induced circumlimbal staining in silicone hydrogel contact lenses worn on a daily wear basis. Eye Cont Lens. 2012;38:16–26.
28. Bandamwara, KL, Garretta, Q, Cheung, D, et al. Onset time course of solution induced corneal staining. Cont Lens Ant Eye. 2010;33:199–201.
29. Young, G, Sulley, A, Hunt, C. Prevalence of astigmatism in relation to soft contact lens fitting. Eye Cont Lens. 2011;37:20–25.
30. Richdale, K, Berntsen, D, Mack, C, et al. Visual acuity with spherical and toric soft contact lenses in astigmatic eyes. Optom Vision Sci. 2007;84:969–975.
31. Morgan, PB, Efron, N, Woods, CA. An international survey of contact lens prescribing for presbyopia. Clin Exp Optom. 2011;94:87–92.
32. Evans, BJ. Monovision: a review. Ophthalmic Physiol Opt. 27, 2007. [417-239].
33. Richdale, K, Mitchell, GL, Zadnik, K. Comparison of multifocal and monovision soft contact lens corrections in patients with low-astigmatic presbyopia. Optom Vision Sci. 2006;83:266–273.
34. Woods, J, Woods, CA, Fonn, D. Early symptomatic presbyopes – what correction modality works best? Eye Cont Lens. 2009;35:221–226.
35. Situ, P, duToit, R, Fonn, D, Simpson, T. Successful monovision contact lens wearers refitted with bifocal contact lenses. Eye Cont Lens. 2003;29:181–184.
36. Gupta, F, Naroo, SA, Wolffsohn, JS. Visual comparison of multifocal contact lens to monovision. Optom Vision Sci. 2009;86:98–105.
37. Ezekiel, DF. A ‘genuinely’ new bifocal lens design. Optom Today. 2002;17:34–35.
38. Papas, E, Decenzo-Verbeten, T, Fonn, D, et al. Utility of short-term evaluation of presbyopic contact lens performance. Eye Cont Lens. 2009;35:144–148.
39. Robboy, MW, Cox, IG, Erickson, P. Effects of sighting and sensory dominance on monovision high and low contrast visual acuity. CLAO J. 1990;16:299–301.
40. Schor, C, Erickson, P. Patterns of binocular suppression and accommodation in monovision. Am J Optom Physiol Opt. 1987;64:723–730.
41. Woods, J, Woods, CA, Fonn, D. Fitting soft center-near design multifocal lenses. Cont Lens Spect. 2010;24:44–46.
42. Edwards, KH. The calculation and fitting of toric lenses. Ophthal Optician. 1982;22:106–114.
43. Yamane, SJ. Are hard lenses superior to soft? The advantages of soft lenses. Cornea. 1990;9:S12–S14.
44. Meyler, JG. Fitting and calculating toric corneal contact lenses. J Brit Cont Lens Assoc. 1989;12:7–14.
45. Campbell, D, Mann, A, Hunt, O, Santos, LJR. The significance of hand wash compliance on the transfer of dermal lipids in contact lens wear. Cont Lens Ant Eye. 2012;35:71–76.
46. McMonnies, CW. Improving contact lens compliance by explaining the benefits of compliant procedures. Cont Lens Ant Eye. 2011;34:49–52.
47. Rosenthal, RA, Henry, CL, Schlech, BA. Contribution of regimen steps to disinfection of hydrophilic contact lenses. Cont Lens Ant Eye. 2004;27:149–156.
48. Hickson-Curran, S, Chalmers, RL, Riley, C. Patient attitudes and behaviour regarding hygiene and replacement of soft contact lenses and storage cases. Cont Lens Ant Eye. 2011;34:207–215.
49. Cho, P, Cheng, SY, Chan, WY, Yip, WK. Soft contact lens cleaning: rub or no-rub? Ophthalmic Physiol Opt. 2009;29:49–57.
50. Vesaluoma M, Kalso S, Jokipii L, et al. Microbiological quality in Finnish swimming pools and whirlpools with special reference to free living amoeba: a risk factor for contact lens wearers? Br J Ophthalmol 1995;79:178-81.
51. Bontempo, AR, Rapp, J. Protein and lipid deposition onto hydrogel contact lenses in vivo. CLAO J. 2001;27:75–80.
52. Leahy, CD, Mandell, RB, Lin, ST. Initial in vivo tear protein deposition on individual hydrogel contact lenses. Optom Vision Sci. 1990;67:504–511.
53. Luensmann, D, Jones, L. Protein deposition on contact lenses: the past, the present, and the future. Cont Lens Ant Eye. 2012;35:53–64.
54. Ng, A, Heynen, M, Luensmann, D, Jones, L. Impact of tear film components on lysozyme deposition to contact lenses. Optom Vision Sci. 89, 2012. [392-340].
55. Lorentz, H, Jones, L. Lipid deposition on hydrogel contact lenses: how history can help us today. Optom Vision Sci. 2007;84:286–295.
56. Teichroeb, JH, Forrest, JA, Ngai, V, et al. Imaging protein deposits on contact lens materials. Optom Vision Sci. 85, 2008. [1151-1116].
57. Brennan, NA, Coles, ML. Deposits and symptomatology with soft contact lens wear. Int Contact Lens Clin. 2000;27:75–100.
58. Maïssa, C, Franklin, V, Guillon, M, Tighe, B. Influence of contact lens material surface characteristics and replacement frequency on protein and lipid deposition. Optom Vision Sci. 1998;75:697–705.
59. Alba-Bueno, F, Beltran-Masgoret, A, Sanjuan, C, et al. Corneal shape changes induced by first and second generation silicone hydrogel contact lenses in daily wear. Cont Lens Ant Eye. 2009;32:88–92.