CHAPTER 8 Cholecystectomy
Step 1. Surgical anatomy
♦ The triangle of Calot is the most important anatomic boundary that needs to be defined when performing cholecystectomy. It is formed by the boundaries of the cystic duct, common hepatic duct, and cystic artery.
♦ Roughly parallel to this triangle is the hepatocystic triangle in which the cystic artery boundary is replaced with the liver edge. The only structure that should be found within this triangle is the cystic artery.
Step 2. Preoperative considerations
Patient preparation
♦ Straightforward symptoms of biliary colic along with objective evidence of gallstones by any imaging modality (ultrasound most sensitive) constitute adequate information to recommend cholecystectomy.
♦ In the absence of stones or sludge, studies of biliary function may help to diagnose pathology and need for surgery.
♦ Asymptomatic patients with stones do not generally require surgery unless immunocompromised. Obviously, the risks and benefits need to be weighed for each patient in making a recommendation for surgery.
♦ In cases of acute cholecystitis, inflammation of the gallbladder and bile ducts makes both open and laparoscopic cholecystectomy more difficult. In early or mild cases, the procedure can usually be managed laparoscopically. However, in severe cases it is often best to manage conservatively with intravenous antibiotics and delay surgery until the inflammation has subsided. Occasionally, in very sick patients, a cholecystostomy tube for drainage is also needed.
Equipment and instrumentation
♦ A 30-degree scope is helpful for providing additional views, especially of the hepatocystic triangle and surrounding structures. Frequently the common bile duct can be seen without any dissection using this type of endoscope.
♦ Standard laparoscopic equipment is used, including the following:


♦ A clip applier is necessary to control the cystic duct. If the cystic duct is too large for a clip, then a pretied loop can be used to occlude the cystic duct stump.
♦ A specimen retrieval bag is recommended to prevent spillage of bile and stones into the abdomen during extraction of the gallbladder from the abdomen.
Anesthesia
♦ Prophylaxis for DVT is important in all patients undergoing laparoscopic procedures. We use sequential compression devices and subcutaneous heparin is started before induction with anesthesia.
♦ An orogastric tube is placed to decompress the stomach and duodenum to facilitate exposure during the procedure.
♦ Patients are asked to void before being brought to the operating room for their comfort after surgery. A Foley catheter is not usually necessary because ports are not placed in the lower abdomen. If a longer procedure is anticipated, then a catheter is placed at the beginning of the procedure.
Room setup and patient positioning
♦ The patient is placed in the supine position. The surgeon operates from patient’s left side. The arms may remain out on armboards unless a cholangiogram is anticipated, in which case the right arm should be tucked to make room for the C-arm.
♦ Although not usually an issue with thin patients, footplates are used to secure the patient on the table and prevent sliding, as most of the procedure is performed with the patient in the reverse Trendelenburg position.
♦ The table is rolled toward the left so that the abdominal contents fall into the left lower quadrant by gravity. This position is also more comfortable because the patient is brought closer to the surgeon and the left-handed instrument can reach the working port more easily.
Step 3. Operative steps
Access and port placement
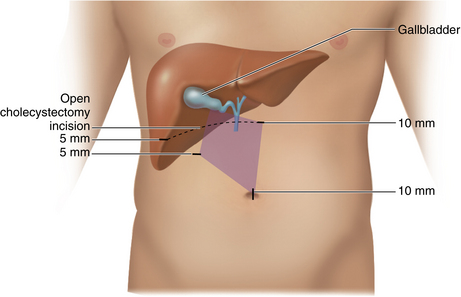
♦ The abdomen is insufflated using a Veress needle at the umbilicus, and a 10-mm port is placed through a vertical incision through the umbilicus. This allows the largest incision to be “hidden” entirely, as the scar will be buried in the base of the umbilicus (Figure 8-1).
♦ A 5-mm port is placed in the right flank, near the costal margin and lateral, just anterior to the right colon, so that it does not interfere with the operating surgeon’s left hand. This is at the anterior axillary line. Through this port, the locking grasper is placed for retraction of the gallbladder fundus up and over the liver edge. It remains relatively stationary throughout the procedure.
♦ The upper epigastric port is used for introduction of the clip applier and must be at least 10 mm in size. The surgeon may choose to orient this in line with a subcostal incision in the event of a conversion to an open procedure. The surgeon’s left-hand instruments are placed through a 5-mm port in the patient’s right upper abdomen. It is optimal if the camera and two operating ports form a diamond shape with the gallbladder at the top corner. The assistant will hold the camera and direct the retraction of the gallbladder fundus.
♦ The procedure is performed through four ports. To prevent port site hernias, try to use the smallest ports possible for the procedure. For most patients, opt to use two 10-mm ports—one for the 10-mm scope and the other for the 10-mm clip applier. By using a 5-mm scope and a 5-mm clip applier, the procedure can be accomplished using all small instruments, although one port, usually the umbilical port, will need to be enlarged to remove the gallbladder.
Description of procedure
♦ The operation begins by exposing the gallbladder infundibulum. The assistant gently retracts the fundus in a cephalad direction, bringing the entire length of the gallbladder into view. Often, adhesions to the upper part of the gallbladder prevent this maneuver and must be divided using the hook electrocautery or stripped away from the gallbladder bluntly.
♦ Once retraction is secured, the patient is moved into a 30-degree reverse Trendelenburg position, with the table rolled with the left side down to improve visualization of the critical structures and to bring the patient closer to the surgeon.
♦ The infundibulum of the gallbladder is pulled laterally by the surgeon’s left hand when starting on the medial surface of the gallbladder. This distracts the cystic duct away from the common bile duct so that they are at right angles to each other. This will make identification of the cystic duct easier and helps to prevent inadvertent injury.
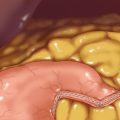
♦ The peritoneum overlying the lower edge of the gallbladder is opened using the hook electrocautery. The cystic node can be used to judge where the lower edge of the gallbladder is. The peritoneum overlying the node should be divided on the side abutting the gallbladder in order to avoid dividing the vessel coming up to the node. The node is then swept down, exposing the lower edge of the gallbladder (Figure 8-2).
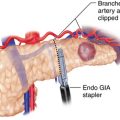
♦ Once the peritoneum on the medial surface is divided, the gallbladder infundibulum is pulled medially, exposing the right side or “back side.” Occasionally, a posterior branch of the artery is encountered as it branches off of the cystic artery below the gallbladder wall. It can be doubly clipped, or cauterized with the hook, and divided. Division of the peritoneum is continued all the way to the liver edge (Figure 8-3).
♦ The dissection should continue on the lower margin of the gallbladder. Identification of the wall and structures may require going back and forth, changing the position of the gallbladder and the angle of the 30-degree laparoscope, until the structures are defined.
♦ Every time the hook electrocautery is used, care should be taken to identify the tissue being divided. The inclination is to divide the deeper tissues, but this is not necessary until the peritoneum is divided on both sides. Being mindful to divide only “see-through” tissues will prevent the inadvertent division of vessels or ducts.
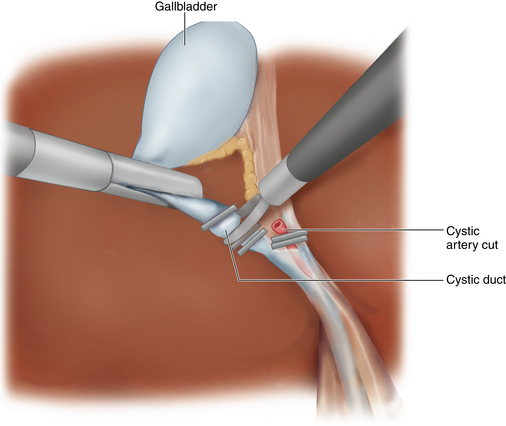
♦ The peanut or Maryland dissector is used for dissection of the hepatocystic triangle and stripping the structures to accommodate the clip applier.
♦ At this point, the gallbladder is removed from the liver bed using the “heel” of the hook instrument. Maintaining constant tension is critical to avoid entering the gallbladder or liver bed (Figure 8-4a and Figure 8-4b).
♦ If bleeding is encountered, control can be obtained by increasing the setting on the electrocautery. The instrument should be held above the surface of the liver to prevent the instrument from sticking to the liver and then dislodging the eschar. Begin cauterizing the most superior portions of the bleeding to avoid blood rolling down.
♦ Every effort should be made to extract stones when they spill in the abdomen. The stones can be picked up individually using stone forceps. To expedite this tedious task, the stones can be placed directly into a specimen retrieval bag within the abdomen. If there are many tiny fragments, then irrigant can be removed with a 10-mm suction device. Any bile spillage should be irrigated.
♦ The instruments and ports are removed from the abdomen as the CO2 pneumoperitoneum is evacuated, and the skin is reapproximated.

Step 4. Postoperative care
♦ Once liquids are tolerated and pain is controlled with oral medications, patients are able to leave the hospital. Most patients go home the same day the operation is performed.
♦ Patients can remove the dressings and shower the day after the operation.
♦ Activity depends on how the patient feels. Most patients will return to normal activities within a week.
♦ Patients are usually seen in the office 2 to 3 weeks after surgery.
Step 5. Pearls and pitfalls
♦ For patients who have had a prior midline incision or who have an umbilical defect, access is obtained using a Veress needle in the left upper quadrant, and the initial trocar is then placed in the lateral position.
♦ In obese patients whose umbilicus is displaced caudally, a port placed through the umbilicus will be too low for the surgeon to see the gallbladder clearly. Instead, the port is placed well above the umbilicus, usually around 20 cm below the xiphoid process.
♦ Very difficult procedures in which the patient is super morbidly obese can be made easier by performing the procedure using a split leg table with the surgeon operating from between the legs. The table is placed in a steep reverse Trendelenburg position to bring the operative field close to the surgeon.
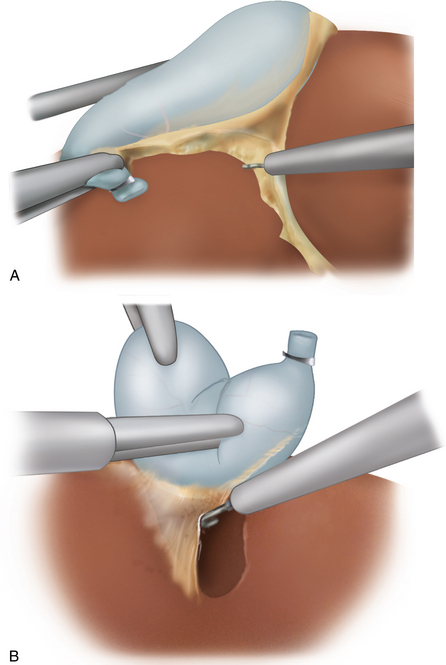
♦ A very distended gallbladder can be decompressed with a laparoscopic needle aspirator so that the grasper used for retraction of the fundus is able to hold the tissue. When that instrument is unavailable, a Veress needle placed through the right upper quadrant abdominal wall can be introduced directly into the fundus and used to aspirate bile.
♦ Retrograde or “fundus-down technique” can be useful when a very inflamed gallbladder is encountered and the anatomy cannot be determined. The procedure is much like the standard open technique with dissection proceeding down along the gallbladder wall. The cystic duct can be transected at any safe level.
♦ If the liver is extremely large, there is excessive inflammation, or the gallbladder wall is not sturdy enough to be retracted, a liver retractor introduced through the right lateral port can hold the liver up and facilitate the dissection.
Hunter JG. Avoidance of bile duct injury during laparoscopic cholecystectomy. Am J Surgery. 1991;162(1):71-76.
Way LW, Stewart LS, et al. Causes and prevention of laparoscopic bile duct injuries: analysis of 252 cases from a human factors and cognitive psychology perspective. Annals of Surg. 2003;237;4:460-469.