[level-membership-for-surgery-category]
CHAPTER 17 Cheek–Midface Lift
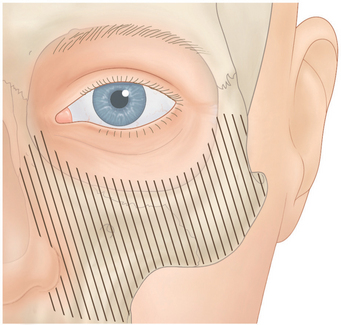
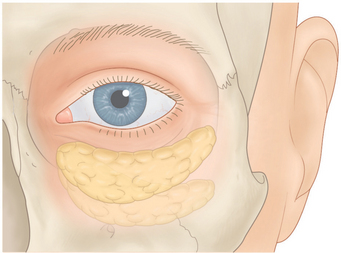
With age, the cheek migrates inferiorly and nasally (Fig. 17-1). This contributes to inferior orbital rim hollowing, a circle effect of the lower eyelids and cheek, a flattening of the cheek, cheek bags (festoons), and nasolabial fold. In the past, these problems have been treated with facelifts, excision of cheek bags, and cheek implants.
Hester and McCord1,2 popularized the cheek–midface lift through an external lower blepharoplasty approach. This procedure originally was done by reattaching the suborbicularis orbital fat (SOOF) in a more normal position along with a full thickness resection of the lower eyelid to stabilize the lid. The procedure has been modified multiple times and at present, I perform the procedure by suspending an orbicularis muscle flap along with tarsal strip and skin flap procedures. The operation places the ptotic cheek in a more normal position, relieves cheek bags, fills in the hollow inferior orbital rim with cheek fat, makes the midface more convex, and decreases the nasolabial fold depression. It also gives the effect of cheek implantation, adds skin to the lower eyelids for the treatment of cicatricial ectropion, and reduces the hollowing of the lower eyelid that sometimes occurs secondary to overzealous fat removal in lower blepharoplasty.

Surgical technique
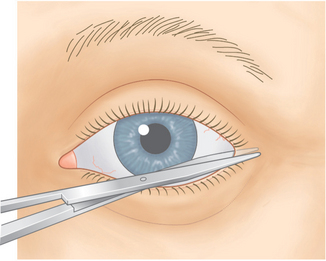
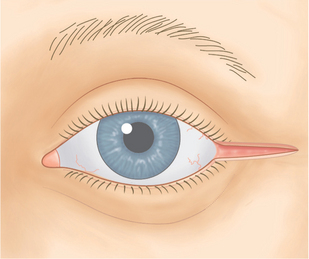
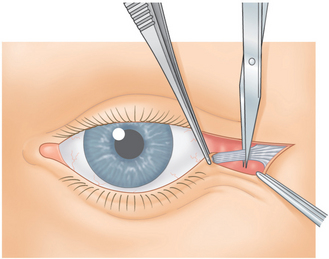
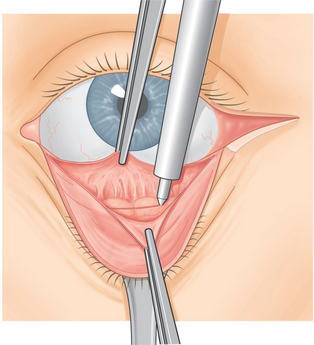
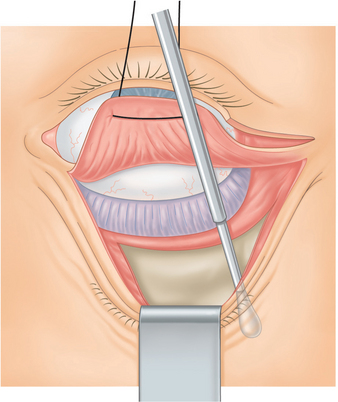
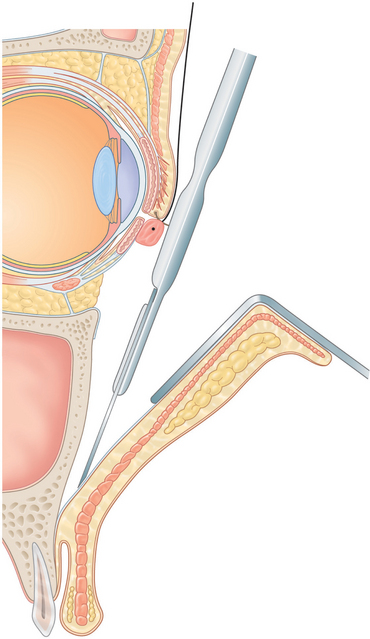
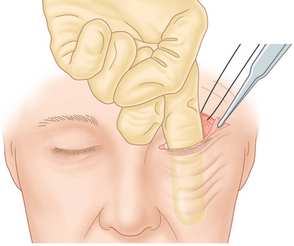
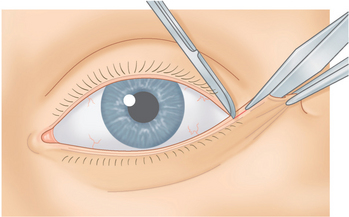
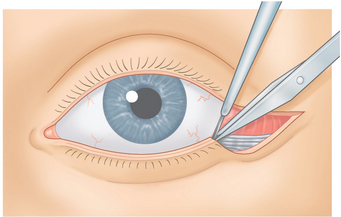
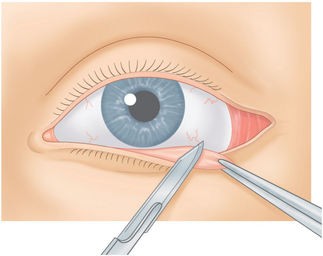
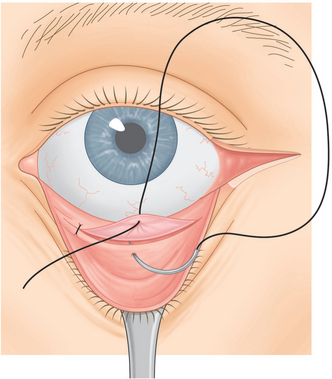
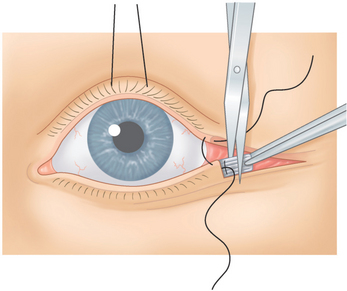
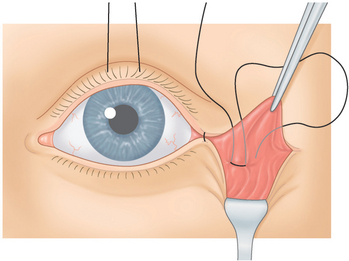
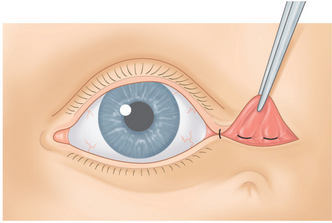
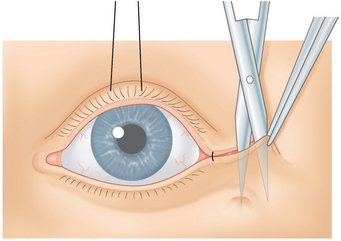
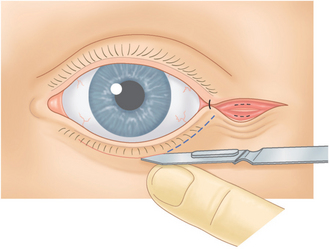
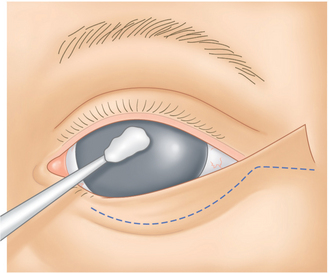
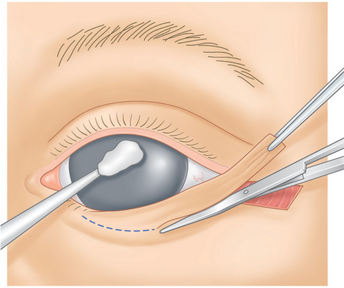
A #15 Bard-Parker blade is then used to make an incision through skin over the lateral canthal mark from the lateral canthus temporally in a horizontal direction for 1 to 1½ cm. A Westcott scissors is then used to sever the lateral canthus (Fig. 17-2). A Colorado needle then incises the orbicularis muscle from the lateral canthus throughout the length of the skin incision (Fig. 17-3). The lower limb of the lateral canthal tendon is severed (Fig. 17-4). A small Desmarres retractor everts the lower eyelid. One to two cubic centimeters of the anesthetic mixture is then injected subconjunctivally from the inferior tarsal border to the inferior fornix across the eyelid. The Colorado needle is then used to cut conjunctiva from the caruncle to the temporal aspect of the eyelid midway between the inferior tarsal border and the inferior fornix (Fig. 17-5). The surgeon grasps the central inferior edge of the severed palpebral conjunctiva while the assistant grasps the adjacent, more superior edge, with another forceps. The two forceps are pulled apart, and then the Colorado needle is applied across the eyelid between the two severed conjunctival layers through Müller’s muscle and capsulopalpebral fascia until fat is seen (Fig. 17-6).
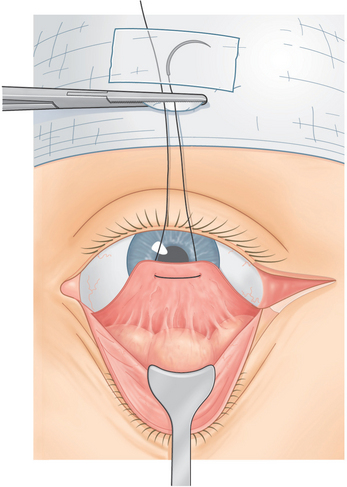
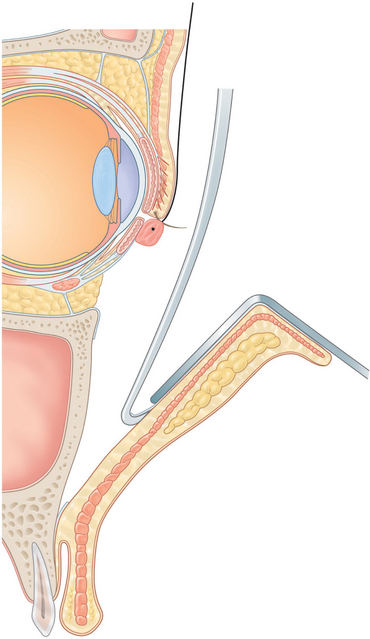
A 4-0 double arm black silk suture is passed through the inferior edge of conjunctiva, Müller’s muscle, and capsulopalpebral fascia with each suture arm. The sutures are then drawn upward and attached to the drape with a hemostat (Fig. 17-7). A small piece of tape is applied over any exposed needle to avoid needle sticks and to allow the suture to be reused, if needed. Usually the needle is cut and removed from the operating field.
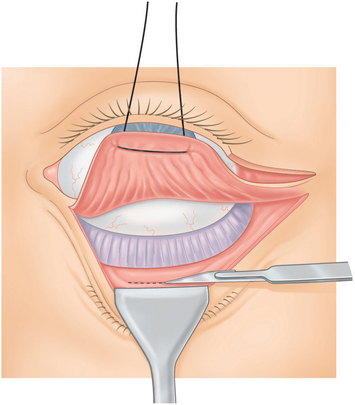
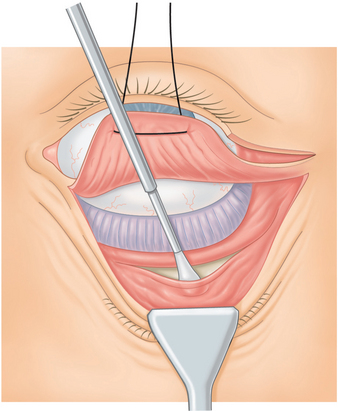
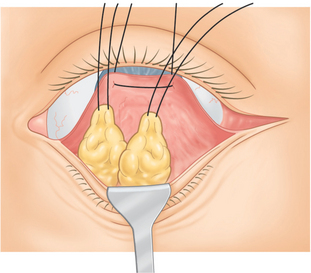
The temporal herniated orbital fat is isolated, and the fat that prolapses with general pressure on the eye is clamped with a hemostat and cut along the hemostat with a #15 Bard-Parker blade (Fig. 17-8). Then cotton tip applicators are placed under the hemostat and a Bovie cautery is applied over the fat stump. The surgeon grasps the fat with the forceps before it is allowed to slide back into the orbit to make sure there is no residual bleeding that might cause a retrobulbar hemorrhage. After the first temporal fat pad is removed, the surgeon applies additional pressure to the eye to determine whether there is a second temporal fat pad.4 If found, it is removed in a similar manner.

Figure 17-8 The surgeon removes the temporal orbital fat pad routinely and occasionally also the central and nasal orbital fat by cutting along the hemostat blade with a #15 Bard-Parker blade, and then applying a Bovie cautery over the fat stump. At times the nasal and central fat pads are repositioned (see Figs 17-22 & 17-23).
At times, the central and nasal fat pads are removed, and sometimes they are repositioned into the inferior orbital rim hollowing. This is a surgical judgement that is made depending on the severity and amount of orbital fat present preoperatively, as well as how much hollowing there is at the inferior orbital rim and nasal-jugal fold areas. If the decision is made to remove the fat, then the nasal and central orbital fat pads are removed in a similar manner to the description of the removal of the temporal fat pads. If the decision is made to reposition the nasal and central orbital fat pads, this is deferred until later in the procedure to avoid having to deal with the fat and sutures at this stage of the procedure.
Dissection of cheek periosteum
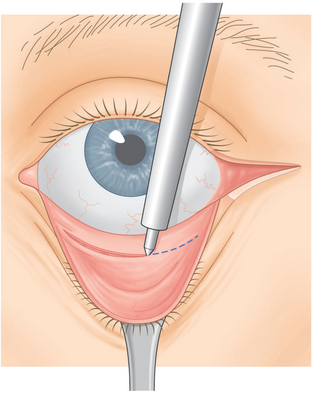
A medium size Desmarres retractor is used to retract conjunctiva, Müller’s muscle, and capsulopalpebral fascia over the inferior orbital rim. Using blunt dissection with a smooth end of a Tenzel periosteal elevator, the periosteum over the inferior orbital rim and lateral orbital rim are isolated. A Colorado needle or #15 Bard-Parker blade is used to incise periosteum several millimeters beneath the orbital rim from the nasal inferior orbital rim all the way across the orbit sweeping up into the lateral orbital rim (Fig. 17-9).
The sharp edge of the Tenzel periosteal elevator is used to reflect periosteum from the incision in a downward direction over the cheekbone (Figs 17-10 & 17-11). The surgeon should take care to avoid the area of the infraorbital foramen and nerve by palpating the inferior orbital foramen which was previously marked with a marking pen and by dissecting inferior to this position.
Most of the time, it is unnecessary to dissect periosteum nasal to the infraorbital canal; leaving periosteum nasal to the infraorbital nerve allows the nasal area to act as fulcrum for the cheek lift. However, if the purpose of the surgery is to add skin to the lower eyelid in the treatment of cicatricial ectropion or to reposition the nasal and central lower eyelid orbital fat pads, then dissection nasal to the infraorbital nerve is performed (Fig. 17-12).
During the periosteal dissection, small blood vessels such as the temporal zygomatic artery are commonly encountered; these are treated with the Colorado needle to coagulate these areas and thereby to avoid bleeding. Also should there be any bleeding from other areas of the cheekbone, the Colorado needle can be used to coagulate those, as well as in order to create a dry field.
A #11 Bard-Parker blade is used to incise the periosteum at the inferior aspect of the dissection, which should be at the area where the cheek bone depresses inward (Fig. 17-13). The surgeon should be careful to penetrate only the periosteum and not any of the more superficial tissues. Once the periosteum has been incised over the entire horizontal dimension of the inferior aspect of the flap, the periosteum is reflected superiorly for approximately 1 cm with the Ramirez endoforehead periosteal spreader (Snowden-Pencer 88-5080, No. 7) to sweep the periosteum upward (Fig. 17-14). When this is accomplished, the surgeon places his or her index finger into the subperiosteal space, engages the area of the periosteal incision site, and lifts the periosteum upward and outward (Fig. 17-15). With this maneuver, the surgeon should feel a release of tissue that allows the patient’s cheek to move upward and outward. The procedure is facilitated by an Adson forceps pulling the lateral canthal orbicularis upward and outward.
A 4 by 4 gauze saturated in the anesthetic mixture is rung out and inserted over the cheek in the subperiosteal plane for hemostasis. During this time the surgeon begins operating on the opposite lower eyelid and cheek area to allow the anesthetic mixture to control hemostasis over the next 10 to 15 minutes. The gauze is then removed and using an Army-Navy retractor to expose the area of the dissection site, any remaining bleeders are cauterized.
Tarsal strip procedure
The protective scleral contact lens is removed. A forceps is used to grasp the temporal aspect of the lower eyelid and to pull it temporally and slightly superior until slight tension of the eyelid is achieved (Fig. 17-16). A scratch incision is made with No. 11 Bard-Parker blade at the aspect of the lower eyelid margin that is now adjacent to the temporal cut edge of the upper eyelid margin (Fig. 17-17). A measurement is made with a ruler from the temporal cut end of the lower eyelid to the scratch incision, which determines the length of the tarsal strip. (It is best to be conservative in size of the tarsal strip since, if it is under too great tension, there is more chance of lateral canthal deformities.)
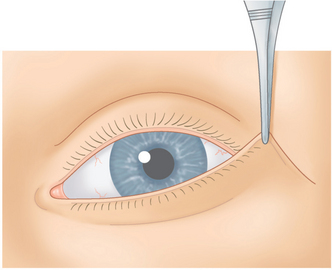
Figure 17-16 The temporal eyelid margin is grasped with forceps and is pulled temporally and upward.
The surgeon then divides the eyelid into two lamellae by cutting with a Westcott scissors along the gray line from the temporal end of the eyelid to the scratch incision site (Fig. 17-17). The Westcott scissors is used to remove skin and orbicularis from the anterior aspect of the tarsus of this eyelid segment (Fig. 17-18). A disposable cautery is used to cut through conjunctival, Müller’s muscle, and capsulopalpebral fascia at the inferior tarsal edge. Bleeding is controlled with a disposable cautery. The surgeon scrapes the conjunctival epithelium on the posterior surface of the tarsus with a No. 15 Bard-Parker blade to prevent epithelial inclusion cysts (Fig. 17-19).
Each arm of a 4-0 Polypropylene (Prolene) double-armed suture is passed internally to externally through the tarsal strip at the junction of the strip and eyelid (Fig. 17-20). The strip is pulled temporally until the area of the Polypropylene suture is adjacent to the lateral orbital wall. The strip is drawn superiorly and internally until it seems to be an acceptable position. The temporal lower eyelid should also be in contact with the eye, not displaced anterior to the eye. If the patient’s eye is proptotic, as in thyroid disease, the tarsal strip should be placed more anteriorly than for a recessed or enophthalmic eye. Once the desired lateral position is determined, each arm of the 4-0 Polypropylene suture is passed internally to externally through the lateral orbital periosteum or through the upper limb of the lateral canthal tendon at this position (Fig. 17-21).
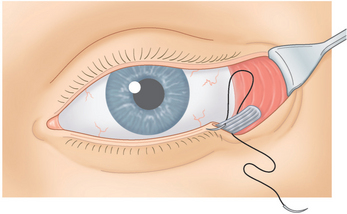

Figure 17-21 The Polypropylene is passed internally to externally through the lateral orbital periosteum.
The cheek periosteal release and tarsal strip procedure is then performed on the opposite side.
Repositioning of the nasal and central lower eyelid fat pads
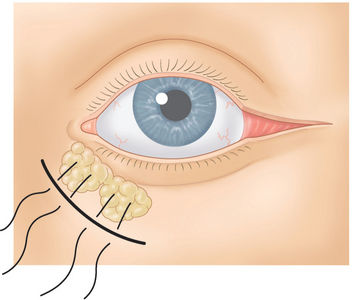
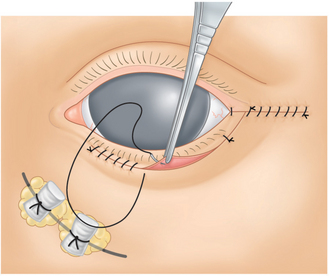
If the nasal and central orbital fat has been removed, the conjunctiva is closed at this point. However, if there is a relatively deep inferior orbital hollowing or nasal-jugal fold, the nasal and central fat pads are repositioned at this point. The 4-0 knot releasing sutures is grasped with forceps at each end and the 4-0 Polypropylene tarsal strip suture is released. The nasal and central fat pads have their outer capsule open and with blunt dissection with cotton tip applicators, a stalk of nasal and central orbital fat pads are formed. Each of these fat pads should easily slide inferiorly into the position of the inferior orbital rim hollowing. A 4-0 Polypropylene (Prolene) double-armed suture is passed through the distal end of each of these fat pads (Fig. 17-22). This needle passes through multiple bites of distal fat and is treaded so that as much of the distal end of the fat pad is captured with the needle and suture. Each arm of the 4-0 Polypropylene suture on the nasal fat pad is passed over the maxillary bone to a position inferior to the hollowed inferior orbital rim area, and then through periosteum orbicularis muscle and out skin. The other 4-0 Polypropylene suture that passes through the central fat pad is passed in a similar manner slightly more centrally than the first sutures (Fig. 17-23). The needles are taped to the drape at this point.3
Conjunctival closure
The 4-0 silk suture that attaches conjunctiva, Müller’s muscle, and capsulopalpebral fascia to the drape is then severed. Conjunctiva is reapproximated with three 6-0 plain catgut buried sutures (Fig. 17-24). Completion of tarsal strip is accomplished with a 5-0 chromic suture passed from the nasal end of the tarsal strip through the lower eyelid gray line margin exiting at the gray line several millimeters from the tarsal strip. The suture then is passed through the upper eyelid margin and exits at the cut edge at the temporal upper lid (Fig. 17-25). When this suture is drawn up and tied, it reforms the angle of the lateral canthus and the knot is buried.
The Polypropylene tarsal strip suture is then tied with approximately four knots. A 4-0 Polyglactin (Vicryl) suture is passed through periosteum adjacent and temporal to the Polypropylene knot. It is then passed through the tarsal strip internally to externally and is tied. This suture further secures the tarsal strip to periosteum and buries the Polypropylene suture. The excessive tarsal strip temporal to the Polyglactin suture is then severed (Fig. 17-25).
Formation of the orbicularis flap
The orbicularis muscle of the lateral canthus is grasped with a forceps and pulled upward. A Westcott scissors is then used to dissect temporal lower eyelid and lateral canthal skin from the orbicularis (Fig. 17-26). A small Desmarres retractor is then placed over this skin flap while the orbicularis is still being pulled upward and any bleeding is controlled with a disposable cautery. A 4-0 Polypropylene double-armed suture is passed through periosteum over the lateral orbital wall just temporal to the tarsal strip. A forceps is used to pull the orbicularis flap upward and outward to the point where the cheek and midface are in good position and the inferior orbital rim hollowing is resolved. This will determine the position that the suture will be placed through the orbicularis flap. One arm of the 4-0 Polypropylene suture is then passed internally to externally through the orbicularis flap at the site where the flap now meets the lateral canthus. The same arm of the suture is then passed externally to internally (Fig. 17-27). The suture is tied with three throws over a 4-0 black silk knot releasing suture that has no needle and is approximately 5 cm long. The procedure is then performed on the opposite side. The patient is then sat up on the operating table, and the positions of the cheek and midface are compared with each other. If there is one side higher or lower than the other then the knot releasing suture is removed and the suture is replaced until the desired effect is achieved. Once this is accomplished, the knot releasing suture is removed and the Polypropylene sutures are tied with approximately four knots. Another 4-0 Polypropylene suture is passed through temporalis fascia and lateral orbital wall just temporal to the first suture. The arm of the suture is then passed internally to externally through the orbicularis flap and then externally to internally so that when that suture is drawn up and tied, it further secures the orbicularis flap (Fig. 17-28). If there is any dimpling that occurs in the skin, then further dissection is carried out between the skin and orbicularis muscle until the dimple dis-appears (Fig. 17-29).

The part of the orbicularis flap that drapes over the lateral canthal skin is then severed and bleeding is controlled with a disposable cautery (Fig. 17-30). This places the suborbicularis orbital fat (SOOF) back into its normal position (Fig. 17-31). A 6-0 Vicryl suture is then passed through orbicularis at the superior aspect of the lateral canthus and then internally to externally through the cut edge of the superior orbicularis flap. The suture is then passed externally to internally so that when the suture is drawn up and tied, it secures orbicularis to orbicularis and covers the Polypropylene suture knots (Fig. 17-32).
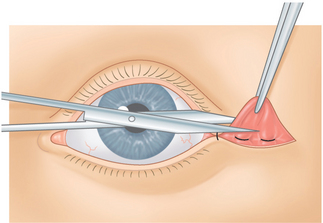
Figure 17-30 The part of the orbicularis flap that drapes over the lateral canthal skin is then severed.
Skin dissection
With a No. 15 Bard-Parker blade, the skin is incised about 2 mm beneath the cilia beginning 1–2 mm temporal to the punctum and extending across the horizontal length of the eyelid to 2–3 mm lateral to the lateral canthus (Fig. 17-32). The skin is dissected from orbicularis muscle with Westcott scissors (Fig. 17-33). The correct subcutaneous plane is judged by observing the spread scissors blades through the translucent skin. With one blade of the scissors placed beneath the skin and the other at the skin edge, the subcutaneous attachments are severed. The skin usually is undermined from the orbicularis muscle to the level of the inferior orbital rim. If there is tenting of the orbicularis muscle, a small amount of superficial orbicularis is trimmed with Westcott scissors, and bleeding is controlled with a disposable cautery (Fig. 17-34) (Solan Accu-Temp, Xomed Surgical Products, Jacksonville, FL). The skin flap is then draped over the incision site while the assistant pushes on the eye by way of the contact lens; this pushes the lower lid upward and simulates its position on upgaze (Fig. 17-35). The skin that drapes the incision is excised with a small vertical triangle along the inferior lash line, and a larger lateral triangle temporal to the lateral canthus (Figs 17-36 & 17-37). To avoid an ectropion, it is better to tighten the lower eyelid skin with the lateral triangle than the vertical one.
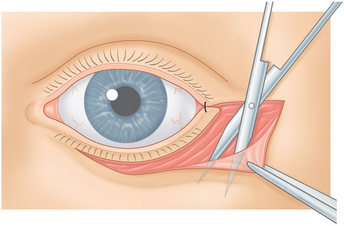
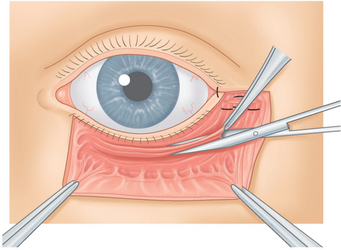
Figure 17-34 If there is tenting of the orbicularis muscle a small amount of superficial orbicularis muscle is trimmed.

Skin closure
A 6-0 black silk suture passes through the temporal lower eyelid skin at the lateral canthal angle site, and catches a slight amount of orbicularis and tendon, as well. The suture is drawn up and tied with three knots, and only one end is cut. A 6-0 Vicryl suture is then passed through the temporal lower eyelid skin edges picking up a slight amount of the inferior tarsal border. When the suture is drawn up and tied, it unites the temporal skin to the inferior tarsal border and prevents overriding of the lower eyelid skin. Several 6-0 Vicryl sutures are then passed through the skin edges over the area temporal to the lateral canthus. The 6-0 silk suture is then run continuously from lateral canthus to temporal wound edge. Another continuous 6-0 black suture is run continuously across the eyelid in a nasal to temporal direction with fewer bites, because this incision site is under minimal tension (Fig. 17-38).

Postoperative care
To reduce edema postoperatively, the patient lies in bed with the head approximately 45° higher than the rest of the body. I also routinely use systemic steroids and antibiotics after surgery. Nurses should check for bleeding associated with proptosis, pain, or loss of vision every 15 minutes for the first 3 hours postoperatively or until the patient leaves the surgical facility. Every hour thereafter until bedtime, the family or patient should monitor the patient’s ability to count fingers and should check for unusual proptosis and pain. If the patient cannot count fingers or has proptosis or pain, the family should take him/her to the emergency room. If loss of vision occurs secondary to retrobulbar hemorrhage, it could be detected quickly and treated by opening the incision involved.5
Complications
Patients should be aware that they may have an Asian appearance immediately after surgery, which should resolve spontaneously. They should also be told that they may still have a slight puckering or dimpling at the temporal lower eyelid from the Polypropylene cheek sutures, which should resolve spontaneously after the next few months. If it does not, further skin dissection or removal of sutures can be done. Occasionally patients will have discomfort or an inflammatory reaction from the buried Polypropylene sutures. If this is the case they can always be removed. The incision site under the eyelashes usually heals quite well. Should there be any unusual scarring in the lateral canthal area, excision and revision of this can be done.
In all of the procedures that I have performed, I have not had any long-term complications.
Results
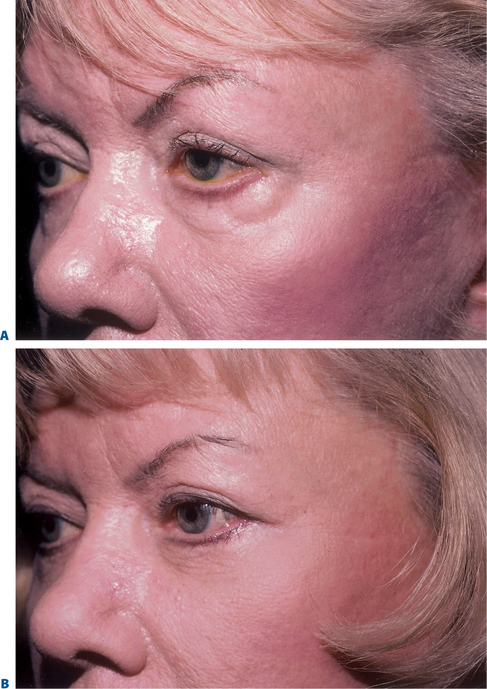
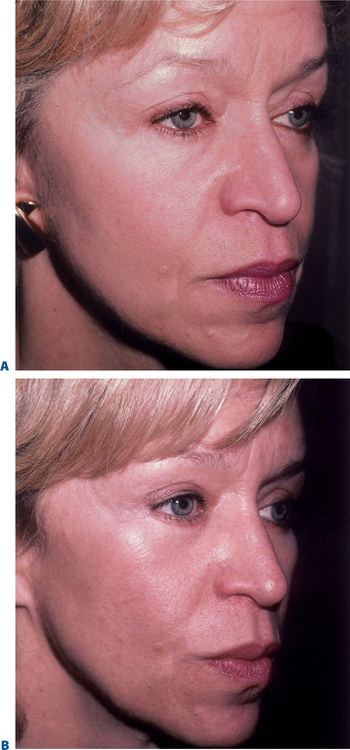
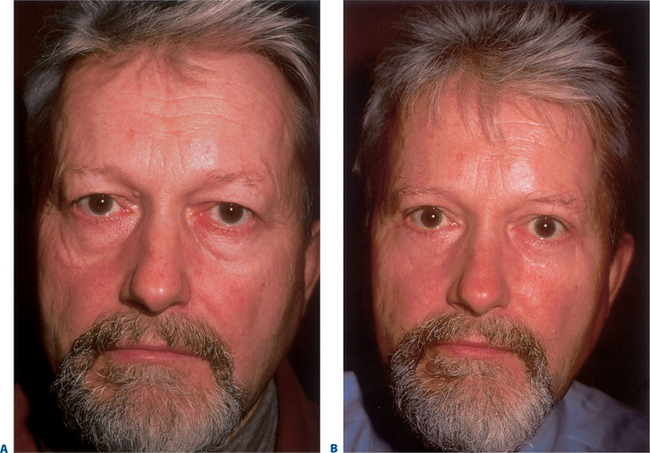
More than 500 patients have been treated with excellent result (Figs 17-40 to 17-42). The rate of patient satisfaction has been high. The main complaints initially used to be skin puckering, which has been resolved for the most part by wider dissection of skin from orbicularis and excision of tented orbicularis during the procedure. Also in a number of patients I have had to remove the buried Polypropylene sutures, revise lateral canthal scars, and perform lateral canthotomies to eliminate webs or rounded lateral acanthi.
1 Hester TRJr., Codner MA, McCord CDJr. Subperiosteal maler cheek lift with lower lid blepharoplasty. In: McCord CDJr., editor. Eyelids Surgery: Principles and Techniques. Philadelphia: Lippincott-Raven; 1995:210-215.
2 McCord CDJr. Lower lid blepharoplasty. In: McCord CDJr., editor. Eyelid Surgery: Principles and Techniques. Philadelphia: Lippincott-Raven; 1995:196-209.
3 Putterman AM. Avoidance of needle stick injuries during reuse of surgical needles. Plastic and Reconstr Surg. 2003;112:333-334.
4 Putterman AM. The mysterious second temporal fat pad. Ophthal Plast Reconst Surg. 1985;1:83-86.
5 Putterman AM. Temporary blindness after cosmetic blepharoplasty. Am J Ophthalmol. 1975;80:1081-1083.
[/level-membership-for-surgery-category][not-level-membership-for-surgery-category]
CHAPTER 17 Cheek–Midface Lift
With age, the cheek migrates inferiorly and nasally (Fig. 17-1). This contributes to inferior orbital rim hollowing, a circle effect of the lower eyelids and cheek, a flattening of the cheek, cheek bags (festoons), and nasolabial fold. In the past, these problems have been treated with facelifts, excision of cheek bags, and cheek implants.
Hester and McCord1,2 popularized the cheek–midface lift through an external lower blepharoplasty approach. This procedure originally was done by reattaching the suborbicularis orbital fat (SOOF) in a more normal position along with a full thickness resection of the lower eyelid to stabilize the lid. The procedure has been modified multiple times and at present, I perform the procedure by suspending an orbicularis muscle flap along with tarsal strip and skin flap procedures. The operation places the ptotic cheek in a more normal position, relieves cheek bags, fills in the hollow inferior orbital rim with cheek fat, makes the midface more convex, and decreases the nasolabial fold depression. It also gives the effect of cheek implantation, adds skin to the lower eyelids for the treatment of cicatricial ectropion, and reduces the hollowing of the lower eyelid that sometimes occurs secondary to overzealous fat removal in lower blepharoplasty.
Surgical technique
A #15 Bard-Parker blade is then used to make an incision through skin over the lateral canthal mark from the lateral canthus temporally in a horizontal direction for 1 to 1½ cm. A Westcott scissors is then used to sever the lateral canthus (Fig. 17-2). A Colorado needle then incises the orbicularis muscle from the lateral canthus throughout the length of the skin incision (Fig. 17-3). The lower limb of the lateral canthal tendon is severed (Fig. 17-4). A small Desmarres retractor everts the lower eyelid. One to two cubic centimeters of the anesthetic mixture is then injected subconjunctivally from the inferior tarsal border to the inferior fornix across the eyelid. The Colorado needle is then used to cut conjunctiva from the caruncle to the temporal aspect of the eyelid midway between the inferior tarsal border and the inferior fornix (Fig. 17-5). The surgeon grasps the central inferior edge of the severed palpebral conjunctiva while the assistant grasps the adjacent, more superior edge, with another forceps. The two forceps are pulled apart, and then the Colorado needle is applied across the eyelid between the two severed conjunctival layers through Müller’s muscle and capsulopalpebral fascia until fat is seen (Fig. 17-6).
A 4-0 double arm black silk suture is passed through the inferior edge of conjunctiva, Müller’s muscle, and capsulopalpebral fascia with each suture arm. The sutures are then drawn upward and attached to the drape with a hemostat (Fig. 17-7). A small piece of tape is applied over any exposed needle to avoid needle sticks and to allow the suture to be reused, if needed. Usually the needle is cut and removed from the operating field.
The temporal herniated orbital fat is isolated, and the fat that prolapses with general pressure on the eye is clamped with a hemostat and cut along the hemostat with a #15 Bard-Parker blade (Fig. 17-8). Then cotton tip applicators are placed under the hemostat and a Bovie cautery is applied over the fat stump. The surgeon grasps the fat with the forceps before it is allowed to slide back into the orbit to make sure there is no residual bleeding that might cause a retrobulbar hemorrhage. After the first temporal fat pad is removed, the surgeon applies additional pressure to the eye to determine whether there is a second temporal fat pad.4 If found, it is removed in a similar manner.
Figure 17-8 The surgeon removes the temporal orbital fat pad routinely and occasionally also the central and nasal orbital fat by cutting along the hemostat blade with a #15 Bard-Parker blade, and then applying a Bovie cautery over the fat stump. At times the nasal and central fat pads are repositioned (see Figs 17-22 & 17-23).
At times, the central and nasal fat pads are removed, and sometimes they are repositioned into the inferior orbital rim hollowing. This is a surgical judgement that is made depending on the severity and amount of orbital fat present preoperatively, as well as how much hollowing there is at the inferior orbital rim and nasal-jugal fold areas. If the decision is made to remove the fat, then the nasal and central orbital fat pads are removed in a similar manner to the description of the removal of the temporal fat pads. If the decision is made to reposition the nasal and central orbital fat pads, this is deferred until later in the procedure to avoid having to deal with the fat and sutures at this stage of the procedure.
Dissection of cheek periosteum
A medium size Desmarres retractor is used to retract conjunctiva, Müller’s muscle, and capsulopalpebral fascia over the inferior orbital rim. Using blunt dissection with a smooth end of a Tenzel periosteal elevator, the periosteum over the inferior orbital rim and lateral orbital rim are isolated. A Colorado needle or #15 Bard-Parker blade is used to incise periosteum several millimeters beneath the orbital rim from the nasal inferior orbital rim all the way across the orbit sweeping up into the lateral orbital rim (Fig. 17-9).
The sharp edge of the Tenzel periosteal elevator is used to reflect periosteum from the incision in a downward direction over the cheekbone (Figs 17-10 & 17-11). The surgeon should take care to avoid the area of the infraorbital foramen and nerve by palpating the inferior orbital foramen which was previously marked with a marking pen and by dissecting inferior to this position.
Most of the time, it is unnecessary to dissect periosteum nasal to the infraorbital canal; leaving periosteum nasal to the infraorbital nerve allows the nasal area to act as fulcrum for the cheek lift. However, if the purpose of the surgery is to add skin to the lower eyelid in the treatment of cicatricial ectropion or to reposition the nasal and central lower eyelid orbital fat pads, then dissection nasal to the infraorbital nerve is performed (Fig. 17-12).
During the periosteal dissection, small blood vessels such as the temporal zygomatic artery are commonly encountered; these are treated with the Colorado needle to coagulate these areas and thereby to avoid bleeding. Also should there be any bleeding from other areas of the cheekbone, the Colorado needle can be used to coagulate those, as well as in order to create a dry field.
[/not-level-membership-for-surgery-category]
