[level-membership-for-surgery-category]
Chapter 61 Care of the Eye in Facial Paralysis
Rehabilitation of a patient with facial paralysis depends on restoration of optimal lid position and function.1–3 This chapter summarizes techniques that I have found to be most helpful in achieving that goal, based on more than 5000 patients with facial paralysis on whom I have operated during the past 3 decades.
CRITERIA FOR SURGERY
DRAPING
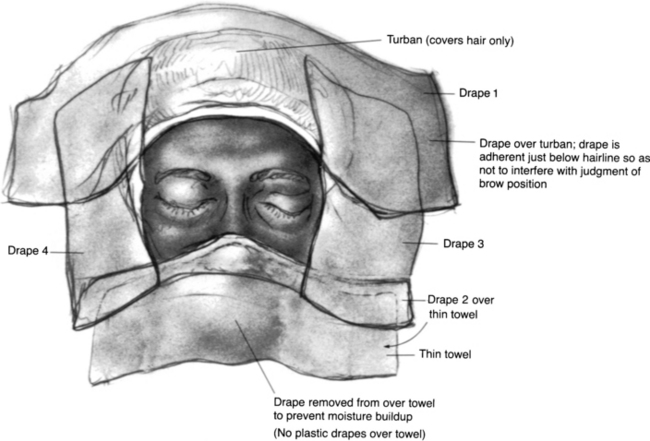
The hair is covered with a small drape formed into a turban and secured with a clamp. A second small sheet is incorporated with that drape to cover the superior end of the table. A body sheet is also placed. The eyelids and brow are isolated by means of two No. 1000 Steri-Drapes cut in half (Fig. 61-1). Each of the four drapes forms a border of the surgical field, which includes both eyes and the forehead area. Before the Steri-Drape is placed over the nose, a thin cloth towel is placed over the nose to avoid the suffocating feeling resulting from plastic over the nose. In addition, the plastic drape over the towel inferior to the adhesive area is excised to prevent moisture accumulation. Care is taken to avoid distorting the lower lid anatomy or brow areas by undue traction from the drapes.
GENERAL CONSIDERATIONS
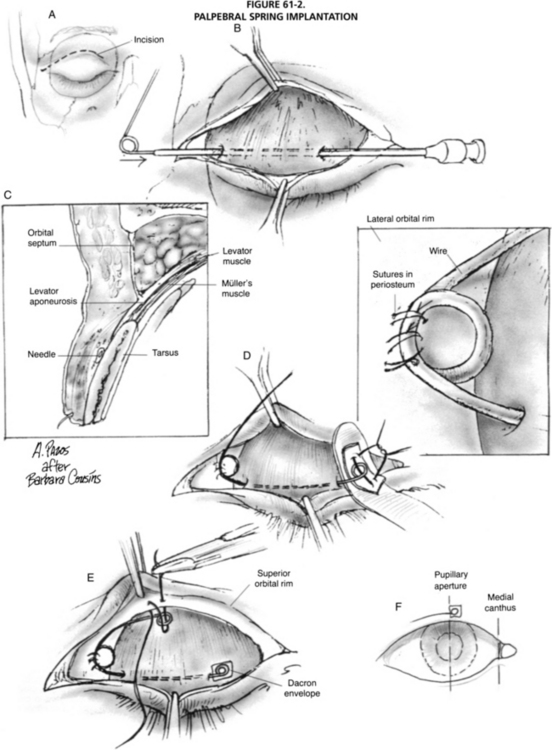
Palpebral Spring Implantation
The palpebral spring4–14 is built preoperatively either in the office or at the bedside. Building the spring is time-consuming, and the surgeon and the patient should be comfortable during the procedure. Good light must be available, and if possible, the patient should be seated so that lid movement can be best evaluated.
Surgical Technique
The eye is protected with a scleral shell. An incision is made along the lid fold at the junction of the medial one third and lateral two thirds of the palpebral aperture and is carried across the orbital rim (Fig. 61-2). Dissection is carried superolaterally, in the plane between the septum and orbicularis, to expose the orbital rim. Dissection is carried downward at the medial aspect of the incision to expose the tarsus.
Enhanced Palpebral Spring Implantation
The enhancement of the palpebral spring operation consists of tightening of the levator during the same procedure (Fig. 61-3). The spring is prepared similarly except that wire lighter than 0.010 inch is not used. I primarily use the 0.011 inch 35NLT (Fort Wayne Metals) alloy.
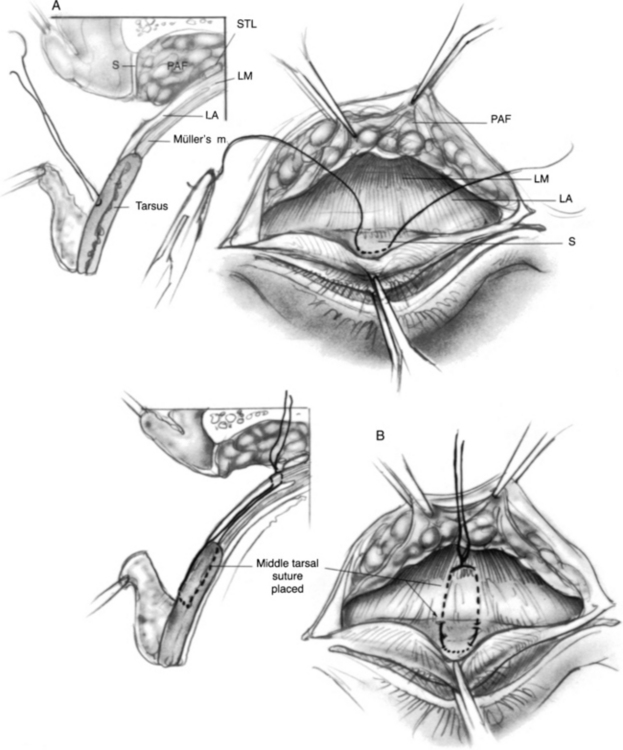
The stronger the levator can be made, the greater the tension possible on the spring, and the more rapid the blink. The nuances of adjustment of the levator and the spring can be appreciated only with experience. Nevertheless, when the general principles are understood, excellent results can be obtained (Fig. 61-4).
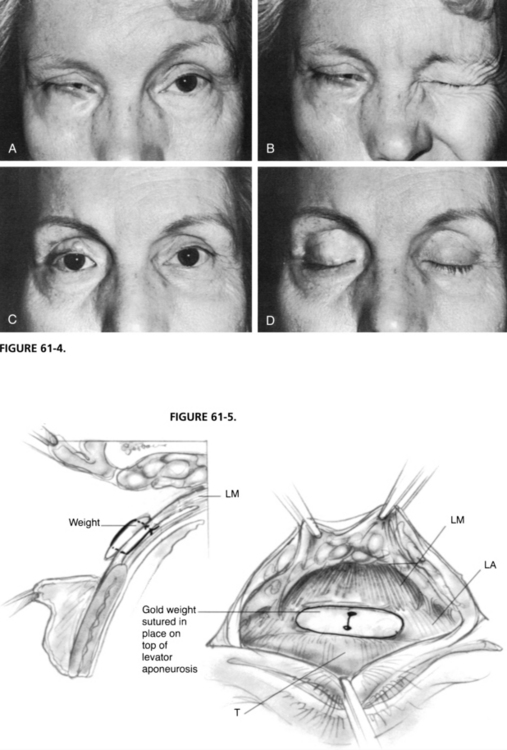
Gold Weight Implantation
The size of the weight is selected preoperatively.15,16 With the patient seated, a gold weight (or the comparable weight from a sizing set) that is estimated to be suitable for the degree of lagophthalmos is selected and is secured to the patient’s upper lid with cyanoacrylate glue, double-stick tape, or a temporary lid suture. The patient is asked to open and close the eye, and the surgeon determines whether the weight of the gold is correct. The evaluation is repeated with the patient supine. Weights of 1.2 to 1.5 g are suitable for use in most patients.
The weight may be fixated either supratarsally (Fig. 61-5) or tarsally. Supratarsal fixation is preferable unless the weight is so large that this is impractical. A scleral shell is placed. An incision is made in the lid fold, and dissection is carried upward to expose the orbital septum. The preaponeurotic fat can be seen through the septum, which is opened, and the weight is secured to the levator with a single 5-0 polyester suture placed through the holes in the weight. The knot is buried. The function of the weight is tested with the patient in the seated and supine positions. If the desired effect is not obtained, a different-sized weight may be tried. Overlying skin muscle is closed with running 6-0 plain gut suture.
An alternative gold weight technique used by Michael Roberts MD, is presented.17–19 It is based on 36 cases performed; no follow-up data are available.
Surgical Technique
After the initial incision is made, blunt dissection is performed posteriorly to expose either the tarsus or the orbital septum. When these are identified, dissection is continued medially and laterally until a sufficient pocket is created for placement of the weight and centration over the pupil. Levator fibers are gently stripped from the tarsus in cases of tarsal fixation. The weight is then fixed to the septum or the tarsus with a 5-0 nonabsorbable suture placed through the holes in the weight. In cases of fixation to the levator, the septum is opened, and the weight is secured to the underlying levator with a 5-0 nonabsorbable suture. The septum is closed with a 6-0 nonabsorbable suture. Some surgeons test function of the weight with the patient in the seated and supine positions. If the desired effect is not obtained, a different sized weight may be inserted. Overlying orbicularis muscle and skin are closed in layers with 6-0 absorbable sutures. Table 61-1 compares the advantages of enhanced palpebral springs and gold weights.
TABLE 61-1 Comparison of Enhanced Palpebral Springs and Gold Weights∗
| Advantages of Spring | Advantages of Gold Weight |
|---|---|
| Closes eye at night when patient is supine | Simple technique |
| Increased blink speed | Works well in cases that have only minimal lagophthalmos |
| Adjustability without removing device | |
| Can protect cornea in severe cases of combined CN V and VII involvement | |
| Increased protection, comfort, and return to full functional activity in patients with active lifestyle (e.g., skiing, surfing, flying, athletics) | |
| More esthetic than a large gold weight | |
| Comfort in patients exposed to extreme heat or cold environments | |
| Facilitates use of adjunctive bandage contact lenses | |
| Increases possibility of successful corneal surgery in patients with previously damaged corneas |
∗ Based on data over >30 years from patients who have had weights removed and springs implanted instead.
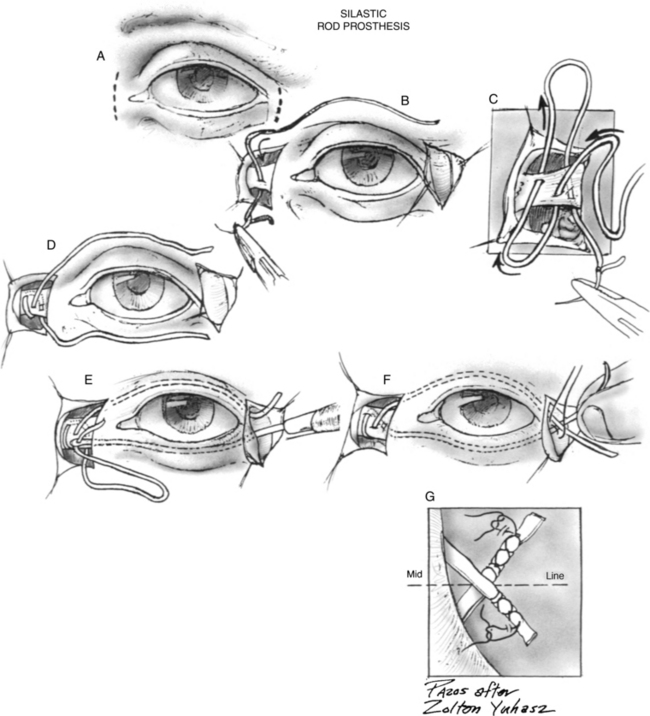
Silicone Rod Prosthesis Implantation
The prosthesis to be used in silicone rod prosthesis implantation20–22 is commercially available as a 1 mm diameter rod. While the eye is protected with a scleral shell, a curvilinear incision is made overlying the medial canthal tendon (Fig. 61-6). The incision should be just lateral to the angular vein to avoid the vein in the course of the dissection. Dissection is carried posteriorly to expose the origin of the tendon. The prosthesis is threaded on a large, noncutting needle (e.g., No. 5 Mayo needle), and is sewn through the tendon twice. The lower arm should emerge from the posterior aspect of the tendon, which facilitates holding the lower lid against the globe.
LOWER LID REAPPOSITION PROCEDURES
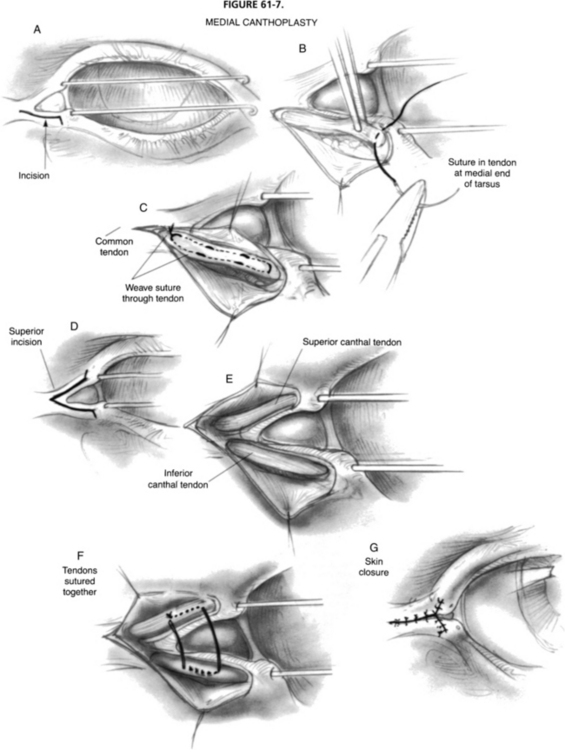
Medial Canthoplasty
Medial canthoplasty23 consists of exposing the lower arm of the medial canthal tendon and the origin of the common tendon and tightening the lower arm. If additional effect is required, the upper arm of the tendon may also be exposed so that it, too, can be included in the surgical procedure.
Surgical Technique
To expose the medial canthal tendon, the globe is protected with a scleral shell, and the canaliculi are protected with probes. An incision is made at the mucocutaneous junction, beginning 2 mm medial to the lower punctum, along the mucocutaneous junction to the medial canthus, and for an additional 2 mm beyond the canthus (Fig. 61-7). A skin/muscle flap is elevated with scissors, and hemostasis is achieved with bipolar cautery. The insertion of the lower arm of the medial canthal tendon is grasped with forceps and drawn superonasally, permitting the placement of a 5-0 double-armed polyester suture through the insertion. Each arm of the suture is woven through the tendon and sewn through the origin of the tendon. Temporary knots are tied.
Lateral Canthoplasty
The object of lateral canthoplasty24,25 is to pull the lid superoposteriorly against the globe. In lieu of the various lid-shortening procedures that have been used in the past, the currently preferred method is to create a new lateral canthal tendon from the tarsus itself, and to secure it to the orbital rim.
Surgical Technique
A hemostat is placed across the lateral canthal angle and removed (Fig. 61-8). The clamped area is cut with scissors, accomplishing a canthotomy. The inferior crux of the lateral canthal tendon is cut (inferior cantholysis) with scissors. At this point, the lateral aspect of the lower lid is freely movable. The lid is pulled taut across the globe. If a medial canthoplasty has been performed, suitable tension should be placed on that canthoplasty suture before this maneuver.

Fascia Lata Suspension of Lower Lid
Surgical Technique
A strip of fascia  inch wide and approximately 4 inches long is used. The technique for placing the fascia within the medial canthal tendon and in the lower lid is similar to the technique described in the section on the silicone rod prosthesis. The medial end of the fascia is anchored with a 5-0 polyester suture passed twice through the fascia and the medial canthal tendon (Fig. 61-9). The knot of the suture should be well buried to avoid later erosion.

ANCILLARY PROCEDURES
Surgical Technique
The area in which brow elevation, tissue excision, or both are required is marked as close to the superior extent of the brow as possible (Fig. 61-10), which helps conceal the resultant scar. The skin is incised perpendicular to the skin surface with a scalpel blade until muscle is reached. Blunt dissection is carried out at each site where a suspension suture is deemed necessary. The brow is elevated during the dissection so that the frontalis periosteum is encountered superior to the brow. A 4-0 Novafil suture on a very curved needle is passed through the periosteum, and then through the dermis at the lower aspect of the wound as a horizontal mattress suture. One to four such sutures may be required, depending on the contour of the brow. When all of the planned sutures have been placed, and temporary knots have been tied, the patient is brought to the seated position, and the brow contour is adjusted to match that on the contralateral side in the primary position of gaze.
Correction of Upper Lid Entropion
A series of 6-0 Vicryl sutures is placed across the lid (Fig. 61-11). Each of these sutures begins supratarsally, in the levator, and continues as a horizontal mattress suture through subcuticular tissue just inferior to the lower aspect of the skin incision. Tightening these sutures rotates the lid margin outward, correcting the entropion resulting from the facial paralysis or from the downward pressure from an implanted prosthetic device. Tension on the sutures is adjusted at the time of surgery to give a slight overcorrection. The sutures also create a pleasing lid fold.
TEMPORIZING MEASURES
Lid Suture Taped to Cheek
The eye is protected with a scleral shell. A 4-0 or 5-0 nonresorbable monofilament suture is passed through the skin and orbicularis, which have been pulled away from the tarsus with forceps (Fig. 61-12). The needle is passed parallel to the tarsus. The two arms of the suture are tied together with multiple knots to prevent slippage underneath the tape and are secured to the cheek with a strip of tape. The suture is brought upward and locked with a second piece of tape. A third strip locks the suture further and keeps it out of the way. When it is necessary to inspect the eye or to check for pupillary signs, all three pieces of tape can be lifted together with the suture away from the cheek and then replaced. By placing antibiotic ointment at the suture sites in the lid, one can usually maintain a suture in the lid for 2 to 3 weeks without undue lid induration.
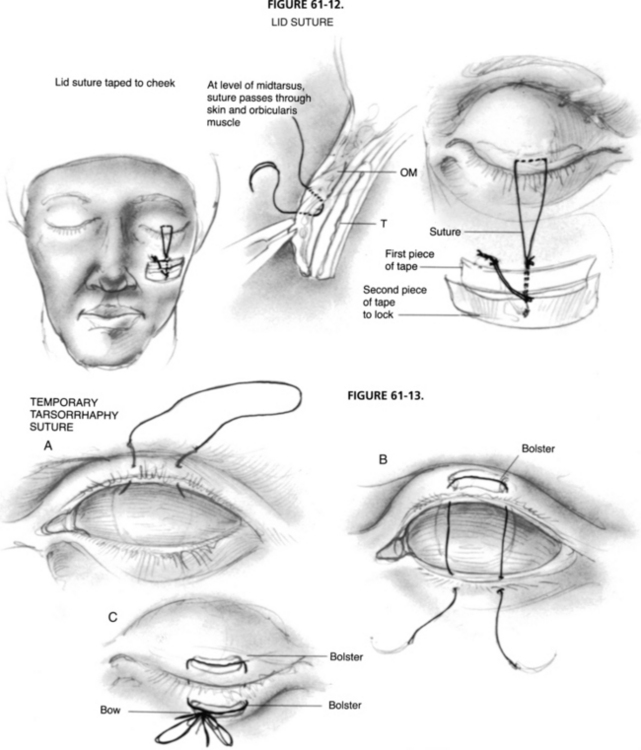
Temporary Tarsorrhaphy Suture
The eye is protected with a scleral shell. Each arm of a double-armed, monofilament, nonresorbable suture is passed through the skin and orbicularis of the central third of the upper lid, beginning 5 mm above the lid margin and exiting at the gray line of the lid margin (Fig. 61-13). The sutures continue into the gray line of the lower lid, exiting through the orbicularis and skin 5 mm below the lid margin. The two arms of the suture are placed 1 cm apart. Cotton bolsters are placed between the suture and skin before the suture is tied. The suture is tied like a shoelace, with a bow (leaving the ends of the suture long), to facilitate untying and retying in the future. The bow and ends of the suture are taped out of the way to the lid. Antibiotic ointment is applied to the suture sites twice daily, allowing the suture to be maintained for several weeks without undue induration of the lid.
CONCLUSION
The purpose of this chapter is to present procedures as I currently do them. Many of the modifications are my own, and tracing the historical evolution of procedures is not always possible. I would be remiss, however, if I did not credit the individuals who initially devised, pioneered, or popularized these procedures; Table 61-2 provides a summary of that information.
| Procedure | Author |
|---|---|
| Palpebral spring | Morel-Fatio and Lalardrie,4,5 Levine et al6–14 |
| Enhanced palpebral spring | Levine13,14 |
| Gold weight | Jobe,15 May16 |
| Silicone rod prosthesis | Arion,20 Marrone and Soll,21 Levine7,11,13 |
| Medial canthoplasty and brow lift | Beard23 |
| Lateral canthoplasty | Tenzel et al24,25 |
1. Jelks G.W., Smith B., Bosniak S. The evaluation and management of the eye in facial palsy. Clin Plast Surg. 1979;6:397-419.
2. Rosenstock T.G., Hurwitz J.J., Nedzelski J.M., Tator C.H. Ocular complications following excision of cerebellopontine angle tumours. Can Ophthalmol. 1986;21:134-139.
3. Seiff S.R., Chang J. Management of ophthalmic complications of facial nerve palsy. Otolaryngol Clin North Am. 1992;25:669-690.
4. Morel-Fatio D., Lalardrie J.P. Palliative surgical treatment of facial paralysis: The palpebral spring. Plast Reconstr Surg. 1964;33:446.
5. Morel-Fatio D., Lalardrie J.P. Le ressort palpebral: Contribution a l’etude de la chirurgie plastique de la paralysie faciale. Neurochirurgie. 1965;11:303.
6. Levine R.E., House W.F., Hitselberger W.E. Ocular complications of seventh nerve paralysis and management with the palpebral spring. Am J Ophthalmol. 1972;73:219.
7. Levine R.E.. Management of the eye after acoustic tumor surgery. House W.F., Luetje C.M., editors. Acoustic Tumors. vol. 2, 1979. University Park Press, Baltimore, 105-149.
8. Levine R.E. Management of the ophthalmologic complications of facial paralysis. Trans Pac Coast Ophthalmol Otolaryngol Soc. 1980;61:85-93.
9. Levine R.E. Protection of the exposed eye. In: Brackmann D.E., editor. Neurological Surgery of the Ear and Skull Base. New York: Raven Press; 1982:81-87.
10. Levine R.E. Protection of the exposed eye in facial paralysis. In: Graham M.D., House W.F., editors. Disorders of the Facial Nerve. New York: Raven Press; 1982:336-375.
11. Levine R.E. Eyelid reanimation surgery. In: May M., editor. The Facial Nerve. New York: Thieme-Stratton; 1985:681-694.
12. Levine R.E. Palpebral spring for lagophthalmos due to facial nerve palsy. In: Wesley R.E., editor. Techniques in Ophthalmic Plastic Surgery. New York: John Wiley & Sons; 1986:424-427.
13. Levine R.E.. Management of lagophthalmos with palpebral spring and Silastic elastic prosthesis. Hornblass A., editor. Ophthalmic and Orbital Plastic Reconstructive Surgery. vol 1, 1989. Williams & Wilkins, Baltimore, 384-392.
14. Levine R.E. Lid reanimation with the palpebral spring. In: Wright K., Tse D., editors. Color Atlas of Ophthalmic Surgery. Philadelphia: Lippincott; 1992:231-238.
15. Jobe R.P. A technique for lid-loading in the management of lagophthalmos in facial paralysis. Plast Reconstr Surg. 1974;53:29-31.
16. May M. Surgical rehabilitation of facial palsy. In: May M., editor. The Facial Nerve. New York: Thieme-Stratton; 1985:695-777.
17. Choo P.H., Carter S.R., Seiff S.R. Upper eyelid gold weight implantation in the Asian patient with facial paralysis. Plast Reconstr Surg. 2000;105:855-859.
18. Seiff S.R., Boerner M., Carter S.R. Treatment of facial palsies with external eyelid weights. Am J Ophthalmol. 1995;120:652-657.
19. Tower R.N., Dailey R.A. Gold weight implantation: A better way? Ophthalmic Plast Reconstr Surg. 2004;20:202-206.
20. Arion H.G. Dynamic closure of the lids in paralysis of the orbicularis muscle. Int Surg. 1972;57:48.
21. Marrone A.C., Soll D. Modification of the Arion encircling silicone spring. Thesis for membership in the American Society of Ophthalmic Plastic and Reconstructive Surgery. 1977.
22. Wood-Smith D. Experience with the Arion prosthesis. In: Tessier P., editor. Symposium on Plastic Surgery in the Orbital Region. St. Louis: Mosby, 1976.
23. Beard C. Canthoplasty and brow elevation for facial palsy. Arch Ophthalmol. 1964;71:386-388.
24. Tenzel R.R. Treatment of lagophthalmos of the lower lid. Arch Ophthalmol. 1969;81:366-368.
25. Tenzel R.R., Buffam F.V., Miller G.R. The use of the lateral canthal sling in ectropion repair. Can J Ophthalmol. 1977;12:199-202.
[/level-membership-for-surgery-category][not-level-membership-for-surgery-category]
Chapter 61 Care of the Eye in Facial Paralysis
Rehabilitation of a patient with facial paralysis depends on restoration of optimal lid position and function.1–3 This chapter summarizes techniques that I have found to be most helpful in achieving that goal, based on more than 5000 patients with facial paralysis on whom I have operated during the past 3 decades.
CRITERIA FOR SURGERY
DRAPING
The hair is covered with a small drape formed into a turban and secured with a clamp. A second small sheet is incorporated with that drape to cover the superior end of the table. A body sheet is also placed. The eyelids and brow are isolated by means of two No. 1000 Steri-Drapes cut in half (Fig. 61-1). Each of the four drapes forms a border of the surgical field, which includes both eyes and the forehead area. Before the Steri-Drape is placed over the nose, a thin cloth towel is placed over the nose to avoid the suffocating feeling resulting from plastic over the nose. In addition, the plastic drape over the towel inferior to the adhesive area is excised to prevent moisture accumulation. Care is taken to avoid distorting the lower lid anatomy or brow areas by undue traction from the drapes.
GENERAL CONSIDERATIONS
Palpebral Spring Implantation
The palpebral spring4–14 is built preoperatively either in the office or at the bedside. Building the spring is time-consuming, and the surgeon and the patient should be comfortable during the procedure. Good light must be available, and if possible, the patient should be seated so that lid movement can be best evaluated.
Surgical Technique
The eye is protected with a scleral shell. An incision is made along the lid fold at the junction of the medial one third and lateral two thirds of the palpebral aperture and is carried across the orbital rim (Fig. 61-2). Dissection is carried superolaterally, in the plane between the septum and orbicularis, to expose the orbital rim. Dissection is carried downward at the medial aspect of the incision to expose the tarsus.
