CHAPTER 15 Breast Reduction with a Central Mound
Summary/Key Points
The use of an inferiorly based dermolipoglandular flap in reduction mammaplasty was first described in Brazil at the congress of the Brazilian Society of Plastic Surgery in 1971, and was first published in 1973.1 The flap has been mistakenly referred to as an ‘inferior pedicle.’
This inferior flap can also be used for the transposition of the nipple–areola complex in reduction mammaplasties and this possibility was introduced by the senior author in 1975,2 based on the follow-up of the patients operated upon this technique and analysis of the vascularization of this flap. This was later confirmed by the works of Robbins,3 and Courtiss and Goldwin,4 in 1977, who demonstrated that the principal sources of blood flow to the inferior pedicle are the perforating and intercostal branches of the internal mammary artery.
At present, the inferior flap is used in almost all mammaplasties performed in our practice, alone or in combination with another technique. We often use Peixoto’s principles,5 which result in reduction of the scars as in the lozenge technique.6–8
Anatomy
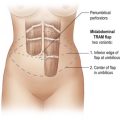
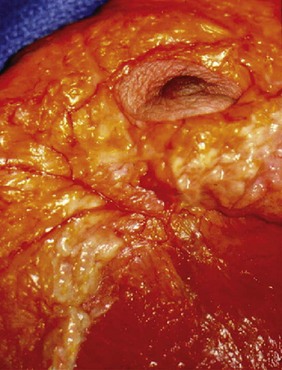
The inferiorly based flap is built from the inferior quadrants of the breast and has dermis, fat and mammary gland as its components. Its vascular supply is reliable and is made by branches of the internal mammary artery. It has an axial pattern with perforators of the intercostal vessels in greater number in the fourth, fifth and sixth intercostal spaces with an average diameter of approximately 1 mm (Fig. 15.1). These perforators are the main source of blood supply to the central and inferior segments of the breast. The venous drainage occurs in the opposite direction toward the internal mammary vein. The lymphatics drain to the internal mammary chain.
Indications and Patient Selection
The inferior flap technique with an inverted T skin resection pattern is indicated in cases of large breasts where the resection of tissue is expected to be over 500 g on each side, or in ptotic breasts where the skin is too flaccid. It is also indicated for less experienced surgeons in minor resections (see Figs 15.32 and 15.33). The lozenge technique cannot be used for every patient. The best results are attained in young patients with elastic skin and mild to moderate hypertrophy, even though we have made resections of up to 900 g on each side (see Fig. 15.34). Mild to moderate ptosis and as an adjunct in breast augmentation with correction of ptosis are also good indications.
I Inferior flap technique with inverted T skin resection pattern
Also called pedicle I (there are four more variants from the original flap numbered from II to V),7 it is used routinely in mammaplasties where the resection of tissue is expected to be over 500 g on each side, or in ptotic breasts were the skin is too flaccid. It is used with the skin markings of the Pitanguy technique,9 resulting in a breast with an ‘inverted T’ scar. The great advantage is the achievement of a conical and firm breast with long lasting result.
Operative technique (inverted T)
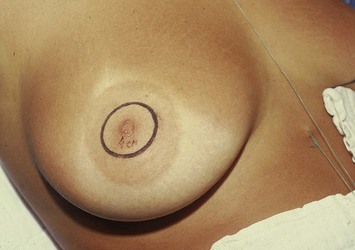
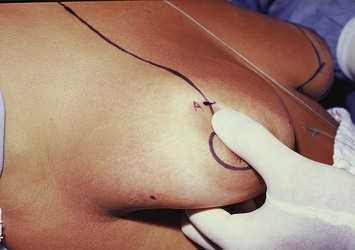
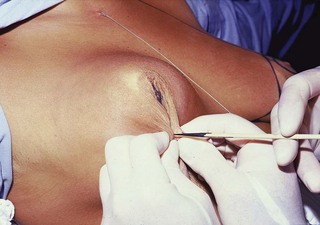
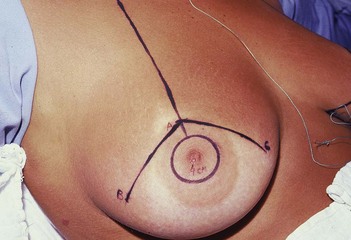
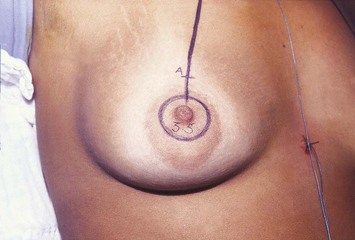
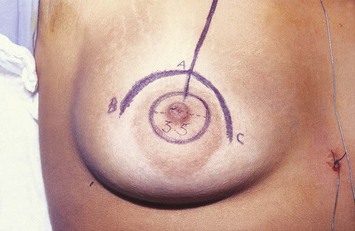
With the patient in a half-sitting position, the new areolae are drawn 4 cm in diameter with an areolar marker (Figs 15.2A and 15.3). A vertical line is drawn from the midclavicular line to the upper edge of the areolae, and point A is marked corresponding to the projection of the inframammary fold on the upper pole of the breast (Figs 15.2B and 15.4). By means of a pinching maneuver and the surgeon’s judgment, points B and C are marked, determining the amount of skin to be resected horizontally (Figs 15.2C and 15.5). The points are linked to the inframammary fold with curving lines, as in Pitanguy’s technique (Figs 15.2D, E, 15.6 and 15.7).
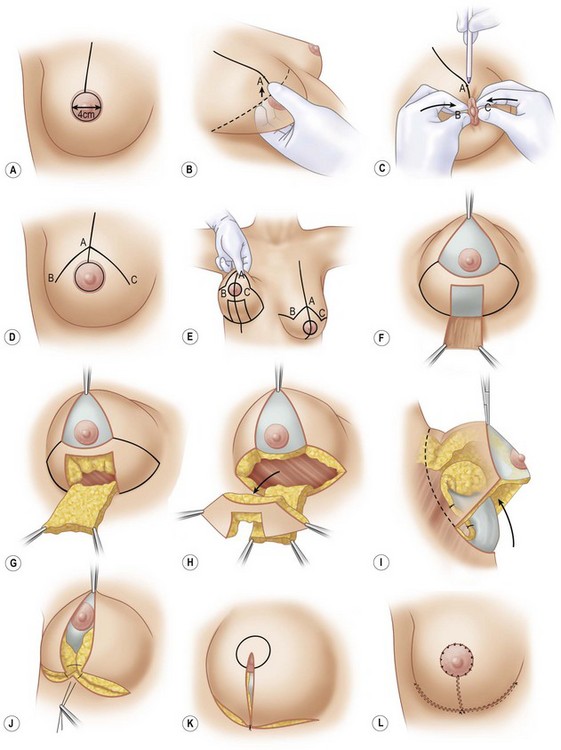

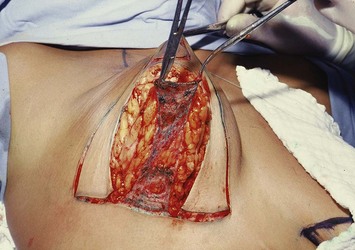
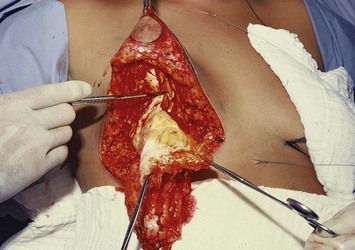
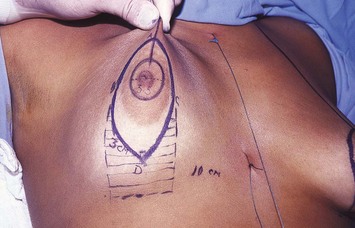
With the breast lifted so that the lower pole can be seen, the drawing of the flap is started at the central portion beginning in the inframammary sulcus and extending to 1 to 2 cm below the inferior edge of the areola. Its width is approximately 4 to 5 cm (Figs 15.2E and 15.7). The outlined flap is de-epithelialized (Fig. 15.2F), and an incision is made on its edges downward to the muscular plane to allow the shaping of a dermolipoglandular flap, supplied by the fourth, fifth, and sixth intercostal perforating vessels. It is important that the flap be 2 to 3 cm thick (Figs 15.2G and 15.8).
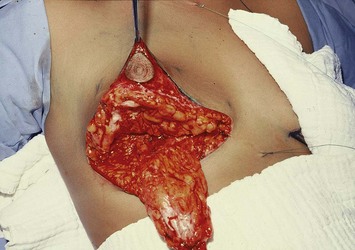
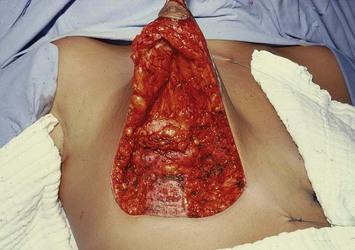
Incision of the new areolar marking is done and is followed by the Schwartzmann maneuver. The excess breast tissue is resected, laterally and medially to the inferior flap and in the upper hemisphere (Figs 15.2H, 15.9 and 15.10). After the resection is completed, the inferior flap is attached to the pectoralis fascia with nylon 3-0 separate stitches. The distal edge of the flap is bent over itself to give the upper pole tissue more projection and to bring the remaining mammary tissue close to the retroglandular area (Figs 15.2I, 15.11 and 15.12). We believe that this procedure ensures the recanalization of the glandular tissue and can allow normal breast feeding.
Points B and C are joined at the middle point of the flap base (Figs 15.2J and 15.13), and the breast is finished (Figs 15.2K and 15.14). Suturing is done with separate nylon 4-0 stitches. Skin suturing is continuous using nylon 5-0. The areola is placed at its new position and is sutured with nylon 5-0 U stitches (Gillies/Perseu techniques) (Figs 15.2L and 15.15).
II Inferior flap with lozenge skin resection pattern
The development of breast surgery led to the search of techniques with shorter scars. The vertical scar mammaplasty became very popular in recent years as it brought together the basic concepts of breast surgery with short scars and good shape as a result. Initially described by Lötsch in 192310 and Dartigues in 192511 for mastopexies, reintroduced by Arié in 1957,12 it was popularized by Lassus in 1970.13
Based on Peixoto’s concepts of dermal and epidermal retraction,5 in an attempt to reduce the length of the scars, we developed a procedure that resulted in a vertical6–8 scar. Unlike Peixoto, initially our results were flattened and flabby breasts, so we used the inferiorly based flap as a corrective procedure. The lozenge technique, which resulted from the association of both principles, led to good results that tend to get better after retraction of the skin. The final result is a scar around the areola and a vertical scar that never goes beyond the inframammary sulcus.
Operative technique (lozenge)
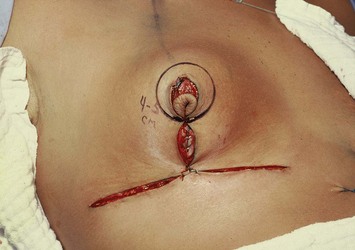
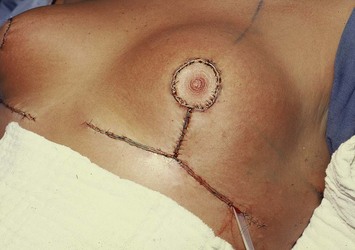
The new areola is marked (Figs 15.16A and 15.17), and point A is determined by the projection of the inframammary fold on the upper pole of the breast. Points B and C are marked by means of a pinching maneuver and the surgeon’s judgment to determine the amount of skin to be resected horizontally (Figs 15.16B and 15.18). Point D is marked 3 cm above the inframammary fold and 10 to 11 cm from the middle line (Fig. 15.19). A curved line is drawn to join points A, B, and C (Fig. 15.18), and points B and C are linked to point D by straight lines (Figs 15.16C and 15.20).
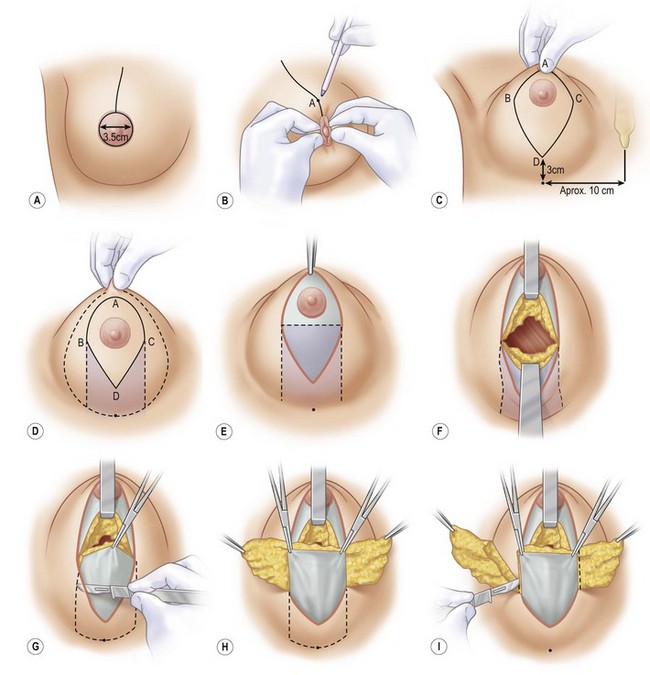
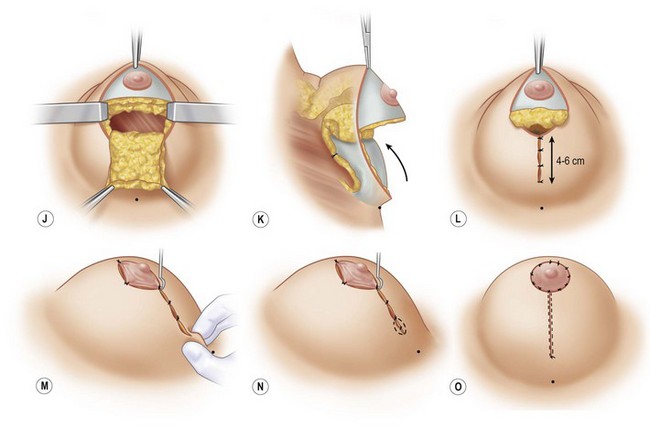

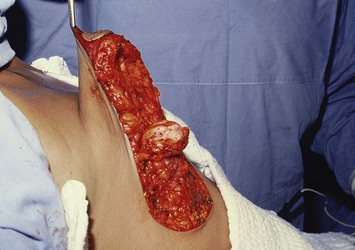
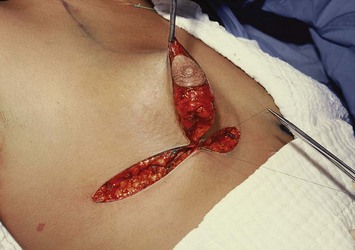
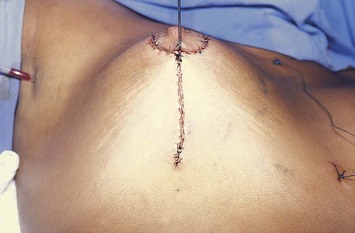
After de-epithelialization of the outlined area (Figs 15.16E and 15.21), a transverse incision is made below the areola, within the de-epithelialized area, downward to the muscular plane, dividing the breast into two halves (Figs 15.16F and 15.22), so keeping the nipple–areola in the superior half. The shaping of the flap starts by undermining the lower quadrants of the breast (Figs 15.16G, H and 15.23) and resecting both its lateral and medial edges, with care taken not to jeopardize the perforating vessels that will provide the blood supply to the inferiorly based flap (Figs 15.24). The tissue on the superior hemisphere is resected until the desired volume is achieved (Figs 15.16J and 15.25), leaving enough of it to maintain the safety of the vascular complex. The inferior based flap is attached to the pectoralis fascia with separate stitches of nylon 3-0 (Figs 15.16K and 15.26). With the breast pulled upwards, the closure is started bringing segments BD and CD together. They are sutured with separate stitches up to 4 to 6 cm from point D (Figs 15.16L and 15.27). The areola is sutured to the segment BAC in such a way as to compensate for the excess of skin. No extra resection of skin is necessary. A Gillies hook is positioned in the transition of the areola and vertical scar to help push the breast upward, a dog-ear might be noted at the inferior portion, in which case its excision is required (Figs 15.16M, N, 15.28 and 15.29). The areola is sutured with separate stitches (Gillies/Perseu) (Figs 15.16O and 15.30).
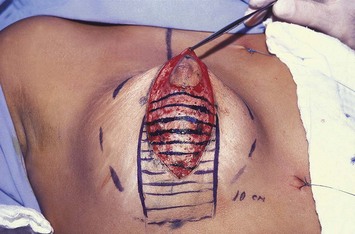
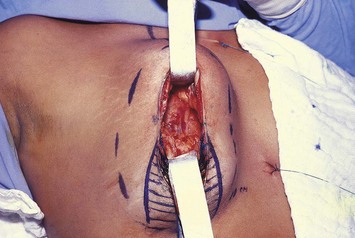
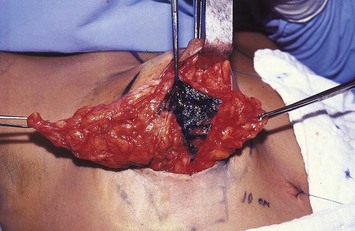
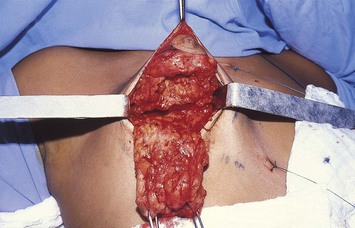
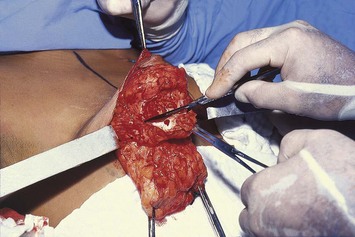

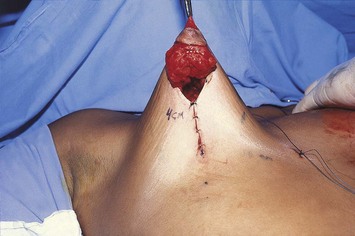
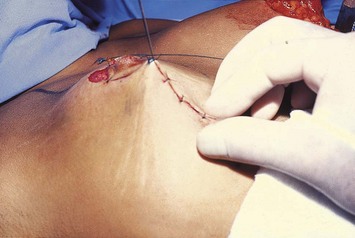
Fig. 15.28 It is important to check for the presence of skin excess in the inferior end of the incision.

Postoperative Care
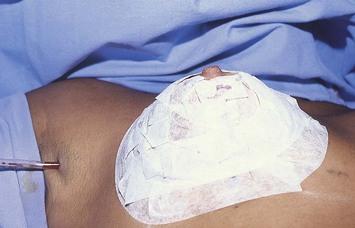
Drainage by a suction drain is the standard procedure, emerging from the axilla, never from the incision line and is left in place for 24 hours. With the hook pulling the breasts upward, immobilization is accomplished with Micropore tape for about 7 days to retain the shape of the flap during the necessary retraction of the skin (Fig. 15.31).
Pitfalls and How to Correct
Asymmetries
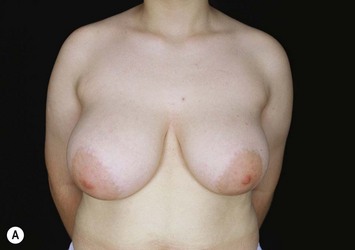
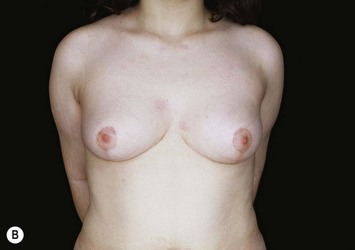
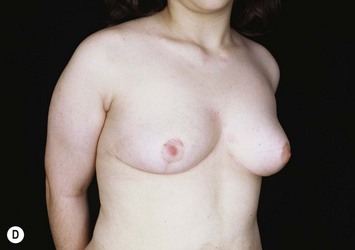
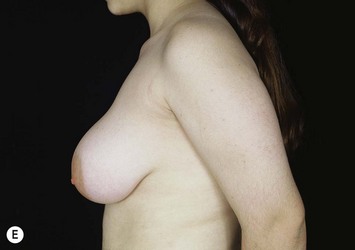
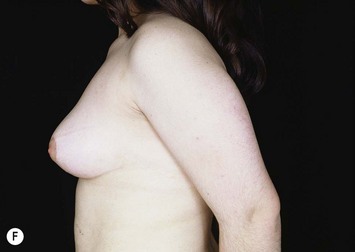
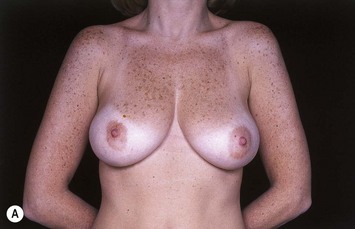
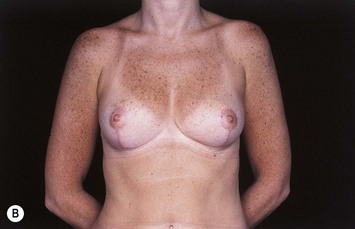
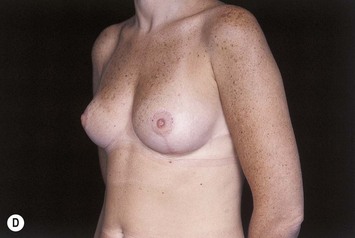
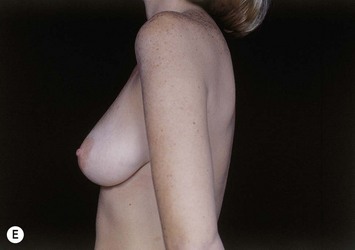
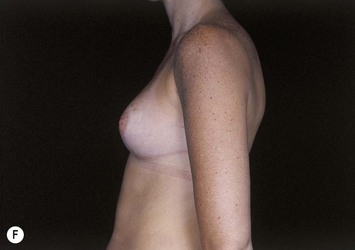
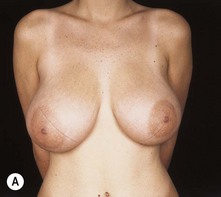
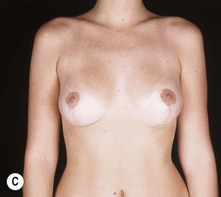
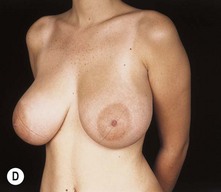
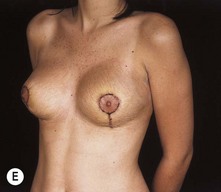
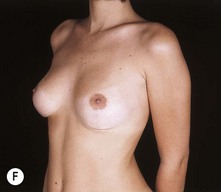
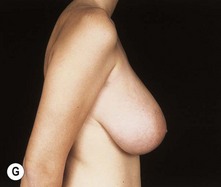
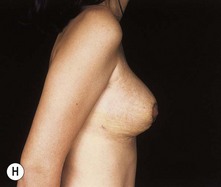
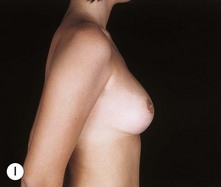
Minor differences in shape and volume are very common, usually with no complaints from the patients. Greater asymmetries should be corrected with a subsequent procedure. This revision should also be delayed for at least six months (Figs 15.32–15.34).


1 Ribeiro L, Backer E. Mastoplastia com pedículo de seguridad. Rev Esp Cir Plast. 1973;16:223.
2 Ribeiro L. A new technique for reduction mammaplasty. Plast Reconstr Surg. 1975;55:330.
3 Robbins TH. A reduction mammaplasty with the areola–nipple based on an inferior dermal pedicle. Plast Reconstr Surg. 1977;59(1):64.
4 Courtiss EH, Goldwyn RM. Reduction mammaplasty by the inferior pedicle technique: an alternative to free nipple and areola grafting for severe macromastia or extreme ptosis. Plast Reconstr Surg. 1977;59(4):500.
5 Peixoto GR. Redução mamária. In: Ribeiro L, editor. Cirurgia plástica da mama. Rio de Janeiro: Medsi Ed. Médica e Cientifica Ltda.; 1989:113.
6 Ribeiro L. The lozenge technique. In: Goldwyn RM, editor. Reduction mammaplasty. Boston: Little, Brown, 1990.
7 Ribeiro L. Pedículos em mamaplastia. Atlas e texto. Rio de Janeiro: Medsi Ed. Médica e Científica Ltda.; 2005.
8 Ribeiro L, Accorsi AJr. Mammaplasty using the lozenge technique. In: Hamdi M, Hammond D, Nahai F, editors. Vertical scar mammaplasty. Berlin: Springer Verlag; 2005:107-115.
9 Pitanguy I. Principles of reduction mammaplasty. In: Georgiade NG, Georgiade GS, Riefkohi R, editors. Aesthetic surgery of the breast. Philadelphia: Saunders; 1990:191.
10 Lotsch F. Uber Hängebrustplastik. Zentralbl Chir. 1923;50:1241.
11 Dartigues L. Traitment chirurgical du prolapsus mammaire. Arch Franco-Belg Chir. 1925;28:313.
12 Arié G. Una nueva técnica de mastoplastía. Rev Latinoam Cir Pl. 1957;3:23.
13 Lassus C. A 30-year experience with vertical mammaplasty. Plast Reconstr Surg. 1996;97:373.