[level-membership-for-plastic-reconstructive-surgery-category]
Chapter 5 Brachioplasty with liposuction resection
• Include the deformity of the axilla and upper chest in the arm reduction plan.
• Close the excision along the posterior half of the medial arm and zigzag across the axilla.
• Fully remove excision site fat and reduce excess fat elsewhere through liposuction.
• Anchor the proximal posterior flap to deltopectoral fascia.
Introduction
The operative strategy relates to the magnitude of deformity.1 For the vast majority of presentations, arm skin reduction surgery is needed from the axilla to elbow.2–4 Experience with severe arm and upper body deformity after massive weight loss (MWL) led to the design of the inclusive L-brachioplasty, so named for the L shaped pattern of excision with the long limb from the elbow to the axilla and the short limb extending at right angles through the axilla and along the lateral chest.5,6
Preoperative Preparation
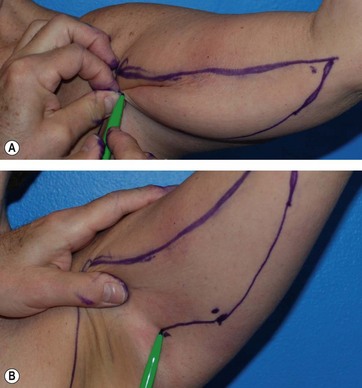
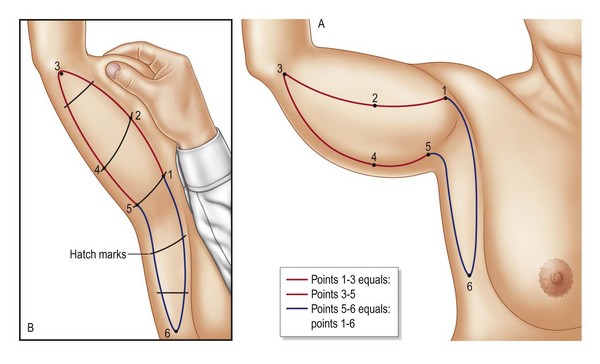
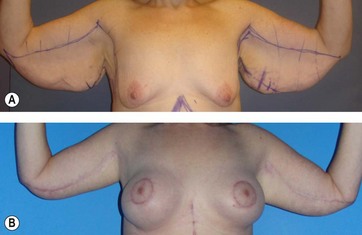
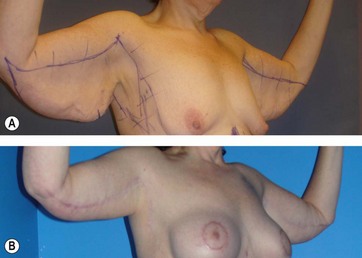
The L-brachioplasty marking begins with a hemi-elliptical skin excision of the medial arm, with the anterior straight line at or slightly above the bicipital groove and the descending curved line along the posterior arm. The six critical points are found with the patient’s arm abducted and the forearm flexed 90°. Ink dots are made at point 1 at the deltopectoral groove, point 2 at the widest portion of the mid arm near the bicipital groove, and point 3 the termination of the brachioplasty about the medial elbow or beyond. The straight or slight bowed line connecting these points is the anterior incision line (Fig. 5.1). The width of the mid-arm excision is determined next by gathering and pinching excess skin and fat posterior to the mid-arm point 2 to mark point 4 along the mid-posterior margin of the arm (Fig. 5.1, upper). With the arm raised and the skin put on stretch, a straight line is drawn from that widest posterior arm point 4 to meet the anterior line termination at point 3. The proximal portion of the posterior incision line is then drawn by finding the critical point 5 that can be advanced to the deltopectoral point 1. Pinching the approximation of point 5 to the deltopectoral groove point 1 advances the posterior axillary fold to tightly suspend the posterior arm (Fig. 5.1, lower). So far an incomplete hemi-ellipse has been drawn. The anterior incision from deltopectoral groove point 1 to the elbow point 3 is measured by tape measure to confirm it is equal in length to the curved posterior incision from elbow point 3 to the advancement point 5. With the arm extended, the posterior line continues across the axilla, staying several centimeters away from the posterior axillary fold to descend to a tapered lateral chest point 6 as the posterior incision line of the lateral chest. The length of this line (points 5 to 6) will vary according to the skin laxity and rolls of the lateral chest. A line roughly perpendicular to 1–3 descends from the deltopectoral groove through the axilla and posterior to the lateral pectoral fold to taper to point 6. The skin excision between these last two lines (5–6 and 1–6) removes the excess skin of the axilla and lateral chest (Fig. 5.2).
Surgical Technique (Fig. 5.3)
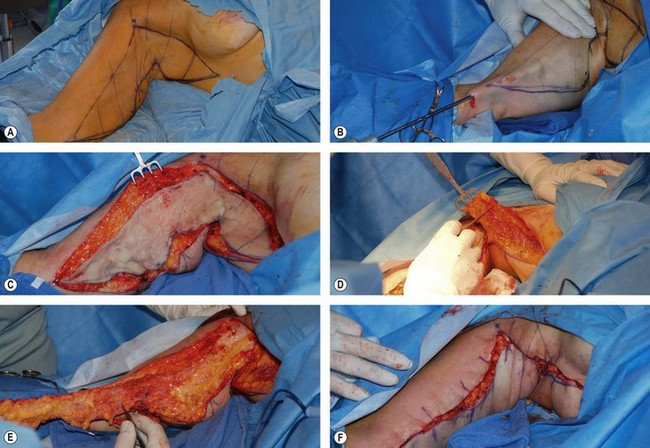
The final adjustment for the adequacy of the width of resection is aided by temporary staple or towel clip closure. Then the posterior arm incision is made through the skin and superficial fascia with traction anteriorly on the arm skin. Once through the fascia the incision pops open and then is undercut about 1 cm. The posterior incision is then continued across the axilla and along the lateral chest to the tapered end at point 6. The anterior straight line arm incision is similarly made, undermined, and continued across the axilla and descends as the anterior incision of the lateral chest to a depth of the serratus fascia. If breast augmentation or a spiral flap breast reshaping is to be performed, the anterior limb of the chest ellipse is not incised until the mastopexy/ augmentation is completed, because the recruitment of skin flaps in a breast augmentation reduces the need for lateral chest skin resection.7
Only late lymphoceles, rather than early seromas, can be a problem. As such, suction drains are unnecessary and we believe are contraindicated as negative pressure encourages flow from damaged lymphatics. The operative time for each arm is approximately 40 minutes. The incisions are covered with foam dressing and then wrapped in ace bandages with the hands elevated. Before and after photographs are seen in Figs 5.4–5.6. The result of an L-brachioplasty with circumferential liposuction is seen in Figs 5.7–5.9. Please see the accompanying video for this chapter for this surgical technique.
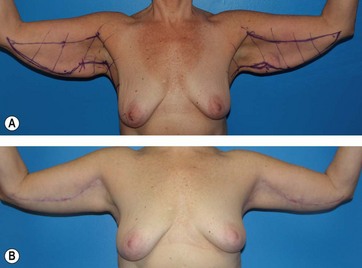
FIG. 5.4 Before and 7 months after L-brachioplasty frontal views with a 7 kg (15 pound) weight gain for the 51-year-old patient (BMI 28) seen in the operative sequence in Fig. 5.4. The preoperative drawings are seen. The hanging posterior skin is gone. The incompletely faded scar curves from the axilla down to the mid arm and then slightly ascends to the elbow.
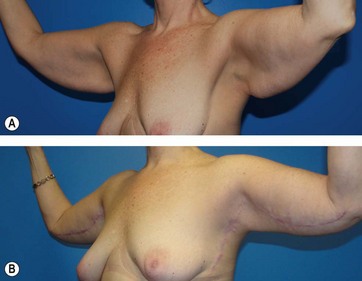
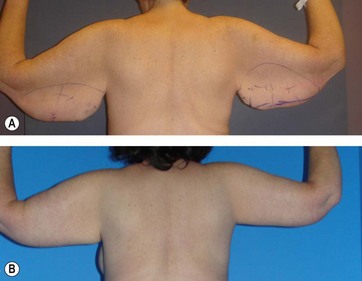
FIG. 5.5 Before and 7 months after L-brachioplasty posterior views for the patient seen in the operative sequence in Fig. 5.4. Despite her 7 kg (15 pound) weight gain, her arms are smaller and better shaped.
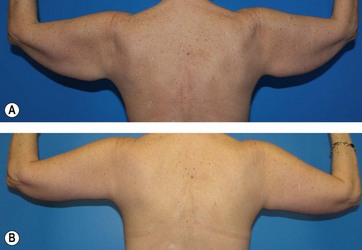
FIG. 5.6 Before and 7 months after L-brachioplasty left oblique views for the patient seen in the operative sequence in Fig. 5.4. The full course of the brachioplasty scar is seen as it crosses the axilla and descends on the chest. The arm, axilla and lateral chest are well shaped and reduced.
Optimizing Outcomes
1. The positioning and precise geometry of the surgical markings are standardized, thereby increasing symmetry, expediting the operation, and leaving the least conspicuous scar.
2. The posterior V-shaped advancement flap is firmly secured to the deltopectoral fascia, assisting vertical lift and minimizing distal scar drift.
3. Thorough excision site liposuction (ESL) of the anticipated hemi-elliptical arm excision allows for excision of skin only, preserving the neurovasculature; thereby eliminating chronic edema and lymphoceles.
4. A two-layered absorbable horizontal running barbed suture closure reduces operative time, improves wound retention and the incidence of delayed healing.
Conclusion
The originally designed L-brachioplasty is commonly used for the MWL arm deformity.5 With our better understanding of the esthetics and the four modifications described herein, we have improved our results and lowered complications.6 We have gone beyond the concept of arm reduction surgery to sculpturing a region to esthetic beauty.7 It is better to leave a little extra tissue than compromise shape or hazard serious complications. Already a commonly accepted procedure,8 with the improvements in shape, scar placement, and reduced complications, L-brachioplasty can take its place as the optimal cosmetic operation for moderate to severe skin and fat redundancy of the upper arm.
1 El Khatib HA. Classification of brachial ptosis; strategy for treatment. Plast Reconstr Surg. 2007;119:1337–1342.
2 Aly A, Soliman S, Cram A, et al. Brachioplasty in the massive weight loss patient. Clin Plast Surg. 2008;35:141–147.
3 Lockwood T. Brachioplasty with superficial fascial system suspension. Plast Reconstr Surg. 1995;96:912–920.
4 Pitanguy I. Correction of lipodystrophy of the lateral thoracic aspect and inner side of the arm and elbow. Clin Plast Surg. 1975;2:477–483.
5 Hurwitz DJ, Holland SW. The L Brachioplasty: An innovative approach to correct excess tissue of the upper arm, axilla and lateral chest. Plast Reconstr Surg. 2006;117:403–411.
6 Hurwitz DJ, Jerrod K. L-Brachioplasty: an adaptable technique for moderate to severe excess skin and fat of the arms for featured operative techniques. Aesth Plast Surg. J. 2010;July–August:620–629.
7 Hurwitz DJ, Agha-Mohammadi S. Post bariatric surgery breast reshaping: the spiral flap. Ann Plast Surg. 2006;569(5):481–486.
8 Symbas L, Losken A. An outcome analysis of brachioplasty techniques following massive weight loss. Ann Plast Surg. 2010;64(5):588–591.
[/level-membership-for-plastic-reconstructive-surgery-category][not-level-membership-for-plastic-reconstructive-surgery-category]
Chapter 5 Brachioplasty with liposuction resection
• Include the deformity of the axilla and upper chest in the arm reduction plan.
• Close the excision along the posterior half of the medial arm and zigzag across the axilla.
• Fully remove excision site fat and reduce excess fat elsewhere through liposuction.
• Anchor the proximal posterior flap to deltopectoral fascia.
Introduction
The operative strategy relates to the magnitude of deformity.1 For the vast majority of presentations, arm skin reduction surgery is needed from the axilla to elbow.2–4 Experience with severe arm and upper body deformity after massive weight loss (MWL) led to the design of the inclusive L-brachioplasty, so named for the L shaped pattern of excision with the long limb from the elbow to the axilla and the short limb extending at right angles through the axilla and along the lateral chest.5,6
Preoperative Preparation
The L-brachioplasty marking begins with a hemi-elliptical skin excision of the medial arm, with the anterior straight line at or slightly above the bicipital groove and the descending curved line along the posterior arm. The six critical points are found with the patient’s arm abducted and the forearm flexed 90°. Ink dots are made at point 1 at the deltopectoral groove, point 2 at the widest portion of the mid arm near the bicipital groove, and point 3 the termination of the brachioplasty about the medial elbow or beyond. The straight or slight bowed line connecting these points is the anterior incision line (Fig. 5.1). The width of the mid-arm excision is determined next by gathering and pinching excess skin and fat posterior to the mid-arm point 2 to mark point 4 along the mid-posterior margin of the arm (Fig. 5.1, upper). With the arm raised and the skin put on stretch, a straight line is drawn from that widest posterior arm point 4 to meet the anterior line termination at point 3. The proximal portion of the posterior incision line is then drawn by finding the critical point 5 that can be advanced to the deltopectoral point 1. Pinching the approximation of point 5 to the deltopectoral groove point 1 advances the posterior axillary fold to tightly suspend the posterior arm (Fig. 5.1, lower). So far an incomplete hemi-ellipse has been drawn. The anterior incision from deltopectoral groove point 1 to the elbow point 3 is measured by tape measure to confirm it is equal in length to the curved posterior incision from elbow point 3 to the advancement point 5. With the arm extended, the posterior line continues across the axilla, staying several centimeters away from the posterior axillary fold to descend to a tapered lateral chest point 6 as the posterior incision line of the lateral chest. The length of this line (points 5 to 6) will vary according to the skin laxity and rolls of the lateral chest. A line roughly perpendicular to 1–3 descends from the deltopectoral groove through the axilla and posterior to the lateral pectoral fold to taper to point 6. The skin excision between these last two lines (5–6 and 1–6) removes the excess skin of the axilla and lateral chest (Fig. 5.2).
[/not-level-membership-for-plastic-reconstructive-surgery-category]
