[level-membership-for-plastic-reconstructive-surgery-category]
Chapter 4 Brachioplasty – the double ellipse technique
• Upper arm excess in massive weight loss patients most often crosses the axilla onto the lateral chest wall.
• Since upper arm excess most often crosses the axilla onto the chest wall, the resection needs to cross the axilla.
• The arm is a cylindrical structure with a hard inner core that is noncompressible.
• It is important to account for the distance between the pinched fingers in the marking process to prevent over-resection during the operative procedure.
• A complete tailor tacking of the arms prior to making the incisions during brachioplasty will prevent over-resection and banding.
• It is dangerous to leave the arm wound open for any considerable time during a brachioplasty procedure.
• The advantages of a posterior scar in brachioplasty include less visibility in normal life animation and less risk to important anatomic structures.
Introduction
In the development of the presented technique, the senior author had to recognize the basic nature of the deformity in the upper arm of the massive weight loss patient. The excess was noted to be located within the posterior axillary fold as it extends from the axilla to the upper arm. Thus, since the posterior fold traverses from the upper arm to the axilla and onto the lateral chest wall, the excess also involved the upper arm, axilla, and the lateral chest wall (see Fig. 4.1). This was a major advancement in knowledge, which led to the authors’ technique of crossing the axilla with the resection. Other authors have since developed other methods of resection, but they are all based on the need to cross the axilla with the resection onto the chest wall.
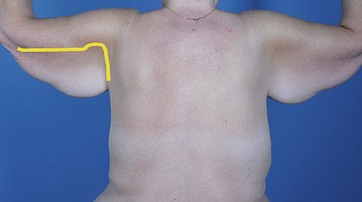
FIG. 4.1 The typical “bat wing” deformity in a massive weight loss patient.
The yellow mark demonstrates how the excess crosses from the upper arm onto the lateral chest wall.
The technique presented here accounts for these two major discoveries: the resection should cross the axilla and minimal to no swelling should be allowed to occur during the procedure.1,2
Surgical Technique
Preoperative Markings: Double Ellipse Technique
1. Patient seated with arms abducted to 90° and elbows flexed at 90°.
2. At the axillary crease, located at the junction of the arm with the chest wall, excess skin and subcutaneous tissues are pinched just below the musculoskeletal complex. The anterior and posterior margins of this pinch are marked.
3. This process of pinching just below the musculoskeletal system is repeated at multiple points along the entire upper arm. In some patients the excess will have to be followed past the elbow.
4. The pinching of excess tissue is continued onto the lateral chest wall.
5. The marks are then all connected, both anteriorly and posteriorly, to create the first ellipse. This ellipse does not account for the distance between the pinching fingers and if used to resect tissues will not allow enough skin to be left behind to close the arm.
6. A second ellipse is created, based on the first ellipse, which accounts for the distance between the pinching fingers. Thus at multiple points along the upper arm, this pinch is repeated and the distance between the pinched fingers is noted. Marks that move in from the original ellipse edges by half the distance of the pinch are then made.
7. This process is repeated along the extent of the arm but not the lateral chest wall, since the resection is not around a cylinder at this point.
8. The second set of marks is then connected to create the inner ellipse.
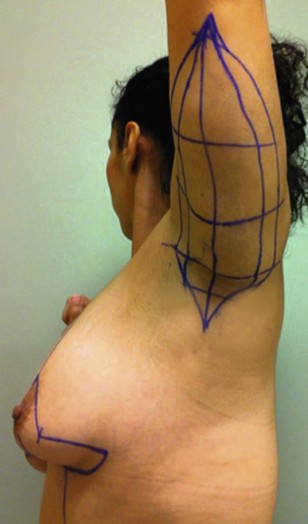
9. Horizontal hatch marks are made at varying distances along the length of the ellipse to assist with final closure (see Fig. 4.2).
Surgical Sequence
1. If a brachioplasty alone is to be performed the patient is placed in the supine position, with arm tables on either side, so that the arms can be manipulated in a variety of positions during the surgery. In the case of combining brachioplasty with an upper body lift, the patient is placed in the lateral decubitus position and turned to the other side when the other side is approached.
2. Intravenous lines should be avoided in the upper extremities. If a line in the arm is required for induction of general anesthesia, this should be moved to the foot or other location prior to prepping.
3. Assistants during surgery are required to stand above the head of the patient so the patient’s head is either turned 180° away from anesthesia or the operating room table is moved away from the anesthesia machine to allow the assistants enough room.
4. The inner ellipse is injected with a small amount of epinephrine-containing anesthetic to reduce bleeding at incision and the patient is prepped and draped.
5. The inner ellipse is then tailor tacked with staples in its entirety, simulating a complete resection and closure. With the tailor tack in place, the entire arm is observed for the tightness and evenness of the proposed resection. The markings are adjusted to avoid areas of under-resection and over-resection. It is especially important to avoid areas of “spot tightness” which will lead to tight bands if not appropriately adjusted for with the markings. After the markings are adjusted, the staples are removed. This tailor tacking step virtually eliminates the chance of over-resection.
6. The resection starts distally by incising both sides of the ellipse up to the first hatch mark. The skin and underlying fat are elevated off the underlying muscle fascia, starting at the distal end of the ellipse and up to the hash mark. There should be no vital neurovascular structures in this layer.
7. After obtaining excellent hemostasis, the skin edges of the ellipse are re-approximated using temporary skin staples.
8. This same process of resecting and temporarily closing the wound with staples is repeated from hash mark to hash mark in what the authors call the “segmental resection-closure technique”. While the arm is open, swelling can and will occur, thus it behoves the surgeon to work efficiently till the temporary staples are in place. The temporary closure prevents any further swelling from taking place.
9. In the region of the axilla, the resection should be more superficial than the muscle fascia to preserve as many lymphatics as possible.
10. After the entire resection is complete and the temporary staples are in place, they are replaced with sutures. The authors prefer to use 2-0 long lasting nonpermanent monofilament interrupted/inverted sutures that re-approximate all of the deep soft tissues in one layer, interspersed with subcuticular nonpermanent staples. Sometimes a more superficial 3-0 monofilament short-lasting suture is placed in a continuous subcuticular fashion. The skin is then covered with glue.
Optimizing Outcomes
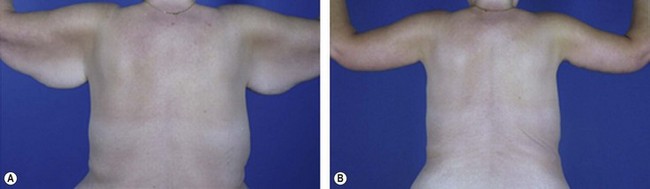
The technique described in this chapter is quite effective in reducing upper arm access, reducing axillary laxity, and because of the lateral chest wall component of the excision, can also be utilized to decrease horizontal thoracic excess. In the authors’ experience the technique is far more effective than the previously popular “T” type brachioplasty technique, especially when the excess is of a severe nature.3,4 A typical early postoperative result of the technique discussed in this chapter is shown in Fig. 4.3.
1 Aly AS, Cram AE. Brachioplasty. In: Aly AS, ed. Body Contouring after Massive Weight Loss. St Louis: Quality Medical Publishing; 2006:303–333.
2 Aly A, Pace D, Cram A. Brachioplasty in the patient with massive weight loss. Aesth Surg J. 2006;26:76–84.
3 Lockwood T. Brachioplasty with superficial fascial system suspension. Plast Reconstruct Surg. 1995;96(4):912–920.
4 Baroudi R. Body sculpturing. Clin Plast Surg. 1984;11(3):419–443.
[/level-membership-for-plastic-reconstructive-surgery-category][not-level-membership-for-plastic-reconstructive-surgery-category]
Chapter 4 Brachioplasty – the double ellipse technique
• Upper arm excess in massive weight loss patients most often crosses the axilla onto the lateral chest wall.
• Since upper arm excess most often crosses the axilla onto the chest wall, the resection needs to cross the axilla.
• The arm is a cylindrical structure with a hard inner core that is noncompressible.
• It is important to account for the distance between the pinched fingers in the marking process to prevent over-resection during the operative procedure.
• A complete tailor tacking of the arms prior to making the incisions during brachioplasty will prevent over-resection and banding.
• It is dangerous to leave the arm wound open for any considerable time during a brachioplasty procedure.
• The advantages of a posterior scar in brachioplasty include less visibility in normal life animation and less risk to important anatomic structures.
Introduction
In the development of the presented technique, the senior author had to recognize the basic nature of the deformity in the upper arm of the massive weight loss patient. The excess was noted to be located within the posterior axillary fold as it extends from the axilla to the upper arm. Thus, since the posterior fold traverses from the upper arm to the axilla and onto the lateral chest wall, the excess also involved the upper arm, axilla, and the lateral chest wall (see Fig. 4.1). This was a major advancement in knowledge, which led to the authors’ technique of crossing the axilla with the resection. Other authors have since developed other methods of resection, but they are all based on the need to cross the axilla with the resection onto the chest wall.
FIG. 4.1 The typical “bat wing” deformity in a massive weight loss patient.
The yellow mark demonstrates how the excess crosses from the upper arm onto the lateral chest wall.
The technique presented here accounts for these two major discoveries: the resection should cross the axilla and minimal to no swelling should be allowed to occur during the procedure.1,2
