Biliary tract
CHOLECYSTECTOMY
Appraise
1. The majority of patients with typical biliary pain undergoing surgery for documented gallstones may expect an excellent response to their operation in terms of symptom resolution and postoperative side-effects.
2. Asymptomatic gallstones are common and it is vital to obtain a careful corroborating history before ascribing vague upper abdominal symptoms to stones seen on imaging.
3. In patients where symptoms are not typical, there should be a warning that the operation may not provide complete relief and a thorough search for an alternative diagnosis should be undertaken prior to surgery.
4. The aim of the operation is to remove the gallbladder with division of the cystic duct, which connects the gallbladder to the main biliary tree and the cystic artery, which is the major blood supply to the gallbladder and usually a branch of the right hepatic artery.
5. Significant variation exists in both biliary and hepatic arterial anatomy and, although the majority of these variations will have little impact on a safely performed cholecystectomy, full advantage should be taken of any preoperative imaging that may be available and careful note made of any anatomical anomalies identified on ultrasound scans, magnetic resonance cholangiograms (MRCP) or ERCPs where available.
Prepare
1. The majority of patients can be treated laparoscopically. Fitness for surgery should be considered on the basis that an open operation may be required. The cardiovascular effects of a pneumoperitoneum should be borne in mind.
2. Patients should be booked to appropriate lists based on any underlying medical co-morbidity and clues as to the likely severity of their disease process, such as a long history of severe and constant pain and ultrasound findings of a very thick-walled gallbladder with surrounding oedema or empyema.
3. Informed consent should be obtained with mention of specific risks such as bleeding, infection, injury to surrounding blood vessels, bowel or the main bile duct, to include bile leak. General complications of surgery such as venous thromboembolism (VTE), acute coronary events, pulmonary and cerebrovascular events and anaesthetic complications should also be discussed. In general terms’ any complications that occur relatively frequently (> 1 in 1000) should be outlined, along with other rarer, but very significant risks.
4. Ensure that a sample of blood has been obtained for group and save of serum and review the preoperative blood results – specifically, the liver function tests.
5. If it is planned to undertake the operation laparoscopically, the patient should be warned of the possibility of conversion to open surgery depending on intra-operative findings or events.
6. Instigate adequate VTE prophylaxis, according to local protocol, which may include the use of pre- or perioperative prophylactic heparin therapy, compression stockings or pneumatic compression devices.
7. A meta-analysis has shown no benefit to the routine use of antibiotic prophylaxis in the prevention of wound infection and septic complications, but they should be considered if the biliary tree is considered to be infected.
8. The operation is conducted under general anaesthesia and care should be taken to ensure that a radiolucent operating table is used, as regardless of whether an intra-operative cholangiogram is performed routinely or selectively, it may be essential in the case of intra-operative difficulties.
LAPAROSCOPIC TECHNIQUE
Action
1. The patient is positioned supine, and following the application of a warming device, antiseptic skin preparation should be applied from an area extending from the nipples to the symphisis pubis, with the drapes positioned such that the full costal margin and the lower border of the sternum are within the sterile operative field.
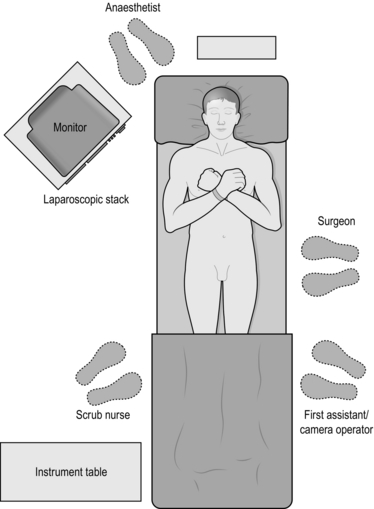
2. The convention is for the operating surgeon to stand on the patient’s left hand side with an assistant to their left and the scrub nurse with instruments on the patient’s right. Some surgeons prefer to place the patient in a Lloyd-Davies position and to operate from between the legs and a few will stand on the right side of the table.
3. The monitor is placed at the surgeon’s eye level at the patient’s right shoulder (Fig. 15.1).
4. The pneumoperitoneum may be safely established by either an open cut-down or through the use of a Veress needle. Although numerous safe techniques exist for an open approach, the authors favour a 1-cm vertical supraumbilical incision with sharp scissor dissection down to the linea alba. A stay suture is then placed either side of the midline and the sheath and peritoneum incised to enter the peritoneal cavity whilst maintaining upward traction on the fascial stay stitches. A blunt trocar is then used to insert a 10- or 11-mm cannula to be used as the optical port. An operating pressure of 12 mmHg is favoured.
5. If a Veress needle technique is preferred, this is introduced through a similarly sited skin incision and gentle upward traction applied by grasping the surrounding skin of the abdominal wall until two distinct clicks of the needle are felt as it passes through first the abdominal wall fascia and then the peritoneum. Correct positioning can be confirmed by either placing a drop of saline at the injection port of the needle with the valve closed – the fluid should be ‘sucked’ into the needle when the valve is opened and the abdominal wall lifted – or, alternatively, the insufflation machine can be attached and should show a high flow rate and low intra-abdominal pressure. Following insufflation of at least 3 L of gas and with an intra-abdominal pressure of 12 mmHg, the needle is removed and an armed, sharp trocar used to introduce the first port, again whilst maintaining traction on the upper abdominal wall. You must be certain of correct positioning of the Veress needle and of an adequate peritoneum prior to the blind insertion of a sharp port and if in any doubt, should consider reverting to an open introduction technique.
6. Following insertion of the optical port, the laparoscope should be introduced and a full inspection of the abdominal contents performed to identify concomitant pathology outside of the vicinity of the gallbladder.
7. Tilt the operating table head-up and to the patient’s left in order to facilitate an optimal view.
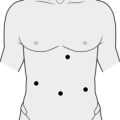
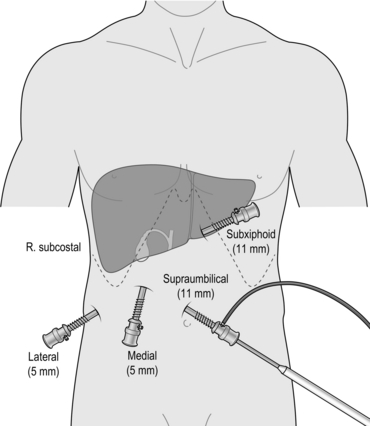
8. A standard four-port laparoscopic cholecystectomy requires the introduction of three further ports which should be introduced under direct vision and usually consist of a further 11-mm port in the epigastrium, one 5-mm port in the right upper quadrant and a further 5-mm port in the right lower quadrant (Fig. 15.2). A three-port cholecystectomy has also been described whereby all retraction is supplied by the surgeon’s left hand instrument and there is no dedicated fundal retractor. There has been no evidence that the elimination of the fourth port alters outcome in terms of postoperative pain or complications – nor have there been any studies addressing safety of the three-port technique.
9. Divide any omental or visceral adhesions to expose the fundus of the gallbladder, which is then grasped with a suitably robust, ratcheted instrument inserted through the RLQ port and retracted cranially to expose Hartmann’s pouch and Calot’s triangle (the area between the cystic duct, common hepatic duct and liver).
10. If the view is obscured by distended duodenum or stomach then the anaesthetist should be asked to aspirate via a nasogastric tube.
11. Apply traction to Hartmann’s pouch using a suitable instrument (Johann or dolphin grasper) in your left hand and use an instrument for dissection in the right hand – usually a diathermy hook, scissors, curved dissecting forceps or a combination of the above.
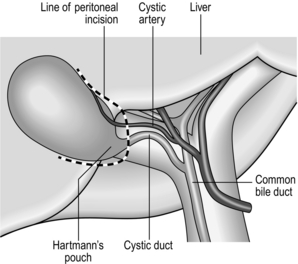
12. Make a peritoneal incision at the medial aspect of the lower border of Hartmann’s pouch and continue to divide the peritoneum around the base of the gallbladder and extended a little way up each of the medial and lateral borders with the liver (Fig. 15.3). This will increase mobility and facilitate the dissection of Calot’s triangle.
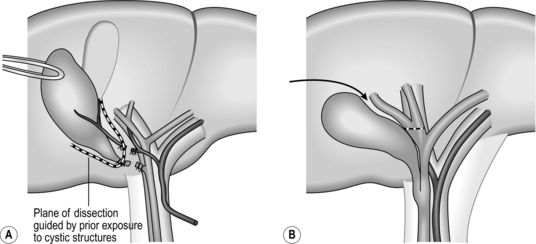
13. Carefully dissect Calot’s triangle to expose the cystic duct and artery (with the artery usually, but not always, lying between the cystic duct and liver plate and usually related to a cystic lymph node). Following isolation of these structures, about 1/3 of the proximal gallbladder should be dissected from the liver in order to be sure of the correct identity of the cystic structures – the so-called critical view of safety (Fig. 15.4).

14. Only when you are absolutely satisfied that the structures are the cystic artery and duct may they be secured and divided. Mechanical clips are the commonest technique used (either metal or polypropylene) and usually the structures are clipped twice proximally and once distally before division with scissors, ensuring that a safe cuff of tissue is left beyond the proximal clips (at least 3 mm).
15. Now grasp Hartmann’s pouch with your left hand and retract it cranially to facilitate dissection of the gallbladder from the liver bed in the layer of the cystic plate.
16. Care should be taken not to stray too deeply towards the liver substance as the middle hepatic vein can lie quite superficially within the gallbladder bed and will be the source of significant and difficult-to-control haemorrhage if injured.
17. A small blood vessel or occasionally a bile duct (of Lushka) may be encountered during dissection of the cystic plate – these should be clipped proximally if they are to be divided.
18. The final dissection of the fundus of the gallbladder from the liver bed is facilitated by conversion to caudal traction with the fundal grasper. However, the cystic structures and the gallbladder bed should be checked for haemostasis and bile leaks prior to division of the final gallbladder attachments, as retraction is more difficult when the gallbladder has been completely detached.
19. Retrieve the gallbladder in an impermeable extraction bag to minimize the risk of port site infection and to protect the wound in the infrequent case of an incidental carcinoma. Extraction is best performed through the umbilical port, as this fascial incision is usually the largest and the simplest to extend and subsequently close.
20. Make a final inspection of the operative field to exclude bleeding and bile leaks and remove each port under direct vision, again to check haemostasis.
21. Close the 11-mm fascial defects using an 0 absorbable suture. The 5-mm ports are not often closed routinely, though some surgeons would advocate doing so to avoid the infrequent hernias encountered through these port sites.
22. Close the skin according to your own preference and instil local anaesthetic into each of the wounds, based on the safe maximum dose for the individual patient.
OPEN TECHNIQUE
Appraise
1. The majority of cholecystectomies are now performed laparoscopically, with the open procedure usually reserved for cases where laparoscopic progress is impossible or when the gallbladder is being removed in conjunction with another procedure that is being performed via an open technique.
2. The presence of previous upper abdominal incisions is not an absolute contraindication to laparoscopic surgery. It is usually possible to insert a laparoscope and take down adhesions (perhaps with a slight modification of the port positioning) in order to proceed to a laparoscopic cholecystectomy.
Action
1. The surgeon usually stands on the patient’s right side with the first assistant and scrub nurse opposite. A second assistant is very useful, if available, and should stand to the surgeon’s left.
2. Make a transverse subcostal incision on the right hand side and deepen this using monopolar diathermy through the fat layer, down to the fascia overlying the rectus and external oblique muscles. Usually a 6–10-cm incision will suffice, though this may need to be extended according to the patient’s build and the degree of inflammation of the gallbladder.
3. Incise the fascia in the same oblique line and stay at least 3–4 cm beneath the costal margin to allow closure of the wound without having to stray too close to the periosteum of the ribs.
4. Some surgeons will pass a swab or tape beneath the rectus muscle prior to division, but it is perfectly safe to simply divide the muscle using diathermy until the posterior fascial layer is reached. Any large vessels encountered within the muscle can be grasped with forceps and diathermized or ligated as required.
5. Grasp the posterior layer of fascia with two clips and incise between them, then extend the full length of the wound with a hand inside the abdominal cavity to protect any underlying bowel.
6. Following an inspection of the abdominal contents, place a folded swab above the right dome of the liver in order to bring the gallbladder and hilum into the operative field.
7. Divide any omental or visceral adhesions to allow the colon and small bowel to be retracted caudally beneath a further folded pack and use a deep retractor such as a ‘Kelly’ held in the assistant’s left hand to maintain a clear view of the gallbladder neck and the hepatic hilum.
8. A ‘Rampley’s’ sponge holding forceps on the fundus of the gallbladder and retracted towards the right shoulder by a second assistant is often useful to display Calot’s triangle.
9. Cholecystectomy may commence with either dissection of the structures in Calot’s triangle, as with the laparoscopic operation, or by a fundus-first dissection of the gallbladder from the liver bed. It is the authors’ preference to first identify and divide the cystic artery and duct and to divide the tissue within Calot’s triangle prior to detaching the gallbladder, as this helps guide the final stage of mobilization of the gallbladder from the liver.
10. Transfix the cystic duct and artery proximally and ligate them distally prior to division. An absorbable suture is adequate and the authors’ preference is for 3/0 vicryl.
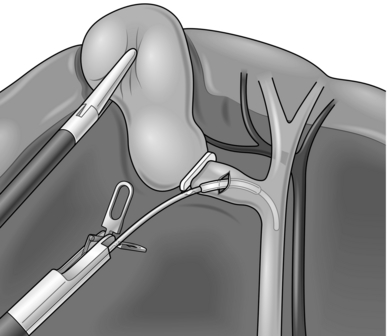
11. Dissection should follow the same plane within the cystic plate as with the laparoscopic operation and as the cystic plate is continuous with the hilar plate it is necessary to direct dissection over the cystic structures on reaching Calot’s triangle, as continuing along the cystic plate will lead to the right hilar structures. Determining the correct plane to follow at this stage of the dissection is made very much easier if Calot’s triangle has been dissected in the first instance (Fig. 15.5).
12. Following removal of the gallbladder, check the cystic plate for bile leaks and bleeding by applying a clean white swab.
13. Unless the gallbladder was perforated during removal, routine lavage or drainage is not required. If bile or stones were spilt, then a careful wash should be performed and all stones retrieved.
14. A drain will not be necessary unless you have any doubts about the integrity of your closure of the cystic duct stump.
15. You may close the wound using either a heavy permanent or an absorbable suture, either in two layers or by mass closure, according to preference. A ‘fat stitch’ is not usually necessary and skin can be closed, again according to preference.
SINGLE INCISION LAPAROSCOPIC SURGERY TECHNIQUE
1. There is a growing interest in single incision laparoscopic surgery (SILS) and some centres offer SILS cholecystectomy.
2. This technique is undoubtedly more challenging and is limited by poor separation of the longitudinal axis of the instruments from the optical axis of the endoscope and by a severely restricted operating angle between the instruments. Careful patient selection is key and the technique is feasible for the more straightforward cases.
3. The advantages of SILS surgery over conventional laparoscopic surgery are yet to be proven and the technique is still far from mainstream. It is mentioned here for the sake of completeness, but should not be attempted without a firm grounding in the laparoscopic technique and specific SILS training.
Action
1. Insert a special SILS port, via an open incision through the umbilicus, which allows passage of a number of standard instruments and a 10-mm laparoscope (Fig. 15.6).
2. The technique for the operation is the same as for the laparoscopic procedure; however, manipulation angles for the instruments are restricted and high-quality camera work is essential.
3. Some lateral retraction of the gallbladder can be achieved by passing a suture on a straight needle through the anterior abdominal wall in the left upper quadrant, passing the suture through Hartmann’s pouch and out through the abdominal wall in the right upper quadrant. Ligaclips are then placed on the suture on either side of Hartmann’s pouch and external traction on either end of the suture will provide some lateral retraction of the gallbladder to facilitate dissection (Fig. 15.7).
THE DIFFICULT GALLBLADDER
PATIENT HABITUS
1. Initial port access may be difficult, especially with the open technique and a larger skin incision may be required in order to reach the abdominal wall fascia.
2. It is helpful to grasp the base of the umbilicus with a ‘Littlewood’s’ forceps and to retract this upwards in order to minimize the distance between the skin and the fascia.
3. In particularly challenging cases a ‘visiport’, which allows insertion of the first port through the various layers under direct vision, may be useful.
4. Fatty change in the liver may severely restrict the ability to retract the gallbladder due to stiffness and bulk of the liver and the liver substance itself becomes far more friable. Some of these difficulties can be overcome by placing the fundal retractor around a third of the way between the fundus and Hartmann’s pouch, rather than on the very tip of the gallbladder.
5. In severe cases, there has been a suggestion that the fatty infiltration of the liver can be minimized for the procedure by a 2-week ultra-low-calorie and ultra-low-fat diet prior to surgery. For this, the patient should be allowed 2 pints of skimmed milk daily along with a balanced multi-vitamin supplement, unlimited water based drinks and a stock-cube to maintain electrolyte balance. Substantial improvements in the bulk of the liver can be obtained by this diet, but it must be stressed to the patient that it is only safe for a very limited period of time preoperatively.
ANATOMY
1. Biliary and hepatic arterial anatomy is extremely variable, although the majority of variations will have no impact on laparoscopic cholecystectomy.
2. It is crucial to begin dissection around Hartmann’s pouch and not to stray too far down the cystic duct – identifying the cystic duct/CBD junction is not helpful and may lead to unnecessary injury.
3. The cystic artery should similarly be dissected at its junction with the gallbladder in order to avoid injury to the right hepatic artery.
4. It is essential that the critical view of safety is obtained, that the cystic duct and artery have been positively identified and that no other structures are present in Calot’s triangle prior to clipping or dividing any structures.
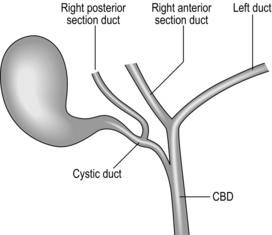
5. A right posterior sectional duct that joins the cystic duct is not too uncommon and is easily injured or mistaken for a duct of Lushka (Fig. 15.8).
6. Any doubts about the anatomy that has been displayed should prompt you to either perform a laparoscopic cholangiogram to confirm ductal anatomy or to convert to an open procedure.
PATHOLOGY
1. Severe inflammation can make cholecystectomy extremely challenging and is sometimes difficult to predict from preoperative ultrasound scanning.
2. Dense omental adhesions to the body of the gallbladder may also involve the colon or the duodenum and care should be taken to identify these viscera during dissection.
3. Fistulae between these hollow organs and the gallbladder occur occasionally and an open procedure is usually required to facilitate safe dissection and closure of fistulae if present.
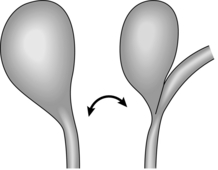
4. A severely inflamed Hartmann’s pouch that is filling Calot’s triangle and adherent to the hilar structures is one of the commonest causes of misidentification of the cystic duct/CBD and, classically, a tubular structure that appears to be funnelling into the gallbladder actually turns out to be the CBD adherent to Hartmann’s pouch (Fig. 15.9). Injury in these circumstances can be avoided by completing the dissection of Calot’s triangle to provide the critical view of safety prior to dividing the duct. If this view cannot be obtained, then conversion to open or a subtotal cholecystectomy may be required.
5. If a Mirizzi’s syndrome exists (obstructive jaundice due to compression from a stone in the cystic duct or Hartmann’s pouch) the inflamed gallbladder is usually densely adherent to the main bile duct). Have a low threshold for subtotal cholecystectomy or enlist specialist HPB assistance if available.
6. In the case of a very badly inflamed gallbladder in the acute setting, it may be wise to abandon the procedure following initial laparoscopy to allow the inflammation to settle down, and perform an interval cholecystectomy in 6 to 8 weeks. If the patient is acutely unwell – consider either a surgical or percutaneous cholecystostomy as a temporising measure.
CONVERSION
1. Have a generally low threshold to convert a difficult laparoscopic cholecystectomy if inflammation is severe, in the event of intra-operative complications or if the anatomy cannot be adequately visualized. Be under no illusions, however, that the open procedure will be any easier and ensure that your incision, lighting and assistance are adequate.
2. A common cause of bile duct injury following conversion is fundus first dissection of the gall bladder, especially when Calot’s triangle has been obliterated. In such circumstances, the cystic plate will lead directly onto the right hilar structures and care must be taken to avoid injury. Have a low threshold for subtotal cholecystectomy in such circumstances.
SUBTOTAL CHOLECYSTECTOMY
1. Start by aspirating the fluid from the gallbladder as this may well be infected (A Veress needle attached to a 50-ml syringe with a Leuer lock is useful). Send the fluid for culture. Then open the gallbladder at the fundus using diathermy.
2. Remove all the stones and stop any bleeding from the gallbladder wall.
3. Place a finger inside the gallbladder and palpate the cystic duct orifice or Hartmann’s pouch, if performed as an open operation, or identify these structures visually if laparoscopic.
4. Incise longitudinally along the inferior border of the gallbladder to a level just above the cystic duct orifice and then extend the incision circumferentially across the gallbladder.
5. If possible, dissect the posterior wall of the gallbladder from the liver and simply amputate the gallbladder at the level of Hartmann’s pouch.
6. If bleeding is encountered in dissecting the cystic plate, then simply carry the circumferential incisions upwards when reaching the junction between the gallbladder and liver and leave the posterior gallbladder wall on the liver.
7. The cystic duct orifice within Hartmann’s pouch should be closed using a purse-string stitch and if the posterior wall of the gallbladder is left behind – destroy its mucosa with diathermy.
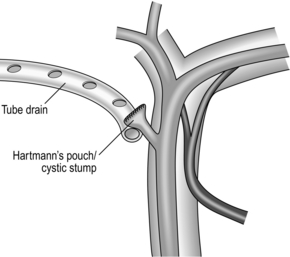
8. A closed non-suction tube drain should be left at the cystic duct stump and can be removed after 48 hours in the absence of bile (Fig. 15.10).
ENTERIC FISTULAE
1. If a fistula to the colon or duodenum is discovered, this should be detached by blunt finger dissection.
2. Debride and close the fistula in one or two layers using an absorbable suture and leave a drain at the site of the closure.
3. If a sizable defect exists, it is occasionally necessary to perform a segmental colonic resection with primary anastomosis or a duodenoplasty.
DUCTAL CALCULI
1. Up to 10% of patients with symptomatic gallstones will have occult ductal calculi.
2. If a stone is identified incidentally during cholecystectomy it may be either removed by surgical exploration of the common bile duct or by postoperative ERCP, depending on the surgeon’s experience and the availability of ERCP services. Duct exploration is a high-risk procedure in frail and elderly patients.
3. Be mindful of any previous surgery or anatomical considerations that would preclude subsequent ERCP, as surgical removal of the ductal stone is mandated in these patients (e.g. previous gastric surgery, which prevents endoscopic access to the ampulla, or the presence of a large duodenal diverticulum).
4. If a postoperative ERCP is planned then a more secure method of securing the cystic duct stump than clips alone is wise as intraductal pressure may be high postoperatively, which would increase the risk of a stump blow out and bile leak. Acceptable techniques would include the use of locking clips, suture ligation, pre-tied endoloops or stapling devices.
INTRA-OPERATIVE COMPLICATIONS
HAEMORRHAGE
1. Small amounts of blood can look very significant when viewed laparoscopically. Care should be taken to cauterize all small vessels, as bleeding during the dissection will obscure the view of vital structures.
2. If bleeding is encountered apply pressure and wait rather than rushing to cauterize or clip a vessel that has not been clearly identified.
3. If there is a significant bleed discuss the likely source and the management plan with your anaesthetist so that blood can be available if transfusion is required.
4. Torrential bleeding can be encountered by injury to the right hepatic artery, portal vein or middle hepatic vein branches.
5. Arterial bleeding is the easiest to deal with as it is usually possible to identify the precise source of the bleeding and to control this with pressure or a grasper in order to repair the laceration with sutures. This can be performed laparoscopically if you are sufficiently experienced or may require conversion to an open approach.
6. Although the right hepatic artery can be ligated without serious consequence this is best avoided wherever possible and a careful suture repair with fine non-absorbable sutures is a far better option. Place a bulldog clip proximally and distally to the injury if bleeding is brisk and you cannot see to perform the repair.
7. Portal venous bleeding is more difficult to control and a significant injury usually mandates conversion to open surgery. Control the bleeding by gentle pressure and dissect and sling the vessel proximally and distally if possible. If necessary, apply a Pringle clamp across the hilar structures at the free edge of the lesser omentum; although this will not prevent back-bleeding from the vein, it can allow better visualization.
8. The extent of the injury must be carefully defined and the venotomy closed by fine non-absorbable sutures (e.g. 5/0 Prolene).
9. Avoid blind stitching in the hilum of the liver. Repair is very much preferable to ligation of the vein, so control the situation with pressure and enlist the help of an HPB or vascular surgeon if necessary.
10. The middle hepatic vein or branches can run very superficially in the gallbladder fossa. Avoid straying into the liver substance during dissection of the gallbladder from its bed. A hole in the gallbladder is far preferable to a hole in the vein. If heavy bleeding is encountered in this area, control it initially by pressure and consider whether you need to convert to open surgery.
11. It is usually necessary to complete the removal of the gallbladder prior to attempting a repair, in order to gain adequate access.
12. With gentle pressure applied to the bleeding point, take a deep bite either side of the injury and with tension on the suture, take a second bite to complete a ‘figure of 8 stitch’. The suture needs to be tied gently to avoid tearing through the parenchyma and a relatively loose stitch will effectively control the bleeding.
13. If you think that you have made a significant sized hole in the middle vein, warn the anaesthetist as air embolism is possible, which could lead to circulatory disturbance and/or a drop in oxygen saturation, and suture the injury as soon as possible.
14. On occasion, following both laparoscopic and open cholecystectomy, a significant degree of ooze can be encountered from the gallbladder bed. Use diathermy set to spray to control the area and then press with a damp swab for 4 minutes (timed by the clock).
15. If the ooze continues, consider whether there is a focal area that needs to be stitched, or try a topical haemostatic product, combined with further pressure.
16. In all cases, ensure that haemostasis is secured before closing the patient as significant blood loss can occur from an oozing gallbladder bed.
BILE LEAK
1. Spillage of bile during mobilization and dissection of the gallbladder due to either a retraction or diathermy injury is relatively common but is usually avoidable with careful technique.
2. If this happens, start by emptying the gallbladder by suction and retrieving any stones that have been spilt. These can act as a nidus for infection if left and may present even years later.
3. If possible, close any holes in the gallbladder using clips, pre-tied loops or by suturing to prevent further stone loss.
4. Biliary injury during cholecystectomy is an unusual but important complication.
5. Occasionally clips on the cystic duct may become loose. If this is noticed intra-operatively then reclip, perhaps using a locking clip, or apply a pre-tied loop to the cystic duct stump.
6. If a bile leak is encountered following gallbladder removal carry out a careful inspection of the operative field. If there is no leakage from the cystic duct stump then an intra-operative cholangiogram should be performed.
7. Apart from cystic stump leaks, the commonest significant injury is damage to (usually transection of) the right posterior sectional duct. It is important that this duct is clearly identified on the cholangiogram as it can occasionally drain into the cystic duct itself.
8. Injury to the main biliary tract should be managed in a specialist setting and may require a biliary reconstruction.
9. If you identify such an injury or cannot locate the source of a bile leak then place a large closed non-suction drain in the region of the porta hepatis and arrange transfer to an HPB centre for further assessment.
VISCERAL INJURY
1. The most commonly injured viscera are the transverse colon and the duodenum.
2. Beware diathermy injury to these structures and if a burn is caused, even if it is not full thickness, it should be oversewn, even if this requires conversion to open surgery.
3. Full-thickness injuries can usually be closed primarily in one or two layers, though some debridement of devitalized tissue may be required.
4. Maintain a low threshold for conversion to open repair in such circumstances.
INTRA-OPERATIVE IMAGING OF THE BILIARY TRACT
Appraise
1. The ability to image the biliary tract during cholecystectomy should be regarded as a core skill.
2. Some surgeons routinely image the bile duct, others use the technique selectively.
3. There is no definite evidence that routine imaging prevents bile duct injury; however, the technique is mandatory if there is the suspicion of injury to the bile duct or if the biliary anatomy cannot be clearly identified.
4. In the elective setting, the presence of small stones or sludge on dividing the cystic duct stump should prompt cholangiography to exclude stones in the common bile duct.
5. The choice of technique depends on local expertise and availability of equipment. Cholangiography is the most commonly employed technique, though endoscopic ultrasound and choledochoscopy are also practised.
CHOLANGIOGRAPHY
1. Care should be taken at the start of every cholecystectomy to position the patient’s upper abdomen over a radiolucent portion of the operating table and to obtain consent for cholangiography.
2. Following dissection of the structures in Calot’s triangle, place a clip on the cystic duct at its origin from Hartmann’s pouch – this is to prevent spillage of bile or small stones.
3. With the gallbladder retracted laterally make a small transverse incision in the cystic duct with fine scissors – this should be sufficient to allow passage of the cholangiogram catheter and is usually around 50% of the calibre of a normal-sized cystic duct.
4. Some bleeding may be expected from the edge of the duct and this does not need intervention unless it is very heavy.
5. Ensure that the catheter is connected to a syringe of diluted contrast (50/50 mix of contrast and saline) and a syringe of plain saline via a three-way tap.
6. The catheter should be flushed to exclude any air bubbles which may later be mistaken for ductal stones and initially opened to the saline-containing syringe.
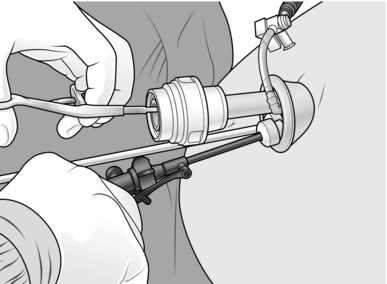
7. The authors prefer to use Olsen-Reddick Cholangiogram Forceps to introduce the catheter as this allows easy insertion and securing of the catheter in the cystic duct with the instrument’s in-built clamp (Fig. 15.11).
8. Regardless of the equipment you use, make fine adjustments with the gallbladder retraction and have your assistant continuously flush the catheter gently to facilitate insertion.
9. Following clipping or clamping of the catheter in position ensure that the saline flushes freely into the bile duct.
10. Return the table to a flat position and then slowly remove the fundal retracting grasper and allow the gallbladder to rest in its usual position.
11. Check again that the saline is flushing freely, without significant leakage prior to opening the three-way tap to the contrast syringe.
12. After covering the patient’s abdomen with a sterile drape move the C-arm of the image intensifier into position with the radiation source placed around 20–30 cm above the patient’s abdomen.
13. Take care not to disturb the cholangiogram catheter whilst positioning the C-arm.
14. Make sure that all operating theatre personnel are covered by protective lead aprons or screens. Place a pair of scissors on the skin surface on the RUQ of the abdomen with the tip pointing upwards and roughly in the position of the junction between the cystic duct and the bile duct. Use the scissors to confirm the orientation and positioning of the radiographic image following a brief burst of screening.
15. The position of the lumbar spine and the right lower ribs also helps to identify the appropriate area of the abdomen prior to contrast injection.
16. When you are happy with the positioning, remove the scissors and screen continuously while you inject contrast. You should see the biliary tree outlined in its entirety, without any filling defects.
17. First concentrate on the lower end of the CBD and its insertion into the duodenum. You should look for free flow of contrast into the duodenum without any filling defects. If contrast does not flow freely to outline the duodenal mucosa, it may be due to a small stone or ampullary spasm: the administration of 20 mg of intravenous buscopan may be helpful.
18. Next direct your attention to the upper duct and follow this along its course into the liver. You should again note the free flow of contrast and absence of filling defects.
19. You should check the calibre of the bile ducts and ensure that they taper smoothly along their length with no extravasation of contrast.
20. Finally, check that you have seen all of the second order branches with the liver, especially the right posterior section duct. As a minimum, you must see the right main duct branching into its anterior and posterior sections and the left duct giving rise to the medial and lateral branches (Fig. 15.12).
21. Although the majority of stones will be seen distally you should check that the whole of the outlined ducts are clear. Occasionally it is necessary to tilt the table slightly head-down in order to see the proximal ducts.
22. When you are happy that the cholangiogram is complete, remove the C-arm and ensure that the images have been stored.
23. Reinsert the laparoscope and retract the gallbladder fundus to display the cystic duct. Remove the catheter under direct vision.
24. Clip the cystic duct distal to the incision, divide the duct and complete the cholecystectomy.
LAPAROSCOPIC ULTRASOUND
Appraise
1. Some centres favour the use of laparoscopic ultrasound over cholangiography.
2. The perceived advantages are that the procedure is less invasive, does not require the use of contrast and can be performed without an incision in the biliary tract.
3. The use of ultrasound is limited by the availability of the equipment and expertise; however, it has been shown to be as sensitive and specific as cholangiography for the determination of biliary anatomy and the detection of ductal calculi.
Action
1. A flexible linear probe is inserted (usually through the epigastric port) and the entire biliary tree from the intra-pancreatic portion of the bile duct to the second order divisions of the intrahepatic ducts may be visualized.
2. The procedure is difficult in the presence of large volumes of intra-peritoneal fat, dense adhesions and a markedly fatty liver; however, adequate views can usually be obtained with careful retraction of the gallbladder. The technique has the added advantage of being able to identify the location of both the ductal and vascular structures prior to dissection in cases of severe inflammation.
SURGICAL EXPLORATION OF THE COMMON BILE DUCT
Appraise
1. Operative exploration of the bile duct has become far less common with the advent of ERCP. Despite this, there remains a role for single-stage management of gallbladder and ductal stones, retrieval of incidental stones detected on routine intra-operative ductal imaging and for those patients in whom endoscopic clearance has either failed or is technically impossible.
2. Several choices for technique are available and procedures can be performed both laparoscopically or open and via the cystic duct or common bile duct.
3. The choice of technique depends partly on the availability of surgical expertise, equipment and preference.
4. Although the majority of common bile duct stones can be removed laparoscopically, the same relative contraindications to laparoscopic cholecystectomy (such as significant cirrhosis or adhesions in the upper abdomen) apply to laparoscopic duct exploration.
5. Large stones that are impacted in the duct can be difficult to dislodge without the benefit of bimanual palpation.
6. A non-dilated bile duct (< 8–10 mm) is a contraindication to direct laparoscopic exploration due to the high risk of stricture formation following closure of the choledochotomy. Such cases are better served by trans-cystic or endoscopic retrieval.
7. Relative contraindications to trans-cystic stone retrieval include numerous and large ductal stones, a narrow cystic duct and a low cystic duct insertion.
The authors’ favoured technique is described – other methods are available.
Action
Laparoscopic duct exploration
Trans-cystic
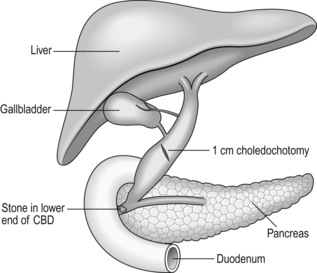
1. Following dissection of the structures at Calot’s triangle, make a 50% cystic dochotomy. The duct should then be ‘milked’ by gently squeezing it proximally to distally to dislodge any small stones or sludge. Now perform a cholangiogram.
2. Make a note of the size, number and location of the ductal stones and evaluate the calibre, length, insertion level and configuration of the cystic duct.
3. Move the fundal retractor a little way proximally along the body of the gallbladder in order to allow use of the RUQ operating port for the insertion of instruments to explore the duct.
4. It is sometimes difficult to maintain adequate exposure and it may be necessary to insert a further 5-mm port in the RUQ between the fundal retractor and working port.
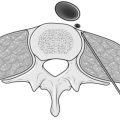
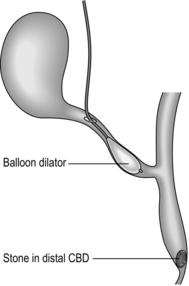
5. Depending on the calibre of the duct and size of the stones, insert a balloon dilator into the cystic duct and gently dilate this to facilitate removal of the stones (Fig. 15.13).
6. Under X-ray screening, pass a lithotripsy basket into the bile duct and try to manoeuvre it through the ampulla and into the duodenum. Take care in negotiating the junction between the cystic and common bile ducts in order not to injure the posterior wall of the bile duct.
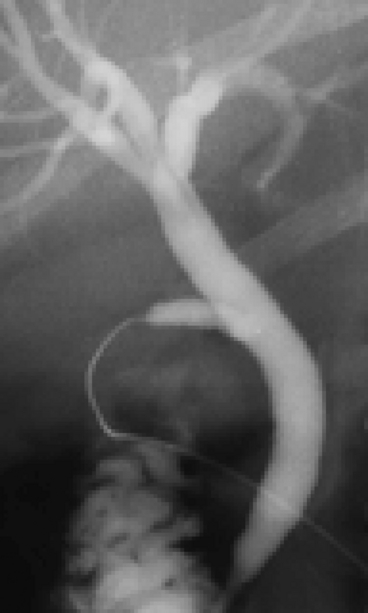
7. Deploy the basket in the duodenum and gently pull it back through the ampulla and catch stones as the basket is slowly withdrawn along the duct. It is often possible to retrieve several stones with each pass, depending on their size. Repeat the procedure, adding more contrast as necessary until the duct is seen to be clear (Fig. 15.14).

8. For stones lying above the level of the cystic duct insertion, it is necessary to pass the basket proximally, rather than distally, which can be challenging.
9. If the basket cannot be encouraged to enter the common hepatic duct it is often possible to flush the stones into the distal duct by injecting saline. Alternatively, a 3-mm choledochoscope with an instrument channel may also be used, although this is not widely available.
10. Following retrieval of all the stones, completion imaging of the ducts should be obtained either by cholangiography, choledochoscopy or ultrasound and the duct secured in the standard fashion prior to division.
Direct choledochotomy
1. Do not attempt direct choledochotomy on bile ducts of less than 8–10 mm in diameter. You will cause a postoperative stricture of the duct.
2. Divide the peritoneum overlying the supraduodenal bile duct to expose its anterior surface over a length of around 2 cm.
3. Do not attempt to dissect the duct laterally or posteriorly as you risk injuring its blood supply, resulting in possible postoperative ischaemic stricture formation.
4. Use a laparoscopic scalpel/cutting diathermy to create an oblique or longitudinal dochotomy of around 1 cm in length (Fig. 15.15).
5. Gently insert the tip of the 5-mm laparoscopic sucker to clear bile and small stones.
6. The duct is most easily cleared by the insertion of an ERCP catheter, which should be first passed proximally to the intrahepatic ducts and then distally to the level of the ampulla and the ducts trawled with the balloon inflated in order to eject the stones through the dochotomy.
7. If stones are impacted, it may be necessary to use a lithotripsy basket to ensnare them or even crush them prior to removal.
8. Complete clearance of the ducts can be confirmed by choledochoscopy using a 5-mm instrument, the majority of which, unlike their 3-mm counterparts, contain an instrument channel to ensnare or trawl any remaining stones under direct vision. The choledochoscope should be used with continuous saline irrigation and can be used to push any recalcitrant distal ductal stones onward through the ampulla if they cannot be dislodged proximally.
9. Close the dochotomy carefully with interrupted fine (5/0 or 6/0) monofilament absorbable sutures spaced approximately 3 mm apart, with 2-mm bites on either edge of the divided duct.
10. Some surgeons advocate the use of either a biliary stent or a T-tube to decompress the duct, but these are not strictly necessary. A closed non-suction drain should be placed at the site of the closure. This may drain placed a small amount of bile for a day or two postoperatively, but inevitably dries up quickly provided the closure has been carefully performed. The potential complications of a displaced T-tube or stent may outweigh their benefits in this situation.
Open exploration
1. Use fixed retractors (e.g. Thompson, Bookwalter) to optimize the view of the gallbladder and structures of the porta hepatis.
2. Transcystic exploration may be performed as described above; however, the majority of ducts that are being explored by open surgery are likely to contain ‘difficult stones’ and success with a trans-cystic approach may therefore be limited.
3. Expose the supraduodenal bile duct as described above. If the duct is difficult to identify then use a 2-ml syringe and a fine needle to aspirate bile from the suspected duct. Then insert fine 5/0 PDS stay sutures on either side of the duct prior to incision using a number 11 scalpel blade.
4. The duct can be explored as above with a combination of balloon catheter, basket and choledochoscope.
5. If stones are impacted distally, it may be possible to dislodge them by bimanual manipulation of the intra-pancreatic portion of the duct, taking care not to squeeze the pancreas too firmly as this may result in pancreatitis.
6. In cases of difficulty, it may be necessary to mobilize the duodenum by dividing the lateral peritoneal attachments (Kocher’s manoeuvre) in order to better manipulate the duct.
7. If the stone is stuck fast, make a 3-cm duodenotomy opposite the ampulla and control with stay sutures. Gently insert a catheter from the distal end of the duct in an attempt to dislodge the stone. If this fails and the stone is palpable above the ampulla through the posterior wall of the duodenum, then a direct incision of the duct and sphincteroplasty can be performed (see below). Close the duodenotomy with interrupted absorbable monofilament sutures.
TRANSDUODENAL SPHINCTEROPLASTY
Appraise
1. Endoscopic sphincterotomy has removed many of the indications for transduodenal sphincteroplasty. Although the surgical technique provides complete division of the sphincter muscle to provide a more reliable and longer lasting drainage procedure than the endoscopic alternative.
2. Impacted distal stones, recurrent problems with primary choledocholithiasis and benign ampullary stenosis are the most frequent indications for sphincteroplasty.
Prepare
1. Explain the procedure, including the possible risks of bleeding, infection, biliary or enteric leak, VTE, myocardial events, and chest infection. In the long term, there is a risk of anastomotic stricture or enteric reflux, which could lead to episodes of cholangitis.
2. The patient should have group and save of serum and routine antibiotic prophylaxis at the time of induction of anaesthesia. VTE prophylaxis should be given in line with local policies.
3. The patient should be positioned supine with the upper abdomen overlying a radiolucent section of the operating table.
Action
1. Make a right subcostal incision to enter the peritoneal cavity.
2. Perform a preliminary inspection of the abdominal contents to exclude concomitant disease.
3. Use fixed retractors and gauze packs to expose the lateral border of the duodenum and the porta hepatis, by packing the small bowel and colon downwards.
4. Mobilize the duodenum by performing Kocher’s manoeuvre – it may also be necessary to mobilize the hepatic flexure of the colon to facilitate this.
5. Locate the ampulla in the second part of the duodenum by palpation through the lateral duodenal wall.
6. Make a 3-cm longitudinal duodenotomy opposite the ampulla and use small retractors or stay sutures on the margins of the incision to give you an optimal view of the ampulla.
7. Pass a small cannula into the duct and aspirate bile to confirm your position in the duct and to guide you in the direction in which you need to divide the sphincter – generally this will be between the 11 and 1 o’clock position on the ampulla. Place stay sutures in the papilla in the 11 and 1 o’clock positions, tie the sutures and secure with clips.
8. Cut down either onto the cannula or onto a small right angle Lahey forceps placed within the bile duct orifice. Stitch the duodenal wall to the bile duct wall on each side of the divided sphincter and bile duct every 3 mm or so as you advance using fine (5/0 or 6/0) absorbable monofilament sutures.
9. Continue in this manner until all the muscle fibres of the ampulla have been divided along the line of the sphincterotomy. You should have a ‘wide-open’ view of the pale mucosal lining of the bile duct and a sphincteroplasty between 1 and 1.5 cm in length. Be sure that all bleeding has been controlled and complete the sphincteroplasty by placing a final suture at the apex of the ‘V’ to stitch the duodenal and biliary mucosa (Fig. 15.16).
10. Be sure that you have identified the major pancreatic papilla – usually around the 6 o’clock position of the sphincterotomy and confirmed by the presence of clear pancreatic juice. Avoid instrumentation of the pancreatic duct, but ensure that it has not been narrowed by any of your sphincterotomy sutures.
11. The bile duct may be explored with a balloon catheter or choledochoscope to ensure that it is clear and then the duodenotomy should be closed with interrupted monofilament non-absorbable sutures. If there is any concern over narrowing the duodenum, then close the duodenotomy transversely as a duodenoplasty rather than longitudinally.
ROUX EN Y HEPATICO-JEJUNOSTOMY – BILIARY RECONSTRUCTION
Appraise
1. There are numerous indications for biliary reconstruction, including situations where part of the biliary tree has been excised (such as for cancer operations or choledochal cysts), where the duct has been damaged and cannot be repaired (such as cholecystectomy bile duct injuries) and also where a definitive drainage procedure is required in the case of recurrent bile duct stone formation or benign bile duct stricture.
2. In cases of ductal stone disease where a definitive drainage procedure is required, a formal hepatico-jejunostomy is a far better treatment than hepatico-duodenostomy, which is associated with significant entero-biliary reflux and long-term problems with recurrent cholangitis.
Prepare
1. Explain the procedure, including the possible risks of bleeding, infection, biliary or enteric leak, VTE, myocardial events, and chest infection. In the long term, there is a risk of anastomotic stricture or ascending cholangitis. The former may require biliary balloon dilatations; the latter is treated with antibiotics.
2. If the reconstruction is being performed for a bile duct injury with an associated arterial injury, the risks of stricture are higher and there is also a long-term risk of the development of sepsis/abscess in the affected section of the liver.
3. The patient should have a group and save of serum and intra-operative cholangiography and/or choledochoscopy should be available.
4. Antibiotic prophylaxis should be given at the time of induction of anaesthesia and VTE prophylaxis should be given in line with local policies.
5. The patient should be positioned supine with the upper abdomen overlying a radiolucent section of the operating table.
Action
1. Make a right subcostal or rooftop incision to enter the peritoneal cavity, depending on the patient’s build (larger patients may require a rooftop incision).
2. Perform a preliminary inspection of the abdominal contents to exclude concomitant disease.
3. If the gallbladder is still in place, dissect the structures at Calot’s triangle and divide the cystic artery.
4. Palpate the lateral edge of the hepatoduodenal ligament to identify an accessory right hepatic artery arising from the superior mesenteric artery. This vessel runs along the lateral border of the main bile duct.
5. Dissect the gallbladder from the liver bed and follow the cystic duct to its junction with the main bile duct.
6. Divide the lateral peritoneum of the hepatoduodenal ligament to expose the bile duct at the level it is to be divided – usually above the level of insertion of the cystic duct and just distal to the biliary confluence.
7. Encircle the bile duct at this level using a right angle Lahey forceps. Pass the instrument behind the bile duct from medial to lateral to minimize risk of injury to the portal vein, which lies behind and medial to the bile duct. Be careful to avoid injury to the accessory artery if present.
8. Pass a nylon tape behind the duct and divide the duct onto the tape with diathermy or knife. Minimize the amount of dissection of the proximal duct in order to protect its blood supply.
9. Suture or diathermize any significant bleeding from the proximal cut end of the duct.
10. The distal duct will be dealt with according to the underlying pathology. For bile duct injuries, it should be dissected down to the upper border of the pancreas, excised and oversewn at that level.
11. Ensure that the proximal ducts are clear by flushing with saline and direct inspection to the level of the second order ducts using a choledochoscope, or by performing a cholangiogram.
12. Release the retraction on the colon and small bowel to identify the Duodenal-Jejunal (D-J) flexure.
13. Use a theatre light angled to transilluminate the jejunal mesentery from above in order to visualize the vascular arcade. Identify an appropriate point to divide the jejunum to provide an optimal blood supply to each end of the bowel, with an adequate length for the Roux loop to reach the bile duct without tension.
14. Find a point where the marginal arcade has good feeding vessels and make a mesenteric window between the feeding vessels on either side of the marginal arcade, before dividing it between clips (Fig. 15.17).
15. Where possible, divide the arcade centrally between the feeding vessels in order to optimize the blood supply to each end of the bowel. You may need to make the division further to the right in order to lengthen the Roux loop if the mesentery is short.
16. Divide the jejunum using a transverse linear cutting stapler and oversew the distal end of the divided bowel (the tip of the Roux loop) with a 3/0 monofilament absorbable suture.
17. The Roux loop is usually best passed through the transverse mesocolon (retrocolic) – assess the lie of the loop in both an antecolic and retrocolic position.
18. Transilluminate the transverse mesocolon and identify the avascular window to the right of the middle-colic vessels. Open this window with diathermy sufficiently to allow free passage of the Roux loop and its mesentery without any tension.
19. Bring the distal limb of the jejunum through the transverse mesocolon until it sits easily adjacent to the bile duct at the hilum.
20. Start the hepatico-jejunostomy by inserting a series of interrupted double ended 4/0 or 5/0 monofilament sutures along the anterior wall of the bile duct – place the sutures approximately 3–5 mm apart, taking 3-mm bites of the bile duct and mount each suture on a rubber-shod clip, leaving both needles attached and arranging the clips in order of insertion (Blumgart Technique, Fig. 15.18). The first and last suture to be placed should be at each corner of the bile duct.
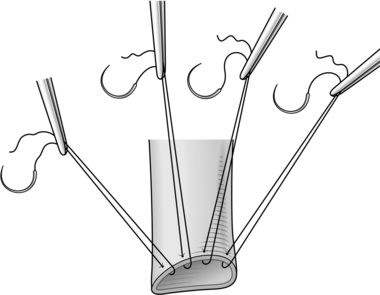
21. Make an enterotomy in the anti-mesenteric border of the distal end of the Roux loop, so that the loop sits neatly on the bile duct and without tension. The enterotomy should be just smaller than the bile duct and should be divided through the full thickness of the bowel wall.
22. Place further interrupted sutures, inside to out on the posterior wall of the bowel, starting 3–5 mm from the corner of the enterotomy and pass the needle out to inside on the posterior wall of the bile duct in the corresponding position.
23. After each suture is placed, cut off both of the needles and mount each suture on a small clip arranged in order of insertion.
24. At either corner of the enterotomy place the corner bile duct stitches inside to out on the bowel and loop the tails to identify them as the corner stitches (Fig. 15.19).
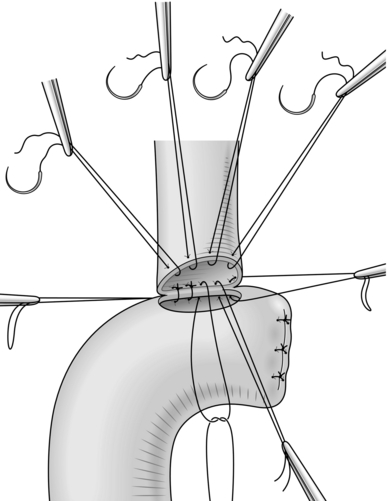
25. Bring the bowel up to efface the bile duct and tie each of the posterior sutures in order on the inside of the anastomosis – do not tie the corner stitches at this point and trim the loose tails when all the knots have been tied.
26. Now pass each of the anterior wall sutures from inside to out on the bowel, cut off the needles and again mount each suture on a small clip until all the anterior sutures have been placed.
27. Tie each of the sutures in turn, starting with one of the corner stitches and trim the tails when all knots have been secured.
28. The anastomosis should be sitting squarely without any tension (Fig. 15.20).

29. Intestinal continuity must now be restored by joining the other divided end of the bowel to the distal small bowel. Mark an area on the anti-mesenteric border of the small bowel around 30–40 cm distal to the end of the Roux loop.
30. The entero-enterostomy can be fashioned in a number of ways – we prefer an end-to-side, two layer, continuous sutured anastomosis.
31. Using a 3/0 monofilament absorbable suture: take a bite of the free end of the bowel on the anti-mesenteric border around 10 mm from the staple line and pass the suture through the anti-mesenteric border of the marked small bowel. Tie this suture and place the short end on a small clip.
32. Fashion the outer posterior layer of the anastomosis by suturing the free end of the small bowel, staying about 10 mm from the staple line, to the side wall of the biliary limb. When you reach the mesenteric border, lock the suture and leave the needle attached on a small clip.
33. Use diathermy to excise the staple line and to make a corresponding enterotomy on the adjacent small bowel.
34. Take a fresh suture and start by passing the needle from out to in on the corner of the free end of the bowel and from in to out on the enterotomy, tie this and loop the short end and mount it on a small clip. Continue the inner posterior layer by taking full-thickness bites of the bowel wall on each side; on reaching the end of the posterior layer continue around onto the anterior layer and close this with sero-submucosal bites to exclude and invert the mucosa (Fig. 15.21). Tie the suture to the looped free end when you finish the inner anterior layer and trim the tails.
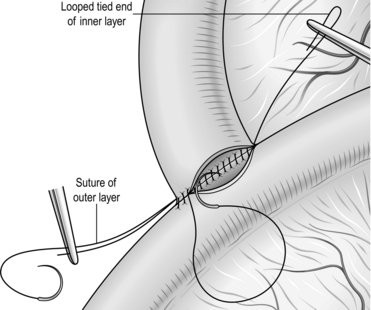
35. Now simply finish the outer anterior layer by continuing with the free needle from the outer posterior layer and by taking small seromuscular bites to cover the inner layer. Tie the suture to the clipped free end on completion and trim the tails.
36. The Roux loop should be fixed as it passes through the transverse mesocolon to prevent herniation into the supra-colic compartment – do this by suturing the mesenteric and anti-mesenteric border of the bowel wall to the peritoneum of the transverse mesocolon using two interrupted absorbable sutures.
37. Place a non-suction closed tube at the site of the biliary anastomosis and close the abdomen in the standard fashion when all swabs and instruments have been accounted for.
FURTHER READING AND REFERENCES
1. Ahmed K, Wang TT, Patel VM, et al. The role of single-incision laparoscopic surgery in abdominal and pelvic surgery: a systematic review. Surg Endosc Feb;25(2):378–96.
2. Al-Ghnaniem, R., Benjamin, I.S., Patel, A.G. Meta-analysis suggests antibiotic prophylaxis is not warranted in low-risk patients undergoing laparoscopic cholecystectomy. Br J Surg. Mar 2003; 90(3):365–366.
3. Attili, A.F., De Santis, A., Capri, R., et al. The natural history of gallstones: the GREPCO experience. The GREPCO Group. Hepatology Mar. 1995; 21(3):655–660.
4. Blumgart, L. Surgery of the Liver, Biliary Tract and Pancreas, 4th ed. New York: Elsevier; 2006.
5. Garden, O.J. Hepatobiliary and Pancreatic Surgery: A Companion to Specialist Surgical Practice, 4th ed. Edinburgh: Elsevier; 2009.
6. Gossage JA, Forshaw MJ. Prevalence and outcome of litigation claims in England after laparoscopic cholecystectomy. Int J Clin Pract Dec;64(13):1832–5.
7. Gurusamy K, Samraj K, Gluud C, et al. Meta-analysis of randomized controlled trials on the safety and effectiveness of early versus delayed laparoscopic cholecystectomy for acute cholecystitis. Br J Surg Feb;97(2):141–50.
8. Gurusamy, K.S., Samraj, K. Primary closure versus T-tube drainage after open common bile duct exploration. Cochrane Database Syst Rev. (1):2007. [CD005640].
9. Gurusamy, K.S., Samraj, K., Fusai, G., Davidson, B.R. Early versus delayed laparoscopic cholecystectomy for biliary colic. Cochrane Database Syst Rev. (4):2008. [CD007196].
10. Gurusamy, K.S., Samraj, K., Mullerat, P., Davidson, B.R. Routine abdominal drainage for uncomplicated laparoscopic cholecystectomy. Cochrane Database Syst Rev. (4):2007. [CD006004].
11. Halldestam, I., Enell, E.L., Kullman, E., Borch, K. Development of symptoms and complications in individuals with asymptomatic gallstones. Br J Surg. Jun 2004; 91(6):734–738.
12. Hugh, T.B. New strategies to prevent laparoscopic bile duct injury–surgeons can learn from pilots. Surgery. Nov 2002; 132(5):826–835.
13. Macafee, D.A., Humes, D.J., Bouliotis, G., Beckingham, I.J., Whynes, D.K., Lobo, D.N. Prospective randomized trial using cost-utility analysis of early versus delayed laparoscopic cholecystectomy for acute gallbladder disease. Br J Surg. Sep 2009; 96(9):1031–1040.
14. Marks, J., Tacchino, R., Roberts, K., et al. Prospective randomized controlled trial of traditional laparoscopic cholecystectomy versus single-incision laparoscopic cholecystectomy: report of preliminary data. Am J Surg. 2011; 201(3):369–372. [discussion 372–3].
15. Peng, W.K., Sheikh, Z., Nixon, S.J., Paterson-Brown, S. Role of laparoscopic cholecystectomy in the early management of acute gallbladder disease. Br J Surg. May 2005; 92(5):586–591.
16. Perry, K.A., Myers, J.A., Deziel, D.J. Laparoscopic ultrasound as the primary method for bile duct imaging during cholecystectomy. Surg Endosc. Jan 2008; 22(1):208–213.
17. Rai, S.S., Grubnik, V.V., Kovalchuk, O.L., Grubnik, O.V. Comparison of long-term results of laparoscopic and endoscopic exploration of common bile duct. J Minim Access Surg. Mar 2006; 2(1):16–22.
18. Strasberg, S.M. Laparoscopic biliary surgery. Gastroenterol Clin North Am. Mar 1999; 28(1):117–132. [vii].
19. Strasberg, S.M. Avoidance of biliary injury during laparoscopic cholecystectomy. J Hepatobiliary Pancreat Surg. 2002; 9(5):543–547.
20. Strasberg, S.M. Error traps and vasculo-biliary injury in laparoscopic and open cholecystectomy. J Hepatobiliary Pancreat Surg. 2008; 15(3):284–292.
21. Strasberg, S.M., Eagon, C.J., Drebin, J.A. The “hidden cystic duct” syndrome and the infundibular technique of laparoscopic cholecystectomy–the danger of the false infundibulum. J Am Coll Surg. Dec 2000; 191(6):661–667.
22. Strasberg SM, Helton WS. An analytical review of vasculobiliary injury in laparoscopic and open cholecystectomy. HPB (Oxford) Jan;13(1):1–14.
23. Way, L.W., Stewart, L., Gantert, W., et al. Causes and prevention of laparoscopic bile duct injuries: analysis of 252 cases from a human factors and cognitive psychology perspective. Ann Surg. Apr 2003; 237(4):460–469.
24. Wilson, R.G., Macintyre, I.M., Nixon, S.J., et al. Laparoscopic cholecystectomy as a safe and effective treatment for severe acute cholecystitis. BMJ. 1992; 305(6850):394–396. [Aug 15].