Chapter 5. Basic life support
The Resuscitation Council (UK) algorithms for basic, advanced, paediatric and neonatal resuscitation can be accessed via their website at: www.resus.org.uk and are based on European and International consensus of the research evidence.
A patient’s best chance of survival occurs when the collapse is witnessed and basic life support (BLS) techniques are started immediately.
The main sign of cardiac arrest is the absence of normal breathing in a non-responsive patient.
The sequence of BLS for laypersons
1. Safety check: to ensure that rescuer, bystanders and patient are not in danger
2. Evaluation of the patient: to identify whether the patient is unresponsive and not breathing normally
3. Airway control: to obtain and maintain a patent airway
4. Circulatory support: to establish an artificial circulation by external cardiac compression
5. Ventilatory support: to establish artificial ventilation using exhaled air.
The algorithm recognises the importance of starting chest compressions as soon as cardiac arrest is suspected; for this reason circulatory support is placed before ventilatory support.
The SAFE approach
S – Shout for help
A – Approach with care
F – Free from danger
E – Evaluate the patient.
• On discovering or being asked to attend to a collapsed patient, the first response must be to shout for help
• BLS techniques are more effective if performed by two rescuers
• Rescuers should approach a collapsed person with care, never putting themselves or others at risk
• If there are risks either to the victim or rescuer, then the patient must be moved to a place of greater safety which is free from danger before starting resuscitation. This decision will inevitably result in a delay to instituting BLS
• Finally, the rescuer must evaluate the patient’s airway, breathing and circulation. Not all collapsed patients will need artificial ventilation and external cardiac compressions.
Patient evaluation
Check the patient for a response: place one hand on the patient’s forehead and shake the shoulder gently with the other hand. At the same time, ask loudly, ‘Are you all right?’
The patient responds by either talking or moving:
• If it is safe to do so, leave the patient in the position in which he or she was found and summon medical assistance or prepare for transfer. Regular reassessment is mandatory
• The head is held stable during the evaluation to guard against the possibility of aggravating an injury to the cervical spine and where there is obvious trauma, the cervical spine must then be immobilised by manual in-line stabilisation
• The patient may be deaf, therefore ensure he or she can see your lips moving when assessing responsiveness.
There is no response to voice or touch:
• If no assistance has arrived, shout for help again and then turn the patient onto their back in a controlled manner. BLS cannot be performed on a patient who is prone or lying awkwardly
• Evaluate the state of the patient’s airway, breathing and circulation.
Open the airway
• In most unconscious patients, the reduced tone in the muscles of the tongue, jaw and neck allow the tongue to fall against the posterior pharyngeal wall
• If a foreign body in the airway is suspected, then the procedure for the choking patient should be followed
• The following manoeuvres are designed to achieve a clear airway.
Head tilt plus chin lift
• This manoeuvre is not recommended if there is any possibility that the patient has a cervical spine injury
• The rescuer’s hand nearest the head is placed on the forehead, gently tilting (extending) the head backwards as though the patient is sniffing
• The chin is then lifted using the index and middle finger of the rescuer’s other hand. If this causes the mouth to close, the lower lip should be retracted downwards by the thumb
• This is the ‘triple airway manoeuvre’ – head tilt, chin lift, mouth open.
Jaw thrust
• If there is a suspicion that the cervical spine may have been injured, then the jaw thrust alone is used
• The patient’s jaw is thrust upwards (forwards) by applying pressure behind the angles of the mandible
• The rescuer uses the fingers, with the base of the thumbs resting on the patient’s cheeks
• When performed correctly, this manoeuvre is uncomfortable for the patient and is generally not tolerated if the patient is conscious.
Patients with suspected cervical spine injury
• Great care should be taken with airway alignment in patients with suspected cervical spine injury. Flexion and rotation of the neck are the most dangerous movements. At all times manual in-line stabilisation should be applied by an assistant
• The safest way to achieve airway patency in patients with suspected cervical spine injury is by jaw thrust
• Extension of the head on the neck should be minimised to that just necessary to establish an airway. It is important to remember, however, that airway obstruction is immediately lethal and airway management takes precedence.
Assess breathing
Keep the airway patent while now assessing breathing for no longer than 10 seconds:
• Look down the line of the chest to see if it is rising and falling
• Listen at the mouth and nose for breath sounds, gurgling or snoring sounds
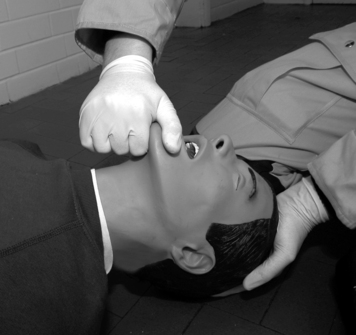 |
| Figure 5.1. |
| Head tilt, chin lift. |
• Feel for breathing at the patient’s mouth and nose with the side of your cheek.
The professional medical responder may check the carotid pulse at the same time. Agonal gasps are present in 40% of cardiac arrest patients and must not be misdiagnosed as normal breathing.
The patient is breathing
• Place the patient in the recovery position unless it is unsafe to do so because of other injuries
• Check regularly for breathing
• The majority of these patients will require urgent hospital transfer. It is essential at this point that either someone is sent to summon such help or, if you are alone, you must leave the patient and go for help.
The patient is not breathing
• Help must be sought immediately, either by sending someone else or going yourself, even if this means temporarily leaving the patient
• On return, begin chest compressions
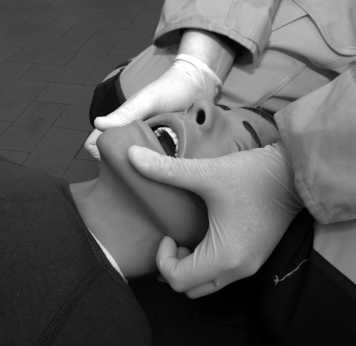 |
| Figure 5.2. |
| Jaw thrust. |
• Exhaled air ventilation (rescue breaths) are started once the first set of 30 chest compressions have been performed.
30 chest compressions to 2 ventilations.
The only exceptions to this sequence of events are cases of drowning or infants and children, when a single rescuer may give five rescue breaths and perform resuscitation for 1 minute before going for help. In these situations, hypoxia is more likely to be the underlying cause of the arrest and so attempts to correct this are made immediately.
Cardiopulmonary resuscitation
• A patient who is unresponsive and is not breathing or has agonal breathing should be placed in the supine position on a firm surface and cardiopulmonary resuscitation (CPR) started
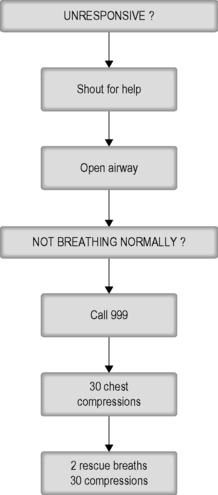 |
| Figure 5.3. |
| The basic life support (BLS) algorithm. |
• The patient is in a safe place, the airway is open, help has been sought and cardiac arrest identified
• The first action at this point is to administer 30 chest compressions
• Once the first set of chest compressions has been given, then the rescuer can administer two exhaled air ventilations
1. The ratio is 30 compressions:2 breaths
2. Should be performed with as few interruptions as possible
3. Assign tasks: e.g. one person for ventilations and a second for compressions
4. The person performing compressions should be changed every 1–2 minutes
5. If the patient shows signs of spontaneous ventilation or movement, then re-evaluate from the beginning of the BLS algorithm (unfortunately very rare).
External cardiac (closed chest) compression
• At best, chest compressions only achieve a maximum blood flow of 20% of normal
• Emphasis is on beginning chest compressions rather than the exact position of the hands:
1. Kneel by the side of the patient
2. Place the heel of one hand in the centre of the patient’s chest (which is the lower half of the victim’s sternum breastbone)
3. Place the heel of the other hand on top of the first hand
4. Interlock the fingers of your hands and ensure that pressure is not applied over the victim’s ribs. Do not apply any pressure over the upper abdomen or the bottom end of the bony sternum
5. Position yourself vertically above the victim’s chest and, with your arms straight, press down on the sternum 5–6 cm
6. After each compression, release all the pressure on the chest without losing contact between your hands and the sternum. Repeat at a rate of about 100–120 times/minute. Compression and release should take an equal amount of time
7. External cardiac compressions are best performed with the rescuer leaning well forward over the patient, with straight arms.
Techniques of exhaled air ventilation
To successfully ventilate a patient with exhaled air, there must be a clear path, with no leaks, between the rescuer’s lungs and the patient’s lungs.
Mouth-to-mouth ventilation
1. The patient’s airway is kept patent by the rescuer using the palm of the uppermost hand to perform a head tilt, leaving the index finger and thumb free to pinch the patient’s nose to prevent leaks. The fingers of the lower hand are then used to perform a chin lift and if necessary, the thumb is used to open the mouth
2. The rescuer takes a deep breath in and makes a seal with his or her lips around the patient’s mouth. Well-fitting dentures should be left in place
3. The rescuer blows into the patient’s mouth for 1 second, at the same time listening for leaks and looking down the patient’s chest to ensure that it rises
1. Wrong hand position
• Too high: the heart is not compressed
• Too low: the stomach is compressed and the risk of aspiration increased
• Too far laterally: will injure underlying organs
2. Over-enthusiastic effort
• Causes cardiac damage
• Fractures ribs, causing damage to underlying organs, particularly lungs and liver
3. Inadequate effort
• The rescuer is not high enough above the patient to use his or her body weight
• Fatigue during prolonged resuscitation or poor technique
4. Failure to release between compressions
• Prevents venous return and filling of the heart
5. Inadequate or excessive rate.
4. While maintaining the head tilt and chin lift, the rescuer moves away from the patient’s mouth to allow passive exhalation, watching to make sure the chest falls.
Mouth-to-nose ventilation
Mouth-to-nose ventilation is used where mouth-to-mouth ventilation is unsuccessful, e.g. if an obstruction in the mouth cannot be relieved or when the rescuer is a child (a child’s mouth would not completely cover an adult’s mouth). The airway is maintained as already described but the mouth is closed with the fingers of the lower hand. The seal is made with the rescuer’s lips around the base of the patient’s nose. Inflation is as above, checking to ensure that the chest rises. The mouth is opened to assist expiration, with the rescuer watching to ensure that the chest falls.
• Obstruction – failing to maintain head tilt or chin lift
• Leaks – inadequate seal around the mouth or failure to occlude the patient’s nose
• Inflating too hard – trying to overcome an obstructed airway, resulting in gastric distension and regurgitation
• Foreign body – unrecognised in the patient’s airway.
Transmission of disease during resuscitation
The safety of both the rescuer and victim are paramount during a resuscitation attempt. There have been few incidents of rescuers suffering adverse effects from undertaking CPR, with only isolated reports of infections such as tuberculosis (TB) and severe acute respiratory distress syndrome (SARS). Transmission of HIV during CPR has never been reported. If the rescuer is unwilling, or unable, to perform exhaled air ventilation, then chest compression only CPR can be performed, although the efficacy of the resuscitation attempt declines after about 5 minutes.
Paramedic basic life support
As there will generally be more than one trained person present, it will be possible for a paramedic crew to undertake actions simultaneously.
1. Having established that the victim is unresponsive, one person should check for breathing, at the same time assessing for signs of a circulation and feeling for a carotid pulse
2. The second person should rapidly collect the appropriate resuscitation equipment, including a defibrillator
3. Having confirmed the diagnosis of cardiac arrest, the defibrillator electrodes should be applied as quickly as possible
4. At the same time, ventilation should commence using a bag-valve-mask with supplemental oxygen rather than exhaled air ventilation
5. If indicated, a shock must be administered, either manually or via an automated external defibrillator (AED)
6. If there is any delay or a shock is not indicated, chest compressions and ventilations in a ratio of 30:2 should commence.
Attempts at defibrillation must not be delayed while basic life support is performed.
The recovery position
In the unconscious patient who is breathing and has a pulse, the airway is best maintained and the risk of aspiration of gastric contents minimised by placing the patient in the recovery position.
1. Remove the patient’s glasses if present
2. Place the patient supine, with legs extended, and ensure the airway is open (head tilt, chin lift)
3. Kneeling against the patient’s chest, move the patient’s closest arm away from the body so that it lies at 90°, and then flex the elbow to 90° so that the palm lies facing upwards
4. Bring the patient’s far arm to lie across the chest, so that the back of the hand lies against the cheek
5. Flex the far leg at the hip and knee, keeping the foot on the ground. Grasp the far shoulder
6. Roll the patient by pulling the shoulders towards you, while using the bent leg as a lever – this is achieved by gently pulling the flexed knee towards you and pressing down
7. Adjust the upper leg so that both the hip and the knee are flexed to 90°. Adjust the hand under the cheek to help maintain the head tilt
8. Finally, the airway, breathing and pulse are checked regularly.
In the recovery position, gravity helps keep the tongue away from the posterior pharyngeal wall; the airway takes precedence over possible cervical spine injuries.
After 30 minutes, the patient should be placed in the recovery position on their other side in order to minimise the chance of developing pressure sores.
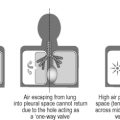
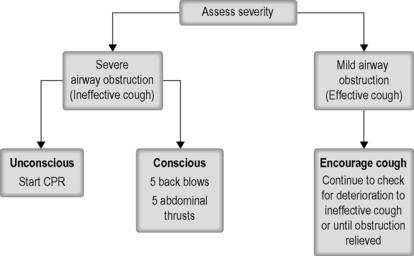
Management of choking (foreign body airway obstruction)
• In adults, the obstruction is usually food. In these circumstances, adults show signs of acute airway obstruction, with extreme distress and activity to try to dislodge an obstruction
• If the obstruction is incomplete, there may be severe coughing and inspiratory stridor
• If the patient is still conscious and unable to cough, then back blows should be used initially.
Back blows
• Standing to one side of the patient, the rescuer should encourage the patient to lean forwards
• While supporting the chest with one hand, five firm blows are delivered between the scapulae. If the obstruction is relieved quickly, all five blows need not be delivered
• If this fails then proceed rapidly to the abdominal thrusts.
Abdominal thrusts
• These can be performed with the patient standing, sitting or kneeling down. The aim is to produce a rapid rise in the intrathoracic pressure (by forcing the diaphragm into the chest), which will expel the foreign body
• If the patient is standing, the rescuer should move behind the patient and pass both arms around the body at the level of the upper abdomen
• The rescuer makes one hand into a fist and places it firmly in the patient’s epigastrium
• The rescuer’s other hand is then placed over the fist and both together forced vigorously upwards and backwards into the epigastrium; this should be repeated up to five times
• This manoeuvre is not without danger of causing visceral injury to the stomach, spleen and liver and it is not recommended for infants and small children
• With luck, this will force the object into a position where the patient can remove it by coughing or it can be hooked out with a finger
• If this fails to dislodge the foreign body, the sequence of five back blows and five abdominal thrusts should be repeated until the patient recovers or becomes unconscious.
Continued deterioration
• When the patient is unconscious, he or she should be placed supine. Tilt the head back and remove any visible obstruction. Perform a chin lift and check for breathing; if absent, then begin chest compressions and follow the algorithm for cardiac arrest
• As soon as ALS equipment is available, perform a laryngoscopy and visualise the object. If it is possible to do so without risk of worsening the obstruction, remove the object using Magill’s forceps. If this proves impossible, a cricothyroidotomy should be performed without further delay and the patient transferred urgently to hospital.
For further information, see Ch. 5 in Emergency Care: A Textbook for Paramedics.