[level-membership-for-emergency-medicine-category]23
Bandaging and Taping Techniques
Taping
1. In general, taping requires practice, but some simple techniques can be easily mastered.
2. Taping is most often used to treat mild to moderate sprains and strains, where some functional capacity, such as weight bearing and lifting, is maintained.
3. Although taping offers dynamic support, it is in no way comparable with splinting, which can immobilize an extremity.
4. The most common tape applied is white athletic (or adhesive) tape, often used by trainers in organized sports. Another very useful product is self-adherent elastic wrap that functions like a tape, but sticks only to itself, such as Coban.
5. Athletic tape may be applied to skin, although it may lose adhesion if the body part is not shaved and tape adhesive not applied.
6. Circumferential wrapping techniques should be used with considerable caution with acute injuries. Marked swelling may cause severe vascular constriction when tape encircles the extremity. Always monitor distal neurovascular status.
Types of Tape
a. Although the major advantage of athletic tape is versatility, its major disadvantage is the tendency of zinc oxide to lose adhesive properties with heat and moisture, thus resulting in loss of support when the patient sweats.
b. A variety of techniques are used to increase the durability of athletic tape under these conditions, described later in this section.
a. Elastic tape (e.g., Elastikon) is cotton elastic cloth tape with a rubber-based adhesive. The elasticity of the tape allows for greater flexibility and is particularly useful for large joints such as the knees or shoulders.
b. Coban is a self-adherent elastic wrap that functions like tape, but sticks only to itself. It is available in sterile and nonsterile styles, and in a variety of widths and colors.
Skin Preparation
1. Skin preparation involves measures meant to increase longevity of tape adhesion and patient comfort.
2. If tape is to be applied directly to the skin, the area is usually shaved to remove hair that may interfere with direct contact.
3. Care must be taken to avoid small abrasions in the skin when shaving because these can serve as sites of infection.
4. Any abrasion should be covered with a thin layer of gauze or small adhesive strip before taping.
5. A variety of commercially available skin adhesives are available in aerosolized form.
a. These preparations use benzoin as the adhesive. One example is Tuf-Skin.
b. Skin adhesives are applied after the skin has been shaved and abrasions dressed.
c. In the wilderness environment, a small plastic bottle of tincture of benzoin is practical. It can be applied with a sterile applicator or gauze pad.
6. If the area is not shaved, a foam underwrap or prewrap is used to protect body hair. Prewrap is generally supplied in 7.5-cm (3-inch) rolls.
7. After applying a topical skin adherent such as Tuf-Skin, prewrap is applied over the part to be taped in a simple, continuous circular wrap.
8. The prewrap is sufficiently self-adherent that it does not need to be taped down.
9. When tape is applied over bony prominences, it can create tension on the skin surface that leads to blistering. Therefore heel-and-lace pads and foam pads are used to provide greater comfort by relieving potential pressure points. Heel-and-lace pads are prefabricated pieces of white foam that are stuck together with petroleum jelly and then applied to the anterior and posterior aspects of the talus when the ankle is taped.
10. Pads of foam can be cut to size to fit over painful areas that need to be taped, as in medial tibial stress syndrome, or they can be used for support in special cases such as taping for patellar subluxation.
Ankle Taping
1. The most common injury to the lower extremity while hiking is a sprained ankle.
2. Pain and swelling linger for several days, and taping can help offer support if the patient is able to bear weight.
3. Because most injuries occur to the lateral ligaments, taping supports the lateral surface by restricting inversion.
4. Ankle taping uses anchor strips on the lower leg and foot, stirrups that run in a medial to lateral direction underneath the calcaneus, and support from either a figure-8 or heel-lock technique (Fig. 23-1).
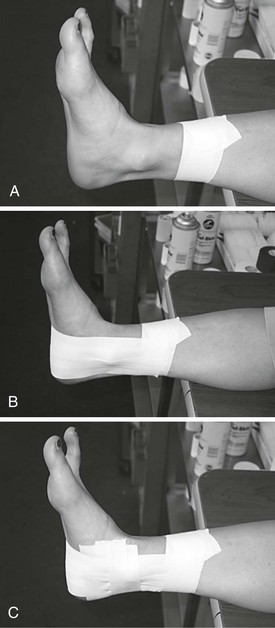
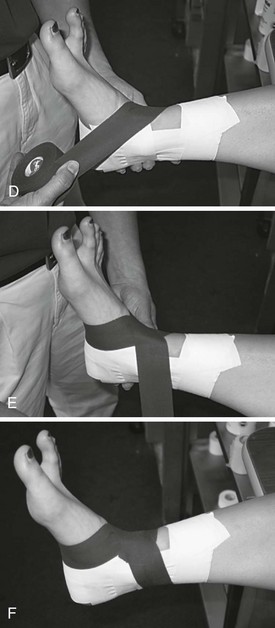
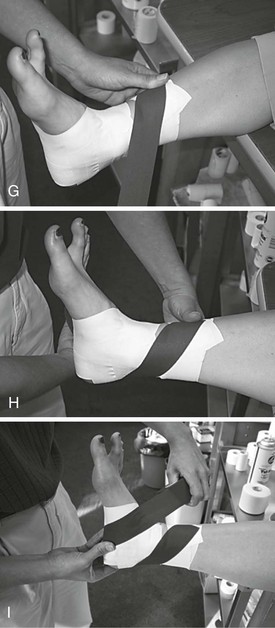
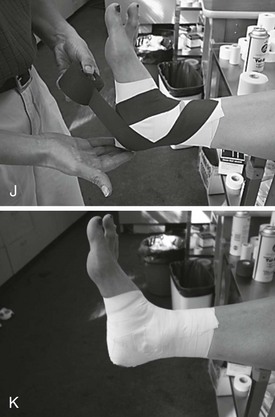
 -inch) tape at the lower leg and distal foot. B, (3) Apply three stirrups from medial to lateral in a slight fan-like projection. C, (4) Fill in gaps with horizontal strips.D, (5) Begin figure-8. Apply tape across front of ankle in left-to-right direction. E, (6) Continue under the foot to the opposite side, and cross back over the top of the foot. F, (7) Complete by wrapping around the leg, and end at the anterior aspect of the ankle.G, (8) Apply heel locks for both feet (omit if not familiar with this technique). Start in left-to-right direction, and apply tape across front of joint. H, (9) Wrap around the heel (bottom margin of tape should be above the superior edge of the calcaneus) to form the first heel lock. I, (10) Continue under the foot to the opposite side, and cross back over the top of the foot.J, (11) The tape is then brought back around the superior margin of the calcaneus and down and around the heel. K, (12) Finish by wrapping around the ankle. Repeat figure-8 or heel lock as desired.
5. The heel lock requires some expertise to perform, so most operators are more comfortable with the figure-8 initially.
Toe Taping
1. Taping toes that are sprained or fractured is simple and effective.
2. This treatment involves buddy-taping to the adjacent toe with one or two pieces of tape to provide support. Figure 23-2 demonstrates buddy-taping of fingers.
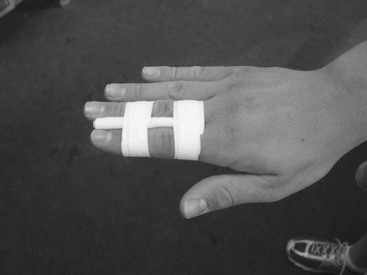
FIGURE 23-2 Buddy-taping of fingers.
3. A piece of gauze, cotton, or cloth can be placed between the toes to avoid skin breakdown.
Lower Leg Taping
1. Medial tibial stress syndrome, commonly referred to as “shin splints,” can be taped for support and comfort.
2. Tape is brought from a lateral to medial direction, and a small foam pad can be cut to cover the area of tenderness.
3. Underwrap should be used over a foam pad to secure it in place (Fig. 23-3).
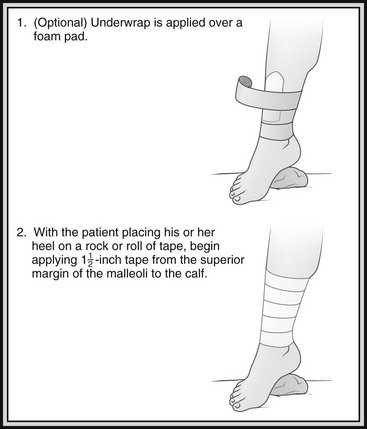
FIGURE 23-3 Lower leg taping.
Knee Taping
1. Underwrap should not be used because adequate traction to support the joint can be achieved only by taping directly to the skin.
2. The patient’s knee should be shaved 15 cm (6 inches) above and below the joint line.
3. Standard athletic tape should not be used because it cannot provide enough support.
4. The foundation is 7.5-cm (3-inch) elastic tape.
5. Taping for injuries to the medial aspect of the knee is described in Figure 23-4.
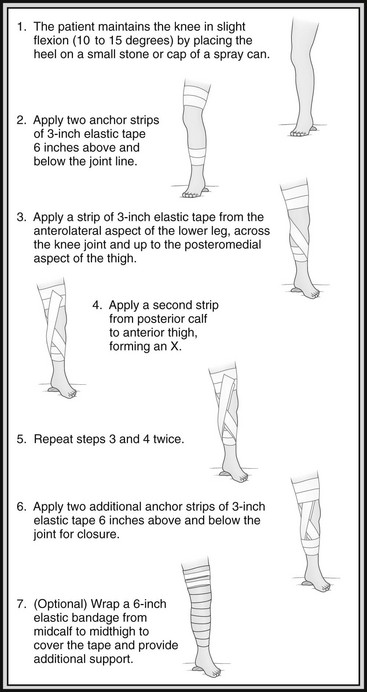
FIGURE 23-4 Knee taping.
Finger Taping
1. The most common scenarios involve fingers that are hyperextended or “jammed.”
a. Injuries in this scenario are often to the palmar ligaments and tendons.
b. Patients may find it difficult to flex the finger against the resistance of an examiner’s finger or may demonstrate tenderness over the palmar aspect of the finger.
c. Swelling is almost always present and may be difficult to localize.
d. This presentation is also seen after reduction of a dorsal dislocation of the proximal interphalangeal joint.
e. In all these cases, it is always best to splint or tape the finger in slight flexion to avoid further injury to the flexor apparatus.
f. Fingers are buddy-taped to the adjacent finger as a natural splint (see Fig. 23-2).
g. The second and third fingers and fourth and fifth fingers are always paired.
h. If the third and fourth fingers are paired, this makes injury to the second and fifth fingers more likely with subsequent activity.
i. A small piece of gauze, cotton, or cloth should be placed between the fingers to avoid blistering or pressure on a tender joint.
j. Strips of tape should be applied around fingers but not over the joints.
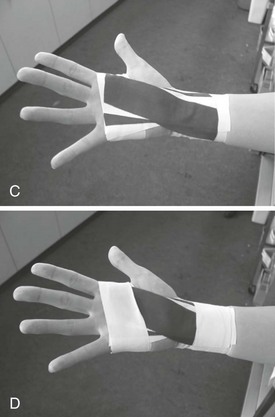
2. Although not as common, injuries to the extensor tendons can occur.
a. Typically these occur with hyperflexion, but they can also occur with hyperextension and axial loading.
b. A mallet finger results from fracture of the base of the distal phalange, the site of attachment for the extensor tendon.
c. The resulting inability of the distal phalange to extend fully results in a partially flexed “mallet” finger.
d. Injuries in which the extensor mechanism is clearly disrupted should be treated with the finger taped in full extension.
e. Often a straight splint such as a tongue blade or smooth stick can be placed on the dorsal surface and the finger taped to it for additional extensor support (Fig. 23-6).
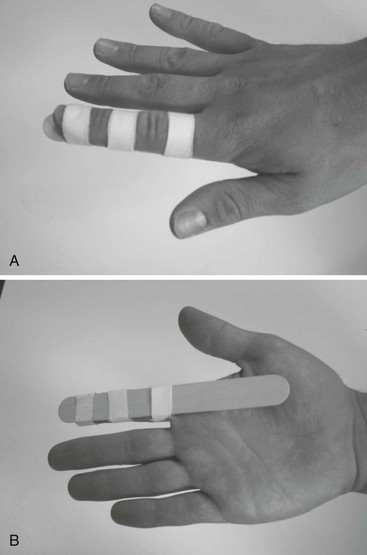
FIGURE 23-6 A and B, Extension taping of finger with small splint. Primarily used for extensor injuries.
f. Any injury to the fingers or hands should always be evaluated by a physician, who can determine whether radiographs are necessary.
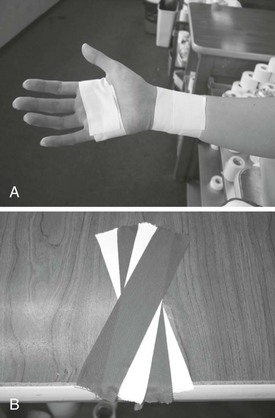
Thumb Taping
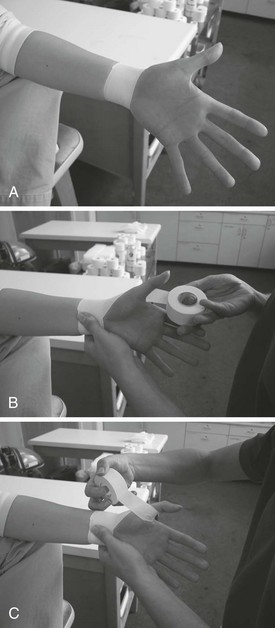
 -inch) athletic tape, wrap an anchor strip around the wrist. B, Using 2-cm (
 -inch) tape, start at the volar aspect and continue along the dorsal aspect of the thumb toward the first web space. C, Allow the patient to crimp the tape as it comes across the web space and continues around the base of the thumb.D, Bring the tape around to the volar aspect of the wrist, and tape at that point. To complete a thumb spica, apply several more strips in succession. To reinforce, rather than repeating a series of strips, continue as follows. E, Apply an anchor strip from volar to dorsal aspects of the wrist through the first web space (note crimping). F, Apply strip from the dorsal to volar aspect of the anchor strip.G, Apply successive strips until at wrist. H, Add a finishing anchor strip though first web space. I, Complete with anchor strip.
Wrist Taping
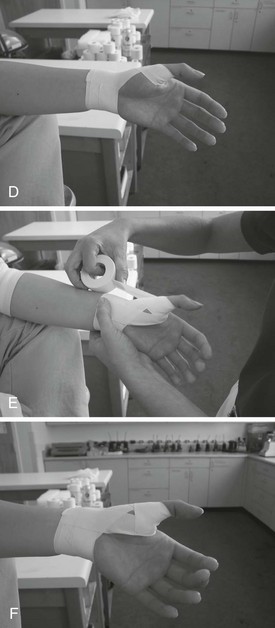
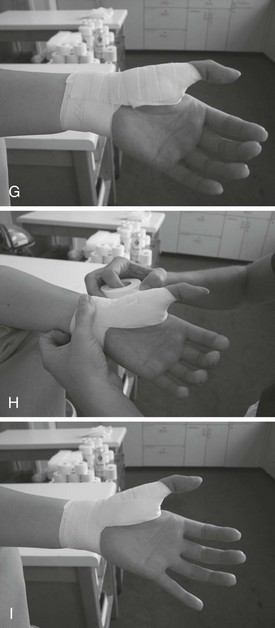
1. Wrist sprains generally occur during falls and initially can be difficult to distinguish from fractures.
2. Although splinting is initially the most desirable treatment, there are two basic taping approaches that can be used, depending on the nature of the injury.
3. As with the finger, the most important factor is whether the injury occurred in hyperextension or hyperflexion.
4. Anchors are placed around the palm and distal wrist, whereas support strips to prevent undesirable movements are placed on the palmar aspect for hyperextension injuries or the dorsal aspect for hyperflexion injuries (Fig. 23-8).
Bandaging
Types of Bandages
1. The type of bandage depends on its purpose.
2. Elastic bandages (e.g., Ace wrap) come in a variety of widths and are used to wrap injuries such as sprains and strains.
3. These bandages generally come with separate clips or clips built into the bandage to secure it.
4. Of note is the double-length 15-cm (6-inch) elastic bandage that is useful for wrapping large joints such as the knee and shoulder.
5. Bandaging wounds generally involves rolled gauze or cotton-based wraps that secure a dressing in place.
6. These wraps are more desirable than elastic bandages in wound care because they do not place as much tension on the wound dressing.
7. A triangular bandage, which is often used to create a sling, can be folded two to three times into a strap, called a cravat.
8. Cravat dressings are useful for applying pressure to a wound that is bleeding to promote hemostasis.
9. In the discussion of bandaging different parts of the body later in this chapter, the method for using an elastic bandage is described.
10. When securing a wound dressing, the same methods may be used, except that rolled gauze or cotton bandages should be substituted.
11. If there is a special technique for wound care, it will be described separately.
Securing Bandages
1. As you finish wrapping with a bandage, bend the free end backward over your fingers, creating a loop. Now double back around the body part, and tie the remaining free end to the loop to secure the bandage.
2. As you finish wrapping, tear or cut the remaining portion of bandage lengthwise down the middle. Double back with one of the resulting strips, and tie off.
Ankle and Foot Bandaging
1. Ankle bandaging with a 5- to 7.5-cm (2- to 3-inch) elastic wrap can be used to support a sprain. The bandage can be applied over a sock or directly to the skin.
2. It is usually simplest to use a series of figure-8 wraps or, if preferable, a series of heel locks as described in the section on ankle taping.
3. Anchors and stirrups are not used.
4. When bandaging the foot, the same technique should be carried out to the metatarsophalangeal joint.
5. Circumferentially bandaging the foot by itself will result in the bandage slipping, as opposed to bandaging the ankle as well.
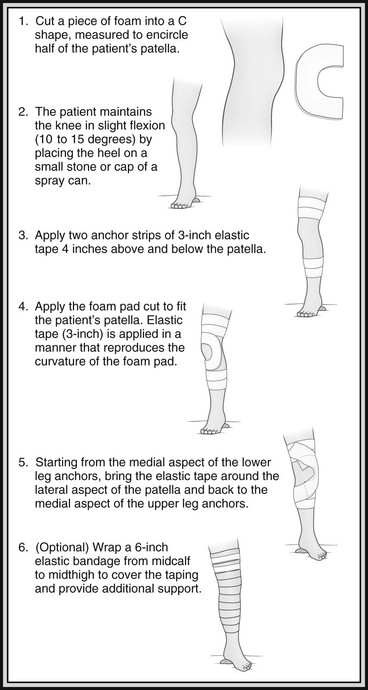
Knee Bandaging
1. A double-length, 15-cm (6-inch) elastic bandage can provide support to the knee. Ask the patient to hold the knee in slight flexion by placing his or her heel on a small stone or piece of wood (see Fig. 23-4).
2. The elastic wrap is then applied circumferentially from midquadriceps to midcalf (see Fig. 23-4).
3. If using gauze to secure a dressing or a smaller elastic wrap, then a series of figure-8 wraps can be applied, leaving the patella exposed.
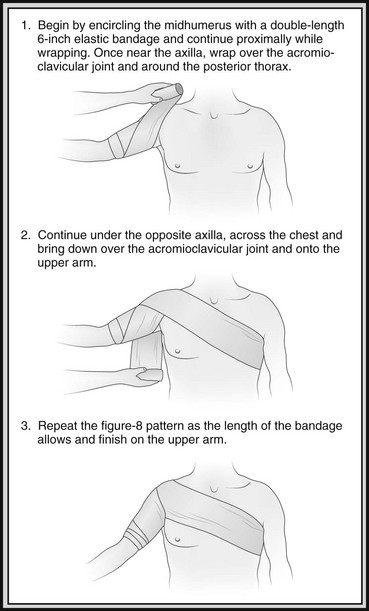
Thigh and Groin Bandaging
1. Quadriceps, hamstring, and hip adductor (“groin”) strains can all be treated with an elastic bandage in a hip spica.
2. The bandage is modified slightly for the groin strain (Fig. 23-9).
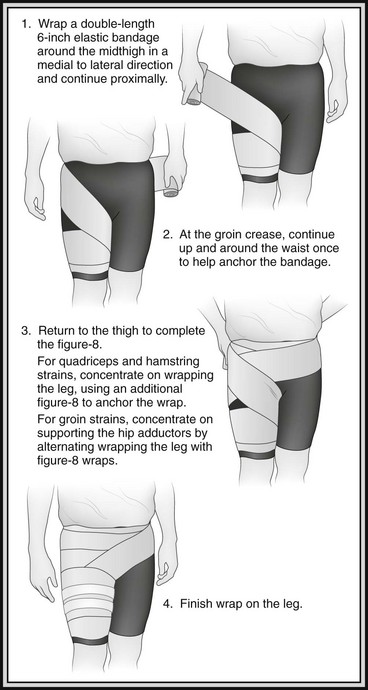
FIGURE 23-9 Thigh and groin bandaging.
3. Although the quadriceps and hamstring can be supported by wrapping only the leg with a 15-cm (6-inch) elastic bandage, the hip spica helps prevent slipping and provides additional support.
Wrist and Hand Bandaging
1. Support to the wrist can be supplied by a 5- to 7.5-cm (2- to 3-inch) elastic wrap using a continuous technique (Fig. 23-10).
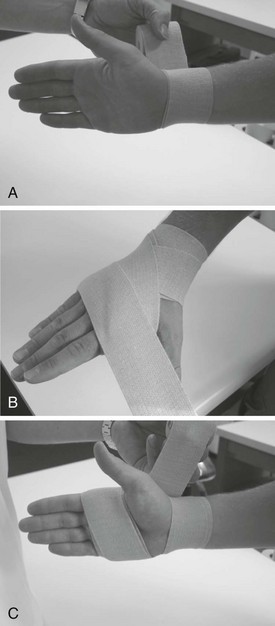
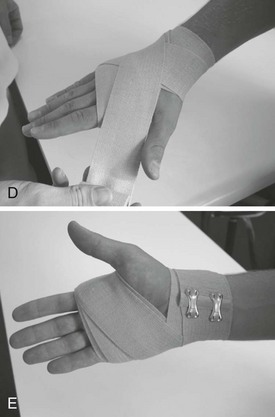
2. This same technique can be used with gauze to secure a dressing to a wound that can occur when falling on an outstretched hand.
3. A hand cravat bandage can be used for wounds that continue to bleed despite manual pressure.
Finger Bandaging
1. Finger wounds are generally easily treated with adhesive bandages.
2. However, if size or degree of bleeding necessitates a larger dressing, then the following method may be used:
a. Fold a 2.5-cm (1-inch) rolled gauze back and forth over the tip of the finger to cover and cushion the wound (Fig. 23-11).
b. Then wrap the gauze around the finger until the gauze is snug.
c. On the last turn around the finger, pull the gauze over the top of the hand so that it extends beyond the wrist.
d. Split this lengthwise; tie the ends around the wrist to secure the bandage.
Ear Bandaging
1. A wound to the pinna may require a compression dressing.
2. If so, gauze should be placed both anterior and posterior to the ear to allow it to maintain its natural curvature.
3. A cravat is used to secure the dressing (Fig. 23-13).
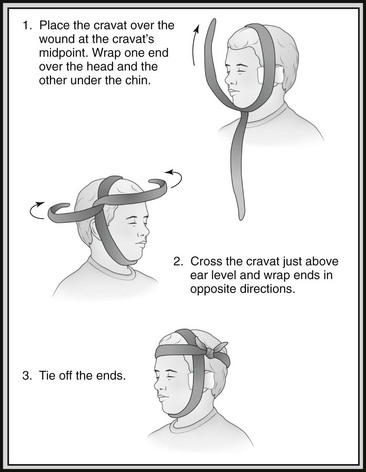
FIGURE 23-13 Ear bandaging.
4. This method may be used for wounds anywhere along the side of the head or under the chin.
Eye Bandaging
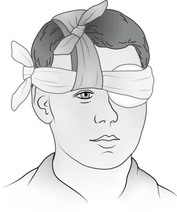
1. When bandaging an eye, a shield is placed over the eye socket to protect the globe, followed by application of a bandage over the shield.
2. The shield may be commercially available sterile pads, cut foam or felt, stacked gauze, or a shirt or cravat fashioned into a doughnut shape (Fig. 23-14).

3. The bandage is fashioned from a cravat and a spare piece of 38-cm (15-inch) cloth or shirt.
4. The spare cloth is placed over the top of the head from posterior to anterior such that the anterior portion lies over the unaffected eye.
5. A cravat is then applied horizontally to hold the shield over the injured eye.
6. To expose the uninjured eye, pull up both ends of the spare cloth and tie at the top of the head (Fig. 23-15).
[/level-membership-for-emergency-medicine-category][not-level-membership-for-emergency-medicine-category]23
Bandaging and Taping Techniques
Taping
1. In general, taping requires practice, but some simple techniques can be easily mastered.
2. Taping is most often used to treat mild to moderate sprains and strains, where some functional capacity, such as weight bearing and lifting, is maintained.
3. Although taping offers dynamic support, it is in no way comparable with splinting, which can immobilize an extremity.
4. The most common tape applied is white athletic (or adhesive) tape, often used by trainers in organized sports. Another very useful product is self-adherent elastic wrap that functions like a tape, but sticks only to itself, such as Coban.
5. Athletic tape may be applied to skin, although it may lose adhesion if the body part is not shaved and tape adhesive not applied.
6. Circumferential wrapping techniques should be used with considerable caution with acute injuries. Marked swelling may cause severe vascular constriction when tape encircles the extremity. Always monitor distal neurovascular status.
Types of Tape
a. Although the major advantage of athletic tape is versatility, its major disadvantage is the tendency of zinc oxide to lose adhesive properties with heat and moisture, thus resulting in loss of support when the patient sweats.
b. A variety of techniques are used to increase the durability of athletic tape under these conditions, described later in this section.
a. Elastic tape (e.g., Elastikon) is cotton elastic cloth tape with a rubber-based adhesive. The elasticity of the tape allows for greater flexibility and is particularly useful for large joints such as the knees or shoulders.
b. Coban is a self-adherent elastic wrap that functions like tape, but sticks only to itself. It is available in sterile and nonsterile styles, and in a variety of widths and colors.
Skin Preparation
1. Skin preparation involves measures meant to increase longevity of tape adhesion and patient comfort.
2. If tape is to be applied directly to the skin, the area is usually shaved to remove hair that may interfere with direct contact.
3. Care must be taken to avoid small abrasions in the skin when shaving because these can serve as sites of infection.
4. Any abrasion should be covered with a thin layer of gauze or small adhesive strip before taping.
5. A variety of commercially available skin adhesives are available in aerosolized form.
a. These preparations use benzoin as the adhesive. One example is Tuf-Skin.
b. Skin adhesives are applied after the skin has been shaved and abrasions dressed.
c. In the wilderness environment, a small plastic bottle of tincture of benzoin is practical. It can be applied with a sterile applicator or gauze pad.
6. If the area is not shaved, a foam underwrap or prewrap is used to protect body hair. Prewrap is generally supplied in 7.5-cm (3-inch) rolls.
7. After applying a topical skin adherent such as Tuf-Skin, prewrap is applied over the part to be taped in a simple, continuous circular wrap.
8. The prewrap is sufficiently self-adherent that it does not need to be taped down.
9. When tape is applied over bony prominences, it can create tension on the skin surface that leads to blistering. Therefore heel-and-lace pads and foam pads are used to provide greater comfort by relieving potential pressure points. Heel-and-lace pads are prefabricated pieces of white foam that are stuck together with petroleum jelly and then applied to the anterior and posterior aspects of the talus when the ankle is taped.
10. Pads of foam can be cut to size to fit over painful areas that need to be taped, as in medial tibial stress syndrome, or they can be used for support in special cases such as taping for patellar subluxation.
Ankle Taping
1. The most common injury to the lower extremity while hiking is a sprained ankle.
2. Pain and swelling linger for several days, and taping can help offer support if the patient is able to bear weight.
3. Because most injuries occur to the lateral ligaments, taping supports the lateral surface by restricting inversion.
4. Ankle taping uses anchor strips on the lower leg and foot, stirrups that run in a medial to lateral direction underneath the calcaneus, and support from either a figure-8 or heel-lock technique (Fig. 23-1).
5. The heel lock requires some expertise to perform, so most operators are more comfortable with the figure-8 initially.
Toe Taping
1. Taping toes that are sprained or fractured is simple and effective.
2. This treatment involves buddy-taping to the adjacent toe with one or two pieces of tape to provide support. Figure 23-2 demonstrates buddy-taping of fingers.
FIGURE 23-2 Buddy-taping of fingers.
3. A piece of gauze, cotton, or cloth can be placed between the toes to avoid skin breakdown.
Lower Leg Taping
1. Medial tibial stress syndrome, commonly referred to as “shin splints,” can be taped for support and comfort.
2. Tape is brought from a lateral to medial direction, and a small foam pad can be cut to cover the area of tenderness.
3. Underwrap should be used over a foam pad to secure it in place (Fig. 23-3).
FIGURE 23-3 Lower leg taping.
