Avalanche Safety and Rescue
Avalanche Safety and Rescue Equipment
Proper equipment is essential for maintaining safety. Safety equipment should include the following:
Snow Shovel
1. It can be used to dig snow pits for stability evaluation and snow caves for overnight shelter.
2. A shovel is necessary for digging in avalanche debris because such snow is far too firm for digging with hands or skis.
3. The shovel should be sturdy and strong enough, yet light and small enough to fit into a pack. Shovels are made of aluminum or high-strength polycarbonate and can be collapsible.
4. To extricate someone buried beneath 1 m (3.3 ft) of snow requires removing about 1 to 1.5 tons of snow.
5. Seven to 10 minutes is needed to uncover someone buried 1 m (3.3 ft) deep. A 2-m (6.6-ft) burial requires 15 to 30 minutes.
Collapsible Probe Pole or Ski Pole Probe
1. This may be used to assist in pinpointing a victim following a transceiver (rescue beacon) search and is essential if the person is without a transceiver.
2. Organized rescue teams keep rigid poles in 3- or 3.7-m (10- or 12-ft) lengths as part of their rescue equipment caches.
3. The recreationist can buy collapsible probe poles of tubular aluminum or carbon fiber that come in 0.6-m (2-ft) sections that fit together to make a full-length probe.
4. Ski poles with removable grips and baskets can be screwed together to make an avalanche probe. These are largely inferior to dedicated commercial probes.
5. Although entirely suboptimal, a tent pole, the tail of a ski, or a ski pole with the basket removed can substitute for this piece of equipment in an absolute emergency.
Avalanche Rescue Transceivers (Beacons)
1. The term transceiver differentiates avalanche transceivers from satellite emergency notification devices, such as personal locator beacons and SPOT devices (satellite personal tracker that transmits a person’s location via satellite to friends or emergency services).
2. Avalanche rescue transceivers are the best device to quickly find a buried companion.
3. Transceivers emit an electromagnetic signal on a worldwide standard frequency of 457 kHz.
4. A buried person’s transceiver emits the signal, and the rescuer’s unit can be set to receive the signal.
5. The signal carries a distance of 20 to 30 m (66 to 98 ft), and when used properly, can guide searchers to the patient.
6. It is essential to confirm that all members of the party have their transceivers set to “transmit” before travel.
7. Merely possessing a transceiver does not ensure its lifesaving capability. Frequent practice is required to master a transceiver-guided search.
8. Skilled practitioners can find a buried unit in less than 5 minutes once they pick up the signal. Because speed is of the essence in avalanche rescue, transceivers are lifesavers.
9. Beacons should be strapped close to the body under a layer of clothing.
10. Always check batteries before trips and carry extra batteries. Use high-quality batteries.
11. Never use rechargeable batteries in an avalanche rescue transceiver. The transceiver could lose power without warning or prior indication of low power.
12. Transceivers should be turned “on” at the start of the day and turned “off” at the end of the day.
13. Check every party member’s transceiver periodically throughout the trip.
14. Keep the device dry and free from battery corrosion.
15. Modern transceivers generally employ a computer chip to process the signal, displaying a digital readout of the distance and general direction to the buried unit.
16. A three-antenna transceiver is preferred over two- or one-antenna devices because the third antenna significantly improves locating the sending unit.
17. Avalanche rescue transceiver searches have become highly specialized, and search technique depends largely on the specific model and type. It is essential to practice and learn the specifics of any model used before using it in an actual rescue.
18. Box 2-1 provides a generic overview of a search, but these instructions should not take the place of the unit’s type-specific instructions.
Avalanche Airbag System (ABS) (Fig. 2-1)

1. Although airbags were originally designed for guides and ski patrollers, airbags can be used by anyone venturing into avalanche terrain.
2. The airbag is based on the principle of “inverse segregation,” which causes larger particles to rise to the surface. A person is already a large particle. The airbag makes the user an even larger particle.
3. The airbag is integrated into a special backpack, and the user deploys it by pulling a rip cord–like handle.
4. Airbags are of two types: dual bags, one on each side of the pack; or a behind-the-head, pillow-like single bag.
5. Empiric data suggest that the ABS significantly reduces the likelihood of dying because of avalanche burial.
6. Avalanche risk increases when users view airbags as a “magic shield.” The reality is that ABS protection is certainly not foolproof. This device should never be used to justify taking additional risks.
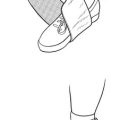
AvaLung (Fig. 2-2)
1. The AvaLung is an emergency breathing device designed to extract air from the snow surrounding a buried avalanche victim.
2. It is worn as a sling or independent device over the outer layer of clothing.
3. If buried, the person can breathe through a mouthpiece and flexible tube connected to the vest.
4. The person inhales oxygenated air coming from the surrounding snow, which passes through a membrane in the vest.
5. The exhaled air passes through a one-way valve and into another area of the snow posterior to the person to greatly reduce the effects of carbon dioxide contaminating the airspace.
6. The AvaLung has worked well in simulated burials, allowing the person to breathe for 1 hour in tightly packed snow. It has been effective in actual avalanche burials.
7. This device should never be used to justify taking additional risks.
8. The most recent version is incorporated into various-sized backpacks with a packable mouthpiece kept in the shoulder strap.
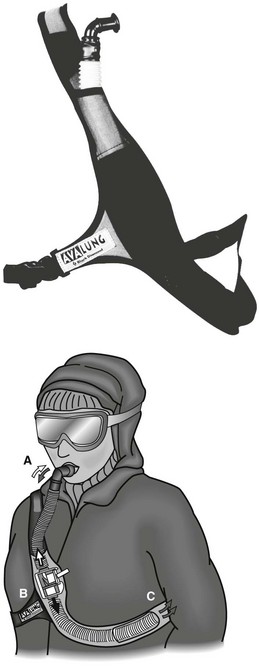
Recco Rescue System
1. The detector sends out a radio signal that is doubled in strength and reflected back by the specially tuned reflector.
2. The reflected signal provides directional pinpointing of the person’s location.
3. The search strategies with the detector are similar to those using avalanche rescue transceivers. However, the Recco system does not replace transceivers.
4. For people equipped with transceivers, the reflector becomes a backup system. For novices who might not even know they should carry a transceiver, the reflector provides a basic rescue system.
5. Through air, the signal range is up to 200 m (656 ft); in snow, the range is up to 20 m (66 ft); liquid water attenuates the signal.
Crossing an Avalanche Slope
1. Never ski alone in dangerous conditions.
2. Tighten up clothing, fasten zippers, and wear hat, gloves, and goggles.
3. If wearing a heavy mountaineering pack, loosen it before crossing so that it can be jettisoned if necessary. A heavy pack may increase potential for traumatic injury. Conversely, a lighter pack or “day pack” is probably best left worn by the person to protect the spine.
5. Remove ski pole straps and ski runaway straps because attached poles and skis will add to potential for trauma and may act like anchors, trapping a person beneath the surface. In avalanche terrain, always use releasable bindings on snowboards and mountaineering skis (including telemark skis).
6. Check transceiver batteries, and be sure that all rescue transceivers are set to “transmit.”
7. Cross slopes at a high point, and stay on ridges. The person highest on a slope runs the least risk for being buried should the slope slide.
8. If crossing below the slope, cross far out from runout zones. Avalanches can be triggered from the flats below steep slopes. The warning signs to this danger typically include collapsing snow and “whumpfing” sounds. In exceptionally unstable snow conditions, avalanches have been triggered in valleys up to 0.8 km (0.5 mile) from the slope.
9. Cross potential avalanche slopes as quickly as possible. Never stop moving in the middle of an avalanche slope.
10. When climbing or descending an avalanche path, stay close to the sides. This makes it easier to escape to the side should the slope begin to slide.
11. Cross one person at a time. This exposes only a single individual to danger, and puts less weight on the snow. Watch this person carefully as he or she crosses.
12. Try to move toward natural islands of safety free from avalanche dangers, such as large rock outcroppings or dense trees. Although avalanches may not start in dense trees, avalanches can run into or through dense timber.
13. Anticipate an avalanche. Plan your escape route ahead of time.
Surviving an Avalanche
1. Escape to the side. The moment the snow begins to move, try to escape by skiing or moving quickly to the side of the avalanche, similar to the method a swimmer uses to ferry to the side of a river. Turning skis or a snow machine downhill in an effort to outrun the avalanche invariably fails because the avalanche will overtake you.
2. Shout, and then close your mouth. Shouting alerts companions, and closing the mouth may help prevent snow inhalation.
3. If knocked off your feet, kick off your skis and toss away ski poles.
4. Although skiers should try to discard their gear, snowmobile riders should try to stay on their snow machines. Once they are off their machines, riders are twice as likely to be buried, as are their machines.
5. Try to grab on to a fixed object (hanging on allows more snow to go past, reducing odds of burial).
6. Once knocked off your feet, you should get your hands up to your face. Reach across the face and grab a jacket collar or the pack strap where it crosses the shoulder. This may not position your hands directly in front of your face, but you can use the crook of your elbow to create an air pocket.
7. Attempting to place your hands immediately in front of your face will increase the probability of maintaining airspace in a tumbling ride. It also leaves your hands in a position to create a breathing space around your mouth and nose after the avalanche stops.
8. Once the avalanche stops, it is nearly impossible to move the hands to the face to create an air pocket. Without an air pocket the consequences of a burial are usually fatal, unless the person is uncovered in minutes.
9. Creating an air pocket is the key to survival, but some persons, sensing themselves to be near the surface, have thrust a hand or foot toward the surface. Any clue on the surface that gives the rescuers something to see greatly improves an individual’s odds of survival.
Rescue
1. Stop and assess the danger. Do not make the situation worse by triggering a second avalanche.
2. Assign a leader. Someone must take charge and confirm how many persons are missing and what will be the rescue plan.
3. Call for help. Use a cell or satellite phone or emergency locator to alert rescuers. See Calling for Help for additional information.
4. If enough rescuers are available, one may stay on the phone to coordinate with rescue teams. This person can also keep an eye out to alert searchers if other people—potential triggers—move into the adjacent avalanche starting zones or trigger a second avalanche.
5. Safely access the avalanche debris, and go to the victim’s last seen area. Mark this location.
6. Spread searchers out to effectively scan the debris. Look and listen for clues, such as any equipment or body parts that may be sticking out of the snow.
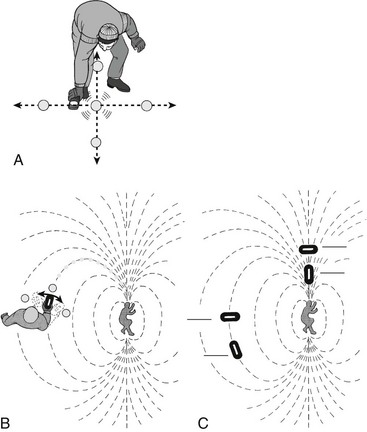
7. With transceivers: Have all survivors immediately switch their units to “receive.” Confirm that this step has been done. With skilled rescuers, when a signal is received, the search can be quickly narrowed and the person pinpointed within a few minutes. For specific transceiver search technique, refer to the manual that came with your unit and practice often (minimally several times during the ski season) (Fig. 2-3; see Box 2-1).
8. Without a transceiver: Search the fall line below the person’s last-seen location for clues. Make shallow probes at likely burial areas with an avalanche probe, ski pole, or tree limb. Likely burial spots are the uphill sides of trees, rocks, benches, or bends in the slope where snow avalanche debris is concentrated. The “toe” of the debris is also a place where many victims come to rest.
9. Alert others when a clue or transceiver signal is heard. Pull the clue out of the snow, and leave it visible on the surface.
10. Shovel fast and efficiently. See Shoveling to employ effective techniques to move snow quickly.
Probe Line Search (Only Applicable in the Initial Search if the Victim Is Without a Transceiver)
1. Probers stand with arms out, wrist to wrist.
2. Probers first probe between their feet, and then probe 50 cm (20 inches) to the right and 50 cm (20 inches) to the left (Fig. 2-4).

3. At a command from the leader, the line advances 50 cm (20 inches) (one step).
4. This method gives an 88% chance of finding the person on the first pass.
5. The goal is to rescue someone alive, but all too often, probe lines are too slow and function as a body recovery.
Shoveling
1. The person’s depth and precise position should be rapidly pinpointed by final probe placement (remember, it is faster to probe than to dig).
2. Although speed is essential when digging, try to do the following:
a. Leave the probe in place as a marker.
b. Avoid standing on top of the person, which may collapse the person’s airspace.
d. Sweep or paddle snow to the sides or downhill rather than lifting and tossing.
e. When reaching the person, free the head and chest of snow.
f. Ensure an open and adequate airway immediately upon uncovering the patient’s head.
Strategic Shoveling
1. During companion rescue, where typically only one to three shovelers might be available and where the debris is often softer, the strategic shoveling technique increases digging efficiency (Fig. 2-5).

2. Avoid standing over the buried person, begin digging downslope from the probe, lift snow as little as possible by throwing it to the side, and move snow only once.
3. With the probe left in place, shovelers begin digging downslope about 1 to 1.5 times the burial depth as determined by the probe.
4. Quickly dig a waist-deep starter hole about one arm span wide (i.e., the distance between the fingertips when the arms are held out to the sides).
5. If two shovelers are digging, they should work in tandem and side by side rather than one digging behind the other.
6. Throw the snow to the sides.
7. Move to the starter hole, and continue digging downward and forward. As depth increases, snow can be cleared to the back rather than lifted and tossed to the sides.
8. When close to the person, use a scraping action to clear snow. Use the first body part to estimate the location of the head, and then use the hands to clear away snow from the person’s face and airway, while continuing to clear snow off his or her chest.
9. The most important feature of efficient shoveling is to create a ramp or platform in the snow that leads to the probe (and the person) instead of digging a hole down around the probe. In this way, extrication and resuscitation of the person are made easier by having a flat surface available, the air pocket is not compromised, there is space to work on the person, and raising up the person is not necessary.
V-Shaped Conveyor Belt
With an organized rescue by rescue teams, the debris is often much harder as a result of age hardening than what is experienced by companion rescuers. Typically, more shovelers are available. In this situation, the V-shaped conveyor belt method works effectively to clear snow quickly (Fig. 2-6). The V-shaped conveyor can be used by just a few companions, just as strategic shoveling can be used by rescue teams.
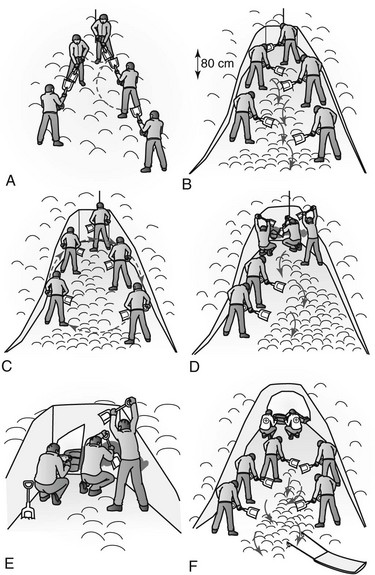
1. Starting downslope from the probe, rescuers are arranged in a wedge shape or inverted-V pattern.
2. The lead shoveler chops out blocks of snow and scoops the snow downslope.
3. The other shovelers use paddling-like motions to clear out snow through the center of the V to create a platform.
4. When getting close to the buried person, an additional shoveler may join the lead to increase the working space.
5. Shovelers may rotate clockwise every 5 minutes to decrease fatigue.
6. After the person is reached, locate his or her head and chest, and use the hands to clear the airway.
Calling for Help
1. Mobile phones and other emergency notification devices should be tried immediately when a burial is known or suspected. If contact cannot be made, then companions must decide when to go for help. If the accident occurs in or near a ski area and there are several companions, one person can be sent to notify the ski patrol immediately. If only one or two companions are present, the correct choice is more difficult. The best advice is to search the surface quickly but thoroughly for clues before anyone leaves to notify the patrol.
2. Cell phones are the most effective and efficient method of calling for help, because contact can be made without losing manpower for continued companion rescue, and the phones allow for two-way communications. In the United States, the Next Generation 9-1-1 system is being implemented in some areas to support text messages, images, and video. However, cell phones do not work in all mountain areas.
3. If a voice connection cannot be made, try sending a text message. Ask the recipient to confirm your message.
4. If the avalanche occurs in the backcountry far from any organized rescue team, all companions should remain at the site and search until they can do no more, or until they put themselves into danger by remaining at the scene. The guiding principle in backcountry rescues is that companions search until they cannot or should not continue.
5. When deciding when to stop searching, the safety of companions must be weighed against the decreasing survival chances of the buried person.
Avalanche Victim (Table 2-1)
Table 2-1
Injuries in Survivors of Avalanche Burial (Partial and Total)
| UTAH | EUROPE | |
| Total Injuries | 9 (Total, 91 Avalanche Accidents) | 351 (Total, 1447 Avalanche Accidents) |
| Major orthopedic | 3 (33%) | 95 (27%) |
| Hypothermia requiring treatment at hospital arrival | 2 (22%) | 74 (21%) |
| Skin/soft tissue | 1 (11%) | 84 (24%) |
| Craniofacial | — | 83 (24%) |
| Chest | 3 (33%) | 7 (2%) |
| Abdominal | — | 4 (1%) |
From Grossman MD, Saffle JR, Thomas F, Tremper B: Avalanche trauma. J Trauma 29:1705, 1989.
1. Asphyxiation secondary to airway occlusion by snow, increased carbon dioxide levels, pressure of snow on the thorax, and formation of an ice mask around the nose and mouth after burial
2. Trauma secondary to the wrenching action of snow in motion and impact with trees, rocks, loose equipment, and cliffs
Prognostic features for low survival potential include the following:
1. Complete burial of the person. Survival probabilities greatly diminish with increasing burial depth, probably because of increased digging time. Very few avalanche victims in the United States have survived burials deeper than 2 m (6.6 ft).
2. Time is the enemy of the buried person. In the first 15 minutes after the avalanche, more persons are found alive than dead. Within 15 to 30 minutes, an equal number of people are found dead and alive. After 30 minutes, more people are found dead than alive, and the survival rate rapidly diminishes thereafter. However, a very few, lucky persons have survived burials of many hours.
3. A factor that affects survival is the position of the person’s head (i.e., whether the person was buried face up or face down). The most favorable position is face up. If buried face up, an airspace forms around the face as the back of the head melts into the snow; if buried face down, an airspace cannot form as the face melts into the snow.
4. Avalanche victims seldom die from hypothermia, but nearly all buried persons suffer hypothermia. Be ready to insulate and protect an injured person from the environment.
Care of the Patient (Fig. 2-7)
Medical Treatment and Resuscitation of Avalanche Burial Victims
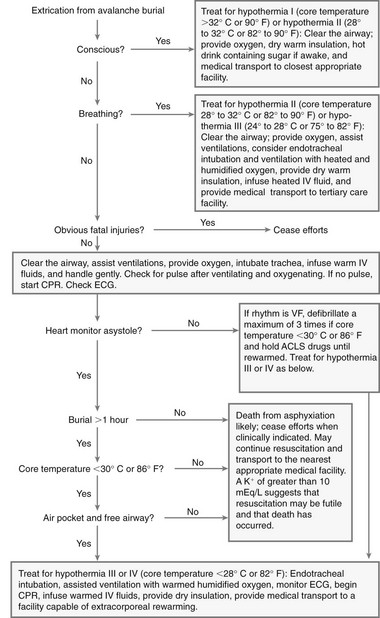
1. An initial impression of the level of consciousness is made as the head and chest are exposed and cleared of snow.
2. Opening the airway and ensuring adequate breathing are the primary medical interventions. Every effort should be made to clear the airway of snow as soon as possible and to provide assistance if breathing is absent or ineffective. These measures should be instituted as soon as possible and not await extrication of the entire body.
3. If injury to the spinal column is suspected or if there is evidence of head or facial trauma, then the spinal column is immobilized as the airway is opened, adequate breathing ensured, and oxygen provided.
4. If endotracheal intubation is required for the unconscious apneic patient who is not yet fully extricated from snow burial, then the inverse intubation technique may be required. With this technique, the laryngoscope is held in the right hand while straddling the patient’s body and facing the head and face. While facing the patient, insert the laryngoscope blade into the oropharynx with the right hand so that the larynx and cords can be visualized by leaning over and looking into the patient’s mouth; the endotracheal tube is then passed through the vocal cords with the left hand.
5. After an adequate airway and breathing are established and supplemental oxygen provided, circulation is assessed. The conscious patient is assumed to have a perfusing rhythm, and further treatment is directed at treating injuries and mild hypothermia.
6. A person who is found unconscious but with a pulse may have moderate or severe hypothermia and should be handled gently to avoid precipitating ventricular fibrillation. The medical treatment of this patient is focused on ensuring adequate oxygenation and ventilation, either noninvasively with a bag-valve-mask device or by endotracheal intubation if clinically indicated, while simultaneously immobilizing the spinal column for transport and treating for manifestations of trauma.
7. Intravenous access may be obtained and warmed isotonic fluids infused. Provide for thermal stabilization. Handle the patient gently in anticipation of hypothermia. Treatment of hypothermia is described in Chapter 3.
8. If a pulse is not present after opening the airway and ventilating the patient, cardiopulmonary resuscitation (CPR) is begun. However, before CPR is initiated, carefully evaluate for the presence of a pulse. Avalanche burial victims may be hypothermic, which causes peripheral vasoconstriction and makes pulses difficult to palpate. In addition, moderate to severe hypothermia causes bradycardia and respiratory depression. Before initiating the chest compressions of CPR, palpation for a pulse should be done for a period that is sufficiently long (up to 60 seconds) to ensure that spontaneous circulation is not present.
9. An air pocket for breathing and a patent airway must be present for an avalanche burial victim to survive long enough to develop severe hypothermia. If an air pocket for breathing is not present or if the airway is obstructed, the avalanche victim who is extricated from snow burial in cardiac arrest has most likely died from trauma or asphyxiation. This is not meant to discourage initial attempts at resuscitation but rather to suggest that prolonged CPR may be a futile exercise. It is always warranted to initially start CPR to see if return of circulation can be achieved in a reasonable time. This is because the rescuer can never know precisely when the avalanche burial victim went into cardiac arrest.