[level-membership-for-orthopaedics-category]
Chapter 9E Autologous Chondrocyte Implantation
Matrix-Induced Autologous Chondrocyte Implantation (MACI)
Introduction
Matrix-induced autologous chondrocyte implantation (MACI) is a method of cartilage regeneration that combines autologous cells with a type1/111 porcine membrane.1–6 MACI was developed from collagen-covered autologous chondrocyte implantation (CACI), but cells are seeded onto the membrane 3 days before implantation. The graft is implanted “cells down” and secured in the cartilage defect with fibrin glue.
Indications and Contraindications
Surgical indications and contraindications are similar to those described by the International Cartilage Research Society for other autologous chondrocyte implantation (ACI) techniques (see also Chapters 9C and 9D):
Some Key Questions Are Addressed
Cartilage Biopsy
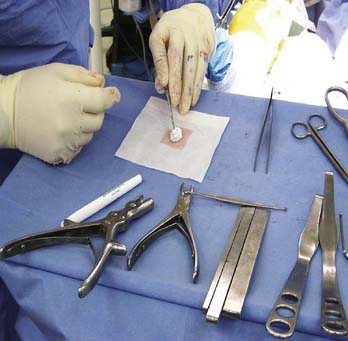
Instruments
Notchplasty gouge, pituitary rongeurs, and ring curettes are useful additions to the standard arthroscopy set (see also Chapters 9C and 9D).
Surgical Technique
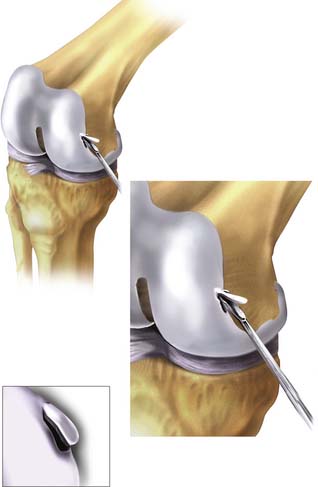
The biopsy for MACI is similar to other ACI techniques and may be taken from the median ridge at the level of the sulcus terminalis, the distal trochlea in the intercondylar region, or the surface of a fresh osteochondral fragment (see also Chapters 9C and 9D).
Using the small notchplasty gouge, a suitable-sized volume of cartilage is “scored” as deep as the subchondral plate. Using the gouge or ring curette, the biopsy is partially levered away from the subchondral plate of bone and finally grasped with pituitary rongeurs, immediately placed in culture medium (Fig. 9E-1), and transported to the laboratory for cell multiplication preparation.
Briggs et al.7 have demonstrated that surface cartilage of osteochondral fragments produces chondrocytes of good quality.
MACI Implantation
For open MACI implantation, the patient is positioned supine with a midthigh tourniquet and foot braces to position the knee in 90 and 120 degrees of flexion, respectively. A side support helps to control the leg in flexion.
Recipient Bed Preparation
Eburnated bone and internal osteophytes should be removed with a small burr.
Templating the Defect
Templates or free hand membrane preparation are both acceptable and which method is used is determined by the skills and preference of the surgeon (Fig. 9E-2).
Matched “cookie cutter” instruments are available to make oval defects and a matched membrane. Templates have been created using aluminum foil and other inelastic materials. The graft itself is more mobile and stretches during implantation. If a template is made, it can be used to mark a pattern or as a definitive guide. I have not found templates useful, and they are impractical in arthroscopic MACI.
The recipient bed is dried, and a trial fit of the membrane is done before implantation.
Implantation
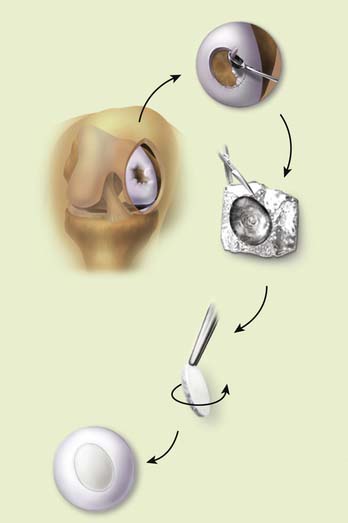
The graft is oriented; there is a rough side and a smooth side (Fig. 9E-3). The cells are seeded on the rough side.
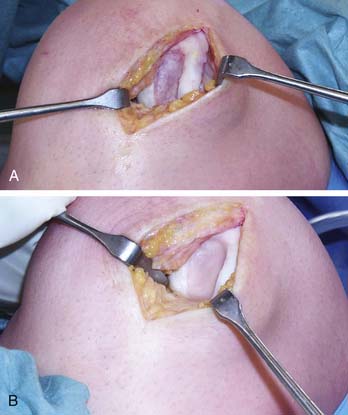
The MACI graft is kept under mild pressure for 30 seconds and then allowed to cure for 2 minutes (Fig. 9E-4, A-B). The knee is then put through a full range of movement to check that the membrane is stable before the wound is closed. If the membrane is unstable, then strategic stitches and repeat application of fibrin glue is required. The wound should not be closed until you are sure that the membrane is perfectly stable. This is a critical step, and to ignore it would invite delamination of the membrane.
Ancillary sutures are more frequently needed in larger defects. Internal osteophytes should be removed with nibblers or a small burr. Eburnated bone may be “freshened up” with a burr.
Arthroscopic MACI
Indications
Simple single defects of the femoral condyles and tibial plateau can be treated arthroscopically, but the trochlear groove and patella are less accessible and best treated with a traditional open procedure.
Instruments
The arthroscopy set (Fig. 9E-5) should include atraumatic grasping forceps, ring- and standard curettes, a shaver, epinephrine-soaked compresses, transparent urinary catheters, a valveless arthroscopic cannula (Fig. 9E-6), neuro sucker, fibrin glue, and spinal needles. Ringer’s lactate irrigation fluid is preferred, although definitive implantation is done dry.
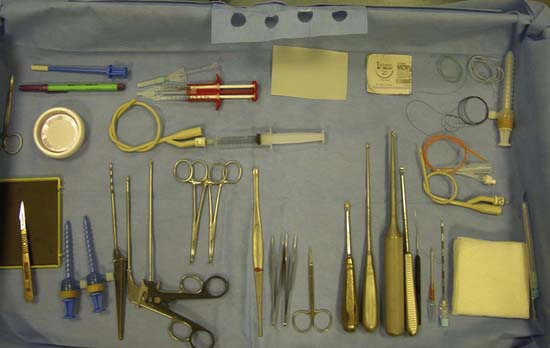
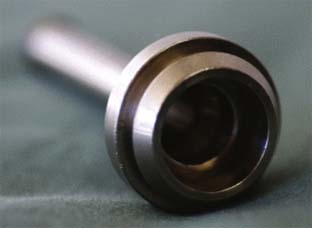
FIGURE 9E-6 A valveless arthroscopic cannula used for the introduction of the MACI implant into the articular joint.
The patient is placed prepared in a low thigh tourniquet with a brace.
Anteromedial and anterolateral portals are used initially to prepare the defect as the knee is irrigated with Ringer’s lactate fluid.
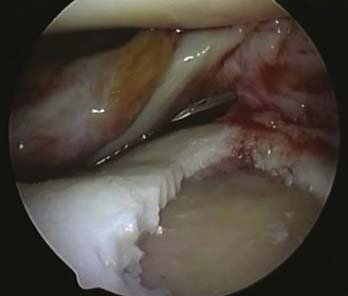
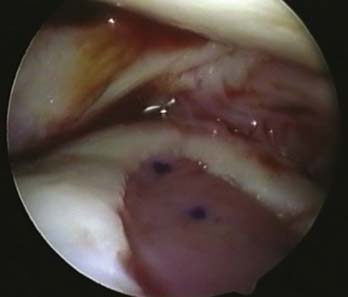
A stable shoulder of hyaline cartilage with a base of subchondral bone is achieved (Figs. 9E-7 and 9E-8). The resultant defect is then measured with the end of an arthroscopy probe in several planes (Figs. 9E-7 and 9E-8). These measurements are then used to shape the membrane of the MACI graft.

The prepared graft is introduced into the knee (Fig. 9E-9, A) via a large bore valveless arthroscopic cannula (ConMed Linvatec, Largo, Florida). The graft is positioned in the defect using a probe; care must be taken to ensure the membrane is the right way up and correctly oriented (Fig. 9E-9, B).

Graft size is then re-assessed to ensure it fits the defect exactly without overlap onto the surrounding healthy cartilage. The graft may need further trimming out of the knee at this point. The large cannula facilitates multiple atraumatic passes into and out of the knee for fine-tuning the shape of the graft.
The graft is then folded away from the defect to allow fibrin glue to be introduced to fix the graft (Fig. 9E-10a). A small amount of fibrin glue is introduced into the defect via a 19-gauge needle via the anteromedial portal (Fig. 9E-10, A). Even spread of the glue is achieved using the end of a probe (Fig. 9E-10, B).
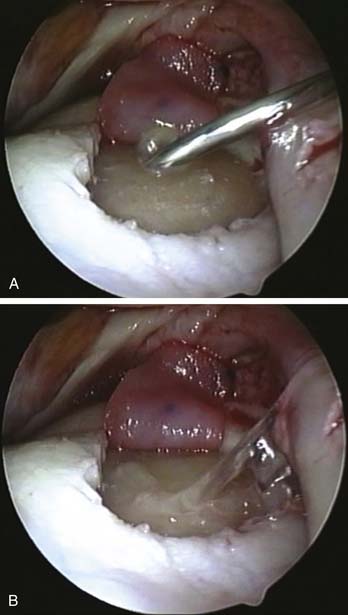
The graft is then replaced over the glue and smoothed into place again with the probe (Fig. 9E-10, B).
Even pressure is applied to the graft for 30 seconds with the balloon end of a transparent Silastic urinary catheter (Fig. 9E-11). The catheter balloon is nonstick, and graft position can be checked as the glue sets.
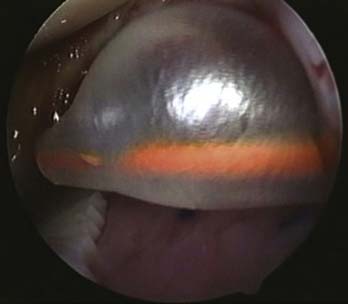
FIGURE 9E-11 Even pressure is applied to the graft for 30 seconds with a balloon end of a transparent Silastic urinary catheter.
The balloon is then inflated with saline instilled into the end of the catheter outside of the knee (Fig. 9E-11). Even pressure is achieved over the graft as the balloon tamponades against the defect and the other surfaces of the knee. After 30 seconds the balloon is deflated and the catheter is removed (Fig. 9E-12).
1. Bartlett W., Krishnan S.P., Skinner J.A., et al. Collagen-covered versus matrix-induced autologous chondrocyte implantation for osteochondral defects of the knee: a comparison of tourniquet times. Eur J Orthop Surg Traumatol. 2006;16:315-317.
2. Cherubino P., Grassi F.A., Bulgheroni P., et al. Autologous chondrocyte implantation using a bilayer collagen membrane: a preliminary report. J Orthop Surg. 2003;11:10-15.
3. Robertson W.B., Fick D., Wood D.J., Linklater J.M., Zheng M.H., Ackland T.R. MRI and clinical evaluation of collagen-covered autologous chondrocyte implantation (CACI) at two years. Knee. 2007 Mar;14(2):117-127.
4. Willers C., Chen J., Wood D., Xu J., Zheng M.H. Autologous chondrocyte implantation with collagen bioscaffold for the treatment of osteochondral defects in rabbits. Tissue Eng. 2005 Jul-Aug;11(7-8):1065-1076.
5. Zheng M.-H., Wood D. The basic science of matrices and cellular repair. In: Bentley G., editor. Current Developments in Autologous Chondrocyte Transplantation. London: Royal Society of Medicine Press; 2003:49-54.
6. Zheng M.H., Willers C., Kirilak L., Yates P., Xu J., Wood D., Shimmin A. Matrix-induced autologous chondrocyte implantation (MACI): biological and histological assessment. Tissue Eng. 2007 Apr;13(4):737-746.
7. Briggs T.W., Mahroof S., David L.A., et al. Histological evaluation of chondral defects after autologous chondrocyte implantation of the knee. J Bone Joint Surg Br. 2003;85:1077-1083.
[/level-membership-for-orthopaedics-category][not-level-membership-for-orthopaedics-category]
Chapter 9E Autologous Chondrocyte Implantation
Matrix-Induced Autologous Chondrocyte Implantation (MACI)
Introduction
Matrix-induced autologous chondrocyte implantation (MACI) is a method of cartilage regeneration that combines autologous cells with a type1/111 porcine membrane.1–6 MACI was developed from collagen-covered autologous chondrocyte implantation (CACI), but cells are seeded onto the membrane 3 days before implantation. The graft is implanted “cells down” and secured in the cartilage defect with fibrin glue.
Indications and Contraindications
Surgical indications and contraindications are similar to those described by the International Cartilage Research Society for other autologous chondrocyte implantation (ACI) techniques (see also Chapters 9C and 9D):
Some Key Questions Are Addressed
Cartilage Biopsy
Instruments
Notchplasty gouge, pituitary rongeurs, and ring curettes are useful additions to the standard arthroscopy set (see also Chapters 9C and 9D).
Surgical Technique
The biopsy for MACI is similar to other ACI techniques and may be taken from the median ridge at the level of the sulcus terminalis, the distal trochlea in the intercondylar region, or the surface of a fresh osteochondral fragment (see also Chapters 9C and 9D).
Using the small notchplasty gouge, a suitable-sized volume of cartilage is “scored” as deep as the subchondral plate. Using the gouge or ring curette, the biopsy is partially levered away from the subchondral plate of bone and finally grasped with pituitary rongeurs, immediately placed in culture medium (Fig. 9E-1), and transported to the laboratory for cell multiplication preparation.
Briggs et al.7 have demonstrated that surface cartilage of osteochondral fragments produces chondrocytes of good quality.
MACI Implantation
For open MACI implantation, the patient is positioned supine with a midthigh tourniquet and foot braces to position the knee in 90 and 120 degrees of flexion, respectively. A side support helps to control the leg in flexion.
