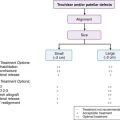
Chapter 9C Autologous Chondrocyte Implantation
ACI First and Second Generation
Introduction
Autologous chondrocyte implantation (ACI) is another means of repairing damaged cartilage.1 It is based on harvest of 200 to 300 mg of cartilage from a less loaded area in the knee. The cartilage is sent to a lab for processing. The cartilage is digested; the isolated chondrocytes are expanded in vitro during 2 to 3 weeks. The expanded final amount of cells is re-sent to the doctor as a suspension. The cells are to be injected into the defect covered with a membrane, periosteum (first generation), or collagen membrane (second generation).
Technical Overview
First-Stage Operation
The knee joint is examined by normal arthroscopy. A cartilage lesion is detected, and a decision is made to treat the defect by ACI. Often such a decision is made based on an earlier treatment that failed.1,2,3
Cartilage Harvest
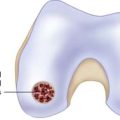
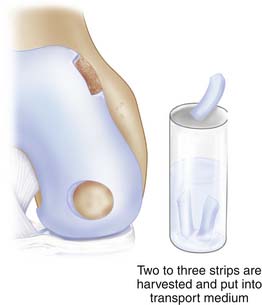
The cartilage is harvested from a less loaded weight-bearing area such as the upper medial femoral condylar area or similar on the lateral upper femoral trochlear area. Also the notch area is easy to use for harvest (Fig. 9C-1).
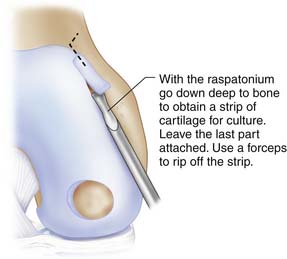
Use a ring curette or sharp gouge like a Wiberg raspatorium. Go deep down to cartilage-bone junction and leave a thin attachment of the strip. This strip may then be grasped with a forceps and ripped off with a gentle movement and taken through the portal to be put into a tube with saline. You may need two to three similar strips (Figs. 9C-2 and 9C-3).
Blood test tubes and harvested cartilage are sent to the cell laboratory that the hospital has a contract with.
Second-Stage Operation
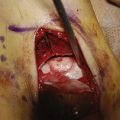
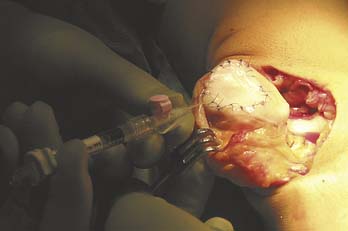
The knee joint is opened by a miniarthrotomy.The cartilage defect is debrided (see Chapter 3). The debridement should result in a well-delineated defect, slightly oval.
Harvest of the Periosteum
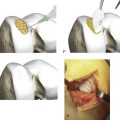
For the first generation of ACI, periost is to be harvested. The periosteum is harvested through a separate incision from the proximal medial tibia, just distal to pes anserinus (Fig. 9C-4).
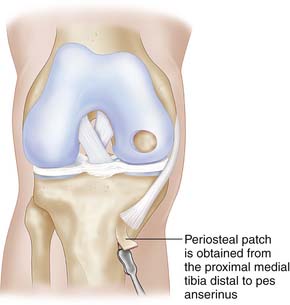
FIGURE 9C-4 The periosteal patch is obtained from the upper medial tibia, distal to the insertion of the pes anserinus.
It is very important that a thin periosteum without remaining fibrous tissue is harvested.
Positioning and Suturing of the Periosteum
The received periosteum is positioned over the defect with the part that has been attached to the bone, the cambium layer facing the cartilage defect.
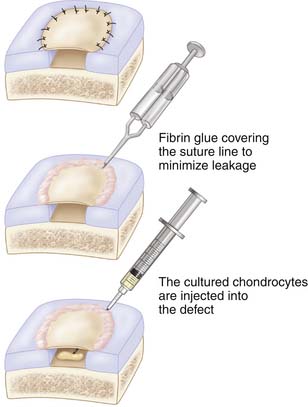
The periosteum is sutured to the defect with interrupted sutures (Vicryl Ethicon, Inc., Somerville, N.J. or Dexon. [Coviden, Mansfield, MA]) 5-0 or 6-0 sutures (Figs. 9C-5 and 9C-6). The sutures should be immersed in sterile glycerin or drawn through the patients’ fatty tissues.
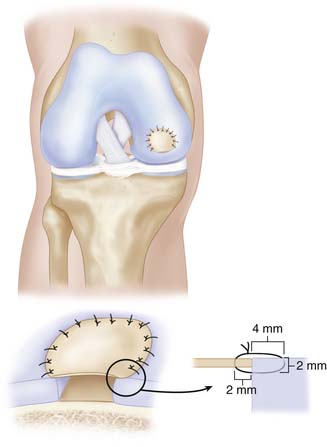
Interruptured sutures are used with an interval of approximately 3 to 4 mm.
Start with one suture in each corner of the defect except for the trochlear region where sutures are placed directly after each other. Angle the suture needle toward the periosteal membrane approximately 2 mm from its edge, and pass the through the membrane into the adjacent cartilage wall, following the curvature of the used needle. It is advisable to enter the cartilage about 2 mm below the surface and with a 3 to 4 mm bite (Fig. 9C-5).
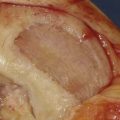
Implantation of Cultured Cells in Suspension
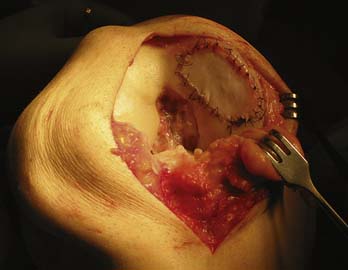
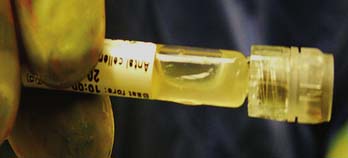
The cultured chondrocytes are finally implanted into the defect under the membrane. A final suture is put at the implantation entrance after implantation and some extra fibrin glue (Figs. 9C-7 and 9C-8). The aim is to implant 30 million cells/ml or at least 2 million cells/cm2 (Fig. 9C-9).
Wound Closure
Close wounds as one would for a normal arthrotomy. No drainage is used intraarticularly. If wanted, the drainage can be placed extra capsular.
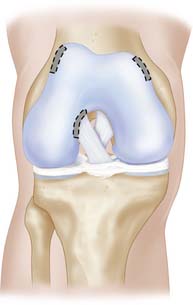
Noncontained Lesions
If the defect is not well contained, the membrane can be sutured to the synovial lining if near the notch. At other regions, suture anchors may be needed. If the uncontained lesion has thick walls, mosaicplasty plugs can be used to build up the missing wall, making the defect into a contained reconstructed defect.
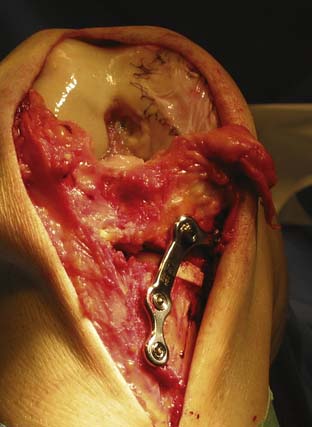
Large Defects and Defects with Concomitant Malalignment
Consider doing a concomitant unloading osteotomy (see Chapter 13). Prepare the defect as described previously until cell implantation. (See first page of this chapter “Technical Overview.”) Do the osteotomy operation, and finish with implantation of the cells (Fig. 9C-10).
Second-Generation ACI
The second-generation ACI is an exchange of the periosteal membrane to instead use a collagen membrane4 such as the Chondro-Gide membrane (Chondro-Gide Geistlich Surgery, Wolhusen, Switzerland). The membrane has to be cut in the exact size because, in comparison to the periosteum, it does not stretch much. Otherwise, the same technique used for the periosteum can be used for membranes.
Postoperative Management
There exists no consensus for the postoperative rehab (see also Chapter 16). The rehabilitation guidelines have changed during the years since the first ACI was done in 1987.
The short description that follows is my personal recommendation for ACI and similar repair techniques. For more specific information and discussion about the rehabilitation, look also at the Postoperative Cartilage Repair Rehabilitation chapter (Chapter 16).
A very large defect may be protected by an unloader brace for a longer period. One may even consider performing a concomitant permanent unloading with osteotomy (Fig. 9C-10).
High-level activities should not be performed until 12 to 14 months postoperatively.
1. Brittberg M., Lindahl A., Nilsson A., et al. Treatment of deep cartilage defects in the knee with autologous chondrocyte transplantation. New England Journal of Medicine. 1994;331:889-895.
2. Brittberg M. Die transplantation autogener knorpelzellen in gelenkflächendefekte des kniegelenks. Operat Ortop Traumatol. 2001;3:198-207.
3. Gillogly S., Brittberg M. Autologous chondrocyte implantation for focal chondral lesions. In: Cole B.J., Malek M.M., editors. Articular cartilage lesions: a practical guide to assessment and treatment. New York: Springer; 2004:95-104.
4. Bentley G., Biant L.C., Carrington R.W., et al. A prospective, randomised comparison of autologous chondrocyte implantation versus mosaicplasty for osteochondral defects in the knee. J Bone Joint Surg Br. 2003; Mar;85(2):223-230.