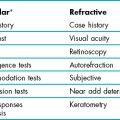
Assessment of Binocular Vision and Accommodation
6.1 Relevant information from case history and assessments of other systems
6.3 Other tests for the detection and measurement of heterotropia
6.4 Other tests for the detection and measurement of heterophoria
6.6 Convergence ability: Near point of convergence (NPC) and jump convergence
6.8 Vergence facility: Prism flippers
6.9 Amplitude of accommodation
6.12 Accommodative convergence/accommodation (AC/A) ratio
6.15 Motility test and other tests for diagnosing/measuring incomitancy
6.16 Identifying the defective muscle: Parks 3-step test
Tests that assess the binocular vision and accommodation systems are described in this chapter. Rather than group these tests in terms of preliminary/pre-refraction and post-refraction tests, tests are grouped together depending on the aspect of binocular vision or accommodation that they help to assess. This is because the organisation of the book is directed towards the assimilation of a problem-oriented approach (section 1.3.3).
Although the chapter contains a large number of tests that may at first appear independent of one another, a systematic, problem-oriented approach is advocated in which only the most appropriate tests are conducted. In the final section (section 6.18) a brief overview is provided of how the results from different tests can be considered in combination in order to aid diagnosis and thus inform management.
6.1 Relevant Information From Case History and Assessments of Other Systems
6.1.1 Observations and symptoms
(a) Simple observation of the patient can highlight a strabismus or head turn or tilt. Parents or carers may also inform you that they have noticed that their child occasionally has an ‘eye turn’ or perhaps an abnormal head posture. Any suggestion of a strabismus requires a careful cover test and a stereopsis test in addition to looking for amblyopia and possible causes of the strabismus such as hyperopia.
(b) Symptoms of blurred vision, headaches or asthenopia at distance and/or near can indicate a decompensated heterophoria or accommodative insufficiency or excess at that distance.
(c) Complaints of ‘double vision’ could suggest a heterophoria breaking down into a heterotropia (typically horizontal diplopia, occurring especially when tired), a remote near point of convergence (section 6.6), the angle of strabismus changing so that the retinal image falls out of the suppression area or an incomitant deviation (section 6.15). An appropriate line of questioning during the case history will help in this differential diagnosis. Beware that children sometimes complain of ‘double vision’ when they mean blurred vision. Note that cortical cataract and occasionally posterior subcapsular cataract can cause monocular diplopia (or polyopia) and should be considered in elderly patients by determining if the diplopia persists if one eye is covered.
(d) Signs or symptoms of fluctuations in distance vision and, in particular, symptoms of distance blur after near work, suggest problems of accommodation and tests that assess accommodative function should be employed (sections 6.9–6.11).
(e) No symptoms: It is worth remembering that a lack of symptoms does not, in itself, mean that the binocular system is normal. For example, patients with suppression or long-standing heterotropia almost certainly will not experience binocular vision symptoms.
(f) Poor reading ability and poor progress at school could also be due to an accommodation or binocular vision problem. Children especially might not complain because they often think everyone sees the way they do.
6.1.4 Birth history
It is also useful to ask the child’s parent/carer about the pregnancy and birth history. There is a high prevalence of ocular abnormality, in particular strabismus, in children born prematurely, those with low birth weight or disorders of the central nervous system, and in children with significant birth complications (e.g. forceps delivery).1 It is, therefore, recommended that the following questions be posed to the parent/carer during the case history examination: Was the child a full-term baby or were they born prematurely? What was the birth weight? (Less than 2500 grams or 5.5 pounds is a significant risk factor for strabismus, in particular esotropia).2 Were there significant complications at the child’s birth? Is the child’s current and past general health good? Since birth, has the child been investigated or received treatment for any medical condition?
6.1.5 Binocular visual acuity
In cases where the acuities in the right and left eyes are similar or identical, it is usual to find that binocular visual acuity (VA) is ½ to one line better than monocular acuity.3 Of course, it is not possible to find this improvement if monocular VA equals the ‘bottom line’ of the Snellen chart you are using (section 3.2.2). When using a non-truncated chart, a binocular VA that is equal or worse than the monocular VA can indicate a binocular vision problem. A poor patient reaction to the restoration of binocular vision after an occluder has been removed following monocular subjective refraction can also indicate a binocular vision problem.
6.1.6 Retinoscopy and subjective refraction
Fluctuations in retinoscopy, retinoscopy results more than 1.00 D more positive than subjective refraction and/or fluctuations in subjective refraction suggest fluctuations in accommodation and/or latent hyperopia or pseudomyopia and should be investigated using assessments of accommodation (sections 6.9 to 6.11) and/or cycloplegic refraction (section 4.13).
6.2 the Cover Test
The cover test, in combination with the motility test (section 6.15), represents the corner-stone of the assessment of oculomotor alignment. The aim of the test is very simply to allow you to observe what happens when binocular vision is suspended by covering one eye whilst the patient has been instructed to view a near, intermediate or distant target. It is often important to determine the effect of any refractive error on the deviation, so an assessment of binocular status is often required in the unaided state, with the patient’s own spectacles and with the optimal refractive error. While the cover test must always be carried out, it is usual for it to be conducted prior to the refraction. It is not generally repeated post-refraction (although it can be) because other tests of heterophoria are typically employed after the subjective refraction has been completed. These tests are described in section 6.4.
6.2.1 Comparison of tests
The cover/uncover test is the only method by which an ocular deviation can be distinguished as either a heterotropia (also called a ‘tropia’, ‘strabismus’ or a ‘squint’) or a heterophoria. The test has the advantage of being an objective test (i.e. one that requires co-operation but no response from the patient) although the subjective response of the patient while performing the test can provide valuable additional information. The cover test provides considerable information about a deviation including its direction and size. In addition, the pattern of movements observed may enable you to form an opinion about the stability, constancy, laterality or control of a deviation. The test is quick and simple to perform. One disadvantage of the test is that even experienced practitioners cannot detect very small deviations (up to 2–3Δ).4 Since even small vertical heterophorias can be clinically significant, it is likely that you would miss these if just using the objective cover test. However, small deviations of any variety may be identified using the subjective cover test. The only real disadvantage of the cover test is that it requires considerable practice before accurate observations can be made. In addition, it is vital to be systematic in your approach (Box 6.1). FIRST: Search for the presence of a heterotropia. If one exists, then by definition, a heterophoria cannot be present simultaneously. SECOND: If there is no heterotropia, search for a heterophoria using the alternating cover test and/or the cover/uncover test. THIRD: If no heterophoria is evident you should perform a subjective cover test.


6.2.2 Procedure
 See online videos 6.1-6.13.
1. Keep the room lights on and, if necessary, use localised lighting so that the patient’s eyes can be easily seen without shadows.
2. Explain the purpose of the test to the patient: ‘I am now going to find out how well your eye muscles work together’.
3. The following targets should be used:
(a) For the distance cover test, isolate a single letter of a size one line larger than the patient’s VA of the poorer eye. For example, if monocular VAs are 6/4.5 (20/15) and 6/9 (20/30), use a 6/12 letter (20/40) as a target for the distance cover test. The patient must be able to easily see the letter with both eyes, but it should be a target that requires accurate fixation and accommodation. If you are using a computer-based or projector chart, isolate a single letter on the appropriate line. If you are using a printed chart, then ask the patient to look at a letter at the end (or beginning) of a line, as it will be easier to locate after the eye has been uncovered and crowding effects are lower. If the monocular VA in either eye is 6/18 (20/60) or worse, a spotlight may be used for fixation.
(b) For the near cover test, a fixation stick should be used that contains letters or pictures of various sizes (Figure 6.1). A single letter of a size one line larger than the patient’s near VA of the poorer eye should be chosen. As most near VA charts are truncated to N5 or 0.4 M (20/20), this will tend to be N6 or 0.5 M (20/25). The fixation stick should be held at the patient’s near working distance (this may be at an intermediate difference if you wish to assess their binocular status at a distance at which they view a computer screen).

4. Irrespective of whether you are carrying out a cover test during distance or near viewing, you should sit directly in front of the patient, at a distance of 25–40 cm away. This will place you close enough to be able to critically note eye movements. When performing the cover test for distance viewing, you should be very careful not to block the patient’s view of the fixation target.
(a) For the distance cover test, the patient should have their head erect and eyes in the primary position of gaze.
(b) For the near cover test, the eyes should be in a slight downward gaze (similar to the position for reading).
5. Instruct the patient: ‘I would like you to look at the letter * at the other end of the room (or the letter * on this stick). Please keep watching the letter as closely as you can. In a moment I will place this cover in front of your eye. If the letter appears to move please follow it with your eyes and keep it as clear as possible at all times’.
6. Before starting the cover test take the opportunity to observe the fixational stability of the patient’s eyes as they view the letter. You can gain a good impression of the stability of their fixation simply by observing their eyes for a period of a few seconds (e.g. 5–10 seconds) as you remind them to keep looking closely at the letter.
7. Perform the cover/uncover (unilateral cover) test to look for a heterotropia (Figure 6.2):
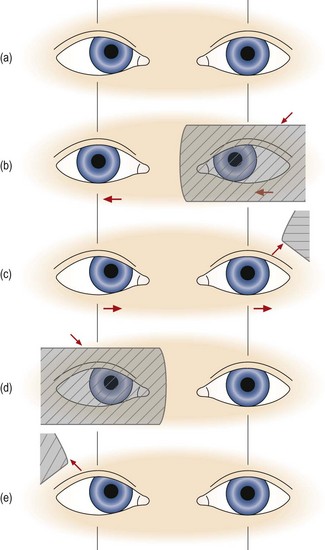
Fig. 6.2 Cover test in a patient with a right esotropia. (a) The right eye deviates inwards slightly, but this may not be obvious depending on its size and your experience. (b) As the left eye is covered, the right eye is seen to move out to take up fixation. Behind the cover, the left eye moves to the right, obeying Hering’s law. (c) As the left eye is uncovered, it moves out to take up fixation as it is the non-strabismic eye. (d) When the right eye is covered, the left eye does not move. (e) When the right eye is uncovered, neither eye moves. Reprinted with permission from Pickwell D (1989). Binocular vision anomalies. Butterworth-Heinemann.
(a) Place the cover before the left eye. As you do so, observe the response of the right eye that has not been covered. Repeat this procedure two or three times before you arrive at any decision. If the right eye moves when the left is covered, then a tropia is present in the right eye. The movement observed occurs to take up fixation. You should allow the eye time to take up fixation, which may be as long as 2–3 seconds. If the eye moves out to take up fixation, then in the binocular situation it must have been directed inwards and so an ESOtropia is present. If the eye moves in to take up fixation an EXOtropia is present. If the eye moves up to take up fixation, then in the binocular situation it must have been directed downwards and so a HYPOtropia is present. If the eye moves down to take up fixation, a HYPERtropia is present.
(b) Repeat the cover/uncover test by placing the cover over the right eye and look for a heterotropia in the left eye. Once again, repeat the procedure two or three times. If neither eye moves when the other is covered there is no heterotropia and you should go to step 8 below.
(c) In a unilateral strabismus, when the deviating eye is covered and then uncovered, the non-tropic ‘normal’ eye will continue to fixate and will not move. If there is a unilateral heterotropia present, there is frequently amblyopia so that the visual acuity is reduced in that eye.
(d) Eyes with strabismus and amblyopia may not take up fixation immediately when the fellow eye is covered. Give them time to fixate and actively encourage them to do so. Note and record any fixation instability or tremor (nystagmus) when the patient attempts to fixate with the eye that normally deviates.
(e) Note that some heterotropias may be intermittent. Typically these are large heterophorias that sometimes break down into a heterotropia. If you suspect an intermittent tropia, use the alternating cover test to investigate whether the tropia is evident when the alternating cover test is concluded. If a tropia is now present, this indicates that the patient may develop a strabismus (i.e. and potentially therefore experience double vision) when tired or under stress.
(f) Repeat the test from the beginning to confirm your diagnosis.
(g) If a heterotropia is present there is no need to search for a heterophoria. You should record your result and move on to the next test (e.g. cover test in different refractive correction, or at a different viewing distance). Note that it is not meaningful to speak of ‘recovery’ movements in relation to tropia movements because there is no fusion reflex to bring the eyes back into alignment. When the cover is removed and habitual viewing is restored the movements that are seen have no diagnostic value in the way that recovery movements are valuable in patients with heterophoria (see 10(d) below).
8. If no heterotropia was found you should now begin the search for a heterophoria. There are two possible alternatives here and both have their advocates. Some practitioners will continue to use the cover/uncover test that was used for heterotropia investigation in the search for a heterophoria. If this is your preferred approach then go to step 9 below. An alternative approach is to switch now to the alternating cover test. If this is your preferred approach then go to step 10. Some practitioners use both techniques to evaluate heterophoria. There is no research to support one approach over the other.
9. If no heterotropia is present, perform the cover/uncover test to look for a heterophoria (Figure 6.3):
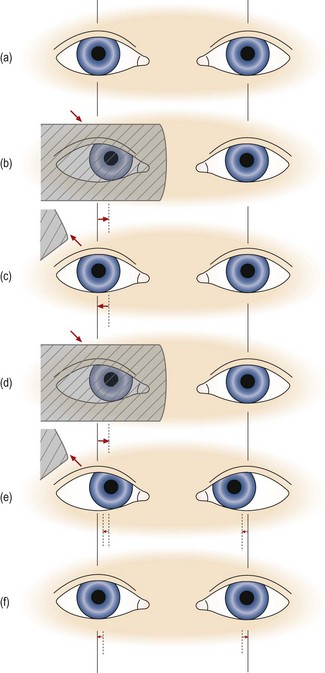
Fig. 6.3 Cover test in a patient with esophoria. (a) to (c) show the simple pattern of movements that are usually seen, and (d) to (f) show the more rare versional pattern of movements that can occur when one eye is dominant. (a) Both eyes look straight ahead. (b) The right eye is covered and the left eye does not move, indicating that there is no strabismus in the left eye. Behind the cover the right eye moves inwards. (c) The right eye is uncovered and the right eye moves out to resume fixation with the other eye. Note that during the movements of the right eye, the left eye has not moved, and disobeys Hering’s law to maintain fixation. (d) The right eye is covered as before and it moves inwards behind the cover. (e) The right eye is uncovered and both eyes move right by the same amount, obeying Hering’s law. (f) Both eyes diverge by the same amount, again obeying Hering’s law, and take up fixation. Reprinted with permission from Pickwell D (1989). Binocular vision anomalies. Butterworth-Heinemann.
(a) In heterophoria, the eye being covered will move out of alignment with the other eye because sensory fusion is being prevented. It will then retake up fixation when the cover is removed. Some practitioners attempt to observe both the movement of the eye that is under cover and the recovery movement of that eye when the cover is removed. This requires some dexterity on your part and care must be taken to ensure that the ‘cover’ is really covering the patient’s view of the target. Other practitioners only attempt to observe the eye’s recovery movement when the cover is removed. If you choose to do the latter, then go directly to step (c).
(b) Place the cover before the left eye in a manner that prevents the patient from viewing the target but allows you to continue viewing the covered eye. Observe the response of the left eye behind the occluder when it is first covered. If a heterophoria is present then the covered eye will drift outwards in EXOphoria, inwards in ESOphoria, upwards in HYPERphoria and downwards in HYPOphoria.
(c) Observe the response of the covered eye as the cover is removed. Remove the cover in a manner that allows you to view the eye continuously as it is being uncovered. In other words don’t move the occluder away from the patient’s eye in a fashion that causes you to temporarily lose sight of it. For example, you can remove the cover from in front of the patient’s right eye by moving the cover diagonally downwards and temporally. Note the recovery movement of the eye will be opposite to that which took place behind the cover. For example, in EXOphoria the eye moves back in when the cover is removed as it drifted out (away from the nose) behind the cover.
(d) In a small number of patients, generally with large phorias or when a highly dominant eye is uncovered, the fixating eye undergoes a flick or wobble as the cover is removed from the other eye. This is due to the eyes more closely following Hering’s law of equal innervation (Figure 6.3d–f).
(e) Since it is not possible to observe the two eyes at once when the cover is removed, you should repeat this cycle several times, watching first one eye and then the other and comparing the movement of the two. However, you should leave several seconds between each cycle to avoid inadvertently performing an alternating cover test.
(f) Repeat the observations when covering and uncovering the right eye. If an esophoria was present in the left eye, it should be present and similarly sized in the right. It does not make sense to state that a patient has, for example, ‘esophoria of the right eye’ since esophoria of the same or very similar magnitude will almost always be present when the left eye is covered. There are some rare exceptions to this rule, such as in patients with uncorrected or residual anisometropia, where greater accommodative convergence in one eye influences the movements. Because the presence of a vertical heterophoria signals a tendency for the eyes to drift out of vertical alignment, a hypophoria evident in one eye will be evident as a hyperphoria in the fellow eye. Once again, however, the deviations will usually be of a similar size in the two eyes.
(g) Estimate or measure the magnitude of the deviation. Deviations can be measured by placing prisms of increasing power in front of one eye until no movement is observed during the cover/uncover test. The prism is normally placed in front of one eye only. Base-in prism power is used to measure EXOphorias/EXOtropias, and base-out to measure ESOphorias/ESOtropias. A prism bar is most conveniently used for this purpose, although estimates made by experienced practitioners can be in good agreement with measurements made using prism bars.5
10. If no heterotropia is present, perform the alternating cover test.
(a) Place the occluder before one eye for 2–3 seconds and then transfer it quickly to the other eye, without pausing. Keep the occluder in front of the eye for 2–3 seconds, and allow the other eye to take up fixation, and then repeat the cycle. The patient must not view the target binocularly at any time and thus rapid movement of the cover between the eyes is required. For this reason, the occluder should be moved along a horizontal line between the eyes rather than in an arc-shaped pattern. In order to facilitate swift transfer of the cover between the eyes it is best if your hand that holds the cover is held close to the patient’s forehead or alternatively, close to the tip of the patient’s nose.
(b) If there is a deviation of the eyes, it will be seen as a re-fixation eye movement when the cover is transferred from one eye to the other. The eyes will move outwards in ESOphoria/ESOtropia, and inwards in EXOphoria/EXOtropia, etc.
(c) Estimate or measure the magnitude of the deviation. Deviations can be measured by placing prisms of increasing power in front of one eye until no movement is observed during the alternating cover test. The prism is normally placed in front of one eye only. Base-in prism power is used to measure EXOphorias and base-out to measure ESOphorias. A prism bar is most conveniently used for this purpose, although estimates made by experienced practitioners can be in good agreement with measurements made using prism bars.5 To help you make better estimates of deviation sizes, ask your patient to look from the first to the last letter on the Snellen 6/12 (20/40) line at six metres (20 ft) with one eye occluded. The movement observed is equivalent to 4 prism dioptres and using this as a guide provides a good way for you to estimate other deviation sizes.
(d) Unlike in cases of heterotropia, observe the latency and the speed of the fusional recovery movement on uncovering, since this may give clues as to the strength of the fusion reflex. The movement should be smooth and fast. Poor fusion reflexes are slow and hesitant, with jerky movements.
11. If no heterophoric movements are seen during the alternating cover test, perform the subjective cover test.
If you cannot see any movement of the eyes during step 10 and the patient can provide good subjective responses, continue to perform the alternating cover test and ask the patient if the target appears to move when the occluder is switched from one eye to the other. Subjectively reported movements of the target are called ‘phi’ (pronounced as ‘fy’ as in ‘why’) movements. Small amounts of phoria (1–3Δ) may be detected in this way. Any reported vertical phi movement should be further investigated using other tests, such as the modified Thorington technique (section 6.4). The type of deviation present can be inferred according to whether the target appears to move in the same or opposite direction as the cover. For example, esophoria will cause the target to move ‘against’ the movement of the occluder and an exophoria will cause the target to move ‘with’ it.
6.2.3 Adaptations to the standard procedure
1. When examining children: Pictures can be used to retain attention, but they should be of an appropriate size. Pictures (or letters) that are too large do not provide an accurate stimulus for fixation or accommodation and this is essential for an accurate cover test. In order to check compliance with your instructions, it is useful to occasionally move the stick a short distance to one side. If the eyes are seen to follow the target then you can be confident that your instructions are being followed.
2. If a heterotropia is suspected in a patient with equal VA in the right and left eye: (see online video 6.6) . In such cases the possibility of an alternating heterotropia should be investigated. Note that patients with a marked difference in VA between the eyes will not alternate. With an alternating heterotropia, the right eye will exhibit the tropia if the left eye fixates during the cover test and the left eye will exhibit the tropia if the right eye fixates during the cover test. The difficulty with diagnosing an alternating tropia is that the tropia movement only occurs during the first cover/uncover assessment. When the cover/uncover assessment is repeated a second and third time, the eye being observed does not now move as it has now become the fixating eye. The other eye has now become the deviating eye and the tropia will appear in the first cover/uncover assessment of the other eye. When asked to view binocularly after completion of the cover/uncover test, some patients with an alternating heterotropia will continue to fixate with the eye that fixated the target during the last iteration of the cover test procedure. In some cases, there is no preferred fixating eye. In other cases, there is a definite preference for fixation with one eye over the other and although the non-preferred eye might continue to fixate for a short period (e.g. a few seconds) after the cover had been removed, fixation then switches back to the preferred eye. Some patients with alternating tropia can switch eyes at will if you ask them to and some may even anticipate which eye is to be covered and switch eyes prior to you using the occluder. These tropias can be very confusing to diagnose.
3. In patients with an abnormal head posture (head turn or tilt): Ask the patient to straighten their head position before testing commences. If the abnormal head position is a permanent feature for a particular patient, the cover test should be carried out with the head in the habitual (i.e. turned/tilted) position and again when the head is straightened. If the deviation differs markedly with adjustment of the head position, it is possible that the head is being turned/tilted to address an underlying binocular vision issue. This can be further investigated if the head is tilted/turned in the opposite direction to the direction that the patient typically exhibits. If the deviation becomes even more pronounced, an incomitancy is certainly present and you can conclude that the abnormal head posture is linked to a binocular vision condition rather than to another, non-visual cause.
6.2.5 Recording
1. Record NMD (No Movement Detected) if this was the case and if no assessment of ‘phi’ movement was conducted. NMD is preferred to ‘ortho’ (i.e. orthophoria) or similar, as even experienced practitioners cannot detect very small eye movements (up to 2–3Δ).4 Hyperphorias of this size can be significant and cause the patient problems, so you must not assume that the patient does not have a significant phoria based on detecting ‘no movement’ using the cover test.
2. Record ‘ortho’ (orthophoria) or similar ( for horizontal orthophoria,
  for vertical orthophoria and
  for both vertical and horizontal orthophoria) only if no movement was detected using the cover test AND no phi movement was reported.
3. If heterotropia is detected, then record:
• The constancy (if intermittent is not recorded, the tropia is assumed to be constant. If the deviation is intermittent, note the percentage of time that the eye deviates).
• Which eye is deviated (right, left or alternating; abbreviated to R, L or Alt)?
• The direction (exo, eso, R hyper or hypo, L hyper or hypo, excyclo, incyclo). Exo and Eso are abbreviated to XO and SO, respectively.
• Add the suffix tropia (abbreviate to T, e.g., SOT, XOT).
• An indication of the size of the tropia, either measured with a prism bar or estimated (if estimated, precede your result with the symbol ‘~’), e.g. ~20 Δ L XOT. Remember that it is not meaningful to attach significance to (or record) ‘recovery’ movements in patients with a tropia.
• Heterotropias can also be defined as following an A- or V-pattern or other varieties of alphabet pattern (e.g. Y or inverted Y). By definition such deviations are of the incomitant variety and their presence will emerge during the motility test (section 6.15).
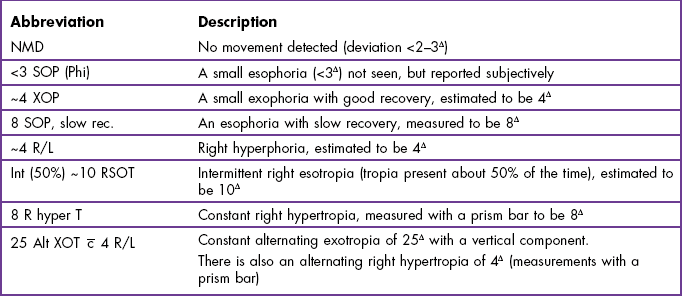
Examples are given in Table 6.1.
4. If heterophoria is detected, then record:
• The direction (exo, eso, R/L or L/R). Exo and Eso are abbreviated to XO and SO, respectively. R/L indicates a right hyperphoria, which is the same as a left hypophoria. L/R indicates a left hyperphoria/right hypophoria.
• Add the suffix phoria (abbreviate to P, e.g., SOP, XOP).
• An indication of the size of the phoria, either measured with a prism bar or estimated (if estimated, precede your result with the symbol ‘~’).
• Any recovery movements that were slow, hesitant and/or jerky. Normal, smooth and fast recovery movements are generally not recorded.
• Heterophorias that were found using the subjective cover test, but not seen by you, should be recorded in the usual manner and followed by the term ‘phi’.
• A and V patterns may also be seen in patients with heterophorias and, as in the case of heterotropias, this also signifies the presence of an incomitant deviation (section 6.15).
Examples of appropriate test recordings are given in Table 6.1.
6.2.6 Interpretation
Hering’s law states that the innervation to synergist muscles of the two eyes is equal. This would imply that the eyes would always move by equal amounts (in the same direction in version movements and in the opposite direction in vergence movements). The common cover test response, in which the fixating eye remains still and the uncovered eye moves to restore fusion thus contravenes Hering’s law. Hering’s law would predict that when one eye is uncovered, both eyes would make a version movement equal to half the deviation, and then both eyes would make an equal fusional (vergence) movement, to restore bifoveal fixation. This response does occur in some patients and should not be confused with heterotropic movements (Figure 6.3). Note that heterotropic cover test movements are in one direction and take place when the cover is introduced to the other eye whereas, when they occur, Hering’s law movements have the appearance of a ‘wobble’ and take place when the cover is removed from the other eye (see online videos 6.7 and 6.10) .
.
Most children show no movement on the cover test at distance and either no movement or a just visible exophoria at near.6 There appears to be little information regarding cover test results for normal adults in the research literature. Textbooks suggest that the majority of adults will also show either no movement or a just visible exophoria or esophoria (up to about 4Δ) on the distance cover test.7 At near, a small amount (3Δ to 6Δ) of exophoria is considered normal (physiological exophoria) and this is likely to increase with age (exophoria measured with the Maddox wing increased from a mean of zero at age 20 to 5Δ at 65).8 As even experienced practitioners cannot detect very small eye movements (up to 2–3Δ), small hyperphorias will be missed with the objective cover test, and any hyperphoria that is detected will be abnormal.4
The movements made by each eye are usually similar in heterophoria. In cases where the heterophoria movement is greater in one eye than the other, suspect poor technique (and re-assess), uncorrected or residual anisometropia or incomitancy (section 6.15).
6.2.7 Most common errors
1. Not positioning yourself appropriately to allow a clear and unimpeded view of the patient’s eyes.
2. Blocking the patient’s view of the target that you have instructed them to fixate upon. This is only a problem during the distance cover test.
3. Covering and uncovering the eyes so rapidly that the eyes do not have time to make the movements consistent with the deviation that is present. In the alternating cover test, you should leave the cover in place for at least 2–3 seconds before removing it or transferring it to the other eye.
4. Arriving at your diagnosis too quickly. Repeat the test two or three times in quick succession to confirm your diagnosis. Fixational instability can cause a misleading result on a single test.
5. Using a fixation target that is too large.
6. Using large, sweeping lateral movements of the occluder when covering/uncovering. This is distracting for the patient, and during an alternating cover test, may mean that binocular vision isn’t being fully suspended. Small but swift movements with the occluder are required.
7. Diagnosing a heterotropia when there is a temporary loss, but then a quick recovery, of fixation of an eye when the fellow eye is uncovered (Figure 6.3e and f).
8. Failing to record information about the speed and/or smoothness of recovery in patients with a heterophoria in patients in whom the recovery is slow or jerky. Conversely, recording information about recovery in heterotropia patients.
6.3 Other Tests for the Detection and Measurement of Heterotropia
6.3.1 Comparison of tests
The Hirschberg test compares the position of the corneal reflexes (the first Purkinje images) of the two eyes that are formed by a pentorch. It is quick and easy to perform, and requires little co-operation on the part of the patient, but can really only be performed at near, the penlight target provides a poor stimulus to accommodation and it is relatively inaccurate. Choi and Kushner found that even experienced practitioners can obtain results that differ by up to 10 prism dioptres.9 This is because a deviation of just 1 mm is equivalent to ~22 Δ. The Krimsky test extends the Hirschberg test by using prisms to equalise the positions of the corneal reflexes in the two eyes. The Bruckner test relies upon a comparison of the brightness of the retinal reflex in the two eyes. In the presence of a strabismus the reflex can be brighter and whiter in the deviating eye as compared to the reflex from the fixing eye due to fundal reflections from a deviating eye being greater than from the darkly pigmented macular area of a normally fixating eye. The usefulness of the Bruckner test is, however, controversial.10,11 Given their limited accuracy, the cover test (section 6.2) should be used in preference to these tests as soon as the child can co-operate with the cover test requirements.
6.3.2 Procedure: Hirschberg and Krimsky
 .
.1. Keep the room fully illuminated. Additional use of localised lighting is recommended so that the patient’s eyes can be easily seen without shadows.
2. Remove any spectacles that the patient may be wearing. However, if it is felt that the refractive correction will alter the result (e.g. in cases of significant hyperopia), the test should also be performed through the correction.
3. Hold a penlight horizontally 40 to 50 cm from the patient with the light aimed at the bridge of the patient’s nose. The back of the penlight should be very close to the tip of your nose.
4. Ask the patient to look at the light with both eyes open. Young children will automatically tend to look toward the bright light but may need a little encouragement.
5. Note the location of the corneal reflex in each eye individually. In order to do this you should briefly cover each eye in turn; you can do this with the palm of your hand. Remember that the reflex is frequently decentred about 0.5 mm nasally with respect to the centre of the pupil because angle kappa is normally positive.
6. Now compare the location of the corneal reflexes as the patient views habitually (i.e. without any occlusion). The eye that has the same angle kappa as in the monocular test is the fixing eye. The location of that reflex should be considered the reference position.
7. If there is a heterotropia present, the corneal reflex of the other eye will have shifted in a direction opposite to that of the ocular deviation. For example, in the case of an ESOtropia, the corneal reflex will be displaced temporally on the patient’s cornea relative to the position of the reflex in the fellow eye.
8. Hirschberg: Estimate the magnitude of the deviation from the displacement of the reflex in millimetres (mm) relative to the reference position using the approximation of 1 mm = ~22Δ.
9. Krimsky: Use a prism bar in front of the fixating eye in order to centre the corneal reflex in the deviated eye. Measures of the angle of heterotropia obtained using the Krimsky test rely upon the assumption that the deviating eye fixates centrally rather than eccentrically. While this assumption may not be valid in many instances, the error it introduces is likely to be small in relation to the overall size of the deviation.
6.3.3 Procedure: Bruckner test
 .
.1. Turn down the lights so the room is dimly lit.
2. Remove any spectacles that the patient may be wearing. However, if it is felt that the refractive correction will alter the result (e.g. in cases of significant hyperopia), the test should also be performed through the correction.
3. Hold a penlight horizontally 1 m from the patient with the light aimed at the bridge of the patient’s nose. The back of the penlight should be very close to the tip of your nose.
4. Ask the patient to look at the light with both eyes open. Young children will automatically tend to look toward the bright light but may need a little encouragement.
5. Compare the colour and brightness of the fundus reflexes.
6.3.6 Most common errors
1. Hirschberg and Krimsky: Basing your decision upon the absolute position of a single reflex relative to the pupil centre rather than on a comparison of the relative locations of the corneal reflexes in the two pupils.
2. Not viewing the patient’s eyes from a position which is directly behind the penlight for the Hirschberg and Bruckner tests or from directly in front of the deviating eye in the case of the Krimsky test.
3. Placing too much emphasis on the accuracy of the estimates provided by these tests.
4. Not realising that these tests may fail to detect a small angle heterotropia.
6.4 Other Tests for the Detection and Measurement of Heterophoria
While the cover test must always be carried out, it is usual for this to be conducted prior to refraction and for other tests of oculo-motor alignment to be employed after the subjective refraction has been completed. The assessment of heterophoria requires that fusion is suspended and the eyes dissociated. This is achieved using vertical prism power which is too high for the eyes to overcome (von Graefe and Howell-card methods); viewing dissimilar images (a streak in one eye, a spotlight in the other as in the Maddox rod and modified Thorington tests) or using a septum (Maddox wing). Heterophoria tests are more repeatable with a trial frame than with a phoropter.12 In addition, since the use of a phoropter will limit the patient’s ability to adopt a habitually abnormal head position, the measurement of vertical phorias is best performed using a trial frame or a hand-held rod in free space.
6.4.1 Comparison of tests
Because the cover test can be difficult to perform when using a phoropter or reduced aperture trial case lenses, all of the techniques described in this section offer advantages over the cover test for assessment of oculomotor alignment post-refractive correction. Also since the objective cover test can’t reveal small eye movements below about 2–3Δ, the subjective tests are useful for checking for small vertical heterophorias that may be clinically significant.4
The modified Thorington technique is a very simple and quick technique that can be used in a phoropter, trial frame or free space. It produces the most repeatable results of the most commonly used techniques.12–14 The modified Thorington overcomes the Maddox rod’s problem of lacking an accommodative target by using a target of small letters or numbers (Figure 6.4). It is principally used at near, but Thorington cards are available for both distance and near. In view of its many advantages it is somewhat surprising that it is not more widely used at present. Normative data from large study populations of children have been published.15
The Maddox wing provides a simple and relatively fast technique for the measurement of heterophoria at near. However, the figures used on the scale are relatively large with the result that accommodation does not need to be precisely controlled. This may lead to overestimation of an exo-deviation, to underestimation of an eso-deviation or to variable results. There are claims that changing to smaller letters improves test reliability.16 In addition, the eyes may not be fully dissociated because the septum may allow peripheral fusion to occur. Finally, the instrument uses a standard, fixed centration distance between the lenses and a fixed testing distance of 25 cm and it would be very difficult to use with a phoropter.
The von Graefe technique is widely used and can be easily performed in a phoropter with a projector chart and no additional equipment. Unfortunately, it is the least reliable technique of those commonly available and its results correlate poorly with the cover test, especially in the case of horizontal phoria measures.12–14,17,18 This may result from variable amounts of prism adaptation, phoropter-induced proximal accommodation, a head tilt behind the phoropter leading to an induced vertical deviation or a reduction in peripheral fusion.12 In addition, it is a relatively lengthy procedure, can be difficult for patients to understand and cannot easily be used with a trial frame. The technique does not appear to warrant its widespread use and other more reliable techniques such as the modified-Thorington or Howell card methods should ideally replace it.12–14,17
The Howell card method provides a simple and quick technique that can be used in a phoropter, trial frame or free space and it can be used for measurement of horizontal phorias at distance or near. It cannot be used to measure vertical phorias. Although it appears to be popular, the method has not been subjected to many comparisons with other techniques but a study by Wong et al. suggests that the Howell phoria card method has a better inter-examiner repeatability than the von Graefe method.17
6.4.2 Initial procedure for all tests
1. Inform the patient about the test: ‘This test is to check how your eye muscles work together with the new prescription’.
2. Measure near phorias immediately after the distance heterophoria measurements in pre-presbyopic patients and after inclusion of the required reading addition in presbyopes.
3. For near phoria measurement, adjust the trial frame/phoropter to the near centration distance.
6.4.3 Procedure: Modified Thorington test
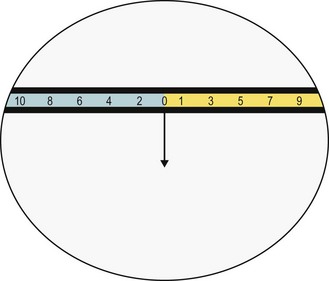
1. Place the Maddox rod in front of one eye making sure that the ‘grooves’ are horizontal. Note that it is conventional to place the Maddox rod before the right eye. Dim the room lights.
2. Shine the light from a penlight through the central aperture of the Thorington near card. The near cards are usually calibrated for 40 cm and because the cards feature a tangent scale it is vital that the viewing distance is correct.
3. Direct the patient to look at the letters and keep them clear. Ask them to then look at the spotlight, and tell you whether the vertical red line is seen to the right, left or straight through the spotlight.
4. Some patients have difficulty seeing the red line initially. If they cannot see the red line, cover each eye in turn to demonstrate that one eye sees the spotlight, letters and numbers and the other sees the red line. Once they are aware of the test format they are often able to see the red line and spotlight, letters and numbers simultaneously. Placing a green filter before the eye viewing the spotlight can also help the patient to perform the test. If difficulty is still experienced, place the Maddox rod in front of the left eye and try again. If the spotlight and red line cannot be seen together then suppression may be present and follow up tests should be performed (section 6.13).
5. With the Maddox rod in front of the right eye the following responses may be given:
(a) If the line is seen to pass through the spotlight the patient has no horizontal phoria.
(b) If the line is to the left of the spotlight (crossed images) the patient has an exophoria. If the line is to the right of the spotlight (uncrossed images) the patient has an esophoria.
(c) Determine the size of the deviation by asking the patient which number on the horizontal series of letters on the Thorington card the line passes through. This is the number of prism dioptres of horizontal heterophoria.
Vertical near heterophoria
1. Rotate the Maddox rod so that the ‘grooves’ are vertical.
2. Ask the patient if the red line is seen above, below or straight through the spot.
3. With the Maddox rod in front of the right eye the following responses may occur:
(a) If the line is seen to pass through the spotlight the patient has no vertical phoria.
(b) If the line is above the spotlight the patient has a right hypophoria. It is possible to specify vertical heterophorias with respect to the right or left eye. Thus, a right hypophoria can also be called a left hyperphoria. As above, the size of the deviation is determined by asking the patient which number on the vertical series (number or letters) of letters on the Thorington card that the line passes through.
6.4.4 Procedure: Howell cards
1. Ensure the patient is wearing their optimal near refractive correction and adjust the phoropter/trial frame to the near centration distance.
2. Ensure the card (Figure 6.5) is 33 cm away from the patient’s eyes. This is important because the tangent scale is calibrated for this exact distance. A piece of string of the appropriate length provides a simple means to establish that the viewing distance is correct.
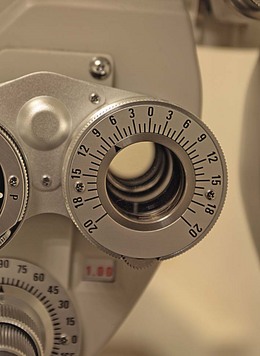
3. Hold the stick-mounted or loose vertical prism in front of the right eye. This will generate vertical diplopia so the patient should see two scales and two arrows. The prism power used is 6Δ and it is introduced with base direction vertically oriented.
4. Ask the patient ‘Do you see two arrows and two sets of numbers?’
5. Next ask the patient to do the following: ‘Please look at the top arrow and you will see it points downwards from the ‘0’ on the top set of numbers. Please follow it down with your eyes, and tell me which number on the lower set of numbers it points to. If it points between two numbers, please tell me between which two numbers it seems to point’.
6. Since the scale is a tangent scale, the number corresponds to the magnitude of the phoria.
7. Assuming the prism is placed base UP in front of the right eye, if the arrow points down towards an odd number, the patient is EXOphoric. If it points to an even number the patient is ESOphoric. Since the patient may extrapolate between two numbers, you should ask if the numbers appear on the yellow or blue part of the scale. Numbers on yellow are odd and those on the blue part of the scale are even.
6.4.5 Procedure: Maddox rod
1. Place the Maddox rod in front of the right eye making sure that the ‘grooves’ are horizontal.
2. Provide a spotlight target at distance using the wall/projector chart and then dim the room lights.
3. Ask the patient to look at the spotlight, and to indicate if the vertical (red) line is seen to the right, left or straight through the spotlight.
4. Some patients have difficulty seeing the red line initially. If this occurs, try the following:
(a) Make sure that there are not other sources of light that will each produce a line image.
(b) Cover each eye in turn to demonstrate to the patient that one eye sees the spotlight while the other sees the line. Once they are aware of the test format they are often able to see the line and spotlight simultaneously.
(c) Placing a green filter before the eye viewing the spotlight may also help the patient perform the test, presumably because the brightness difference between the spot and streak is reduced relative to the normal white/red condition.
(d) If the patient continues to see only the line or spot, transfer the Maddox rod to the left eye and try again.
(e) If the spotlight and red line cannot be seen together then suppression may be present and follow-up tests should be performed (section 6.13).
5. With the Maddox rod in front of the right eye the following responses can occur:
(a) If the line is seen to pass through the spotlight the patient has no horizontal heterophoria.
(b) If the line is seen to the left of the spotlight (crossed images) the patient has an exophoria. If the line is to the right of the spotlight (uncrossed images) the patient has an esophoria.
(c) If the line is seen to be continuously in motion, ask the patient to concentrate on seeing the spotlight as clearly as possible.
6. To measure the size of the phoria, place prism in front of either eye. The following approach can be adopted:
(a) When using a phoropter, use the Risley prism (Figure 6.6) and increase the power of the appropriately-oriented prism (base in for exophoria, base-out for esophoria). Ask the patient to say when the line is seen to overlap the spot and record the prism power at this instant.
(b) When using a trial frame, use loose prisms or a prism bar and increase the power of the appropriately oriented prism (base in for exophoria, base-out for esophoria) until the patient indicates that the line runs through the spot or until the line is reported to have crossed to the other side of the spot. In the latter case use an interpolated score. For example, if the patient has exophoria and with 2Δ IN the line is still to the left of the spot, but with 3Δ IN it switches across to the right, record 2.5Δ.
(c) Some practitioners adopt a screening approach when using the test with a trial frame and place a 2Δ prism with appropriately oriented base in front of one eye. If the line moves to the opposite side, the heterophoria can be recorded as <2Δ.
Vertical distance heterophoria
1. Rotate the Maddox rod so that the ‘grooves’ are vertical.
2. Ask the patient if the red line is seen above, below or straight through the spot.
3. With the Maddox rod in front of the right eye the following responses can occur.
(a) If the line is seen to pass through the spotlight the patient has no vertical heterophoria.
(b) If the line is above the spotlight the patient has a right hypophoria. It is possible to specify vertical heterophorias with respect to the right or left eye. Thus, a right hypophoria can also be called a left hyperphoria. The size of the deviation is determined using base down prisms before the left eye (or base up prism power before the right eye) until the red line and spotlight are overlapping (Figure 6.7).
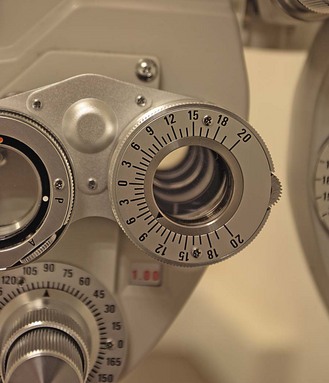
Fig. 6.7 A Risley prism in position to provide prism base up or base down (8Δ base down in this case).
(c) If the line is below the spotlight the patient has a right hyperphoria (or left hypophoria). The size of the deviation is determined using base up prisms before the left eye (or base down prism power before the right eye) until the red line and spotlight are coincident.
4. As a screening technique when used with a trial frame, place a ½Δ prism with appropriate base in front of one eye. If the line moves to the opposite side, the phoria can be recorded as < ½Δ.
6.4.6 Procedure: Maddox wing
1. The test is carried out with the room lights on. Ensure there is sufficient lighting to allow the scale on the Maddox wing to be seen with ease (Figure 6.8).
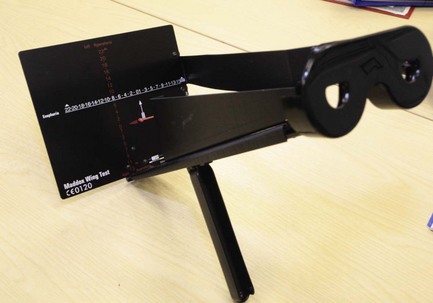
2. Direct the patient to look through the horizontal slits to view the chart, which comprises horizontal and vertical scales, and horizontal and vertical arrows. The right eye sees only the arrows whilst the left eye sees only the scales. The arrows are positioned at zero on the scales but through the dissociation, any departure from orthophoria will be indicated by an apparent movement of the arrow along the scale.
3. Some patients have difficulty seeing the arrows and the scales simultaneously and require help to position the instrument correctly. If necessary demonstrate to the patient, by covering the aperture in front of each eye in turn, that one eye views the arrows and the other eye views the scales. If the arrows and scales cannot be seen together then suppression may be present and follow-up tests should be performed (section 6.13).
4. Firstly ask the patient to say whether the arrow is to the right or left of the zero on the scale. This will inform you as to whether there is exophoria or esophoria present. Allow the patient plenty of time before asking ‘Which white number does the white arrow point to?’ The number on the scale indicates the magnitude of the deviation in prism dioptres and the direction (even numbers correspond to exophoria, odd numbers to esophoria). If, over time, the arrow moves to higher and higher numbers on the scale, wait until the arrow has stopped moving before taking the reading. If the arrow is varying between a maximum and a minimum value, record the value of the midpoint between the extremes. The arrow position will be more stable if you remind the patient to focus on the tip of the arrow and ensure that it is kept as clear as possible.
5. To measure a vertical heterophoria ask the patient ‘Which red number does the red arrow point to?’ The number on the scale indicates the magnitude of the deviation and the direction.
6.4.7 Procedure: Von Graefe’s method
1. Using the projector chart, isolate a letter or a vertical column of letters one line larger than the visual acuity of the poorer eye. This ensures that both eyes can easily see the letters. As the patient is asked to keep the letter(s) clear, this also helps to control accommodation. Direct the patient’s attention to the letter(s).
2. Inform the patient: ‘Please close your eyes while I make the letters go double.’ Patients are asked to briefly close their eyes because some patients do not react well when the letters are seen to move as the prism is being introduced. Using the Risley prisms, place 6Δ base up (BU) in front of the left eye. This is the dissociating prism. Place 10Δ base in (BI) in front of the right eye. This is the measuring prism.
3. Ask the patient whether they see double. If they do not, there are a number of changes you can make to ensure diplopia is seen:
(a) Check the phoropter as one eye may be occluded.
(b) Ask the patient to look around. The patient may simply not have noticed the second image.
(c) Alternately occlude the eyes so that each eye’s target is shown. This can help the patient find the targets and can help to eliminate slight suppression.
(d) Increase the base up prism to 8–10Δ BU. They may have a very large vertical vergence range or large prism adaptation.
(e) Change the prism to 6Δ base down (BD). The patient may have a vertical deviation that the original 6Δ BU is correcting/partly correcting.
(f) Check the patient is holding their head straight so that both eyes are looking through the phoropter.
4. Explain to the patient that you want them to look at the bottom letter and that you are going to line up the two letters/columns of letters ‘like buttons on a shirt’. To minimise accommodative (and accompanying vergence) changes, ask the patient to keep the bottom letter clear. This is the letter viewed through the dissociating prism.
5. To ensure that prism adaptation has minimal effect, the letters should only be made visible to the patient for brief periods of about 1 second (‘flashing’). Briefly occlude the right eye with a hand-held occluder, then remove the occluder and ask the patient if the top letter is seen initially to the right or left of the bottom one.
6. Given the prism used in step 2, the bottom letter is seen by the left eye and the top letter by the right eye. If the top letter is initially seen to the right of the bottom, this is uncrossed diplopia, and the deviation is less than the 10Δ measuring prism, so this should be reduced. If the top letter initially appears to be to the left of the bottom, this is crossed diplopia, and the deviation is greater than the 10Δ measuring prism, so this should be increased.
7. Repeat the occlusion and change the base in measuring prism accordingly. Initially use about 4Δ steps and progressively reduce the step size to 2Δ as the alignment position is first passed and then use a step size of 1Δ as you approach alignment.
8. Use a bracketing technique to determine the amount of measuring prism required to make the letters line up ‘like buttons on a shirt’.
9. Some clinicians get close to the end-result by asking the patient when the letters are lined up as they move the prism in the appropriate direction. They then ‘fine-tune’ the result using a flashing technique. There is a greater risk of prism adaptation with this technique, and it is less repeatable than the ‘flashing’ procedure.13
Distance vertical phorias
1. This is usually measured after the distance lateral phoria measurement.
2. Occlude one eye and change the prism before the right eye to 15Δ BI. Leave the prism before the left eye (6Δ BU). In this case, the base in prism is the dissociating prism and the base up prism is the measuring prism.
3. Adjust the base up prism in front of the left eye until the patient reports that the two letters line up like ‘the headlights on a car’. Use a similar technique as for the lateral phoria measurement: ‘flash’ the letters for 1 second only, change the prism power when the left eye is occluded, ask the patient to keep the letter to the right clear (this is the letter viewed through the dissociating prism) and use a bracketing technique to determine the required prism. Use an initial step size of 2Δ, then subsequent step sizes of 1Δ and finally 0.5Δ as you approach alignment. Accuracy is especially important for the vertical phoria measurement as small phorias frequently give rise to symptoms.
6.4.8 Recording
1. The technique used to measure heterophoria should be included.
2. Record ‘ortho H and V’ (i.e. orthophoria) if there is no horizontal or vertical phoria. Another way to record orthophoria is to use the symbol  to record that there is no horizontal phoria,
  to record that there is no vertical phoria or
  to signal that there is no horizontal or vertical phoria.
3. Record the amount of deviation in prism dioptres (Δ) and the direction of the phoria, e.g., 3Δ SOP, 5Δ XOP. Vertical phorias can be recorded in a variety of ways, such as: 2Δ R/L (or 2Δ R hyper or 2Δ L hypo), 1Δ L/R (or 1Δ L hyper or 1Δ R hypo). Record the test distance corresponding to each heterophoria measurement.
4. Note if any suppression took place during the test, for example if the patient could not simultaneously perceive the line (streak) and spot during Maddox rod or modified-Thorington methods.
5. Also record if the result was variable, for example if the arrow in the Maddox wing or Howell card methods is not stable on the tangent scale.
6.4.9 Interpretation
Most people with normal binocular vision have some slight degree of heterophoria. Lyon et al. reported 25th to 75th percentiles for distance and near phorias of 0 to 1Δ esophoria and 2Δ exophoria to 1Δ esophoria, respectively, in a large sample of first-grade children (aged ~5 years).15 In older children (4th grade, aged ~8 years), distance and near phorias measured with the modified Thorington method were of 0 to 1Δ esophoria (distance) and 2Δ exophoria to 2Δ esophoria (near). Mean distance heterophoria in children and young adults is 1Δ exophoria ± 1Δ and mean near heterophoria is 3Δ exophoria ± 3Δ.19 In older adults, there is a tendency towards greater amounts of exophoria (physiological exophoria) and up to 6Δ of exophoria is not uncommon.7 In adults and children, only about 0.5Δ of vertical phoria may be considered normal, and in some patients even this amount can give rise to symptoms. Significant vertical phorias should be checked to make sure they are not due to a head tilt (unseen behind a phoropter) or abnormal head posture or a non-level trial frame or phoropter.
The heterophoria determined using the subjective tests and measured with the optimal refractive correction, should be compared with the corresponding cover test result measured using the patient’s spectacles. If there is no significant change in refractive error, the horizontal heterophoria measurements post-refraction should be similar to that found with the cover test. Vertical heterophorias would not be expected to differ pre- versus post-refraction, even if there is a substantial change in refractive correction. If a change in refractive correction has occurred this should lead to a predictable change in the horizontal heterophoria so that if the optimal correction shows an increase in plus/decrease in minus power from the patient’s spectacles, then an increase in exophoria or a decrease in esophoria should be expected. Similarly, an increase in minus/decrease in plus power could lead to a decrease in exophoria or increase in esophoria. The amount of change will depend upon the accommodative convergence/accommodation ratio (AC/A ratio, section 6.12). This can be particularly useful to students as it can help to monitor the accuracy of their cover test results, particularly when estimates of the heterophoria are made, rather than measurements with a prism bar.
6.4.10 Most common errors
1. Attempting to determine the presence of heterophoria in a patient with strabismus.
2. Failing to distinguish between lens-induced deviations and true heterophorias, particularly with vertical phorias and commonly caused by a head tilt behind the phoropter or the trial frame or phoropter not being level.
3. Believing that the results from different heterophoria tests are inter-changeable when research evidence shows that this is often not the case.14
Maddox wing
1. Not allowing the patient sufficient time for the arrow to stop moving with horizontal phoria measurement. Also, not encouraging the patient to keep the arrow-head in sharp focus to help reduce it’s apparent movement on the scale.
2. Mistaking the direction of horizontal heterophoria present because the patient has interpolated between the numbers on the scale. For example, if the arrow is seen to be between the 11 and 13 scale positions (esophoria), the patient may state that ‘the arrow is pointing to 12’. You may mistakenly record this result as 12Δ of exophoria because even numbers are employed on the test for exo deviations. The way to avoid this problem is to initially ask whether the line is seen to the left or right of the zero position. This is also a potential issue with the Howell card method.
6.5 Fixation Disparity
During binocular viewing the visual axes are directed at the object of regard so that an image falls on each fovea. However, it is possible to fixate an object without the visual axes intersecting precisely on the object and still have binocular single vision, providing the misalignment is within Panum’s areas. Since Panum’s areas are small, fixation disparities represent small (typically less than 10 minutes of arc) misalignments.20,21 The advocates of fixation disparity maintain that a fixation disparity arises when the visual system is under stress; indeed the presence of fixation disparity is considered by some to represent that part of the heterophoria that is decompensated.
Unlike in heterophoria assessments (section 6.4), the eyes are only partially dissociated during fixation disparity assessment. Thus, most of the target is seen by both eyes; these elements are known as the binocular locks. A small portion of the target, however, is visible to only one eye; these elements are called the monocular markers and the relative position of these markers indicates whether or not a fixation disparity is present.
Some clinical assessments of fixation disparity do not provide a direct measure of the magnitude of the disparity but rather provide a measure of the amount of prism required to eliminate a fixation disparity. This prism power is called the ‘aligning prism’. Fixation disparity measures that are given in prism dioptres are sometimes referred to as the ‘associated heterophoria’ or ‘associated phoria’, although these terms are not universally popular.7 Similarly, though less commonly practised, the presence of a fixation disparity can be eliminated using spherical lens power placed before both eyes.
6.5.1 Comparison of tests
The assessment of fixation disparity with the Mallett unit is quick and simple and gives the prism or spherical lens power that can be used as the starting point for correction of binocular problems. Jenkins et al. found that 1Δ and 2Δ of fixation disparity was associated with symptoms in pre-presbyopes and presbyopes, respectively, and it may be the best indicator that a heterophoria is decompensated.22,23 Mallett reported that the aligning prism corresponded to the decompensated portion of the heterophoria, and fixation disparity has also been shown to increase under binocular stress, such as working under inadequate illumination or too close a working distance, and at the end of a working day.23,24
The Saladin and Wesson cards provide a means for establishing the shape of the fixation disparity curve, something that was originally possible only with the Sheedy Disparometer, a device that is no longer commercially available.25,26 As opposed to the aligning prism measure (which corresponds to just one point on the fixation disparity curve) provided by the Mallett unit, the Saladin and Wesson cards provide estimates of fixation disparity when different amounts of prism are introduced and from these measures the key components of fixation disparity curves (e.g. slope in central region, as well as the x- and y-intercepts) can be deduced.25,26 The Saladin card is reported to have good test-retest reliability.27
The fixation disparity approach has a number of significant disadvantages. One is that fixation disparity measures seem to be critically dependent on the method used to measure them. For example, results obtained with the Wesson and Saladin cards are not comparable, raising the possibility that the measures indicate more about the equipment than about the visual system they are testing.25 The size and position of the binocular lock and monocular markers appear to exert an influence on the magnitude of the fixation disparity.28 This is a problem given that many computer-based programmes offer different formats of the fixation disparity test. For this and other reasons, many remain unconvinced about the clinical relevance of fixation disparity and view it instead as a physiological phenomenon.29 For example, if fixation disparity does reflect the decompensated portion of the heterophoria, the type of fixation disparity present should always match the direction of heterophoric deviation (e.g. an exo fixation disparity should only be present in a patient with exophoria). However, this is not always the case and it is estimated that one quarter to one third of individuals may have so-called ‘paradoxical fixation disparity’.30,31 Nevertheless, others place much greater emphasis on its clinical significance and claim that fixation disparities have strong diagnostic significance. There are claims, for example, that the magnitude of fixation disparity is linked to the level of stereopsis that can be achieved by the patient and that the size of the aligning prism at near is inversely correlated with the fusional reserves, supporting the view that both measures may be indicators of decompensation of heterophoria.32,33 Proponents of fixation disparity also argue that since the eyes are only minimally dissociated, the conditions of testing mimic those in habitual viewing to a much greater extent than is the case in heterophoria measurement.
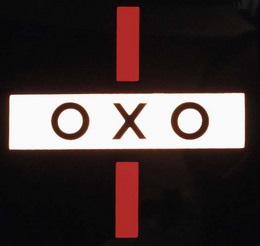
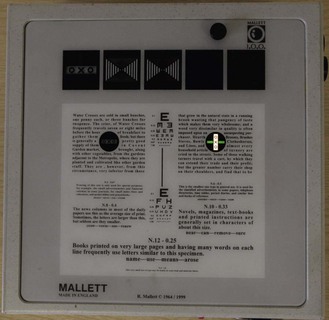
In the UK, the Mallet unit is typically used to measure the fixation disparity at distance and near. The distance Mallet unit uses red monocular strips and a central fixation lock (OXO), but does not have a peripheral fusion lock (Figure 6.9). The near Mallett unit uses green monocular strips, as green is usually more sharply focused at near due to a slight lag of accommodation, a central fixation lock (OXO) and a surrounding paragraph of print providing a peripheral fusion lock. The near Mallet unit (Figure 6.10) also contains paragraphs of text of various sizes (typically N5 to N10), a retractable ruler, a near duochrome and targets that allow investigation of stereopsis and suppression.
6.5.2 Procedure: Mallett unit
1. Explain the test to the patient: ‘This is a test that will help to determine whether your symptoms could be due to a problem of your eye muscles not working together properly.’
2. Fixation disparity is usually assessed when the appropriate refractive correction is in place for the viewing distance.
Fixation disparity at distance
3. Orient the OXO in a horizontal position with the red strips vertical. Keep the room lights on to illuminate the unit’s surroundings; this provides paramacular and peripheral fusion stimuli.
4. Prior to placing the polaroid visor in front of the patient’s eyes, ask the patient to ‘Look at the X in the middle of the OXO; do you see two red strips, one above and one below the OXO? Are the two strips exactly in line with each other and in line with the middle of the X?’ This ensures that the patient is aware of what alignment looks like (Figure 6.11a), so that any subsequent misalignment is more easily noticed.
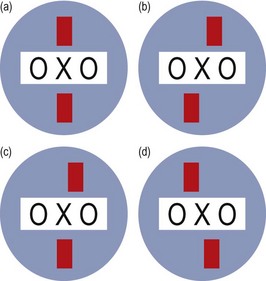
Fig. 6.11 Diagram illustrating the possible patient responses to the Mallett fixation disparity test.
5. Place the polaroid visor in front of the patient’s eyes and check that the top red strip is seen by the left eye, and the lower strip by the right eye.
6. Ask the patient ‘Can you still see the two red strips?’ If only one strip is seen, show the patient the two individual strips by covering each eye in turn. If only one strip is still seen, deep central suppression may be present, and no further measurement is possible. Most patients, however, should see both strips without difficulty.
7. Ask the patient ‘Are the strips in line with the middle of the X?’
8. If both of the strips are seen to be aligned with X, no fixation disparity is present (Figure 6.11a).
9. Several results could be reported:
(a) If the lower red strip (RE) is to the left of the X and the upper strip (LE) is to the right, an EXO fixation disparity is present in both eyes (Figure 6.11b).
(b) If the lower strip (RE) remains below the X but the upper strip (LE) moves to the right, an EXO fixation disparity is present in the left eye only (Figure 6.11c). When the disparity is unilateral, it is usually the non-dominant eye that demonstrates the deviation. Unilateral fixation disparity is most common in vertical imbalance, whereas horizontal fixation disparities are usually bilateral.
(c) If an ESO fixation disparity is present, the lower strip (RE) will be to the right of the upper strip (LE) (Figure 6.11d).
10. The fixation disparity should be neutralised using the lowest prism power (or in some cases of esophoria, the weakest spherical lens) that eliminates the fixation disparity. With a unilateral fixation disparity, it is suggested that prism should be added to the eye demonstrating the slip. Note, however, that in the case of a bilateral slip it is not necessary to introduce prism before both eyes when neutralising the disparity. Between changes of prism, instruct the patient to read a few Snellen letters from the distance chart. Remember that the Mallett unit is designed to allow you to determine the minimum power of prism necessary to eliminate the fixation disparity.
11. Rotate the OXO through 90 degrees. The OXO letters now appear in a vertical line with the red strips horizontal. Repeat the assessment. If both a horizontal and vertical fixation disparity exists together, the horizontal fixation disparity should be corrected before the vertical is measured.
Fixation disparity at near
1. The measures obtained using the near Mallett unit are likely to be changed by previous heterophoria measurement, particularly if von Graefe’s technique was employed. It is recommended, therefore, that the near Mallett unit should be used before the dissociated heterophoria is measured in patients regarded as having unstable binocular vision, past or present.34
2. For near assessment, the procedure is similar, except that the patient’s normal reading spectacles or optimal near correction should be worn in the trial frame. Also, the near centration distance should be adjusted for near.
3. A paragraph of small text must be read prior to any fixation disparity assessment to ensure accurate accommodation on the target.
6.5.3 Procedure: Wesson card
1. The Wesson chart can be used at 40 cm or at 25 cm. Appropriate refractive correction should be worn and the card should be properly illuminated.
2. Wearing the polarising goggles, the patient reports which line the arrow is pointing towards when no prism is introduced and then when 3 BI, 3 BO, 6 BI, 6 BO, etc., in 3 prism dioptre increments up to 24 BI and 24 BO, or up to the prism power where non-transient diplopia is reported. In so far as possible, the prism should be split evenly between the eyes.
3. Because of the risks of prism adaptation it is recommended that the prism should not be in place for more than 15 seconds and that the patient should close their eyes for at least 15 seconds between measurements with successive prism powers.26
4. Note the magnitude of fixation disparity from the card for each prism and plot the fixation disparity curve using the data that are gathered.
5. To obtain vertical fixation disparity measures, the card is turned through 90 degrees. Vertical fixation disparity measures are taken without any prism in place.
6.5.4 Procedure: Saladin card
1. The Saladin chart is used at 40 cm and appropriate refractive correction should be worn to enable the card to be seen clearly at this distance. The card should be properly illuminated.
2. Wearing the polarising goggles, the patient reports which circle contains the vertically-oriented lines that are in alignment. The physical misalignment of the lines in these circles provides the measure of horizontal fixation disparity.
3. The above procedure is carried out when no prism is introduced and then when 3 BI, 3 BO, 6 BI, 6 BO, etc., in 3 prism dioptre increments up to 24 BI and 24 BO, or up to the prism power where non-transient diplopia is reported. In so far as possible, the prism should be split equally between the eyes.
4. Because of the risks of prism adaptation it is recommended that the prism should not be in place for more than 15 seconds and that the patient should close their eyes for at least 15 seconds between measurements with successive prism power.26 Similarly if the patient fails to achieve fusion with the new prism power within 5 seconds of its introduction, it is suggested that no fixation disparity be recorded for that prism power and that no higher prism power with the same base direction be offered.26
5. Note the magnitude of fixation disparity from the card for each prism and plot the fixation disparity curve using the data that are gathered.
6. Using the circles with horizontally oriented lines, the vertical fixation disparity can be measured. Vertical fixation disparity measures are taken without any prism in place.
6.5.6 Interpretation
Most patients will be able to simultaneously perceive the monocular markers on the distance and near Mallett unit, and usually they are aligned without the need for any prisms. It is important to remember that the prism power required to align the markers is not predictable from the magnitude of the fixation disparity (e.g. small fixation disparities are not always eliminated by low prism powers) and two patients exhibiting the same amount of fixation disparity may require very different prism powers to perceive the lines as aligned. Owing to prism adaptation it is advisable to leave the lowest prism power that neutralises the fixation disparity in place for a period of time (several minutes). If a slip re-appears after a period of time when the same prism power had initially neutralised the fixation disparity, you can be much less certain that prescribing this prism will prove beneficial. On the other hand, it is claimed that most patients with abnormal binocular vision which gives rise to symptoms do not adapt, or only partially adapt, to prisms.35 The prism power that neutralises any vertical fixation disparities can be used to prescribe vertical prism.
For the Wesson and Saladin card, the horizontal fixation disparity data gathered are used to plot fixation disparity curves and from these curves four key characteristics are identified; they are the type (I, II, III or IV), the slope, and the x- and y-intercepts. A discussion of fixation disparity curves is beyond the scope of this chapter except to say that most asymptomatic patients have type I curves that feature shallow slopes in the central region, and most show low numerical values for the x- (aligning prism) and y- (fixation disparity in minutes of arc) intercepts. Scheiman and Wick maintain that fixation disparity curve method provides the best means for determining the amount of prism to prescribe.19
6.5.7 Most common errors
1. Decentration errors due to poorly fitting trial frame/phoropter or badly centred lenses.
6.6 Convergence Ability: Near Point of Convergence (NPC) and Jump Convergence
When we wish to view a near target, three processes take place and collectively they are referred to as the near triad of responses. The eyes converge, they accommodate and there is pupillary constriction. The near point of convergence (NPC) is the point where the visual axes intersect under the maximum effort of convergence whilst maintaining binocular single vision. It is a measure of pursuit convergence. Jump convergence, a qualitative assessment of the quality of convergence as fixation jumps from a distant or mid-distant target to a near target, can also be measured.36
Convergence insufficiency is typically described as a syndrome of exophoria that is greater at near than at distance, a remote near point of convergence and poor positive fusional reserves together with the presence of asthenopia.37 Tests of jump convergence are not normally included in the diagnosis of convergence insufficiency, perhaps because it provides qualitative rather than quantitative data. Convergence insufficiency is an important binocular vision problem due to its high prevalence; in population-based studies it has been reported to have a prevalence of up to 8.3%.38 It is also important because there is considerable evidence available to show that it is a treatable condition.38–40 It is not appropriate to assess convergence ability in a patient with heterotropia at near; unless the strabismus is of recent-onset they will almost certainly not experience diplopia because of suppression of the strabismic eye. Also, convergence is not tested in these patients because the eyes do not converge to the same point in habitual viewing at near.
6.6.1 Comparison of tests
The near point of convergence is a quick and easy test to perform. It requires no special equipment and it provides a very repeatable result.41 It is the standard test for convergence ability. The Jump Convergence test has the advantage that it more closely reflects typical near viewing situations where fixation is continually switching between near targets; it is seldom in the real world that we would encounter a target that moves slowly and predictably towards us along the midline as with the NPC task. Early research suggested poor jump convergence was more closely linked to visual difficulties at near by comparison with a remote NPC.36 The test is relatively easy to perform and can be used as an additional assessment in patients who show signs of convergence insufficiency, and in patients who show a normal NPC but whose symptoms suggest possible convergence difficulties. The disadvantage of the jump convergence test is that it has not been subjected to the same research evaluation as NPC. Consequently there is a lack of normative values for the test and a lack of evidence that the test can discriminate symptomatic from asymptomatic individuals.42
The issue of whether NPC should be measured with an accommodative (e.g. a letter) or a non-accommodative (e.g. spotlight) target has received considerable attention. In presbyopic patients the choice of target does not seem important but in pre-presbyopes there may be a difference in NPCs measured with accommodative and non-accommodative targets.42–44 Although such differences may not be substantial in visual normals, Scheiman et al. suggest that individuals with convergence insufficiency show more remote break and recovery NPCs with a penlight compared to when an accommodative target is used.42
6.6.2 Procedure: NPC
 .
.1. Seat the patient comfortably with their head erect and eyes in slightly downward gaze. Make sure the patient is wearing their near correction because this relates to the situation in which any symptoms are being noticed. There is also merit in assessing convergence without any correction, although the patient will need to be reminded that it is doubling, not blurring of the near target that is of interest. Sit directly in front of the patient so that you have a clear view of the two eyes.
2. Keep the room lights on. If necessary, position additional lighting to illuminate the patient’s eyes and/or the target.
3. Explain the measurement to the patient: ‘This test determines how well your eyes can turn in to follow a close object’.
4. Position the target at a distance of 50 cm directly in front of the patient slightly below the midline. A target with fine detail should be avoided as otherwise patients often confuse blur with diplopia. In adults, the tip of a pen can be used. A medium sized, coloured picture on a fixation stick can be used with children.
5. Instruct the patient: ‘Please keep looking at the pen/picture as I move it towards your eyes. Let me know as soon as it becomes doubled – not blurred but doubled. Try really hard to keep it single. Don’t worry if you feel your eyes pulling’.
6. Make sure that the patient is looking at the target with both eyes.
7. Slowly but steadily move the target toward the bridge of the patient’s nose. The speed should be such that it takes approximately 10 s to move the target from 50 cm to the bridge of the patient’s nose. To keep the patients attention, it can be useful to move the target from side to side slightly, particularly at the beginning of the measurement, and check that the patient maintains fixation.
8. Observe the patient’s eyes for loss of convergence. Measure the distance the target is from the eyes when one of the eyes loses fixation by flicking outwards (objective NPC) and/or the patient reports diplopia (subjective NPC).
9. If the target becomes doubled (subjective NPC) before it is more than 10 cm from the bridge of the nose encourage the patient to make an extra effort to make the target single again. Moving it away slightly will help this. If single binocular vision can be re-established, advance the target again towards the patient.
10. If a patient exhibits a remote NPC and both eyes appear to be converging to the target, they may be confusing diplopia with blur. Check this by covering one eye and asking the patient if the target is still double. Continue to move the target in until the objective NPC is found.
11. Once the NPC has been reached, slowly move the target away from the patient’s eyes and ask when the target becomes single again. Measure this point and record it as the recovery NPC point. Repeat the test. If the patient can keep the target single to their nose, this is recorded as ‘to nose’ and a recovery point is not measured.
12. If the history indicates that the patient requires prolonged and/or excessive convergence in a specific position of gaze then repeat the procedure in that specific gaze position.
13. If the NPC appears remote (10 cm or above) in a pre-presbyopic patient, repeat the test using an accommodative target rather than the tip of the pen.
6.6.4 Procedure: Jump convergence
1. Seat the patient comfortably with their head erect and eyes in slightly downward gaze. The patient should wear their refractive correction for distance viewing. Sit directly in front of the patient so that both eyes can be viewed simultaneously, but ensure that distance fixation is not obscured.
2. Keep the room lights on. If necessary, position additional lighting to illuminate the patient’s eyes and/or the target thus avoiding shadows.
3. Indicate clearly to the patient both a distant single letter of a size one line larger than the patient’s VA of the poorer eye (e.g. if the patient’s VAs are 6/4 and 6/9, use a 6/12 letter as a target) and near (fixation rule) target. Position the near target about 20 cm in front of the patient. In another version of the test, the patient may be asked to switch fixation between a target at, say, 60 cm and another at, say, 30 cm.
4. Ask the patient to alternate fixation from the near target to the more distant target and back again.
5. Observe the eyes as they converge and diverge in order to gain an impression of the speed and accuracy in switching between the two target locations.
6. The number of cycles (switching from the first target to the second target and then back to the first) that can be completed in a minute (cycles per minute, cpm) may be counted. Alternatively, comment on the speed and accuracy of eye movements between the near and more distant targets observed over a shorter period of time (e.g. 5 or 6 cycles of change in target being viewed).
6.6.5 Recording
1. NPC: The break and recovery NPC points should be recorded in centimetres from the bridge of the nose. Record the break point first, followed by the recovery point. Examples are given in Table 6.2. If the subjective NPC is much larger than the objective NPC, it is likely that the patient has confused blurring with diplopia and the objective NPC should be recorded. If the patient reports that the target is still seen singly when the eyes are seen to be misaligned, suppression should be suspected and investigated further.
Table 6.2
Examples of recordings of the near point of convergence
| Abbreviation | Description |
| NPC: 6 cm/9 cm | A break point of 6 cm and recovery point of 9 cm (normal convergence) |
| (Obj.) NPC: 5 cm/8 cm | Objective NPC recording of a 5 cm break point and 8 cm recovery point |
| NPC: to nose | Normal convergence to the nose |
| NPC: 12 cm/16 cm, RE diverges | Abnormal convergence, with 12 cm break and 16 cm recovery points. The right eye moves out at the break point |
| NPC: 14 cm/18 cm, LE diverges, suppression? | Abnormal convergence with likely suppression. The break point is 14 cm and the recovery point is 18 cm. The left eye moves out at the break point, but no diplopia is reported |
2. Jump: Record whether the jump convergence is smooth and fast or whether there are any jerky movements or an inability of one eye to converge adequately to the target. For example:
6.6.6 Interpretation
Normative NPC values show considerable variation between studies. Scheiman et al. suggest a clinical cut-off value of 5 cm for the near-point of convergence break and 7 cm for the near-point of convergence recovery with either an accommodative target or a penlight in children and adults.42 Children and adults should certainly be able to converge to within about 7.5 cm and recovery should return within 10.5 cm.37 An NPC larger than these figures suggests possible convergence insufficiency and should be investigated further. This investigation should include jump convergence, distance and near heterophoria, near fusional reserves and near fixation disparity. Given the reported high prevalence of accommodative insufficiency in children with convergence insufficiency, tests of accommodation should also be conducted in these patients.37 The effect of any new refractive error or refractive change on these measurements should be assessed.
Instead of a failure of one eye to converge it is possible that diplopia will be reported and/or that both eyes are seen to no longer view the target because of over-convergence. This is rarely encountered but when it does arise it suggests that the patient may have an abnormally high AC/A ratio (section 6.12). This should be recorded and additional investigations should be carried out. Good, fast, smooth jump convergence should be observed to 10–15 cm.
6.6.7 Most common errors (NPC)
1. Relying upon subjective NPC measures. Objective estimates should also be gained from careful observation of the eyes as they converge.
2. Carrying out the test once only; the test should be carried out at least twice to gain an impression of sustained and repeated convergence ability.
3. Moving the target too rapidly can lead to over-estimation of convergence ability. Moving the target too slowly could cause the patient to lose interest. This is particularly true in children.
4. Not encouraging the patient enough to keep the NPC target single (particularly children).
5. Testing the eyes in upward or primary gaze instead of slight downward gaze.
6. Carrying out the tests in patients who have a heterotropia at near.
6.7 Fusional Reserves
6.7.1 Fusional reserves
The measurement of fusional reserves is an important clinical test in the assessment of binocular vision status. Heterophorias are latent deviations that are corrected by the sensory fusion reflex. It is useful to know what proportion of the fusional reserves are required to correct the heterophoria.45 It is thought that between one-third and two-thirds of the fusional reserves may be used without placing the system under undue stress. Positive and negative fusional reserves can be measured at distance and near by placing appropriate prisms before the eyes. Prism is introduced before the eyes until fusion breaks down and diplopia results.46 Placing base-out prism before the eyes stimulates convergence and the amount required to produce diplopia is called the positive fusional reserve (PFR). Because the eyes are forced to converge, accommodation is stimulated (convergence accommodation) but cannot be maintained at the correct level for the target distance and therefore the target usually blurs before diplopia occurs.47
6.7.2 Comparison of techniques
Risley or rotary prisms are an ideal method of changing the amount of prism before the eyes in a smooth manner and they provide repeatable results in young adults, although the results are reported to be less repeatable in children.41,46 Although phoropters typically feature rotary prisms, they have the disadvantage that they do not allow a view of the patient’s eyes. Fusional reserve tests in free space, typically using prism bars, more closely mimic natural viewing conditions and are particularly useful with young children as the eyes can be seen and an objective assessment of the fusional reserves can also be obtained. Objective fusional reserve estimates are very important, particularly in individuals in whom subjective estimates are often unreliable (e.g. young children).
6.7.3 Procedure
 NOTE: This description is for the measurement at 6 m. The technique can be applied for near by adjusting the trial frame/phoropter to the near centration distance and locating a fixation target at the appropriate distance.
1. Explain the test to the patient: ‘This test measures the range over which your eye muscles can keep objects clear and single.’ The patient should wear their distance refractive correction. Keep the room lights on.
2. Position yourself in front of the patient so that you can view the patient’s eyes easily without obstructing their view of the target.
3. To ensure accurate fixation and accommodation, isolate a single letter of a size that is equal to or slightly larger than the patient’s visual acuity of the poorer eye (alternatively, a small block or a vertical line of letters can be used). For young children, a small, isolated picture may be better for holding their attention.
4. Instruct the patient: ‘I would like you to look at the letter * at the other end of the room (or ‘the letter * on this stick’ for near reserves). I am going to make the picture want to go double and I would like you to try as hard as you can to keep it both clear and single. Please tell me as soon as the letter/target becomes blurred or doubled but remember to try to keep it clear and single for as long as you can even it takes a big effort to achieve this.’
Horizontal fusional reserves
5. Measure horizontal fusional reserves first. You should first measure the fusional reserve that opposes the heterophoria: e.g. if the patient has exophoria, measure the positive fusional reserve first. This is to ensure that an accurate measurement of the key reserve is obtained, as fusional reserves that are measured subsequently may be modified by vergence adaptation and fatigue.48
6. If you are using a phoropter, ask the patient to close their eyes and introduce the Risley prisms (set at zero) in front of both eyes. If you are using a prism bar, position it so that horizontal prism will be introduced from a zero starting point over one eye.
7. Let us take the example of measuring PFR (measured with base-out prism): Slowly increase the amount of base-out prism at a rate of around 2/3 Δ/second. If you are using a phoropter, increase the prism in both eyes at an equal rate. In this case, remember that the amount of prism being added is the sum of the powers introduced before each eye.
8. Instruct the patient to report the first perceptible blur. As soon as the blur is reported, stop increasing the base-out prism and instruct the patient to attempt to clear the letter. If the letter can be cleared, continue to slowly increase the base-out prism power until the patient reports a blur that cannot be cleared. This is the sustained blur point and it indicates that the prism power has caused the patient’s accommodation response to be over-exerted (base-out prism) or under-exerted (base-in prism) for the viewing distance in question. In other words, the error in accommodation response just exceeds the depth-of-focus at the blur point. Make a mental note of the prism amount before the patient’s eye(s) at this point. If the patient does not report a blur but instead reports diplopia first, then there is no blur point.
9. Ask the patient to report when the letter now doubles. Increase the amount of prism until the patient reports sustained double vision. This is the break point and it corresponds to the situation where the eyes can no longer make the motor response that is needed to overcome the prism power and the image of the target no longer falls on the fovea of the right and left eyes. Make a mental note of the prism before the eye(s) at this point.
10. Throughout the procedure watch the patient’s eyes carefully. As the base-out prism power is increased, the eye receiving the prism power should be seen to converge to overcome the prism. This is difficult to observe initially when small amounts of base-out prism power are introduced and when the increments in prism power are small. However, when substantial amounts of prism power (e.g. 6Δ and above) have been introduced, the eye (or both eyes if prism is simultaneously introduced to both eyes) receiving the prism should be seen to converge and when the prism power is further increased, further convergent movements should be observed. Thus you should be on the look out for the objective break-point. When the break point is reached, the eye receiving the base-out prism will be seen to make a swift, large outwards movement (so as to make the visual axes parallel again) or the eye not receiving the base-out prism will make a swift and large outwards movement which leaves the visual axes more parallel.
11. It is important to note that in some cases the patient will not report diplopia even though the break point has been passed. When questioned, such patients will usually notice that there is another target ‘away to the side’. Because the two images are widely separated it can be ignored by the patient. Careful observation of the patient’s eyes will alert you to the possibility that this may have happened. For example, despite the presence of large prism power the visual axes of the eyes will look aligned whereas the appropriate response of the visual system in these circumstances is that the eye receiving the prism should have converged (base-out prism) or diverged (base-in) so as to overcome the prism to restore single binocular vision.
12. Slowly reduce the amount of prism until the patient reports that the two images have moved together again to form a single image. This is the recovery point. Make a mental note of the amount of prism in front of the patient’s eye(s) and remove the prism bar.
13. If you are using a phoropter, ask the patient to close their eyes and return the Risley prism power to zero.
14. Repeat the measurement for the other horizontal fusional reserve (steps 6–12). In the example above base-out prisms were used to measure the PFR, so base-in prisms should now be used to measure the NFR. Remember that with NFR measurement at distance there is usually no blur point.
Vertical fusional reserves
15. If you are using a phoropter, ask the patient to close their eyes and introduce a Risley prism in front of one eye only (e.g., base-up BU RE). If you are using a prism bar, position it so that vertical prism will be introduced from a zero starting point over one eye.
16. To measure vertical fusional reserves, slowly increase the amount of prism placed before the eye(s). Note that vertical fusional reserves are considerably less in magnitude than the horizontal reserves and the increase of the prism power should be slower than used for measuring horizontal vergences (at about 0.5–1Δ/second).
17. Measure the break and recovery points for right supravergence (base-up before right eye) and infravergence (base-down before right eye). Vertical fusional reserves do not have a blur point.
6.7.4 Recording
1. If there is no blur point, record ‘X’.
2. Examples of test results include: e.g. NFR @ 6 m: X/14/10; PFR @ 6 m: 12/18/10; R(OD) infra @ 40 cm: 3/1; R(OD) supra @ 40 cm: 3/1.
3. A recovery point that requires prism of the opposite base to that used to initially produce the diplopia (such as a base in prism being needed for recovery from diplopia when using base-out prisms to produce diplopia and measure PFR) is recorded as a minus value. For example, PFR @ 6 m: 3/5/–1 indicates that 1Δ base in was required to achieve recovery from the diplopia that resulted when 5Δ base-out had produced diplopia and 3Δ base-out had produced the first sustained blur.
4. If the limit of the prism power is exceeded, record as >40Δ (or the maximum prism value) provided you are certain that the break-point has not been exceeded and that the patient simply failed to report diplopia.
6.7.5 Interpretation
Fusional reserves can be compared to normal data (Table 6.3) and several tables of comparison have been published in adults and children.15,19,49 It is clear from these comparisons that a wide variety of ‘normal’ data has been published over the years. While you should have some awareness of values that can be expected at distance and near for the various measures (base in, out, etc.), it is desirable that each clinician obtain their own impression of the normative values (average and range) that they can expect using their own equipment and their own technique. The value of fusional reserve measures is greatest when considered not in isolation but when compared to the heterophoria measurements. A patient with an exophoria will use part of their PFR to correct the deviation. The measured PFR therefore represents the amount of fusional vergence in reserve to maintain single binocular vision. Similarly, a patient with esophoria will use part of their NFR to correct the deviation. Knowledge of the heterophoria size and of the magnitude of the opposing fusional reserves can be useful in the assessment of a patient’s binocular status specifically in relation to whether the heterophoria is likely to be giving rise to the patient’s symptoms. The proportion of the total fusional vergence used to correct the phoria can be determined. For example:
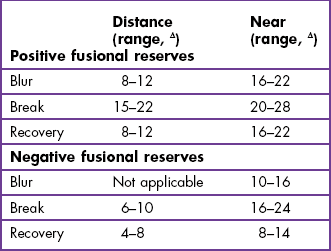
| Distance phoria | 9Δ exophoria |
| Measured positive fusional reserves (PFR) | 18Δ |
| Total positive fusional reserves | 18Δ + 9Δ = 27Δ |
Therefore, ⅓ (9Δ) of the total positive fusional reserves (27Δ) are used to correct the phoria, which is within normal limits. This approach has been formalised in Sheard’s and Percival’s rules, which are used to compare the fusional reserves with the heterophoria and to indicate whether the phoria is likely to be decompensated now or to decompensate in the future under conditions of stress (e.g. around examination time in the case of students).
Sheard’s rule proposes that the fusional reserve blur point should be at least twice the size of the phoria. Sheard’s criterion works best for exophoric cases so that the PFR to blur should be at least twice the size of the exophoria in order for it to be compensated.50 Sheard’s criterion further suggests that the prism required to correct a decompensated exophoria is:
Prism required = 2/3 exophoria – 1/3 PFR. Thus, for example if the exophoria is 6Δ and the PFR is also 6Δ. Sheard’s criterion suggests that a prism of 2Δ base-in should be prescribed. Percival’s rule suggests that a patient should operate in the middle third of their binocular vergence range. Percival’s rule should only be used for near phorias as normal distance PFR and NFR are typically very unbalanced and Percival’s rule tends to work best for near esophoric cases.50 Percival’s rule suggests that the PFR and NFR should be balanced and that one should not be more than double the other. Percival’s criterion suggests:
6.7.6 Most common errors
1. Not explaining the test properly to the patient and not pushing the patient to make maximum effort to keep the target clear and single for as long as possible.
2. Not observing the eyes carefully as the prism power is increased so as to gain an objective estimate of the break-point.
3. Increasing the prism power too quickly or too slowly.
4. Carrying out the test in those patients who do not have binocular vision at the test distance. In patients with suppression (e.g. strabismic patients) diplopia will probably never be reported no matter what prism power is introduced.
5. Providing an inappropriate stimulus to accommodation through poor choice of target.
6.7.7 Acceptable alternative technique: 20Δ base-out test

This technique is suitable for use in those patients who may not be able to co-operate with fusional reserve measurement (e.g. young children). Rather than introduce variable prism power and obtain responses from the patient regarding the blurring or doubling of images, this test relies upon qualitative judgements made by the practitioner in response to the introduction of a high-powered prism. Typically, a 20Δ base-out is used (though in theory any prism power or direction can be employed) and the practitioner examines whether the eye behind the prism makes a swift and smooth movement in order to restore the image of the object of regard on the fovea and a swift recovery movement in the opposite direction when the base-out prism is removed. The test is repeated with the prism in front of the other eye. In principle the test is similar to 4 prism base-out test (section 6.13) but it is qualitatively much easier for the practitioner to establish whether the appropriate motor fusion response has taken place following the introduction of this high powered prism. A normal response on this test can allow the practitioner to generalise about the effectiveness of the motor fusion system and thus the ability of the visual system to maintain fusion throughout the day. A normal response on this test may be recorded in the following fashion: ‘20Δ base-out overcome with either eye, and good recovery’. A positive response on this test (i.e. an appropriate motor fusion response) is a very strong indicator that peripheral fusion exists and thus the 20Δ base-out test can prove useful in children who are too young to undergo formal sensory testing.51 Unfortunately the same is not true in reverse, because a negative result on the 20Δ base-out does not guarantee that peripheral fusion is poor or absent.
6.8 Vergence Facility: Prism Flippers
Measures of vergence facility may be useful alongside measures of fusional reserves (section 6.7) in diagnosing binocular vision problems in symptomatic patients in the same way that measures of accommodative facility can provide additional information beyond that provided by measures of accommodative amplitude.52 Base-out prism forces the eyes to converge and thus the patient is forced to employ their positive fusional reserves to restore bifoveal fixation following the introduction of base-out prism pair. No change in accommodation is needed, and any accommodation that accompanies the positive fusional effort may blur the target. Similarly, the patient needs to employ their negative fusional reserves without relaxing accommodation to overcome the presence of base-in prism. Different prism powers can be used in prism flippers. For example, 3BI/12BO and 8BI/8BO represent common combinations.19
6.8.1 Comparison of tests
This test requires little additional equipment and is straightforward to perform. The results of the test may explain symptoms not readily explained by other tests.52 Gall and colleagues reported that the combination of 3Δ base-in and 12Δ base-out prism flippers provides good repeatability and the best discrimination between symptomatic and non-symptomatic patients.53 However, normative values have also been published for 8BO/8BI prism flippers.49,53
6.8.2 Procedure

The test can be carried out at any test distance, although it is normally carried out at near. If, however, symptoms are reported at a non-reading test distance, testing should be carried out at that distance. The patient should view a single isolated letter/target or a vertical line of letters; the letter/target should be ~1 line bigger than the smallest letters that can be read at the test distance. The patient should wear the habitual near correction for the test. You should sit down during the test so that you can observe the patient’s eyes as the prisms are flipped.54
1. Instruct the patient as follows: ‘I am now going to test how well your eyes can maintain clear and single vision when I introduce some lenses’.
2. First demonstrate the task required of the patient by introducing the prisms and asking the patient to appreciate that it can take some time for the letters to become clear and single after the introduction of the prism flippers. Remind the patient that they will be required to let you know as soon as the letters are clear and single, and also that they should attempt to make them clear and single as quickly as possible.
3. Once the patient has understood the test, start a watch and introduce the 12Δ base-out prism power. When the patient reports ‘clear’, flip the handle to introduce the 3Δ base-in prism power. When the patient again reports ‘clear’ this represents one cycle.
4. Observing the patient’s eyes as the prisms are introduced provides very useful objective confirmation that the patient understands what is required in the test, that they are complying with your instructions and therefore that the result is valid. When base-out prism power is introduced, expect to see the eyes converge and when the prisms are flipped to provide base in power the eyes should be seen to diverge. The ease with which this pattern of eye movements can be seen naturally depends on the prism powers but except in the case of very low powers (e.g. 2BI/2BO), careful observation should reveal the expected pattern if the test is proceeding properly.
5. As the eyes are being observed, count the number of cycles achieved by the patient in a 60 second period.
6.8.4 Interpretation
Normal values for this test (using 12 BO/3BI) are in the region of 15 cycles/minute.19
6.8.5 Most common errors
1. Using an inappropriately sized target for the test (e.g. letters that are too large) or using a target that is surrounded horizontally by other targets so that appreciation of diplopia is made difficult for the patient.
2. Counting the recovery from each prism introduction as a cycle and thus over-estimating the test performance by a factor of two.
3. Not observing the eyes closely during the test and therefore failing to check that the eyes move in the expected fashion when base-in and base-out prism powers are added.
4. Not recording the power of prisms in the flippers used to test the vergence facility and/or the test distance.
6.9 Amplitude of Accommodation
Accommodation or focusing allows targets to be made clear over a large range of distances. The amplitude of accommodation measures the full range of accommodation: from the far point, where accommodation is fully relaxed, to the near point, with maximum accommodation exerted. If the far point is at infinity (as in the case of emmetropes and those wearing optimal refractive correction for distance vision), then measurement of the near point allows the amplitude of accommodation to be determined with ease. The amplitude is calculated simply by taking the inverse of the near point of accommodation, which is expressed in metres. For example, if the near point was 10 cm, the amplitude of accommodation is 1/0.10 = 10D. The amplitude of accommodation gradually falls with age, and causes patients over the age of about 45 years to have difficulty with near work and require reading glasses. Measurement of the amplitude of accommodation can help to identify the appropriate reading add required to alleviate the patient’s near visual problems (section 4.14). The amplitude of accommodation becomes zero at age 55–60.55 If you obtain a measure for amplitude of accommodation in patients over 60 years of age, you are measuring their depth of focus and not accommodative amplitude.
6.9.1 Comparison of tests
There are a variety of ways in which the amplitude of accommodation can be measured.56,57 One is to bring a target closer and closer to the patient’s eyes until it first blurs; this is called the push-up amplitude. Another is to start with the target directly in front of the eyes and move it away until it first becomes clear; this is the pull-away method. Some practitioners take an average of the push-up and pull-away values as the amplitude of accommodation because it provides a useful compromise between the slight overestimate of the push-up technique and the slight underestimate of the pull-away technique.58 However, the subjective element that is a feature of push-up methods (where the patient reports first sustained blur) is best avoided altogether because of differences between patients in their understanding of ‘blur’ or in their interpretation of these instructions and because the letters get progressively bigger in angular size (and thus easier to see) as they are moved closer to the eyes.59 The technique advocated here is the pull-away method. The advantage of the pull-away method is that the patient responds by naming the letter/target as soon as they can identify it rather than when they first notice the subjective impression of blur (as in the push-up method). In the pull-away method, you hold the fixation stick and place your thumb beneath an isolated 20/30 letter (or use an RAF rule, Figure 6.12; or an appropriately sized picture target in the case of young children). The patient should not know the identity of the target/letter before the test starts. There is a modification to the pull-away method which involves inserting a –4 D lens before the eye before the test is carried out. This modification has some advantages and is described below in section 6.9.6.
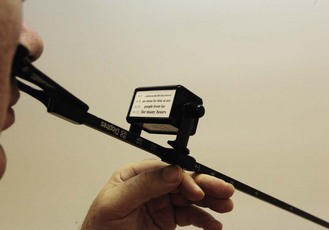
Fig. 6.12 A Royal Air Force (RAF) rule being used to measure amplitude of accommodation. It can also be used to measure the near point of convergence.
Another alternative involves using increasing amounts of minus spherical lens power until distance vision blurs (‘Sheard’s technique’). This method typically provides lower estimates of amplitude of accommodation than those provided by the push-up method and it can only be satisfactorily measured using a phoropter.60 In addition, the minus lens method provides a less clinically relevant measure than the push-up or pull-away techniques, which provide direct measurements of the near point of clear vision.59
6.9.2 Procedure: Pull-away amplitude of accommodation
1. Explain the test to the patient: ‘I am going to measure the focusing power of your eyes.’
2. The test is usually performed with the patient wearing their optimal distance correction, but can be performed with the patient’s spectacles as a screening test. If the test is to be performed on older presbyopes they should wear a partial addition (~+1.00 for 45–55 years) to ensure they can see the stimulus at the end of the near point rule. You should sit directly in front of the patient to allow a simultaneous, unobstructed view of the two eyes. In young children with very high amplitudes, slight linear differences of the near point produce large dioptric differences, and it is useful to add a –3.00 D lens to place the near point further from the spectacle plane. This also ensures that depth-of-focus errors are minimised.59
3. Direct additional lighting over the patient’s shoulder to illuminate the reading card without shadows.
4. The test is usually performed monocularly (right and left) followed by a binocular measure of accommodation amplitude. The procedure is common for all viewing conditions. For monocular measures occlude one eye.
5. Instructions: ‘In a moment I am going to ask you to close your eyes. When you open them there will be a letter/target right in front of your eye(s). At the start it will be too close for you to name but I will start to move it away from your eye. It is very important that you tell me what the letter/target is as soon as you can see it’.
6. With the patient’s eyes closed, place the fixation stick so that it is almost touching the eyelid (monocular measures) or tip of the nose (binocular measures). When you instruct the patient to open their eyes, begin to move the target slowly away from the patient. Remind the patient to tell you as soon as they know what the letter/target is. In the case of children this can take the form of a game to try to optimise compliance and engagement.
7. When the patient correctly identifies the target/letter, stop the movement and measure the distance to the spectacle plane and convert this distance to dioptres by taking the inverse of the distance (in metres). For example, if the target was first identified correctly at 10 cm, the amplitude of accommodation as assessed using this method is 10 D (i.e. 1 ÷ 0.1 m).
8. Add the effect of any additional lenses to the measured dioptric near point to obtain the true amplitude. For example, if a +1.00 DS lens was added and the measured amplitude was 4.50 D, the actual amplitude of accommodation is 3.50 D as the additional lens provided 1.00 D. If a –3.00 DS lens was added and the measure indicates an amplitude of 7.50 D, the true amplitude is 10.50 D. Repeat at least once, or twice if the values obtained from the first and second tests are significantly different from each other (e.g. ≥1.5 D difference) or from what would be expected on the basis of the patient’s age. In young adults, differences of less than 1.50 D between recorded and age-matched values, or between recordings on two separate occasions, are not usually clinically significant.56
6.9.3 Recording
Record the number of dioptres of accommodation for each eye. Examples:
Amp. of Accomm. (pull-away) R(OD) 8.50 D, L(OS) 8.50 D, BE(OU) 10.00 D.
6.9.4 Interpretation
Pull-away values tend to be lower than push-up values for the amplitude of accommodation. Normal values of monocular spectacle accommodation are shown in Table 6.4. If the measured amplitude is significantly (>1.50 D) lower than the age-matched normal values the patient may have accommodative insufficiency.56 Binocular values of amplitude of accommodation are usually a little higher (1–2 D) than the monocular values as the convergence response helps to induce additional accommodation (convergence accommodation).61 If amplitude of accommodation is reduced to a level below 5.00 D in a patient aged over 40 years wearing optimal distance correction but who has difficulty reading, the patient is presbyopic. In children aged 4 to 11 years, Adler et al. found large intra-individual variation in measures of amplitude of accommodation and suggested that, in this age-group, the test may prove useful mainly as a pass/fail check for substantially reduced accommodative amplitude of less than 8 D.61
Table 6.4
Monocular expected accommodation levels as a function of age

Duane–Hoffstetter formula for probable amplitude of accommodation:
Anomalies of accommodation may be associated with a wide variety of conditions including various systemic and ocular medication (probably the most common cause), trauma, inflammatory disease, metabolic disorders such as diabetes and other systemic diseases.58 Reduced amplitudes of accommodation have also been reported in children with Down’s syndrome and cerebral palsy.62,63 Wick and Hall found that a battery of tests (amplitude, lead/lag of accommodation, accommodative facility and a cycloplegic refraction) was required to detect accommodative dysfunction, and that just because a patient had an adequate amplitude of accommodation did not mean that accommodative function was normal.64
6.9.5 Most common errors
1. Not stressing to the patient to report the identity of the letter/target as soon as it becomes known.
2. Carrying out the test without optimal distance correction in place. This will have the effect of overestimating the amplitude in myopes and underestimating the accommodative amplitude in hyperopic individuals.
3. Moving the fixation stick away too slowly or too quickly from the patient. The latter will lead to an underestimation of the accommodative amplitude while the former is less of an issue.
6.9.6 Acceptable alternative technique: Modified pull-away method
This is carried out precisely as described above except that a –4 D lens (or pair of –4 D lenses in binocular measurements) is placed in front of the eye before the test is started.57 This has the effect of moving the point at which the letter/target is identified away from the eyes. Measurements are more repeatable because of the non-linear relationship between the distance (metres) and dioptric scales. Once the distance has been converted to dioptres, 4 D is then added to obtain the final result.
6.10 Accommodative Facility
Accommodative facility is the ability of a patient to rapidly change accommodation. A reduced accommodative facility has been shown to be related to symptoms experienced in near viewing and it may exist even when other accommodative measures, such as the amplitude of accommodation, are at normal levels.64 There is growing evidence from clinical studies that the responsiveness of accommodation is amenable to treatment and evidence of objectively-measured improvement in accommodation responsiveness following training is also beginning to emerge from laboratory studies.65–67
6.10.1 Comparison of techniques
The ±2.00 DS flippers test of accommodative facility can be performed rapidly with minimal additional equipment. Measures of accommodative facility may be useful in diagnosing binocular vision problems in symptomatic patients whose phorias and visual acuity are normal.52 It appears to have diagnostic value in that a reduced facility correlates with near symptoms and facility increases as symptoms are alleviated through treatment. Indeed, flippers can be part of the treatment. There is little justification for the use of the ±2.00 DS flippers other than they are the power traditionally used. Indeed, it may be that what is required is a range of flipper powers that relate to the patient’s amplitude of accommodation.68 For example, for a young patient with an amplitude of 12.00 D, the ±2.00 DS represent only a 33% range of the amplitude, whereas they represent a 67% range of the amplitude in an older patient with an amplitude of 6.00 D. Yothers et al. suggest using an amplitude-scaled test for adults, which uses a test distance that requires 45% of the amplitude of accommodation to be exerted and a lens flipper range that is 30% of the amplitude.69 For example, a patient with 7.00 D of accommodation would indicate the use of an approximate working distance of 32 cm (1/3.15, i.e. 45% of 7.00) and a flipper range of 2.10 (30% of 7.00) giving a flipper power of ±1.00 D.
6.10.2 Procedure

1. If testing monocularly, occlude one eye. Keep the room lights on and, if necessary, use localised lighting so that the patient’s eyes can be easily seen without shadows.
2. Explain the measurement to the patient: ‘I am now going to test how quickly your focusing can change.’
3. Ask the patient to hold a near chart at 40 cm. Maintaining a stable viewing distance is crucial because viewing distance affects the results obtained and because published normative data are generally based upon a 40 cm test distance.19,70 Ask the patient to look at a letter on a line that is one line bigger than the binocular near visual acuity. This would typically be about N6 (0.4 M, 20/30).
4. Explain the test to the patient: ‘I want you to keep looking at the word/letter *. I am going to place a lens in front of your eye that may make the word appear blurred. I want you to focus and make the print clear again as soon as you can. As soon as it becomes clear, say ‘clear’. I will then flip another lens in front of the eye that may make the word appear blurred again. As before, I want you to refocus quickly and make the word clear again, and then say ‘clear’. We will repeat this for 60 seconds.’ Demonstrate the procedure to the patient so that they understand what is required before the test is started.
5. Start a watch as soon as you place the +2.00 D lens in the lens flippers (twirls) in front of the patient’s right eye and ask the patient to tell you as soon as they get it clear by saying ‘clear’.
6. As soon as the patient reports that the word is clear, quickly flip the lens flippers to the –2.00 lens and ask the patient to inform you as soon as the letters become clear again.
7. Count the number of times the patient utters ‘clear’ in 60 seconds. One cycle consists of clearing both the plus and the minus lenses.
9. Repeat the test binocularly if the patient does not suppress at near. Some practitioners use a polaroid bar reader placed over the near chart while the patient wears polaroid glasses. This provides a check on suppression because the patient will only be able to see half of the text if suppression is present.
6.10.4 Interpretation
The normative data reported in the literature are variable, possibly because data were gathered across a range of ages but reported as a grand average or because they were collected from unselected samples (e.g. samples may have included patients with symptoms and accommodative or vergence dysfunctions). For these reasons, published normative data cannot be completely relied upon and you are encouraged to have an impression of normative data for a range of age groups based upon your own measurements.68 Suggested ‘clinical pass’ criteria in young adults are 11 cycles/minute (monocular). The task becomes more difficult with the polaroid system, so that a clinical pass binocularly is 8 cycles/minute.71 For children aged between 8 and 12 years, ‘clinical pass’ criteria are 7 cycles/minute (monocular) and 5 cycles/minute (binocular polaroids).72 A major disadvantage of the accommodative facility test is that there is no objective information available to you. In other words from observing the eyes, it is not possible for you to ensure that the patient understands and is complying with the test requirements. This is because changes in accommodation do not produce a change in the appearance of the eyes in the way that changes in vergence (e.g. during vergence facility test with prism flippers) do. You are therefore forced to rely exclusively on the subjective impressions of the patient during this test.
6.10.5 Most common errors
1. Holding the flippers so that the patient cannot see the target.
2. Not allowing the patient to practice before starting the test or not explaining in sufficient detail to the patient as to what is expected.
3. Not turning the flippers fast enough so that the cycles/minute result reflects the hand-speed of the examiner instead of a measure of accommodative facility.
4. Not recording an abnormal test result in sufficient detail; e.g. not indicating whether it was negative or positive lens powers (or both) that the patient struggled to clear.
5. Not recording the powers of the lens flippers and/or the testing distance.
6. Overestimating the facility by a factor of two because each ‘clear’ was counted as a cycle.
6.11 Accommodation Accuracy
Accommodation accuracy measurements are valued because they indicate the behaviour of the patient’s accommodation system when an actual near task is being carried out. Accommodative lag and lead indicate whether a patient’s accommodation level to a target is less (lag) or more (lead) than expected. These measures provide information about the patient’s accommodation that may be more directly applicable than that provided by amplitude (section 6.9) or facility (section 6.10) measures.
6.11.1 Comparison of tests
Accommodative lag and lead can be measured objectively using various dynamic retinoscopy techniques or subjectively using relative accommodation measurements or the binocular crossed-cylinder method. The latter two subjective measurements are more often used in the assessment of accommodation to help determine the tentative reading addition and are discussed elsewhere (section 4.14). Dynamic retinoscopy offers a quick, repeatable and valid means for establishing the accuracy of the patient’s accommodation system and it requires minimal extra equipment.73 Both dynamic retinoscopy tests provide results that are less variable than the crossed-cylinder or near duochrome techniques.74 As with most clinical techniques, practice is required in order to develop proficiency in carrying out the tests, especially in relation to the short time in which to make retinoscopy judgements. One study has suggested that the Nott technique provides more accurate estimates of the accommodative response as it does not require the introduction of supplementary lenses.74
6.11.2 Procedure: Nott dynamic retinoscopy
1. The patient should wear their optimal distance refractive correction in the trial frame, or their existing spectacles if lens powers are not significantly different from the optimal refraction result. The phoropter should not be used for this test because of the risk of inducing proximal accommodation.
2. Explain the test to the patient: ‘I am going to check the focusing ability of your eyes using this torch that will shine a light into your eye.’
3. The test should be carried out in conditions that approximate, in so far as possible, normal reading conditions and the card to be viewed by the patient needs to be located close to the patient’s typical reading distance (e.g. 30 cm). The card should contain letters (or pictures for young children) in a position that permits you to perform retinoscopy close to the patient’s visual axis (Figure 6.13). A near chart with a central aperture works well. If letters are being used they should be bigger (by one line) than the binocular near visual acuity (typically N6, 0.5 M, 20/30).
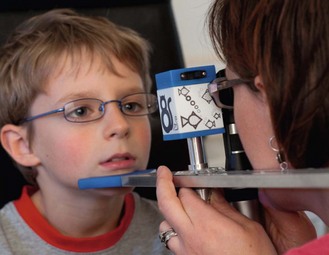
Fig. 6.13 The Ulster-Cardiff Accommodation Cube enables distances to be accurately measured during dynamic retinoscopy. Photograph courtesy of Dr. KJ Saunders, University of Ulster.
4. The room lights can be left on and use additional lighting if necessary to ensure that the near chart is well illuminated.
5. Ask the patient to focus on the letters/targets.
6. Perform retinoscopy on the right eye from 40 cm (typically 10 cm behind the near point card) along the horizontal meridian (with the streak vertical). Perform retinoscopy as quickly as possible as the retinoscope light will interfere with binocularity.
7. If neutrality is not observed at 40 cm, change the working distance (further away if ‘with’ movements are seen at 40 cm, and closer if ‘against’ movements are seen) until the neutral point is seen. Note the distance of your retinoscope when the neutral point is obtained. To establish the result you need to know the distance at which the target was presented and the distance from the patient’s eyes at which the retinoscope was positioned when reversal was observed. To help to measure these two distances, a convenient new measurement scale and target has been developed and validated (Figure 6.13).73,75
6.11.3 Procedure: MEM dynamic retinoscopy
1. Attach a MEM card or hold a fixation stick to the front of your retinoscope. The card should contain letters or pictures around a central aperture, through which retinoscopy is performed.
2. The room lights can be left on and use additional lighting if necessary to ensure that the near chart is well illuminated.
3. Ask the patient to focus on the letters/targets. To maintain appropriate fixation and accommodation, you may need to ask children to read some of the letters out aloud or to name details in the picture.
4. Perform retinoscopy on the right eye from the patient’s typical working distance (usually around 30 cm) along the horizontal meridian (with the streak vertical). Retinoscopy should be performed in the usual manner, but the lenses should only be placed in front of the patient’s eyes for the least amount of time possible. This is to maintain binocularity, which is interrupted by the retinoscope’s light. Try to ensure that the accommodative system does not change in response to any added lenses. To ensure the latter does not occur, you need to place the lens in front of the eye for 0.50 seconds or less.
5. Record the dioptric power of the lens that provides neutrality.
6.11.5 Interpretation
Typically the accommodative response to a target is slightly less than the accommodative stimulus. For example, a target positioned at 40 cm provides an accommodative stimulus of 2.50 D, but the normal accommodative response is slightly less, at about 2.00 D. The target remains clear due to depth of focus. Accommodative lags of 1.00 D or greater could be due to uncorrected (or insufficiently corrected) presbyopia and/or hyperopia or it can indicate a lack of accommodative amplitude or reduced accommodative facility in a pre-presbyopic patient. The lack of an accommodative lag or an accommodative lead can indicate pseudomyopia or accommodative spasm. It has been claimed that the MEM technique provides lags which are on average twice those found using the Nott method but most studies find results that are similar.58,76 In children with low- to moderate hyperopia for whom it is not clear whether they would benefit from refractive correction, there is a growing belief that assessment of accommodative accuracy using dynamic retinoscopy offers a means of identifying those who are likely to benefit from spectacle correction.77 Specifically those with a large lag of accommodation are predicted to benefit more than those with smaller lags.
6.11.6 Most common errors
1. Not realising that a small of accommodation is normal.
2. Taking too long to make a judgement as to whether the reflex is moving ‘with’ or ‘against’.
3. Nott method: inaccurate measurement of the distance of the target to the patient and the retinoscope distance from the patient that gives reversal.
4. MEM method: leaving the lens in place for too long. This lens can alter the accommodation of the eye.
6.12 Accommodative Convergence/Accommodation (AC/A) Ratio
The coupling of accommodation and vergence allows clear stable single binocular vision across a range of viewing distances. A change in accommodation (A) is usually accompanied by a change in vergence known as accommodative convergence (AC). When accommodation is exerted the eyes are induced to converge. When accommodation is relaxed the eyes diverge. The amount of accommodative convergence in prism dioptres (Δ) evoked by 1 D of accommodation is known as the AC/A ratio. As the actual accommodation response is difficult to measure in clinical practice, it is usual to measure the change in vergence obtained with a fixed change in the stimulus to accommodation. This is formally known as the stimulus AC/A ratio but clinically it is usually just called the ‘AC/A ratio’. AC/A ratios that are abnormally high or low can give rise to binocular vision problems.78 The AC/A ratio remains fairly constant throughout life until the onset of presbyopia. Measurements of AC/A after the age of 45 years are of little value.79
6.12.1 Comparison of tests
The modified gradient test allows a quick and reliable measure of the AC/A ratio using standard clinical equipment. This procedure allows proximal components of the response to be controlled as the test is performed at a fixed distance.80 The modified gradient AC/A depends on heterophoria measures at only two points, which can lead to errors.81 The full gradient test overcomes this problem by measuring heterophorias with additional powers from +3 D to –3 D in 1.00 D steps and plotting a graph of lens power against induced phoria. The gradient of this line gives the AC/A ratio in Δ/D. The AC/A ratio can also be calculated from the information that is already available during a routine eye examination, specifically by comparing the distance heterophoria and near heterophoria (see section 6.12.6 below). This method has the disadvantage that proximal accommodation is present in one heterophoria measure (near) but not the other (distance). Also, the result is subject to error because only two measures of heterophoria are used in the calculation. Irrespective of the method used, the target viewed by the patient should require controlled accommodation as the ratio obtained has been shown to depend upon the fixation target.82
6.12.2 Procedure: Modified gradient AC/A ratio
1. Ensure the patient is wearing an appropriate refractive correction, either their own spectacles or, preferably, the optimal correction determined during the eye examination.
2. Measure the horizontal near heterophoria using the modified Thorington or Howell card method (section 6.4) or some other method that carefully controls accommodation.
3. Add –2.00 DS to the refractive correction in both eyes and measure the new horizontal phoria (any pair of minus lenses can be used but –2.00 DS provides a reasonable accommodative stimulus for most patients).
4. The above procedure is normally carried out at near. However it is just as valid to determine the AC/A ratio by comparing the horizontal heterophoria at 6 m when viewing with optimal refractive correction to the heterophoria that exists when the patient looks through a pair of –2 D lenses.


6.12.5 Most common error
Using a method of heterophoria assessment to determine the AC/A ratio, which is less reliable than other available methods (section 6.4).
6.13 Suppression Tests
A properly functioning oculo-motor system is a requirement for binocular vision, but it does not guarantee that binocular vision exists. Suppression testing provides an indication of whether the patient is capable of fusing the images from the right and left eyes, thus providing the conditions that are necessary if the highest level of binocularity (stereopsis, see section 6.14) is to be achieved. When the retinal images differ in size as in aniseikonia, or in clarity as in uncorrected anisometropia, amblyopia or unilateral eye disease, it is possible that the images from the two eyes are not fused because one eye is suppressed. An inability to appreciate diplopia in some of the motor system assessments, such as the near point of convergence, may already have suggested suppression.
6.13.1 Comparison of tests
The Worth 4-dot test is widely available, relatively cheap, easy to use and can be used to assess fusion or reveal suppression at distance and near. It provides a rather coarse indication of suppression in the sense that other tests may reveal the presence of suppression when the 4-dot test suggests that none is present. This is particularly true for near 4-dot testing because of the relatively large angular size of the lights when viewed at near compared to distance viewing. Conversely, the rivalry produced by the red/green goggles may lead to dissociation even in a patient with useful or normal binocular vision so that the test can suggest the existence of suppression when none is present under habitual viewing conditions. The major disadvantage of the test is that luminance of the red and green targets can vary widely between tests as can the transmission characteristics of the red and green goggles with the result that the test outcome can vary depending on whether the goggles are used in the standard format (red goggle in front of the right eye) or reversed.83 Another disadvantage of the test is that a patient with constant strabismus and abnormal retinal correspondence may achieve a normal result. A positive test result does not therefore guarantee the presence of normal binocular vision.
The 4Δ base-out test is used as a test of suppression in the specific case of a suspected microtropia. Indeed, it is used in combination with tests of visual acuity, refraction, eccentric fixation, abnormal retinal correspondence (ARC) and stereopsis to confirm a diagnosis of microtropia. It differs from the Worth 4-dot and Bagolini lens tests in that it is entirely objective; the result does not rely upon a verbal response from the patient but rather is determined by a comparison of the pattern of eye movements that result when the 4Δ (base-out) is introduced in front of one eye and then the other. This test thus requires little additional equipment and is quick and straightforward to perform. However, its repeatability is relatively poor and visually normal children can show atypical responses.84 Other assessments of suppression are also available on the Mallett unit (section 6.5) and with some stereopsis tests (section 6.14).
6.13.2 Procedure: Worth 4-dot
1. Explain the test to the patient: ‘This test checks whether you are using both eyes at the same time to see’.
2. Do not allow the patient to see the 4-dot stimulus before putting the red–green spectacles on. Place the red–green spectacles on the patient (over their spectacles if worn for that particular test distance). Except in cases where the test is presented on a computer screen, the eye with the red filter in front of it (usually the right eye) will see the red dots and the eye with the green filter in front of it (usually the left eye) will see the green dots. When presented on a computer screen, the eye wearing the red filter will see the green dots, and vice versa. You need to be aware which eye is seeing which dots in order to be able to interpret an abnormal test result (see below).
(a) For testing at 6 m: Ensure that the patient is wearing their distance spectacles/contact lenses.
(b) For testing at 40 cm: Hold the Worth 4-dot torch/flashlight at the patient’s reading position, so that the patient looks slightly downward at it. In the case of presbyopic patients, ensure that the patient wears appropriate refractive correction for the near test distance. The torch is usually held with the red light at the top and white light at the bottom (Figure 6.14).
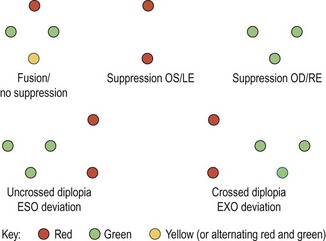
3. Keeping the room lights on, now turn on the Worth 4-dot instrument.
4. Ask the patient: ‘How many dots do you see?’
5. There are four possible responses (Figure 6.14).
(i) ‘4 dots seen’: This generally indicates that the patient has normal flat fusion and no suppression. The response can be checked by asking ‘How many red dots do you see? How many green ones?’ Normally, patients will see one red, two green and one yellow dot. The white dot may appear yellow, or alternate between red and green due to retinal rivalry.
(ii) ‘2 dots seen’. These will be the red and white, seen by the patient as two red dots. This indicates suppression of the eye with the green filter in front of it (usually the left). To detect alternating and/or intermittent suppression ask: ‘Are the number of dots changing as you look at them?’ If the number of dots seen is constant, check to see if fusion can be achieved by briefly occluding the non-suppressed eye.
(iii) ‘3 dots seen’. These will be the two green dots and the white dot, seen by the patient as three green dots. This indicates suppression of the eye with the red filter in front of it (usually the right). To detect alternating and/or intermittent suppression ask: ‘Are the number of dots changing as you look at them?’ If the number of dots seen is constant, check to see if fusion can be achieved by briefly occluding the non-suppressed eye.
(iv) ‘5 dots seen’: This indicates diplopia. The right eye (usually with the red filter) will see two red dots. The left eye (with the green filter) will see three green dots. Ask the patient to indicate where the red dots are in relation to the green ones. If the red dots (usually seen by the right eye) are to the right of the green dots, this indicates uncrossed diplopia and an eso deviation. If the red dots are to the left of the green dots, this indicates crossed diplopia and an exo deviation. If the red dots are below the green dots, this indicates an R/L deviation. If the red dots are above the green dots, this indicates an L/R deviation.
6. If suppression or diplopia is found, repeat the testing with the room lights off.
7. If suppression is found at distance but not at near, measure the extent of the suppression scotoma by moving the near target away from the patient and, based upon what they say, deducing when suppression does and does not occur.
8. In patients who show suppression, it can be useful to repeat the test with the red–green goggles reversed to ensure an accurate assessment.83
Children who cannot respond verbally can be asked to touch the dots to indicate the number seen, and ‘touching four’ indicates normal flat fusion. There is some evidence to indicate that although the test will reliably detect suppression in this way, it is unlikely to differentiate between normal fusion and alternating suppression.85
6.13.3 Procedure: Bagolini lenses
1. Ensure the patient is wearing appropriate refractive correction. The test is normally conducted with the patient viewing a spotlight in the distance but a hand-held pentorch allows the test to be carried out at closer viewing distances. The room lights should be turned off; aside from the spotlight or pentorch there should be little or no other lighting.
2. Place one Bagolini lens in front of each eye. The lenses are oriented so that they will generate streaks of light that are mutually perpendicular when a spot of light is viewed. Typically the lenses generate streaks oriented at 45 and 135 degrees.
3. Explain the test to the patient: ‘This test assesses how well your eyes are working together as a team’.
4. The patient should be instructed to report on what they see when they have been made aware of the streak of light in each eye. It may be necessary to cover one eye and say to the patient ‘When you look at the spot of light, can you see a faint streak of light extending either side of the light?’ Once you have established that the patient understands and perceives the streaks you then ask ‘What do you see when you look at the spotlight with both eyes open?’ (Figure 6.15).
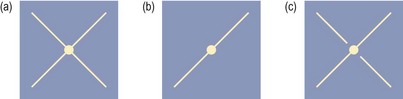
Fig. 6.15 Possible patient responses to the Bagolini lens test. The right eye sees the line oriented at 135 degrees while the left eye sees the line oriented at 45 degrees. (a) No suppression; (b) Right eye suppression; (c) Central suppression of the right eye.
5. To be able to interpret the patient’s description of what they see it is necessary to know whether the right eye sees the 45 or 135 degree line. Covering one eye and asking the patient allows this information to be gained very simply and quickly.
6. Bagolini lenses can also be used to assess retinal correspondence and the approach to testing is identical whether the lenses are being used to assess suppression of retinal correspondence. When used as a test for suppression, the patient is asked about the presence and completeness of the lines. When used to investigate retinal correspondence the patient also reports on the relative location of the lines and on the location of their intersection.
6.13.4 Procedure: 4Δ base-out (BO) test
1. Seat the patient comfortably. Keep the room lights on and, if necessary, use additional lighting so that the patient’s eyes can be easily seen without shadows. The test cannot be performed using a phoropter and a trial frame with the optimal distance refractive correction (or the patient’s spectacles) should therefore be used.
2. Explain the measurement to the patient: ‘I am going to perform a test to see how if and how your eyes move when I introduce this lens’.
3. Provide a single letter on a featureless background for the patient to view. The letter should be one line larger than the distance VA of the weaker eye.
4. Ask the patient to keep looking at the letter, even if it appears to move.
5. This test is normally carried out in cases of suspected microtropia in which there is an interocular difference in visual acuity. First place the 4Δ BO prism over the eye with the better VA (Figure 6.16). The eye should make a swift movement inwards due to the prism. The fellow eye, which is likely to have slightly reduced VA (due to amblyopia and/or eccentric fixation if the patient has microtropia), should make a conjugate, versional movement (i.e. in the same direction as the sound eye) due to Hering’s law. You should repeat this several times to confirm your result.
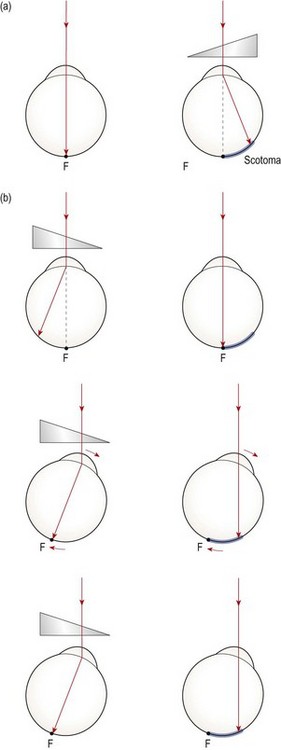
Fig. 6.16 Diagram illustrating the eye movements that should occur during a 4-prism dioptre test when the prism is placed in front of (a) a microtropic eye (there are no eye movements) and (b) the fellow normal eye.
6. Now place the 4Δ BO prism over the eye with reduced VA (Figure 6.16). In a microtropia (which is generally of the esotropic type) the 4Δ BO prism will merely shift the retinal image within the suppression scotoma of the amblyopic eye. In such cases, neither eye will move. Again, you should repeat this several times to confirm your result. Obtaining the expected pattern of eye movements when the fellow eye views through the prism but the absence of eye movements when the amblyopic eye views is confirmation of an abnormal (‘fail’) result.
6.13.5 Recording
1. Worth 4-dot. Record the normal perception of four dots at 6 m and 40 cm as: ‘W 4-dot: 4-dots seen, DV and NV’ or similar. If suppression is found, indicate which eye was being suppressed. Indicate whether suppression was found at both distance and/or near in both the light and dark. Indicate whether the condition was intermittent or constant.
If diplopia is found, indicate the direction of deviation suggested. Indicate whether diplopia was found at both distance and/or near in the light and/or dark.
2. Bagolini lenses. Record what the patient describes in words or using a simple diagram. For example, ‘no suppression’ or ‘RE suppressed centrally’ may appear on the patient’s record. A cross may also be drawn by yourself or even by the patient if they are struggling to put into words what they saw.
3. 4Δ BO test. Record ‘fail’ if there is no movement of the weaker eye when the 4Δ base-out prism is placed before the weaker eye (note that in this case, the fellow eye will also not move, as described above). This indicates suppression. For example, 4Δ BO test: fail LE (OS). Record ‘normal’ if the expected pattern of eye movements was seen when the 4Δ BO prism was introduced before each eye in turn.
6.13.6 Interpretation
If a patient without strabismus sees all four dots on the Worth dot test, this is a normal test result. Note that absence of suppression does not mean that binocularity is necessarily normal. If a patient with strabismus sees four dots with the test, then this indicates that they have abnormal retinal correspondence (ARC). If the response is suppression of the right eye (i.e. the response is “three green dots”) or suppression of the left eye (i.e. the response is “two red dots”) (Figure 6.14) then there is a suppression scotoma larger then the angular subtense of one of the four dots. The dots on the distance target have a smaller angular subtense than those on the near target. Because suppression is more common for targets imaged in central vision, suppression is therefore found more frequently for distance viewing than for near. The size of the suppression scotoma can be estimated by moving the near target further away from the patient than the standard 40 cm until a response consistent with suppression is noted. The distance that the target is from the patient should be recorded. If the patient achieves fusion in the dark but not in the light, this indicates a shallower level of suppression as compared to the situation where suppression is present in both the dark- and light-room conditions.
If the patient reports seeing two orthogonal, continuous lines which intersect at the spotlight when using the Bagolini lenses, then there is no suppression. If one line is missing when the spotlight is viewed with both eyes open, one eye is being suppressed. You can establish which eye is being suppressed from the orientation of the line that is seen. Instead of a line being completely absent, part of a line may be missing. Typically, if part of a line is missing, it will be in the vicinity of the spotlight. Thus the patient might, for example, report a continuous line oriented at 45 degrees but a line oriented at 135 degrees which has a gap on either side of the centre (Figure 6.15) but which appears further away from the spotlight. If the 45 degree line should have been generated in the right eye, this report would be interpreted as evidence for central suppression in the right eye. If the left eye is now covered and the patient reports that the vertical line now runs continuously through the spotlight, this is powerful evidence that the right eye is being suppressed by the left eye in habitual viewing.
6.13.7 Most common errors
1. Not performing the tests with the patient’s optimal refractive correction in place.
2. Assuming that the absence of suppression confirms the presence of stereopsis.
3. Worth 4-dot: Asking the patient the leading question ‘Can you see four dots?’
4. 4Δ BO test: (a) Providing a target that is inappropriately sized or crowded by other letters/targets; (b) Making a decision on the test result on the basis of the first introduction of the prism; (c) Not comparing the pattern of eye movements in the two eyes in response to the introduction of the prism.