CHAPTER 5 Arthroscopic Knot Tying
The last 2 decades have been a period of dynamic and exciting growth in the field of reconstructive arthroscopy. The drive of patient demand, availability of improved instrumentation and implants, and increasing acceptance of arthroscopic reconstructive techniques by the orthopedic community have all fueled development of increasingly complex arthroscopic reconstructive surgical procedures. The ability to approximate tissue with confidence is a cornerstone of complex arthroscopic procedures and integral to this advancement has been the evolution of arthroscopic knot tying. Unfortunately, development of arthroscopic knot tying skills has proven a stumbling block to many arthroscopists because arthroscopic knot tying is not as intuitive as open knot tying. Recognizing this frustration, many device and implant manufacturers and a number of innovative orthopedic surgeons have devised ways whereby an orthopedist can accomplish some of these reconstructive techniques without the need for tying knots arthroscopically.1–8 These techniques are, by their nature, dependent on a particular piece of equipment or implant, which subject to the same risk of failure at the time of surgery as any other implant or device. Thus, although these techniques may allow a surgeon to bypass knot tying in some cases, the prudent orthopedist would not undertake a complex arthroscopic reconstructive procedure that relies on tissue fixation without the ability to accomplish basic arthroscopic knot tying as a backup plan. Perhaps more importantly, the ability to tie knots arthroscopically also gives the reconstructive arthroscopist freedom to tailor specific reconstructions to the needs of the patient without being constrained by those options allowed by knotless devices.
LEARNING TO TIE KNOTS ARTHROSCOPICALLY
The quickest and most certain way to learn arthroscopic knot tying is to attend hands-on instructional courses such as the Master’s Series courses presented by the Arthroscopy Association of North America (www.aana.org). These 3-day courses, offered throughout the year, provide sustained knot tying instruction in both didactic and laboratory formats. In the laboratory setting, experienced surgeons are available to assist and troubleshoot the student’s knot tying as dexterity is achieved.
DEFINITIONS
INSTRUMENTATION FOR ARTHROSCOPIC KNOT TYING
Sutures
The decision between dissolving (e.g., PDS II, Ethicon, Somerville, NJ) and permanent (e.g., Ethibond Excel, Ethicon) suture depends both on surgeon preference and situation-specific factors such as the nature of the reconstruction and the particular tissue being approximated in the process of that reconstruction. Historically, monofilament suture has been easier to pass with available arthroscopic suturing instruments but in general is more difficult to tie securely,10–12 presumably because of differences in surface characteristics of the two types of suture.
A new class of high-strength braided suture incorporating ultra–high-molecular-weight polyethylene (UHMWPE) has recently become available. These sutures, including FiberWire (Arthrex, Naples, Fla), Orthocord (DePuy-Mitek, Raynham, Mass), Hi-Fi (ConMed Linvatec, Largo, Fla), Ultrabraid (Smith & Nephew, Andover, Mass), Force Fiber (Stryker Endoscopy, San Jose, Calif), MagnumWire (ArthroCare, Sunnyvale, Calif) and MaxBraid PE (Biomet, Warsaw, Ind), have been shown to have improved mechanical properties compared with traditional suture materials, but have also been shown to have different knot security qualities.13–17 These differences in knot security qualities, presumably caused by differences in surface properties, mandate the need for additional half-hitches to lock these knots. One recent study has demonstrated that a total of four locking half-hitches backing a sliding arthroscopic knot is not enough to prevent knot slippage reliably with these high-strength sutures.17 The authors did not give a recommendation regarding the appropriate number of locking half-hitches needed. Other investigators have suggested that the addition of two locking half-hitches beyond the number that would be used to secure more traditional suture materials is sufficient for reliable knot security.14
Some of the newer high-strength sutures provide greater bulk than the same knots tied with traditional sutures.13 Selecting a knot with a lower profile may be very important when using newer high-strength sutures. The surgeon should also be aware that damage to gloves and even finger skin tears can be sustained when tying vigorously with these high-strength suture materials.18 Moderation of vigor when tying any knot is sensible, especially when tensioning the tissue loop to avoid tissue strangulation.
Knot Pushers
Several different knot pusher designs are available to the arthroscopic surgeon—single-hole, double-hole slotted, mechanical spreading, and dual-lumen single-hole. Single-hole knot pushers are the most commonly used type because they can easily push a knot down by placement on the post limb, or pull a loop down by placement on the wrapping limb. Double-hole knot pushers can be used for these tasks as well, but their added size and bulk confer no advantage and can complicate passage of individual knot loops. Double-hole knot pushers find their main use in correcting twists of the suture limbs prior to knot tying. Both suture limbs are threaded through the knot pusher and the pusher is advanced to the target tissue intra-articularly. Any twist of the sutures is immediately evident and can be corrected with a simple clockwise or counterclockwise turn of the knot pusher as both limbs are captive in the tip of the knot pusher. Slotted knot pushers function similarly to single-hole knot pushers, but allow the knot pusher to be applied and removed from the suture strand without having to withdraw the knot pusher from the joint. This capability can be a liability, however, if the knot pusher is inadvertently separated from the intended suture limb during the process of tying. The incomplete loop of the knot pusher tip also opens the door for soft tissue entanglement. The dual-lumen single-hole knot pusher is designed to hold tension in that portion of the knot already passed while additional throws are tied and advanced. Investigation has shown this knot pusher design to be very effective in achieving loop security during arthroscopic knot tying.19 This knot pusher does however represent a per-use cost (it is disposable), requires use of longer sutures (36 instead of 27 inches), and may require a greater degree of technical proficiency. The dual-lumen single-hole knot pusher is most useful when the surgeon has to tie a nonsliding knot. These nonsliding knots do not have a sliding component to hold temporary tension in the initial (tissue) loop while additional securing throws are being passed. By virtue of its design, the dual-lumen single-hole knot pusher provides this tension, and therefore good loop security, even with simple half-hitch–based nonsliding knots.
TIPS AND TRICKS FOR INSTRUMENTATION
Suture Anchors
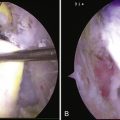
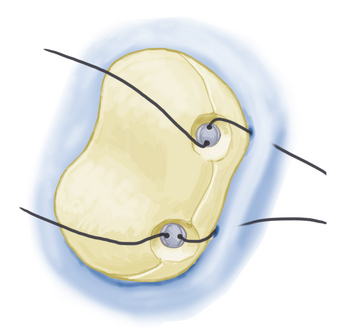
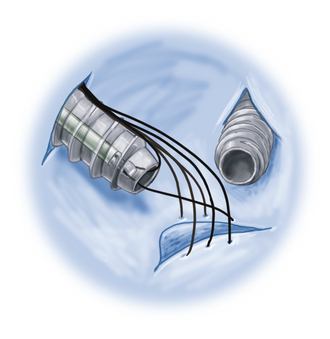
Overpenetration of suture anchors into bone should be avoided because this recesses the suture eyelet relative to the cortical surface, potentially leading to abrasion of the suture on the edge of the suture anchor tunnel as the suture exits the tunnel. This can lead to suture failure. For anchors with fixed (nonsuture) eyelets, the eyelet should be aligned when sinking the anchor so that the suture path is aligned with knot tying (Fig. 5-1).
Sutures
If the surgeon wishes instead to continue tying a damaged suture, the suture is purposely shifted to ensure that when the tied knot is seated, the damaged area of the suture does not end up in the final knot. This requires understanding of the direction and degree of shift anticipated as the sliding knot is seated. Tying of a damaged high-strength suture is generally possible without gross failure. Tying of damaged common (regular strength) suture can occasionally result in breakage when the knot loops are tensioned. If the suture breaks prior to completion of the locking half-hitches, the surgeon is in the difficult position of assessing whether the number of successfully thrown locking half-hitches is satisfactory or whether the suture needs to be replaced. One possible option in this predicament is to use an arthroscopic tissue grasper on the broken limb intra-articularly and then use this grasper–suture stump composite as the limb for subsequent throws.20
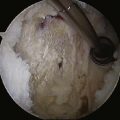
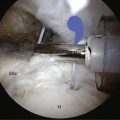
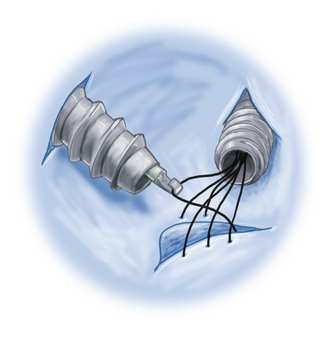
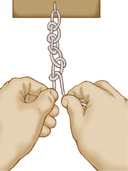
Passing only the two suture limbs being tied through the working cannula dramatically reduces the likelihood of suture tangling and speeds knot tying significantly. Other sutures within the joint are best passed from the joint through another portal (Fig. 5-2). These other sutures can be passed out of the joint through the same portal by placing them between the working cannula and portal wall. This can make subsequent retrieval of the sutures difficult. Friction between the portal wall and cannula makes it difficult for the tissue to slide while being retrieved. Binding of the suture against the end of the cannula along with the need to apply greater force increases the likelihood of suture stretching or fraying (Fig. 5-3).
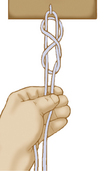
Once the suture limbs are passed out through the cannula and separated, placing a finger between the suture limbs (Fig. 5-4) separates them, making it easier to differentiate the limbs when constructing the knot. It also prevents twisting of the limbs within the cannula as the initial knot is constructed.
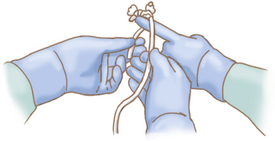
FIGURE 5-4 Assistant’s finger placed to maintain suture separation and orientation, facilitating knot tying.
In choosing the limb to act as the post, select the limb that exits the tissue where you want the knot bulk to seat. With a typical capsulorrhaphy, the limb on the capsular side would be the appropriate choice for the limb post21 so as to keep the knot away from the joint surfaces. Serious and lasting complications have been reported when bulky arthroscopic knots are placed too close to articular surfaces.22,23
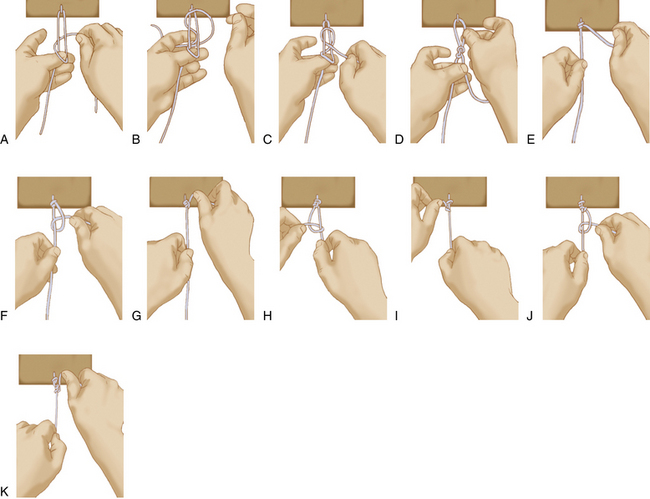
When first learning to tie arthroscopic knots, it is helpful to apply a hemostat to the end of the post limb to remember which limb is serving as the post at any given time. One other helpful practice is to make a habit of holding the two suture limbs separated between the thumb and middle finger of the nondominant hand, instead of the thumb and index finger, which may feel more natural (Fig. 5-5A). Using the middle finger for this grasp leaves the index finger free to help with wrapping and manipulation of the wrapping post during knot tying. This can significantly facilitate knot tying once the surgeon becomes accustomed to the sequence.
Knot Pushers
If a double-hole knot pusher is not available, pass a single-hole knot pusher down one limb of the suture and check for suture twisting, as noted. If twisting is noted, pass the tip of the knot pusher around the other limb in the direction needed to untwist the knot. Once untangled, hold the tip of the knot pusher as far as possible to the side of the cannula and withdraw it. Capture and separate the sutures between the knot pusher and cannula as described earlier for the two-hole knot pusher technique. Another option is to grasp one suture limb from a separate portal, thereby untangling the sutures, and then regrasp the suture from the working cannula.
For subsequent throws of both sliding and nonsliding knots, the knot pusher is applied to the wrapping limb and loops are pulled down to the target. To create as much internal friction as possible, the post is alternated when tying the knot. The knot pusher has to be transferred from limb to limb during application of subsequent throws. Pulling subsequent loops (by having the knot pusher on the wrapping limb) instead of pushing them (with the knot pusher on the post limb) allows past pointing to tighten the knot. Past pointing is simply the process of pulling the loop being tied beyond the knot to establish a secure configuration (see Fig. 5-5G). This is the same motion one would use when tying an open knot to cinch the knot.
KNOTS
Types of Knots
Arthroscopic knots fall into several general classes—nonsliding, sliding, and sliding-locking.
Sliding Knots
Sliding knots are tied externally to the joint around a post limb. The knot is then advanced into the joint and onto the target tissue by drawing the post limb out of the joint until the knot contacts and approximates the target tissue. Alternating post half-hitches are then placed behind the sliding knot9,10,12,24–26 to prevent the knot from sliding back away from the target tissue. For sliding knots using traditional regular-strength sutures, application of three alternating-post half-hitches on top of the sliding knot has been shown to effectively prevent knot loosening. With all sliding knots, self-locking or not, the suture’s strands must be arranged with the post limb shortened into one third of the length of the suture, while the wrapping limb represents two thirds of the suture. This ensures that the subsequent sliding of the knot does not leave a tail too short to work with if locking half-hitches are needed.
Sliding-Locking Knots
Sliding-locking knots are sliding knots in which the final configuration is purposely changed by application of a differential force to the seated knot using a knot pusher. Proponents have suggested that this eliminates the need for additional locking half-hitches,27,28 but research has indicated that these sliding-locking knots should be backed with alternating-post half-hitches to secure tissue adequately.29 Because these knots are intended to be permanently fixed relative to the post limb suture once the locking mechanism is actuated, they can be unforgiving if locked prematurely. Surgeons who are not familiar with each knot’s locking mechanism can inadvertently lock the knot when it is not in the desired final position, leading to poor initial loop security or worse—locking of the knot within the cannula before it reaches the joint. With a typical nonlocking sliding knot, tension is maintained on the post after the initial sliding knot is seated until a locking half-hitch can be placed to prevent loosening of the initial tissue-approximating suture loop. It might therefore be thought that the process of locking a sliding-locking knot could compromise initial loop security. Interestingly, this has not proven to be the case in clinical investigations.30
Nonsliding Knots
Nonsliding knots are those intended to be constructed without sliding of the suture relative to the tissue being fixed. These knots are typically built within the joint by advancing various half-hitches around a post limb, alternating the limb serving as the post in some predetermined pattern that defines the knot. Another variation of the nonsliding knot is the square knot, in which the knot configuration is purposely changed using the knot pusher after throwing the second loop to reproduce the suture configuration of an open square knot.31,32 One must be facile with tying a nonsliding knot given the possibility of a suture strand not sliding or if there is concern about tissue damage from the sawing motion of a sliding knot.
Choosing an Arthroscopic Knot
For typical arthroscopic reconstructive purposes, a sliding knot provides the best loop security, reproducibility, and greatest ease of tying. Based on the prevalence of braided sutures in commercially available implants and on the better knot security afforded, braided permanent suture is the suture material most commonly used. The surgeons preference is the primary consideration in the decision of a sliding versus a sliding-locking knot. Either type should be backed with alternating post half-hitches to achieve adequate knot security.10,12,17,24,26,29
In terms of specific knots, studies have indicated that when tied with high-strength sutures, the Tennessee slider33 (sliding knot), SMC knot27 (sliding-locking knot), and Revo33 knot (nonsliding knot) are the best for knot security.17
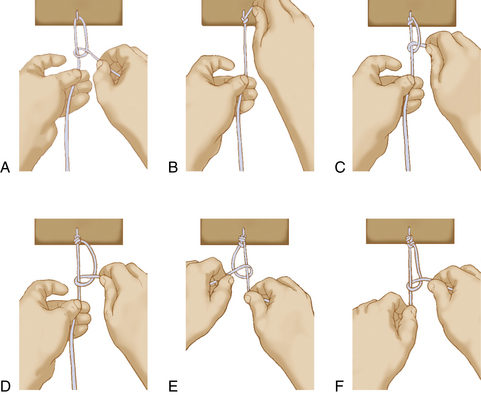
Knot-Tying Mechanics
Secure Knot.
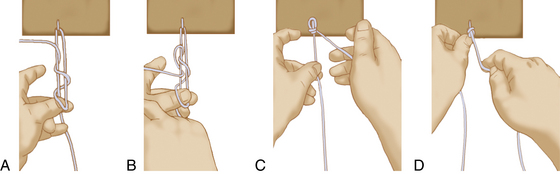
Remove the knot pusher, switch posts, and reverse the direction of the next half-hitch (overhand) to create the second locking loop. Apply the knot pusher to the new wrapping limb and pull the second half-hitch down to the target, again past pointing to tighten the loop.

1. Williams DP, Hughes PJ, Fisher AC, Doherty P. Heat treatment of arthroscopic knots and its effect on knot security. Arthroscopy. 2008;24:7-13.
2. Mahar A, Odell T, Thomas W, Pedowitz R. A biomechanical analysis of a novel arthroscopic suture method compared with standard suture knots and materials for rotator cuff repair. Arthroscopy. 2007;23:1162-1166.
3. Cho NS, Lubis AM, Ha JH, Rhee YG. Clinical results of arthroscopic Bankart repair with knot-tying and knotless suture anchors. Arthroscopy. 2006;22:1276-1282.
4. Lee S, Mahar A, Bynum K, Pedowitz R. Biomechanical comparison of bioabsorbable sutureless screw anchor versus suture anchor fixation for rotator cuff repair. Arthroscopy. 2005;21:43-47.
5. Yian E, Wang C, Millett PJ, Warner JJ. Arthroscopic repair of SLAP lesions with a bioknotless suture anchor. Arthroscopy. 2004;20:547-551.
6. Bonutti PM, Cremens MJ, Gray TJ. Evaluation of a suture seat, a biodegradable suture fastener, to eliminate knot-tying in arthroscopic rotator cuff repair. J Bone Joint Surg Am. 2003;85(Suppl 4):147-152.
7. Thal R. A knotless suture anchor. Design, function, and biomechanical testing. Am J Sports Med. 2001;29:646-649.
8. Richmond JC. A comparison of ultrasonic suture welding and traditional knot tying. Am J Sports Med. 2001;29:297-299.
9. Lo IK, Burkhart SS, Chan KC, Athanasiou K Arthroscopic knots: determining the optimal balance of loop security and knot security. Arthroscopy, 20; 2004:489-502.
10. Chan KC, Burkhart SS, Thiagarajan P, Goh JC. Optimization of stacked half-hitch knots for arthroscopic surgery. Arthroscopy. 2001;17:752-759.
11. Lee TQ, Matsuura PA, Fogolin RP, et al Arthroscopic suture tying: a comparison of knot types and suture materials. Arthroscopy, 17; 2001:348-352.
12. Loutzenheiser TD, Harryman DT2nd, Ziegler DW, Yung SW. Optimizing arthroscopic knots using braided or monofilament suture. Arthroscopy. 1998;14:57-65.
13. Ilahi OA, Younas SA, Ho DM, Noble PC. Security of knots tied with ethibond, fiberwire, orthocord, or ultrabraid. Am J Sports Med. 2008;36:2407-2414.
14. Wüst DM, Meyer DC, Favre P, Gerber C. Mechanical and handling properties of braided polyblend polyethylene sutures in comparison to braided polyester and monofilament polydioxanone sutures. Arthroscopy. 2006;22:1146-1153.
15. Mahar AT, Moezzi DM, Serra-Hsu F, Pedowitz RA. Comparison and performance characteristics of 3 different knots when tied with 2 suture materials used for shoulder arthroscopy. Arthroscopy. 2006;22(614):e1-e2.
16. Abbi G, Espinoza L, Odell T, et al Evaluation of 5 knots and 2 suture materials for arthroscopic rotator cuff repair: very strong sutures can still slip. Arthroscopy, 22; 2006:38-43.
17. Barber FA, Herbert MA, Beavis RC. Cyclic load and failure behavior of arthroscopic knots and high strength sutures. Arthroscopy. 2009;25:192-199.
18. Kaplan KM, Gruson KI, Gorczynksi CT, et al. Glove tears during arthroscopic shoulder surgery using solid-core suture. Arthroscopy. 2007;23:51-56.
19. Burkhart SS, Wirth MA, Simonick M, et al. Loop security as a determinant of tissue fixation security. Arthroscopy. 1998;14:773-776.
20. Tauro JC. Completing arthroscopic knots with a broken suture limb. Arthroscopy. 1997;13:268-270.
21. De Beer JF Arthroscopic Bankart repair: some aspects of suture and knot management. Arthroscopy, 15; 1999:660-662.
22. Rhee YG, Ha JH Knot-induced glenoid erosion after arthroscopic fixation for unstable superior labrum anterior-posterior lesion: case report. J Shoulder Elbow Surg, 15; 2006:391-393.
23. Kelly JD4th, Ebrahimpour P. Chondral injury and synovitis after arthroscopic meniscal repair using an outside-in mulberry knot suture technique. Arthroscopy. 2004;20:e49-e52.
24. Kim SH, Yoo JC, Wang JH, et al Arthroscopic sliding knot: how many additional half-hitches are really needed. Arthroscopy, 21; 2005:405-411.
25. Ilahi OA, Younas SA, Alexander J, Noble PC. Cyclic testing of arthroscopic knot security. Arthroscopy. 2004;20:62-68.
26. Loutzenheiser TD, Harryman DT2nd, Yung SW, et al. Optimizing arthroscopic knots. Arthroscopy. 1995;11:199-206.
27. Kim SH, Ha KI. The SMC knot—a new slip knot with locking mechanism. Arthroscopy. 2000;16:563-565.
28. Fleega BA, Sokkar SH The giant knot: a new one-way self-locking secured arthroscopic slip knot. Arthroscopy, 15; 1999:451-452.
29. Elkousy HA, Sekiya JK, Stabile KJ, McMahon PJ. A biomechanical comparison of arthroscopic sliding and sliding-locking knots. Arthroscopy. 2005;21:204-210.
30. Kim SH, Ha KI, Kim SH, Kim JS. Significance of the internal locking mechanism for loop security enhancement in the arthroscopic knot. Arthroscopy. 2001;17:850-855.
31. Elkousy H, Hammerman SM, Edwards TB, et al The arthroscopic square knot: a biomechanical comparison with open and arthroscopic knots. Arthroscopy, 22; 2006:736-741.
32. Nottage WM, Lieurance RK. Arthroscopic knot typing techniques. Arthroscopy. 1999;15:515-521.
33. pp 9-10Linvatec ConMed The Revo/Mini-Revo Shoulder Fixation System: Surgical Technique. Available at http://www.conmed. com/PDFfiles/CST3013Rev4Revo MiniST.pdf, 2005. Accessed October 5, 2009
34. Wolf EM, Wilk RM, Richmond JC. Arthroscopic Bankart repair using suture anchors. Oper Tech Orthop. 1991;1:184-191.
35. Weston PV. A new clinch knot. Obstet Gynecol. 1991;78:144-147.