20 Approaches to treatment
 Clinical cases for thought
General concepts in treatment application
1. Education—The patient should be taught about their condition, the expected time course of treatment, and any side effects that they may also expect.
2. Graded application of therapy—All treatment modalities should be applied in a graded fashion, proceeding from low intensity to an intensity that produces the desired therapeutic effect.
3. Monitor the effect of the treatment on the neuraxis—Monitoring of each therapy should be conducted as soon as possible following the therapy and then at appropriate intervals such as hourly, daily, or weekly, depending on the intensity of the therapy. Monitoring the effect of the intervention can be accomplished by monitoring the changes in time to activation, and fatigue in a neural circuit before and after the intervention.
The time to activation (TTA) of a neuron is a measure of the time from which the neuron receives a stimulus to the time that an activation response can be detected. Obviously, in clinical practice the response of individual neurons cannot be measured but the response of neuron systems such as the pupil response to light can be. As a rule, the time to activation will be less in situations where the neuron system has maintained a high level of integration and activity, and greater in situations where the neuron has not maintained a high level of integration and activity or is in the late stages of transneural degeneration. Again, an exception to this rule can occur in situations where the neuron system is in the early stages of transneural degeneration and is irritable to stimulus and responds quickly. This response will be of short duration and cannot be maintained for more than a short period of time.
Treatment should be composed of a three-pronged approach:
1. Modulation of the central integrative state (CIS) of a system, to maximise function of the viable neurons within the dysfunctional system, to promote regeneration and decrease iatrogenic loss of neurons, and to stimulate a repair process in any injured neurons;
2. Assist oxygen delivery to the system; and
3. Ensure that adequate fuel and other physiologically necessary substrates are delivered to the system.
Treatment approaches
Manipulation
Afferent modulation of the neuraxis via manipulation of spinal joints
Vertebral joint manipulation has been reported to have an effect on numerous signs and symptoms related to central nervous system function including visual dysfunction (Carrick 1997; Stephens et al. 1999), reaction time (Kelly et al. 2000), central motor excitability, dizziness, tinnitus or hearing impairment, migraine, sleep bruxism (Knutson 2001), bipolar and sleep disorders, and cervical dystonia. There have also been reports that spinal joint manipulation may assist in the improvement of otitis media and asthma in addition to other non-musculoskeletal complaints. Ample evidence exists to suggest that noxious stimulation of spinal tissues can lead to autonomically mediated reflex responses, which may explain how spinal joint manipulation can relieve some of these non-musculoskeletal complaints.
Several studies have investigated the effect of changes in spinal afferentiation as a result of manipulation on the activity of the sympathetic nervous system (Korr 1979; Sato 1992; Chiu & Wright 1996). Suprasegmental changes, especially in brain function, have demonstrated the central influence of altered afferentiation of segmental spinal levels (Thomas & Wood 1992; Carrick 1997; Kelly et al. 2000). Immune system function may be mediated through spinal afferent mechanisms that may operate via suprasegmental or segmental levels by modulating the activity of the sympathetic nervous system (Beck 2003).
Based on the above, it is likely that spinal joint manipulation may influence the CIS of various neuronal pools through changes in afferent inputs from joint and muscle receptors. A few studies have reported that upper cervical spinal joint manipulations have asymmetrical effects on measures of central nervous system function (Carrick 1997). This may account, in part, for reduction of symptoms in migraine sufferers following spinal manipulation, as asymmetry in blood flow to the head is thought to be a key feature in migraine and other headache types (Drummond & Lance 1984; Drummond, 1988, 1993).
A number of potential pathways exist that might explain why spinal manipulations have the potential to excite the rostral ventrolateral medulla (RVLM) and therefore result in modulatory effects on the neuraxis (Holt et al. 2006). The pathways and mechanisms most likely involved include the following:
1. Cervical manipulations excite spinoreticular pathways or collaterals of dorsal column and spinocerebellar pathways. Spinoreticular fibres originate at all levels of the cord but particularly in the upper cervical segments. They synapse on many areas of the pontomedullary reticular formation (PMRF).
2. Cervical manipulations cause modulation of vestibulosympathetic pathways. This may involve the same pathways as above or could reflect modulation of vestibular neurons at the level of the vestibular nuclei.
3. Cervical manipulations cause vestibulocerebellar activation of the nucleus tractus solitarius (NTS), dorsal motor nucleus of vagus, and nucleus ambiguus.
4. Manipulations may result in brain hemisphere influences causing descending excitation of the PMRF, which will exert tonic inhibitory control of the intermediolateral (IML) cell column.
5. Lumbosacral manipulations may result in sympathetic modulation due to direct innervation of the RVLM via dorsal column nuclei or spinoreticular fibres that ascend within the ventrolateral funiculus of the cord.
6. Spinal manipulation may alter the expression of segmental somatosympathetic reflexes by reducing small-diameter afferent input and enhancing large-diameter afferent input. This might influence sympathetic innervation of primary and secondary organs of the immune system.
7. Spinal manipulations might alter the expression of suprasegmental somatosympathetic reflexes by reducing afferent inputs on second-order ascending spinoreticular neurons. This might influence sympathetic innervation of immune system organs at a more global level.
8. Spinal manipulations might alter central integration of brainstem centres involved in descending modulation of somatosympathetic reflexes. This may occur via spinoreticular projections or interactions between somatic and vestibular inputs in the reticular formation. Both somatic (high-threshold) and vestibular inputs have been shown to increase output from the RVLM, which provides tonic excitatory influences on the IML cell column of the spinal cord. Proprioceptive (low-threshold) inputs from the cervical spine have been shown to have an antagonistic effect on vestibular inputs to the RVLM. Neurons in the brainstem reticular formation also mediate tonic descending inhibition of segmental somatosympathetic reflexes. Segmental somatosympathetic reflexes appear to be most influential in the absence of descending inhibitory influences from the brainstem.
9. Spinal manipulations might alter central integration in the hypothalamus via spinoreticular and spinohypothalamic projections and the influence of spinal afferents on vestibular and midline cerebellar function. Direct connections have been found to exist between vestibular and cerebellar nuclei and the hypothalamus, nucleus tractus solitarius, and parabrachial nuclei. The latter two nuclei project to the hypothalamus in addition to visceral and limbic areas of the medial temporal and insular regions of the cortex.
10. Spinal manipulations might influence brain asymmetry by enhancing summation of multimodal neurons in the CNS, monoaminergic neurons in the brainstem or basal forebrain regions, or cerebral blood flow via autonomic influences, or by influencing the hypothalamic-mediated isoprenoid pathway.
A variety of manipulations can be performed to stimulate afferent systems
Many excellent textbooks and video programs exclusively describing how to perform manipulations of virtually every joint of the body have been written (Carrick 1991, 1994). I will simply provide an overview of some of the more common manipulations that I have found clinically effective.
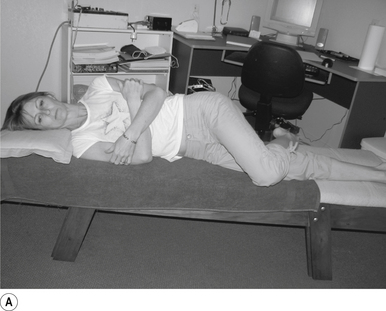
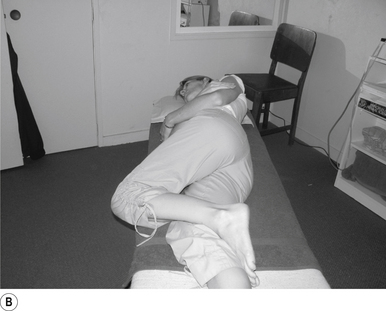
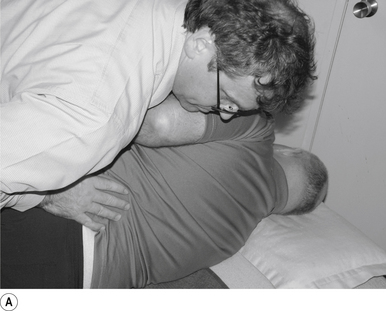
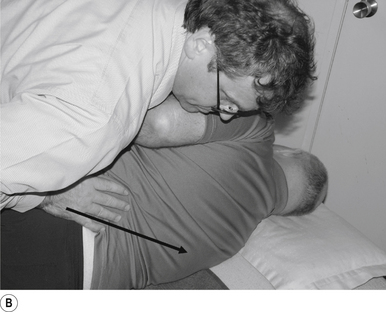
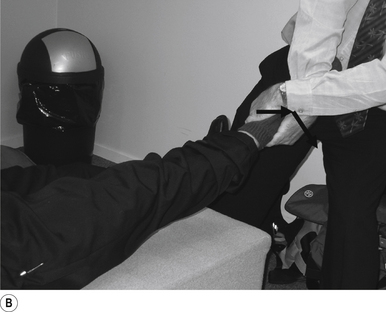
1 Positioning the patient for lumbar and pelvic manipulations
The standard position for lumbar and pelvic manipulations is referred to as the lateral recumbent position. The patient is lying comfortably on their side with the superior leg slightly bent at the knee and hip (Fig. 20.1A). The patient’s arms are crossed loosely over their chest. The patient should be stable and balanced while in this position and should not feel like they are going to roll off the table (Fig. 20.1B).
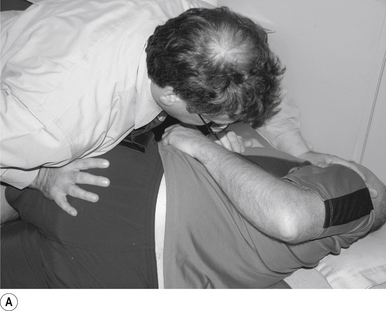
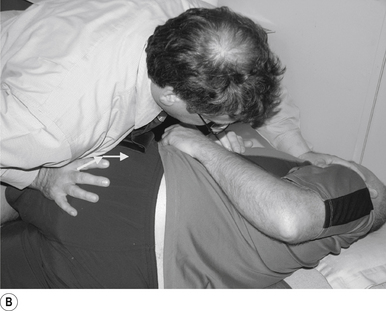
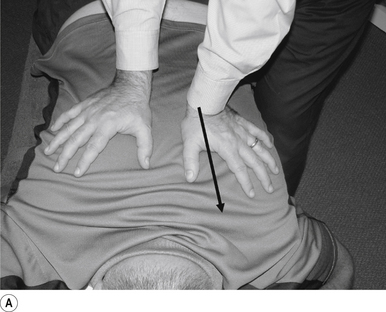
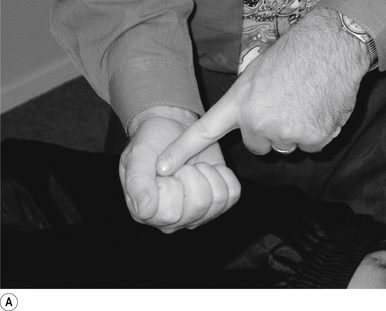
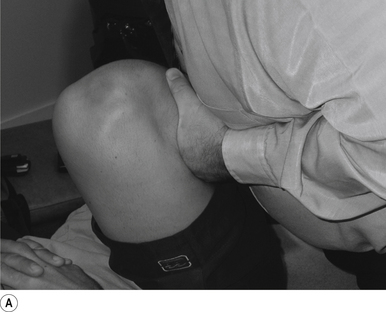
2 Lumbar mammillary push manipulation
Contact
The contact hand is semi-flexed into an ’L’ shape with the fingers reinforcing each other. The tips of the second and third fingers on the hand contacting the mammillary process vertebra of choice is the most efficient contact for this manipulation (Fig. 20.2A).
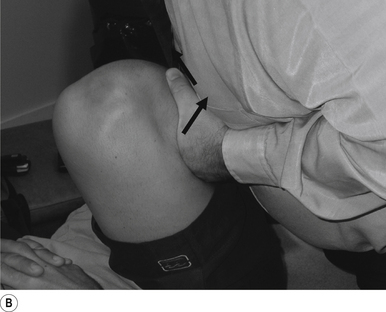
Adjuster’s position
The manipulating neurologist should be positioned standing but in a crouching position to the side of the patient; the contact arm is bent with the elbow contacting the patient’s hip for added support and control. The non-contact hand maintains a gentle supporting pressure on the patient’s shoulder. The contact hand maintains a gentle pressure on the contact (Fig. 20.2B). The manipulating neurologist then centres his/her sternal area over the contact and pushes against the patient’s shoulder and the patient’s hip in opposing directions until mild pressure is established.
Thrust
The thrust is a body drop impulse along the facet joint line of the lumbar vertebra in question, usually about 45° inferior to superior and anterior to posterior, in such a way that the thrust on the lumbar vertebra causes the vertebra to rotate away from the contact (Fig 20.2B).
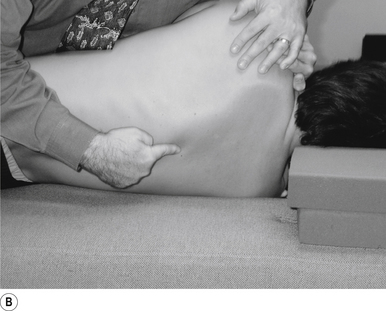
3 Sacroiliac manipulation
Contact
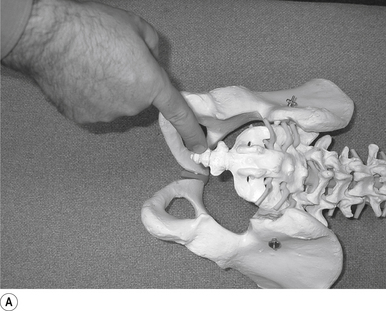
The pisiform of the contact hand establishes a contact on the sacral angle above the second sacral tubercle to manipulate the ipsilateral or ’up-side’ sacroiliac joint. A contact on the sacral arch below the second sacral tubercle can be used to manipulate the sacroiliac joint on the contralateral or ’down side’ (Fig. 20.3A).
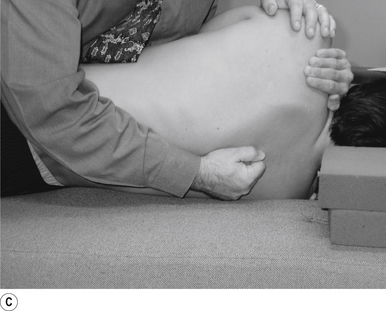
Adjuster’s position
The manipulating neurologist should be positioned standing but in a crouching position to the side of the patient. The manipulating neurologist contacts the angle of the sacrum with the hand closest to the patient and stabilises the patient’s superior shoulder with the other hand. Maintain a gentle pressure on the contact so that the patient is locked against the neurologist and the table (see Fig. 20.3A). The manipulating neurologist then centres his/her sternal area over the contact, making sure that his/her shoulder is held as tightly to his/her body as possible.
Thrust
The thrust is a body drop impulse along the joint line of the sacroiliac joint, usually about 45° inferior to superior and posterior to anterior (Fig 20.3B).
Clinical comments
1. The line of drive of the thrust is aligned too much in the posterior to anterior plane, the thrust should be inferior to superior as well; and
2. The elbow of the contact arm is allowed to move away from the body of the neurologist (winging). This position puts a great amount of strain on the shoulder and results in shoulder problems at a later time.
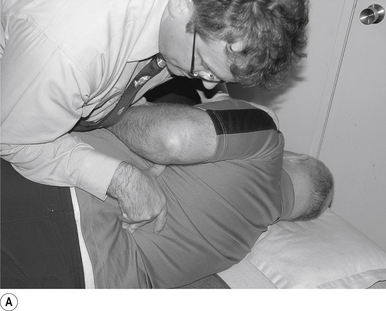
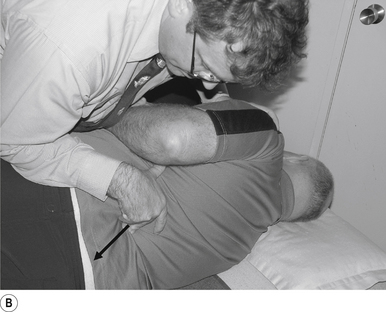
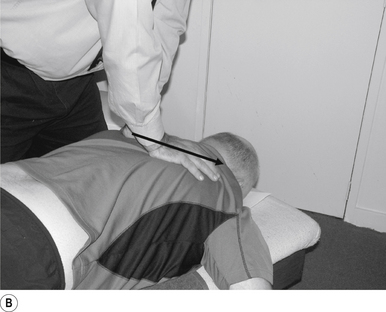
4 Ilium flexion push manipulation
Contact
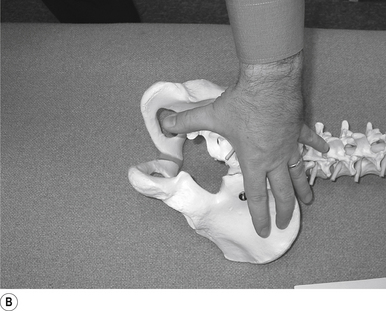
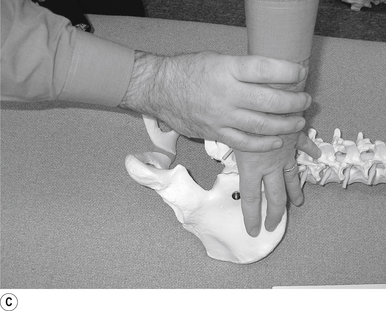
The ischium of the ilium is cupped into the contact hand with the heel of the hand establishing a firm contact (Fig. 20.4A).
Adjuster’s position
The manipulating neurologist should be positioned standing but in a crouching position slightly to the rear and side of the patient. The contact arm is bent so that the shoulder is firmly behind the contact. The non-contact hand maintains a gentle supporting pressure on the patient’s shoulder. The contact hand maintains a gentle pressure on the contact (Fig. 20.4B). The manipulating neurologist then centres his/her sternal area behind the contact and pushes against the patient’s ischium until a mild pressure is established.
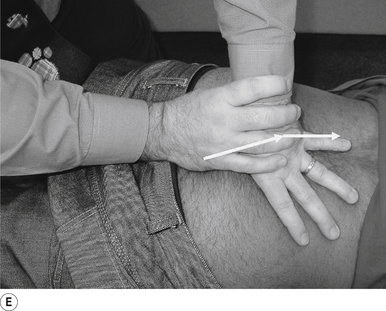
Thrust
The thrust is a body drop impulse with a scoop-like motion along the facet joint line of the ilium in question, in such a way that the thrust on the ilium moves the ilium into flexion (Fig. 20.4B).
Clinical comments
This manipulation must be performed with the patient relaxed. The support hand does not thrust or twist the body but simply stabilises. The manipulating neurologist must concentrate the line of drive of the thrust through the contact. The contact is more focused and the adjustment easier to perform if the manipulator positions their shoulder immediately behind the contact for maximum thrust power. Compared with other manipulations, this manipulation requires considerable power to accomplish properly. Asking the patient to exhale just before thrusting can also be helpful.
5 Anterior coccyx manipulation
Contact
A pisiform contact with the thrust hand contacting the knuckle of the thumb, which is in firm contact with the posterior inferior coccyx, is the most efficient contact for this adjustment (Figs 20.5A–C).

Adjuster’s position
The adjuster should be behind and centred to the patient with a gentle pressure on the contact (Fig. 20.5D).
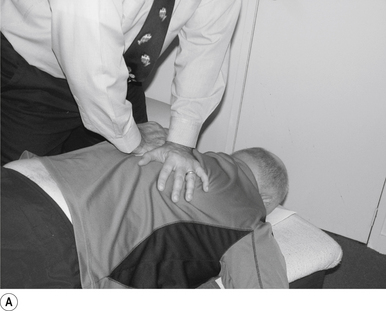
6 Bilateral thenar thoracic manipulation
Contact
The manipulating neurologist contacts the transverse process of the thoracic vertebra in question with the pisiform of their contact hand. The non-contact hand contacts the contralateral transverse process to aid in stabilisation (Fig. 20.6A).
Adjuster’s position
The manipulating neurologist should be positioned standing to the side the patient, with their contact hand contacting the transverse process of the thoracic vertebra in question (Fig. 20.6A).
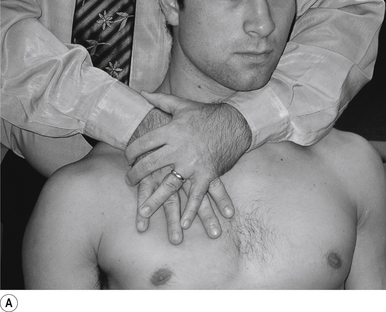
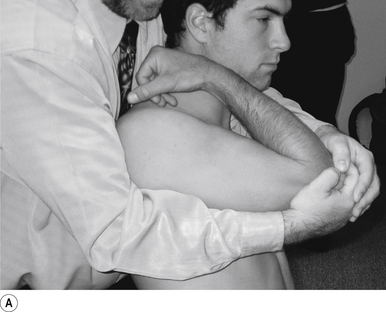
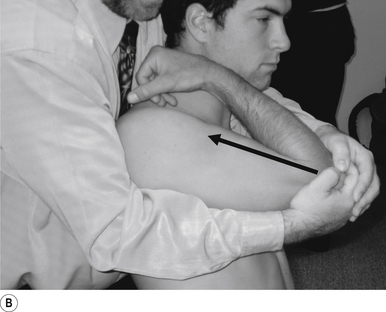
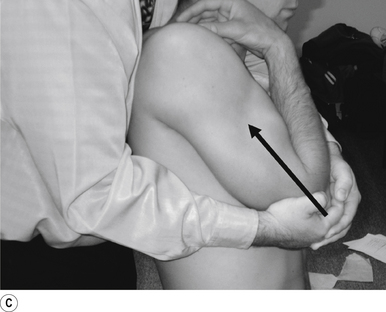
7 Anterior thoracic manipulation
Indication
This manipulation can be used to address any thoracic segment from T2 to T12 that has shifted posteriorly, or is not moving into rotation. This manipulation can also be used to stimulate the ipsilateral cerebellum or contralateral cortex in relation to the contact.
Contact
The contact hand is formed into a fist, and a contact established along the thenar eminence of the thumb on the hand contacting the transverse process (TVP) of the thoracic vertebra of choice is the most efficient contact for this manipulation (Fig. 20.7A).
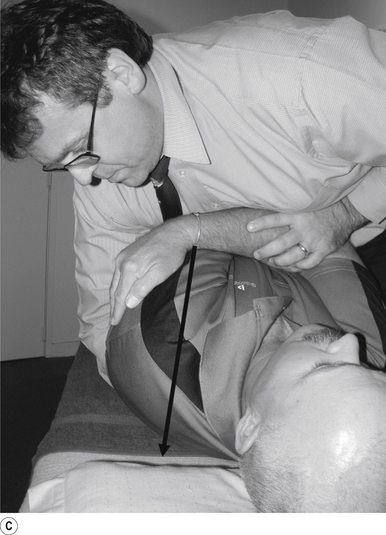
Adjuster’s position
The manipulating neurologist should be positioned standing but in a crouching position to the side of the patient, with their arm encircling the patient to maintain a gentle pressure on the contact (see Fig. 20.7B). The manipulating neurologist then centres his/her sternal area over the contact and lowers their body onto the patient’s chest until mild pressure is established.
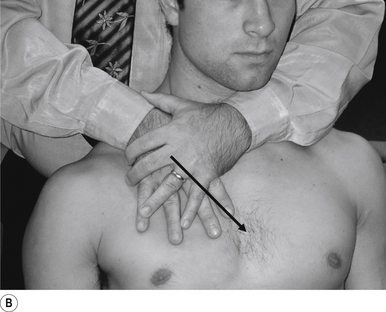
Thrust
The thrust is a body drop impulse along the facet joint line of the thoracic vertebra in question, usually about 45° inferior to superior and anterior to posterior above T6 and 45° superior to inferior and anterior to posterior below T6, in such a way that the thrust on the thoracic vertebra causes the vertebra to rotate away from the contact (Fig. 20.7C).
8 Crossed bilateral thoracic manipulation
Contact
The manipulating neurologist contacts the transverse process of the thoracic vertebra in question with the pisiform of their contact hand. The non-contact hand contacts the contralateral transverse process to aid in the delivery of the torque component of this manipulation (Fig. 20.8A).
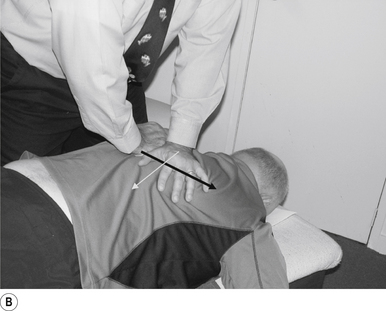
Adjuster’s position
The manipulating neurologist should be positioned standing to the side of the patient, with their contact hand contacting the transverse process of the thoracic vertebra in question (Fig 20.8A).
Thrust
The thrust is inferior to superior and posterior to anterior along a line of drive following the facet lines of the thoracic vertebra in question with the contact hand. The non-contact hand thrusts in the opposite direction, producing a torque around the joint (Fig. 20.8B).
Clinical comments
This manipulation must be performed with the patient relaxed. The manipulating neurologist must concentrate the line of drive of the thrust through the contact. The torque component of the manipulation allows for a greater speed of delivery and thus makes the manipulation easier to perform. Asking the patient to exhale just before thrusting can also be helpful.
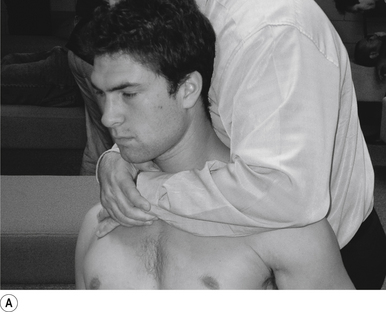
9 Standing thoracic long-axis manipulation
Contact
The manipulating neurologist contacts the patient’s thoracic spine area with their sternum (Fig. 20.9A).
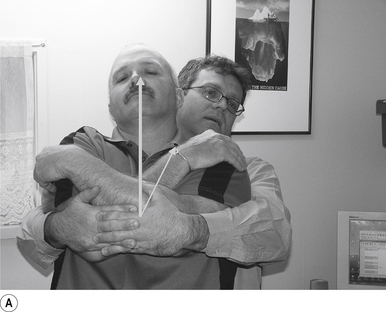
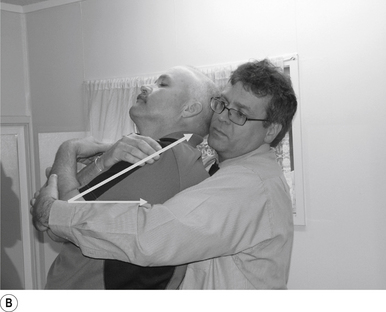
Patient position
The patient should be comfortably standing, facing away from the manipulator; their arms should be crossed over their chest. The patient is asked to lie back onto the manipulating neurologist, who grasps the patient’s elbows with their palms in a reinforced cupped contact. The patient is then asked to relax and take a deep breath in and out and allow their body to relax.
Adjuster’s position
The manipulating neurologist should be positioned standing behind the patient, with their arms around the patient and grasping the patient’s elbows (Fig. 20.9B). The manipulating neurologist then centres his/her sternal area behind the contact. With a mild pull on the patient’s elbows and a push against the patient’s back, a mild pressure is established to remove any slack between the patient and the manipulator.
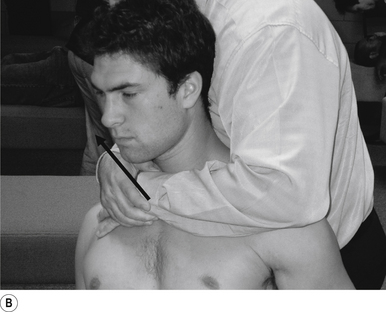
Thrust
The thrust is an impulse generated by a quick contraction of the biceps. The line of drive should be inferior to superior and anterior to posterior in nature (Figs 20.9A and 20.9B).
Clinical comments
This manipulation must be performed with the patient relaxed. The manipulating neurologist must concentrate the line of drive of the thrust through the contact. Compared with other manipulations, this manipulation requires considerable power to accomplish properly. Asking the patient to exhale just before thrusting can also be helpful.
10 Sitting atlas lateral flexion manipulation
Contact
A contact along the medial aspect of the thumb of the thrust hand contacting the most lateral edge of the posterior arch of the atlas is the most efficient contact for this manipulation (Fig. 20.10A).

Adjuster’s position
The manipulating neurologist should be positioned standing behind and slightly to the side of the patient. The patient’s head should be at the level of the manipulator’s mid-sternal area. The non-contact hand should be gently cupping the contralateral ear and supporting the head; the contact thumb should apply a gentle pressure on the contact (see Fig. 20.10A). The head is laterally flexed to the side of contact until a firm end feel is established. Extension of the neck should be avoided.
Thrust
The thrust is an impulse along the facet joint lines of the atlas in a lateral plane (Fig. 20.10B).
11 Sitting ’cervical pull’ manipulation
Contact
A contact along the palmer aspect of the third finger of the thrust hand contacting the posterior arch of the cervical vertebra of choice is the most efficient contact for this manipulation (Fig. 20.11A).
Adjuster’s position
The manipulating neurologist should be positioned to the side opposite the contact, with a gentle pressure on the contact (see Fig. 20.11A). The head can be laterally flexed either to the side of contact or away from the contact. When laterally flexing away from the contact the manipulation takes advantage of the normal coupled motion of the cervical vertebral motion units and produces a greater stimulus.
12 Sitting atlas rotation manipulation
Contact
A contact along the medial aspect of the first finger of the thrust hand contacting the posterior arch of the atlas is the most efficient contact for this manipulation (Fig. 20.12A).
Adjuster’s position
The manipulating neurologist should be positioned standing in front and slightly to the side of the patient. The patient’s head should be at the level of the manipulator’s mid-sternal area. The non-contact hand should be gently cupping the contralateral ear and supporting the head; the contact thumb should apply a gentle pressure on the contact (see Fig. 20.12A). The head is laterally flexed to the side of contact until a firm end feel is established. Extension of the neck should be avoided.
Thrust
The thrust is an impulse along the facet joint lines of the atlas in an inferior to superior plane (Fig. 20.12B).
13 Supine cervical manipulation
Contact
A contact along the palmer aspect of the first finger of the thrust hand contacting the posterior arch of the cervical vertebra of choice is the most efficient contact for this manipulation (Fig. 20.13A).
Adjuster’s position
The manipulating neurologist should be positioned standing but in a crouching position to the head of the patient, with a gentle pressure on the contact (see Fig. 20.13A). The head can be laterally flexed to the side of contact until a firm end feel is established.
14 Supine atlas rotation manipulation
Contact
A contact along the lateral aspect of the first finger of the thrust hand contacting the posterior arch of the atlas is the most efficient contact for this manipulation (Fig. 20.14A).
Adjuster’s position
The manipulating neurologist should be positioned standing but in a crouching position to the head of the patient, with a gentle pressure on the contact (see Fig. 20.14A). The head can be laterally flexed to the side of contact and rotated away from the contact until a firm end feel is established.
15 Supine atlas lateral flexion manipulation
Contact
A contact along the lateral aspect of the first finger of the thrust hand contacting the posterior arch of the atlas is the most efficient contact for this manipulation (Fig. 20.15A).
Adjuster’s position
The manipulating neurologist should be positioned standing but in a crouching position to the head of the patient, with a gentle pressure on the contact (see Fig. 20.15A). The head can first be rotated away from the contact and then laterally flexed to the side of contact until a firm end feel is established. Extension of the neck should be avoided.
Thrust
The thrust is an impulse along the facet joint lines of the atlas in a lateral plane (Figs 20.15A and 20.15B).
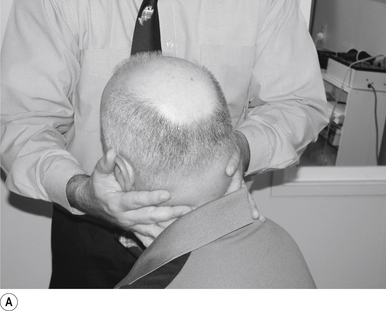
16 Supine occiput manipulation
Contact
The manipulating neurologist contacts the patient’s occiput in question with the pisiform of the contact hand (Fig. 20.16A).
Adjuster’s position
The manipulating neurologist should be positioned standing above and to the side the patient.
Thrust
The thrust is an impulse along a line of drive that follows a path from the patient’s occiput to their nose. The line of drive should be inferior to superior and posterior to anterior in nature (Fig. 20.16B).
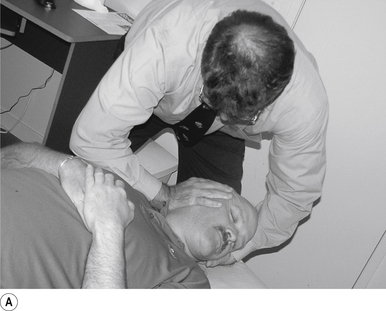
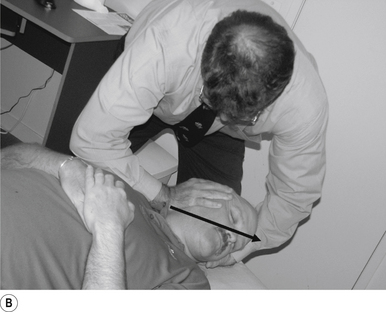
17 Combination cervical/thoracic manipulation
Contact
The manipulating neurologist contacts the patient’s ipsilateral occiput with the palm of the non-contact hand. A pisiform contact is established on the transverse process of the thoracic vertebra in question (Fig. 20.17A).
Adjuster’s position
The manipulating neurologist should be positioned standing above and to the side of the patient, with their superior hand cupping the patient’s occiput and the inferior hand contacting the thoracic vertebra in question (Figs 20.17A and 20.17B).
Thrust
The thrust is a body drop impulse down the contact arm along a line of drive that follows the facet joints of the thoracic vertebra in question. The line of drive should be superior to inferior and posterior to anterior in nature. The non-contact hand applies steady superior and lateral to medial pressure to stabilise the head during the thrust (Figs 20.17A and 20.17B).
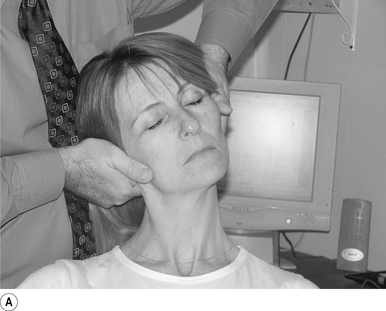
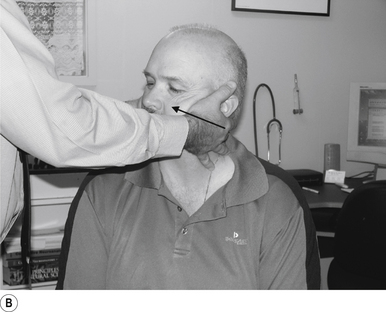
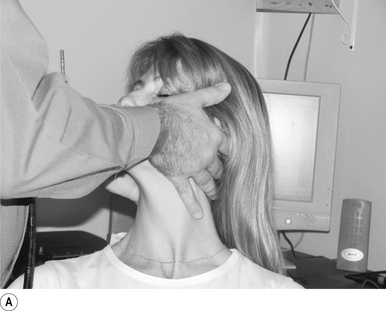
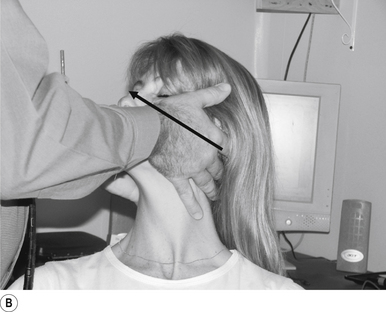
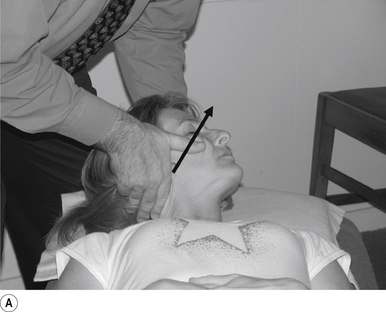
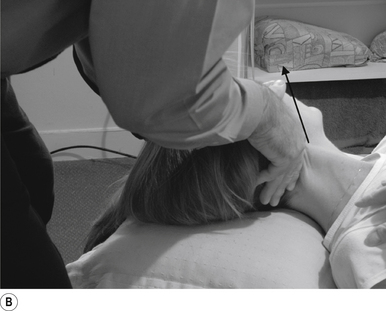
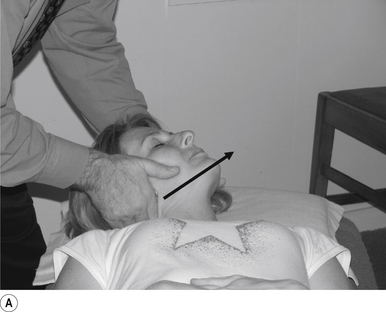
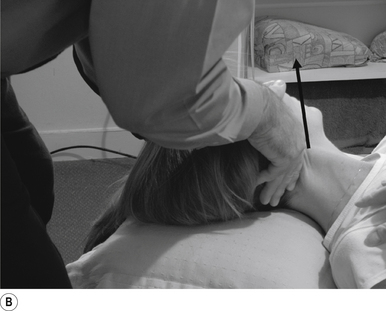
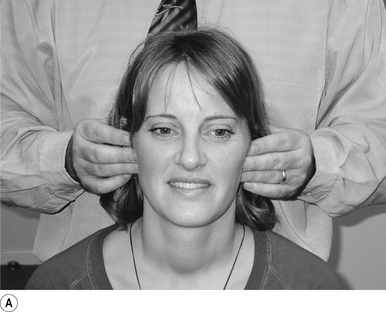
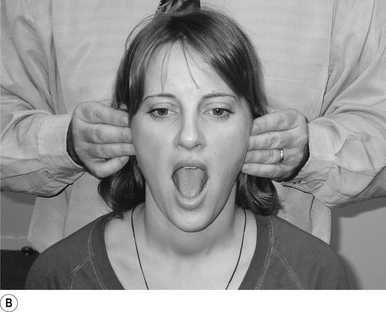
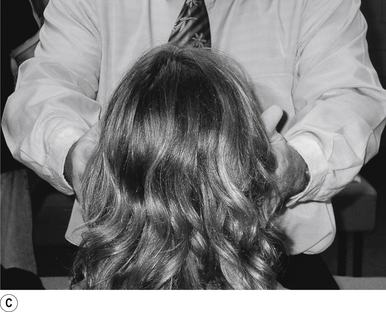
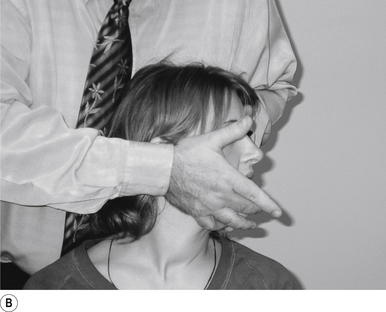
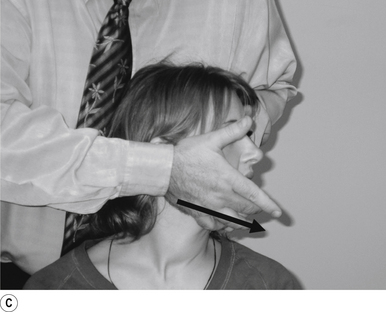
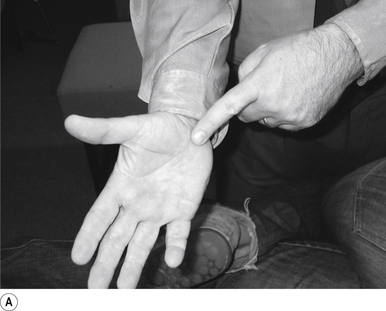
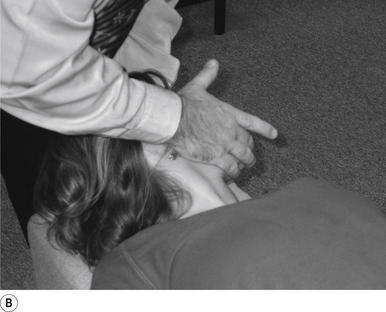
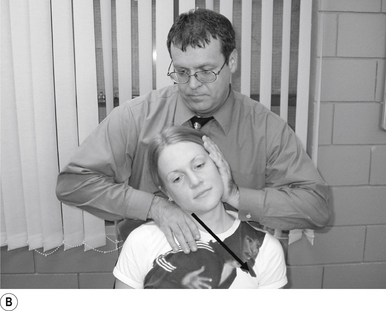
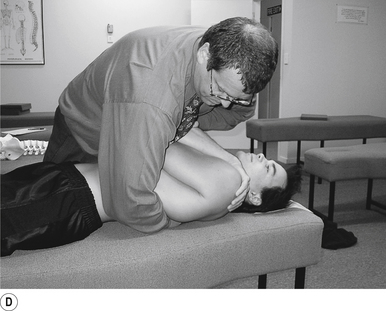
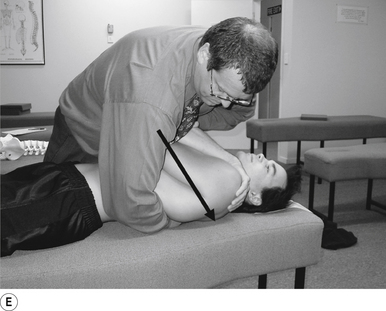
18 Analysis of the temporal mandibular joint
Analysis technique
Palpation of the temporal mandibular joint (TMJ) bilaterally can give you a very good idea of how the joint is functioning. The fingers should contact the area of the TMJ in order to appreciate both the rotational and translational components of TMJ function. The patient is then asked to open and close their mouth slowly and repeatedly to allow the adjuster the opportunity to evaluate the motion of the TMJ. The translational and rotational components of the TMJ are compared bilaterally for delays or aberrant function including swinging of the mandible to the left or right. The technique can be performed from the back (Figs 20.18A and 20.18B) or from the front (Fig. 20.18C) of the patient.
19 Temporal mandibular joint sitting translation adjustment
Indication
This adjustment can be used to address a TMJ that is not translating during opening motion.
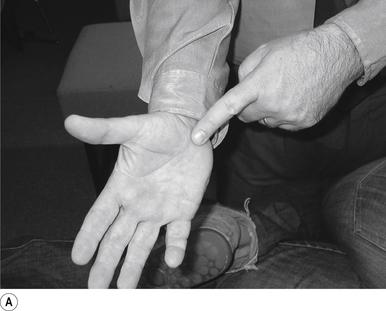
Contact
A pisiform contact over the TMJ in question is the most efficient contact for this adjustment. The fifth finger and lateral aspect of the hand should rest lightly on the mandible with the fingers pointing down the jaw line. Skin slack should be taken from superior to inferior and lateral to medial. The contact should be firm but not causing the patient discomfort (Figs 20.19A and 20.19B).
Adjuster’s position
The adjuster should be standing with feet slightly more than shoulder-width apart, knees slightly bent, facing the patient on a 75–80° angle from the patient’s head, on the same side as the contact (Fig. 20.19B). The sternal notch should be posterior to the contact.
Thrust
The thrust is an impulse along the line of the mandible (Fig. 20.19C). The non-thrust hand stabilises the head and neck to avoid over rotation.
Clinical comments
Temporal mandibular joint adjusting can be very anxiety provoking for patients and chiropractors alike. This results in ridged, stiff hands that cause the patient to ’tighten up’. Taking a moment to remind yourself to relax your hands is very useful. You must also be very watchful not to stick your thumb into the patient’s eye as you concentrate on performance of the adjustment. Students are often concerned about the amount of thrust to use when performing a TMJ adjustment. This can be overcome by starting with a light thrust and progressing over two or three thrusts, allowing the force to increase slightly each time until you have developed a feel for the amount of thrust to utilise.
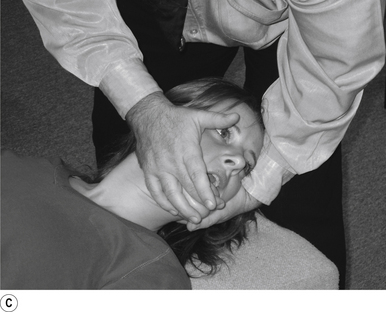
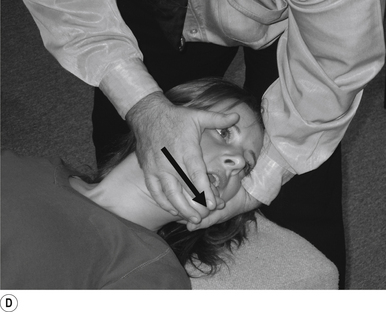
20 Temporal mandibular joint sitting rotational adjustment
Contact
A double-handed interlocked finger contact cupping the mandible is the most efficient contact for this adjustment. The palmer aspect of the hand should rest lightly on the mandible with the fingers pointing down the jaw line. Skin slack should be taken from superior to inferior and lateral to medial. The contact should be firm but not cause the patient discomfort (Fig. 20.20A).
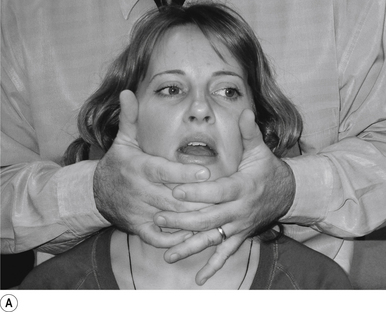

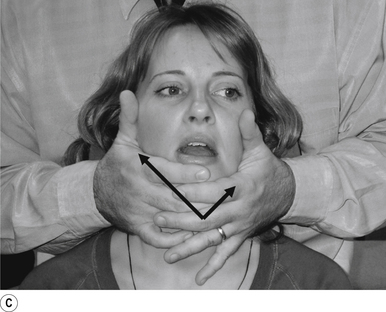
Adjuster’s position
The adjuster should be standing with feet slightly more than shoulder-width apart, directly behind the patient (Fig. 20.20A). The sternal notch should be posterior to the contact.
Thrust
The thrust is an impulse along the line of the mandible just as the TMJ begins the rotational component of movement. The thrust can be bilateral and equal or emphasis directed on one side by altering the amount of thrust on each side (Figs 20.20B and 20.20C).
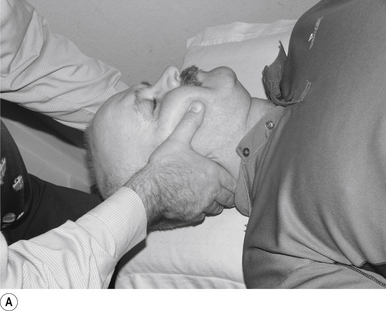
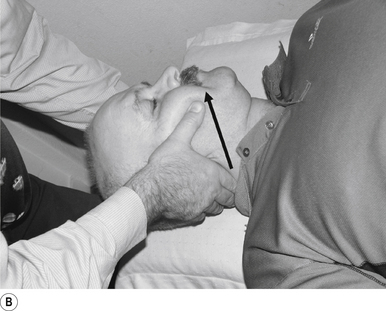
21 Temporal mandibular joint supine translation adjustment
Indication
This adjustment can be used to address a TMJ that is not translating during opening motion.
Contact
A pisiform contact over the TMJ in question is the most efficient contact for this adjustment. The fifth finger and lateral aspect of the hand should rest lightly on the mandible with the fingers pointing down the jaw line. Skin slack should be taken from superior to inferior and lateral to medial. The contact should be firm but not cause the patient discomfort (Figs 20.21A and 20.21B).
Adjuster’s position
The adjuster should be standing with feet slightly more than shoulder-width apart, knees slightly bent, facing the patient on a 75–80° angle from the patient’s head, on the same side as the contact (Fig. 20.21C). The sternal notch should be over or posterior to the contact.
Clinical comments
Temporal mandibular joint adjusting can be very anxiety provoking for patients and chiropractors alike. This results in ridged, stiff hands that cause the patient to ’tighten up’. Taking a moment to remind yourself to relax your hands is very useful. You must also be very watchful not to stick your thumb into the patient’s eye as you concentrate on performance of the adjustment. Students are often concerned about the amount of thrust to use when performing a TMJ adjustment. This can be overcome by starting with a light thrust and progressing over two or three thrusts, allowing the force to increase slightly each time until you have developed a feel for the amount of thrust to utilise.
22 Sternal–clavicular inferior glide adjustment
Contact
A pisiform contact with the thrust hand contacting the head of the sternum, the non-adjusting hand reinforces the thrusting hand to maintain downward pressure during the thrust so the contact does not slip (Fig. 20.22A).
23 Sternal–clavicular superior glide adjustment
Contact
A pisiform contact with the thrust hand contacting the head of the clavicle, the non-adjusting hand re-enforces the thrusting hand to maintain downward pressure during the thrust so the contact does not slip (Fig. 20.23A).
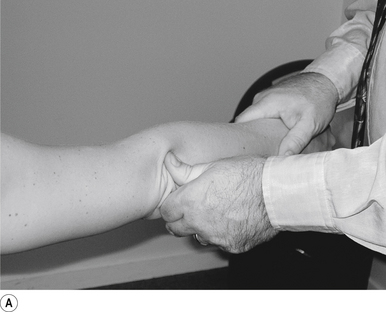
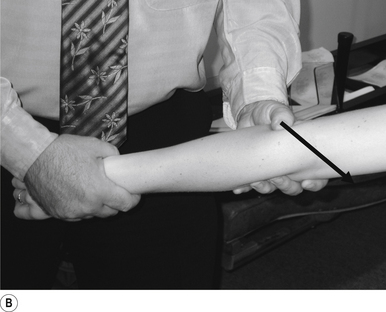
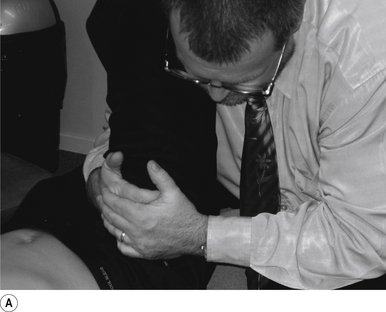
24 Sitting posterior capsule shoulder adjustment
Contact
A double-handed interlocked finger contact cupping the elbow is the most efficient contact for this adjustment. The palmer aspect of the hand should rest lightly on the elbow with the fingers interlocked or overlapped for strength. Skin slack should be taken from inferior to superior and anterior to posterior. The contact should be firm but not cause the patient discomfort (Fig. 20.24A).
Adjuster’s position
The adjuster should be standing with feet slightly more than shoulder-width apart, directly behind the patient (Fig. 20.24A). The sternal notch should be posterior to the contact.
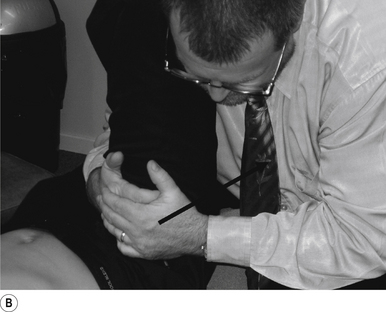
Thrust
The humerus is elevated to about 90°. The thrust is an impulse along the line of the humerus (Fig. 20.24B).
Clinical comments
Shoulder adjusting can be very anxiety provoking for patients and chiropractors alike due to the discomfort often felt by the patient when in the preloaded position. The patient can be comforted by informing them that in most cases the pain will subside in a few minutes following the adjustment.
25 Sitting superior capsule and A/C joint adjustment
Contact
A double-handed interlocked finger contact cupping the elbow is the most efficient contact for this adjustment. The palmer aspect of the hand should rest lightly on the elbow with the fingers interlocked or overlapped for strength. Skin slack should be taken from inferior to superior. The contact should be firm but not cause the patient discomfort (Fig. 20.25A).


Adjuster’s position
The adjuster should be standing with feet slightly more than shoulder-width apart, directly behind the patient (Fig. 20.25B). The sternal notch should be posterior to the contact.
Clinical comments
Shoulder adjusting can be very anxiety provoking for patients and chiropractors alike due to the discomfort often felt by the patient when in the preloaded position. The patient can be comforted by informing them that in most cases the pain will subside in a few minutes following the adjustment.
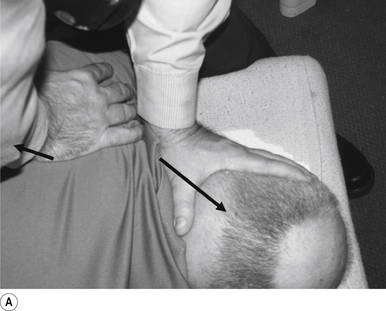
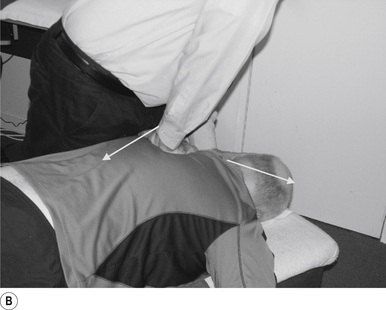
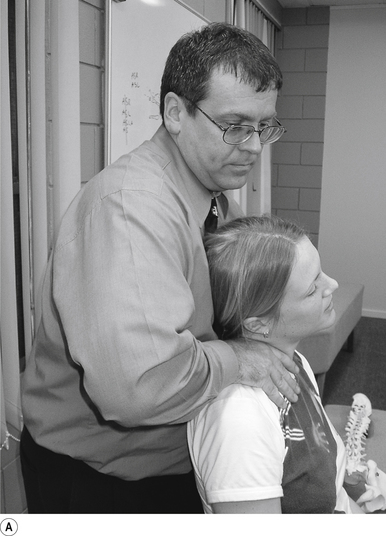
26 Sitting first rib adjustment
Contact
The first rib is contacted with the first metacarpal phalangeal joint of the thrusting hand. The support hand cups the contralateral occiput to the contact and applies a steady rostral and lateral to medial force that causes the patient’s head to laterally flex towards and rotate away from the contact (Fig. 20.26A).
27 Posterior rib head adjustment (anterior positioning)
Contact
A closed fist contact with fingers facing upwards is probably the best contact for this adjustment, although many variations of hand configuration may also be used (Fig. 20.27A). The contact is made on the head of the involved rib. The adjuster wraps his/her arm around the patient to contact the rib head in question (Fig. 20.27B).
Adjuster’s position
The adjuster should be in a fencer stance with the pelvis facing in a forward position. This will allow the body drop thrust to be transmitted along the proper resultant vector with maximum efficiency. The sternal notch (the functional centre of gravity) should be positioned over or posterior to the contact on the spine. The adjuster takes the contact as described above and as illustrated in Figs 20.27C and 20.27D below.
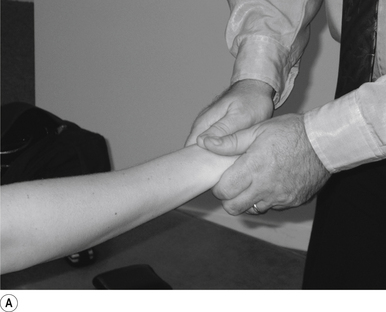
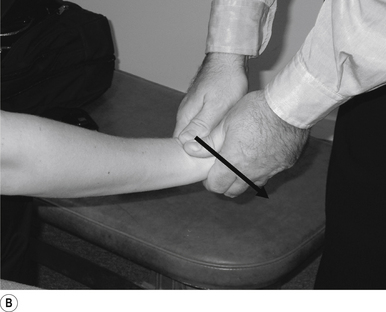
28 Sitting radial head adjustment
Contact
A single-handed thumb contact on the radial head in question just below the joint line is the most efficient contact for this adjustment. Skin slack should be taken into the direction of thrust. The contact should be firm but not cause the patient discomfort (Fig. 20.28A).
Patient position
The patient should be sitting comfortably in front of the adjuster, with their arm outstretched.
29 Sitting carpal joint adjustment
Contact
A double-handed reinforced thumb contact gripping the carpal bone in question just below the joint line of the specific bone is the most efficient contact for this adjustment. Skin slack should be taken into the direction of thrust. The contact should be firm but not cause the patient discomfort (Fig. 20.29A).
Patient position
The patient should be sitting comfortably in front of the adjuster, with their arm outstretched.
30 Supine general mobilisation hip adjustment
Contact
A double-handed interlocking finger contact gripping the leg just above the flexed hip is the most efficient contact for this adjustment. Skin slack should be taken in the direction of thrust, which is superior to inferior. The contact should be firm but not cause the patient discomfort (Fig. 20.30A).
31 Supine long-axis traction/internal/external rotation hip adjustment
Contact
A double-handed cross-handed contact gripping the leg just above the ankle is the most efficient contact for this adjustment. Skin slack should be taken in the direction of thrust, either internal or external rotation or long axis traction. The contact should be firm but not cause the patient discomfort (Fig. 20.31A).

Patient position
The patient should be lying comfortably in front of the adjuster, with their leg outstretched.
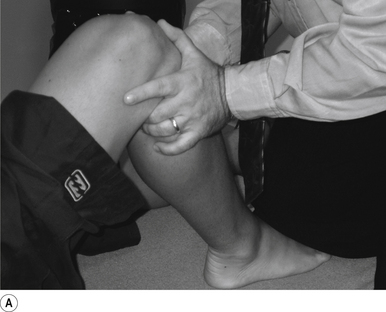
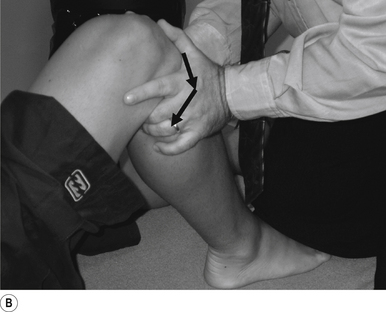
32 Supine internal rotation knee adjustment
Contact
A single-handed palmer contact cupping the lateral posterior tibia is the most efficient contact for this adjustment. The palmer aspect of the hand should rest lightly on the posterior tibial region. Skin slack should be taken from posterior to anterior and lateral to medial. The contact should be firm but not cause the patient discomfort. The non-thrust hand should be holding the patient’s lower leg above the ankle (Fig. 20.32A).
33 Supine internal/external rotation knee adjustment
Contact
A double-handed palmer ’choke’ contact gripping the tibia just below the joint line is the most efficient contact for this adjustment. The palmer aspect of the thrust hand should rest lightly on the anterior tibial region. Skin slack should be taken from anterior to posterior and in the direction of thrust, either internal or external rotation. The contact should be firm but not cause the patient discomfort (Fig. 20.33A).
34 Supine talus/navicular internal/external rotation adjustment
Contact
A double-handed reinforced finger contact gripping the navicular or the talus just below their respective joint lines is the most efficient contact for this adjustment. The palmer aspect of the thrust hand should rest lightly on the medial arch region. Skin slack should be taken from anterior to posterior and in the direction of thrust, either internal or external rotation. The contact should be firm but not cause the patient discomfort (Fig. 20.34A).
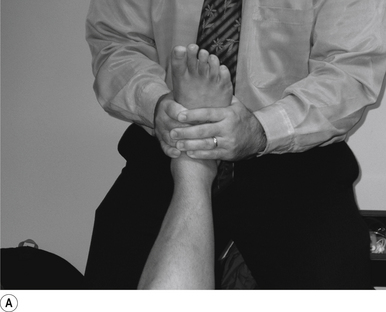
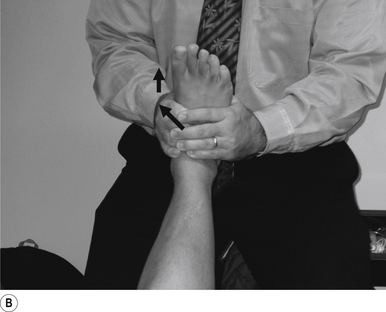
Patient position
The patient should be lying comfortably in front of the adjuster, with their leg outstretched.
Contraindications for manipulation
Manipulation when employed in appropriate circumstances is a safe and effective technique for restoring joint biomechanics and as a form of afferent stimulation. I have outlined several common conditions that may constitute contraindications to manipulation in certain cases; for a more comprehensive description see Beck et al. (2004). There are very few situations or conditions where some form of manipulation cannot be performed as a form of stimulus to the neuraxis.
 Quick facts 20.1
Instability
Instability or ligament tears can be acute, chronic, or recurrent in nature and usually result in different degrees of instability which become apparent from minor movement of the joint. This is due to swelling and kinematic dysfunction of the joint due to the dislocation. Usually, the direction of causative force relates to the direction of instability and patients are very apprehensive about any movement in the direction of the instability. It is important to keep in mind that ligament instability may also be caused by infection, inflammatory processes, or autoimmune conditions.
Tumours
1. Metastatic tumours—In cases of metastatic tumour involvement of the primary site must be identified and located.
2. Multiple myeloma—This condition most commonly affects long bones and marrow-producing bones including the vertebra.
3. Ewing’s sarcoma—This condition prefers long bones such as the humerus, radius, and ulna.
4. Reticular cell carcinoma—This condition is rare, but prefers the humerus when it does occur.
5. Osteochondroma—This condition prefers the area around the knee most commonly, followed by the area around the elbow.
6. Paget’s disease—This condition results in deformation of the bony matrix and changes in bone deposits. It may affect all bones but most commonly the head, jaw, and pelvis are involved.
Arthritides
1. Osteoarthritis—In many cases, osteoarthritis is not a contraindication for manipulation; however, it may be contraindicated in severe cases.
2. Rheumatoid arthritis (RA)—In addition to pain, the process of RA may lead to ligament destruction, including the alar ligaments of the atlas/axis complex; for this reason great care needs to be taken when manipulating patients with a history of RA.
3. Charcot’s (neuropathic) joint—Destruction of the proprioceptive nerves to a joint result in massive destruction due to denervation of the joint. These joints can become extremely disfigured with relatively no pain to the patient.
4. Psoriatic arthritis—This condition is associated with psoriasis of the skin and may also result in severe joint destruction in some cases.
5. Gout—This condition usually affects the joints of the hands and feet, and in the inflammatory stage these may be too painful to manipulate.
Congenital anomalies
A variety of congenital anomalies can be considered as contraindications for manipulation or at the very least result in alteration of the manipulation approach applied. Extra bones such as a fabella or segmented patella may interfere with the standard manipulation approach. Pseudo-joints, ossifications, and scar tissue may occur following trauma or surgical interventions that may also result in difficulties when considering manipulation. Several structural deformities such as club foot, pes planus, and pes cavus can also present a manipulative challenge. These congenital anomalies usually coexist with other deformities, so check the patients thoroughly before manipulating.
Manipulation can produce complications
Vertebrobasilar strokes (VBS)
Firstly, it must be accepted and understood that VBS following manipulation of the cervical spine can and do occur. The temporal relationship between young healthy patients without apparent osseous or vascular disease attending for manipulation and then suffering this type of rare stroke is well documented (Terrett 2001).
 Quick facts 20.2
Characteristics of patients who suffer a VBS or VBS-like symptoms following manipulation
• They are young healthy adults.
• They have uneventful medical or health histories.
• They have no or only a few of the stroke ’risk factors’.
• They cannot be identified a priori by clinical or radiographic examination.
• Women do not appear to be at greater risk.
• Injuries to the vertebral arteries can occur anywhere along their entire path.
A variety of studies have reported a wide range of incidence findings, ranging from 1 incident per 300 000 manipulations to 1 per 14 000 000 manipulations (Maigne 1972; Cyriax 1978; Hosek et al. 1981; Gutmann 1983; Carey 1993). Terrett (2001) examined 255 cases of vertebrobasilar insufficiency (VBI) following spinal manipulation; this investigation revealed that there is no greater risk for any age range, although the greatest number of occurrences was in the range 30–45 years, and there is no greater risk for any sex, although women had the greatest number of occurrences.
Patients who suffer a VBS or VBS-like symptoms display the following characteristics:
• They are young healthy adults;
• They have uneventful medical or health histories;
• They have no or only a few of the stroke ’risk factors’;
• They cannot be identified a priori by clinical or radiographic exam;
• Women do not appear to be at greater risk; and
• Injuries to the vertebral arteries can occur anywhere along their entire path.
The symptoms of VBI most commonly found include:
1. Dizziness/vertigo/giddiness/light-headedness;
2. Drop attacks/loss of consciousness;
3. Diplopia (amaurosis fugax);
6. Ataxia of gait/falling to one side;
The five most common presenting complaints in patients who subsequently developed VBI include:
If a patient suffers symptoms of VBI, do not adjust them again. Left alone,the patient may recover.
Wallenberg and ’locked in’ syndromes
 Quick facts 20.3
Wallenberg syndrome
Two syndromes that may also result from cervical spine manipulation have been identified: Wallenberg syndrome and the ’locked in’ syndrome. Wallenberg syndrome (dorsolateral medullary syndrome) is a syndrome of symptoms that results from an injury or dysfunction in the dorsal lateral medulla, which usually is a result of an infarct in blood supply caused by occlusion of the vertebral artery but may also result from occlusion of the posterior inferior cerebellar artery (PICA). The most common symptoms include:
Cortical stimulation
Ipsilateral cortical stimulation/activation in rehabilitation
• Any complex chore involves both sides of the brain;
• Contralateral cerebellar activation, novel hand, foot movements, vibration;
• Contralateral music, sound, snapping fingers;
• Light stimulation in the contralateral visual field;
• Ipsilateral smell stimulation;
• Watching vertical movement on ipsilateral side;
Right cortical stimulation/activation in rehabilitation
• Arranging blocks is a very right-sided activity;
• Listening to and reading stories, especially with images;
• Listen for double meanings, puns, jokes;
• Holding many possible meanings in mind;
• Functions more as an arbiter, selects the meaning according to the context;
• Summarising the gist of something, getting the ’bigger picture’;
• Look at shapes, lines, crosses, cubes, dots displays;
• Looking at anonymous faces or meeting new people;
• Appraisal of self-worth, attachment, and bonding;
• Look at global activity versus details;
• Knowing where/what objects are in a blurred picture, or from general outlines;
• Seeing links between things at the same time, different places;
• Seeing things as they are, not as they ’should be’, literal rather than interpretive;
• Tap to flashing lights, target synchronised with memory;
• Trace mazes with eyes, hands, look for object in a picture or maze;
• Listen for the melody of music, tone, especially with the left ear, especially the lower tones, including heartbeat, digestion;
• Listen to words used to describe the mind: ’think’, ’imagine’;
• Spatial attention, such as mental rotation of objects while looking at parts;
• Movement of larger muscles (arm and leg escape, running and fighting);
• Recalling letters or words without reference to meaning (Burgund & Marsolek 1997; Epstein et al. 1997; Fink et al. 1997b; Henry 1997; Lechevalier 1997; Tranel et al. 1997).
Left cortical stimulation/activation in rehabilitation
• Writing is a very left-sided function;
• Speaking fluently is more left than right;
• Listen for the rhythm of music, pitch, familiarity, identification;
• Listening with right ear, especially the higher tones;
• Reading imageless technical material, imageless concepts;
• Reading sentences with centre-embedded meanings requires more memory;
• Drawing new detailed diagrams or pictures;
• Verbal organisational, interpretational skills;
• Seeing the links between things presented sequentially;
• Seeing similarities between words on paired lists;
• Classification of words, pictures, into categories;
• Word games, deriving small words from larger words, finding a word in a list;
• Number organisational, interpretational skills;
• Counting exercises such as subtracting by 7s from 100;
• Paying attention to details of an object;
• Identification of familiar faces, objects, shapes;
• Interpreting incomplete pictures;
• Making stories when details are incomplete, true or false;
• Interpreting things based on a sense of ’should’, dependent on past experience;
• Rapid selection of a single meaning;
• Paying attention to details other than the object in view;
• Attention-switching exercises;
• Self-preservation versus species preservation;
• Movement of smaller muscles;
• Recalling meaningful information, or well-practised complex narrative; and
• Silent verb generation activities and cognitive processes leading to the answer ’yes’ (Andreasen et al. 1995; Herholtz et al. 1996; Schumacher et al. 1996; Carlsson 1997; Fallgatter et al. 1997; Fink et al. 1997a,b; Henriques & Davidson 1997; Jennings et al. 1997; Lechevalier 1997; Pashek 1997; Wang 1997; Gabrieli et al. 1998)
Activation of the left premotor area
Frontal lobe stimulation/activation in rehabilitation
• Recall well-practised material;
• Pay attention to rhythm (Broca’s area);
• Verbal exercises which impose a heavy burden on working memory;
• Cerebellar activation, especially of hands and fingers, which is specific for the dentate nucleus;
• Volitional eye activity or saccadic movement activity to the contralateral side;
• Listen to complex concepts; and
• Learn new songs (Decety et al. 1997; Paradiso et al. 1997).
Temporal lobe stimulation/activation in rehabilitation
• Naming/viewing pictures of new faces or novel experiences;
• Point with the ipsilateral hand;
• Cognitive processes leading to the answer ’yes’;
• Working with or looking at animals produces left medial temporal lobe stimulation;
• Verbs/actions stimulate the left middle temporal gyrus;
• Time and place (long-term episodic memory) – left prefrontal cortex;
• Spatial orientation in remembered places stimulates the right hippocampus and temporal lobe areas;
• Listening and counting, listen for how many times a word is spoken in a sentence, etc.;
• Performing tasks with familiar stimulus;
• Recall visual landmarks, which activates spatial memory centres;
• Quarter field stimulation from superior quadrant of contralateral side;
• Listening to music in the contralateral ear;
• Ipsilateral smell stimulation;
• Looking at unknown persons, faces;
• Remember where objects are in the environment;
• Narrative recall and list learning (Berthoz 1997; Grady et al. 1997; Henriques & Davidson 1997).
Parietal lobe stimulation/activation in rehabilitation
• Trace a maze, initial unskilled attempts;
• Quarter field stimulation from inferior quadrant of contralateral side;
• Remember words and pseudo-words;
• Meaningless hand movements; and
• Attention exercises involving timing such as pushing a button when a light flashes (Decety et al. 1997; Pashek 1997; Harrington et al. 1998; Schiffer 1998).
Cerebellar stimulation/activation in rehabilitation
General cerebellar stimulation techniques
• Warming the auditory canal will stimulate the cerebellum on the ipsilateral side;
• Revolving chair to the right will stimulate the cerebellum on the right and vice versa but will also stimulate the vestibular system;
• Passive muscle stretch will stimulate the cerebellum on the ipsilateral side;
• Squeezing a tennis ball will stimulate the cerebellum on the ipsilateral side;
• Alternate passive stretch on ipsilateral side with active stretch of contralateral side;
• Eye movements up the ipsilateral side and down the contralateral side will stimulate the respective cerebellum and not the vestibular system; and
Feedforward and efferent copy (lateral cerebellum)
• Cognitive processes leading to the answer ’yes’;
• Learning a musical instrument;
• Tracing a maze, especially the first few attempts;
• Throwing and catching a ball off the wall;
• Tapping to the beat of a metronome or to music;
• Trying to write with the eyes closed (with dominant or non-dominant hand);
• Board games involving strategy and forward planning; and
• Silent generation of verbs and reading nouns out loud (Herholz et al. 1996; Jennings et al. 1997; Pashek 1997; Ojemann et al. 1998).
Mesencephalic stimulation/activation in rehabilitation
• Eye exercises include alternating focusing on near and then far objects;
• Listening to music and sounds is especially crucial when IML activation level is high;
• Light and visual stimulation, especially when IML activation is low; and
• Increase cerebellar activation, especially novel contralateral hand activities.
Vestibular system stimulation/activation in rehabilitation
The following are Cawthorne–Cooksey exercises for patients with vestibular hypofunction:
Diligence and perseverance are required but the earlier and more regularly the exercise regimen is carried out, the faster and more complete will be the return to normal activity (Dix 1979).
Exercises to improve postural stability
There are many different balance exercises that can be used. These exercises are devised to incorporate head movement (vestibular stimulation) or to foster the use of different sensory cues for balance (Herdman et al. 1994).
1. The patient stands with his or her feet as close together as possible with both or one hand helping maintain balance by touching a wall if needed. The patient then turns his or her head to the right and to the left horizontally while looking straight ahead at the wall for 1 minute without stopping. The patient takes his or her hand or hands off the wall for longer and longer periods of time while maintaining balance. The patient then tries moving his or her feet even closer together.
2. The patient walks, with someone for assistance if needed, as often as possible (acute disorders).
3. The patient begins to practise turning his or her head while walking. This will make the patient less stable so the patient should stay near a wall as he or she walks.
4. The patient stands with his or her feet shoulder-width apart with eyes open, looking straight ahead at a target on the wall. He or she progressively narrows the base of support from feet apart to feet together to a semi-heel-to-toe position. The exercise is performed first with arms outstretched, then with arms close to the body, and then with arms folded across the chest. Each position is held for 15 seconds before the patient does the next most difficult exercise. The patient practises for a total of 5 to 15 minutes.
5. The patient stands with his or her feet shoulder-width apart with eyes open, looking straight ahead at a target on the wall. The patient progressively narrows his or her base of support from feet apart to feet together to a semi-heel-to-toe-position. The exercise is performed first with arms outstretched, then with arms close to the body, and then the patient tries the next position. The patient practises for a total of 5 to 15 minutes.
6. A headlamp can be attached to the patient’s waist or shoulders, and the patient can practise shifting weight to place the light into targets marked on the wall. This home ’biofeedback’ exercise can be used with the feet in different positions and with the patient standing on surfaces of different densities.
7. The patient practises standing on a cushioned surface. Progressively more difficult tasks might be hard floor (linoleum, wood), thin carpet, shag carpet, thin pillow, sofa cushion. Graded-density foam can also be used.
8. The patient practises walking with a more narrow base of support. The patient can do this first touching the wall for support or for tactile cues and then gradually touching only intermittently and then not at all.
9. The patient practises turning around while walking, at first making a large circle but gradually making smaller and smaller turns. The patient must be sure to turn in both directions.
10. The patient can practise standing and then walking on ramps, either with a firm surface or with more cushioned surface.
11. The patient can practise maintaining balance while sitting and bouncing on a Swedish ball or while bouncing on a trampoline. This exercise can be incorporated with attempting to maintain visual fixation or a stationary target, thus facilitating adaptation of the otolith-ocular reflexes.
12. Out in the community, the patient can practise walking in a mall before it is open and therefore while it is quiet; can practise walking in the mall while walking in the same direction as the flow of traffic; and can walk against the flow of traffic (Herdman et al. 1994).
Exercises to improve gaze stability
Acute stage (also used with chronic, uncompensated patients)
1. A business card or other target with words on it (foveal target) is taped on the wall in front of the patient so he or she can read it. The patient moves his or her head gently back and forth horizontally for 1 minute while keeping the words in focus.
2. This is repeated moving the head vertically for 1 minute.
3. Depending on whether this induces any nausea, the exercise is then repeated using a large pattern such as a checkerboard (full-field stimulus), moving the head horizontally.
4. The exercise with the checkerboard is then repeated moving the head vertically.
Subacute stage
1. The patient holds a business card in front of him or her so that he or she can read it. The patient moves the card and his or her head back and forth horizontally in opposite directions, keeping the words in focus for 1 minute without stopping.
2. This is repeated with vertical head movements and with a large, full-field stimulus.
The duration is gradually extended from 1 to 2 minutes. The patient should repeat each exercise at least three times each day (Herdman et al. 1994).
Treatment of vestibular hypofunction
1. Increase and alternate the speed of exercises;
2. Perform exercises in various positions and activities (i.e. head movements performed in sitting, then standing, and finally during walking);
3. Perform exercises in situations of decreasing visual and/or somatosensory input (i.e. eyes open to eyes closed);
4. Expose the patient to a variety of task and environmental situations and contexts (i.e. walking in the home to walking at a shopping mall);
5. Trace the alphabet with your foot; and
6. Step forwards and backwards and cross over your legs (Dix 1979; Herdman et al. 1994).
Activation of special areas
 Clinical case answers
Case 20.1
20.1.1
Any combination of the following in the appropriate amounts would be beneficial to this woman:
• Writing is a very left-sided function;
• Speaking fluently is more left than right;
• Listen for the rhythm of music, pitch, familiarity, identification;
• Listening with right ear, especially the higher tones;
• Reading imageless technical material, imageless concepts;
• Reading sentences with centre-embedded meanings requires more memory;
• Drawing detailed new diagrams or pictures;
• Verbal organisational, interpretational skills;
• Seeing the links between things presented sequentially;
• Seeing similarities between words on paired lists;
• Classification of words, pictures, into categories;
• Word games, deriving small words from larger words, finding a word in a list;
• Number organisational, interpretational skills;
• Counting exercises such as subtracting by 7s from 100;
• Paying attention to details of an object
• Identification of familiar faces, objects, shapes;
• Interpreting incomplete pictures;
• Making stories when details are incomplete, true or false;
• Interpreting things based on a sense of ’should’, dependent on past experience;
• Rapid selection of a single meaning;
• Paying attention to details other than the object in view;
• Attention-switching exercises;
• Self-preservation versus species preservation;
• Movement of smaller muscles;
• Recalling meaningful information, or well-practised complex narrative;
• Silent verb generation activities and cognitive processes leading to the answer ’yes’; and
Case 20.2
20.2.1
Any of the following would be beneficial to this young man in the appropriate amounts:
General cerebellar stimulation techniques
• Warming the auditory canal will stimulate the cerebellum on the ipsilateral side;
• Revolving a chair to the right will stimulate the cerebellum on the right and vice versa but will also stimulate the vestibular system;
• Passive muscle stretch will stimulate the cerebellum on the ipsilateral side;
• Squeezing a tennis ball will stimulate the cerebellum on the ipsilateral side;
• Alternate passive stretch on ipsilateral side with active stretch of contralateral side;
• Eye movements up to ipsilateral side and down to contralateral side will stimulate the respective cerebellum and not the vestibular system; and
Feedforward and efferent copy (lateral cerebellum)
• Cognitive processes leading to the answer ’yes’;
• Learning a musical instrument;
• Tracing a maze, especially the first few attempts;
• Throwing and catching a ball off the wall;
• Tapping to the beat of a metronome or to music;
• Trying to write with the eyes closed (with dominant or non-dominant hand);
• Board games involving strategy and forward planning;
• Silent generation of verbs and reading nouns out loud;
• Warming the auditory canal will stimulate the cerebellum on the ipsilateral side;
• Revolving a chair to the right will stimulate the cerebellum on the right and vice versa but will also stimulate the vestibular system;
• Passive muscle stretch will stimulate the cerebellum on the ipsilateral side;
• Squeezing a tennis ball will stimulate the cerebellum on the ipsilateral side;
• Alternate passive stretch on ipsilateral side with active stretch of contralateral side;
• Eye movements up to ipsilateral side and down to contralateral side will stimulate the respective cerebellum and not the vestibular system; and Pointing with the ipsilateral hand.
References
Beck R.W. Psychoneuroimmunology. Beirman R. Sydney: Handbook of Clinical Diagnosis; 2003:27-35.
Drummond P. Autonomic disturbances in cluster headache. Brain. 1988;111:1199-1209.
K. Holt, R.W. Beck, S. Sexton, 2006. Reflex Effects of a Spinal Adjustment on Blood Pressure.
Wang S. Traumatic stress and attachment. Acta Physiol. Scand. Suppl.. 1997;640:164-169.


