[level-membership-for-orthopaedics-category]
Anterior Capsular Reconstruction
Renee Songer, Reza Jazayeri, Diane R. Schwab, Ralph A. Gambardella and Clive E. Brewster
Introduction
Anterior shoulder instability is one of the most commonly diagnosed and treated conditions of the shoulder in athletes. This encompasses a wide spectrum of pathology, and similarly various surgical approaches have been used to address the specific pathoanatomy involved. Treatment of anterior shoulder instability has evolved due to advances in arthroscopic techniques along with an improved understanding of shoulder anatomy and its complex biomechanics. Although the treatment of anterior glenohumeral instability has been a topic of debate over the last couple of decades, a consensus exists regarding the necessity of an individualized treatment plan based on the patients’ functional demands and their associated type and degree of instability. Treating anterior shoulder instability requires an accurate diagnosis, a detailed operative plan, experience with advanced arthroscopic and open procedures, and individualized rehabilitation programs.
Etiology/Evaluation
Shoulder instability is often not an isolated diagnosis, but rather one point of a continuum of pathology (Fig. 4-1). This is particularly evident in overhead-throwing athletes who place a tremendous amount of force on the shoulder joint and surrounding soft tissue structures. Repetitive microtrauma and stresses placed on the shoulder can lead to injury of the glenohumeral joint and various supporting structures including the rotator cuff, glenohumeral ligaments, and labrum.

Shoulder instability is often associated with internal impingement, a process where the posterosuperior labrum and the articular undersurface of the rotator cuff tendons impinge and become injured. The cause of internal impingement is multifactorial in throwing athletes. Poor mechanics such as hyperangulation of the arm during the cocking phase and poor endurance can lead to pathologic stretching of the anterior shoulder structures. This is often exacerbated by underlying weak periscapular stabilizers and deficits in internal rotation. The combination of these factors and the repetitive nature of throwing sports can lead to internal impingement with damage to the surrounding structures.
Many patients cannot be simply placed into categories represented by the eponyms TUBS and AMBRI. TUBS stands for traumatic instability, unidirectional, Bankart lesion, treated with surgery. AMBRI stands for atraumatic instability, multidirectional, bilateral, with treatment being initially rehabilitation; if nonoperative treatment fails, then surgical treatment is an inferior capsular shift. Shoulder instability may be better addressed when classified into one of four groups as shown in Box 4-1.
Clinical examination of group 1 patients with anterior shoulder instability commonly demonstrate glenohumeral internal rotation deficit (GIRD), with positive apprehension and relocation signs. Associated posterior capsular tightness contributes to anterior and superior shifting of the humeral head, leading to posterior impingement and labral pathology. If left untreated, this instability can lead to internal impingement with rotator cuff and labral tearing (group 2).
Some patients also have signs of external impingement or a diagnosis of rotator cuff tendinitis, bursitis, or bicipital tendinitis. Generally, this group is older than those who experience internal impingement. This group often has persistent symptoms despite both nonoperative treatment and surgical subacromial decompression.
Young patients with generalized ligamentous laxity (group 3) are another group of patients that can have shoulder instability, as well as a positive relocation test and internal impingement. Lastly, (group 4) a traumatic episode can lead to anterior instability as a result of a Bankart lesion. These patients, however, show no evidence of impingement.
The majority of patients will respond to conservative treatment if the diagnosis of anterior shoulder instability is made early during the pathologic course. As many as 95% of patients can return to their previous level of competition. The focus of these exercises is on posterior capsular stretching, strengthening the periscapular muscles, and emphasis of proper throwing mechanics. Activity modification and rest from throwing combined with a supervised therapy program are instrumental in protecting the anterior shoulder structures. Persistence and attention to detail are both essential to a successful outcome: the elimination of pain and return to full activity without surgical intervention.
Patients who do not respond to 3 to 6 months of appropriate nonoperative management are possible candidates for anterior capsulolabral reconstruction (ACLR) for recurrent instability or repair of their Bankart lesion for traumatic instability.
Surgical Considerations
It is imperative to determine the correct etiology of instability by a thorough history, physical examination, and imaging studies for selection of the appropriate procedure. A surgical approach that combines careful preoperative and intraoperative evaluation maximizes the possibility of good and excellent outcomes. Both open and arthroscopic surgical repairs have a role in the management of anterior shoulder instability. While arthroscopic capsulolabral repair has recently become the standard of care for the treatment of anterior shoulder instability, open approaches remain a reliable, time-tested option and in certain cases continue to be the gold standard.
All patients are examined under anesthesia. Subtle instabilities, which were not apparent previously, are often better appreciated with the patient asleep. Regardless of surgical approach, a thorough diagnostic arthroscopy is performed. The patient is placed in the lateral position, and the shoulder is distracted with 10 lb using an overhead traction suspension unit. The arthroscope is introduced into the shoulder via the posterior portal. The glenohumeral joint is evaluated for subtle changes—such as attenuation or absence of the inferior glenohumeral ligament, a loose redundant capsule—with a positive “push-through” test. Often an internal impingement between the undersurface of the supraspinatus tendon and the posterior labrum is evident with fraying or a partial articular supraspinatus tendon avulsion (PASTA) lesion in more advanced cases.
In cases of traumatic anterior shoulder instability, a Bankart lesion, and occasionally a Hill-Sachs deformity can be seen. The subacromial space usually appears normal in the younger overhead-thrower who has an anterior instability without the inflamed, thickened bursa and decreased space that is characteristically found with external impingement.
Based on the preoperative workup, evaluation under anesthesia and diagnostic arthroscopy, the surgical approach that will best address the patient’s issues is elected.
Arthroscopic Procedure
Arthroscopic surgical stabilization is currently the preferred method of treatment for most patients with anterior instability. Surgical goals remain similar to open approaches, including addressing any Bankart/anterior labral periosteal sleeve avulsion (ALPSA) lesion back to its anatomic position on the glenoid, eliminating any capsular hyperlaxity, and repairing any clinically significant rotator interval laxity. Furthermore, an arthroscopic approach allows better identification and treatment of associated pathologic conditions including superior labral anterior-posterior (SLAP) lesions, release of posterior capsular tightness, and any possible subacromial impingement.
Traditionally, open stabilization has been the gold standard. However, more recent arthroscopic suture anchor techniques have recurrence rates equal to open techniques, even in high-demand contact athletes. Recent reports documented 92% to 97% good to excellent results, with 91% of high-demand contact athletes with traumatic anterior instability returning to sports. Multidirectional instability also may be treated by arthroscopic stabilization with predictably good results.
Arthroscopy is minimally invasive; avoiding open surgical dissection decreases morbidity and facilitates an outpatient approach. Maintaining subscapularis integrity improves postoperative muscle function and facilitates rehabilitation, particularly in the overhead athlete.
Initially, a diagnostic arthroscopy is performed through a standard posterior portal. An anterior superior portal is created just anterior to the biceps tendon. This portal is used for mobilization of the capsulolabral complex and for subsequent suture management. An anterior inferior portal is placed just above the superior edge of the subscapularis and is used for inferior placement of suture anchors on the lower aspect of the glenoid neck. Assessment of the mobility of the capsuloligamentous complex is crucial in determining whether the soft tissues have been displaced or are scarred in a medial position on the neck of the glenoid as in an ALPSA lesion. Adequate inferior soft tissue mobilization to the 6 o’clock position on the glenoid face is carried out using a combination of probes, rasps, motorized shavers, and periosteal elevators.
The anterior glenoid is rasped and decorticated in preparation for suture anchor insertion. The anchors are then placed on the edge of the articular surface in the 2 o’clock, 3 o’clock, and 5 o’clock positions. A suture lasso* or similar device is used to shift the labroligamentous complex superiorly and medially as needed. The suture is passed through the tissue, and arthroscopic knots are then used to securely fix the soft tissue to the glenoid. After all suture anchors are tied, the repair is evaluated for stable fixation and restoration of an anterior “buttress” to inhibit instability.
Adjunctive procedures may need to be performed to completely correct all pathology associated with the instability, such as rotator interval (RI) incompetence and capsular laxity. Arthroscopic findings consistent with RI tears are capsular redundancy between the supraspinatus and subscapularis, biceps tendon fraying, superior glenohumeral ligament (SGHL) tear, and the superior border of the subscapularis fraying. Arthroscopic closure of the deep layer of the SGHL to the middle glenohumeral ligament (MGHL) imbricates the anterosuperior capsule and can address RI capsular incompetence.
Contraindications to arthroscopic treatment include large Hill-Sachs lesions (25% to 35% of the humeral arc), Hill-Sachs lesions that engage the anterior glenoid rim in abduction-external rotation, or a loss of more than 20% to 25% of the anteroinferior glenoid.
Multiple dislocations can lead to attenuated capsulolabral tissue. This remaining poor quality tissue is often difficult to mobilize and repair arthroscopically, and an open stabilization may be preferred in these patients. Other relative indications for open stabilization include recurrent instability after failed arthroscopic stabilizations and avulsion of the capsulolabral tissue from the humerus (the humeral avulsion of the glenohumeral ligaments [HAGL] lesion).
Recent stabilization techniques have also expanded the arthroscopic scope of treating anterior shoulder instability. The “Remplissage” procedure (French for “to fill”) described by Wolf consists of an arthroscopic capsulotenodesis of the posterior capsule and infraspinatus tendon to fill the Hill-Sachs lesion.† Although others have also demonstrated satisfactory results with this technique,‡ alterations in biomechanics of the shoulder remain a valid concern.§
Open Procedure
Open surgery remains the preferred method of treatment in situations where even the most advanced arthroscopic techniques cannot adequately address the pathoanatomy, such as anterior instability in the setting of large bone defects or soft tissue deficiencies.
An anterior axillary approach is performed with the skin incision in Langer lines. The incision starts 2 cm distal and lateral to the coracoid process and extends 5 to 7 cm distally into the anterior axillary crease. The deltopectoral interval is identified, and the cephalic vein is retracted laterally with the deltoid. The conjoined tendon is identified and retracted medially. With the shoulder in external rotation, the subscapularis tendon is split transversely in line with its fibers at the junction of the upper two thirds and lower one third.
The subscapularis muscle is dissected free from the underlying capsule, starting medially in the muscular portion of the subscapularis and extending laterally. Retractors are positioned to maintain the subscapularis interval, allowing a horizontal anterior capsulotomy to be made in line with the split of the subscapularis tendon. Tag sutures are placed on either side of the capsular flaps just lateral to the labrum exposing the glenoid.
If a Bankart lesion is noted, it is repaired using suture anchors back to its anatomic location on the anterior-inferior glenoid neck. The capsule is assessed for its volume, quality, and ability to buttress the anterior inferior margin. The degree of capsular shift is tailored to the degree of laxity. If the capsule is deemed lax or incompetent, it is overlapped to obliterate the redundancy. The inferior leaf of the capsule and accompanying inferior glenohumeral ligament are advanced proximally. The superior portion of the capsule is brought over the inferior portion and labrum, resting along the anterior scapular neck. The inferior and superior leaflets are overlapped using a vest-over-pants technique with nonabsorbable sutures. If the labrum is intact and does not require repair, a capsular imbrication alone is adequate to reduce the volume of the joint.
After capsular closure, the arm is taken through a ROM, noting the extent of motion which places tension on the repair. This will mark the limitation of motion that the patient is permitted postoperatively. The surgeon must clearly communicate with the therapist to ensure that this safe zone is observed.
After determining a safe postoperative motion, the surgeon reapproximates the subscapularis and closes the deltopectoral interval, followed by subcuticular closure of the skin with the addition of adhesive strips. The arm is splinted in abduction and external rotation.
Discussion
The management of anterior shoulder instability continues to evolve as advances in arthroscopy provide an effective alternative to traditional open surgery. Furthermore, arthroscopic procedures allow improved evaluation and treatment of associated pathologies, including SLAP lesions, partial rotator cuff tears, subacromial impingement, RI, and capsular laxity while avoiding the common morbidities associated with open procedures.
Open surgical stabilization, however, continues to play an important role in certain injury patterns that cannot be adequately addressed arthroscopically. Decision-making regarding surgery for instability is influenced by the relevant pathologic findings and the surgeon’s experience.
Careful patient selection and a thorough understanding of the involved pathoanatomy are paramount in maximizing patient outcome. Regardless of the surgical approach chosen, our success should be based on retaining range of motion, decreasing recovery time, maintaining proprioceptive control, and ultimately returning patients to their prior level of activity.
Therapy Guidelines for Rehabilitation
Because no muscles are cut during the surgical reconstruction, rehabilitation proceeds promptly with two familiar goals: restore structural flexibility and strengthen dynamic glenohumeral and scapulothoracic stabilizers. This chapter includes exercises and manual interventions to restore the trinity of normalcy: range of motion, strength, and endurance. The key to success is restoring all three components concurrently rather than addressing each component sequentially. The best plan is an integrated one: do not wait for full range of motion to return before initiating strengthening, and address muscular endurance as gross strength improves. The likelihood of an optimal postoperative outcome increases dramatically when the physical therapist monitors postoperative exercises carefully to ensure correct execution. Be cautious and avoid pushing for full ROM too early and disrupting the healing tissue.
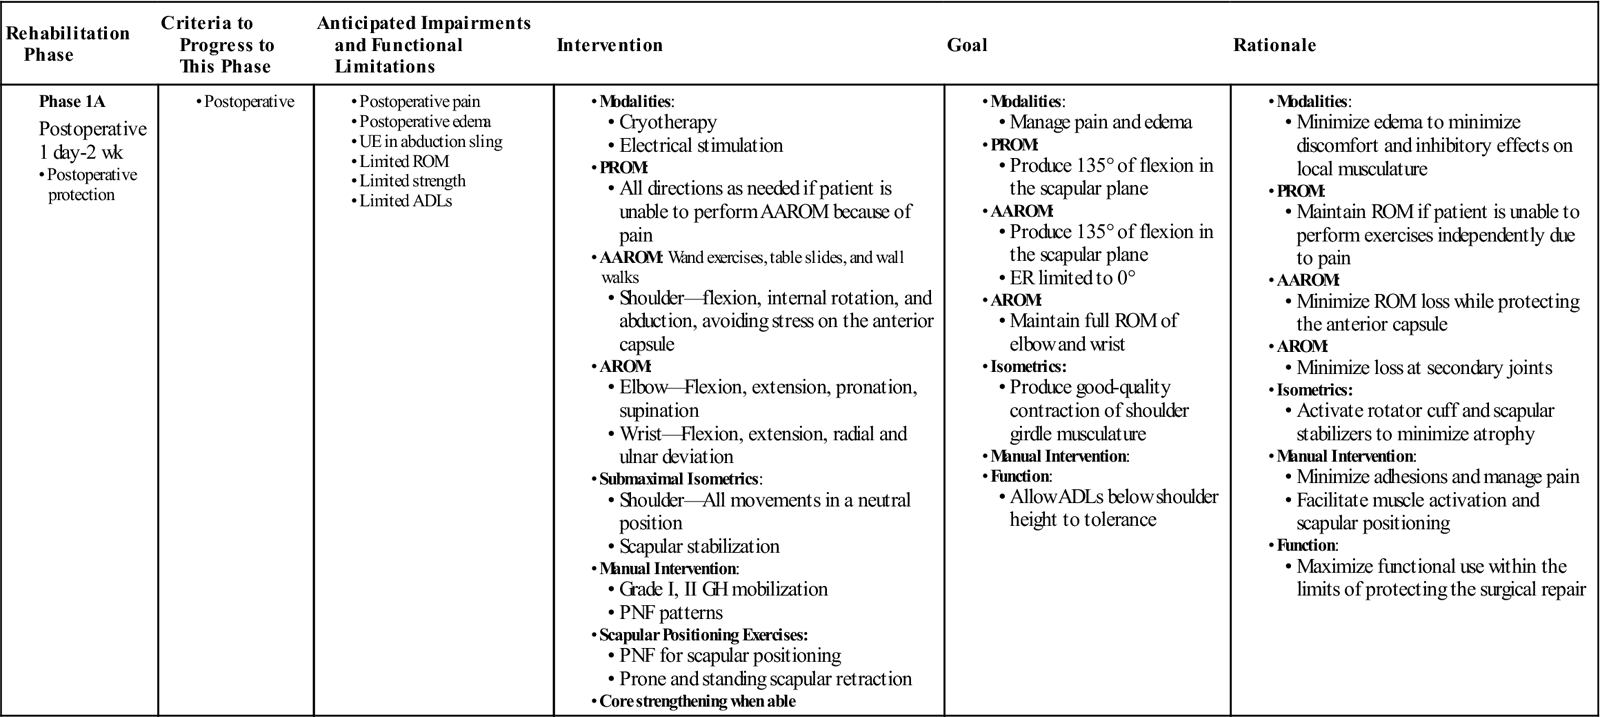
Phase IA
TIME: Day 1 to 2 weeks (Table 4-1)
TABLE 4-1
Anterior Capsular Reconstruction
< ?comst?>
| Rehabilitation Phase | Criteria to Progress to This Phase | Anticipated Impairments and Functional Limitations | Intervention | Goal | Rationale |
|
Phase 1A |
|
< ?comen?>< ?comst1?>
< ?comst1?>
< ?comen1?>
GOALS: Manage pain and protect the surgical wounds from infection
Protect the anterior capsule from excessive stress
Activate scapular stabilizers and encourage proper scapular positioning
Initiate passive and active assisted ROM with a goal of 135° in the flexion plane
For 2 to 4 weeks, the arm will be in an abduction sling. Protection of the surgically repaired tissue is essential for a successful long-term outcome. Many of these patients have some joint laxity and rarely have difficulty regaining motion with a normal course of rehabilitation. The inflammatory and initial fibroblastic/granulation stages of physiologic healing occur during the first 2 weeks following surgery.1–3 Taking care not to extend the inflammatory phase with overly aggressive treatments will allow maximal collagen fiber deposition with minimal disruption leading to better healing in the end.  Avoid stressing the anterior capsule with your interventions.
On the first visit, remove the sling and measure passive range of motion (PROM) in flexion and abduction in the scapular plane (scaption). Do not move into external rotation past zero degrees at this time to prevent excessive stress to the anterior capsule. Measure internal rotation to the limits permitted by pain tolerance because there is no concern about disrupting healing tissue in this direction. Assess wrist and elbow motion at the first visit as well. Early mobilization has been shown to improve tissue healing following surgery.4,5 Without mobilization the patient is less likely to regain full motion; therefore, it is important to begin ranging the shoulder within the limits of discomfort immediately. Because pain typically prevents independent active range of motion (AROM) in the first few days after surgery, perform passive or manual active-assisted range of motion (AAROM). Independent AAROM can be safely initiated using wand exercises, table slides, and wall walks into flexion and scaption. When the postoperative pain subsides, measure active elevation in the scapular plane.
Assess scapular positioning and active scapular mobility immediately and begin scapular positioning exercises. Emphasis should be placed on activation of the serratus anteriors and the middle and lower trapezius muscles to promote retraction and upward rotation of the scapula.6 Exercises may include (1) proprioceptive neuromuscular facilitation (PNF) interventions for scapular positioning, which are very effective and safe immediately postoperatively7; and (2) prone or standing scapular retraction. Avoid excessive activation of upper trapezius or latissimus dorsi, which leads to improper scapular elevation or depression, respectively.6
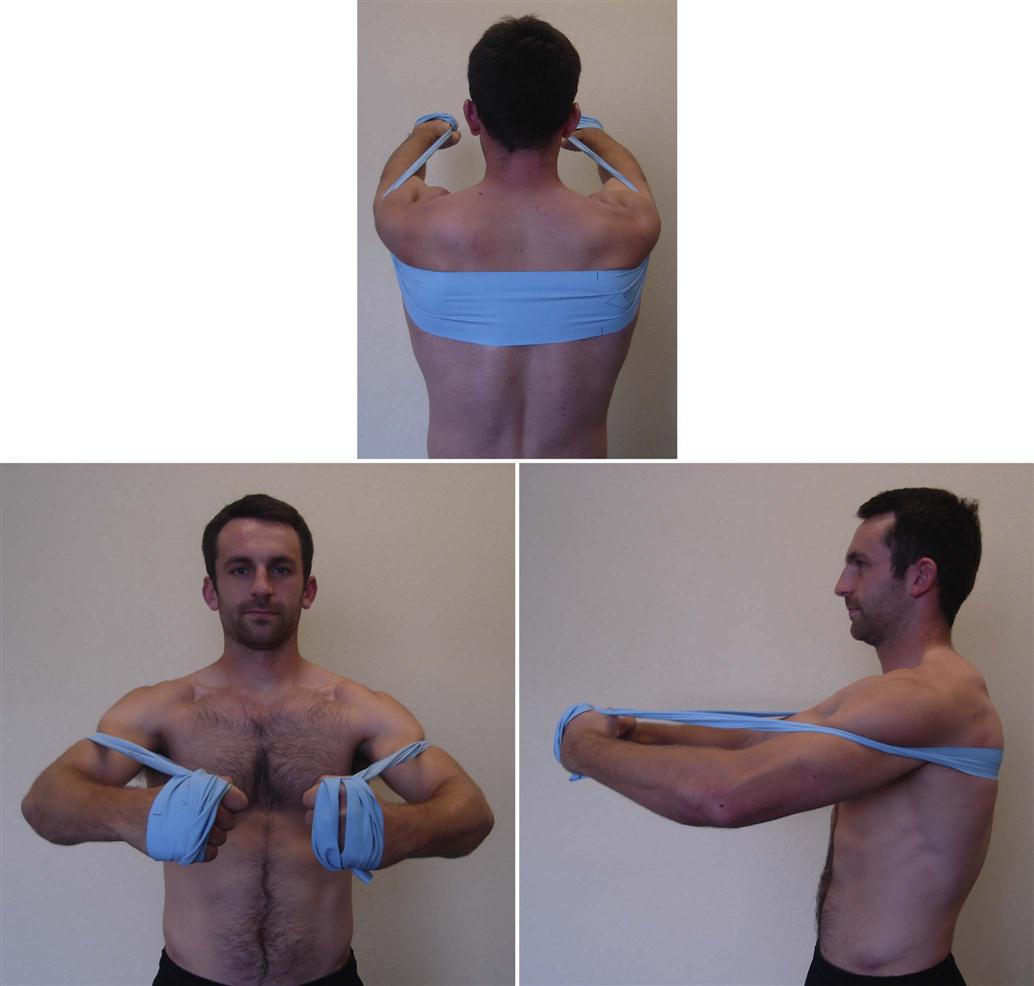
A home exercise program should begin immediately (Box 4-2). Remove the sling three to four times per day to perform exercises for 15 minutes including: scapular retraction, AROM elbow flexion/extension, pronation/supination, wrist flexion, extension, radial and ulnar deviation, and squeezing a gripper ball. Follow this routine with ice and return to the sling. Codman’s pendulum exercises are also appropriate at home if the patient has no contraindications due to extreme laxity.8
Pain management modalities, such as electrical stimulation and cryotherapy, may be used as needed throughout the course of therapy. If the patient is having an excessive amount of pain, assessment and treatment of the cervical spine may be appropriate. Preoperative compensations, intraoperative positioning, and postoperative guarding can lead to joint and soft tissue dysfunction in the neck. Comparable objective findings locally at cervical levels 3, 4, and 5 may explain excessive pain, muscle inhibition, or excessive tightness in the shoulder and the therapist should intervene appropriately.9
Begin core strengthening exercises immediately. Abdominals, lumbar extensor muscles, and gluteals are all critical components in the kinetic chain for athletes and physical laborers alike. Core and lower body strengthening are safe and easy to incorporate into the training program. Once the patient is safe and independent, transition these exercises into a home exercise program to allow more time for close supervision of the shoulder exercises during therapy sessions.
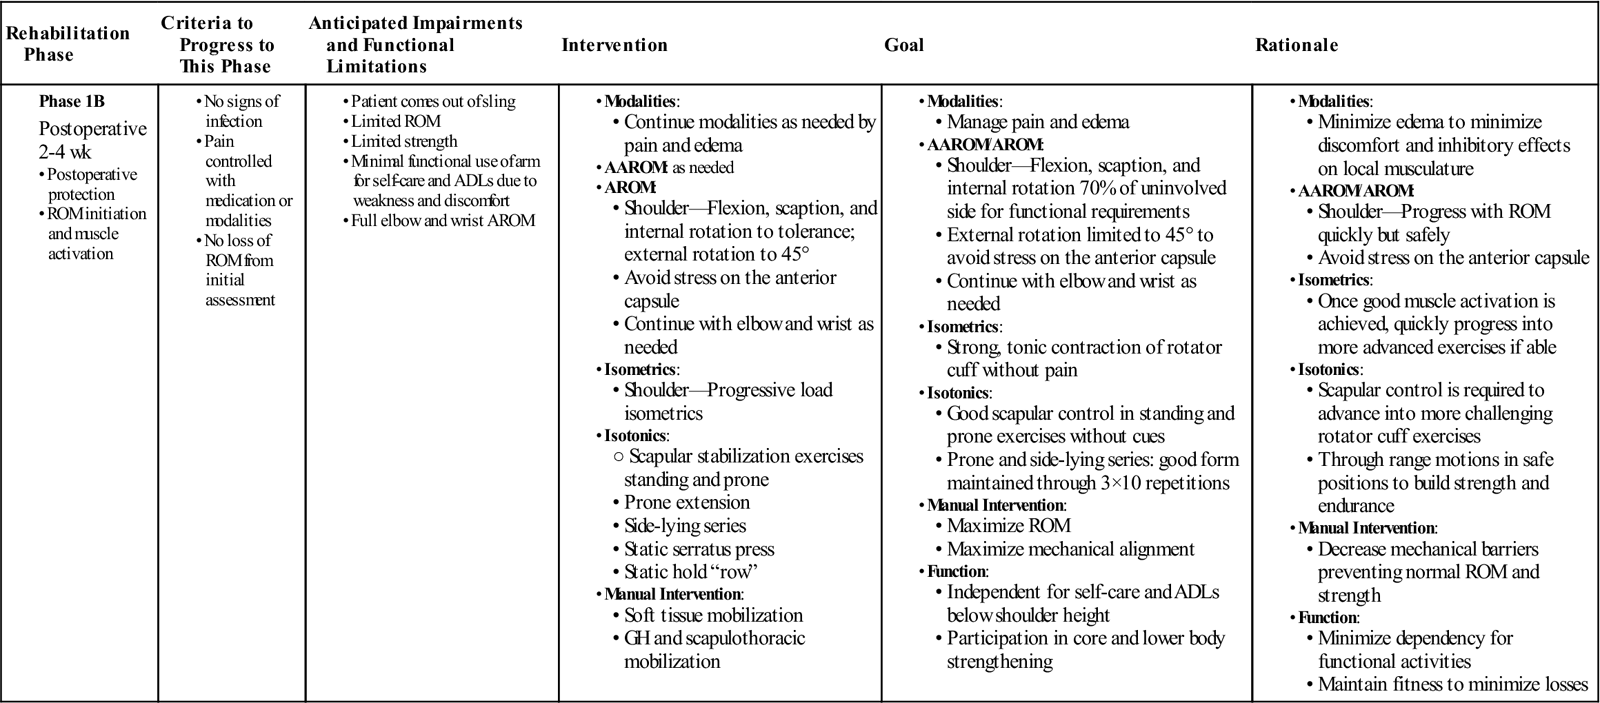
Phase IB
TIME: 2 weeks to 4 weeks (Table 4-2)
TABLE 4-2
Anterior Capsular Reconstruction
< ?comst?>
| Rehabilitation Phase | Criteria to Progress to This Phase | Anticipated Impairments and Functional Limitations | Intervention | Goal | Rationale |
|
Phase 1B |
• AROM:
|

< ?comen?>< ?comst1?>
< ?comst1?>
< ?comen1?>
GOALS:
• Progress from PROM to AAROM to AROM while protecting the anterior joint capsule
• Progress scapular stabilization exercises
• Initiate rotator cuff exercises while protecting the anterior joint capsule
Typically, the arm comes out of the sling during this phase. Physiologic healing is progressing from the granulation stage into the proliferative/fibroblastic stage.1–3 Due to the deposition of collagen fibrils, the healing tissues are developing some internal integrity enabling them to tolerate gentle stresses. The skin wounds should be healing and pain should be minimal.
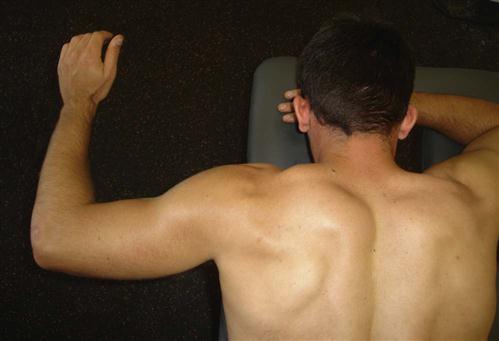
Measure active range of motion to the onset of discomfort including: flexion, scaption, and internal rotation. Measure external rotation to 45° or onset of discomfort, whichever comes first. Assess scapular mobility and quality of motion during AROM looking for abnormalities in scapular winging, scapulothoracic or scapulohumeral rhythm, and quality of muscle contraction. Gentle strength assessment of the rotator cuff in all planes from a neutral position is also appropriate as pain tolerance allows. The goal is to assess muscle activation rather than to perform break testing, which would require maximal force production and potentially damage the surgically repaired tissue and cause pain.
Active-assisted ROM exercises can include wand flexion and abduction in the scapular plane, external rotation to 45°, and hand behind the back. The patient should move into the ROM until he or she begins to feel an initial stretch. Make certain the patient understands that the goal of therapy in this phase is to initiate range of motion without stressing the anterior capsule. These exercises can be incorporated into a home program.
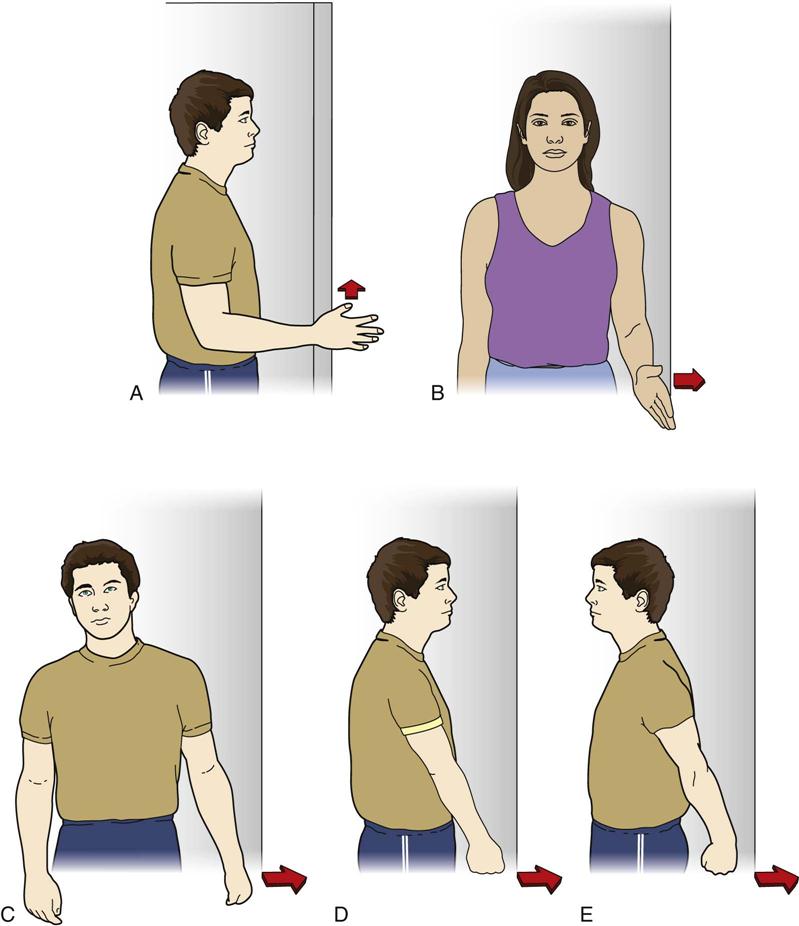
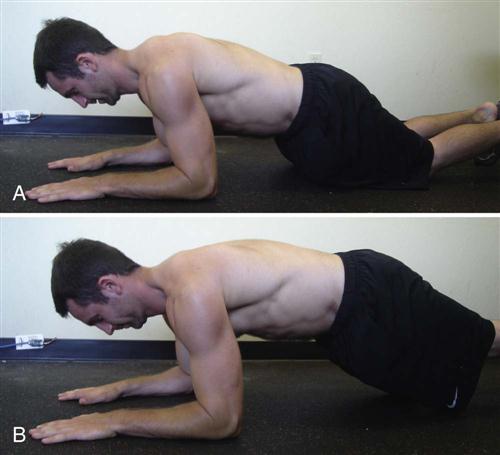
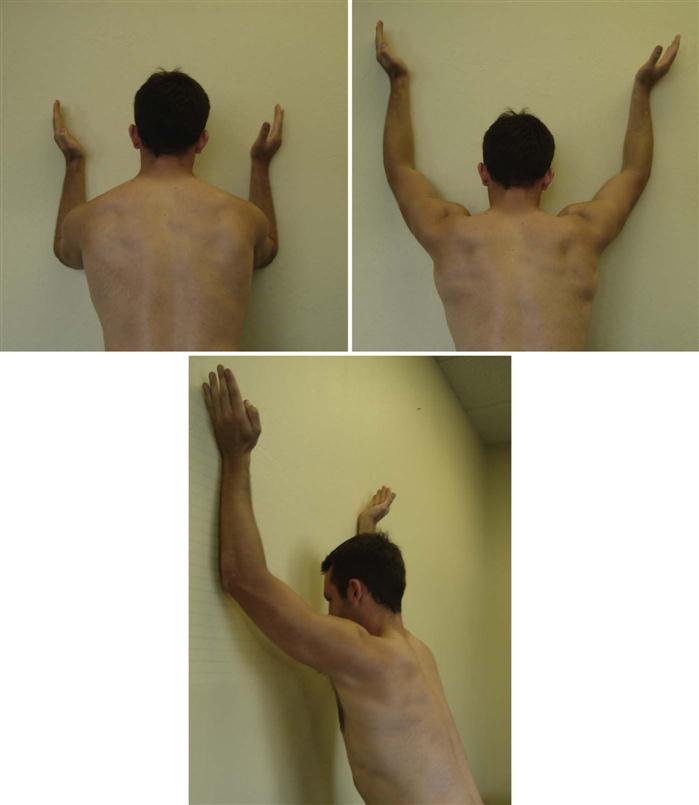
During this phase the patient must learn to actively control the position of the scapula without cues. The goal is to maximize scapular stability and minimize scapular winging. Proper control of scapular position is required to progress with rotator cuff exercises. Three key muscles to activate are the middle trapezius, lower trapezius, and serratus anterior. Progress prone or standing scapular retractions to a static row using an exercise band. The patient grasps an exercise band with two hands, and performs a scapular retraction creating tension in the band, while the elbows remain bent to 90° and in the plane of the body. The patient then walks slowly backward to increase tension in the band while maintaining a scapular retraction to load the posterior scapular stabilizers. Static rows can be performed with an isometric hold in the loaded position or simply by moving repeatedly through the motion to load and relax the muscles. Early activation of the serratus anterior can be achieved with a static hold serratus press in a modified push-up position at the wall (Fig. 4-2, A). This position is similar to the “plus” position of the traditional “push-up plus,” which demonstrates high EMG activity in the serratus anterior.10,11 The patient places the hands on the wall at shoulder height, with the head and spine in neutral alignment. Instruct the patient to press the hands into the wall and the body away from the hands using a scapular protraction motion to achieve the “plus” position. Progress into a more challenging position by lowering the hands to the height of a table, thereby increasing gravitational forces and increasing the workload on the serratus (Fig. 4-2, B). These are safe exercises to add to the patient’s home program because there is no active motion being performed at the glenohumeral joint (see Box 4-2).
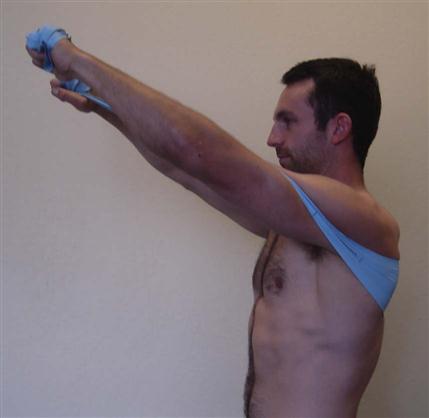
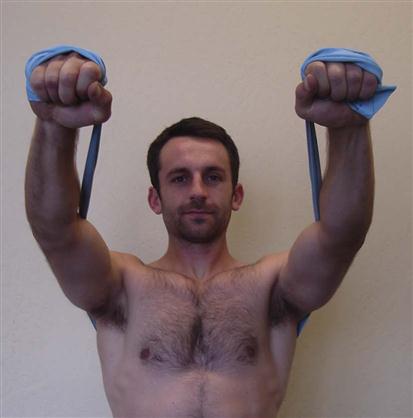
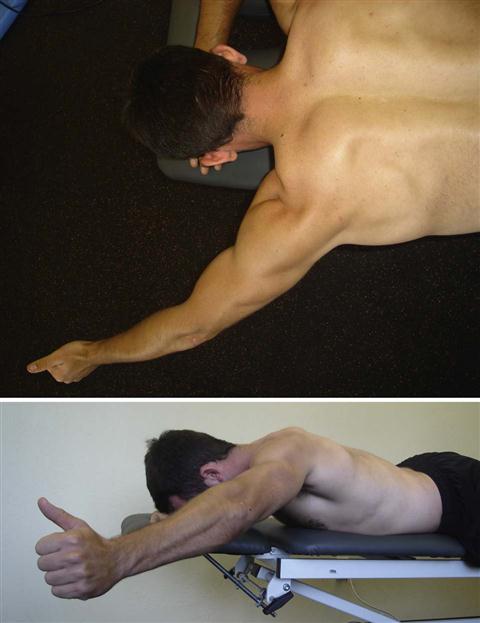
Once scapular positioning can be achieved and maintained by the patient, slowly progress rotator cuff strengthening as tolerance, strength, and proper form allow. Caution the patient that the elbow should never be behind the plane of the body to avoid stressing the anterior capsule. To begin, submaximal isometric strengthening exercises can be performed in a neutral position into shoulder flexion, extension, internal and external rotation, and abduction (Fig. 4-3). Progression of these initial rotator cuff exercises includes variable load isometrics using resistance bands. The patient stands holding the band as if to perform classic isotonic internal and external rotation exercises. Yet rather than move the arm, the patient holds the arm still while stepping away from the anchor point of the band, thereby increasing resistance and loading the rotator cuff muscles in a safe manner. Another technique for safe early strengthening is performing active motion from the prone position with a stable scapula. Prone extension is an excellent exercise for initiating dynamic scapular stabilization and activation of the middle trapezius (cools) (Fig. 4-4, A). The elbow should remain in full extension and the motion ends at the plane of the body to protect the anterior capsule.
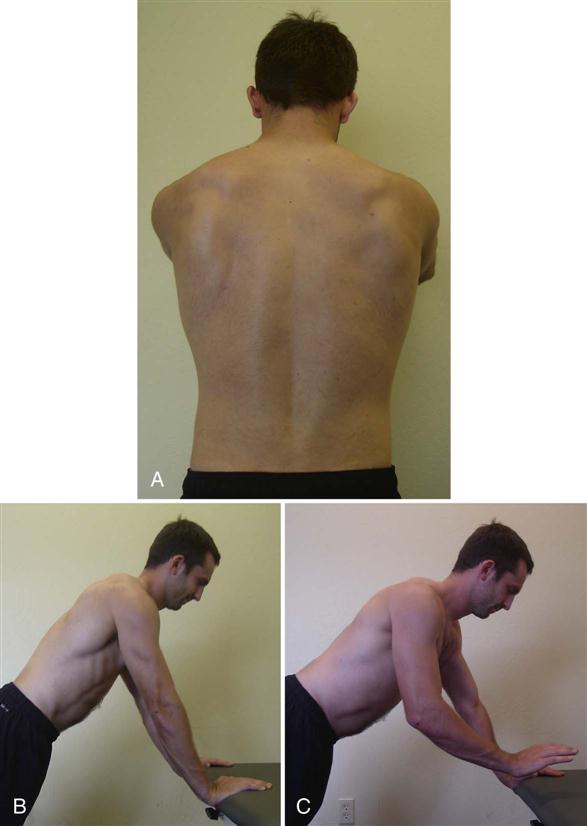
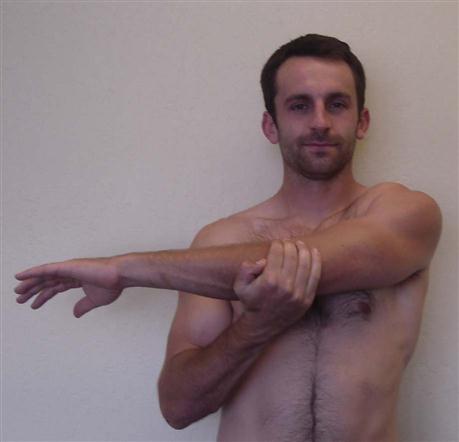
Posterior shoulder soft tissue restriction or posterior capsule tightness can accompany anterior shoulder instability. If restriction is present, as determined by the Tyler test12 and available horizontal adduction ROM,13 it may lead to aggravation of the anterior shoulder structures and stress the anterior capsular repair. Stretching the posterior capsule may be a project that requires both manual interventions and home self-stretching exercises over the course of many weeks to normalize. Manually address posterior capsule tightness with soft tissue mobilization and anterior-posterior GH joint mobilizations.14,15 The physical therapist should take care to avoid excessive compression forces on the anterior shoulder with hand-holds because this can be very painful for the patient. Cross-body stretching of the posterior capsule can be included in the home program if appropriate for the patient (Fig. 4-5).16,17
Grade II manual GH mobilizations in the anterior-posterior and cephalad/caudad directions can be used for pain management18 and to prevent excessive adhesion formation during this phase.14
Nighttime discomfort may continue to be a problem and the therapist can advise the patient regarding sleeping positions. Pillow support under the elbow maintains the shoulder in the scapular plane while sleeping and reduces stress on the anterior capsule. Pillows should not be placed under the shoulder directly because this forces the scapula into a more protracted and anteriorly tipped position.
Phase II
TIME: 4 weeks to 8 weeks (Table 4-3)
TABLE 4-3
Anterior Capsular Reconstruction
< ?comst?>
| Rehabilitation Phase | Criteria to Progress to This Phase | Anticipated Impairments and Functional Limitations | Intervention | Goal | Rationale |
|
Phase II |
< ?comen?>< ?comst1?>
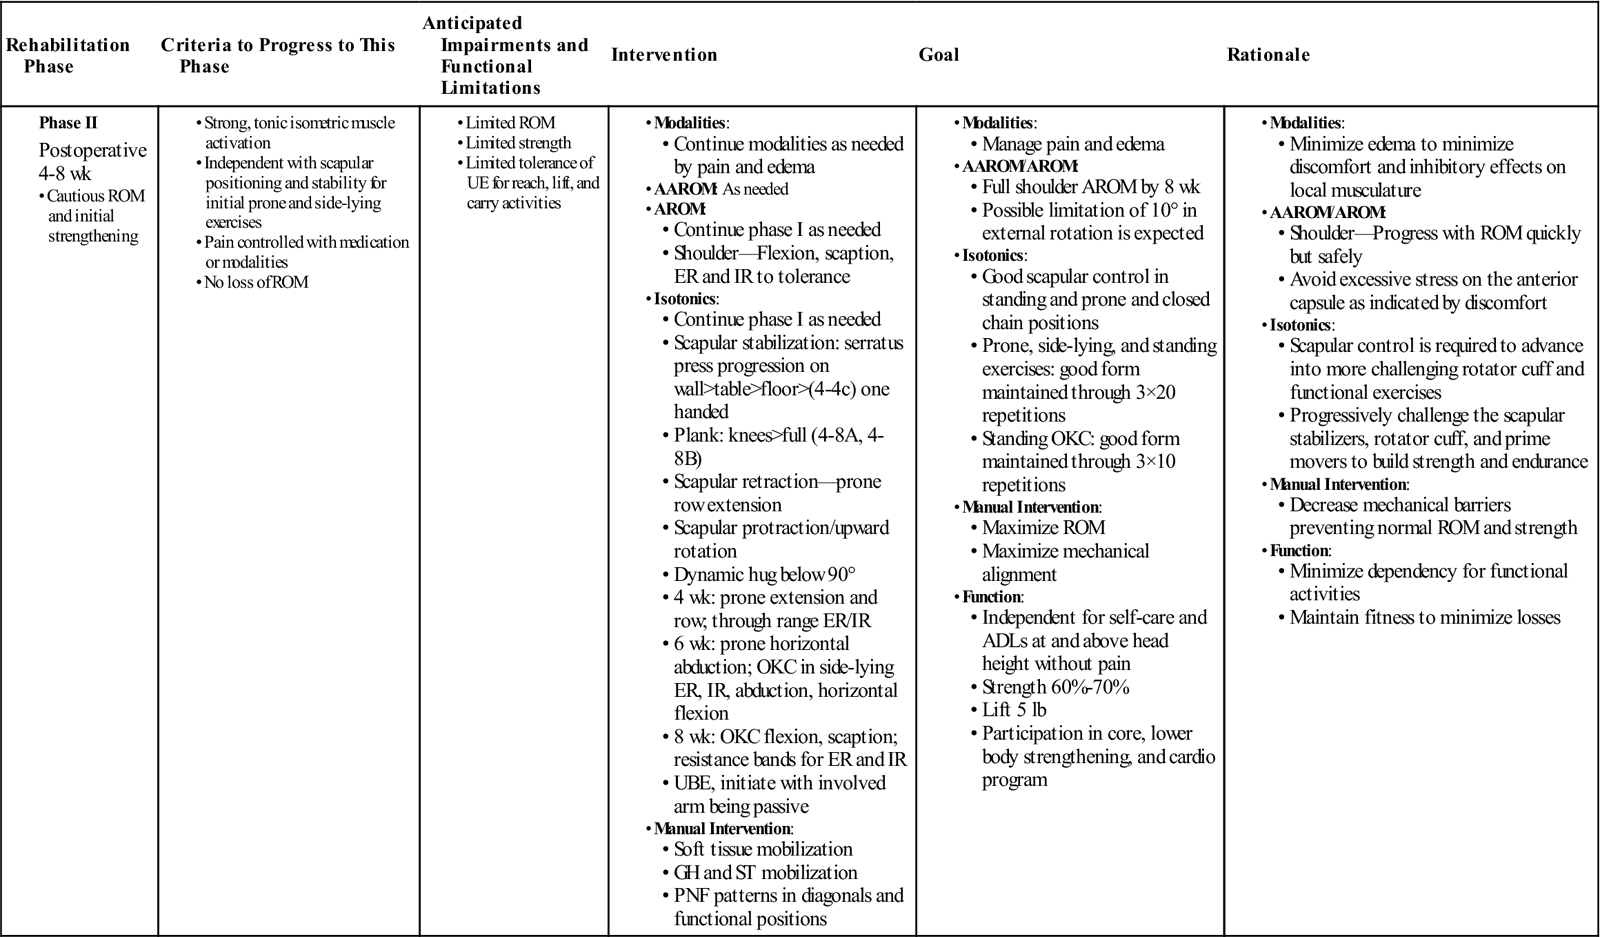
< ?comst1?>
< ?comen1?>
GOALS:
• Full ROM is expected by 8 weeks.
• Progress dynamic scapular stabilization and rotator cuff strengthening exercises.
• Return to ADLs and functional activities that do not stress the anterior capsule.
Physiologically, the healing tissue is well advanced into the proliferative/fibroblastic stage during this phase.1–3 There is an abundance of collagen fibers in the region and the surgical repair has fair integrity. At a cellular level, the goal of physical therapy is to align these collagen fibers in the proper orientation along lines of normal stress.15 This phase is the optimal time period for elongating tissue with a progressively lessening amount of risk for damage. Moving the arm through a large pain-free range of motion will allow appropriate stresses to the healing tissue, resulting in an optimal outcome.
Typical manual muscle testing and active range of motion assessment in all directions are appropriate at this time. Include strength testing of the rotator cuff and scapular stabilizers to be certain all aspects of the kinetic chain are progressing as required.  Do not force motion into extension, external rotation, or horizontal abduction to avoid stretching the anterior capsule.
Functional mobility begins to return during this phase. Overhead reaching into flexion typically is the most comfortable direction and most easily regained after surgery. Often, patients continue to complain of pain with functional activities involving extension and external rotation, such as putting on a jacket. The patient should have full PROM and nearly full AROM by two months following surgery with the exception of external rotation, which may lack approximately 10°.20 Slowly begin exercises that gently stretch the anterior capsule through the active range rather than forcing a stretch by passive manual interventions, for example, wand scaption or external rotation. If by 6 weeks postsurgery a deficit in external rotation of 25° or larger remains, incorporate more aggressive manual techniques or self-stretching exercises to regain full motion. It is the authors’ opinion that a 5° to 10° loss of external rotation in a neutral position and at 90° of abduction at 8 weeks postoperative is not uncommon and not detrimental to the final outcome. The surgical reconstruction will continue to stretch over the next 2 to 4 months. Keep in mind that the goal of the surgery was to decrease pathologic laxity. Aggressively stretching the repair site can put the patient back into their preoperative state of excessive laxity and should be avoided during this phase. The patient should continue with ROM exercises at home as needed (see Box 4-2).
During this phase, emphasis must be on proper dynamic scapulothoracic and scapulohumeral rhythm. Allowing excessive motion at the glenohumeral joint as a compensation for improper scapulothoracic motion can overstress the anterior capsule and the repair. It is best to observe scapulothoracic and scapulohumeral rhythm with the patient shirtless to ensure proper mechanics are present before advancing the program. The scapular slide test,21 although inconsistently validated in the literature, can be used as an assessment tool early in the rehabilitation process to quantify gross differences in scapular motion. The physical therapist measures the distance from the inferior angle of the scapula to the midline of the thoracic spine at the level of the inferior angle of the scapula. The measurements should be symmetrical for the involved and uninvolved shoulders at zero degrees hands at sides, 45° hands on hips, and 90° of abduction with internal rotation. Assess the quality of the motion in addition to the quantity of motion. The goal is to have a smooth contraction and appropriate firing patterns on both the concentric and eccentric phases of motion. A jerky pattern with visible muscle fasciculations would be considered abnormal and needs to be addressed before progressing into more difficult exercises.
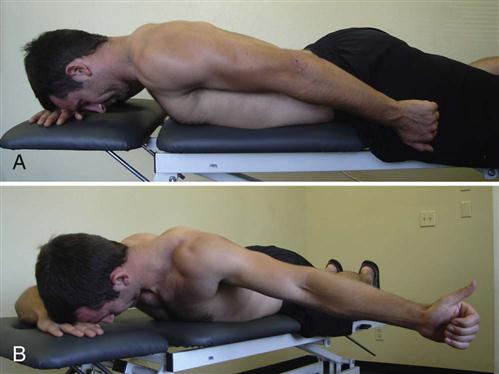
Proper function of the serratus anterior muscle is critical to normal shoulder function and is essential if the patient is to avoid an external impingement problem. Progress the serratus press exercise into one-handed stabilization at table height (see Fig. 4-2, C). Further progression moves to the floor in a kneeling plank position (Fig. 4-6, A), and finally a full plank position on the floor (Fig. 4-6, B). The serratus dynamic hug below 90° of elevation is an excellent progression into functional through range serratus activation10 (Fig. 4-7).
Prone horizontal abduction (see Fig. 4-4, B) and prone row (Fig. 4-8) target the middle and lower trapezius muscles22 and posterior rotator cuff.23 Begin with AROM only to retrain proper scapular control and progress to light weight to increase the demand on the muscle. Because the patient is retrained in a manner minimizing risk to the anterior shoulder, these are excellent exercises for building muscle endurance.
Once dynamic scapular control is achieved, advance with more specific rotator cuff muscle-strengthening exercises. Side-lying external rotation,23 abduction, and horizontal forward flexion,24 all limited to body plane range of motion, require more dynamic scapular stability while maintaining a safe range of motion for the shoulder. Watch carefully to ensure excessive scapular adduction and trunk rotation do not substitute for proper stabilization by the middle and lower trapezius.
Progress to through-range external and internal rotation with resistance bands, emphasizing scapular stability to ensure proper rotator cuff activation.25,26 Use an axillary towel roll to reinforce proper positioning, increase muscle activation, and to improve synergistic function of the adductors and external rotators.23
Begin open kinetic chain exercises in standing, including shoulder scaption in a full can position,23 flexion, and abduction using gravity as resistance. These exercises can be used to train proper scapulohumeral rhythm through AROM and are less effective for specific muscle strengthening. Add light-weight or resistance bands as movement patterns, scapular stability, and overall strength increase. Poor eccentric control and scapular winging tend to be limiting factors in progression with added resistance.
The upper body ergometer (UBE) may be incorporated early in rehab. Initially the involved arm is passive to focus on mobility, with the uninvolved arm doing the majority of the work. An easy five-minute program alternates forward and backward revolutions at a comfortable pace. With repeated use, the involved arm may begin to participate more as tolerance allows, progressively increasing the effort until the patient is predominantly using the involved arm by 2 months postoperation.
If anterior shoulder pain, a protracted scapula,27 or an anteriorly translated humeral head are noted, reassess for possible restriction in the posterior shoulder. If capsular or muscular restriction is present, incorporate more aggressive manual interventions and home exercises. Grade IV+ posterior mobilizations in varying angles of humeral flexion and rotation may be indicated to redress this dysfunction and normalize mechanics.14 The sleeper stretch (Fig. 4-9) is a good home exercise to improve the extensibility of the posterior capsule.17,28 Additionally, the excursion and pliability of the subscapularis muscle often becomes restricted following surgery and prevents the patient from regaining full range of motion. Gentle soft tissue mobilization can ease this restriction, allowing the patient to actively move into increased range.
Phase III
TIME: 2 to 3 months (Table 4-4)
TABLE 4-4
Anterior Capsular Reconstruction
< ?comst?>
| Rehabilitation Phase | Criteria to Progress to This Phase | Anticipated Impairments and Functional Limitations | Intervention | Goal | Rationale |
|
Phase III |
|
< ?comen?>< ?comst1?>
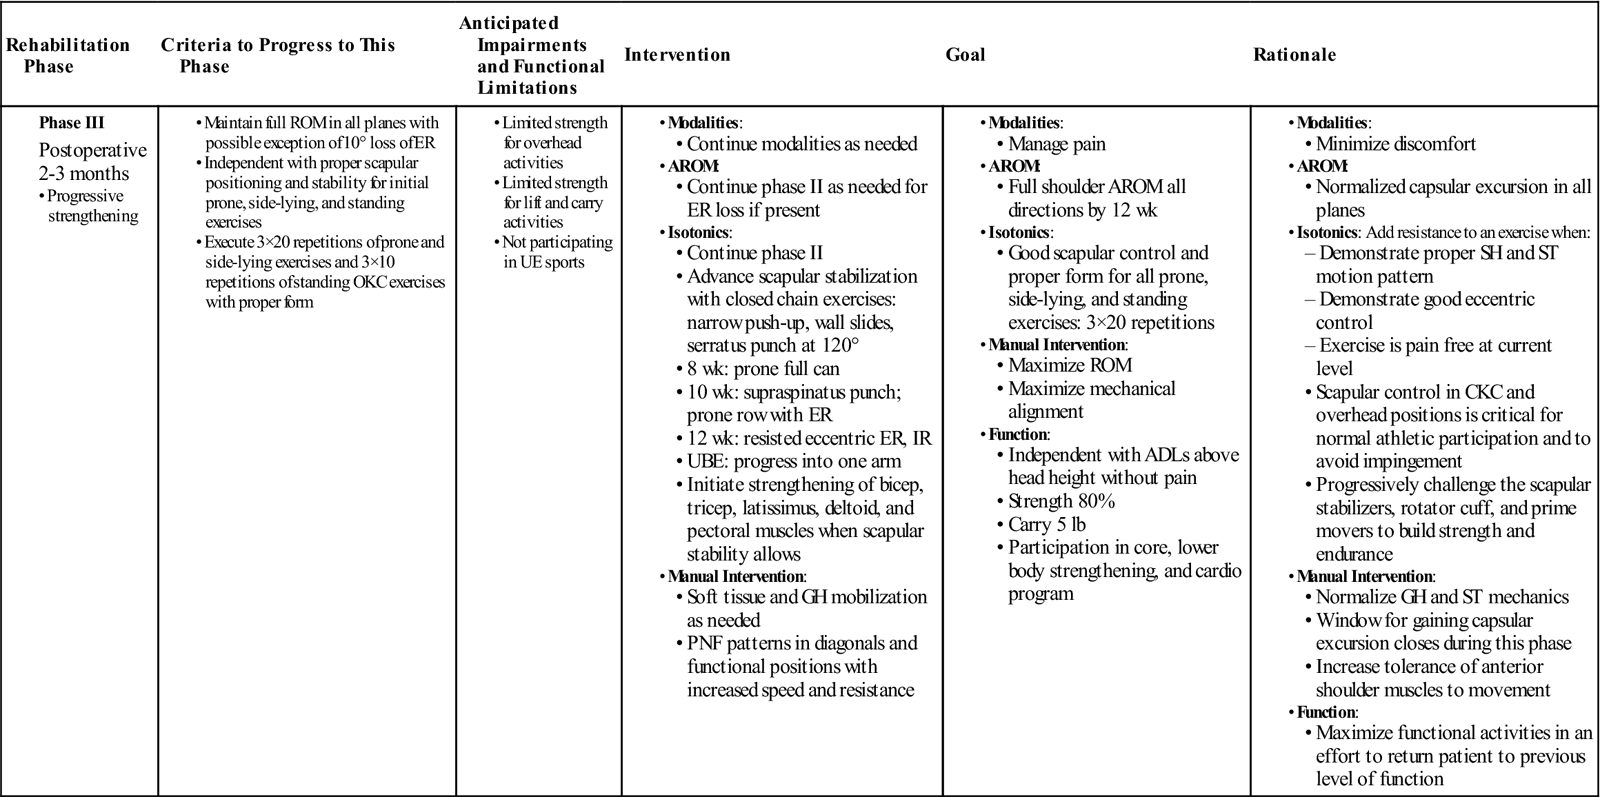
< ?comst1?>
< ?comen1?>
GOALS:
• Full range of motion in all directions
• Progressive strengthening with resistance in all planes of motion
• Normal functional tasks without limitations with the exception of sports
Physiologically, the capsular tissue is progressing out of the proliferative/fibroblastic stage and into the remodeling/maturation stage.1–3 As the collagen tissue matures, it becomes more resilient to stress, therefore more stress can be placed on the capsule without risk of damage. Because of this increasing tissue strength, the window of opportunity to increase ROM is closing during this phase. Be certain you have achieved the desired ROM, otherwise it may be very hard to regain later.
The primary goal of the third postoperative month of physical therapy is strengthening throughout the full active range of motion. The patient may add resistance to an exercise when (1) the motion can be performed with proper scapulohumeral and scapulothoracic motion patterns; (2) he or she can demonstrate good eccentric control through the range of motion; and (3) such motion is pain-free.
It is necessary to perform break testing in all planes of motion, including end range, to assess functional strength. Performing manual muscle tests only in neutral positions is not a sufficient assessment to ensure adequate functional strength and endurance in athletes. If weakness is present in overhead positions, many overhead athletes will be unable to regain all necessary function.
Adequate strength of the serratus anterior is critical to maintain scapular protraction and to prevent scapular winging throughout open and closed kinetic chain activities.6 Concentric and eccentric control must be evaluated during all exercises. A modified minirange push-up plus with a narrow grip and elbows hugged tightly to the body can be the next step in strengthening.11 Begin these on the wall and progress to table height, then the floor. Do not jeopardize the anterior capsule by progressing too quickly.  Patients should not be performing normal full range push-ups at this time, as the tensile strength of the healing tissue is inadequate. Many athletes view a push-up as a gold-standard of functional strength and will strive to return to push-ups too quickly, leading to pain or damage in the shoulder. The serratus also functions to upwardly rotate and posteriorly tip the scapula when the arm is overhead.29 Use wall slides to train overhead motion, with the emphasis on pushing the hands into the wall and the body away from the wall (Fig. 4-10).30 Once the motor pattern is learned, progress into a serratus punch at a 120° elevation (Fig. 4-11) which demonstrates high EMG activity through a functional overhead motion.10
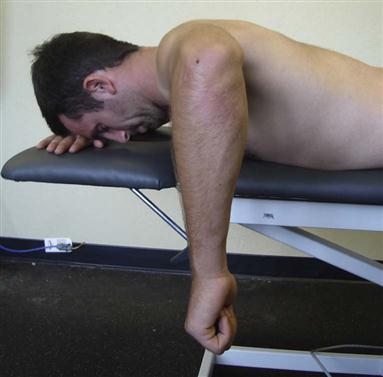
Lower and middle trapezius muscle strength and endurance are progressed by moving the arm into different planes of motion. Prone full can (Fig. 4-12) emphasizes the lower trapezius while a prone row emphasizes the middle trapezius.22 Prone rows can be progressed by adding external rotation into the 90°/90° position (Fig. 4-13) when strength and eccentric control of the scapular stabilizers and rotator cuff are adequate. Avoid pain at end range external rotation because this is a position that stresses the anterior capsule.
Progress rotator cuff exercises described above by increasing either resistance or repetitions. Given their role as dynamic glenohumeral stabilizers31,32 we must consider the rotator cuff muscles as muscles of endurance rather than power and focus on lighter weight with more repetition. This is a more appropriate training strategy than using heavier weight and fewer repetitions. The supraspinatus punch in midrange in the scapular plane is a good method of initiating overhead strengthening.10 Supine internal and external rotation with the arm positioned in 45° to 90° of abduction using resistance bands allows for a safe progression of range by moving the arm into more functional positions.
PNF continues to be a valuable manual tool in this patient population. The therapist can use PNF patterns to strengthen muscles in terminal ranges of motion, as well as for gross motor patterning throughout the range of motion.7 Minimal resistance is applied to focus the effort on proper muscle firing patterns more than gross power or speed.
Strengthening of the biceps, triceps, latissimus dorsi, deltoid, and pectoral muscles becomes more important once the therapist is certain there is adequate strength and endurance of the rotator cuff muscles and scapular stabilizers. Athletes often push toward lifting heavy weights for these larger muscle groups, yet progressing with light to medium weights is more appropriate. Remember that it has been several months since the last true training session was possible and the rotator cuff and scapular muscles must provide the necessary stability to the shoulder complex. Allowing a patient to return to 45 lb bicep curls on the first attempt simply because that is “what I was lifting before surgery” will cause shoulder discomfort.
Progress the UBE to using only the involved arm with emphasis on endurance training and increased speed.
Phase IV
TIME: 3 to 4 months (Table 4-5)
TABLE 4-5
Anterior Capsular Reconstruction
< ?comst?>
| Rehabilitation Phase | Criteria to Progress to This Phase | Anticipated Impairments and Functional Limitations | Intervention | Goal | Rationale |
|
Phase IV |
< ?comen?>< ?comst1?>
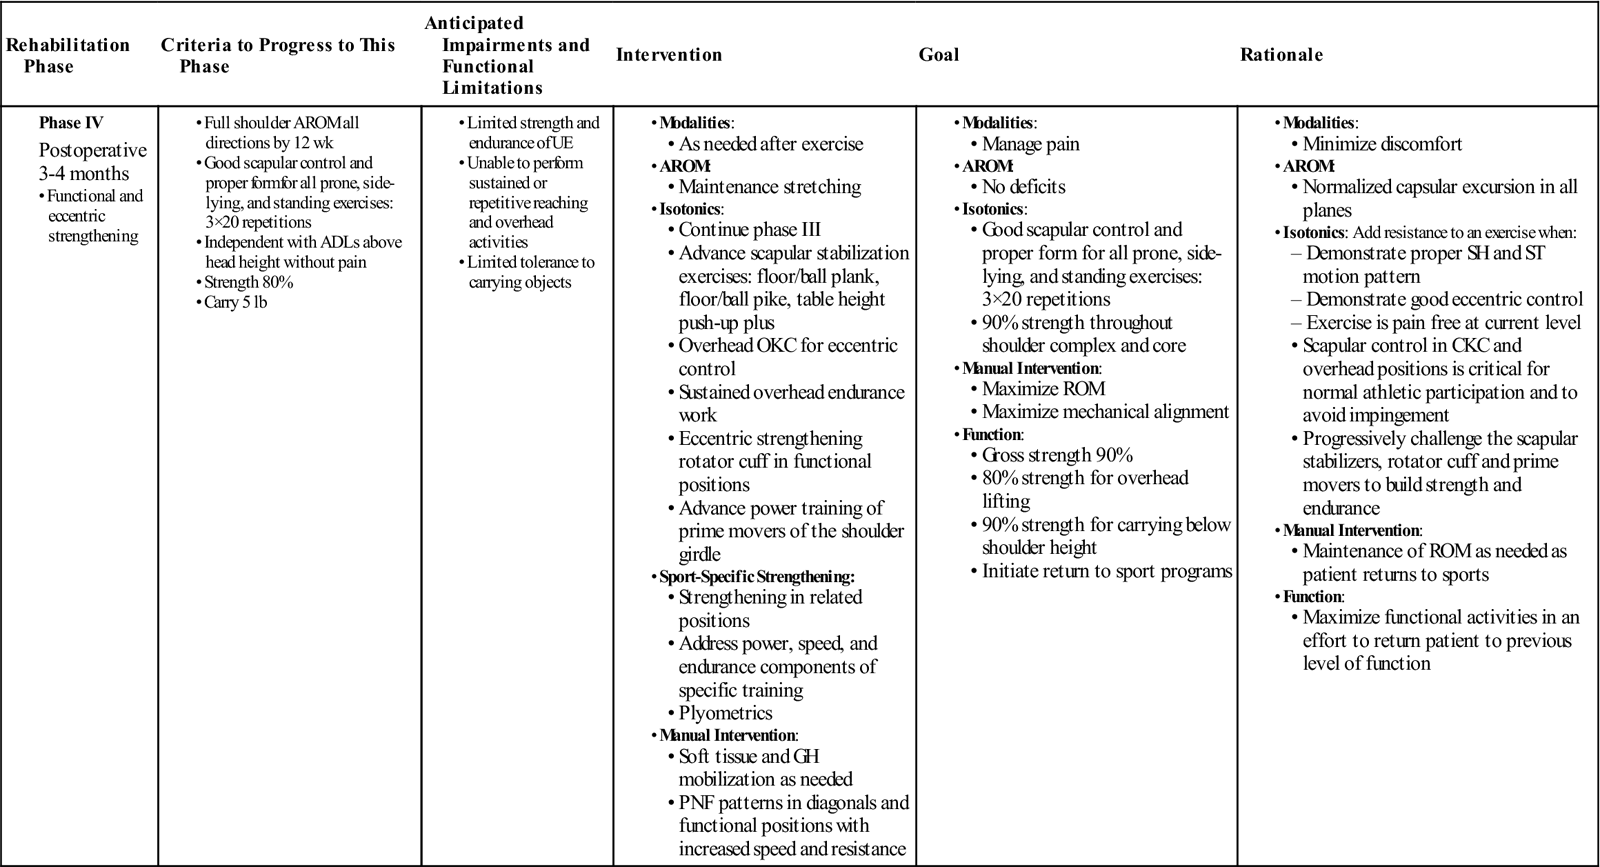
< ?comst1?>
< ?comen1?>
GOALS:
• Initiate a return to an overhead sports training program at approximately 4 months postoperatively
While tissue remodeling continues, we can be confident the surgical repair is strong and can tolerate increasing stresses. We become less and less concerned about damaging the surgical repair as time goes on. Full range of motion is expected at this time. Functionally, the patient should feel normal with the exception of overall gross power for heavier lifting and endurance for longer duration activities. Overhead sports and work specific activities likely remain challenging from a strength and endurance perspective.
Consider sport-specific activities and positional requirements to identify ongoing impairments that need continued attention. Have the patient move through patterns of motion similar to their sport, without speed or load. If the patient is a pitcher, assess objective ability and subjective tolerance to the cocking position of the arm, then with the full body pitching motion before allowing him or her to throw a ball. If the patient is a volleyball player, mimic the serving and blocking motions starting with just the arm and progressing into slow, purposeful full body motion. Look for the ability to control the concentric and eccentric phases of motion. Question the patient about any pain, restriction, or weakness with the action. Use this information to guide the next several weeks of treatment ensuring that the patient is ready to transition to sport-specific training at 4 months postoperation.
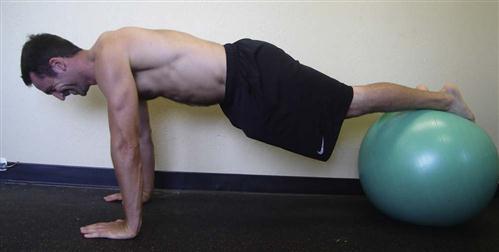
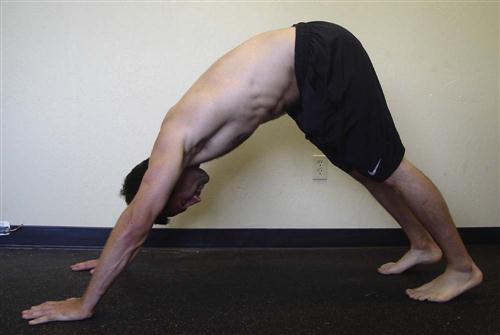
Advance serratus anterior strength with planks or walkouts on an exercise ball (Fig. 4-14), and continue to emphasize scapular protraction and upward rotation throughout the exercise. Pressing from a plank into a pike position (Fig. 4-15) on the floor will train closed chain overhead serratus control. Pikes can be performed using a stability ball (Fig. 4-16) and are a very challenging high-level exercise, which may be appropriate for only the strongest individuals near the end of this phase of rehab. Full-range, overhead, open kinetic chain exercises, such as forward flexion, full can, and supraspinatus press, can be used to train eccentric control of the scapula as the arm is lowered to the side. This is more of a neuromuscular retraining exercise than a true strength building exercise. Again, assess the quality of motion, not simply the quantity of motion or weight lifted.

If the patient is an overhead athlete or worker, endurance for maintaining the arms overhead can be critical to returning to these activities. Bounce a light ball, gym ball, or medicine ball overhead for 30 to 60 seconds, focusing on scapular stability in a retracted, posteriorly tipped, and upwardly rotated position.
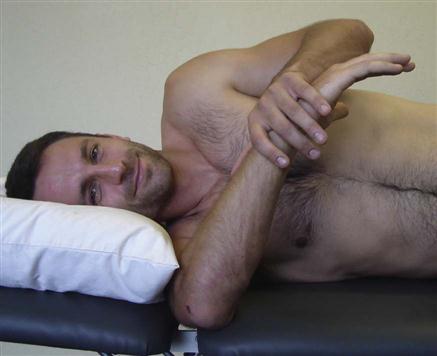
It is essential to achieve good eccentric control of the rotator cuff muscles before returning to sports activity. This is particularly important when working with overhead athletes since the posterior rotator cuff is responsible for the eccentric deceleration of the arm in activities such as throwing, serving, or hitting.33,34 Therapist-assisted prone external rotation can be used for eccentric strengthening of the posterior rotator cuff. A heavier but controllable weight is selected, and the therapist helps the patient preposition the arm into the 90°/90° position, then releases the weight, forcing the patient to control the weight in the negative direction. To eccentrically strengthen internal rotation, have the patient lie supine and perform the same therapist-assisted 90°/90° exercise. A home exercise for eccentric posterior rotator cuff strengthening is performed with resistance bands. The patient lies supine with a resistance band tied to the foot and the band wrapped around the hand (Fig. 4-17, A). The arm is positioned at 90° abduction in neutral rotation. With the band slack, the arm is externally rotated into the 90°/90° position, the thumb pointing toward the floor (Fig. 4-17, B). The leg is extended tensioning the band, while maintaining the arm in the 90°/90° position (Fig. 4-17, C). Slowly, the arm is returned to the neutral starting position in a controlled manner creating eccentric loading of the posterior cuff (Fig. 4-17, D).

Increase the speed and resistance applied when performing PNF patterns.7 Speed work into internal and external rotation in multiple planes in both the concentric and eccentric directions is effective training for overhead activities. Sports such as volleyball, tennis, swimming, water polo, and throwing sports can benefit greatly from D1/D2 patterning into end ranges of motion. These exercises can also be performed with resistance bands and transitioned into sport-specific warm-up drills as the patient progresses toward independence.
Power training for the deltoids, biceps, triceps, latissimus dorsi, and pectoral muscles becomes more important in this last phase of therapy before returning to sports activity. Whereas the rotator cuff and scapular stabilizers are control and endurance muscles, the prime movers of the arm are the power muscles.33–35 Incorporate lat pull-downs, bicep curls, tricep extensions, and rows into the program with heavier weight and fewer repetitions.
Phase V
TIME: 4 to 6 months (Table 4-6)
TABLE 4-6
Anterior Capsular Reconstruction
< ?comst?>
| Rehabilitation Phase | Criteria to Progress to This Phase | Anticipated Impairments and Functional Limitations | Intervention | Goal | Rationale |
|
Phase V |
< ?comen?>< ?comst1?>

< ?comst1?>
< ?comen1?>
GOALS:
At this time, many patients have returned to normal activities including sports played below shoulder height or sports demanding very little of the upper extremity. Overhead athletes must have adequate strength and endurance to transition into sport-specific training.
Plyometrics are a critical part of rehabilitation for athletes. Ball toss to a trampoline while in tall kneel, half kneel, or standing can mimic required motions for sports. Playing catch with a light medicine ball allows concentric and eccentric training of the throwing motion. While lying prone the patient catches the ball in the 90°/90° position, eccentrically lowering the ball to 90° abduction with neutral rotation, then tosses the ball back to the therapist by externally rotating the arm back to the 90°/90° position. For larger motion patterns, throw a 5 to 10 lb medicine ball against a wall in a chest pass, side pass, or overhead toss. There is no limit to the options for ball related plyometrics that can be very sport-specific.
Isokinetic strength measurement is an excellent way to determine overall power and endurance compared with the uninvolved arm. Understand that the dominant arm is expected to be stronger, and this may alter the interpretation of strength testing. The authors of this chapter test isokinetic strength at 120° per second for internal rotation and 240° per second for external rotation.  Sport-specific training begins when the involved arm demonstrates 70% to 80% strength of the uninvolved arm.
Sport-specific programs are indicated in Boxes 4-3 through 4-6.
Box 4-6
Rehabilitation Program for Golfers
This sport-specific protocol is designed to be performed every other day. Each session should begin with the warm-up exercises outlined here. Continue the strengthening, flexibility, and conditioning exercises on the days you are not playing or practicing golf. Advance one stage every 2 to 4 weeks, depending on the severity of the shoulder problem, as each stage becomes pain-free in execution.
Warm-Up
Lower extremities: jog or walk briskly around the practice green area three or four times; stretch the hamstrings, quadriceps, and Achilles tendon.
Upper extremities: stretch the shoulder (i.e., posterior cuff, inferior cuff, rhomboid) and wrist flexors and extensors.
Trunk: do side bends, extension, and rotation stretching exercises.
| Stage 1 | ||
| Putt | 50 | 3 times/week |
| Medium long | 0 | 0 times/week |
| Long | 0 | 0 times/week |
| Stage 2 | ||
| Putt | 50 | 3 times/week |
| Medium long | 20 | 2 times/week |
| Long | 0 | 0 times/week |
| Stage 3 | ||
| Putt | 50 | 3 times/week |
| Medium long | 40 | 3 times/week |
| Long | 0 | 0 times/week |
| Not more than one third best distance | ||
| Stage 4 | ||
| Putt | 50 | 3 times/week |
| Medium long | 50 | 3 times/week |
| Long | 10 | 2 times/week |
| Up to one half best distance | ||
| Stage 5 | ||
| Putt | 50 | 3 times/week |
| Medium long | 50 | 3 times/week |
| Long | 10 | 3 times/week |
| Stage 6 | ||
| Putt | 50 | 3 times/week |
| Medium long | 50 | 3 times/week |
| Long | 20 | 3 times/week |
| Play a round of golf in lieu of one practice session per week. | ||
< ?comen?>< ?comst1?>

< ?comst1?>
< ?comen1?>
From Jobe FW: Operative techniques in upper extremity sports injuries, St Louis, 1996, Mosby.
Troubleshooting
Misapprehending Tissue Quality
Patients with “normal” or tight connective tissue must work early and diligently to reacquire motion, while avoiding stress on the anterior joint capsule during the first postoperative month. Conversely, the therapist should not push range of motion in patients with hyperelasticity. They will reacquire motion quickly and should be allowed to heal before attempting extremes of motion.
Anterior Shoulder Pain
Despite surgery, some patients continue to have anterior shoulder pain with palpation of the proximal biceps tendon or transverse humeral ligament. This may be considered “leftover inflammation.” Although the structural problem has been rectified surgically, the residual inflammation does not disappear overnight. Assess the posterior cuff and capsule for adequate tissue length. Stretching may be necessary to allow the humeral head to articulate with the glenoid at its normal contact point, which will eliminate stress on the anterior structures and allow the irritation to resolve. The therapist can use modalities to reduce discomfort at the clinic and the patient should follow through at home with a cryotherapy routine.
Posterior Shoulder Pain
Many patients note pain in the posterior shoulder, especially with activity that requires elevation above 120° and motion that requires horizontal abduction posterior to the frontal plane. Another potentially difficult motion is hyperextension posterior to the plane of the body. Occasionally, patients develop a tendinopathy of the rotator cuff external rotators, specifically the teres minor, which may be treated symptomatically. The therapist may note pain on palpation of the posterior cuff insertion, the posterior capsule, or the proximal third of the axillary border of the scapula, as well as decreased extensibility of the posterior structures, which may affect the alignment of the humeral head in the glenoid. Treat accordingly with modalities, stretching, and progressive strengthening.
Insufficient Range of Motion
If too much time elapses after surgery before the patient regains normal motion, capsular adhesion may develop, permanently limiting the total motion available in the shoulder. The best defense for this problem is a good offense: the physical therapist should know the patient’s tissue type and encourage motion early if appropriate. As noted earlier, normal ROM differs for different patients and a very carefully planned stretching program should be implemented based on the patient’s tissue type and functional requirements. This plan should include manual stretching by the therapist and stretching independently by the patient with a goal of returning the patient to functional ROM requirements without excessive motion. For example, a baseball pitcher may require 130° of external rotation for function, while most other populations have more modest requirements.  While an athlete does need this amount of external rotation, too much external rotation can lead to instability. A very narrow margin exists between being able to perform and having a problem. Precisely correct mechanics is crucial to prevent recurrence.
If the patient is having difficulty gaining the last few degrees of shoulder flexion because of pain or stiffness and the physical therapist determines the glenohumeral and scapular mobility are normal, the problem may be in the spine. Assess the lower cervical and upper thoracic spine for hypomobility.36,37 The cervicothoracic junction is required to move into extension during end range shoulder flexion. At times, this region of the spine can become restricted and actually limits functional end range shoulder flexion. Mobilizing the spine into extension restores normal scapulothoracic and cervicothoracic motion and allows terminal functional flexion to be achieved.
Strength and Endurance
Often rehabilitation programs concentrate on increasing strength. However, for most patients, including overhead throwers, endurance is probably much more important to overall function than gross strength. Endurance training is equally important for patients who are hurt on the job. With inadequate endurance, the patient will develop muscle substitution patterns to enable them to continue to perform an activity, which will lead to altered mechanics for a given task or sport. Such substitutions and alterations are often the forerunners of tissue breakdown. The therapist should prescribe focused strengthening exercises for specific muscle groups based on their functional use for shoulder motion. The scapular upward rotators and the rotator cuff require more endurance training, while the larger prime mover muscles of the shoulder, such as the shoulder flexors, extensors, and abductors, tend to require more power training.
One specific and often overlooked area of concern is scapular anterior tipping and winging with active motion. Often this is a result of weakness or poor endurance in the serratus anterior. It is easily observed during the eccentric phase in open kinetic chain arm motions or in dynamic closed kinetic chain activities such as stability ball walk-outs. This lack of dynamic scapular control leads to excessive stresses throughout the shoulder and may contribute to a recurrence of the original presurgery symptoms. If adequate strength and endurance are present, the patient should be able to raise and lower the arm through a full range of motion while maintaining the scapula flat against the thoracic wall. For closed chain assessment, demonstrating dynamic control under load, the athletic patient should be able to perform 10 walk-outs on a stability ball while maintaining the scapula flush with the thoracic wall in a protracted position. Lastly, functional strength and endurance of the serratus must be observed during the actual motion pattern the patient requires. For example, the physical therapist must observe a pitcher mimicking the pitching motion repeatedly, at normal speeds, to ensure the scapular control is adequate to allow a safe return to pitching. The physical therapist must ensure there is adequate dynamic control of the serratus anterior before allowing high-level functional activities.
Stretching Considerations
Patients with anterior instability may have a tight posterior capsule. Despite surgical correction, the posterior tightness may remain and, if left untreated, lead to a recurrence of the original complaint. Two excellent self-stretching techniques for the posterior capsule are the cross body stretch with scapular stabilization (see Fig. 4-5) and the sleeper stretch (see Fig. 4-9).
Periscapular muscles that tend to be restricted include the pectoralis minor and levator scapula. Both of these muscles will contribute to an anteriorly tipped and downwardly rotated scapula, thus preventing normal rotation of the scapula and therefore contributing to shoulder impingement. The therapist should be suspicious if the patient has rounded shoulders and a protracted scapula. Stretching of both muscles can be performed manually or independently. Soft tissue mobilization can be very effective in treating these restrictions as well. Remember to protect the anterior capsule from being overstretched when addressing these issues.
 The therapist must not stretch the anterior shoulder structures of any throwing athlete unless he or she is certain that tightness exists. By and large, all these patients can demonstrate anterior laxity in the dominant shoulder. Assess ROM carefully and consider all factors of the patient and physical demands before proceeding with any stretching of the anterior shoulder.
Mechanics
Even though the patient may have good ROM, strength, and endurance in the shoulder itself, important work remains to be done. Poor body mechanics may be one of the reasons the patient was injured in the first place. Understanding the mechanics of the sport the patient is resuming is essential. For example, in the throwing athlete, the physical therapist must ensure the full kinetic chain is functioning properly, including the front foot pointing toward the plate, appropriate stride length, adequate balance, and that the front foot does not hit the ground before the arm is in the fully cocked position. An awareness of the mechanics of tennis, volleyball, swimming, and golf is critically important when working with these athletes. Without incorporating a review of proper mechanics and a “tune up” when necessary, it is likely that the player will return to old habits formed before the shoulder surgery, possibly leading to reaggravation and injury.
Clinical Case Review
1John is a 35-year-old surfer. He had several episodes of shoulder dislocation while paddling his surfboard. He also complained of anterior shoulder pain. Conservative treatment failed, so he underwent an anterior capsular reconstruction 11 weeks ago. Passive range of motion (PROM) and AROM are good. John’s main complaint is continuing anterior shoulder pain. The pain can be elicited by palpation over the biceps tendon and transverse humeral ligament. This symptom has delayed progress with strengthening. How was the patient treated?
John was treated for biceps tendonitis, or inflammatory symptoms occurring in the area of the proximal biceps tendon and transverse humeral ligament. Despite the structural corrections, these tissues may remain irritable. Because the posterior capsule also was slightly restricted, posterior capsular mobilizations were performed to allow the humeral head to articulate with the glenoid at its normal contact point, eliminating this as a source of continuing aggravation for these anterior structures.
2Peter is a 20-year-old pitcher for a baseball team. He had right-shoulder laxity and a painful shoulder secondary to impingement problems. He underwent capsular reconstruction on his right shoulder 10 weeks ago. His shoulder flexion and abduction with PROM is still limited by 15° for flexion and 20° for abduction. PROM for internal rotation also is limited by 20°. At this time, should decreased ROM be a concern? If yes, what techniques were used to improve ROM?
On further investigation a tight posterior capsule was noted. The therapist used posterior capsular mobilizations in the next treatment to increase shoulder flexion and internal rotation. The patient gained 10° to 15° more for flexion and internal rotation and 5° to 10° more for abduction. After mobilization and PROM were performed, the patient executed AROM exercises for shoulder flexion, abduction, and internal rotation.
3Caroline is an 18-year-old high school volleyball player who experienced recurrent anterior subluxations during play. At 16 weeks postoperation, she notes a clicking with mild pain in the anterior shoulder while performing overhead motions mimicking a volleyball serve. Her involved shoulder motion and strength are considered normal. However the uninvolved side had 30° more internal rotation than the involved shoulder. What structures are possibly at fault?
Recheck her shoulder internal rotation at 90° and above. Despite her internal rotation being normal for the average population, she is still lacking 30° compared with her uninvolved side. By aggressively mobilizing the soft tissue in the posterior cuff, she is able to regain what is normal mobility for her and the pain and clicking has resolved.
4Lucy is a 13-year-old middle school competitive swimmer who experienced anterior shoulder pain and impingement signs primarily with backstroke. She is 3 weeks since the operation and has full PROM in external rotation without resistance or pain. How do you proceed?
Educate Lucy and her parents regarding the physiology and goal of the surgery and the concern you have about her arm moving too far into external rotation. Explain that you would like her to limit this motion as much as possible to allow physiologic healing to occur. Do not give her any stretching exercises involving external rotation at this time.
5Steve is a 29-year-old computer programmer who is 4 weeks postoperation. His anterior shoulder pain is not resolving as expected. Progress with ROM is hampered by pain more than stiffness and the end feel is empty in all directions. He is also having difficulty sleeping at night because of pain. What steps should you take?
Assess the cervical spine. Include ROM, palpation, and cervical strength testing. Often times there is segmental cervical dysfunction, which can contribute to referred shoulder pain and restriction. This is different than a cervical radiculopathy because there are no hard neurologic findings such as myotomal weakness, altered reflexes, or sensation.
6Kari is a 40-year-old mother who plays recreational volleyball and runs. She noted nondominant shoulder subluxations with basic reaching activities of increasing frequency over the past 2 years. She had to stop playing volleyball because of the shoulder instability. Kari is 6 weeks postoperation and notes minimal pain. She is able to gain ROM during therapy sessions but is unable to maintain the range between sessions. What can be addressed to help her maintain her range?
After the patient/therapist is done stretching the shoulder, PNF patterns can be useful to initiate muscle contraction into the newly gained ROM. PNF D1 and D2 patterns with minimal resistance performed in a pain-free range can facilitate the rotator cuff and scapular muscles to help Kari maintain these gains. At home, the exercises can be performed with no resistance or light band resistance to reinforce the active end range control.
7Marc is a 42-year-old recreational basketball player who is 5 months postoperation. He has full ROM in all directions but continues to have anterior shoulder pain at end range flexion in his initial attempts to return to play. Every time he reaches for a lay up, the shoulder pain is sharp but settles quickly. What would you expect to find with your palpation examination?
Likely Marc has tightness in muscles of the posterior rotator cuff and tenderness over the proximal bicep tendon. When he reaches with speed and force into full flexion, impingement of the bicep tendon under the acromion may occur if the force couple of the rotator cuff musculature is not functioning properly.
8Angela is a competitive gymnast who underwent ACR surgery 2 weeks ago. She presents to you at her physical therapy evaluation with empty end feels for external rotation at 30°, flexion at 150° with minimal pain, and abduction at 90°. She notes minimal postoperative pain at this time and is wearing the sling “only because my doctor told me to.” What is your treatment on day one?
At a physiologic level, collagen fibers must be deposited and bond together to limit the extensibility of the capsular tissue. If you work to increase ROM at this time, you may be hampering the healing of the newly restricted capsule by excessively elongating the new fibers. Focus on AAROM exercises within the guidelines of restricted ROM despite her ability to move beyond the suggested precautions. When more time has elapsed, progress ROM according to the doctors recommended limitations.
9Two muscles are particularly critical to create proper scapulohumeral rhythm. What are they?
Levator scapula and serratus anterior. If the levator scapula is restricted and lacks the normal extensibility, it will prevent the scapula from moving into upward rotation as the arm moves into elevation. If the serratus anterior is weak, it will not properly guide the scapula into upward rotation as the arm moves into elevation. If either of these muscles is not performing properly, the scapula becomes dysfunctional and will lead to secondary impingement. Be certain to assess and reassess the function of these two muscles throughout the course of rehabilitation.
References
1. Frank CB. Ligament structure, physiology and function. J Musculoskelet Neuronal Interact. 2004;4(2):199–201.
2. Hardy MA. The biology of scar formation. Phys Ther. 1989;69(12):22–32.
3. Woo SL, Apreleva M, Hoher J. Tissue biomechanics of ligaments and tendons. In: Kumar S, ed. Biomechanics in ergonomics, Philadelphia. CRC Press 1999.
4. Burroughs P, Dahners LE. The effect of enforced exercise on the healing of ligament injuries. Am J Sports Med. 1990;18:376–378.
5. Lechner CT, Dahners LE. Healing of the medial collateral ligament in unstable rat knees. Am J Sports Med. 1991;19:508–512.
6. Mottram SL. Dynamic stability of the scapula. Manual Ther. 1997;2(3):123–131.
7. Saliba V, Johnson GS, Wardlaw C. Proprioceptive neuromuscular facilitation. In: Basmajian JV, Nyberg RE, eds. Rational manual therapies. Baltimore: Williams & Wilkins; 1992.
8. Long JL, et al. Activation of the shoulder musculature during pendulum exercises and light activities. J Orthop Sports Phys Ther. 2010;40(4):230–237.
9. Dwyer A, Aprill C, Bogduk N. Cervical zygapophyseal joint pain patterns: A study in normal volunteers. Spine. 1990;15(6):453–457.
10. Decker MJ, et al. Serratus anterior muscle activity during selected rehabilitation exercises. Am J Sports Med. 1999;27(6):784–791.
11. Moseley Jr JB, et al. EMG analysis of the scapular muscles during a shoulder rehabilitation program. Am J Sports Med. 1992;20:128–134.
12. Tyler TF, et al. Reliability and validity of a new method of measuring posterior shoulder tightness. J Orthop Sports Phys Ther. 1999;29(5):262–269.
13. Laudner KG, Stanek JM, Meister K. Assessing posterior shoulder contracture: The reliability and validity of measuring glenohumeral joint horizontal adduction. J Athl Train. 2006;41:375–380.
14. Hengeveld E, Banks K, eds. Maitland’s peripheral manipulation. ed 4 Butterworth-Heinemann 2005.
15. Threlkeld A. Effects of manual therapy on connective tissue. Phys Ther. 1992;72(12):893–902.
16. Warner JJP, et al. Patterns of flexibility, laxity, and strength in normal shoulders and shoulders with instability and impingement. Am J Sports Med. 1990;18:366–375.
17. McClure P, et al. A randomized controlled comparison of stretching procedures for poster shoulder tightness. J Orthop Sports Phys Ther. 2007;37(3):108–114.
18. Conroy DE, Hayes KW. The effect of joint mobilization as a component of comprehensive treatment for primary shoulder impingement syndrome. J Orthop Sports Phys Ther. 1998;28(1):3–14.
19. Reference 19 deleted in proof.
20. Ellenbecker TS, Mattalino AJ. Glenohumeral joint range of motion and rotator cuff strength following arthroscopic anterior stabilization with thermal capsulorraphy. J Orthop Sports Phys Ther. 1999;29(3):160–167.
21. Kibler WB. The role of the scapula in athletic shoulder function. Am J Sports Med. 1998;36(9):1789–1798.
22. Ekstrom RA, Donatelli RA, Soderberg GL. Surface electromyography analysis of exercises for the trapezius and serratus anterior muscles. J Orthop Sports Phys Ther. 2003;33(45):247–258.
23. Reinold MM, et al. Electromyographic analysis of the rotator cuff and deltoid musculature during common shoulder external rotation exercises. J Orthop Sports Phys Ther. 2004;34:385–394.
24. Cools AM, et al. Rehabilitation of scapular muscle balance: Which exercises to prescribe? Am J Sports Med. 2007;35(10):1744–1751.
25. Myers JB, et al. On-the-field resistance-tubing exercises for throwers: an electromyographic analysis. J Athl Train. 2005;40:15–22.
26. Hintersmeister RA, et al. Electromyographic activity and applied load during shoulder rehabilitation exercises using elastic resistance. Am J Sports Med. 1998;26(2):210–220.
27. Laudner KG, Moline MT, Meister K. The relationship between forward scapular posture and posterior shoulder tightness among baseball players. Am J Sports Med. 2010;38(10):2106–2112.
28. Laudner KG, Sipes RC, Wilson JT. The acute effects of sleeper stretches on shoulder range of motion. J Athl Train. 2008;43(4):359–363.
29. Ludewig PM, Cook TM, Nawoczenski DA. Three-dimensional scapular orientation and muscle activity at selected positions of humeral elevation. J Orthop Sports Phys Ther. 1996;24:57–65.
30. Hardwick DH, et al. A comparison of serratus anterior muscle activation during a wall slide exercise and other traditional exercises. J Orthop Sports Phys Ther. 2006;36(12):903–910.
31. Escamilla RF, et al. Shoulder muscle activity and function in common shoulder rehabilitation exercises. Sports Med. 2009;39(8):663–685.
32. Lee SB, et al. Dynamic glenohumeral stability provided by the rotator cuff muscles in the mid-range and end-range of motion: A study in cadavera. J Bone Joint Surg Am. 2000;82:849–857.
33. Jobe FW, et al. An EMG analysis of the shoulder in throwing and pitching: A preliminary report. Am J Sports Med. 1983;11(1):3–5.
34. Jobe FW, et al. An EMG analysis of the shoulder in pitching: A second report. Am J Sports Med. 1984;12(3):218–220.
35. Jobe FW, Pink M. Classification and treatment of shoulder dysfunction in the overhead athlete. J Orthop Sports Phys Ther. 1993;18(2):427–432.
36. Crosbie J, et al. Scapulohumeral rhythm and associated spinal motion. Clin Biomech. 2008;23(2):184–192.
37. Boyles RE, et al. The short-term effects of thoracic spine thrust manipulation on patients with shoulder impingement syndrome. Manual Ther. 2009;14(4):375–380.
[/level-membership-for-orthopaedics-category][not-level-membership-for-orthopaedics-category]<
[/not-level-membership-for-orthopaedics-category]
