[level-membership-for-orthopaedics-category]
Ankle Arthroscopy
Tom Burton, Danny Arora, Benjamin Cornell, Lisa Maxey and Richard D. Ferkel
The first arthroscopic inspection of a cadaveric joint was performed by Takagi in Japan in 1918.1 In 1939 he reported on the arthroscopic examination of an ankle joint in a human patient.1 With the advent of fiberoptic light transmission, video cameras, instruments for small joints, and distraction devices, arthroscopy has become an important diagnostic and therapeutic modality for disorders of the ankle. Arthroscopic examination of the ankle joint allows direct visualization during stress testing of intraarticular structures and ligaments about the ankle joint. Various arthroscopic procedures have been developed with less attendant morbidity and mortality to patients.2–6 With the advent of better, smaller joint arthroscopes and instrumentation, and the introduction of more efficient noninvasive distraction devices, ankle arthroscopy is now state of the art. It has become a standard procedure in many institutions as a diagnostic and therapeutic tool for the practicing surgeon.
Surgical Indications and Contraindications
Foot and ankle arthroscopy has become a valuable adjuvant to the diagnosis and treatment of an increasing amount of disorders. Diagnostic indications (Box 30-1) for ankle arthroscopy include unexplained pain, swelling, stiffness, instability, hemarthrosis, locking, and abnormal snapping or popping.
Operative indications for ankle arthroscopy include loose body removal, excision of anterior tibiotalar osteophytes, débridement of soft tissue impingement and arthrofibrosis, and treatment of osteochondral lesions and ankle instability. Other indications include arthrodesis for posttraumatic degenerative arthritis and treatment for ankle fractures and postfracture defects.
 Absolute contraindications for ankle arthroscopy include localized soft tissue or systemic infection, and severe degenerative joint disease (DJD). With end-stage DJD, occasionally successful distraction may not be possible, precluding visualization of the ankle joint. Relative contraindications include complex regional pain syndrome (CRPS), moderate DJD with restricted range of motion (ROM), severe edema, and tenuous vascular supply.
Patient Evaluation
Successful outcomes following ankle arthroscopy depend on accurate diagnosis and concise preoperative planning. It is important to understand the nature of the patient’s complaint and gather the following information: date of injury, duration and severity of symptoms, provocative events, previous injuries and presence of any redness, swelling, instability, stiffness, locking, or popping.
A general medical examination should be obtained, with special attention to rheumatologic disorders. The physical examination should include: inspection, palpation, ROM, and special tests. The contralateral side should always be inspected for comparison. Stability of the ankle and the subtalar joint should be evaluated. Often, a local anesthetic agent can be injected into a specific joint to aid in diagnosis.
Routine blood tests should be performed to check for systemic and rheumatologic conditions and infection. Aspiration of the ankle joint and analysis of the joint fluid can be helpful in distinguishing inflammatory from septic conditions of the ankle joint.
Routine radiographs (anteroposterior [AP], lateral, and mortise view) should be obtained for all patients. Stress radiographs can provide useful information when instability is suspected. Computed tomography (CT) and/or magnetic resonance imaging (MRI) are often helpful in evaluating soft tissue and bony disorders about the foot and ankle. Three-phase bone scans can also aid in distinguishing soft tissue from bony pathology.
Surgical Technique
Ankle arthroscopy is usually performed in one of four ways: (1) in the supine position, (2) with the knee bent 90° over the end of the table, (3) in the decubitus position, or (4) in the prone position for posterior ankle arthroscopy. The method of choice is a surgeon’s preference, while taking into account specific surgical circumstances. Different types and sizes of arthroscopic equipment can be used depending on surgeon’s preference and availability of equipment. The procedure described is that used most commonly by the senior author of this chapter; a more detailed description of ankle arthroscopy can be found in his textbook.2
Positioning
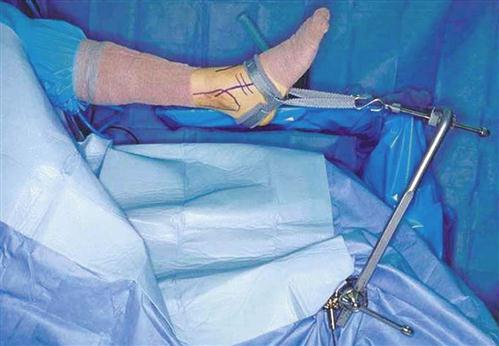
The patient is taken to the operating room and placed in the supine position. The hip is flexed to 45°, and the thigh is placed onto a well-padded support placed proximal to the popliteal fossa and distal to the tourniquet. The lower extremity (LE) is then prepared and draped so that good access is available posteriorly. A tourniquet is applied as needed. A noninvasive distraction strap is placed over the foot and ankle. Distraction is used to separate the distal tibia from the talus so that at least 4 mm of joint space opening is obtained (Fig. 30-1). Without distraction, the surgeon has difficulty positioning the arthroscopic instruments in the ankle without scuffing the articular cartilage; visualizing the central and posterior portions of the ankle also is difficult without adequate joint separation. The distraction device is carefully positioned so as not to injure the neurovascular structures, and approximately 30 to 40 lb of force is placed across the ankle for no more than 60 to 90 minutes. Before applying the distraction strap, the surgeon should identify and outline the dorsalis pedis artery, the deep peroneal nerve, saphenous vein, tibialis anterior tendon, peroneus tertius tendon, and superficial peroneal nerve and its branches on the skin with a marker. Identification of the superficial peroneal nerve and its branches is facilitated by inverting and plantar flexing the foot and flexing the toes.
Arthroscopic Portal Placement
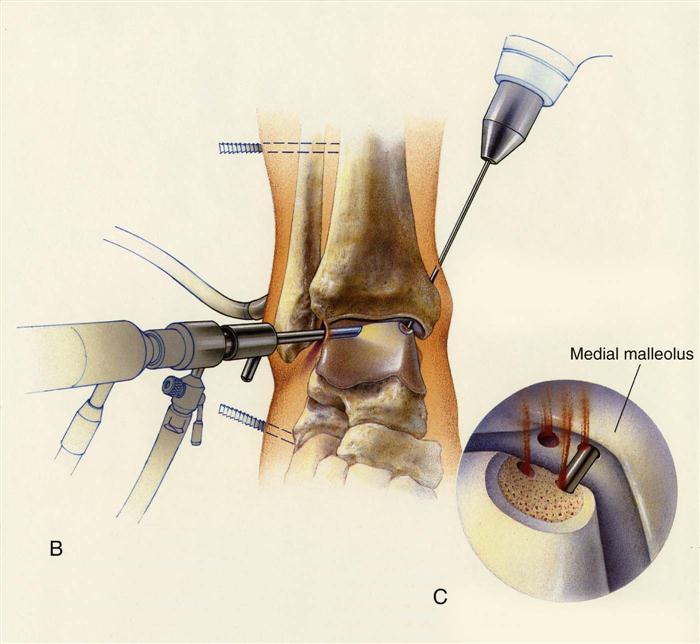
The surgeon uses three primary portals or access areas to insert the arthroscope and instrumentation (Fig. 30-2). These include the anteromedial, anterolateral, and posterolateral portals. Accessory portals can be used as needed but are rarely required. Portals are made by nicking the skin only, then with the use of a clamp spreading through the subcutaneous tissue and into the ankle joint. The surgeon must take great care to avoid injuring the neurovascular and tendinous structures.
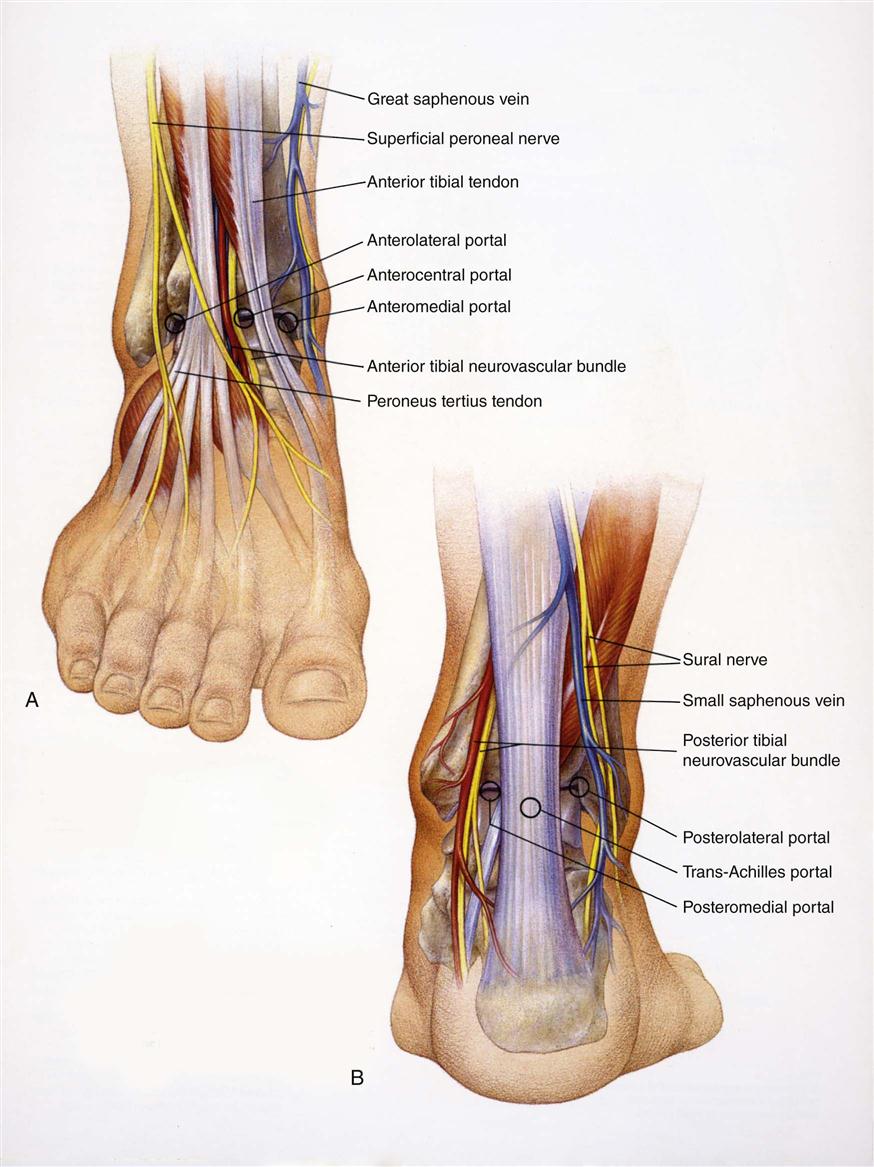
The anteromedial portal is established first and a 2.7-mm, 30° oblique small joint videoscope is inserted. The surgeon establishes the anterolateral portal under direct vision, using extreme care to avoid injuring the superficial peroneal nerve branches. The arthroscope is then positioned in the posterior portion of the ankle so the posterolateral portal can be made just lateral to the Achilles tendon, entering the ankle beneath the posterior ankle ligaments.
In recent years, techniques have been developed for arthroscopy in the prone position, using the posterolateral and posteromedial portals. This allows access for treatment of a variety of problems, including osteochondral lesions of the talus (OLT), os trigonum, and flexor hallucis longus tendinitis or tears.7–10 The senior author of this chapter occasionally uses this position.
Arthroscopic Examination
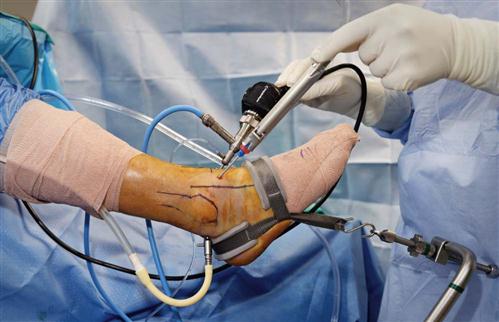
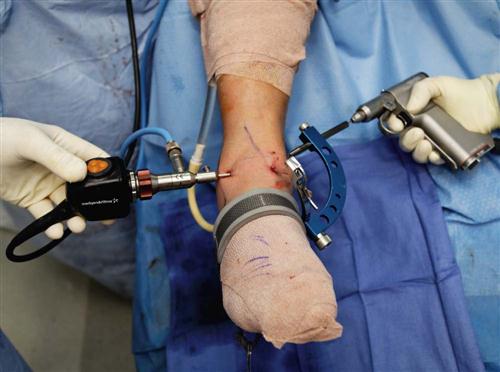
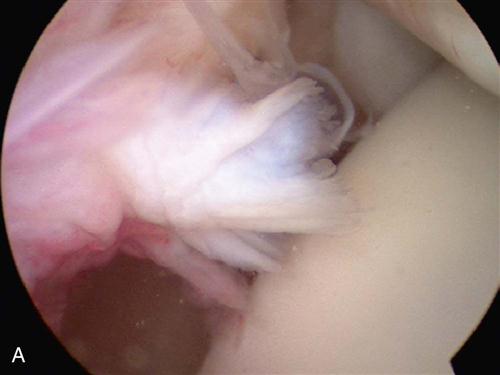
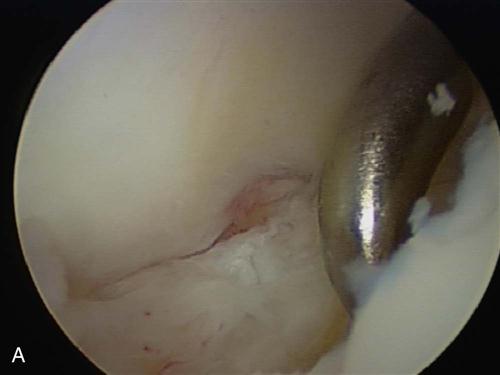
A 21-point arthroscopic examination of the ankle is performed to ensure a systematic evaluation.2 After completing the arthroscopic evaluation, the surgeon identifies the pathology and treats it accordingly, using small joint instrumentation ranging in size from 2.0 to 3.5 mm. These instruments include baskets, knives, intraarticular shavers, and burrs. Scar tissue is removed using baskets and an intraarticular shaver. Synovectomy is performed with an intraarticular shaver (Fig. 30-3). OLT are carefully evaluated and, if they are found to be loose, excised with a ring curette and banana knife. The surgeon can use transmalleolar or transtalar drilling, and/or microfracture techniques, to promote fibrocartilage formation and new circulation in the avascular area (Fig. 30-4). Acute ankle fractures can be evaluated arthroscopically; the surgeon can perform percutaneous screw insertion while monitoring fracture reduction arthroscopically (see Chapter 29).
After the procedure is performed, the wounds are closed with a nonabsorbable suture, and a compression dressing and posterior splint are applied.
Postoperative Plan
The patient remains non–weight bearing on crutches for 1 week. The splint and the stitches are then removed. If an osteochondral lesion has been treated with one of the previously mentioned methods, the patient may be required to be non-weight bearing for 4 to 6 weeks. During this time, the patient is initially in a removable splint and is allowed to exercise the ankle actively to promote new fibrocartilage formation. The type of arthroscopic procedure performed and individual patient goals determine weight-bearing status and rehabilitation.
Soft Tissue Impingement
Ankle sprains are one of the most common injuries in sports. One inversion sprain occurs per 10,000 persons per day. It has been estimated that 10% to 50% of patients will have some degree of chronic ankle pain.
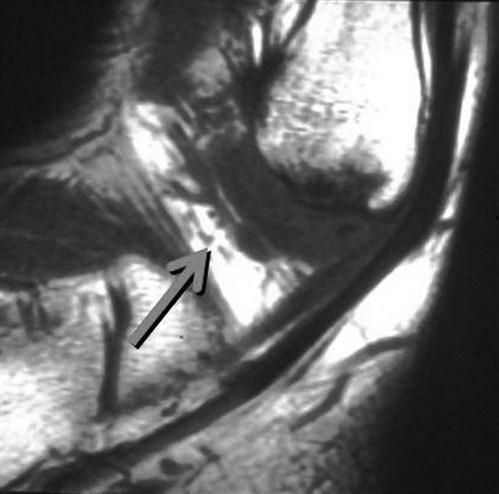
The primary cause of chronic ankle pain after an ankle sprain is soft tissue impingement. This can occur along the syndesmosis, the syndesmotic interval between the tibia and fibula, or the medial, lateral, and/or posterior gutters. Most commonly it is located anterolaterally given the common occurrence of a common inversion ankle sprain.11 Diagnosis is done by careful history, physical examination, and selective injections. MRI can also be very helpful in assessing the problem (Fig. 30-5).12
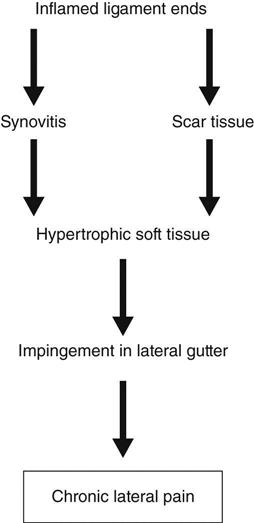
The sequence of lateral ankle pain after a sprain can be explained as shown in Fig. 30-6.
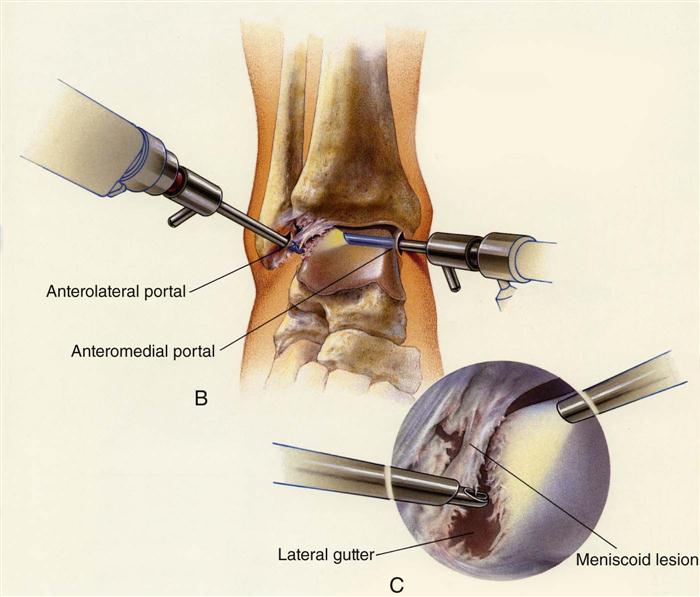
A distraction device may be necessary to identify some of the synovial pathology involving the posterolateral corner of the ankle, because such identification can be sometimes difficult. The inflamed synovium, thickened adhesive bands, osteophytes, and loose bodies are débrided arthroscopically using motorized shavers and burrs, graspers, and baskets (Fig. 30-7).
Postoperatively, patients are splinted for 1 week, and then put into a CAM (controlled angle motion) walker for 2 to 3 weeks. Subsequently, they wear a soft ankle brace and begin formal physiotherapy. Return to activity or sport is allowed only after all rehabilitation goals are achieved.
Arthroscopic treatment of anterolateral soft tissue impingement of the ankle has been proven successful at alleviating chronic ankle pain after an inversion sprain. Numerous authors have reported a good to excellent outcome in approximately 80% to 85% of patients.11,13,14
Osteochondral Lesions
Controversy persists regarding the cause, treatment, and prognosis of osteochondral and chondral lesions of the ankle. OLT comprise 4% of all osteochondral defects. Males are slightly more predominant than females between the ages of 20 to 30 years. Medial talar dome lesions are more common than lateral.
There are many possible causes for OLT. Trauma is believed to play a major role, but there are also instances where atraumatic presentations are possible, secondary to idiopathic avascular necrosis. The diagnosis of OLT requires a high index of suspicion because symptoms may be mild and imaging is not readily available. Patients may present in an acute traumatic setting, complaining of persistent ankle pain (i.e., inversion ankle sprain), or may have a chronic complaint of ongoing ankle pain. The literature has shown that the location of pain is not correlative with the location of the lesion, therefore adding to the vague nature of the condition. Other common symptoms include stiffness, deep aching pain, swelling, clicking, locking, or even instability.
OLT that do not respond to conservative treatment are treated arthroscopically. Most chronic OLT in adults are loose and have to be excised. The osteochondral lesion bed is then microfractured and/or drilled. Occasional they can be pinned back (Fig. 30-8).
Postoperatively, patients are splinted for 1 week in neutral position. Once the portal incisions have healed (approximately 1 to 2 weeks), ROM exercises are begun, since early motion appears to facilitate cartilage healing. Patients remain non–weight bearing for 6 to 8 weeks, depending on the size of the lesion. Usually by 4 to 6 weeks, patients start physical therapy in the pool and then progress to land exercises. Cutting, shear stress, or impact activities are avoided for 6 months.
Arthroscopic treatment of OLT has proven to be comparable with open surgery, with less morbidity and less recovery time. Ankle arthroscopy has proven to be one of the most reliable methods in classifying OLT. Recently, clinical management of articular cartilage defects has generated significant research interest in the orthopedic world. Attempts to stimulate a hyaline cartilage response have included transplantation of various cells, including periosteal and perichondral tissues, woven carbon-fiber pads, and osteochondral autografts/ allografts.
In addition, chondrocyte transplantation has been studied extensively now in the United States. With further research, it is hoped that osteochondral defects can be successfully covered by articular cartilage instead of fibrocartilage replacement.9
Overall Surgical Outcomes
Numerous papers have been published regarding the outcome of arthroscopic surgery of the ankle. Results vary depending on the type of procedure and the study that was undertaken.15–23 In general, a large percentage of patients should achieve a successful outcome depending on the nature of the pathology. Expectations after surgery include a full ROM, strength, and full function. The preoperative ROM, strength, and severity of the pathologic condition heavily influence the results.
Complications
All arthroscopic procedures have potential complications.24 The most common complications in foot and ankle arthroscopy are injuries to the neurovascular structures, especially the superficial peroneal nerve.8 The overall complication rate has varied with the transition from invasive to noninvasive distraction. Current complication rates are between 6.8% and 9%.25,26 The physical therapist should report to the physician any problems they note after surgery. Sometimes, excessive massage over the portals can even irritate the nerves and cause tingling and numbness. In general, we wait 2 to 3 weeks to initiate physical therapy after ankle and foot arthroscopy to avoid wound problems and increased pain while the soft tissues are healing.
Therapy Guidelines for Rehabilitation
Several factors must be considered in planning a successful rehabilitation program for the postoperative ankle arthroscopy patient. Rehabilitation guidelines can vary greatly for the same injury depending on the patient’s age, severity/chronicity of injury, healing rate of tissue, general medical health, and previous level of activity. The physician, physical therapist, and patient must work together as a team to create an appropriate, effective, and efficient treatment plan that will allow the patient to optimize his or her recovery. The phases in each of the following rehabilitation protocols may overlap 1 to 3 weeks depending on the factors mentioned previously and individual progress.
The physical therapist should consider the following 6 basic principles when planning an ankle rehabilitation protocol:
The following rehabilitation program was designed for a patient who has chronic pain because of a recurring inversion sprain suffered during the basketball season. The patient underwent an arthroscopic procedure to débride the anterolateral soft tissue because of impingement.
Preoperative Phase
GOALS: Restore functional ROM; normalize gait; apply corrective orthoses to improve mechanical neutrality; gait train with the appropriate assistive device(s), taking into consideration postoperative weight-bearing status; create patient’s initial postoperative home exercise program (HEP) to bridge the gap from surgery to initiation of formal postoperative rehabilitation with surgeon’s input; educate patient as to what the next few months will entail and answer any questions the patient may have (Table 30-1)

Phase I: Acute Phase
Initial Postoperative Examination
Active range of motion (AROM)/passive range of motion (PROM) measurements
Strength of uninvolved LE muscles
TIME: Week 1 Postoperative
GOALS: Protect the healing tissue; control postoperative pain and swelling; initiate HEP; maintain patients overall level of fitness (Table 30-2)
TABLE 30-2
< ?comst?>
| Phase | Criteria to Progress to This Phase | Anticipated Impairments and Functional Limitations | Intervention | Goal | Rationale |
| Phase IPostoperative wk 1 |
< ?comen?>< ?comst1?>

< ?comst1?>
< ?comen1?>
Postoperatively, the patient will be in a splint and have weight-bearing restrictions. The patient should follow all postoperative instructions unless told otherwise by the surgeon. Elevation and intermittent icing (including cryopneumatic device) will help control postoperative swelling and pain. The patient’s HEP can be initiated based on the program designed preoperatively. This may include upper extremity (UE) AROM/resistive exercises, trunk and core training, isometric strengthening of the glutes, and quads and hamstrings bilaterally with AROM exercises for the uninvolved side.
Phase II: Early Rehabilitation
TIME: Weeks 2 to 5 Postoperative
GOAL: Decrease inflammation and pain; increase ankle ROM; restore soft tissue flexibility/mobility; restore normal gait; progress weight-bearing and non–weight bearing exercises; maintain patient’s general cardiovascular fitness (Table 30-3)
TABLE 30-3
< ?comst?>
| Phase | Criteria to Progress to This Phase | Anticipated Impairments and Functional Limitations | Intervention | Goal | Rationale |
| Phase IIpostoperative wk 2-5 |
< ?comen?>< ?comst1?>

< ?comst1?>
< ?comen1?>
LE, Lower extremity; ROM, range of motion; UE, upper extremity.
The splint can be removed under the surgeon’s directive. Patient can progress to weight bearing as tolerated (WBAT) and eventually full weight bearing (FWB) as long as there is no evidence of compensation. If the surgical sites are closed/dry/healed and the surgeon has approved, initiate pool therapy when available. Pool therapy should include normalized gait, weight-bearing exercises, balance, and deep water cardiovascular exercises. Land therapy may also begin progressing through AROM exercises, exercise bike, beginning weight-bearing exercises, and passive resistance exercises. Care needs to be taken to not progress the patient too quickly, which could lead to an unwanted inflammatory response and probable setback. General physical fitness should continue to be addressed. PROM, A/AROM, AROM, and joint mobilization can be initiated to address the patient’s restricted ROM at the ankle and the surrounding joints. The soft tissue will need to be addressed as well, since it is an integral component of normal joint function Balance activities can also be progressed as the patient is able to tolerate when on land. Start with static positioned exercises such as single-limb stance (SLS) and progress by varying the standing surfaces (pads/towels/trampoline) and adding dynamic activities such as the PlyoBack.
The following are some ideas to address the goals for phase 2.
Decrease Inflammation and Pain
• Active ankle pumps and circles.
• Grade I to II forefoot, midfoot, and hindfoot joint mobilization. Sustained stretching techniques after ankle and foot mobilization can be used as a beginning technique to stretch the joint capsule. The gentle oscillations involved with grade I and II mobilizations can assist in decreasing swelling and pain. Grade III and IV mobilizations can be used to improve limited joint ROM once pain and swelling have been reduced. The following are a few recommendations for accessory joint mobilizations:
• Forefoot and metatarsal anterior and posterior glides
• Talar rock (for calcaneal movement)
• Anterior glide of the talocrural joint (to increase plantar flexion)
• Posterior glide of the talocrural joint (to increase dorsiflexion) (see Fig. 29-8)
• Distraction of the talocrural joint (increase joint play in the mortise) (see Fig. 29-6) and subtalar joint (see Fig. 29-8)
• Medial and lateral subtalar glides (to increase eversion and inversion) (Fig. 30-9)
Restore Normal Gait
As the patient transitions to partial weight bearing (PWB), WBAT, and FWB, emphasis on proper heel to toe patterning should be made. This will limit compensatory patterning as the patient transitions off of assistive devices. This should carry over into the pool with his or her aquatic program and on land. It needs to be noted that normalizing ROM and strength not only in the involved foot and ankle, but in the proximal lower quarter of the surgical side as well as the nonsurgical side will lessen the possibility of a compensated patterning. Use of orthotics can be considered to assist in supporting the foot in a mechanically correct position.
Increase Ankle Joint ROM and Restore Soft Tissue Flexibility
The use of joint mobilization and soft tissue mobilization combined with exercise is an effective way to improve ROM and soft tissue function. As would be expected, a patient who has had an injury or surgery and is splinted or immobilized can quickly develop restrictions in the soft tissues and joints at and around the affected area. The following techniques should be considered if deemed safe to the surgical area:
Increase Strength
It is important to progress slowly in a well-paced manner to avoid aggravating the ankle. Aggravation of symptoms could require a 1 to 2 week delay. This can be avoided by making the patient aware that over activity with exercises and or functional weight bearing could lead to irritation and overstressing the healing tissues. Adding a few exercises at a time, working at minimal resistances, and progressing with each success by either adding new exercises or progressing the resistance/repetitions of their present exercises is one method of lessening the risk of any exacerbations. The following are a few examples:
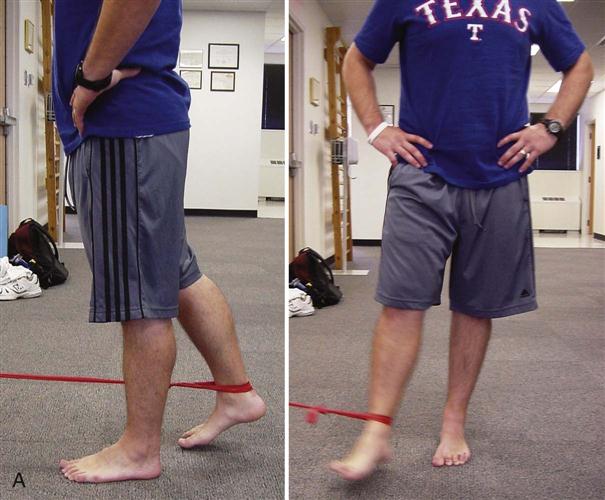
• Manual resistance exercises in all planes. Resistance is mild progressing to moderate.
• Active resistive exercises using elastic bands (progress from lightest to heavier) (Fig. 30-10).
• Very low resistance leg presses and total gym within pain-minimized ranges.
• Incorporate weight bearing toe ups/heel ups.
• Continue UE, trunk, and proximal lower quarter exercises.
• Incorporate beginning cardiovascular exercises with the exercise bike at low resistance.
Increase Proprioception
Strengthening the stabilizing muscle groups will offer improved support through movement and increased safety on surfaces that are less stable. It will also offer improved reaction when loss of balance occurs. The following are some examples to help improve this:
• SLS exercises (see Fig. 28-5). Beginning with static flat surface SLS progressing to the use of variable firmness balance pads. With success, progression to dynamic SLS activities such as using the rebounder and Thera-Band. The BAPS (Biomechanical Ankle Platform System) Board can be used in sitting as a mild weight-bearing AROM exercise program and progressed to FWB in stance (see Fig. 28-6).
Maintain Cardiovascular Fitness
It is important to support and progress the overall fitness of the patient while in rehab. A patient’s general fitness level is important to his or her ability to sustain activity in a safe, mechanically correct manner. If a body part fatigues but the activity continues, other areas of the body must work harder to sustain that activity. This can lead to overuse issues and potentially to injury. The following are ideas to help sustain fitness:
Increase Patient Knowledge and Awareness
By educating the patient, the physical therapist is involving the patient as an active participant in his or her own care. The therapist can empower the patient by having a dramatic effect on his or her response to therapy, including how to avoid exacerbations and how to progress with each success. The following are ways to increase a patient’s knowledge and awareness:
Phase III: Advanced Rehabilitation
TIME: Weeks 6 to 8 Postoperative
GOALS: Alleviate pain and swelling; normalize functional ROM; normalize functional strength; normalize functional proprioception (Table 30-4)
TABLE 30-4
< ?comst?>
| Phase | Criteria to Progress to This Phase | Anticipated Impairments and Functional Limitations | Intervention | Goal | Rationale |
| Phase IIIpostoperative wk 6-8 |
< ?comen?>< ?comst1?>

< ?comst1?>
< ?comen1?>
At this point, the patient should be progressing well with therapy. ROM and strength should be to a point that the patient is able to walk with a near normal gait pattern and progressing with the exercise program that should consist of a variety of weight-bearing and non–weight-bearing exercises.
Alleviate Pain and Swelling
Modalities specific to the issue(s) being treated should continue. Work with the patient to help problem solve if there are mechanical dysfunctions or behaviors that may be precipitating the patient’s symptoms. The patient is far enough into the healing phases to consider iontophoresis or phonophoresis (it should still be cleared by the surgeon as to not interrupt any anticipated healing). Encourage the patient to continue using home applied modalities such as ice. Modification of activities may need to continue with some refining.
Restore Normalized ROM
The patient should be near normal ROM at this point with the goal to achieve normalized ROM during this phase. Mobilizations should continue combined with a strong soft tissue mobilization program and stretching program. ROM during this phase can be made more aggressive with the use of body weight for stretching. Muscle energy can be an effective technique to improve ROM. Continue with general LE ROM as well. Stretching before and after a workout can be very effective. Help the patient in realizing that the efforts made outside of therapy (under the therapist’s guidance) will not only bridge the gap between treatments, but continue his or her progress.
Improve Strength
As the patient is able to tolerate, progress the resistances in the therapeutic exercise program:
• Increase elastic band resistance.
• Add resistance to Windshield wipers and towel curls.
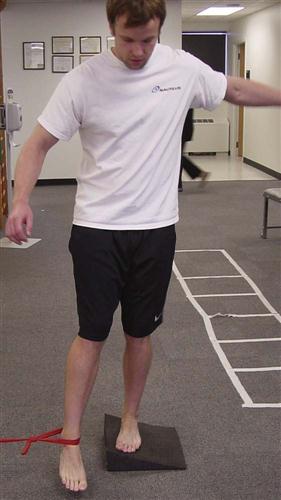
• Step up/downs. Add resistance and increase heights of steps (see Fig. 28-15).
• Increase resistance and time on exercise bike, elliptical, treadmill. Okay to incorporate elevation.
• Closed kinetic chain exercises using elastic bands, sports cord (start with light resistance and progress) (Fig. 30-11)
• Front and side LE lunges (add weight as tolerated).
• Lateral steps, lateral shuffles, lateral sidestep with elastic band.
• Continued ongoing UE and trunk strengthening and conditioning.

Improve Proprioception and Balance
Balance and proprioception become more important in this phase because the patient is getting nearer to returning to sport. With that in mind, modifications in the stability of the base of support should be added (i.e., wobble boards, DynaDisc, etc.). Additionally, perturbations to balance using manual contact or external loads such as weight or bands will challenge the patient’s balance strategies.
• SLS varied surface static and dynamic including uninvolved side resistive exercises
• DynaDisc
Continue with precautions and limitations with activities, rate of progression, and specific goals.
Phase IV: Specificity of Sport
TIME: Weeks 9 to 12 Postoperative
GOALS: Provide sport-specific training to allow return to the required physical demands of the sport and the athlete’s specific position; independent home and gym exercise program (HEP, GEP) (Table 30-5)
TABLE 30-5
< ?comst?>
| Phase | Criteria to Progress to This Phase | Anticipated Impairments and Functional Limitations | Intervention | Goal | Rationale |
| Phase IVpostoperative wk 9-12 |
< ?comen?>< ?comst1?>

< ?comst1?>
< ?comen1?>
This final phase of rehab is critical to the success of the athlete’s return and is oftentimes an area not included in his or her rehabilitation. It is often heard that an athlete can return to play when he or she has full strength and ROM. The problem is full strength and full ROM does not imply readiness to return to a sport safely and successfully. This safety and readiness comes with sport- or position-specific training. As the athlete prepares to return to sports, he or she will need to be progressed through a grouping of higher-level activities to recreate the expected stresses, forces, and movements for his or her sport and position.
 It is important to note that an athlete before starting this phase of their rehabilitation should be:
Pain free
Without swelling
Full ROM
Full strength
Good proprioception
During this phase, the athlete will be working on advanced strengthening/proprioceptive/conditioning training. The exercises need to be tailored not only for the physical requirements of the sport, but also the physical requirements of the position. A football kicker would require a much different training regimen than a football offensive lineman. That said, the following exercises and progressions are useful for rehabilitating a basketball player:
• Vary the speeds from jogging to sprint (if available).
• Consider lateral shuffle and carioca.
• Jogging to sprint on flat hard surface
• Resisted running (chute, sport cord)
• Agility drills (progressing to sport-specific surface and to competition speeds) (see Fig. 28-12)
• “B” skip (high knees skip with knee extension)
• Carioca
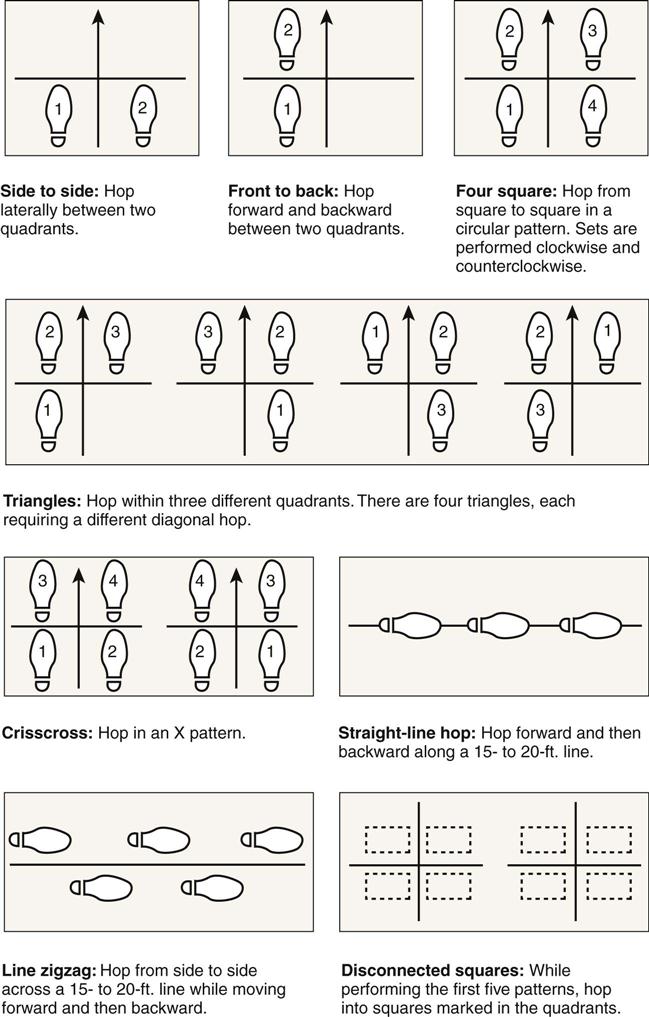
• Four-square hopping (single limb) (Fig. 30-13)
• Lay ups
• Shooting
In review, the athlete can be guided in returning to sports activities with some basic progressions:
• Non–weight-bearing exercises
• Full weight-bearing exercises
• Stable surface balance training
• Walking
• Weight-bearing balance board training (start with bilateral and go to unilateral)
• Cariocas
• Jogging
• Running
The program should be challenging for the athlete while keeping in mind where that patient is in the healing cycle. Stresses should be progressed when the physiology will allow for it and as the patient is able to demonstrate success. Continue to train the athlete into the physical requirements of his or her sport and position. Safe and successful return is the ultimate goal.
Before ending the formal rehabilitation program, the physical therapist should review proper training technique as it applies to the athlete’s HEP. The athlete needs to be independent in his or her program.
If the athlete is part of a team that has training staff, with the athlete’s approval, discuss the ongoing training program with the team trainer for consistency during this transition. Speed and duration of these exercises should meet what is expected for the sport or activity to ensure a safe return. If the patient has increased swelling or pain that lasts more than a day or two with these activities, then the patient is not ready to return to that particular level of play. Be sure to communicate with the surgeon the athlete’s status in the discharge note. Be sure to comment on the HEP and that the training staff has been contacted.
Troubleshooting
It is not uncommon after ankle surgery to have soreness, numbness, and tingling over the portal sites. There may also be residual swelling and discoloration. Physical therapy can begin within 1 to 3 weeks postoperatively. If the therapy is too aggressive too soon, significant swelling and pain may develop and lead to loss of motion, loss of strength, decreased functional ability, and diminished confidence. It will take time to reverse this and it can delay therapy for 2 to 3 weeks or more. Although it is desirable to achieve weight bearing early in the rehabilitation process, caution should be taken in removing assistive devices if the patient is continuing to walk with an antalgic gait. Some patients may require special precautions depending on the surgery performed, the tissues involved, and the normal physiologic healing that is expected. The physical therapist should review the operative notes and discuss any precautions with the surgeon.
Complications can occur in ankle arthroscopy as with any surgery. It was previously discussed that a 6.8% to 9% complication rate exists. The most common of these complications is injury to the surrounding nerves, with injury to the superficial peroneal nerve accounting for the most frequent complication seen with ankle arthroscopy. There would be transient or permanent numbness on the dorsum of the foot extending into the toes. The therapist should notify the surgeon immediately if:
• Drainage, redness, swelling, increased pain is evident at any of the surgical sites.
• Abnormal redness, swelling of the lower leg is seen.
• Lack or loss of sensation develops.
• Sudden inability to tolerate therapy, HEP, function is evident.
• Patient stops attending therapy.
• Patient is noncompliant to any part of or all of rehabilitation.
Be sure that the athlete/patient always has a progress note when returning to the physician. This will allow the surgeon to know where the patient is in rehabilitation, any gains made, any issues that exist, and any recommendations to consider with his or her ongoing care. Keep the lines of communication open always.
Conclusion
Therapy for the postoperative ankle should follow an agreed upon plan set up by the surgeon. Sticking to a program that allows for progression of a patient taking into account the physiologic healing that is occurring will allow for a well-progressed rehabilitation with a minimal amount off exacerbations. Progressing the patient with success and making sure the patient has met all goals before progressing to the next phase of rehabilitation will continue steady, forward progress. Only when the athlete/patient has successfully returned to full functional ROM/strength/proprioception in a pain minimized/alleviated state and is able to meet the necessary physical requirements of normal activities should he or she be allowed to return to normal activities (whether it be professional sports or gardening at home). Do not forget the other three-fourths of the patient when rehabilitating the surgical ankle. Remember, the patient will need to be able to perform all required functions of his or her normal activities, which means the need to be fully functional and strong. The patient must also exhibit sustained endurance. Lastly, and perhaps most importantly, if there are any questions or issues that come up, talk with the surgeon. This open line of communication is paramount to the patient’s/athlete’s ultimate outcome.
Clinical Case Review
1Paul had arthroscopic ankle surgery for an excision of an anterior tibiotalar osteophyte. He had surgery 7 weeks ago and has returned to working as a store manager. He is on his feet most of the day. He is anxious about recovering quickly and doing his usual routine. During his last visit he complained of increased soreness at times. The pain has not been decreasing, and swelling persists. During his home exercises, Paul works hard on the resisted exercises. How can the therapist help Paul to progress?
Paul was told that progressing his function or exercising too aggressively could lead to increased symptoms and potential delays in his progress. Paul’s physician was able to write a prescription for compression stockings to help with the swelling and Paul was advised to sit and elevate his leg whenever possible. Paul was put on an icing regimen to elevate and ice three times a day as well. Paul’s HEP was reviewed, with adjustments to resistances and repetitions to lessen the likelihood of irritation. Steady progress staying below the threshold of symptoms and exacerbations will keep Paul progressing with his therapy/function with minimal delays and setbacks.
2Christine is a 32-year-old woman who underwent an ankle arthroscopy procedure for débridement of soft tissue impingement 5 weeks ago. Since then her physical therapy has consisted of massage, ultrasound, AROM and PROM exercises, resisted exercises, cryotherapy, and a HEP. Her main complaint is pain during gait, while descending stairs, and during attempts to squat partially. Dorsiflexion is limited, and minimal swelling persists. What treatment may be particularly helpful to Christine?
Mobilization of the talocrural joint was performed with an AP movement applied to the talus while stabilizing the distal tibia. Distal fibular mobilizations were performed as well to assist with the talus’ ability to move into the ankle mortise. This was followed by stretching and ROM exercises to reinforce dorsiflexion. The increase in ROM to 15° with this treatment addition reduced her pain dramatically with gait, stairs, and squatting.
3Jessica is a 40-year-old woman who had an ankle arthroscopy done with the removal of a loose body from an osteochondral lesion 9 weeks ago. She was non–weight bearing for 5 weeks and has been in therapy; progress with exercise has decreased because of pain during many of the closed chain exercises, such as SLS, double heel lifts, minisquats, and walking more than 8 minutes on the treadmill. What type of closed chain exercises can Jessica do to progress with her strengthening?
The therapist explained that any activities that cause prolonged pain and swelling need to be put on hold and techniques reviewed with the physical therapist. Any changes and modifications can be made so the exercise is successful. If success is not able to be achieved, the exercises that are symptomatic should be stopped until such time that the patient is able to perform without symptoms. Jessica was able to perform the following exercises without issue: forward lunges, backward lunges, lateral lunges, and single heel raises performed on a leg press machine set at 75 lb. She could backward walk and lessen the time on the treadmill. Use of a pool for gravity-minimized exercises is ideal in this situation as well. As her tolerance improved, she was able to progress her therapeutic exercises successfully and without exacerbation.
4Rebecca is a 45-year-old mother of young children. She underwent ankle arthroscopy surgery for a synovectomy 5 weeks ago. When she is on her feet for more than a couple of hours, she has prolonged soreness. Yesterday, she was on her feet for several hours in the afternoon and intermittently for the rest of the day. Today, she is in for treatment. She has minimal to moderate swelling and complains of minimum to moderate levels of pain with weight-bearing activities. What type of treatment should Rebecca receive today?
When pain and/or swelling limits the progress of rehabilitation, the intensity of rehabilitation needs to be modified. The therapist, in this case, focused on controlling pain and decreasing swelling. Joint mobilizations using glides and distraction maneuvers were performed on the talocrural joints. Gentle PROM was performed. AROM and resisted exercises were placed on hold because of the pain and swelling. Soft tissue mobilization was performed to assist with swelling and to address any soft tissue/fascial restrictions. Ice packs with compression was performed as well. The patient was encouraged to avoid any known aggravating factors. The patient’s swelling and pain lessened and the patient was able to get back on track.
5Jennifer is a 22-year-old ballet dancer. She underwent arthroscopic ankle surgery 10 weeks ago for posterior soft-tissue impingement. She has begun to resume dance practice but still feels some pinching discomfort in her posterior ankle when in an en pointe (on toes) position. What treatment may be particularly helpful to Jennifer at this stage of her rehabilitation?
A mobilization technique was performed at the talocrural joint. A posterior to anterior (PA) glide was applied to the talus, while stabilizing the distal tibia, to increase plantarflexion. To address the end range position needed for ballet, the mobilization was performed in an end range plantarflexion position with a grade IV technique to improve capsular stretching. Following treatment, Jennifer was able to go en pointe with significantly less pinching in her posterior ankle.
6James is a 30-year-old recreational soccer player. Because of multiple ankle sprains over many years of playing, he suffered an osteochondral lesion of his medial talus. He underwent arthroscopic loose body débridement 9 weeks ago. He has been jogging without symptoms for up to 15 minutes on a treadmill or a track. Over the weekend, he went out to run on the soccer field and began to feel soreness. He states he did no cutting, only running straight up and down the field. What can be done to help James achieve his goal of returning to soccer when he is unable to run on grass pain free?
Despite James’ pain-free running on flat surfaces, the grass poses a new challenge because of its inherent instability. James may need to spend more time working on his ankle proprioception during dynamic activities before running on grass. Running on level ground with small changes in direction will provide his ankle the stimulus to control the lateral movements of the subtalar joint. He may also be able to achieve his goal by breaking down the task and doing shorter jogs on the grass with rest before discomfort to allow his body to adjust to the new situation.
7You have been seeing Sharon in physical therapy for 1 week following her surgery for ankle arthroscopy 2 weeks ago. Today she is complaining of worsening pain and redness along her surgical portals. Upon inspection you notice localized edema, erythema, and warmth along the surgical portal. In addition, there is a small amount of yellow exudate from the wound. How should your physical therapy plan change based on today’s findings?
You should immediately contact the surgeon as there is a chance that the wound has become infected.
8For 2 weeks following arthroscopic surgery for synovitis of his ankle, Bill complains of numbness and tingling along his lateral foot. He noticed it to be more pronounced after splint removal and the onset of weight bearing 1 week ago. He often feels it when pointing his toes during his active ROM exercises. What other objective testing should you perform at this time to help in your treatment of Bill?
Decreased neural mobility in the foot and ankle can occur following any immobilization. Straight leg raise or slump testing should be completed to determine if this might be causing Bill’s symptoms.
[/level-membership-for-orthopaedics-category][not-level-membership-for-orthopaedics-category]
Ankle Arthroscopy
Tom Burton, Danny Arora, Benjamin Cornell, Lisa Maxey and Richard D. Ferkel
The first arthroscopic inspection of a cadaveric joint was performed by Takagi in Japan in 1918.1 In 1939 he reported on the arthroscopic examination of an ankle joint in a human patient.1 With the advent of fiberoptic light transmission, video cameras, instruments for small joints, and distraction devices, arthroscopy has become an important diagnostic and therapeutic modality for disorders of the ankle. Arthroscopic examination of the ankle joint allows direct visualization during stress testing of intraarticular structures and ligaments about the ankle joint. Various arthroscopic procedures have been developed with less attendant morbidity and mortality to patients.2–6 With the advent of better, smaller joint arthroscopes and instrumentation, and the introduction of more efficient noninvasive distraction devices, ankle arthroscopy is now state of the art. It has become a standard procedure in many institutions as a diagnostic and therapeutic tool for the practicing surgeon.
Surgical Indications and Contraindications
Foot and ankle arthroscopy has become a valuable adjuvant to the diagnosis and treatment of an increasing amount of disorders. Diagnostic indications (Box 30-1) for ankle arthroscopy include unexplained pain, swelling, stiffness, instability, hemarthrosis, locking, and abnormal snapping or popping.
Operative indications for ankle arthroscopy include loose body removal, excision of anterior tibiotalar osteophytes, débridement of soft tissue impingement and arthrofibrosis, and treatment of osteochondral lesions and ankle instability. Other indications include arthrodesis for posttraumatic degenerative arthritis and treatment for ankle fractures and postfracture defects.
Absolute contraindications for ankle arthroscopy include localized soft tissue or systemic infection, and severe degenerative joint disease (DJD). With end-stage DJD, occasionally successful distraction may not be possible, precluding visualization of the ankle joint. Relative contraindications include complex regional pain syndrome (CRPS), moderate DJD with restricted range of motion (ROM), severe edema, and tenuous vascular supply.
Patient Evaluation
Successful outcomes following ankle arthroscopy depend on accurate diagnosis and concise preoperative planning. It is important to understand the nature of the patient’s complaint and gather the following information: date of injury, duration and severity of symptoms, provocative events, previous injuries and presence of any redness, swelling, instability, stiffness, locking, or popping.
A general medical examination should be obtained, with special attention to rheumatologic disorders. The physical examination should include: inspection, palpation, ROM, and special tests. The contralateral side should always be inspected for comparison. Stability of the ankle and the subtalar joint should be evaluated. Often, a local anesthetic agent can be injected into a specific joint to aid in diagnosis.
Routine blood tests should be performed to check for systemic and rheumatologic conditions and infection. Aspiration of the ankle joint and analysis of the joint fluid can be helpful in distinguishing inflammatory from septic conditions of the ankle joint.
Routine radiographs (anteroposterior [AP], lateral, and mortise view) should be obtained for all patients. Stress radiographs can provide useful information when instability is suspected. Computed tomography (CT) and/or magnetic resonance imaging (MRI) are often helpful in evaluating soft tissue and bony disorders about the foot and ankle. Three-phase bone scans can also aid in distinguishing soft tissue from bony pathology.
Surgical Technique
Ankle arthroscopy is usually performed in one of four ways: (1) in the supine position, (2) with the knee bent 90° over the end of the table, (3) in the decubitus position, or (4) in the prone position for posterior ankle arthroscopy. The method of choice is a surgeon’s preference, while taking into account specific surgical circumstances. Different types and sizes of arthroscopic equipment can be used depending on surgeon’s preference and availability of equipment. The procedure described is that used most commonly by the senior author of this chapter; a more detailed description of ankle arthroscopy can be found in his textbook.2
Positioning
The patient is taken to the operating room and placed in the supine position. The hip is flexed to 45°, and the thigh is placed onto a well-padded support placed proximal to the popliteal fossa and distal to the tourniquet. The lower extremity (LE) is then prepared and draped so that good access is available posteriorly. A tourniquet is applied as needed. A noninvasive distraction strap is placed over the foot and ankle. Distraction is used to separate the distal tibia from the talus so that at least 4 mm of joint space opening is obtained (Fig. 30-1). Without distraction, the surgeon has difficulty positioning the arthroscopic instruments in the ankle without scuffing the articular cartilage; visualizing the central and posterior portions of the ankle also is difficult without adequate joint separation. The distraction device is carefully positioned so as not to injure the neurovascular structures, and approximately 30 to 40 lb of force is placed across the ankle for no more than 60 to 90 minutes. Before applying the distraction strap, the surgeon should identify and outline the dorsalis pedis artery, the deep peroneal nerve, saphenous vein, tibialis anterior tendon, peroneus tertius tendon, and superficial peroneal nerve and its branches on the skin with a marker. Identification of the superficial peroneal nerve and its branches is facilitated by inverting and plantar flexing the foot and flexing the toes.
Arthroscopic Portal Placement
The surgeon uses three primary portals or access areas to insert the arthroscope and instrumentation (Fig. 30-2). These include the anteromedial, anterolateral, and posterolateral portals. Accessory portals can be used as needed but are rarely required. Portals are made by nicking the skin only, then with the use of a clamp spreading through the subcutaneous tissue and into the ankle joint. The surgeon must take great care to avoid injuring the neurovascular and tendinous structures.
The anteromedial portal is established first and a 2.7-mm, 30° oblique small joint videoscope is inserted. The surgeon establishes the anterolateral portal under direct vision, using extreme care to avoid injuring the superficial peroneal nerve branches. The arthroscope is then positioned in the posterior portion of the ankle so the posterolateral portal can be made just lateral to the Achilles tendon, entering the ankle beneath the posterior ankle ligaments.
In recent years, techniques have been developed for arthroscopy in the prone position, using the posterolateral and posteromedial portals. This allows access for treatment of a variety of problems, including osteochondral lesions of the talus (OLT), os trigonum, and flexor hallucis longus tendinitis or tears.7–10 The senior author of this chapter occasionally uses this position.
Arthroscopic Examination
A 21-point arthroscopic examination of the ankle is performed to ensure a systematic evaluation.2 After completing the arthroscopic evaluation, the surgeon identifies the pathology and treats it accordingly, using small joint instrumentation ranging in size from 2.0 to 3.5 mm. These instruments include baskets, knives, intraarticular shavers, and burrs. Scar tissue is removed using baskets and an intraarticular shaver. Synovectomy is performed with an intraarticular shaver (Fig. 30-3). OLT are carefully evaluated and, if they are found to be loose, excised with a ring curette and banana knife. The surgeon can use transmalleolar or transtalar drilling, and/or microfracture techniques, to promote fibrocartilage formation and new circulation in the avascular area (Fig. 30-4). Acute ankle fractures can be evaluated arthroscopically; the surgeon can perform percutaneous screw insertion while monitoring fracture reduction arthroscopically (see Chapter 29).
After the procedure is performed, the wounds are closed with a nonabsorbable suture, and a compression dressing and posterior splint are applied.
Postoperative Plan
The patient remains non–weight bearing on crutches for 1 week. The splint and the stitches are then removed. If an osteochondral lesion has been treated with one of the previously mentioned methods, the patient may be required to be non-weight bearing for 4 to 6 weeks. During this time, the patient is initially in a removable splint and is allowed to exercise the ankle actively to promote new fibrocartilage formation. The type of arthroscopic procedure performed and individual patient goals determine weight-bearing status and rehabilitation.
Soft Tissue Impingement
Ankle sprains are one of the most common injuries in sports. One inversion sprain occurs per 10,000 persons per day. It has been estimated that 10% to 50% of patients will have some degree of chronic ankle pain.
The primary cause of chronic ankle pain after an ankle sprain is soft tissue impingement. This can occur along the syndesmosis, the syndesmotic interval between the tibia and fibula, or the medial, lateral, and/or posterior gutters. Most commonly it is located anterolaterally given the common occurrence of a common inversion ankle sprain.11 Diagnosis is done by careful history, physical examination, and selective injections. MRI can also be very helpful in assessing the problem (Fig. 30-5).12
The sequence of lateral ankle pain after a sprain can be explained as shown in Fig. 30-6.
A distraction device may be necessary to identify some of the synovial pathology involving the posterolateral corner of the ankle, because such identification can be sometimes difficult. The inflamed synovium, thickened adhesive bands, osteophytes, and loose bodies are débrided arthroscopically using motorized shavers and burrs, graspers, and baskets (Fig. 30-7).
Postoperatively, patients are splinted for 1 week, and then put into a CAM (controlled angle motion) walker for 2 to 3 weeks. Subsequently, they wear a soft ankle brace and begin formal physiotherapy. Return to activity or sport is allowed only after all rehabilitation goals are achieved.
Arthroscopic treatment of anterolateral soft tissue impingement of the ankle has been proven successful at alleviating chronic ankle pain after an inversion sprain. Numerous authors have reported a good to excellent outcome in approximately 80% to 85% of patients.11,13,14
Osteochondral Lesions
Controversy persists regarding the cause, treatment, and prognosis of osteochondral and chondral lesions of the ankle. OLT comprise 4% of all osteochondral defects. Males are slightly more predominant than females between the ages of 20 to 30 years. Medial talar dome lesions are more common than lateral.
There are many possible causes for OLT. Trauma is believed to play a major role, but there are also instances where atraumatic presentations are possible, secondary to idiopathic avascular necrosis. The diagnosis of OLT requires a high index of suspicion because symptoms may be mild and imaging is not readily available. Patients may present in an acute traumatic setting, complaining of persistent ankle pain (i.e., inversion ankle sprain), or may have a chronic complaint of ongoing ankle pain. The literature has shown that the location of pain is not correlative with the location of the lesion, therefore adding to the vague nature of the condition. Other common symptoms include stiffness, deep aching pain, swelling, clicking, locking, or even instability.
OLT that do not respond to conservative treatment are treated arthroscopically. Most chronic OLT in adults are loose and have to be excised. The osteochondral lesion bed is then microfractured and/or drilled. Occasional they can be pinned back (Fig. 30-8).
Postoperatively, patients are splinted for 1 week in neutral position. Once the portal incisions have healed (approximately 1 to 2 weeks), ROM exercises are begun, since early motion appears to facilitate cartilage healing. Patients remain non–weight bearing for 6 to 8 weeks, depending on the size of the lesion. Usually by 4 to 6 weeks, patients start physical therapy in the pool and then progress to land exercises. Cutting, shear stress, or impact activities are avoided for 6 months.
Arthroscopic treatment of OLT has proven to be comparable with open surgery, with less morbidity and less recovery time. Ankle arthroscopy has proven to be one of the most reliable methods in classifying OLT. Recently, clinical management of articular cartilage defects has generated significant research interest in the orthopedic world. Attempts to stimulate a hyaline cartilage response have included transplantation of various cells, including periosteal and perichondral tissues, woven carbon-fiber pads, and osteochondral autografts/ allografts.
In addition, chondrocyte transplantation has been studied extensively now in the United States. With further research, it is hoped that osteochondral defects can be successfully covered by articular cartilage instead of fibrocartilage replacement.9
Overall Surgical Outcomes
Numerous papers have been published regarding the outcome of arthroscopic surgery of the ankle. Results vary depending on the type of procedure and the study that was undertaken.15–23 In general, a large percentage of patients should achieve a successful outcome depending on the nature of the pathology. Expectations after surgery include a full ROM, strength, and full function. The preoperative ROM, strength, and severity of the pathologic condition heavily influence the results.
Complications
All arthroscopic procedures have potential complications.24 The most common complications in foot and ankle arthroscopy are injuries to the neurovascular structures, especially the superficial peroneal nerve.8 The overall complication rate has varied with the transition from invasive to noninvasive distraction. Current complication rates are between 6.8% and 9%.25,26 The physical therapist should report to the physician any problems they note after surgery. Sometimes, excessive massage over the portals can even irritate the nerves and cause tingling and numbness. In general, we wait 2 to 3 weeks to initiate physical therapy after ankle and foot arthroscopy to avoid wound problems and increased pain while the soft tissues are healing.
Therapy Guidelines for Rehabilitation
Several factors must be considered in planning a successful rehabilitation program for the postoperative ankle arthroscopy patient. Rehabilitation guidelines can vary greatly for the same injury depending on the patient’s age, severity/chronicity of injury, healing rate of tissue, general medical health, and previous level of activity. The physician, physical therapist, and patient must work together as a team to create an appropriate, effective, and efficient treatment plan that will allow the patient to optimize his or her recovery. The phases in each of the following rehabilitation protocols may overlap 1 to 3 weeks depending on the factors mentioned previously and individual progress.
The physical therapist should consider the following 6 basic principles when planning an ankle rehabilitation protocol:
The following rehabilitation program was designed for a patient who has chronic pain because of a recurring inversion sprain suffered during the basketball season. The patient underwent an arthroscopic procedure to débride the anterolateral soft tissue because of impingement.
Preoperative Phase
GOALS: Restore functional ROM; normalize gait; apply corrective orthoses to improve mechanical neutrality; gait train with the appropriate assistive device(s), taking into consideration postoperative weight-bearing status; create patient’s initial postoperative home exercise program (HEP) to bridge the gap from surgery to initiation of formal postoperative rehabilitation with surgeon’s input; educate patient as to what the next few months will entail and answer any questions the patient may have (Table 30-1)
TABLE 30-1
< ?comst?>
| Phase | Criteria to Progress to This Phase | Anticipated Impairments and Functional Limitations | Intervention | Goal | Rationale |
| Preoperation |
|
Buy Membership for Orthopaedics Category to continue reading. Learn more here
[/not-level-membership-for-orthopaedics-category] |
