CHAPTER 21 Anatomic Single-Bundle Anterior Cruciate Ligament Reconstruction
Anterior cruciate ligament (ACL) reconstruction has evolved from the open techniques of the 1970s and early 1980s to current arthroscopic techniques. During the course of that evolution, the endoscopic transtibial reconstructive technique became popular.1 With this technique, the position of the femoral tunnel is dictated by the direction and position of the tibial tunnel. Unfortunately, not enough attention was paid to this fact and through the 1990s, more transtibial endoscopic ACL reconstructions were done in a very sagittal alignment, resulting in persistent rotatory instability, even if the graft remained intact. Howell and colleagues2,3 were among the first to recognize this as a clinical problem. They noted that with such an alignment of the graft, one of two problems would ensue, stretching of the graft as it wrapped about the posterior cruciate ligament (PCL) in flexion or failure to regain flexion. They described the coronal angle as the angle in the frontal plane between the axis of the joint line and axis of the tibial tunnel. For coronal angles more than 75 degrees (more vertical), these problems of stretching of the graft or failure to regain motion were encountered. For coronal angles less than 75 degrees, optimal results were obtained.
Raffo and associates4 have recently described a reproducible anatomic landmark for the starting point of the tibial tunnel on the anteromedial tibia as the point of intersection between the anterior edge of the medial collateral ligament and superior border of the gracilis tendon, as a point that will reproducibly yield a coronal angle of 70 degrees or less. This technique for establishing the tibial tunnel start point is my preference for bone-patellar tendon-bone (B-PT-B) grafts. This allows creation of a femoral socket that will accommodate 30 mm of bone block in the anatomic attachment site of the ACL. Because an interference screw can be placed proximal to the bone block within the socket, the graft can be well positioned near the center of the ACL footprint on the femur. Others have described a similar starting point for the tibial tunnel, but have relied on techniques to identify it5 that are less reproducible than those I have used.
Fu and coworkers6 were instrumental in recognizing the issues with the sagittally placed ACL reconstruction, and have exquisitely defined the anatomy of the ACL—in particular, its two-bundle configuration with separate and distinct sites of origin from the femur and insertion onto the tibia. They demonstrated that both anatomically placed double- or single-bundle reconstructions were superior biomechanically and kinematically to nonanatomic techniques.7,8 Gardiner and coworkers have recently shown in the cadaver laboratory that the anatomic single- bundle technique is kinematically equal to the double-bundle technique.9 With soft tissue grafts, placing the graft into the center of the footprint of the ACL on the lateral wall of the intercondylar notch and obtaining rigid fixation may best be done through a medial portal technique. This has become my routine for soft tissue grafts. Confirmation of use of the anatomically placed single-bundle reconstructive technique has recently come from a meta-analysis by Meredic and colleagues,10 which showed no advantage of double-bundle techniques over the anatomic single-bundle procedure.
Graft choice is another variable that may affect ACL outcome. A number of meta-analyses comparing autograft patellar tendon to autograft hamstring tendons have demonstrated that there are distinct differences between the outcomes.11,12 The patellar tendon graft in these analyses has consistently yielded a higher percentage of stable knees, with a greater percentage of athletes returning to preinjury activities, when compared with the soft tissue alternatives. It is apparent that patellar tendon grafts are not without issues. Anterior knee pain and quadriceps weakness have been identified as problems.13 These make hamstring grafts an attractive alternative for the patient with less demanding work or athletic pursuits.. Finally, allografts have become more frequently used for ACL reconstruction. In a younger and more active patient, these may lead to significantly greater rates of failure—two or three times greater in a recent meta-analysis—when compared with autograft alternatives.14,15 All these data considered together have resulted in a graft selection algorithm that I routinely discuss with patients when considering ACL reconstruction (Table 21-1). Autologous B-PT-B is preferred for the high-demand competitive athlete. An autologous four-strand hamstring graft is selected for the moderately demanding recreational athlete, with less time of exposure to high-risk activities. Finally, allograft tissue is reserved forspecial cases, which include age older than 40 years, autologous tendon issues such as failed autograft, or prior tendon injury. Each of these graft choices must be placed in an anatomic location on both the femur and tibia and rigidly fixed to result in a stable knee postsurgery that will allow individuals to pursue their work or recreational activities.
TABLE 21-1 Anterior Cruciate Ligament Graft Selection Algorithm
| Patient Characteristics | ACL Graft Choice |
|---|---|
| Competitive athlete: high school, college, professional | B-PT-B autograft |
| Recreational athlete <40 yr | Quadrupled hamstring autograft |
| Recreational athlete >40 yr; mitigating factors (e.g., revision) | Allograft—B-PT-B or tibialis anterior |
TREATMENT
Arthroscopic Technique: Anatomic Soft Tissue Anterior Cruciate Ligament Reconstruction
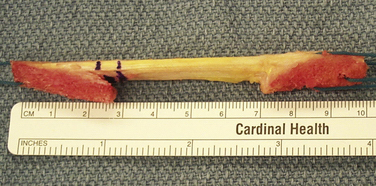
Preparation of the graft is another important step. For either graft, the overall length is determined by the height of the patient. I routinely double a 21-cm graft (yielding a 10.5-cm construct) for patients 5’8” tall or shorter. For patients between 5’8” and 6’2”, I use a 22-cm graft doubled over to yield an 11-cm construct. Finally, for patients taller than 6’2”, I use a 23-cm graft doubled over to yield an 11.5-cm overall construct length. These lengths are important, because tensioning the graft on the tibial side with the Intrafix and its tensioner is most easily accomplished with 5 to 10 mm of graft extending from the tibial tunnel when the Intrafix sheath and screw are placed. For the tibialis grafts, I split each end in half for a length of 7 cm to yield four ends for tensioning. I whipstitch with a baseball-type suture configuration using a no. 2 high-strength suture, for a length of 5 cm. The central 5 cm of the graft is whipped together by looping a no. 2 high-strength tie around the graft. This facilitates passage of the sheath for the femoral Intrafix, with its triangular flange between the two bundles. The suture material also improves the fixation properties of the construct, reducing potential slippage of the graft past the device with cyclic loading (Fig. 21-1).
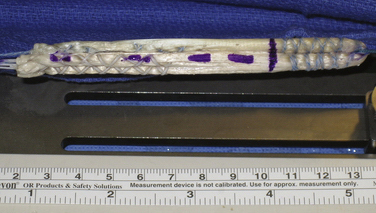
FIGURE 21-1 Soft tissue graft prepared for use with Femoral and Tibial Intrafix devices (DePuy Mitek).
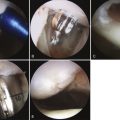
Minimal notch preparation is needed for this technique. In a chronic situation, any osteophytes that might potentially impinge on the graft are removed. If the anterior aspect of the notch is narrow, notchplasty to expand this and reduce the likelihood of impingement on the graft is also appropriate. I prefer to preserve the ACL footprint intact on the femur (Video 1), clear it centrally prior to guide pin passage, and mark my preferred guide pin starting point with a curette (Fig. 21-2) (Video 2). Use of an over the back guide of the femoral aimer with an offset to preserve 1.5 to 2 mm of bone posterior to the femoral socket will yield excellent anatomic positioning of the graft.
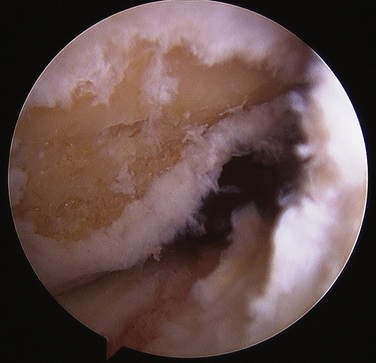
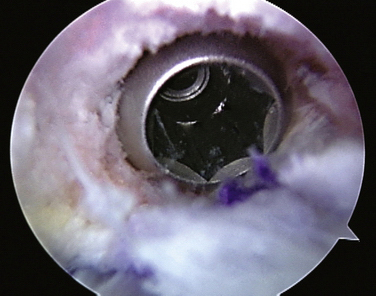
Prior to placement of the femoral guide pin, it is essential that an adequate amount of the fat pad be resected so that at 120 degrees of flexion, the fat pad does not obstruct vision of the notch (Video 3). Once this is done, the over the back guide is introduced through the medial portal. The medial portal needs to be low (just above the medial meniscus) and medial so that the over the back femoral guide is touching the medial femoral condyle when the guide pin is passed (Fig. 21-3). It is best to identify the anatomic start location for the femoral guide pin with the knee flexed 90 degrees. In this position, the guide pin is directed so that the pin will pass through the ridge separating the footprints of the anteromedial bundle of the ACL from the posterolateral bundle. While maintaining the guide in that position, the knee is flexed to 120 degrees and the guide pin drilled through the femoral condyle, out through the skin laterally. The guide pin is then immediately removed and switched to a flexible 2.4-mm Nitinol wire. This allows the knee to be extended and the position of the wire inspected to ascertain proper positioning (Fig. 21-4). The acorn drill can be passed into the joint over this flexible wire without damaging the medial femoral condyle by bending the wire away from the condyle as the drill is introduced through the portal. Using a hemostat to spread the portal site along the wire facilitates passage of the cannulated drill. The knee is again flexed to 120 degrees and the socket is established by drilling to the depth of 27 to 30 mm, which is necessary to accommodate the femoral Intrafix (Video). In very small women, this may result in penetration of the lateral cortex of the femoral condyle. This does not present a problem, but one should be careful about to the feel of the drill as it penetrates the cortex. The drill and Nitinol wire are then removed and a large-diameter (5 mm or larger) shaver is used to remove the bone debris from the joint and socket (Fig. 21-5). The socket can then be carefully visualized from the medial portal to ascertain integrity of the posterior cortex and its position in the ACL femoral footprint (Video 6).
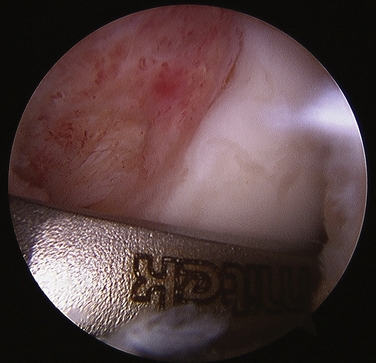
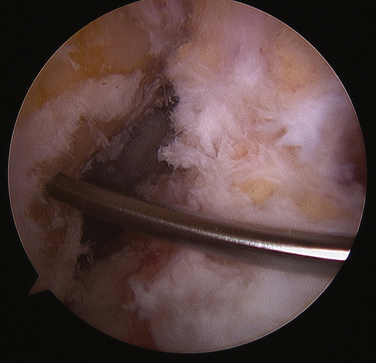
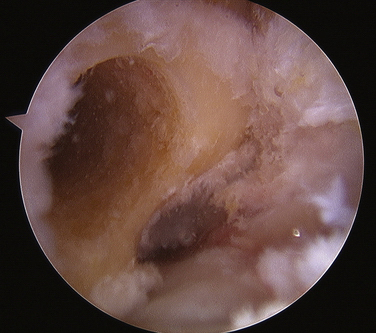
FIGURE 21-5 Femoral socket viewed from the anterolateral portal, showing its location within the ACL footprint.
The tibial guide pin is then passed. I prefer to maintain a cuff of approximately 5-mm long ACL fibers on the tibia to improve proprioception postsurgery during rehabilitation and return to athletics.16 The entry site of the guide pin into the tibia needs to be low enough to have adequate tunnel length. I routinely use the superior border of the pes anserine tendons as the starting site, because this will yield a 30 to 40-mm tibial tunnel in all patients. One should aim for an entry site of the guide pin into the joint, which is in the middle of the ACL footprint. For deviations of guide pin placement that are a few millimeters from optimal, the guide pin can initially be overreamed with a small (4.5-mm) cannulated drill and then moved eccentrically within this tunnel when full-size drilling is performed. For greater deviations from optimal for pin placement, use of a parallel guide or complete repositioning of the pin is appropriate.
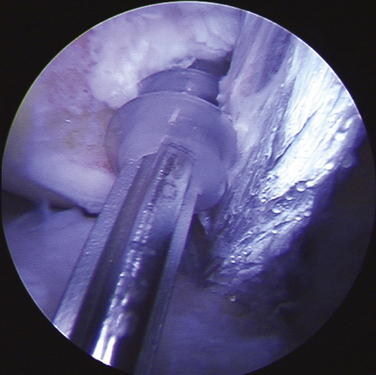
The sheath is inserted over a Nitinol wire that has been placed anterior in the femoral socket (Video 8). This needs to be fully seated into the femoral socket (Fig. 21-6). The screw is then brought down over this wire and screwed in until it is recessed within the sheath (Video 9). The entire construct should be entirely within the lateral femoral condyle. To maintain the positioning of the graft, I have found that having an assistant maintain tension on both arms of the graft as the socket is dilated and the sheath and screw are inserted is helpful. The two-bundle configuration of the graft as it exits the femur is readily visualized at this point (Fig. 21-7).
FIGURE 21-6 Sheath placed in the femoral socket only occupies one third or less of the circumference of the hole.
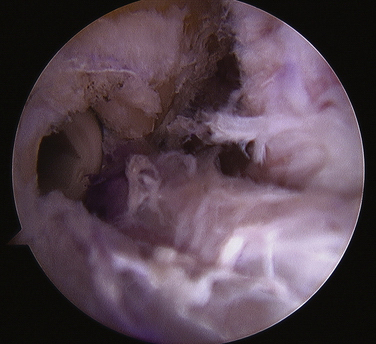
FIGURE 21-7 With femoral fixation complete, the two-bundle configuration of the graft is readily identified.
The graft is then inspected. I routinely use a probe to position the graft so that it lies in an anterior and posterior plane in the tibial tunnel to mimic the anteromedial and posterolateral bundle configuration of the native ACL. The graft is tensioned using the tibial Intrafix tensioning device. This allows central placement of the sheath and screw on the tibia. I generally tension the grafts with 25 pounds of force on a tensioner and the knee in 0 degree of extension (without hyperextension). Once tibial fixation has been established, the joint can be examined for stability using the Lachman, anterior drawer, and pivot shift tests. If the results are acceptable, final arthroscopic inspection is appropriate prior to closure. By tensioning the graft at a full 0 degree of extension, with high tension in the graft, full extension and good stability are assured.17
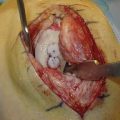
For those high-demand patients for whom a B-PT-B autograft has been selected as the graft of choice, variations on this technique are needed. Specifically, the use of a transtibial endoscopic approach for drilling the femur results in a longer femoral socket. This allows recessing of the bone block up into the femoral tunnel to reduce the likelihood of a graft-tunnel mismatch, with the bone block extending out of the tibial tunnel and precluding interference fixation on the tibia.18 Once ACL insufficiency has been confirmed by examination under anesthesia or by arthroscopy, I harvest the B-PT-B graft prior to preparing the joint. An anterior incision over the patella tendon, which is curved medially at its distal extent, allows placement of the tibial tunnel in the appropriate position just above the intersection of the anteriormost fibers of the medial collateral ligament (MCL) and the superior border of the gracilis tendon. I routinely harvest a minimum width of 10 mm for male patients and 8 mm for female patients, measured at the inferior pole of the patella. In larger patients, I harvest one third or the width of the proximal tendon, up to (but not exceeding) 12 mm. The patellar bone block should be 30 mm in length and 1 cm in depth; this block will ultimately end up in the tibia. The bone block harvested from the tibia will be placed in the femur and should be a total of 33 mm long; this includes an additional 8 mm of bone harvested proximal to the tendon attachment onto the tibia (Fig. 21-8).17 The graft is prepared on the back table while the joint is being prepared.
The tibial guide pin is passed first using a standard commercially available drill guide. I prefer using a tip guide with the entry site into the tibia on the external cortex of the tibia at the intersection of the leading fibers of the MCL and gracilis tendon.4 The entry site into the joint should be central in the ACL footprint; guide pin placement can be adjusted, as noted earlier in the discussion of soft tissue ACL reconstruction.
The bone block is positioned so that the tendinous portion of the graft is central on the femoral footprint and the screw is placed proximal to the bone block over a Nitinol guide wire to push the soft tissue attachment of the tendon to the middle of the ACL femoral footprint (Fig. 21-9). I routinely use titanium screws, because I have encountered a number of screw breakages using composite absorbable screws. This is particularly an issue with the very hard bone of high-performance young male athletes. Biocomposite absorbable screws are a reasonable alternative, but require the additional step of tapping, and may break on insertion if the bone is hard. Using a stainless steel wire in the bone block for tensioning will prevent inadvertent cutting of the tensioning sutures when tapping. When preparing the bone blocks on the back table, I size the block harvested from the tibia that is to be fixed in the femur to ensure a snug fit with less than a 1-mm gap in the sizing block. With this, a 7-mm screw will provide high-strength fixation for the femur, and it is easier to insert past the PCL without injuring the graft when the knee is flexed to 110 degrees. The screw should be 20 mm or longer for adequate strength of fixation.19
The graft is tensioned with the knee in full extension, applying maximal manual tension to the graft for fixation. When preparing the bone block that was harvested from the patella, to be fixed in the tibia, there should be a 2-mm gap between the bone block and sizing hole. This will ensure that the block will slide in the tibial tunnel without binding as it is tensioned. With this 2-mm gap, a 9-mm interference screw is needed on the tibial side to ensure adequate fixation strength.19 The screw length is determined by the position of the bone block within the tibial tunnel. At least 20 mm of screw in contact with the bone block is needed, and I try to obtain 25 mm or more, which is adequate length if the block remains in the tunnel. Prior to tensioning and fixing the graft in the tibia, I externally rotate the bone block 90 degrees (toward the fibula). This results in rotation of the flat graft, which mimics the anatomic positioning of the ACL anteromedial and posterolateral bundles on the tibia.20
PEARLS& PITFALLS
PEARLS
PITFALLS
Postoperative Rehabilitation
Because the grafts are tensioned in 0 degree of extension, the patient should have no difficulty obtaining this in the immediate postoperative period.17 My routine rehabilitation protocol keeps the patient in a postoperative adjustable brace locked in extension for 18 hours daily during the first 10 days. During the 6 hours out of the brace, the patient is in a continuous passive motion machine (CPM), stressing full extension to 0 degree and gradually regaining flexion from 40 degrees on the first postoperative day to 90 degrees by day 10, in 5-degree daily increments. Quadriceps setting exercises and straight leg lifts (in full 0-degree extension) out of the brace are used to minimize quadriceps atrophy. Hourly ankle pumps, elastic compression of the calf, and aspirin or a cyclooxygenase-1 (COX-1) nonsteroidal antiinflammatory are used during this period to reduce the risk of thrombophlebitis. At this point (10 days postoperatively), the patient is examined and formal physical therapy is begun, stressing swelling control and maintenance of muscle bulk. I continue use of the postoperative brace with the knee locked in extension for ambulation, but discontinue the brace for all other activities, until 4 weeks after surgery. This allows early revascularization of the graft and healing within the bone tunnels prior to significant stress being applied to the graft. It also allows the patient to regain excellent quadriceps control before being released from the brace to engage in routine daily activities, such as stair climbing and walking on uneven ground.
1. Larson RL, Taillon M. Anterior cruciate ligament insufficiency: Principles of treatment. J Am Acad Orthop Surg. 1994;2:26-35.
2. Howell SM, Gittins ME, Gottlieb JE, et al. The relationship between the angle of the tibial tunnel in the coronal plane and loss of flexion and anterior laxity after anterior cruciate ligament reconstruction. Am J Sports Med. 2001;29:567-574.
3. Simmons R, Howell SM, Hull ML. Effect of the angle of the femoral and tibial tunnels in the coronal plane and incremental excision of the posterior cruciate ligament on tension of an anterior cruciate ligament graft: an in vitro study. J Bone Joint Surg Am. 2003;85:1018-1029.
4. Raffo CS, Pizzarello P, Richmond JC, Pathare N. A reproducible landmark for the tibial tunnel origin in anterior cruciate ligament reconstruction: avoiding a vertical graft in the coronal plane. J Arthrosc Rel Surg. 2008;24:843-845.
5. Golish SR, Baumfeld JA, Schoderbek RJ, Miller MD. The effect of femoral tunnel starting position on tunnel length in anterior curciate ligament reconstruction: a cadaveric study. Arthroscopy. 2007;23:1187-1192.
6. Chhabra A, Starman JS, Ferretti M, et al. Anatomic radiographic, biomechanical and kinematic evaluation of the anterior cruciate ligament and its two functional bundles. J Bone Joint Surg Am. 2006;88:2-10.
7. Loh JC, Fukuda Y, Tsuda E, et al. Knee stability and graft function following anterior cruciate ligament reconstruction: comparison between 11 o’clock and 10 o’clock femoral tunnel placement. J Arthrosc Relat Surg. 2003;19:297-304.
8. Yagi M, Wong EK, Kanamori A, et al. Biomechanical analysis of an anatomic anterior cruciate ligament reconstruction. Am J Sports Med. 2002;30:660-666.
9. Ho JY, Gardiner A, Shah V, Steiner ME. Equal Kinematics Between Central Anatomic Single-Bundle and Double-Bundle Anterior Cruciate Ligament Reconstructions. Arthroscopy. 2009;25:464-472.
10. Meredic RB, Vance KJ, Appleby D, Lubowitz JH. Outcome of single-bundle versus double-bundle reconstruction of the anterior cruciate ligament—a meta analysis. Am J Sports Med. 2008;36:1414-1420.
11. Goldblatt JP, Fitzsimmons SE, Balk E, Richmond JC. Reconstruction of the anterior cruciate ligament: meta-analysis of patellar tendon versus hamstring tendon autograft. Arthroscopy. 2005;21:791-803.
12. Prodromos CC, Joyce BT, Shi K, Keller BL. A meta-analysis of stability after anterior cruciate ligament reconstruction as a function of hamstring versus patellar-tendon graft and fixation type. Arthroscopy. 2005;21:1202-1208.
13. Poolman RW, Farrokhyar F, Bhandari M. Hamstring tendon autograft better than bone patellar-tendon bone autograft in ACL reconstruction: a cumulative meta-analysis and clinically relevant sensitivity analysis applied to a previously published analysis. Acta Orthop. 2007;78:350-354.
14. Prodromos CC, Joyce BT, Shi K, Keller BL. A meta-analysis of stability of autograft compared to allografts after anterior cruciate ligament reconstruction. Knee Surgy Sports Traumatol Arthrosc. 2007;15:851-856.
15. Singhal MC, Gardiner JR, Johnson DL. Failure of primary anterior cruciate ligament surgery using anterior tibialis allograft. Arthroscopy. 2007;23:469-475.
16. Lee BI, Kwon SW, Kim JB, et al. Comparison of clinical results according to amount of preserved remnant in arthroscopic anterior cruciate ligament reconstruction using quadrupled hamstring graft. Arthroscopy. 2008;24:560-568.
17. Nabors ED, Richmond JC, Vannah WM, McConville OR. Anterior cruciate ligament graft tensioning in full extension. Am J Sports Med. 1995;23:488-492.
18. Shaffer B, Gow W, Tibone JE. Graft-Tunnel mismatch in endoscopic anterior cruciate ligament reconstruction: a new technique of intra-articular measurement and modified graft harvesting. Arthroscopy. 1993;9:633-646.
19. Hulstyn M, Fadale PD, Abate J, Walsh WR. Biomechanical evaluation of interference screw fixation in a bovine patellar bone-tendon-bone autograft complex for anterior cruciate ligament reconstruction. Arthroscopy. 1993;9:417-424.
20. Samuelson TS, Drez DJr, Maletis GB. Anterior cruciate ligament graft rotationreproduction of normal graft rotation. Am J Sports Med. 1996;24:67-71.