AN APPROACH TO THE UNCONSCIOUS VICTIM
Any disorder that decreases the supply of oxygen or sugar to the brain or that causes brain swelling, bleeding into the brain, or alteration of critical body chemistries can lead to unconsciousness. Thus, virtually every major illness or injury can ultimately render a person unconscious. If you come across someone who cannot be awakened, you must rapidly assess him for any treatable life-threatening conditions, and then try to discover the cause of the altered mental state.
1. Evaluate the airway (see page 22).
2. Evaluate breathing (see page 28).
3. Check for pulses (see page 33).
4. Protect the cervical spine (see page 37).
5. Control obvious bleeding (see page 53).
6. Examine the victim for chest injury (see page 42), broken bones (see page 70), and burns (see page 108).
7. Consider shock (see page 60), head injury (see page 61), seizure (see page 68), severe allergic reaction (see page 66), low blood sugar (see page 142), stroke (see page 144), fainting spell (see page 165), hypothermia (see page 305), heat illness (see page 322), high-altitude cerebral edema (see page 340), high-altitude pulmonary edema (see page 339), lightning strike (see page 395), poisoning, and alcohol (drug) intoxication.
8. Remove contact lenses (see page 183).
9. Transport the victim to medical attention (see page 459).
HELMET REMOVAL
1. The first rescuer, positioned above the head of the victim, holds the helmeted head steady by grasping it on each side. If necessary to support the airway, the first rescuer can reach down and hold the mandible (lower jaw).
2. The second rescuer, positioned below the head of the victim, prepares the helmet for removal by loosening and removing straps, goggles, and other attachments, so long as this process does not allow for unintended head movement.
3. The second rescuer takes over head stabilization, while the first rescuer continues to hold the helmeted head, by sliding two hands along the sides of the victim’s head position; this should be done by either placing one hand behind the base of the head at its junction with the neck and the other hand under the chin or by sliding two hands along the sides of the head and up inside the helmet.
4. The first rescuer completes removal of retaining straps, then slides the helmet off the head using axial (straight up away from the feet, without any twisting) traction.
5. Head positioning and gentle traction is maintained while a cervical collar or other method (see page 37) is used to stabilize the position of the head and neck.
AIRWAY
Figure 2 depicts the anatomy of the respiratory system. Air enters the mouth and nose (where it is humidified), traverses the pharynx (throat), passes through the trachea (windpipe) and bronchi, and normally proceeds into the smallest air sacs of the lungs, known as the alveoli. Within these distal air spaces, inspired oxygen is exchanged for carbon dioxide, one of the end products of human metabolism. During swallowing, the epiglottis and tongue cover the entrance (via the vocal cords) to the trachea, so that food and liquid enter the esophagus and not the airway.

Symptoms of airway obstruction include sudden inability to speak, an appearance of panic with bulging eyes, blue skin discoloration (cyanosis), choking gestures (hand held to the throat) (see Figure 11), harsh and raspy or “musical” and high-pitched noise (“stridor”) that comes from the throat during breathing, and difficulty with breathing as evidenced by struggling and profound agitation. Any person who collapses suddenly, particularly while eating, or who has been in an accident should be examined rapidly for airway obstruction.
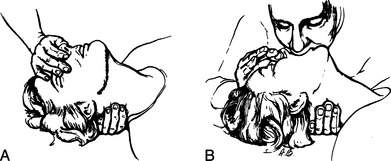
1. Under no circumstance should the neck be manipulated if there is a possibility of injury to the spine or spinal cord. If a victim is unconscious and has suffered a fall or multiple injuries, it is safest to assume that his neck is broken. If this is the case, keep the airway open by gently but firmly lifting the jaw, either by grasping the lower teeth and jaw and pulling directly forward (away from the face), or by maintaining a forward pull on the angles of the jaw (Figure 3). Do not bend the neck forward or backward. A modified jaw thrust (Figure 4) can be performed by a single rescuer while stabilizing the neck.
2. If there is no chance of a broken neck, maintain the airway with the jaw lifts previously described or by tilting the head backward while gently lifting under the neck (Figure 5). The alignment is different for an infant, a small child, and an older child or adult in terms of where one would position a pad or pillow (Figure 6). A head tilt with chin lift may be used (Figure 7).
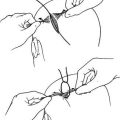
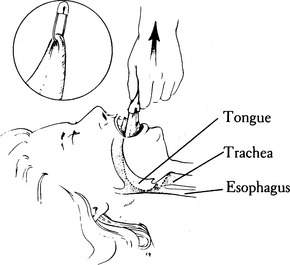
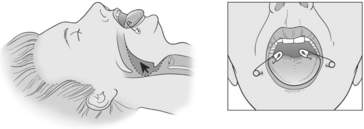
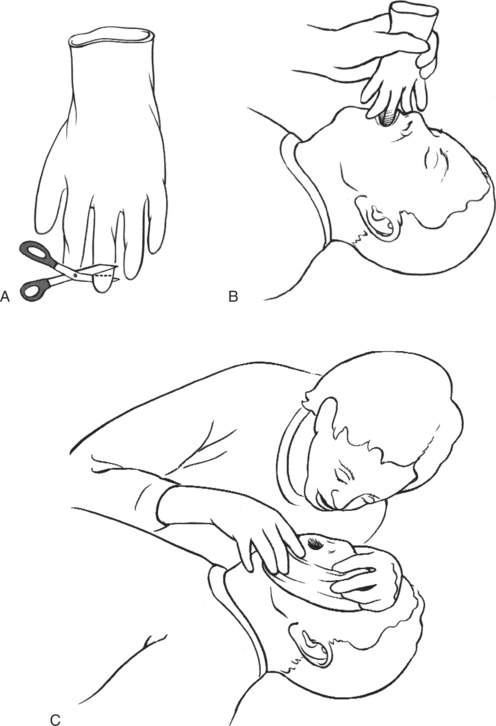
3. Keep the airway clear of blood, vomitus, loose dentures, and debris. This can be accomplished by sweeping the mouth with two fingers or by continuous suction with a field suction apparatus powerful enough to extract chunks. Take care not to force objects deeper into the throat. If the tongue appears to be the problem, wrap the end of the tongue in a cloth or gauze bandage, grasp firmly, and pull it out of the mouth (Figure 8). If it cannot be held in this manner, a large safety pin or sharp-pointed wire may be passed through the tongue and used to improve the grip (see Figure 8); take care to avoid the large, visible blood vessels at the base of the tongue. To keep the tongue out of the mouth, a string can be tied to the safety pin and then secured to the victim’s shirt button or jacket zipper. Fortunately, in most cases the jaw lift will carry the base of the tongue out of the airway. Another technique is to use two safety pins to attach the tongue to the face just below the lower lip (Figure 9).
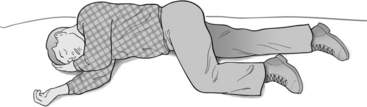
4. If the victim is unconscious, and there is no chance of a broken neck or back, do not leave him lying flat on his back. Turn him on his side so that if vomiting occurs, the fluid can drain from his mouth and the victim won’t choke or drown (Figure 10).
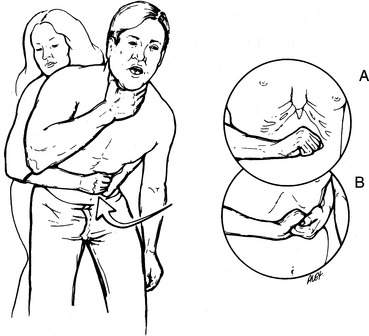
5. Choking is a life-threatening condition in which the upper airway (above the vocal cords) is obstructed by a foreign object (tongue, broken teeth, dentures, food). The choking person is profoundly agitated (until he becomes unconscious from lack of oxygen), may appear to be panicked with bulging eyes, may grasp at his throat in a choking gesture, cannot breathe, and is unable to speak. You must respond rapidly:
6. If necessary, begin mouth-to-mouth breathing (see page 29).
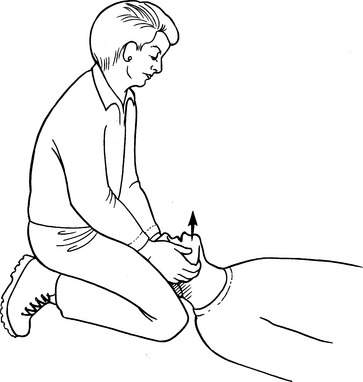
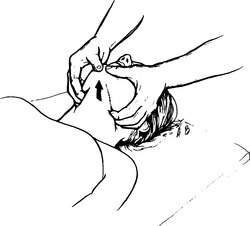

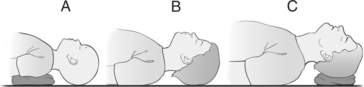
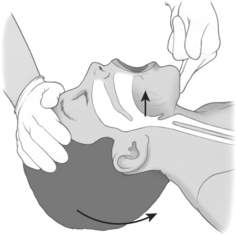
Figure 7 Head tilt with chin lift to bring the base of the tongue forward and open the airway.
(Redrawn from Auerbach PS [ed]: Wilderness medicine [ed 5]. St. Louis: Mosby, 2007, p 453; redrawn from Mahadevan SV, Garmel GM [eds]: An introduction to clinical emergency medicine: guide for practitioners in the emergency department. Cambridge, UK: Cambridge University Press, 2005. © Chris Gralapp, www.biolumina.com.)
BREATHING
The act of breathing delivers oxygen to the lungs during inhalation, exchanges oxygen for carbon dioxide in the lungs, transfers oxygen into the bloodstream, and removes carbon dioxide during exhalation. The rate and depth of breathing are controlled by the oxygen and carbon dioxide levels in the blood, by the body’s oxygen demand, by the ability of the blood to unload oxygen to the tissues, by brain and brainstem regulatory sensory systems, and by emotional factors. If there is a head or spinal cord injury, however, the central nervous system stimulus for breathing may be lost. In many instances, this is only transient (lightning strike is a good example); thus, it is imperative to provide breathing assistance for a period of time before giving up hope. Exhaled air from a human contains 16% oxygen, which is enough to support life (via mouth-to-mouth or mouth-to-mask breathing) at low altitudes.
How to Assist Breathing (Mouth-to-Mouth)
1. Position the victim’s head in the “sniffing position” by placing one hand under his neck and the other on his forehead, to lift behind the neck (gently) and tilt the head backward (see Figure 5). If you suspect a broken neck, do not move the victim’s neck; merely lift his jaw (see Figure 4).
2. Quickly sweep two fingers through the victim’s mouth to remove any foreign material. Remove loose dentures.
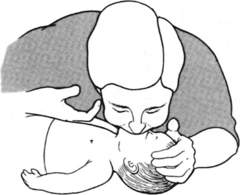
3. Pinch the victim’s mouth closed and cover his mouth with your own (Figure 13). If you have a barrier (pocket mask or mouth shield, such as the NuMask Pocket CPRKIT with one-way valve) to prevent transmission of infectious diseases, use it as directed. An improvised barrier shield for rescue breathing can be created by taking a surgical glove and cutting off the middle finger at the midpoint of its length. The rescuer then stretches the glove across the victim’s mouth and nose and blows into the glove (Figure 14). After each breath, uncover the nose to allow the victim to exhale. If you are using the jaw lift technique (see step 1 on page 23) to open the airway, press your cheek against the victim’s nose to occlude it during mouth-to-mouth breathing. For mouth-to-nose breathing, close the victim’s mouth and cover his nose with your mouth. For small children and infants, cover both the mouth and nose with your mouth (Figure 15).
4. Blow air into the adult victim until you see his chest rise. This should take approximately 1 second. Give two full breaths, pausing between them to inhale and see if the chest rises. With small children and infants, do not blow forcefully. If the chest does not rise, be certain the airway is open (proper head position, tongue and mouth clear—see pages 23 to 26). If the positioning is correct and the chest still does not rise, consider an airway obstruction with a foreign body (see page 27). If the victim is not breathing, coughing, or moving after you have provided the first two breaths, prepare to administer the chest compressions of CPR (see page 32).
5. Remove your mouth and allow the victim to exhale passively. Repeat the cycle every 5 seconds for adults, and every 3 seconds for children. If chest compressions are occurring, the ratio is 30 compressions to each 2 rescue breaths for adults and children.
6. If you meet resistance trying to blow air into the victim’s lungs, check the head positioning and reclear the mouth. You may need to lift the jaw to pull the base of the tongue up and out of the throat.
7. If it is impossible to blow any air into the victim’s lungs, it might be that something is lodged in his airway. Turn the victim on his side and deliver four sharp blows between the shoulder blades, or perform the Heimlich maneuver (see page 27).
8. Mouth-to-mouth breathing usually forces air into the victim’s stomach as well as into his lungs. If the stomach fills up with so much air that it becomes tense and you cannot expand the lungs, turn the victim quickly on his side and press on the abdomen. This may make him vomit, so be prepared to clean out the mouth.
CHECK FOR PULSES (CIRCULATION)
Assess the need for cardiopulmonary resuscitation (CPR). Current American Heart Association guidelines advise laypersons to begin chest compressions without going through a pulse check on victims who are not breathing and who do not show any sign of life. If an automatic defibrillator is available, a single shock may be administered.
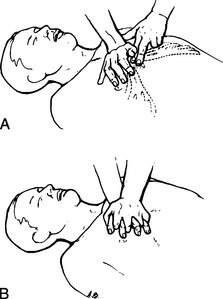
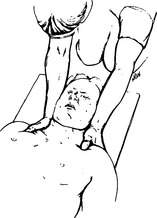
Basic life support may also be initiated by checking for a pulse. Check for pulses for 10 seconds at the neck (carotid artery: Figure 16, A) or groin (femoral artery: Figure 16, B). Use the tips of your index and middle fingers to feel for a pulse. Do not use your thumb, because this finger often has pulsations of its own, which you may confuse with the victim’s pulse.
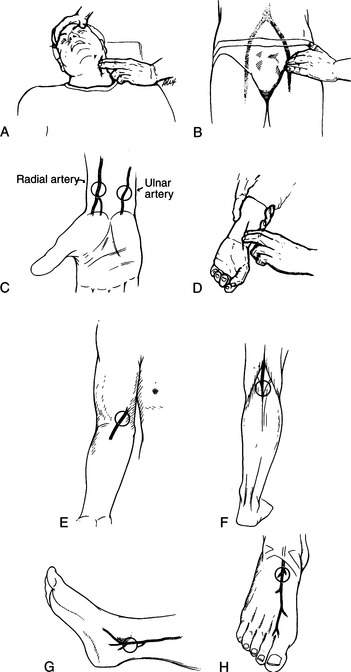
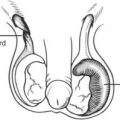
Do not rely on the wrist (radial or ulnar artery: Figure 16, C and D) for the determination of heartbeat. The carotid artery is located (see Figure 16, A) at the level of the Adam’s apple, between this structure and the large muscle (sternocleidomastoid) that runs from the base of the ear to the collarbone. Pulsations from the femoral artery may be felt (see Figure 16, B) below the abdomen in the groin crease where the front of the leg attaches to the trunk, two fingerbreadths medial (toward the center) to the midpoint in the line from the hipbone (anterior iliac spine) to the bony region directly under the pubic hair (the pubic symphysis). Other locations where the pulse may be felt (often with great difficulty) are on the inner aspect of the elbow (brachial artery: Figure 16, E); behind the knee (popliteal artery: Figure 16, F); directly behind the bony prominence (malleolus) on the inner side of the ankle (posterior tibial artery: Figure 16, G); and centrally on the top of the foot (dorsalis pedis artery: Figure 16, H).
If no pulse is detected (and the victim is unconscious and not breathing), send someone for help, give two breaths to the victim (see page 29), and begin the chest compressions of cardiopulmonary resuscitation (CPR).
Chest compressions are performed as follows:
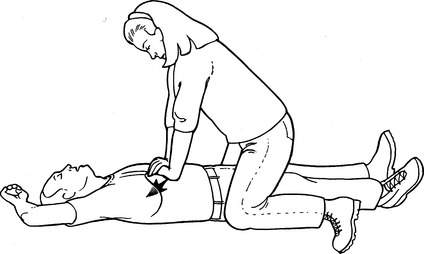
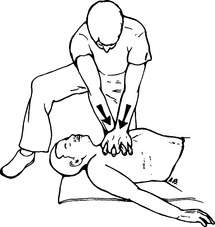
1. Place the victim on his back on a firm surface and position the heel of one of your hands over the center of his breastbone (Figure 17, A). The heel of your second hand is placed over the bottom hand. Interlock your fingers (Figure 17, B) and keep them held lightly off the victim’s chest.
2. Your shoulders should line up directly over the victim’s breastbone, with your arms straightened at the elbows (Figure 18).
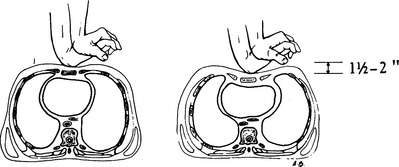
3. Using a stiff-arm technique, the breastbone is compressed 1.5 to 2 in (3.8 to 5 cm) and then released (Figure 19). Keep your motions smooth. The compression phase should equal the relaxation phase, with a rate of 100 compressions per minute for adults and children. Give an initial 30 compressions. With single-rescuer CPR, try to maintain a ratio of 30 compressions interrupted by two mouth-to-mouth breaths (see page 29). After the first four cycles of compressions and breaths, check for pulses and spontaneous breathing. If both are absent, resume your efforts, checking for signs of life every few minutes.
4. If two rescuers are working together, the second rescuer should give the victim mouth-to-mouth resuscitation, forcing two breaths into him with every 30 chest compressions. The artificial breaths should be provided during a brief pause between compressions.
5. Continue CPR until you are relieved by someone, you become exhausted, the victim is revived, or a qualified person pronounces the victim dead. Situations in which CPR is unlikely to revive a victim include cardiac arrest associated with severe injuries, drowning in which the victim has been submerged for more than an hour (with the rare exception of cold-water immersion—see page 305), the victim having an incompressible chest (extreme cold or prolonged “downtime” with rigor mortis—see page 309), and after 30 minutes of resuscitation effort without any victim response (breathing or pulse).
Chest compressions in infants and small children can be performed by placing a stabilizing hand on the child’s back and compressing hand (or fingers) on the chest (Figure 20). With a small child, use one hand to perform the compressions. With an infant, use two fingers. Care should be taken to provide firm compressions without separating the ribs from the breastbone. The rate of chest compressions for a child is 100 per minute at a depth of 1 to 1.5 in (2.5 to 3.8 cm), with a breath after each 30 compressions. For an infant, the rate of compressions is 100 per minute at a depth of 0.5 to 1 in (1.3 to 2.5 cm), with two breaths after each 30 compressions.
If you have access to an automated external defibrillator (AED), attach it to the victim as soon as possible, so that it can determine whether or not a shock (for ventricular fibrillation, in which the heart does not contract, but quivers in such a fashion as to be unable to pump blood) is indicated. If the AED shocks the victim, check for a pulse and breathing. If the victim continues to require chest compressions because a pulse is not present, continue CPR for 2 minutes, and then use the AED again to determine whether or not a shock is indicated. If a shock is successful in terminating ventricular fibrillation, chest compressions may still be necessary for a minute or two to circulate blood (and oxygen), while the heart restores a life-sustaining rhythm. When pulses return and can be felt, discontinue chest compressions.
The Condition of Death
CPR in a wilderness setting is rarely successful. Unfortunately, your best efforts at resuscitation may be to no avail and the victim will die. Signs of death include no movement or response to pain; no detectable pulse; absent breathing; dilated (and often irregularly shaped) pupils that do not contract when exposed to bright light; pale or blue-gray skin, fingernails, and lips; penile erection; uncontrolled urination or bowel movement; and cool body temperature. After a period of an hour or two, the muscles become stiff (rigor mortis), the skin mottles, and blood settles visibly in a dependent fashion due to gravity, causing large discolored blotches on the victim’s back, buttocks, and legs (if he is kept supine). However, it is essential to remember that hypothermic individuals, who are extremely cold, may appear to be dead (see page 309). Therefore, if hypothermia is suspected, “no one is dead until he is warm and dead.” In such a case, resuscitative efforts should be carried out until the victim is revived, the rescuers become exhausted or endangered, or a health care professional can pronounce death. This is also true for a victim of lightning strike or cold-water drowning, and for children. If a victim is dead, the body should be decently covered and kept in a cool location until extrication is possible. If foul play is suspected, the body should not be moved.
PROTECT THE CERVICAL SPINE
Never move the neck to reposition it. You must immediately immobilize the head and neck. The neck can be immobilized by taping the head to a backboard or stretcher, by applying a rigid collar, or by placing sandbags or their equivalent on either side of the head (Figure 21). Do not use bags of snow to hold the head, because these may melt and allow too much motion; they can also contribute to hypothermia (see page 305).
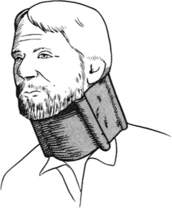
In general, the most dangerous direction of motion for a neck-injured (spinal cord–injured) person is chin to chest (flexed). Circumferential neck collars that prevent flexion can be purchased preformed or be fashioned from cardboard, Ensolite sleeping pad material, foam-covered aluminum (the SAM Splint) (Figure 22), a padded backpack hip belt, or other semirigid materials. For a neck collar to be effective, it must be rigid or semirigid, fit properly, not choke the victim, and allow the victim’s mouth to open if he needs to vomit. One way to improvise is to wrap bulky clothing with a wide elastic bandage to compress the material and make it more rigid.
An improvised spine board can be made by inserting a snow shovel through the centerline attachment points of an internal frame backpack. Pad the shovel, then tape the victim’s head to the shovel, which serves as a head bed. The pack suspension system is used to stabilize the shoulders and torso, so that the victim now has his head relatively immobilized. Another possibility is to invert (turn upside down) an internal or external frame backpack and use the padded hip belt as a head bed.
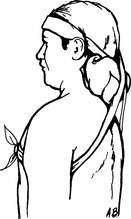
If no other equipment is available and if the victim is conscious and cooperative, a thick pad (rolled towel, jacket, or the like) may be placed at the base of his neck. This can be made more rigid by first wrapping (compressing) it with a wide elastic (Ace) bandage. Secure this by wrapping tape or cloth around the forehead, then crossing it over the pad and bringing it back out under the armpits to be tied across the chest (Figure 23). Be aware that this technique does not guarantee immobilization in a combative or confused victim.
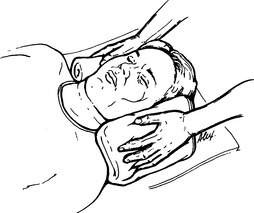
If the victim becomes uncooperative or agitated, you must hold his head until it can be firmly immobilized and the victim restrained from motion (Figure 24; see Figure 21). All of this is necessary to avoid injury to the spinal cord. If the victim must be moved or turned on his side (most commonly to allow vomiting or to place insulation beneath him), hold his head fixed between your forearms while you hold his shoulders with your hands. In this way the victim can be “logrolled,” using as many rescuers as possible to avoid unnecessary motion (Figure 25).
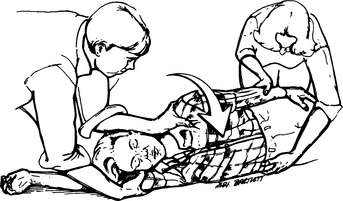
Logrolling the Victim (see Figure 25)
1. The first rescuer approaches the victim from the head, and keeps the head and shoulders in a fixed position (no neck movement).
2. The second rescuer extends the victim’s arm (on the side over which the victim is to be rolled) above the victim’s head. The first rescuer takes this arm and uses it to help support the head in proper position.
3. All rescuers work together to turn the victim without moving his neck.