[level-membership-for-emergency-medicine-category]58
Aeromedical Transport
Because aeromedical transport involves medical care delivered in a hostile environment, the patient and crew are at risk for injury or death in the event of a mishap. Flight crew training must emphasize safety. A helicopter mountain rescue operation is a high-risk endeavor for the pilot and crew, as well as for the patient. Dangerous mistakes are easy to make around working helicopters. Therefore, aeromedical transport is not always the proper choice for rescue. Any decision to use aeromedical resources must be weighed against the lower risk associated with ground-based rescue or evacuation. One should consider the severity of the patient’s condition, desired level of out-of-hospital care, access to ground transportation, weather conditions for helicopter flight, and if local receiving hospitals have the capacity to land helicopters. Specific medical conditions may be more appropriate for aeromedical transport (Box 58-1).
Common Aeromedical Transport Problems
1. Once the decision is made to transport a patient by air and the appropriate aeromedical service is contacted, preparations must be made to ensure safety and comfort and to aid the flight crew in patient care.
2. To minimize delays, pretransport preparations should be made for patients of acute trauma (Box 58-2).
Patient Movement
1. Patient handling and movement can contribute to morbidity and mortality in unstable persons.
2. All transported patients should be adequately secured to the stretcher with safety straps to prevent sudden shifting of position or movement of a secured fracture.
3. During transport from the ground to the aircraft cabin, attempts should be made to limit sudden pitching of the stretcher.
4. U.S. Department of Transportation guidelines recommend design of cabin access such that no more than 30 degrees of roll and 45 degrees of pitch may occur to the patient-occupied stretcher during loading.
5. The stretcher, in turn, should be adequately attached to the floor.
6. Motion sickness in the patient may be treated with an antiemetic such as promethazine (25 mg PO, IV, or IM) or prochlorperazine (5 to 10 mg PO, IV, or IM).
7. Transdermal scopolamine patches are useful for prolonged flights and do not require parenteral or oral administration. Scopolamine’s antiemetic effects are not always uniform and may not occur until 4 to 6 hours after application of a patch. Patches may best be used to decrease motion sickness in the flight crew because they are nonsedating.
8. A novel approach to prevention of airsickness that does not induce excessive sedation is to give 25 mg of promethazine orally along with 200 mg of caffeine.
Oxygen Availability for Flight
1. In general, enough oxygen should be provided for the flight, plus a 30- to 45-minute reserve.
2. Sufficient oxygen should be carried to allow for ground handling time at either end.
3. The amount of oxygen required can be obtained by multiplying the desired flow rate in liters per minute (L/min) by the total duration of transport, including patient loading and unloading.
4. Table 58-1 lists the capacities of various types of oxygen tanks and their respective weights.
Table 58-1
Aluminum Oxygen Tank Specifications and Approximate Endurance
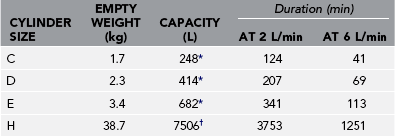
*Fill pressure of 139 bar (2016 psi).
†Fill pressure 153 bar (2219 psi).
From Luxfer Gas Cylinders. http://www.luxfercylinders.com/products.
5. Some portable ventilators have a gas-driven logic circuit that requires additional air or oxygen. Electrically powered ventilators have a lower requirement for oxygen but carry the additional need for a power inverter.
6. Most patients are transported with oxygen supplied by nasal cannula (1 to 6 L/min). A single E-sized oxygen cylinder is adequate for short flights, although backup cylinders are usually carried.
7. Patients intubated and maintained on 100% oxygen, as well as those ventilated on long flights, will quickly exceed the capacity of an E cylinder; several E cylinders or an H cylinder will be required.
Noise
1. Noise can be avoided with hearing protectors, which are devices similar to headphones but without internal speakers.
2. Inexpensive hearing protectors are available as moldable foam earplugs. In some cases, headphones may be used in the awake patient if the crew wants the patient to be able to communicate on the intercom system.
Cold
1. For winter and cold weather operations, remember that rotor wash can produce wind speeds of 80 mph under the rotor.
2. Always adequately dress or protect the patient from freezing rotor wash when loading under power (“hot loading”) or for winch or short-haul operations (patient outside the aircraft).
3. Use goggles to protect from blowing snow, along with full head and hand protection.
Eye Protection
1. Serious eye injuries can result from debris blown into the air.
2. When a patient is loaded onto or off a helicopter with the rotors turning, the patient’s eyes must be protected.
3. The eyes must be protected even if the patient is unconscious.
4. Lightweight skydiver goggles (“boogie goggles”) or ski goggles are effective and inexpensive.
5. Taping temporary patches over the eyes is also effective.
Respiratory Distress
1. Persons with respiratory disease or distress should have immediately treatable conditions addressed before takeoff.
2. Endotracheal (ET) intubation is essential if airway patency is threatened or if adequate oxygenation cannot be maintained with supplemental oxygen.
3. It is better to err on the side of caution when making a decision about a patient’s airway.
4. During flight it is easier to treat restlessness in an intubated person than airway obstruction or apnea in a nonintubated person.
5. Nearly all patients should receive supplemental oxygen.
6. Fraction of inspired oxygen (FIo2) should be increased with increasing cabin altitude to maintain a stable partial pressure of oxygen (Po2).
7. When oxygen saturation monitoring is unavailable and pretransport arterial oxygen content unknown, 100% oxygen may be administered throughout the flight to ensure adequate oxygenation.
8. Persons with chronic lung disease who are prone to hypercapnia may undergo deterioration in condition if the hypoxic drive is eliminated. In these patients, the least oxygen necessary to maintain saturation above 90% is advisable.
9. Close in-flight monitoring is essential, preferably by continuous pulse oximetry. Portable end-tidal CO2 monitoring is now relatively easy to accomplish and should be used for intubated/ventilated patients whenever possible.
10. Altitude changes may affect ET cuff volume, so cuff pressure must be checked frequently.
11. If any other air-bladder devices (e.g., cuffed tracheostomy tubes, laryngeal mask airways, air splints) are present on the patient, they must also be adjusted during flight to avoid increased volume/pressure problems. Check these frequently.
Transport of Dive-Related Injuries (e.g., Decompression Sickness, Arterial Gas Embolism)
1. Aircraft selection is crucial because the stricken diver should not be exposed to a significantly lower atmospheric pressure in the aircraft.
2. Ideally, transport only by pressurized aircraft.
3. For nonpressurized aircraft (i.e., helicopter), the flight altitude must be maintained as low as possible, not to exceed 305 m (1000 feet) above sea level, if possible.
Cardiopulmonary Resuscitation and Cardiac Defibrillation
1. Cardiopulmonary resuscitation (CPR) in an aircraft is difficult. The rescuers must perform several tasks simultaneously while ventilating the lungs or compressing the chest, all in a physically confining space.
2. There should be no concern with airborne defibrillation if all electronic navigational equipment on the aircraft has a common ground, as mandated by Federal Aviation Agency standards.
3. Despite cramped quarters and sensitive electrical equipment, defibrillation can be safely performed in all types of aircraft currently used for emergency transport using standard precautions routinely used during defibrillation on the ground.
4. In the interest of safety, it is best to notify the pilot before performing defibrillation.
Patient Combativeness
1. Patients may be combative to the point that they pose a threat to the safety of the flight and crew.
2. An uncontrollable person may cause sudden shifts in aircraft balance or may strike a crew member or important flight instruments or equipment.
3. Any combative person should be properly restrained in advance.
4. If sedation is necessary, document a thorough neurologic examination before administering medication.
5. Useful sedative-hypnotic agents include diazepam (5 to 10 mg IV) or a shorter-acting agent such as midazolam (2 to 5 mg IV or IM).
6. Paralyzing agents, such as pancuronium, vecuronium, and succinylcholine, have the advantage of not altering the sensorium, but they require airway control with ET intubation. In addition, it is humane to sedate a patient who is paralyzed to facilitate intubation and transport.
Endotracheal Intubation
1. ET intubation may be difficult to perform while airborne, especially in a confining cabin, and should be done before departure if possible. This is especially true in trauma patients with head injuries and in burn patients who have carbonaceous sputum or hoarseness.
2. Special techniques are available to supplement standard methods of intubation, including ET tubes with controllable tips, intubating laryngeal mask airways, and digital intubation. Video laryngoscopy has been shown to be effective in the air medical environment and is now being used by some transport teams.
3. Sedation and/or pharmacologic paralysis may be necessary.
4. Induction of paralysis before intubation in the aeromedical setting is controversial. Besides the need for a surgical airway if intubation is unsuccessful, concerns exist about cervical spine manipulation during intubation in the paralyzed patient, unrecognized esophageal intubation in a nonbreathing patient, and the relative contraindications to the use of paralyzing agents in certain patients. Determination of paralysis before ET intubation is made by the crew and medical control physicians, taking into account all relevant factors, including safety of the patient and crew in flight.
5. Shorter-acting nondepolarizing paralytic agents (e.g., mivacurium) may have advantages, but they have not yet been thoroughly validated in the aeromedical setting.
6. As with any critical airway intervention, there must always be a backup plan if ET intubation fails. Blind airway devices such as a laryngeal mask airway or King LT airway device, or other salvage airway device with which the crew is comfortable, should always be available.
7. In some flight programs, nonphysician crew members are taught to perform emergency cricothyrotomy. Although occasionally lifesaving, this procedure is often difficult to perform and should be undertaken only as a final method to secure an emergency airway.
Flight Safety
Approaching the Aircraft
Helicopters (Fig. 58-1 and Box 58-3)
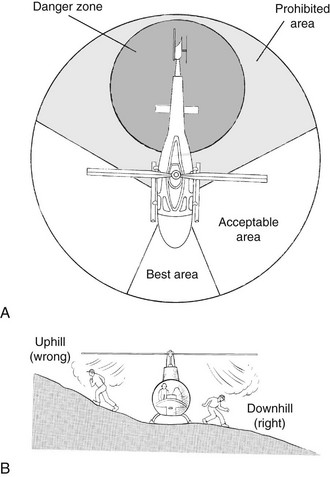
FIGURE 58-1 Helicopter safety. A, Safe approach zones. B, Proper way to approach or depart from a helicopter.
1. Approach helicopters with turning rotor blades only from the front and sides and only while under pilot observation.
2. Give the tail rotor a wide berth, especially on helicopters with rear doors. The tail rotor is invisible when in operation.
3. If on a slope, approach from the downhill side.
4. Station a crew member in a safe position to direct approaching individuals away from the tail rotor.
5. Shut down the helicopter’s engines completely, when the situation allows, before patient loading and unloading.
6. Approach the helicopter in a crouched position to minimize the risk for contact with the rotor blades should a sudden gust of wind or movement of the aircraft cause them to dip.
Safety Belt Use
1. Use of safety belts (preferably with shoulder harnesses, especially in helicopters) is an important safety measure. Certain patient care activities (e.g., ET intubation, CPR), however, may be impossible to perform with safety belts secured.
2. Design and selection of aircraft and interior configurations should allow maximal access to the patient with the crew members properly restrained.
3. Throughout the flight, the crew members and patient should remain restrained as much as possible in smooth air and at all times in rough air.
4. Movement inside the cabin affects aircraft balance. An aircraft loaded near its aft center-of-gravity limit may exceed its limits if a crew member moves to a new position within the cabin.
5. Changes in position should be preceded by consultation with the pilot.
6. Light aircraft are sensitive to turbulent air, and appropriate precautions must be taken to avoid being injured from sudden motion.
Proper Use of Aircraft Equipment
1. Crew members must be familiar with all aircraft equipment they may be required to operate in flight or in an emergency. This includes aircraft doors, fire extinguisher, communications equipment, emergency locator transmitters (ELTs), oxygen equipment, and electrical outlets.
2. The crew must be familiar with emergency shutdown procedures.
3. Before takeoff, door security must be confirmed by a crew member familiar with the operation of the door.
In-Flight Obstacle Reporting
1. An extra pair of eyes can be invaluable to a pilot in a busy airspace or on a scene approach complicated by trees and electrical or phone wires.
2. If during flight you observe anything of which the pilot may not be aware, such as air traffic, point it out. Most pilots appreciate the “heads-up” even when these factors seem obvious.
3. Primarily important in visual flight conditions, assistance with obstacle identification can enhance the safety of the mission; however, flight should not occur under conditions in which obstacle reporting by a crew member is essential to safety, because the person must then divide attention between patient care and obstacle reporting.
Flight Crew–Ground Coordination
1. Flight crew members must be able to communicate with ground units during the landing phase to ensure adequate scene preparation.
2. Enthusiastic rescue personnel or curious onlookers may approach the aircraft in a hazardous manner.
3. Crew may be required to perform crowd control while on the ground. This requires directing individuals away from the rotor blades, propellers, or other hazardous equipment.
4. If loading or unloading the patient while the rotors or propellers are still turning (“hot loading” or “hot off-loading”) is necessary, special precautions must be undertaken for ground crews, the flight crew, and the patient.
Survival
1. An emergency or precautionary landing away from an airport necessitates survival before rescue.
2. Under adverse environmental conditions and with injured patients, survival may depend on specific actions by the crew.
3. The crew should be proficient in emergency egress from the aircraft, including escape after crashes and water landings, especially in helicopters.
4. After water landings, helicopters usually roll inverted and sink rapidly. Helicopter “dunker” training is required for all military helicopter crews and should be practiced by any crew involved in over-water operations.
5. All crew members should be trained in the use of emergency signaling devices, such as ELTs, flares, signal fires, and ground emergency signals.
6. Survival skills taught to all crew members include advanced first aid, building emergency shelters, fire starting, and obtaining water and food from the environment.
Landing Zone Operations
1. The ideal helicopter landing zone (HLZ, or simply LZ) is a wide, flat, clear area with no obstacles in the approach or departure end.
2. Vertical landings and takeoffs can be accomplished, but it is safer for the helicopter to make a gradual descent while flying forward.
3. Higher altitudes and higher temperatures require larger landing zones.
4. The center of the landing zone can be marked with a V, with the apex pointing into the prevailing wind.
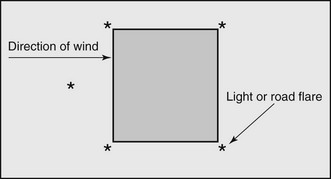
5. The FAA recommends that the HLZ be marked at night with a “box and one” configuration (Fig. 58-2). Each corner of the HLZ is marked with a light or a flare, with a fifth flare outside the box indicating the direction of the wind. Any obstacles can be marked with brightly colored, properly secured clothing.
6. The size of the landing zone depends on the weather conditions, type of helicopter involved, altitude, temperature, and types of obstacles in the area. Small helicopters, such as the Jet Ranger, can usually land safely in an 18.3 × 18.3-m (60 × 60-foot) landing zone. Larger helicopters, such as the Bell 412, require a 36.6 × 36.6-m (120 × 120-foot) zone. Large military helicopters may require even more space.
7. The condition of the ground (e.g., loose snow, dust, gravel) should be communicated to the pilot before the final approach.
8. Before the helicopter lands, all loose clothing and equipment should be secured.
9. During approach, no personnel or vehicles should move on or near the landing zone.
10. Once the helicopter is on the ground, it must be approached only from the front and side, and then only while under direct observation of the pilot.
11. The aft portion of the aircraft and areas around the tail rotor must be avoided at all times. Some helicopters (e.g., BK-117) have rear doors for loading and unloading patients, and ground personnel should wait for directions from the crew before approaching the rear area. A safety person should be assigned to prevent anyone from inadvertently walking toward the tail rotor.
12. If the ground is uneven or sloped, all personnel should approach and depart from the helicopter on the downslope side.
13. It is safest to load the patient into the helicopter with the engines off and the rotors stopped (“cold load”).
14. If the patient must be loaded with the engines on and blades turning (“hot load”), eye and ear protection should be worn by all personnel approaching the helicopter, including the patient.
15. Once the patient is loaded, all persons should leave the landing zone, take cover, and stay in place until the helicopter has departed.
16. It is best to be off to the side, not directly in the takeoff path.
17. If you have a radio and know your frequency, inform the flight crew at the time of dispatch. You can more easily direct them into the HLZ and warn of potential hazards. Wires are almost impossible to see during the daytime and virtually invisible at night.
Ground-to-Air Signaling
1. It is best to have radio communication between the ground party and the helicopter crew. If this is not possible, hand signals may be necessary.
2. Standard hand signals are used by military rescue personnel for communication between a deployed rescue swimmer and the helicopter (Table 58-2). These same signals can be used while on land.
Table 58-2
Swimmer to Helicopter and Ground-to-Air Signals
| INTENTION | ACTION |
| Deploy medical kit | Arms above head, wrists crossed |
| Situation okay | Thumbs up |
| Lower rescue cable with rescue device attached | Arm extended over head, fist clenched |
| Lower rescue cable without rescue | Climbing-rope motion with hands |
| Helicopter move in/out | Wave in/out with both hands |
| Cease operations | Slashing motion across throat |
| Deploy litter | Hands cupped, then arms outstretched |
| Personnel secured, raise cable | Vigorously shake hoist cable or thumb up; vigorous up motion with arm |
| Team recall | Circle arm over head with fingers skyward |
3. To acknowledge the signals, the hoist operator gives a thumbs up or the pilot flashes the rotating beacon. It is best to coordinate these signals with flight crew before rescue.
Using a Ground Guide
1. Have the ground guide individual wear eye protection and keep his or her back to the wind, because helicopters take off and land into the wind.
2. If a ground guide for the HLZ is to be used, the person designated to be the ground guide should initially stand in the middle of the HLZ.
3. Once the helicopter is in sight, the ground guide should hold both arms over his or her head (daytime) or hold two flashlights over his or her head (night operations).
4. Once the pilot has identified the HLZ, the ground guide should move out of the HLZ in the upwind direction.
5. The guide should continue to give the “safe to land” signal from well outside the HLZ until the aircraft has landed.
6. No persons should be in the HLZ or even moving toward the HLZ during landing.
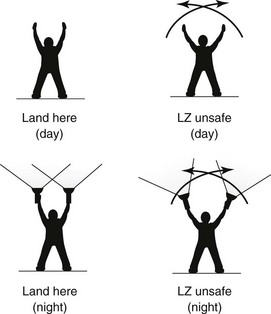
7. If at any time during the helicopter’s approach the ground guide sees any unsafe condition in the HLZ or surrounding area, he or she should immediately give a “wave off” signal (Fig. 58-3).
Hoist Operations
1. Do not touch the hoist, rescue device, or cable until after it has touched the ground (or water). A helicopter can build up a powerful static electricity charge that will be grounded through whatever the hoist first touches. This has been known to knock rescuers and survivors off their feet.
2. Once the rescue device and cable have touched the ground, put the patient into the rescue device, taking care to keep the hoist cable clear of all persons.
3. Do not allow the hoist cable to loop around any person or around the rescue device because serious injury is possible when the cable slack is taken up.
4. Make sure that the patient is properly secured in the rescue device, with all safety straps tightened.
5. When the patient is secured, move away from the rescue device and signal “up cable.”
6. If the rescue device is a basket (Stokes) litter, use a tag line with a properly installed weak link to prevent the litter from spinning during the hoist.
Night Operations
1. Night helicopter rescue operations are considerably more dangerous than daylight operations. It is preferable to delay helicopter insertion or extraction operations until daylight.
2. The landing zone should be clearly marked and the pilot allowed to make the approach. All personnel should stay clear of the landing zone until the pilot has made a safe landing.
3. Persons approaching the landing zone should have a small light or reflective material attached to outer clothing so that it can be clearly seen.
4. A minimum number of people should approach the helicopter, and a safety observer is mandatory to keep the ground team together and clear of the tail rotor and rotor blades.
5. The landing zone should be as large as possible, preferably at least 50% larger than a daylight landing zone.
6. Any obstacles should be clearly marked with light-colored streamers, small lights, or even light-colored clothing.
7. The landing zone can be illuminated with flashlights at the corners, with another flashlight at the center point. These flashlights should be pointed at the ground, not into the air; flashlights pointed at the helicopter during landing and takeoff may distract or momentarily blind the crew. If flashlights are not available, small fires can be used to illuminate the edges of the landing zone, although the helicopter can scatter burning embers for many meters.
8. If crew members are using night vision equipment, lights must never be flashed at the helicopter. Even the amount of white light from a small flashlight may be sufficient to overload the night vision equipment, functionally blinding the crew.
Dispatch and Communications
1. The dispatch center is the focal point for communications during aeromedical transport operations.
2. Dispatchers receive incoming requests for service; obtain necessary information relative to the launch decision; coordinate the interaction between essential parties; “scramble” the flight crew; assemble and maintain necessary information regarding destination, weather, local telephone numbers and frequencies; follow the progress of the flight; input data into the system database; and communicate with ground emergency medical services (EMS) units and hospitals.
3. Communication may occur through a combination of methods: land telephone lines into a dispatch switchboard, hospital-EMS net transceiver, discrete frequency transceiver (communications with aircraft), or walkie-talkie radios.
4. Familiarity with the EMS system and EMS communications is essential for successful dispatch.
5. Flight following is an important part of aeromedical safety and involves tracking the position of the aircraft during a mission by plotting the location according to reports from the pilot at 10- to 15-minute intervals. If an accident or in-flight emergency occurs, the dispatcher is soon aware and can initiate search and rescue to a precise location, which enhances the chances of survival.
Appropriate Use of Aeromedical Services
1. Aeromedical transport combines skilled treatment and stabilization capability with rapid access to definitive care, but not without risk and at a cost approximately four times that of ground transport.
2. The comparative risk of aeromedical transport must be placed in perspective against the risk for patient death from less timely ground transport with limited medical capability en route.
3. In isolated rural or wilderness locations, a helicopter may be the only means of expedient access.
4. Prolonged patient extrication allows time for a helicopter to arrive at the scene, decreasing total transport time and thereby increasing the advantage of helicopter transport.
5. Patient comfort must be considered, especially on long transports over rough roads. Although a helicopter moves in three dimensions, fore and aft acceleration is usually steady, without the starting and stopping motions present during ground transport. However, helicopters typically travel within 914 m (3000 feet) of the ground’s surface and are more subject to turbulence than are high-flying fixed-wing aircraft.
6. The decision to transport a patient by air requires judgment and a realistic appraisal of the risks. A patient should be transported by air only if he or she is so ill that transport is necessary; if ground transport is unavailable, delayed, or unable to reach the patient; or if aeromedical transport would reduce the risk for death by permitting more rapid access to definitive care, providing greater medical skill en route, or both.
[/level-membership-for-emergency-medicine-category][not-level-membership-for-emergency-medicine-category]58
Aeromedical Transport
Because aeromedical transport involves medical care delivered in a hostile environment, the patient and crew are at risk for injury or death in the event of a mishap. Flight crew training must emphasize safety. A helicopter mountain rescue operation is a high-risk endeavor for the pilot and crew, as well as for the patient. Dangerous mistakes are easy to make around working helicopters. Therefore, aeromedical transport is not always the proper choice for rescue. Any decision to use aeromedical resources must be weighed against the lower risk associated with ground-based rescue or evacuation. One should consider the severity of the patient’s condition, desired level of out-of-hospital care, access to ground transportation, weather conditions for helicopter flight, and if local receiving hospitals have the capacity to land helicopters. Specific medical conditions may be more appropriate for aeromedical transport (Box 58-1).
Common Aeromedical Transport Problems
1. Once the decision is made to transport a patient by air and the appropriate aeromedical service is contacted, preparations must be made to ensure safety and comfort and to aid the flight crew in patient care.
2. To minimize delays, pretransport preparations should be made for patients of acute trauma (Box 58-2).
Patient Movement
1. Patient handling and movement can contribute to morbidity and mortality in unstable persons.
2. All transported patients should be adequately secured to the stretcher with safety straps to prevent sudden shifting of position or movement of a secured fracture.
3. During transport from the ground to the aircraft cabin, attempts should be made to limit sudden pitching of the stretcher.
4. U.S. Department of Transportation guidelines recommend design of cabin access such that no more than 30 degrees of roll and 45 degrees of pitch may occur to the patient-occupied stretcher during loading.
5. The stretcher, in turn, should be adequately attached to the floor.
6. Motion sickness in the patient may be treated with an antiemetic such as promethazine (25 mg PO, IV, or IM) or prochlorperazine (5 to 10 mg PO, IV, or IM).
7. Transdermal scopolamine patches are useful for prolonged flights and do not require parenteral or oral administration. Scopolamine’s antiemetic effects are not always uniform and may not occur until 4 to 6 hours after application of a patch. Patches may best be used to decrease motion sickness in the flight crew because they are nonsedating.
8. A novel approach to prevention of airsickness that does not induce excessive sedation is to give 25 mg of promethazine orally along with 200 mg of caffeine.
Oxygen Availability for Flight
1. In general, enough oxygen should be provided for the flight, plus a 30- to 45-minute reserve.
2. Sufficient oxygen should be carried to allow for ground handling time at either end.
3. The amount of oxygen required can be obtained by multiplying the desired flow rate in liters per minute (L/min) by the total duration of transport, including patient loading and unloading.
4. Table 58-1 lists the capacities of various types of oxygen tanks and their respective weights.
Table 58-1
Aluminum Oxygen Tank Specifications and Approximate Endurance
*Fill pressure of 139 bar (2016 psi).
†Fill pressure 153 bar (2219 psi).
From Luxfer Gas Cylinders. http://www.luxfercylinders.com/products.
5. Some portable ventilators have a gas-driven logic circuit that requires additional air or oxygen. Electrically powered ventilators have a lower requirement for oxygen but carry the additional need for a power inverter.
6. Most patients are transported with oxygen supplied by nasal cannula (1 to 6 L/min). A single E-sized oxygen cylinder is adequate for short flights, although backup cylinders are usually carried.
7. Patients intubated and maintained on 100% oxygen, as well as those ventilated on long flights, will quickly exceed the capacity of an E cylinder; several E cylinders or an H cylinder will be required.
Noise
1. Noise can be avoided with hearing protectors, which are devices similar to headphones but without internal speakers.
2. Inexpensive hearing protectors are available as moldable foam earplugs. In some cases, headphones may be used in the awake patient if the crew wants the patient to be able to communicate on the intercom system.
Cold
1. For winter and cold weather operations, remember that rotor wash can produce wind speeds of 80 mph under the rotor.
2. Always adequately dress or protect the patient from freezing rotor wash when loading under power (“hot loading”) or for winch or short-haul operations (patient outside the aircraft).
3. Use goggles to protect from blowing snow, along with full head and hand protection.
Eye Protection
1. Serious eye injuries can result from debris blown into the air.
2. When a patient is loaded onto or off a helicopter with the rotors turning, the patient’s eyes must be protected.
3. The eyes must be protected even if the patient is unconscious.
4. Lightweight skydiver goggles (“boogie goggles”) or ski goggles are effective and inexpensive.
5. Taping temporary patches over the eyes is also effective.
Respiratory Distress
1. Persons with respiratory disease or distress should have immediately treatable conditions addressed before takeoff.
2. Endotracheal (ET) intubation is essential if airway patency is threatened or if adequate oxygenation cannot be maintained with supplemental oxygen.
3. It is better to err on the side of caution when making a decision about a patient’s airway.
4. During flight it is easier to treat restlessness in an intubated person than airway obstruction or apnea in a nonintubated person.
5. Nearly all patients should receive supplemental oxygen.
6. Fraction of inspired oxygen (FIo2) should be increased with increasing cabin altitude to maintain a stable partial pressure of oxygen (Po2).
7. When oxygen saturation monitoring is unavailable and pretransport arterial oxygen content unknown, 100% oxygen may be administered throughout the flight to ensure adequate oxygenation.
8. Persons with chronic lung disease who are prone to hypercapnia may undergo deterioration in condition if the hypoxic drive is eliminated. In these patients, the least oxygen necessary to maintain saturation above 90% is advisable.
9. Close in-flight monitoring is essential, preferably by continuous pulse oximetry. Portable end-tidal CO2 monitoring is now relatively easy to accomplish and should be used for intubated/ventilated patients whenever possible.
10. Altitude changes may affect ET cuff volume, so cuff pressure must be checked frequently.
11. If any other air-bladder devices (e.g., cuffed tracheostomy tubes, laryngeal mask airways, air splints) are present on the patient, they must also be adjusted during flight to avoid increased volume/pressure problems. Check these frequently.
Transport of Dive-Related Injuries (e.g., Decompression Sickness, Arterial Gas Embolism)
1. Aircraft selection is crucial because the stricken diver should not be exposed to a significantly lower atmospheric pressure in the aircraft.
2. Ideally, transport only by pressurized aircraft.
3. For nonpressurized aircraft (i.e., helicopter), the flight altitude must be maintained as low as possible, not to exceed 305 m (1000 feet) above sea level, if possible.
Cardiopulmonary Resuscitation and Cardiac Defibrillation
1. Cardiopulmonary resuscitation (CPR) in an aircraft is difficult. The rescuers must perform several tasks simultaneously while ventilating the lungs or compressing the chest, all in a physically confining space.
2. There should be no concern with airborne defibrillation if all electronic navigational equipment on the aircraft has a common ground, as mandated by Federal Aviation Agency standards.
[/not-level-membership-for-emergency-medicine-category]
