Abdominal Hysterectomy
Abdominal hysterectomy is one of the most frequently performed surgical procedures in the United States. The basis for this operation is an open abdomen (laparotomy), which provides adequate exposure for isolation of the uterus and adnexa from surrounding structures to allow cutting and securing of support structures that attach the uterus to the pelvic floor and sidewalls.
These supporting structures include (1) vascular pedicles together with their peritoneal and connective tissue investments (e.g., infundibulopelvic ligament, uterine artery and veins); (2) muscular supports (e.g., the round ligaments); (3) connective tissue–vascular/neural condensations (e.g., cardinal, uterosacral ligaments); and (4) fat and peritoneum (e.g., broad ligament, uterovesical, uterorectal folds).
Strategic surrounding structures include the bladder anteriorly, the rectum posteriorly, and the ureters and great vessels laterally.
The blood supply to the uterus emanates from the hypogastric arteries and via the ovarian arteries from the aorta. The venous drainage enters the hypogastric veins, the vena cava (right ovarian), and the left renal vein (left ovarian). The uterine artery crosses from the anterior division of the hypogastric artery obliquely above the ureter to join the uterus at the junction of the corpus and cervix. The artery divides into a larger, ascending branch and a smaller, descending branch that supplies the cervix and anastomoses with the vaginal artery. The latter also takes origin from the anterior division of the hypogastric artery.
Total Abdominal Hysterectomy With Bilateral Salpingo-oophorectomy
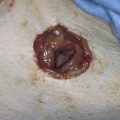
After the abdomen has been opened and the intestine carefully packed, a self-retaining retractor is placed (Fig. 11–1A, B). The abdomen has been previously explored. The pelvic contents in the operative field are identified, and any pathology or anatomic distortion is noted (Fig. 11–2).
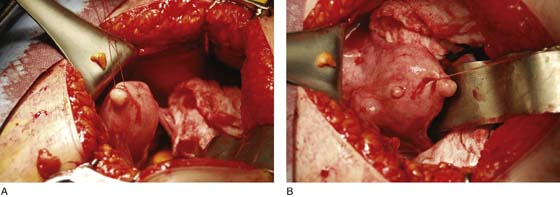
FIGURE 11–1 A. The myomatous uterus in situ, the Balfour self-retaining retractor is in place. A Richardson retractor is positioned between the bladder and the uterus. B. A 0 Vicryl stitch placed into the uterine fundus pulls the uterus posteriorly, exposing the vesicouterine peritoneum. A malleable retractor has been placed between the uterus and the sigmoid colon.
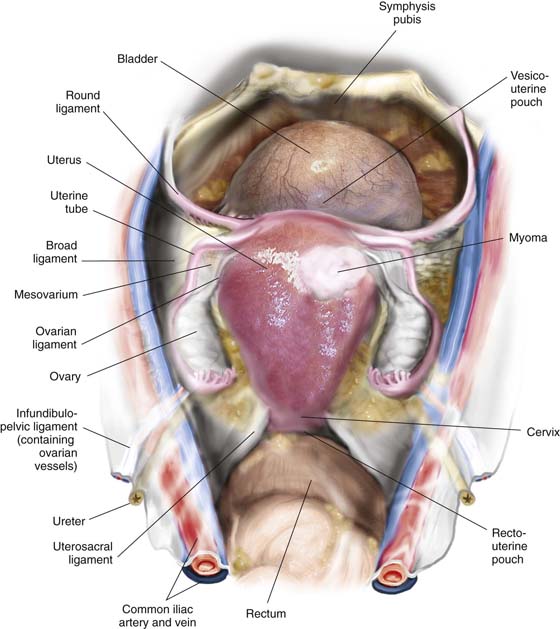
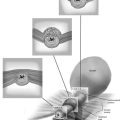
FIGURE 11–2 Schematic topographic view of the pertinent anatomy encountered during hysterectomy.
Thus, surgery is performed in a logical stepwise fashion.
1. The round ligaments are clamped, divided, and suture-ligated with 0 Vicryl (Fig. 11–3A, C).
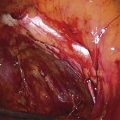
2. The bladder flap is cut by grasping the peritoneum of the vesicouterine fold just below its reflection onto the uterus (Figs. 11–4 and 11–5A–D). Steps 1 and 2 are repeated on the opposite sites (Fig. 11–6).
3. With the use of a sponge forceps, the bladder is gently pushed inferiorly from the cervix. Care is taken to stay in the midline, pushing onto the cervix (Figs. 11–7A, B and 11–8). If the patient has had previous surgery (e.g., a cesarean section), the bladder should be separated from the uterus by sharp dissection.
4. The infundibulopelvic ligaments (ovarian arteries and veins) are isolated from the ureter and triply clamped (Fig. 11–9A–E). The ligament is divided between the first and second clamps. The vessels are doubly ligated with the tissue beneath the lowermost clamp simply ligated or suture-ligated. The tissue beneath the second (middle) clamp is suture-ligated with 0 Vicryl (Fig. 11–10).
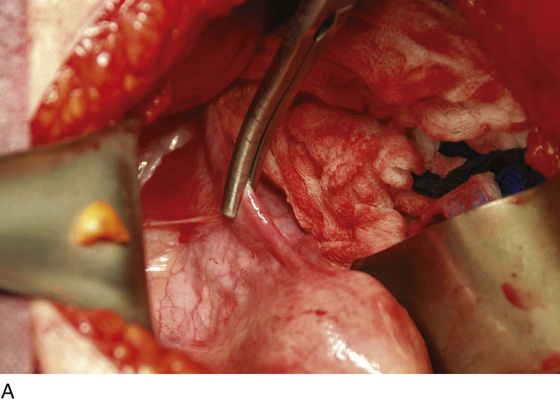
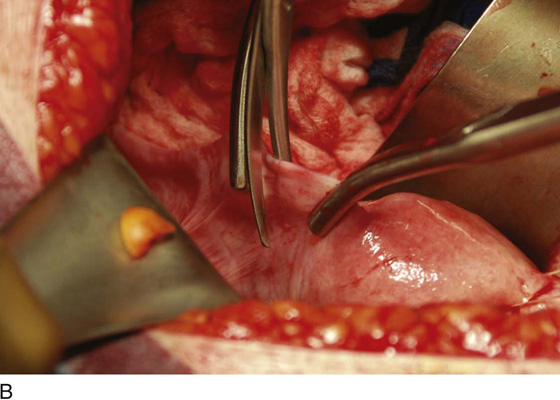
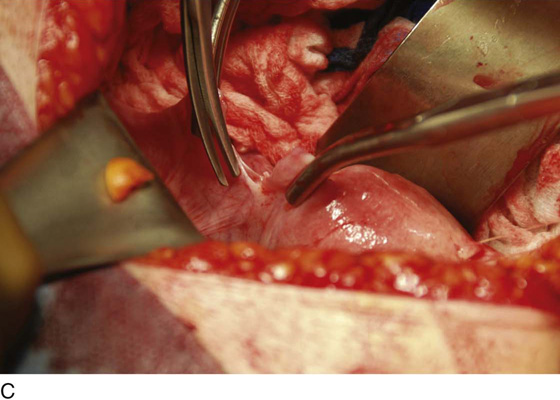
FIGURE 11–3 A. The round ligament is clamped with a Zeppelin clamp. B. A second clamp is placed on the round ligament at the point where it attaches to the uterus and the ligament is divided. C. The cut is extended into the upper portion on the anterior leaf of the broad ligament.
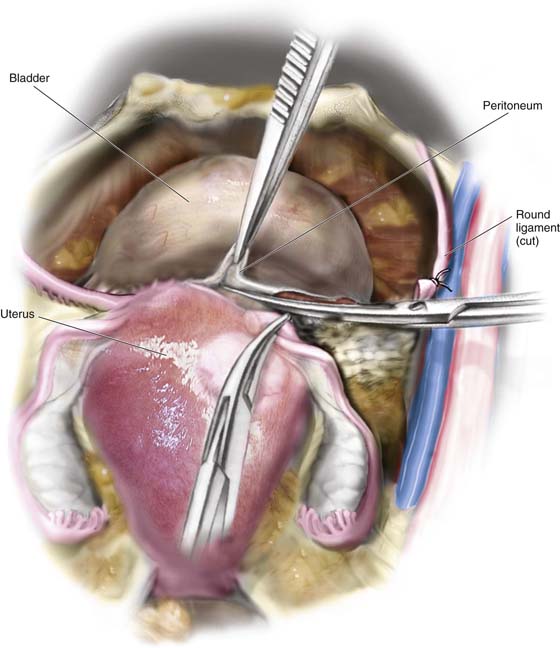
FIGURE 11–4 The round ligament is cut, and the peritoneal reflection between the bladder and the uterus is dissected by slipping the scissors beneath the peritoneal edge and spreading the scissors repeatedly as the scissor is advanced. Next, the dissected peritoneum is cut.
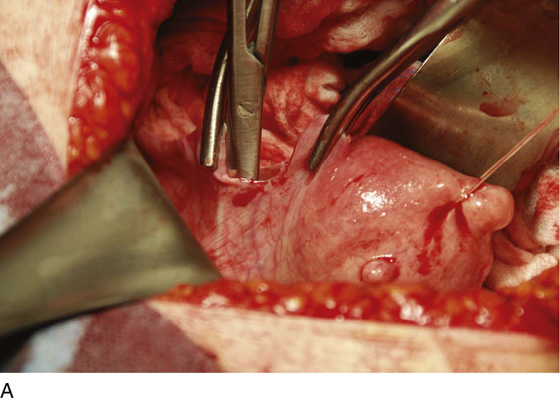
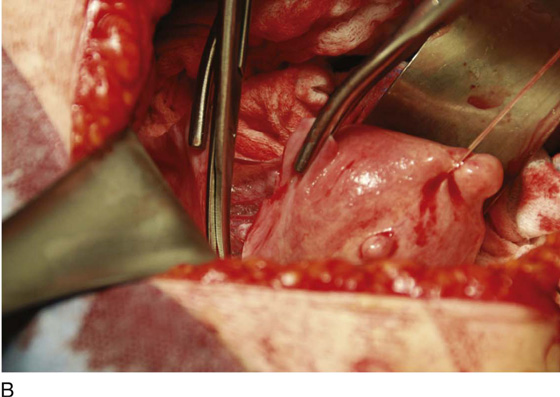
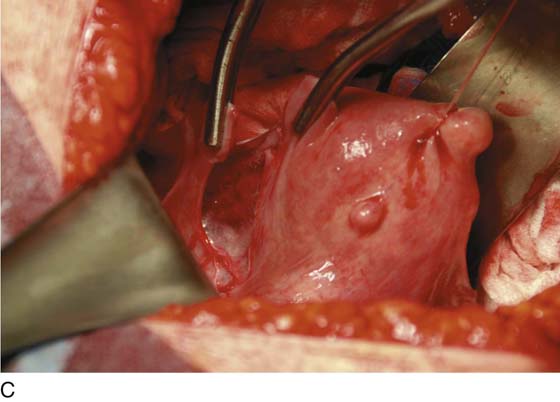
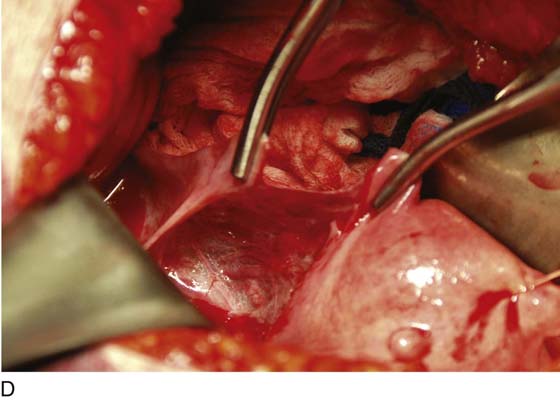
FIGURE 11–5 A. The scissor is slipped under the vesicouterine peritoneum within a bloodless space, in preparation for cutting the peritoneum. B. The bladder peritoneum is cut, thereby severing the attachment between the bladder and the uterus. C. The loose areolar tissue deep within the anterior leaf of the broad ligament is dissected. D. The pelvic ureter lies at the floor of the dissected broad ligament.
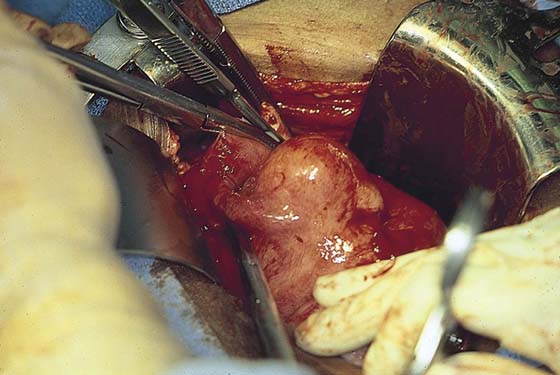
FIGURE 11–6 The left round ligament is divided similarly to the procedure performed on the right side.
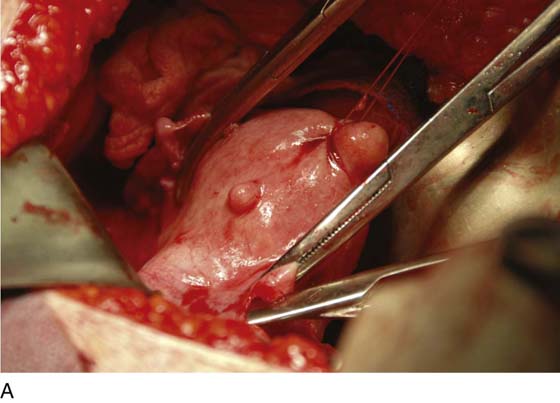
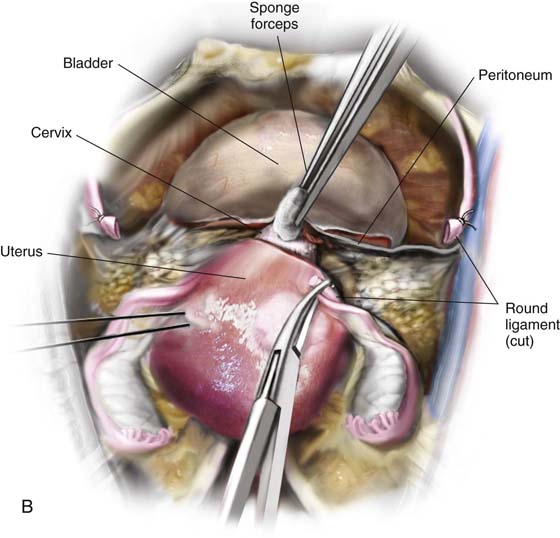
FIGURE 11–7 A. The left round ligament has been cut. The left side of the vesicouterine peritoneum is dissected with scissors and cut so as to join up with the severed peritoneum on the right side. B. The bladder is pushed inferiorly by applying pressure on the cervix and bladder with a sponge stick. The pressure should mainly be applied to the cervix.
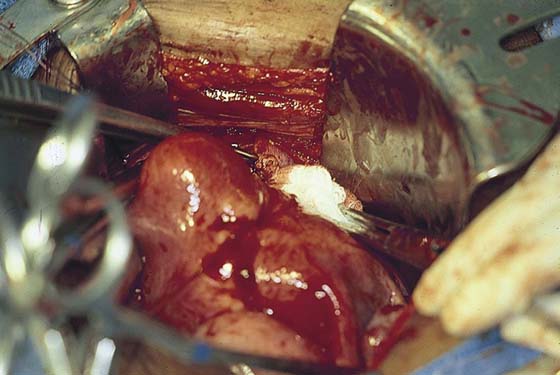
FIGURE 11–8 When sponge forceps are applied to the bladder, care must be taken to stay in the midline; straying to the right or left will invariably tear the surrounding vesical (vesicle) and uterine vessels.
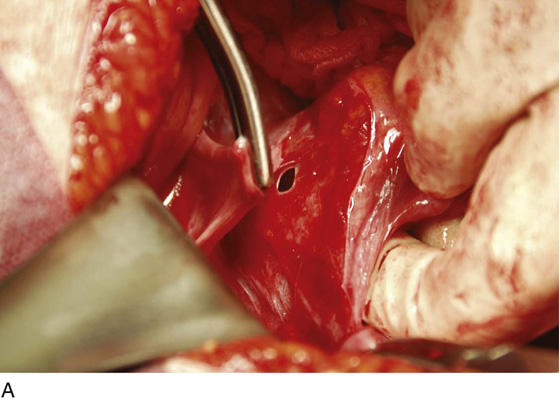
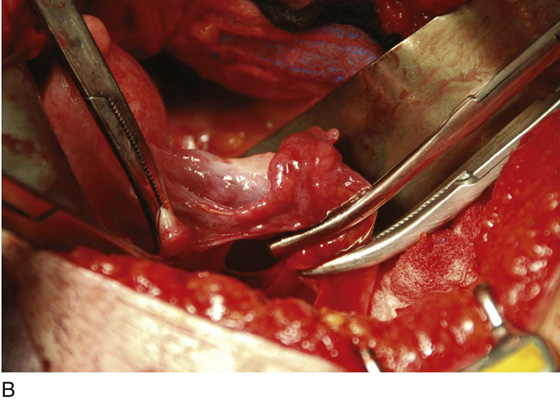
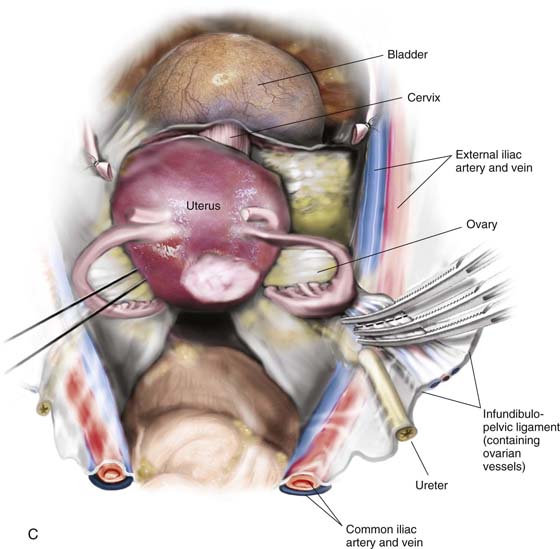
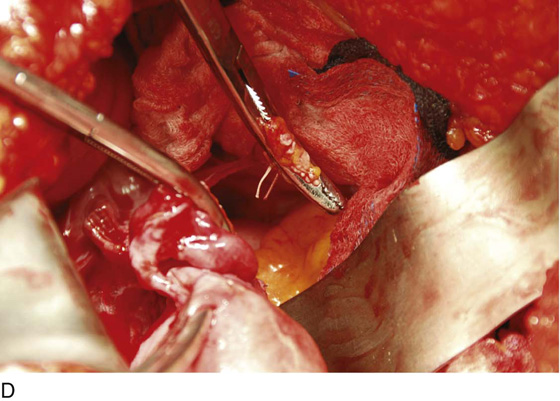
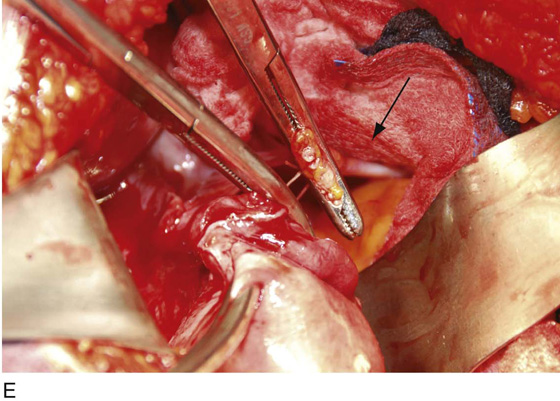
FIGURE 11–9 A. The posterior leaf of the broad ligament is isolated and opened. B. The ovarian vessels (infundibulopelvic ligaments) are clamped with Zeppelin clamps with identical curvature. C. The infundibulopelvic ligament is triply clamped with Zeppelin clamps and divided along the dashed line between the clamp closest to the ovary and the two clamps farthest from the ovary. D. The ovarian vessels have been cut free from the adnexa, and one suture ligature has been placed and tied. E. The two portions of the cut infundibulopelvic ligament are shown here. A second suture ligature will be placed midway and below the clamp to which the arrow points. The suture ligature will be tied “fore and aft.”
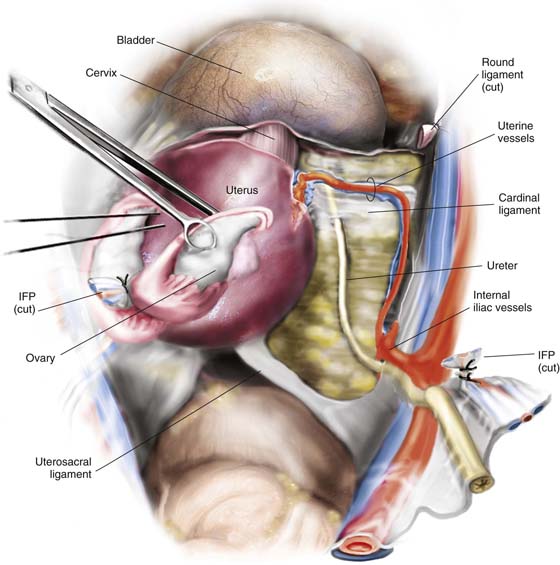
FIGURE 11–10 The lowest clamp on the infundibulopelvic ligament is tied with 0 Vicryl. The remaining clamp is removed after a suture is passed under the clamp and is tied fore and aft (around the tip and heel of the clamp). The ligament, thus doubly secured, is then divided. A similar procedure is performed on the right and left sides. The ureter is identified to the point where it is crossed over by the uterine vessels.
5. The uterine vessels are skeletonized (i.e., excessive connective tissue is trimmed away, denuding the vessels) (Fig. 11–11A, B). The vessels are clamped, with this first clamp applied tightly to the uterus (Fig. 11–11C, D). A second clamp is applied directly above, never below, the first uterine vessel clamp (Fig. 11–12). Finally, a third clamp is applied above the second to secure back-bleeding (Fig. 11–13A, B). The uterine vessels are cut with scissors or scalpel (Fig. 11–14A, B). Next, the uterine vessels are doubly suture-ligated with 0 Vicryl, with care taken to pass the needle immediately beneath the tip of the clamp (Fig. 11–15A, B). The clamps (with the exception of the uppermost clamp) are removed after suture placement (see Fig. 11–14B). The procedure is identical for the right and left sides.
6. The cardinal ligaments are clamped in juxtaposition to the uterus, with care taken to avoid infringement of the ureter, which is very close to the uterine cervical junction. The upper portion of the cardinal ligament is then cut (Fig. 11–16A–E). The procedure is carried out on either side. The ligaments are sutured with 0 Vicryl with a transfixing stitch.
7. The uterosacral ligaments on either side are clamped, cut, and suture-ligated. This again is carried out close to the uterus, because farther back (posteriorly), the ligaments are intimately associated with the ureters. In fact, definite identification of the ureter once again is advised at this point in the procedure. Finally, the cervix is palpated and is confirmed to be separate from the vagina. A clamp is placed across the vagina after it has been confirmed that the margin of the urinary bladder is free and clear. The specimen is removed and the vagina is closed (Fig. 11–17A–J).
8. Alternatively, particularly if the corpus is bulky, the uterus may be “subtotaled” (i.e., the body of the uterus is amputated from the cervix). The uterus is elevated (the remaining clamps are those applied to prevent back-bleeding clamps during step 5) (Fig. 11–18). A sharp scalpel cuts the cervix free from the corpus (Fig. 11–19).
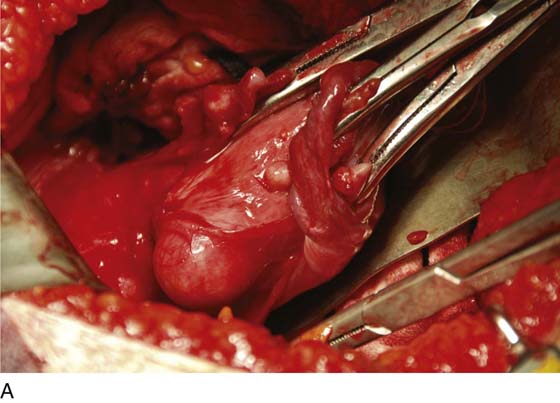
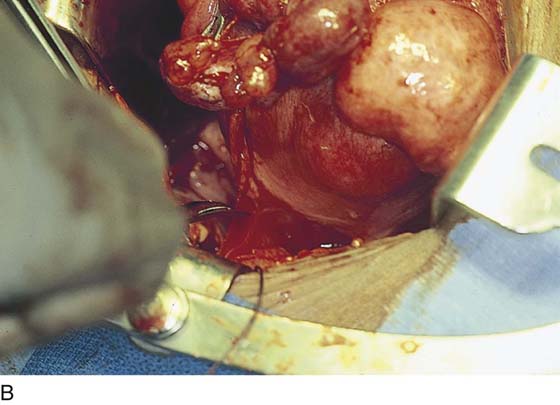
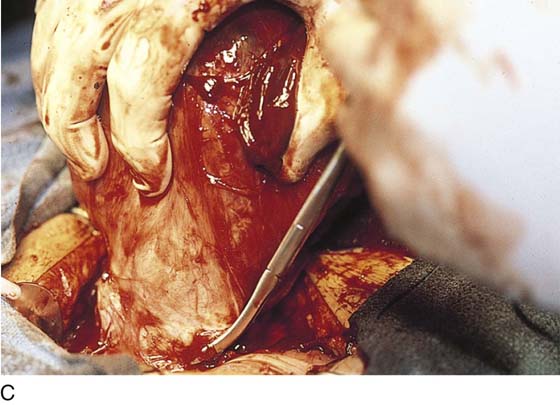

FIGURE 11–11 A. The uterus is pulled upward and the uterine vessels are prepared for clamping. Note that the bladder has been pushed down from the cervix (see Figs. 11–7B and 11–8A). B. The uterine vessels are skeletonized from the surrounding connective tissue, permitting the ureters to drop away laterally. The uterine vessels can now be identified as they ascend laterally onto the uterus and rise upward to anastomose with the ovarian vessels at the level of the uterotubal junction. C. The first clamp to secure the uterine vessels is applied above the bladder reflection and intimately close to the uterus. D. The clamp should extend inward to the cervicouterine junction such that the tip of the clamp glances off the solid uterine tissue while grabbing the vessels and their accompanying connective tissues securely. The next two clamps will be applied above this sentinel first clamp.
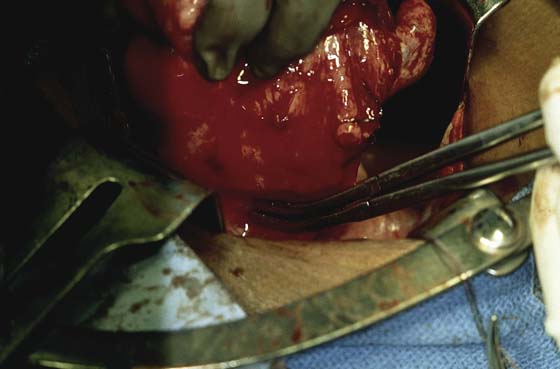
FIGURE 11–12 The second clamp has been placed close above the first clamp. The clamp itself should have an identical curve to the first clamp applied.
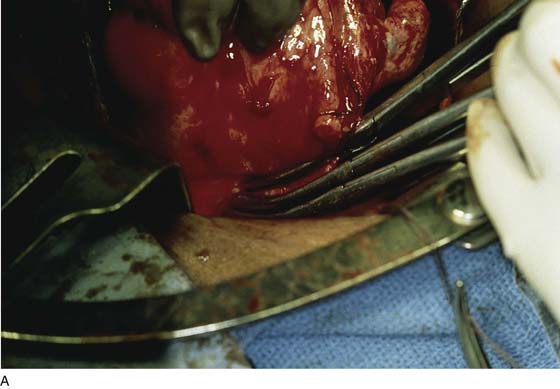
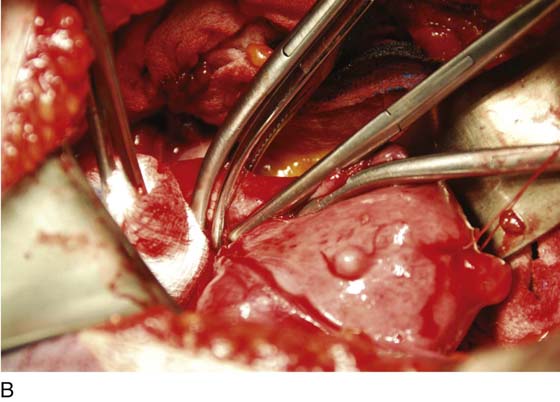
FIGURE 11–13 A. A third clamp is applied for the purpose of controlling back-bleeding. B. Two curved Zeppelin clamps are placed across the uterine vessels. A straight clamp is placed close to the corpus for back-bleeding. The cut will be made between the second applied curved clamp and the straight clamp.
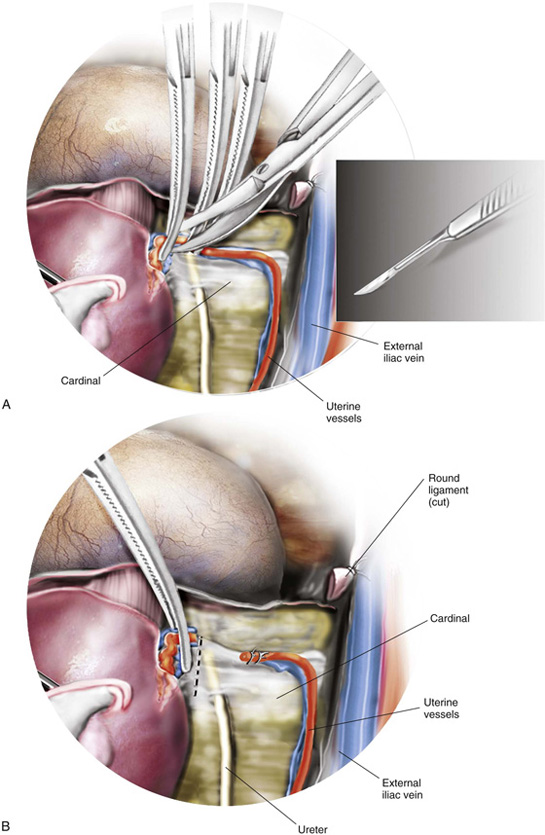
FIGURE 11–14 A. The uterine vessels are cut between the second and third clamps applied. This may be accomplished with either scissors or a knife. The incision should not extend beyond the tip of the clamp. B. Suture ligatures of 0 Vicryl are placed just below the tip of each clamp and tied. The uterine vessels are thus doubly suture-ligated. Again, the location of the ureter should be checked. At this point, the ureter traverses the cardinal ligament to reach the bladder base. The dashed line indicates where the cardinal ligament will subsequently be clamped and cut.
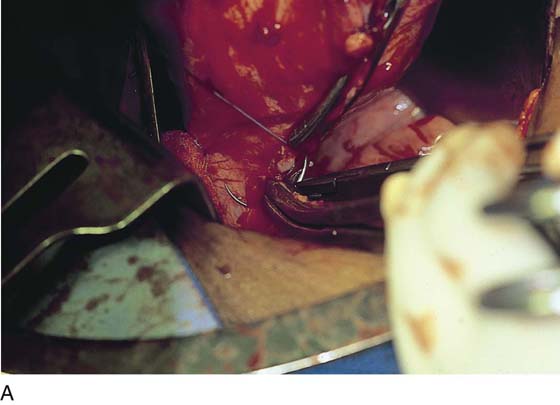

FIGURE 11–15 A. Technique for suturing the uterine artery pedicle. Note that the needle passes directly beneath the tip of the uterine artery clamp. The back-bleeding clamps can be removed after both uterine arteries have been divided and suture-ligated, because by this point the ovarian and uterine vessels have been ligated. B. The uterine vessels have been cut. A suture ligature has been placed and is being tightened and tied. A second suture ligature will be placed beneath the remaining clamp.
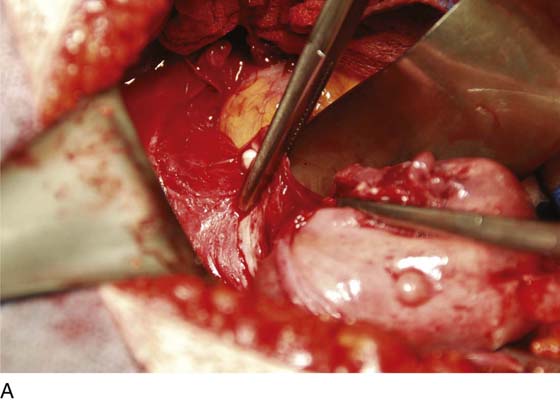
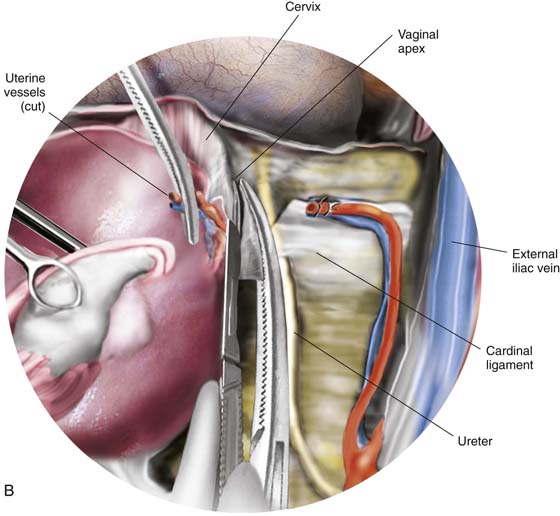
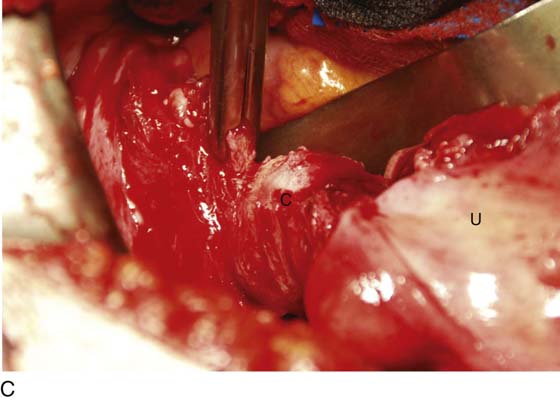
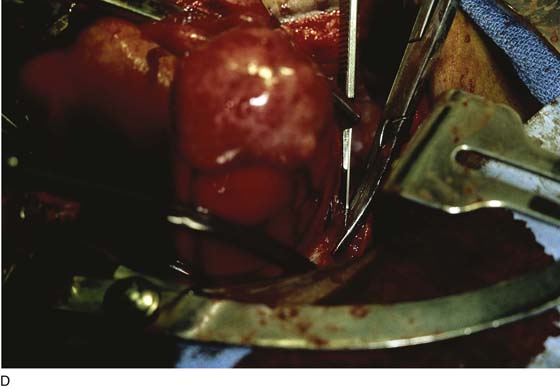
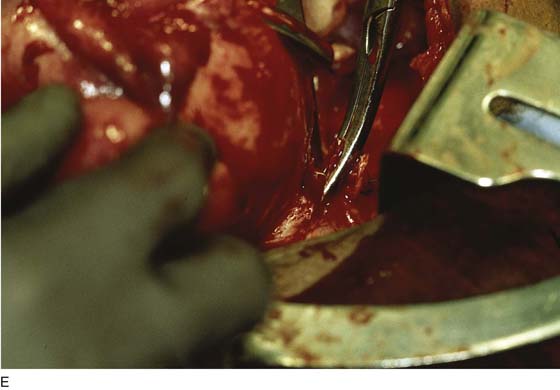
FIGURE 11–16 A. The cardinal ligament is clamped. B. The upper portion of the cardinal ligament may now be clamped close to the upper portion of the cervix. C. The cut edge of the cardinal ligament is held within the clamp. The cervix is seen at C with the body of the uterus above U. D. The clamped upper cardinal ligament is incised. E. The cardinal ligament is now free at the cervicouterine junction.
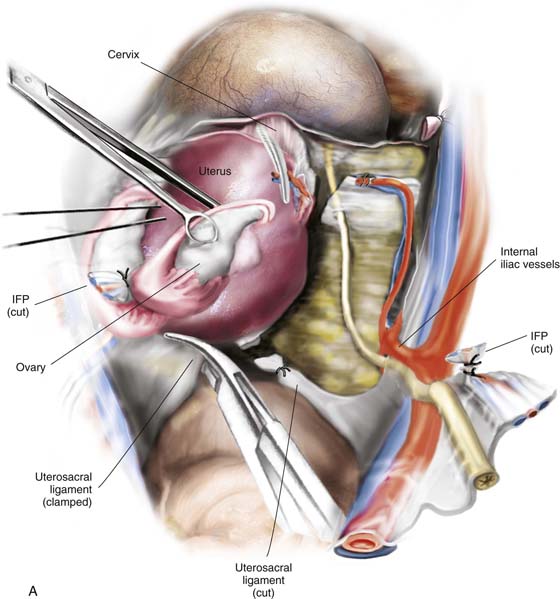
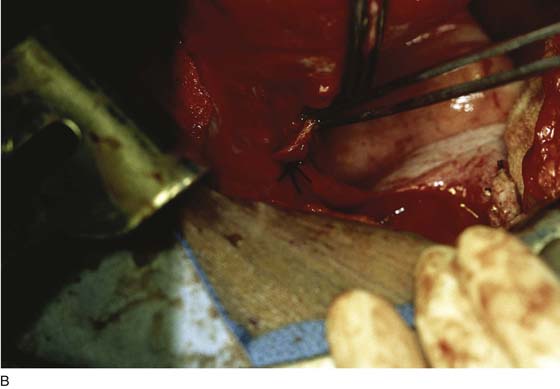
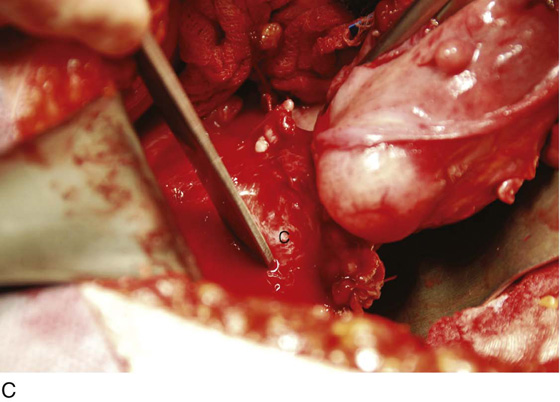
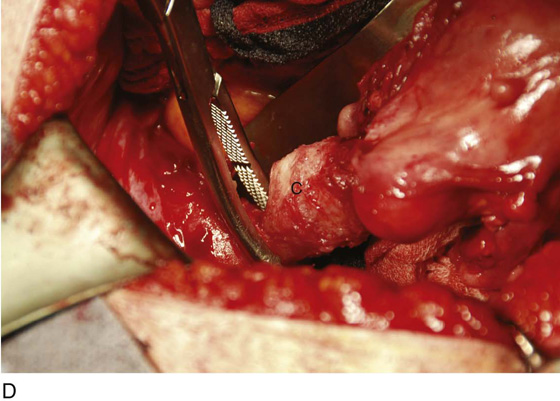
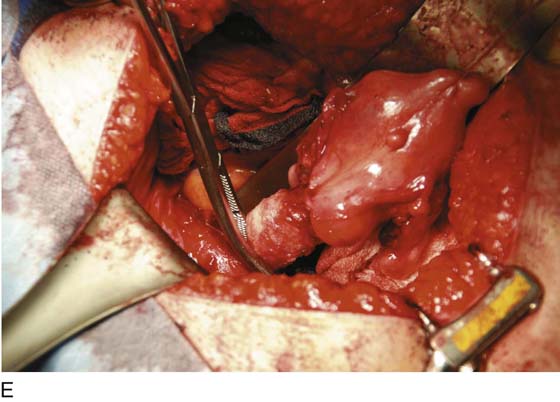
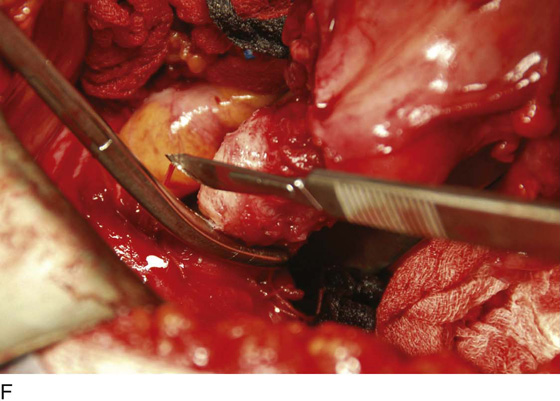
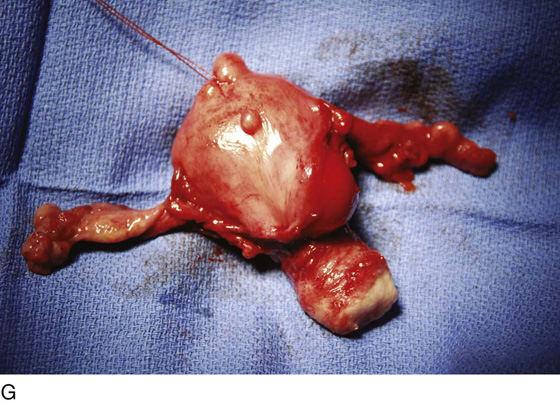
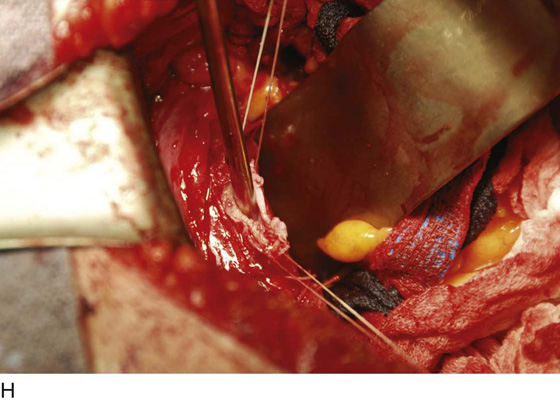
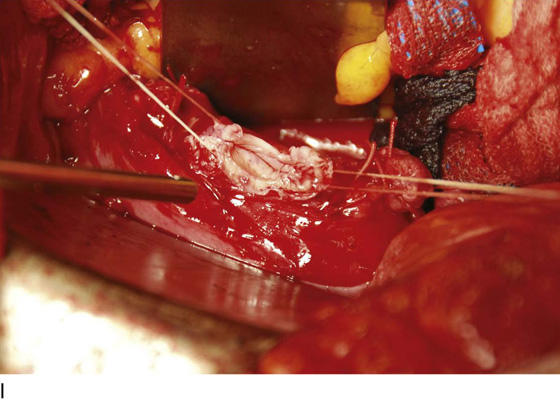
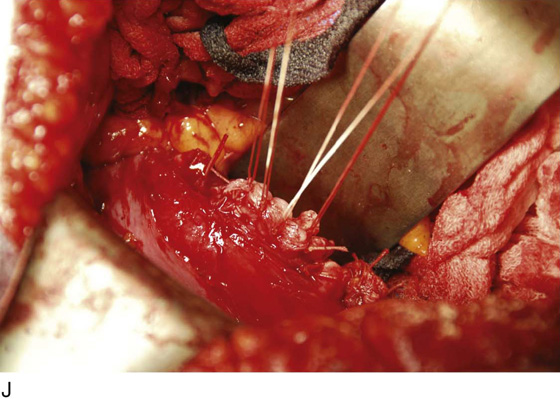
FIGURE 11–17 A. Next, the uterosacral ligaments are clamped close to the uterus and incised. The clamped uterosacral ligament is suture-ligated by means of a transfixing suture. Similarly, the cut upper cardinal ligament is ligated by a transfixing suture. B. The uterosacral ligaments are bilaterally cut and sutured (as in Fig. 11–17A). The forceps is holding the cut end of the left uterosacral ligament. C. The pubocervical fascia covering the cervix (C) has been cut transversely with a scalpel. With the handle of the scalpel, the fascia is pushed inferiorly. D. The edge of the vagina below the cervix (C) is isolated from the bladder, and a clamp is placed across the vagina. E. The clamp is closed. F. The upper vagina is cut above the applied clamp separating the uterus above from the vagina below. G. The total abdominal hysterectomy, bilateral salpingo-oophorectomy has been completed. H. The vaginal cuff is exposed, and a suction catheter is placed into the vagina. I. The anterior and posterior walls of the vagina are inspected. J. The vagina has been closed with interrupted 0 Vicryl sutures. Note that the sigmoid colon is protected by the malleable retractor.
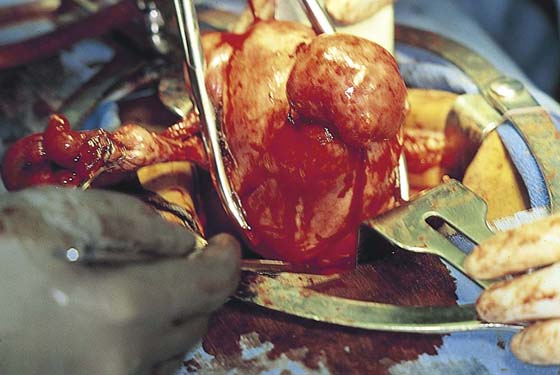
FIGURE 11–18 In the case of a large, bulky uterus the body of the uterus may be separated from the cervix to provide better viewing within the pelvis. A scalpel cuts between the corpus and the cervix.

FIGURE 11–19 The dashed line shows the plane through which the scalpel will cut the uterine body free relative to performing a temporary subtotal procedure (see Fig. 11–18). No bleeding should be encountered during the maneuver.
9. The cervix is grasped with two tenacula, and the superficial portion of the lower part of the cardinal ligament is clamped on each side. Note that the clamp is applied close to the sides of the cervix away from the ureter (Fig. 11–20A, B). The pubovesical cervical fascia is incised and pushed inferiorly, creating a plane between the bladder base and the cervix (Fig. 11–21). Finally, straight clamps are placed along the lowest portion of the cardinal ligaments, with the tips of the clamps within the peeled down pubovesical cervical fascia (Fig. 11–22). The ligaments are cut with a sharp scalpel and sutured with a 0 Vicryl transfixing stitch (Fig. 11–23).
10. The bladder is pushed farther inferiorly, with use of the established infrafascial plane within the pubovesical cervical fascia. Note that the vagina is behind and the bladder and ureters are in front of the plane. Clamps are applied within the pubovesical cervical fascial plane to secure the vaginal angles (Fig. 11–24). The cervix is cut away from the top of the vagina, and a small margin of vagina is incorporated with it (Fig. 11–25). The vaginal angles are secured, and the vagina is closed with interrupted figure-of-8 sutures of 0 Vicryl (Figs. 11–26 and 11–27A). Alternatively, the vaginal cuff may be left open by suturing the edges with a continuous running lock suture of 0 Vicryl (Fig. 11–27B). The wound should be irrigated to facilitate identification of bleeding sites.
11. Next the vagina is suspended by suturing the stumps of the cardinal and uterosacral ligaments to the vaginal vault (Fig. 11–28).
12. Finally, the peritoneum is carefully closed. The position of the ureter must be definitely identified so as not to ligate it during this phase of peritoneal closure.
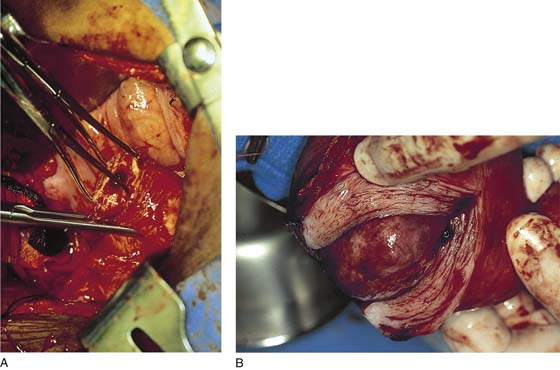
FIGURE 11–20 A. The corpus of the uterus has been separated and removed from the field. Two tenacula have been placed through the cervical stump. The right cardinal ligament has been cut and sutured by a transfixing ligature. A Zeppelin clamp has been placed on the left cardinal ligament close to the cervix (view from head looking toward feet). B. The separated corpus is cut, demonstrating a large submucous myoma.
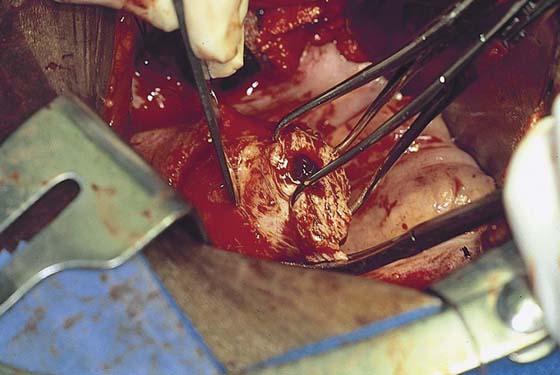
FIGURE 11–21 The pubovesical cervical fascia is cut transversely with a scalpel and is dissected inferiorly.
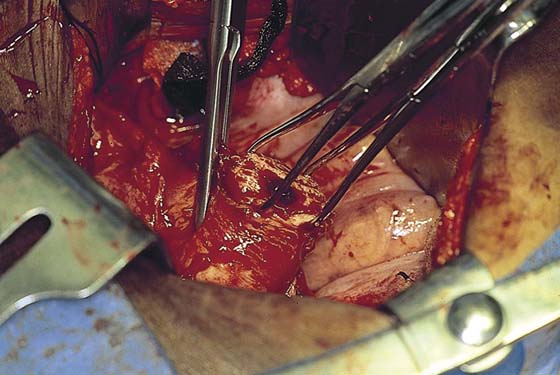
FIGURE 11–22 A straight Zeppelin clamp is placed across the bottom of the cardinal ligament with the point of the clamp angled within the pubovesicocervical fascia. Clamping within the fascial layer prevents injury to the bladder and ureters.
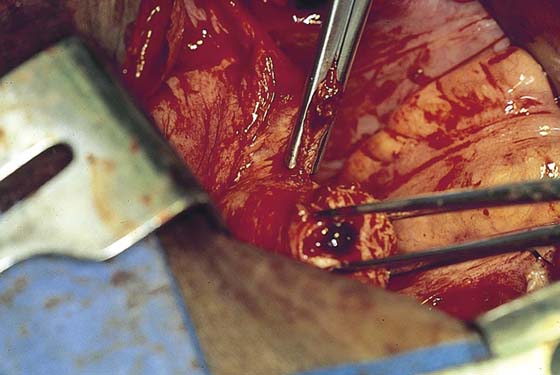
FIGURE 11–23 The lower portion of the cardinal ligament is cut.
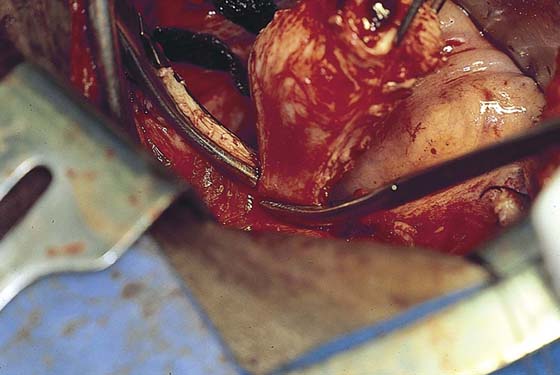
FIGURE 11–24 Zeppelin clamps are placed at the angles of the vagina as the cervix is cut away from the top of the vagina.
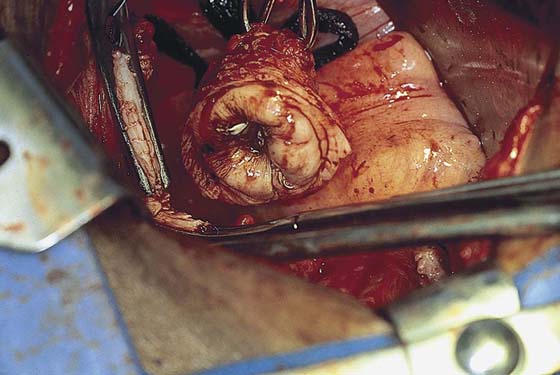
FIGURE 11–25 The excised cervix is shown with its peripheral “cuff” of vagina. Below, the Zeppelin clamps are across the vaginal vault.
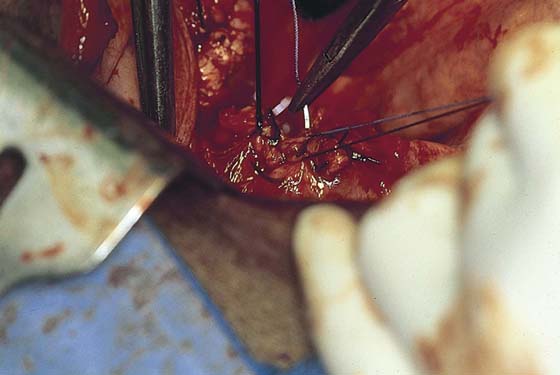
FIGURE 11–26 The top of the vagina may be closed with figure-of-8 (hemostatic) sutures as pictured here or, alternatively, may be left open by running a continuous locking stitch completely around the upper margin of the vagina.
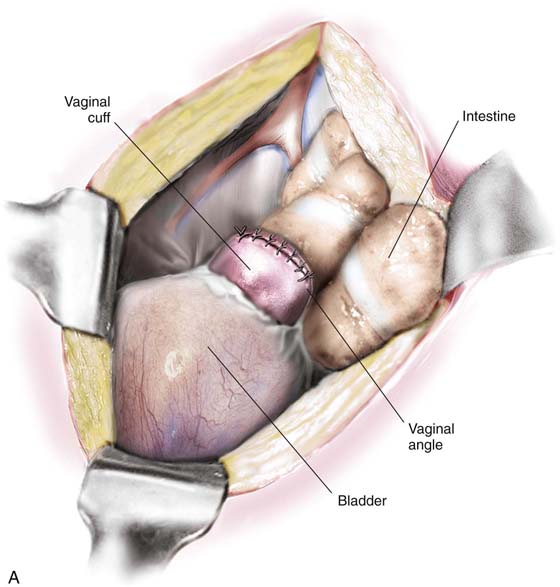
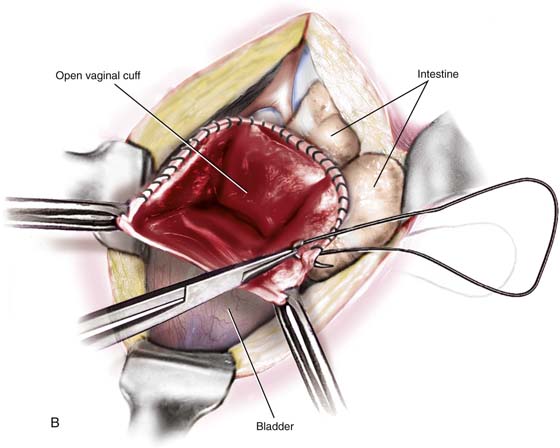
FIGURE 11–27 A. This view is taken from the front perspective. The uterus is gone. The top of the vagina is neatly separated from the bladder and has been sutured closed. B. The uterus has been removed. The edges of the vagina have been grasped with Allis clamps. The upper margin (cuff) of the vagina is reefed with a running or running lock stitch. Following closure, the vagina is suspended (see Fig. 11–28).
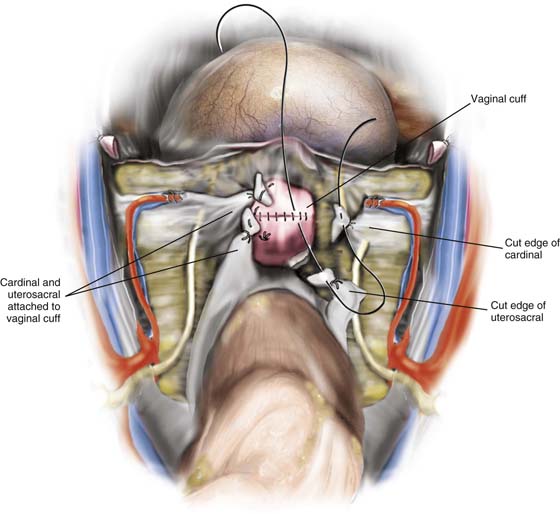
FIGURE 11–28 The final steps to complete the hysterectomy are to suspend the vaginal vault by suturing the cardinal and uterosacral ligament stumps into the vagina. In this picture, the suspension has been completed on the left side, and the right side has been sutured but not yet tied into place. Finally, the cut edges of the perineum are approximated by a running suture of 3-0 Vicryl.
Subtotal Hysterectomy
This procedure is not frequently done, although during the 1940s, 1950s, and even early 1960s, its performance was commonplace. The advantages of the operation are principally speed and a diminished risk of ureteral injury because the cardinal ligaments are not taken down. For emergency obstetric surgery (e.g., nonresponsive uterine atony, massive rupture), the operation is ideal.
Subtotal hysterectomy concludes after step 5 of the total hysterectomy (described in the previous subsection and depicted in Figs. 11–18 and 11–19). When the corpus is severed and removed from the field, operative exposure is always positively affected. The descending or cervical branch of the uterine artery is left intact if possible. If this branch is clamped with the larger ascending branch, no difficulty relative to vascular supply to the cervix is encountered because anastomotic branches of the vaginal artery provide ample collateral circulation. Typically, the uterosacral and cardinal ligaments are intact; therefore, no suspension is required. The top of the exposed cervix should be closed; this can be accomplished by suturing the posterior surfaces to the anterior surfaces with the use of interrupted simple sutures or figure-of-8 sutures of 0 Vicryl (Fig. 11–29). Upon completion of cervical closure, the wound is irrigated to check for bleeding points. Next, the peritoneum from the earlier bladder reflection (see Fig. 11–4) is sutured to the posterior leaf of the previously incised peritoneum with a running stitch of 3-0 Vicryl (Fig. 11–30). The author recommends, before the top of the cervical stump is sutured, that the surgeon cut a thin disc from the exposed cervix at the point of separation from the body of the uterus to ensure that no functioning endometrium remains. The removed sample should be sent to pathology for frozen section. This procedure will eliminate the 7% risk of subsequent cyclic bleeding.
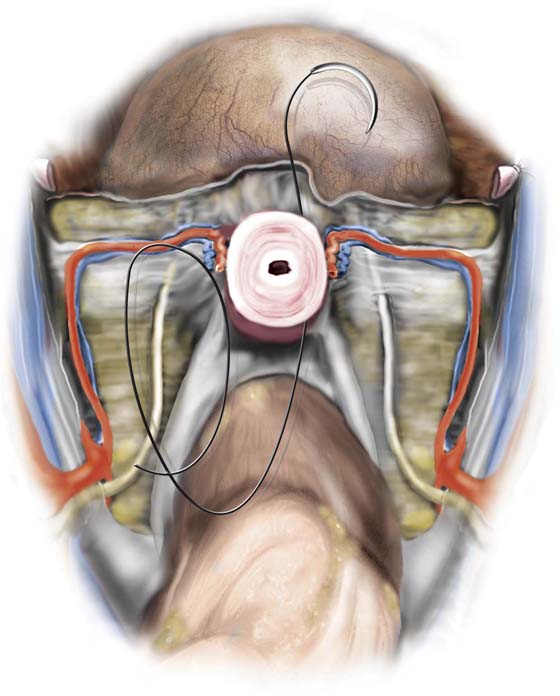
FIGURE 11–29 In this picture, a subtotal hysterectomy is illustrated. The body of the uterus has been amputated (see Figs. 11–18 through 11–20). The cervix with its attached ligaments will be left in place. The intra-abdominal portion of the cervix is closed by a row of interrupted simple or figure-of-8 sutures.
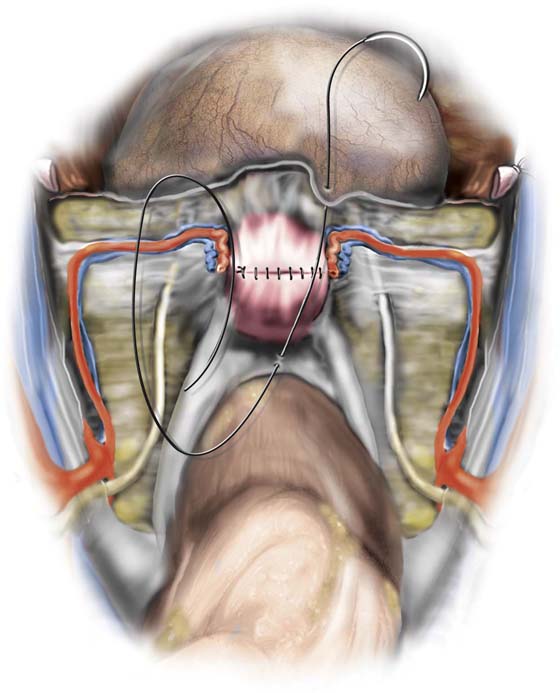
FIGURE 11–30 The top of the cervix has been closed. The peritoneum (visceral) is closed over the operative site.
Simple Abdominal Hysterectomy
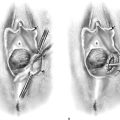
Another variant of the abdominal hysterectomy is preservation of the adnexa at the time of uterine extirpation. In this instance, the utero-ovarian ligament and the oviduct are triply clamped close to the uterine fundus. The incision is made with scissors or knife between the clamp closest to the uterus and the second clamp. Transfixing suture ligatures of 0 Vicryl are placed behind the third (most distant from the uterus) and second clamps. A simple tie or suture ligature can be placed under the first clamp to prevent back-bleeding as an alternative to keeping the clamp attached until the uterine vascular supply is secured (Fig. 11–31). The three suturing techniques described herein and in preceding paragraphs are illustrated in Figure 11–32.
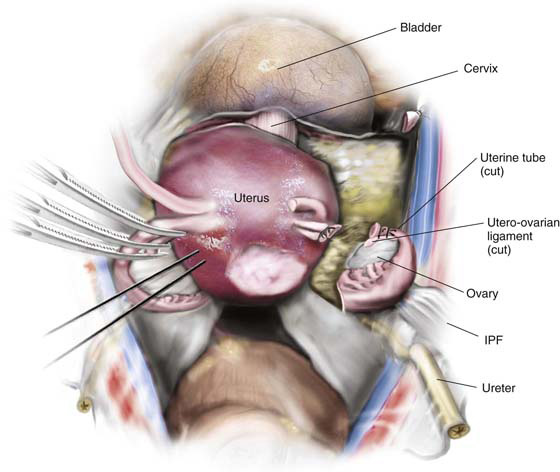
FIGURE 11–31 The technique of simple hysterectomy without excision of the tubes and ovaries. On the right side, the round ligament has been divided and sutured. The tube and utero-ovarian ligament have been cut and doubly suture-ligated. On the left side, three clamps have been placed across the tube and utero-ovarian ligament. Note that a traction stitch has been placed into the uterine fundus.
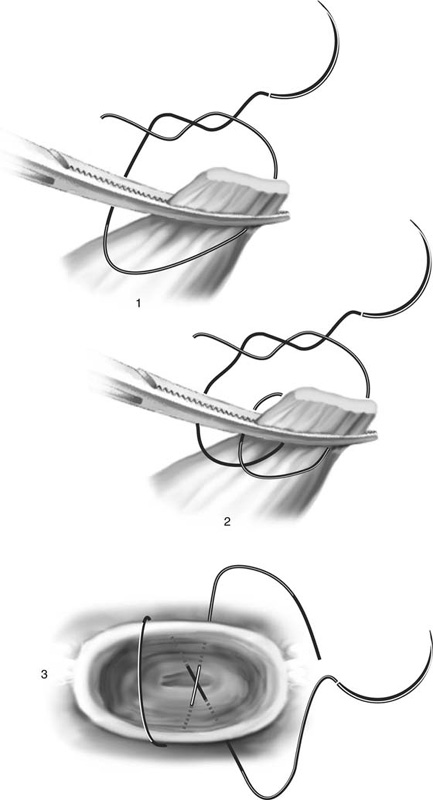
FIGURE 11–32 Three types of sutures are used for hysterectomy: (1) simple suture ligature, (2) transfixing suture ligature, and (3) figure-of-8 suture ligature.