[level-membership-for-internal-medicine-category]
CHAPTER 15 PRACTICAL PROCEDURES
GENERAL INFORMATION
 Always seek senior help if you are not familiar with a procedure.
Universal infection control precautions


 Place all sharps directly into a sharps bin; do not manually resheath or break needles. Do not overfill sharps bins, and ensure that the bin is securely fastened before disposal.

 If you do accidentally cut, scrape or puncture your skin, follow the ‘accidental inoculation procedure’, encourage bleeding, wash with warm soapy water, dry and cover with a waterproof dressing. Report the incident to the senior person in charge and ensure a report is completed. Seek advice from the occupational health department or A&E. In some cases, post-exposure prophylaxis may be required. This is time-critical, so seek immediate advice. It may be appropriate for someone else to complete the practical procedure.


ARTERIAL CANNULATION
Indications


Procedure
Arterial cannulation. You will need:
Universal precautions; sterile gloves
Syringe of local anaesthetic / needle
Syringe of heparinized saline flush
Arterial cannulae (usually 20 gauge or 22 gauge)
Decide which artery to cannulate. The radial artery of the non-dominant hand is usually preferred in the first instance. Alternatives include the ulnar, dorsalis pedis and posterior tibial arteries. It is pointless, however, to persist with attempts at peripheral arterial cannulation in patients who are hypotensive and ‘shut down’. The femoral and brachial arteries are useful during resuscitation of profoundly shocked patients. Ultrasound guidance is potentially useful at all sites to aid arterial cannulation, particularly in hypotensive patients and those whose landmarks are obscured by oedema or obesity.


Seldinger technique
 Advance needle through the puncture site towards the artery at a shallow angle. As the vessel is punctured, a flashback of arterial blood is seen in the hub. Pass the guide wire through the needle into the artery. Withdraw the needle and pass the cannula over the guide wire. The guide wire is then discarded.
Direct cannulation
 Either: advance the cannula and needle through the puncture site towards the artery at a shallow angle. As the vessel is punctured a flashback of arterial blood is seen in the hub. Holding the needle still, advance the cannula over the needle into the artery. This should be a single smooth movement without resistance.


USE OF PRESSURE TRANSDUCERS
 The patient’s arterial catheter is connected to the transducer by a continuous column of (heparinized) saline. A pressurized flushing device maintains a small forward flow (approximately 2–3 mL / h) to keep the cannula patent.
 Pressure changes in the vessel are transmitted via the saline to a diaphragm. As this diaphragm moves in response to the pressure changes, its electrical conductivity changes. This results in fluctuations in electrical signal from the diaphragm, which is interpreted by a monitor and displayed as an arterial waveform and blood pressure values. Systolic, diastolic and mean pressures are usually displayed.
 There must be no air bubble in the connection tubing or transducer chamber. This will damp the trace and produce lower blood pressure values. Flush well before connecting the transducer to the patient.


CENTRAL VENOUS CANNULATION
 Do not attempt central venous cannulation without supervision until you have been adequately taught to do so. You must be aware of possible complications and how to manage them.
Indications
Central venous access is almost universal in intensive care patients. Indications include:


Ultrasound guidance for vascular access
The use of ultrasound to guide central venous access procedures is recommended in all cases (NICE Guidance. Central venous catheters, ultrasound locating devices, Sept. 2002. www.nice.org.uk/guidance/TA49).


 Effective use of ultrasound requires practice. In particular the needle must be visualized as it passes into the vessel. Seek instruction before attempting to use it on a patient.
Traditional approaches to the central veins are described below.
Internal jugular vein
Right sided internal jugular vein cannulation is associated with a lower incidence of complications and higher incidence of correct line placement than other approaches. It is especially appropriate for patients with coagulopathy or those patients with lung disease in whom pneumothorax may be disastrous. It may be best avoided in those patients with carotid artery disease or those with raised intracranial pressure because of the risks of carotid puncture and of impaired cerebral venous drainage. Internal jugular cannulation is associated with a higher incidence of catheter infection than subclavian cannulation but both have a much lower infection rate than the femoral approach.
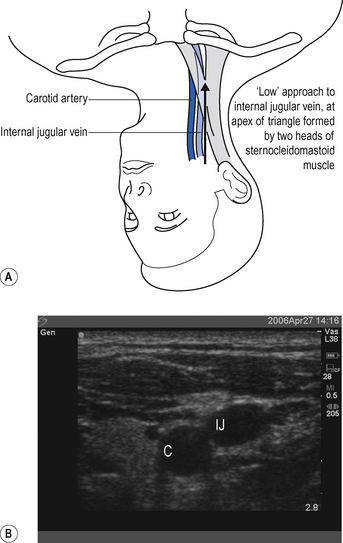
The internal jugular vein runs from the jugular foramen at the base of the skull (immediately behind the ear) to its termination behind the posterior border of the sternoclavicular joint, where it combines with the subclavian vein to become the brachiocephalic vein. Throughout its length it lies lateral, first to the internal and then common carotid arteries, within the carotid sheath, behind the sternomastoid muscle (Fig. 15.1A). Ultrasound demonstrates the close proximity of the vein to the carotid artery (Fig. 15.1B). Many approaches to the internal jugular vein have been described. A typical landmark approach is from the apex of the triangle formed by the two heads of the sternomastoid (Fig. 15.1).


 It is a common mistake to assume the internal jugular vein is deep. Typically it is <2 cm from the skin. Do not introduce the needle to its full length. There is a danger of puncturing the apex of the lung.
External jugular vein
The external jugular vein lies superficially in the neck, running down from the region of the angle of the jaw, across the sternomastoid before passing deep to drain into the subclavian vein. It can be used to provide central venous access, particularly in emergency situations when a simple large-bore cannula can be used for the administration of drugs and resuscitation fluids. Longer central venous catheters can be sited via the external jugular but the angle of entry to the subclavian vein often leads to inability to pass guide wires centrally and results in a high failure rate.
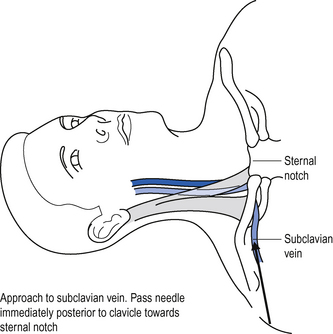
Subclavian vein
The subclavian vein is a continuation of the axillary vein. It runs from the apex of the axilla behind the posterior border of the clavicle and across the first rib to join the internal jugular vein, forming the brachiocephalic vein behind the sternoclavicular joint. See Fig. 15.2.


Femoral vein


 Ultrasound can be used to identify the vessels and ensure that the vein is punctured near the inguinal ligament where the artery and vein lie side by side. See Fig. 15.3.
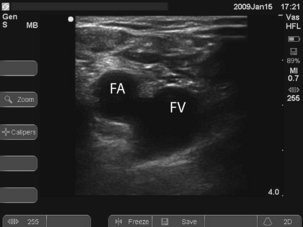
Procedure
Central venous cannulation. You will need:
Universal precautions; sterile gown and gloves
5-mL syringe of local anaesthetic
Heparinized saline to flush line
 Central venous catheterization is almost universally achieved using a catheter over a guide wire (Seldinger) technique. This is associated with a lower incidence of incorrect line placement and complications than cannula over needle techniques.


 Using a 10-mL syringe and needle enter the central vein by the chosen approach, maintaining suction on the syringe at all times.


 If you appear to have missed the vein on the first pass, pull back slowly while maintaining suction on the syringe. You often find you have gone through the vein and can identify it on withdrawal.
Position on chest X-ray
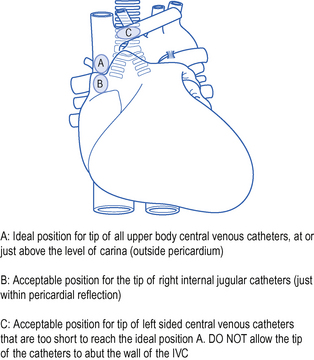
The catheter should lie along the long axis of the vessel and the distal segment and tip should be in the superior vena cava (SVC) or at the junction of the SVC and right atrium but ideally outside the pericardial reflection. Catheters below this level may perforate the heart and cause cardiac tamponade. The pericardial reflection lies below the level of the carina and this can therefore be used as a radiological marker. Catheters placed via subclavian veins of left internal jugular vein must not be allowed to lie with the tip abutting the wall of the superior vena cava. This may cause pain, perforation and accelerated thrombus formation. Either advance the catheter to lie in the long axis of the SVC or pull it back to lie in the brachiocephalic vein. See Fig. 15.4.
COMMON PROBLEMS DURING CENTRAL VENOUS ACCESS
Cannot find the vein
Check position (ultrasound and / or landmarks) and try again. If unsuccessful do not persist with repeated passages of the needle in the hope of striking oil! You may have misinterpreted the landmarks, or the vein may be absent or occluded (e.g. with thrombus). Seek help.
 Do not proceed immediately to attempt cannulation on the contralateral side: this increases the risk of complications, such as bilateral pneumothorax!


Complications
Complications of central venous cannulation depend in part on the route used but include those in Box 15.2.
| Early | Late |
|---|---|
| Arrhythmias | Infection |
| Vascular injury | Thrombosis |
| Pneumothorax | Embolization |
| Haemothorax | Erosion/perforation of vessels |
| Thoracic duct injury (chylothorax) | Cardiac tamponade |
| Cardiac tamponade | AV fistula |
| Neural injury | |
| Embolization (including guide wire) | |
| AV fistula |
CHANGING AND REMOVING CENTRAL VENOUS CATHETERS
Line colonization with bacteria and fungi is common and there is no evidence that changing lines on a regular basis (e.g. every 5–7 days) is of benefit. (See Catheter-related sepsis, p. 340.)


 The difficulty with this technique is retaining sterility, Wear two pairs of gloves and discard the top pair when you have removed the old line.
LARGE-BORE INTRODUCER SHEATHS / DIALYSIS CATHETERS
Indications
Introducer sheaths are available in a number of sizes for different applications, including insertion of pulmonary artery catheters and temporary pacing wires. In adults, 7.5 or 8.5 Fr are generally used. They may be used as large-bore access for volume resuscitation. Smaller sheaths may be used for introducing specialized monitoring such as jugular bulb oximetery. Large-bore double lumen dialysis catheters are used for haemodialysis, haemofiltration, plasma exchange and rapid transfusion.
Procedure


 The dilators provided are often very stiff and can easily kink guide wires and tear vessels if advanced too far or too aggressively. If difficulties are encountered in inserting dilators, abandon the procedure and call for help. If possible avoid left internal jugular routes.
PULMONARY ARTERY CATHETERIZATION
The place of pulmonary artery catheters has been questioned recently and their use has diminished. In general non-invasive cardiac output monitoring and the ready availability of bedside echocardiography have superseded them. (See Haemodynamic monitoring, p. 74.) They may be of value, however, in conditions where haemodynamic instability or shock is unresponsive to fluid and inotrope therapy guided by conventional CVP measurement, particularly where pulmonary hypertension/right heart failure are thought to contribute to the problem. As insertion of a PA catheter is not without hazard, you should always seek senior guidance. Traditional indications and contraindications are shown in Box 15.3.
Box 15.3 Indications and contraindications for pulmonary artery catheterization
| Indications | Relative contraindications |
|---|---|
| Shock | Severe coagulopathy |
| Sepsis / SIRS | Unstable ventricular rhythm |
| ARDS | Heart block |
| Valvular heart disease* | Temporary transvenous pacemaker (wire dislodgement) |
| Left ventricular failure | Stenosis tricuspid or pulmonary valve† |
| Cor pulmonale / pulmonary hypertension | |
| High-risk surgical patients |
† Severe stenosis or mechanical valves absolute contraindication.
Procedure
PA catheterization. You will need:
Universal precautions; sterile gown and gloves
5-mL syringe of local anaesthetic
Introducer sheath (see previous section)
Ultrasound/sterile probe cover and gel
 Before attempting to insert a PA catheter, ECG monitoring must be established and a defibrillator must be immediately available because of the risks of dysrhythmia.


 Inflate balloon and advance catheter gently to right ventricle at approximately 30–40 cm. Advance further until the pulmonary artery is entered at approximately 40–50 cm.
 Advance the catheter until pulmonary artery occlusion trace or wedge trace is observed, approx. 20 cm from RV (approximately 50–60 cm total). Deflate the balloon and see return of the PA trace (Fig. 15.5).

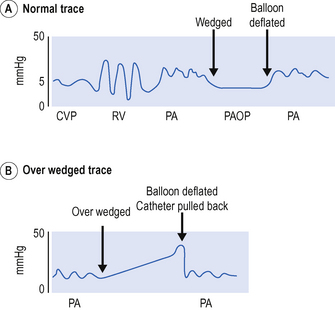
 Never advance the catheter with the balloon down. Never pass more than 20 cm of catheter without seeing a change in the trace. Never pull the catheter back with the balloon up.
COMMON PROBLEMS DURING PULMONARY ARTERY CATHETERIZATION
Catheter will not take the correct path
This may be due to a dilated RV or low CO. Do not persist if unsuccessful:


Catheter is ‘over wedged’


Catheter will not wedge


Complications
Potential complications of pulmonary artery catheterization are shown in Table 15.1.
TABLE 15.1 Complications of pulmonary artery catheterization
| Complication | Comment |
|---|---|
| Central venous puncture | Any complications of central venous cannulation |
| Dysrhythmia | Usually on passage through tricuspid valve and RV Especially if hypoxia, acidosis, hypokalaemia: withdraw catheter and reposition Complete heart block may occur |
| Pulmonary infarction | Check catheter is in proximal PA on chest X-ray Never leave balloon inflated Display PA trace continuously |
| Pulmonary artery rupture | Pulmonary haemorrhage and blood up the endotracheal tube Avoid overinflation of the balloon Watch trace and never inflate against resistance |
| Infection | Risk includes endocardial damage and endocarditis Careful aseptic technique and catheter care Remove after 72 h or ASAP |
| Knotting | Poor insertion technique Do not insert more than 20 cm without a change in trace Do not attempt to pull back. Call for help |


MEASUREMENT OF CARDIAC OUTPUT BY THERMODILUTION
 Ensure that the correct cables are connected between the monitor and the PA catheter (one to the distal thermistor and one to measure the temperature of the injectate).


 Best results are obtained using ice-cold (<4°C) 5% dextrose for the injectate. For convenience, however, room temperature injectate may be used. Ensure the correct computation constant is entered for the temperature of injectate used.
Having measured the cardiac output and PA occlusion pressure a range of haemodynamic variables can be calculated. This is generally performed by the monitoring system. Normal values for these variables are given in Chapter 4. (See Optimizing haemodynamic status, p. 78.)
PERICARDIAL ASPIRATION


 In an emergency situation when aspirating presumed cardiac tamponade it is difficult to know whether blood aspirated is from the pericardial space or whether the ventricle has been punctured. Observe the ECG throughout. If the needle touches the ventricle, an injury pattern or arrhythmia should be observed.
DEFIBRILLATION AND DC CARDIOVERSION
Elective cardioversion is beyond the scope of this book. Life-threatening ‘shockable rhythm’ should be managed according to advanced life support protocols. (See pp. 90–98.) For cardioversion in the emergency situation, i.e. the intensive care patient with haemodynamic compromise, the following approach is reasonable.
Procedure
Pericardial aspiration. You will need:
Universal precautions; sterile gown and gloves
10-mL syringe of local anaesthetic and needle
 Defibrillators are potentially dangerous pieces of equipment. Make sure you know how to use defibrillator equipment safely. It is your responsibility to ensure the safety of everyone in the proximity, including yourself. Paddles should be either on the defibrillator (safe position) or in contact with the patient. Do not charge except when ready to deliver a shock.
 Ensure the patient is adequately sedated / anaesthetized. This may require supplementation of existing sedation / analgesia with a small bolus dose of midazolam, opioid or other similar agent. Conscious patients will require anaesthesia, usually with a cardiostable drug (e.g. etomidate) or volatile agent Seek anaesthetic support.


 Before delivering the shock, give a second all clear warning; check that everyone is clear and that any oxygen source is temporarily removed from the patient. Ensure that you yourself are not inadvertently in contact with the patient.

If normal rhythm is not restored seek expert help. Consider:


INTUBATION OF THE TRACHEA
 Do not attempt tracheal intubation without senior help if you are not experienced in the technique. In an emergency, ventilate the patient with a bag and mask or via a laryngeal mask and await reinforcements!
Indications
These fall broadly into three groups: relieving airway obstruction, protection of the airway from aspiration and facilitation of artificial ventilation of the lungs. Typical indications are given in Box 15.4.
Box 15.4 Indications for tracheal intubation
| Airway obstruction | Risks of aspiration | Facilitation of IPPV |
|---|---|---|
| Tumours | Obtunded consciousness level | Anaesthesia and surgery |
| Head and neck trauma | Bulbar palsy | Cardiopulmonary resuscitation |
| Epiglottitis | Impaired cough reflexes | Respiratory failure |
| Surgery | Cardiac failure | |
| Airway oedema | Multisystem organ failure | |
| Major trauma including chest injury | ||
| Brain injury |
Muscle relaxants will usually be required to facilitate intubation. Suxamethonium (1–2 mg/kg) is rapid in onset and relatively short-acting in most patients. It is the drug of choice for rapid sequence induction. It has a number of side-effects, however, which limit its use. Atracurium (0.5 mg/kg) is an alternative, but is slower in onset and has a longer duration of action.
 Do not use i.v. anaesthetic agents or muscle relaxants unless you are familiar with them. Seek senior help. (See Sedation and analgesia, p. 34, Muscle relaxants, p. 43 and Contraindications to suxamethonium, p. 43.)
Procedure
Tracheal intubation. You will need:
Self-inflating bag (Ambu or similar) and oxygen supply
Two laryngoscopes (check bulbs)
Selection of endotracheal tubes
Syringe for cuff inflation and tape to tie tube
Gum-elastic bougie, airway exchange catheter or rigid stilette
Laryngeal mask (for use in failed intubation) sizes 3, 4, 5.
 If immediate intubation proves to be difficult or impracticable, do not persist with fruitless attempts. Ventilate the patient with 100% oxygen using bag and mask or laryngeal mask and call for help.
 Preoxygenate the patient. Administer 100% oxygen using a tight-fitting face mask for a period of 3–4 min prior to administering any drugs or attempting intubation, if possible. This will wash out nitrogen and fill the functional residual capacity with oxygen, thereby providing an oxygen reservoir and increasing the safety margin in the event of difficulties.


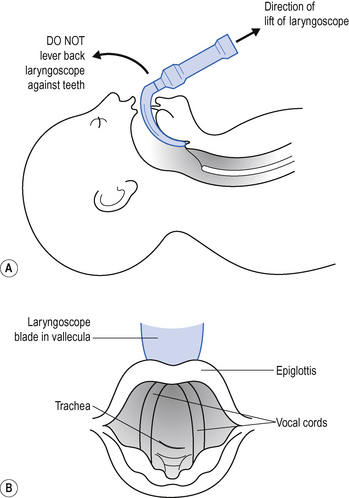
 Hold the laryngoscope in the left hand (size 3 or 4 Macintosh scopes are most commonly used). Slide the scope into the right of the mouth, sweeping the tongue into the groove in the blade, under it and to the left. As you advance the laryngoscope blade over the base of the tongue, the epiglottis pops into sight. With the blade between the epiglottis and the base of the tongue (vallecula), apply traction in the line of the laryngoscope handle, gently drawing the epiglottis forward and exposing the V-shaped glottis behind (Fig. 15.7).


Complications
Potential complications of endotracheal intubation are shown in Box 15.5.
| Immediate | Late |
|---|---|
| Hypoxia (prolonged attempts) | Accidental extubation or obstruction of airway |
| Misplacement of tube | Complications associated with mechanical ventilation |
| Obstruction of airway | Ventilator associated pneumonia |
| Aspiration | Sinusitis |
| Trauma to teeth | Injury to vocal cords |
| Trauma to airway / larynx / trachea | Tracheal stenosis |
Nasal intubation may provoke epistaxis or predispose to mucosal injury (e.g. submucosal positioning of the tube). In the longer term, nasal intubation may occlude the maxillary antrum and give rise to sinusitis. It is nevertheless better tolerated than oral intubation, particularly during weaning from ventilation. Long-term complications include erosion and stenosis of local tissues, particularly of the larynx and trachea. This may present as airway obstruction and stridor after extubation (see p. 138).
EXTUBATION OF THE TRACHEA


PERCUTANEOUS TRACHEOSTOMY
Potential advantages of tracheostomy


Indications


Procedure
Percutaneous tracheostomy. You will need:
Universal precautions; sterile gown and gloves
Local anaesthetic (1% lidocaine (lignocaine) + adrenaline (epinephrine), syringe and needle
10 mL normal saline and syringe
Basic surgical instruments (e.g. venous cut down set)
Appropriate size cuffed tracheostomy tubes (1 size smaller and larger than planned)
 This procedure requires a separate anaesthetist to manage the patient and airway and an operator to perform the tracheostomy. On no account should percutaneous tracheostomy be attempted by a single operator.
Anaesthetist
 Ensure appropriate monitoring and anaesthetize patient with inhalational or intravenous technique as appropriate. Beware of relying solely on intermittent bolus of propofol, as there is a risk of ‘awareness’. A muscle relaxant is usually required.


Operator


 Puncture the trachea with the introducer needle below the level of the first tracheal ring and in the midline. Using a saline-filled syringe, confirm the position of the needle by aspiration of air/mucus from the trachea. A bronchoscope passed through the endotracheal tube can also be used to confirm the correct position of the needle tip within the tracheal lumen. A green seeker needle may be helpful if difficulties are encountered in cannulating the trachea.


COMMON PROBLEMS DURING PERCUTANEOUS TRACHEOSTOMY
Difficulty ventilating the patient
This usually means that the tracheostomy tube has been misplaced. Do not persist as this may produce a tension pneumothorax! Remove the tracheostomy tube and reintubate the patient by the oral route.
Complications
The potential complications of percutaneous tracheostomy are shown in Box 15.6.
Box 15.6 Complications of tracheostomy
| Early | Late |
|---|---|
| Bleeding (may lead to total airway obstruction) | Tracheal stenosis |
| Pneumothorax | Tracheo–oesophageal fistula |
| Tube misplacement or dislodgement | Skin tethering / scarring |
| Air emphysema | Late haemorrhage from innominate vessels |
| Mucus plugging / obstruction | |
| Stomal infection |
Changing tracheostomy tubes
Tracheostomy tubes can be changed at any time if necessary, but it is more difficult if the tract is not well established. Administer 100% oxygen and position as for performing a tracheostomy. Pass a large-bore suction catheter (with the end cut off) or gum elastic bougie through the old tracheostomy tube before removing it and use this as a guide to insert the new tube. Facilities for ventilating the patient with a bag and mask and for reintubation should be available in case of difficulty.


CRICOTHYROIDOTOMY/MINITRACHEOSTOMY
Minitracheostomy is a term used to describe the insertion of a similar small-bore non-cuffed tube through the cricothyroid membrane (4 mm internal diameter), principally to aid the clearance of secretions. The passage of suction catheters stimulates coughing and allows secretions to be aspirated. As a short-term measure these devices may help to prevent the need for naso-/orotracheal intubation and assisted ventilation. The small size of the tube limits its value and the use of minitracheostomy has declined in recent years.
Procedure
Cricothyroidotomy / minitracheostomy. You will need:
Universal precautions; sterile gown and gloves
Cricothyroidotomy / minitracheostomy kit (containing needle, guide wire, dilator tube and tape)


FIBREOPTIC BRONCHOSCOPY


 Use of the bronchoscope clearly requires knowledge of the endoscopic anatomy of the bronchial tree. If you do not know this you should not be performing a bronchoscopy.
Procedure
 When handling the scope never allow it to bend or fold at an acute angle, as this will break the fibreoptic components.


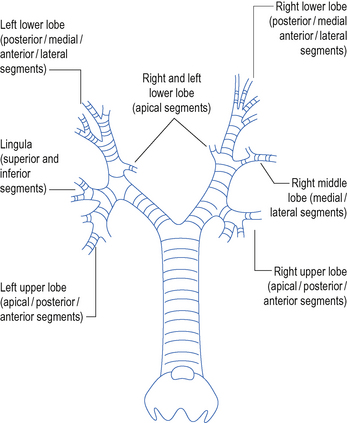
 Pass the bronchoscope through the bung on the swivel connector and into the endotracheal or tracheostomy tube. Continue forward under direct vision.
 Pass the scope forward to the carina. Then explore each side of the bronchial tree in turn. Identify and enter each lobar and segmental bronchus (Fig. 15.8). Take note of any abnormal anatomy and remove any secretions.
 To obtain microbiology specimens place a sputum trap in between the bronchoscope and the wall suction. Use a separate trap for each side. Be careful to keep the sputum trap upright to prevent the secretions disappearing down the suction tubing. Also remove sputum traps before removing the scope from the patient to prevent specimens being contaminated with upper airway flora.


BRONCHOALVEOLAR LAVAGE


 Not all the saline instilled will be aspirated back. This does not matter. If necessary repeat the procedure until an adequate. volume specimen is obtained.


INSERTION OF CHEST DRAIN
The emergency treatment of life-threatening tension pneumothorax is large-bore needle decompression. The diagnosis is made on clinical grounds without chest X-ray. (Hyper-resonance, reduced breath sounds, deviated trachea, haemodynamic compromise.) A 14-gauge cannula is inserted into the pleural cavity immediately above the second rib in the midclavicular line to allow air under tension in the pleural space to escape. This should always be followed by placement of a formal chest drain.
 Do not attempt ‘blind’ needle decompression unless there is clear evidence of life threatening tension pneumothorax. Insertion of a needle in other circumstances is likely to create a problem where one may not have existed before.
Site of drain
This is partly dictated by the position of the collection clinically and radiographically. In the case of long-standing collections, which may be loculated, ultrasound guidance may be helpful. In all other cases the drain should be sited in the 5th intercostal space, just anterior to the midaxillary line, and can be directed cephalad for air and caudally for fluid or blood. All drains should be placed immediately above the rib to avoid damage to the neurovascular bundle, which lies underneath.
 Use of the 2nd intercostal space in the midclavicular line (anterior approach) is associated with risk of injury to the internal mammary artery and breast tissue (in the female) and may result in unsightly scarring. Do not use this approach.
Procedure
Chest drainage. You will need:
Universal precautions; sterile gown and gloves
10-mL syringe, local anaesthetic and needles (lidocaine (lignocaine) 1–2%)
Basic instruments: scalpel, blade, large arterial clamps
 Do not use trocars to insert drains. They are sharp and may cause injury to underlying viscera.


 DO NOT CLAMP CHEST DRAINS. If moving a patient, simply keep the underwater drain bottle below the level of the chest. Clamping drains may produce a tension pneumothorax.
COMMON PROBLEMS DURING INSERTION OF CHEST DRAINS


 When assessing a chest drain on X-ray, look at the length of the tube and whether it is kinked or needs to be pulled back or has slipped out. Check the position of the drainage holes – are they within the chest. The limitations of an AP chest X-ray should be appreciated. Tubes may lie within the lung parenchyma and this will only be identified on CT.
Persistent air leak


Indications for urgent thoracic surgical opinion
The combination of persistent air leak and non-compliant lungs (e.g. ARDS) may make adequate ventilation and gas exchange impossible. Urgent thoracic surgical opinion may be required (Box 15.8).
 Do not clamp chest drains prior to removal. If a drain is not bubbling or draining, it is not performing any useful function. Remove it and re-site it if necessary.


PASSING A NASOGASTRIC TUBE
Most patients in the ICU who require ventilation require a nasogastric tube, initially at least, to ensure gastric drainage and early enteral feeding (Box 15.9).
Box 15.9 Indications and contraindications for nasogastric tube
| Indications | Contraindications |
|---|---|
| To deflate the stomach after bag mask ventilation | Base of skull fracture (use orogastric tube) |
| To aspirate gastric contents which might otherwise reflux and soil the airway | Recent gastric or oesophageal surgery (discuss with surgeon) |
| To provide a route for enteral feeding and drugs | Oesophageal varices (relative contraindication) |
| Severe coagulopathy (consider oral route to avoid nose bleed) |


 Beware that the presence of a cuffed endotracheal or tracheostomy tube does necessarily prevent gastric tubes entering the lung. Awake patients can tolerate fine bore tubes within the lung and it should be appreciated that some nasogastric tubes only have a radio-opaque marker on the distal segment, which may be well out in the periphery of the lung.
PASSING A SENGSTAKEN–BLAKEMORE TUBE
A number of tubes have been designed to apply pressure to oesophageal varices in order to compress the vessels and reduce bleeding while the patient is resuscitated and definitive treatment carried out. The Sengstaken–Blakemore tube has three lumens. Two are used to inflate balloons, one in the stomach and the other in the oesophagus, while the third is used to aspirate gastric contents.


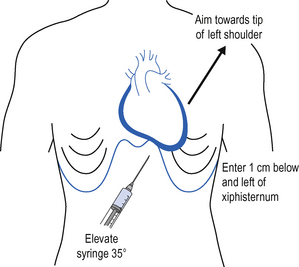
PERITONEAL TAP/DRAINAGE OF ASCITES
Drainage of ascites: You will need:
Universal precautions; sterile gown and gloves
10-mL syringe, local anaesthetic lidocaine (lignocaine) 1–2% and needles
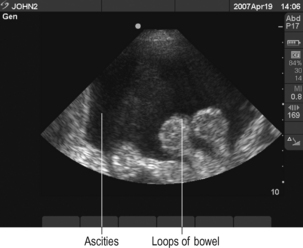
 Before commencing procedure perform ultrasound to demonstrate fluid and verify position for needle puncture away from bowel (Fig. 15.9).


There is debate about how much fluid should be drained and what replacement fluid should be used. Seek local guidance.
TURNING A PATIENT PRONE


TRANSPORT OF CRITICALLY ILL PATIENTS
 Full monitoring should be continued. This should include blood pressure monitoring (preferably invasive), ECG, oxygen saturation, and end-tidal CO2 for intubated / ventilated patients. If a PA catheter is in situ the pressure trace must be displayed, or the catheter should be pulled back into the SVC to prevent inadvertent pulmonary artery occlusion.


[/level-membership-for-internal-medicine-category][not-level-membership-for-internal-medicine-category]
CHAPTER 15 PRACTICAL PROCEDURES
GENERAL INFORMATION
Universal infection control precautions
Place all sharps directly into a sharps bin; do not manually resheath or break needles. Do not overfill sharps bins, and ensure that the bin is securely fastened before disposal.ARTERIAL CANNULATION
Indications
Procedure
Arterial cannulation. You will need:
Universal precautions; sterile gloves
Syringe of local anaesthetic / needle
Syringe of heparinized saline flush
Arterial cannulae (usually 20 gauge or 22 gauge)
Decide which artery to cannulate. The radial artery of the non-dominant hand is usually preferred in the first instance. Alternatives include the ulnar, dorsalis pedis and posterior tibial arteries. It is pointless, however, to persist with attempts at peripheral arterial cannulation in patients who are hypotensive and ‘shut down’. The femoral and brachial arteries are useful during resuscitation of profoundly shocked patients. Ultrasound guidance is potentially useful at all sites to aid arterial cannulation, particularly in hypotensive patients and those whose landmarks are obscured by oedema or obesity.
Seldinger technique
Advance needle through the puncture site towards the artery at a shallow angle. As the vessel is punctured, a flashback of arterial blood is seen in the hub. Pass the guide wire through the needle into the artery. Withdraw the needle and pass the cannula over the guide wire. The guide wire is then discarded.Direct cannulation
Either: advance the cannula and needle through the puncture site towards the artery at a shallow angle. As the vessel is punctured a flashback of arterial blood is seen in the hub. Holding the needle still, advance the cannula over the needle into the artery. This should be a single smooth movement without resistance.USE OF PRESSURE TRANSDUCERS
The patient’s arterial catheter is connected to the transducer by a continuous column of (heparinized) saline. A pressurized flushing device maintains a small forward flow (approximately 2–3 mL / h) to keep the cannula patent. Pressure changes in the vessel are transmitted via the saline to a diaphragm. As this diaphragm moves in response to the pressure changes, its electrical conductivity changes. This results in fluctuations in electrical signal from the diaphragm, which is interpreted by a monitor and displayed as an arterial waveform and blood pressure values. Systolic, diastolic and mean pressures are usually displayed. There must be no air bubble in the connection tubing or transducer chamber. This will damp the trace and produce lower blood pressure values. Flush well before connecting the transducer to the patient.CENTRAL VENOUS CANNULATION
Indications
Central venous access is almost universal in intensive care patients. Indications include:
Ultrasound guidance for vascular access
The use of ultrasound to guide central venous access procedures is recommended in all cases (NICE Guidance. Central venous catheters, ultrasound locating devices, Sept. 2002. www.nice.org.uk/guidance/TA49).
Traditional approaches to the central veins are described below.
Internal jugular vein
Right sided internal jugular vein cannulation is associated with a lower incidence of complications and higher incidence of correct line placement than other approaches. It is especially appropriate for patients with coagulopathy or those patients with lung disease in whom pneumothorax may be disastrous. It may be best avoided in those patients with carotid artery disease or those with raised intracranial pressure because of the risks of carotid puncture and of impaired cerebral venous drainage. Internal jugular cannulation is associated with a higher incidence of catheter infection than subclavian cannulation but both have a much lower infection rate than the femoral approach.
The internal jugular vein runs from the jugular foramen at the base of the skull (immediately behind the ear) to its termination behind the posterior border of the sternoclavicular joint, where it combines with the subclavian vein to become the brachiocephalic vein. Throughout its length it lies lateral, first to the internal and then common carotid arteries, within the carotid sheath, behind the sternomastoid muscle (Fig. 15.1A). Ultrasound demonstrates the close proximity of the vein to the carotid artery (Fig. 15.1B). Many approaches to the internal jugular vein have been described. A typical landmark approach is from the apex of the triangle formed by the two heads of the sternomastoid (Fig. 15.1).
External jugular vein
The external jugular vein lies superficially in the neck, running down from the region of the angle of the jaw, across the sternomastoid before passing deep to drain into the subclavian vein. It can be used to provide central venous access, particularly in emergency situations when a simple large-bore cannula can be used for the administration of drugs and resuscitation fluids. Longer central venous catheters can be sited via the external jugular but the angle of entry to the subclavian vein often leads to inability to pass guide wires centrally and results in a high failure rate.
Subclavian vein
The subclavian vein is a continuation of the axillary vein. It runs from the apex of the axilla behind the posterior border of the clavicle and across the first rib to join the internal jugular vein, forming the brachiocephalic vein behind the sternoclavicular joint. See Fig. 15.2.
Femoral vein
Ultrasound can be used to identify the vessels and ensure that the vein is punctured near the inguinal ligament where the artery and vein lie side by side. See Fig. 15.3.Procedure
Central venous cannulation. You will need:
Universal precautions; sterile gown and gloves
5-mL syringe of local anaesthetic
Heparinized saline to flush line
Central venous catheterization is almost universally achieved using a catheter over a guide wire (Seldinger) technique. This is associated with a lower incidence of incorrect line placement and complications than cannula over needle techniques. Using a 10-mL syringe and needle enter the central vein by the chosen approach, maintaining suction on the syringe at all times.Position on chest X-ray
The catheter should lie along the long axis of the vessel and the distal segment and tip should be in the superior vena cava (SVC) or at the junction of the SVC and right atrium but ideally outside the pericardial reflection. Catheters below this level may perforate the heart and cause cardiac tamponade. The pericardial reflection lies below the level of the carina and this can therefore be used as a radiological marker. Catheters placed via subclavian veins of left internal jugular vein must not be allowed to lie with the tip abutting the wall of the superior vena cava. This may cause pain, perforation and accelerated thrombus formation. Either advance the catheter to lie in the long axis of the SVC or pull it back to lie in the brachiocephalic vein. See Fig. 15.4.
COMMON PROBLEMS DURING CENTRAL VENOUS ACCESS
Cannot find the vein
Check position (ultrasound and / or landmarks) and try again. If unsuccessful do not persist with repeated passages of the needle in the hope of striking oil! You may have misinterpreted the landmarks, or the vein may be absent or occluded (e.g. with thrombus). Seek help.
Complications
Complications of central venous cannulation depend in part on the route used but include those in Box 15.2.
| Early | Late |
|---|---|
| Arrhythmias | Infection |
| Vascular injury | Thrombosis |
| Pneumothorax | Embolization |
| Haemothorax | Erosion/perforation of vessels |
| Thoracic duct injury (chylothorax) | Cardiac tamponade |
| Cardiac tamponade | AV fistula |
| Neural injury | |
| Embolization (including guide wire) | |
| AV fistula |
CHANGING AND REMOVING CENTRAL VENOUS CATHETERS
Line colonization with bacteria and fungi is common and there is no evidence that changing lines on a regular basis (e.g. every 5–7 days) is of benefit. (See Catheter-related sepsis, p. 340.)
LARGE-BORE INTRODUCER SHEATHS / DIALYSIS CATHETERS
Indications
Introducer sheaths are available in a number of sizes for different applications, including insertion of pulmonary artery catheters and temporary pacing wires. In adults, 7.5 or 8.5 Fr are generally used. They may be used as large-bore access for volume resuscitation. Smaller sheaths may be used for introducing specialized monitoring such as jugular bulb oximetery. Large-bore double lumen dialysis catheters are used for haemodialysis, haemofiltration, plasma exchange and rapid transfusion.
