[level-membership-for-surgery-category]
Procedure 9 Staged Flexor Tendon Reconstruction
 See Video 6: Staged Flexor Tendon Reconstruction
Indications


Examination/Imaging
Clinical Examination
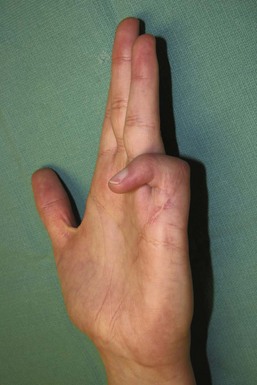
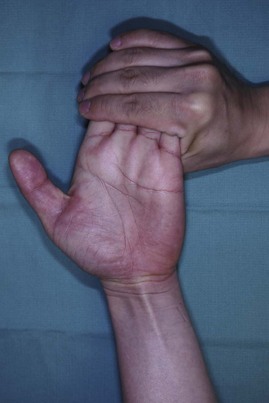
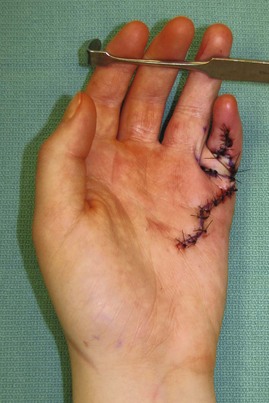
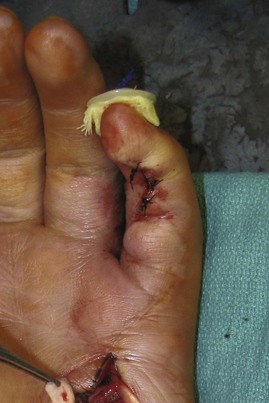
 The patient should be examined to identify specific tendon involvement and reconstructive needs. Patients will present with loss of active distal interphalangeal (DIP) and proximal interphalangeal (PIP) joint flexion if both the FDP and FDS are divided, or loss of only DIP joint flexion if only FDP has been injured. On inspection, the normal finger cascade is lost, with the affected digit in an extended position (see Fig. 9-2).
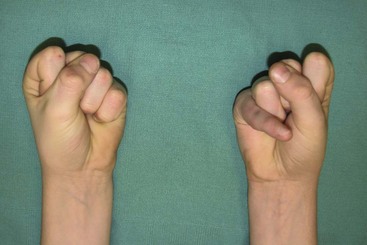
 The metacarpophalangeal (MCP) and interphalangeal (IP) joints should have full passive range of motion, or they will require capsulotomy before tendon reconstruction (Figs. 9-3 and 9-4).


Surgical Anatomy
 The lumbrical muscle prevents further proximal retraction of the FDP tendons. For this reason, the proximal juncture of the tendon graft is usually placed in the palm to the FDP, just distal to the lumbrical origin. The median innervated first and second lumbricals are unipennate and arise from the radial and palmar surface of the FDP tendons to the index and long finger. The ulnar innervated third and fourth lumbricals are bipennate and arise from contiguous surfaces of the long/ring finger FDP tendon and ring/small finger FDP tendon, respectively. If the palm is involved in trauma, the proximal juncture is placed in the forearm.


Stage I: Exploration, Pulley Reconstruction, and Placement of Silicone Rod
Exposures
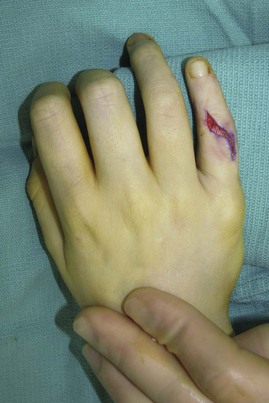
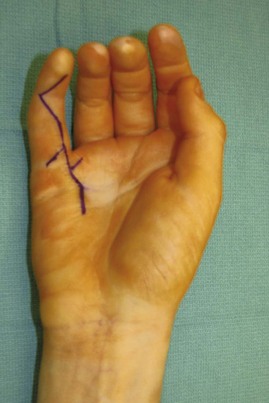
 Bruner incisions are designed from the mid-distal phalanx to the distal palm. Incisions are planned such that they incorporate any previous scars (Fig. 9-6).
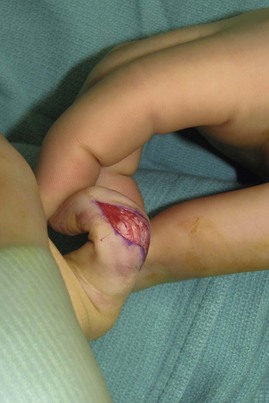
 Thick skin flaps are raised in a plane superficial to the tendon sheath to expose the tendon sheath from the A1 pulley to the DIP joint (Fig. 9-7).
Pearls
If pulley reconstruction is not necessary, two separate incisions may be used: the first for distal palm exposure and the second for exposure of the tendon sheath in the finger.
The neurovascular bundles should be identified outside the zone of injury (related to previous scars) and protected when flaps are raised, as well as for the remainder of the operation.
Procedure
Step 1: Assessment of Pulleys


Step 2: Débridement of Scar Sheath and Tendons


Step 3: Pulley Reconstruction
 We use excised remnants of the FDS and FDP harvested from the finger or from FDS tendon in the palm or forearm to reconstruct the pulley.
 A single pulley is made at the middle phalanx, and two pulleys are made over the proximal phalanx. Pulleys are made by suturing segments of FDS and FDP to the remnants of the pulleys on the lateral aspect of the phalanx and the periosteum using 4-0 Ethibond sutures (Fig. 9-9).
Step 4: Silicone Rod Placement
 The widest silicone rod that will pass through the pulleys and still glide proximally and distally with passive finger flexion and extension is selected.
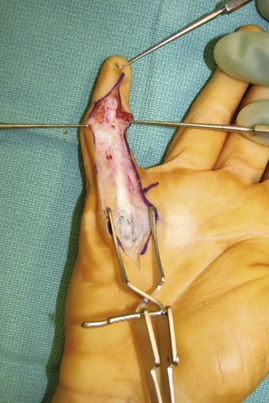
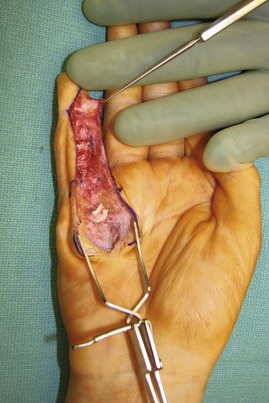
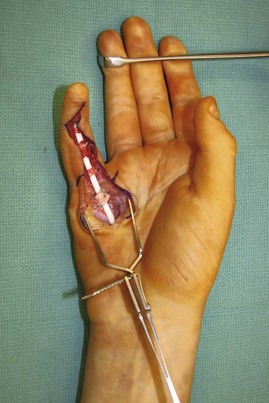
 The selected silicone rod is passed from proximal (A1 pulley) to distal until it emerges at the DIP joint. It will need to be gently maneuvered through the remaining or reconstructed pulleys (Fig. 9-10).


Step 4 Pearls
One must move the finger to ensure that the silicone rod glides freely and that there is no buckling of the silicone rod. The excess length of the silicone rod should be excised proximally. It is important to leave sufficient length such that it does not slip out distal to the A1 pulley with the digit in full extension or hyperextension. It should also not be so long that it gets kinked in the palm or forearm on full flexion of the digits.
If a decision about the proximal juncture has not been made, placing the rod in the forearm allows for the option of grafting either to the palm or to the forearm during the second stage. Typically, tendon grafting to the palm can be facilitated by the palmaris tendon graft, but sometimes the palm is so scarred that the silicone rod must be placed into the distal forearm. In these cases, a plantaris tendon graft is often used to reach the wrist, or, in some situations, a long palmaris longus tendon may reach the distal wrist that requires proximal juncture repair in the carpal tunnel.
The proximal rod should be placed next to the tendon to be used to power the tendon graft. In the palm, the FDP tendon is used, and the tendon repair juncture is at the lumbrical muscle origin. In the wrist, the FDS tendon is preferable because it is superficial and more accessible.
Step 4 Pitfalls
It is important not to suture the proximal juncture of the silicone rod to the FDP tendon. Although this may seem like a good idea to enable active motion, the juncture between native tendon and silicone rod does not heal and will never be strong enough for active motion. A disruption of the distal juncture will require surgery to prevent proximal migration.
Step 5
 The tourniquet is released and hemostasis achieved.
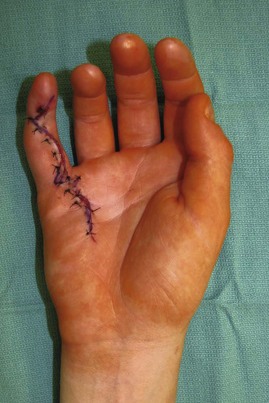
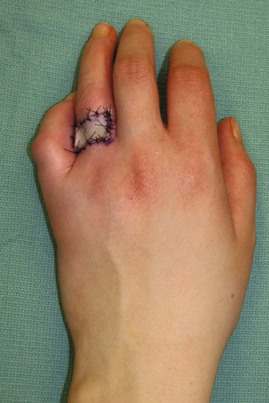
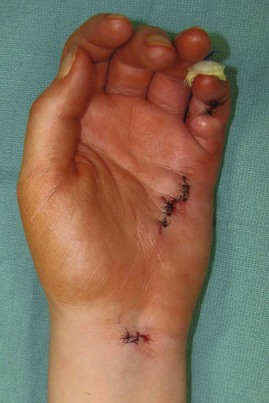
 The skin is closed with interrupted 4-0 nylon sutures (Fig. 9-11).

Step 5 Pearls
In the event that there is a significant soft tissue defect, local tissue rearrangement, such as the cross-finger flap, may be required for durable coverage of the silicone rod (Figs. 9-12 to 9-15). In heavily injured or contracted fingers, durable soft tissue coverage may even require a separate stage.


Stage II: Removal of Silicone Rod and Placement of Tendon Graft
Exposures
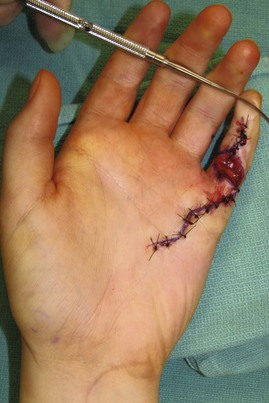
 Only a limited exposure is required for the second stage. An incision is made at the site of the proposed proximal tendon juncture (distal forearm or distal palm), and the proximal free end of the silicone rod is identified. Another incision is made over the DIP joint, and the distal end of the tendon rod is exposed (Fig. 9-16).

Procedure
Step 1: Harvest of Tendon Graft
 The PL is used if the proximal juncture is in the palm, and the longer plantaris is used if the proximal juncture is in the forearm or if the palmaris is absent.
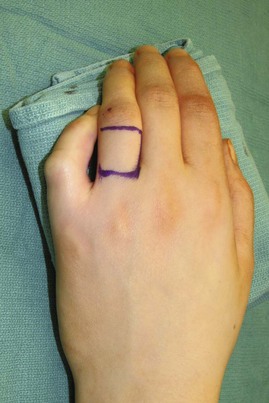
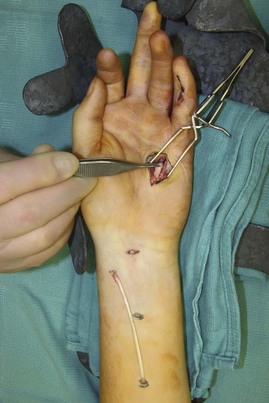
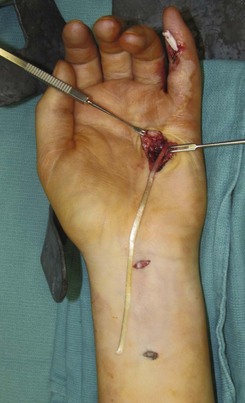
 The PL tendon is exposed and harvested through a 1-cm transverse incision over the distal tendon at the wrist and three 1-cm transverse incisions in the forearm (Fig. 9-17).
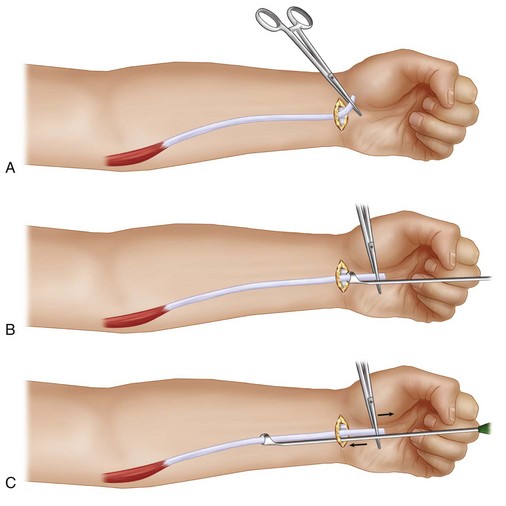
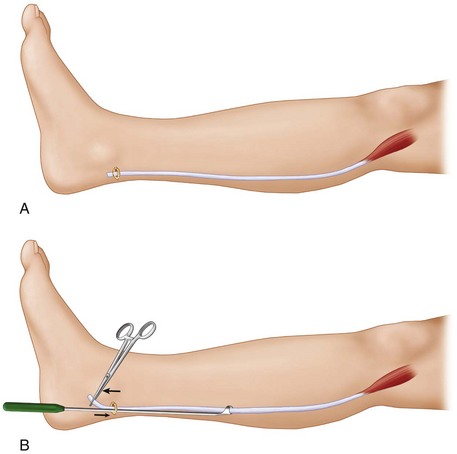
 The plantaris tendon is exposed by a 2-cm transverse incision just anterior to the Achilles tendon and above the medial calcaneus. The tendon is divided and the distal end passed through a Brand tendon harvester. While maintaining countertraction on the distal end of the tendon, the tendon harvester is advanced proximally to release the tendon at the myotendinous junction. The knee should be kept extended during the harvest to avoid injury to neurovascular structures in the popliteal area (Fig. 9-19A and B).

Step 2: Passing the Tendon Graft through the Flexor Tendon Sheath
 The proximal end of the silicone rod is exposed at the palm or wrist, and one end of the tendon graft is sutured to the rod using a horizontal mattress suture with 3-0 Prolene. It is important not to make this juncture bulky (Fig. 9-20).
 The attachments of the silicone rod at the DIP joint are divided, and the distal end of the silicone rod is pulled gradually (Fig. 9-21). This brings the silicone rod and the attached tendon graft through the flexor sheath and the reconstructed pulleys to the DIP joint. The attachment of the proximal end of the silicone rod to the tendon graft is divided, and the silicone rod is discarded.
 One end of the tendon graft is now at the DIP joint and the other at the location of the proximal tendon juncture in the distal palm or distal forearm (Fig. 9-22).

Step 3: Distal Tendon Repair
 If a sufficient amount of good-quality FDP remnant (>1 cm) is available distally, the distal end of the tendon graft can be sutured directly to the FDP remnant by a double Kessler technique using 4-0 Ethibond sutures. This repair is bolstered by additional sutures to the palmar periosteum of the distal phalanx and the volar plate. This type of repair, however, is usually not strong enough to start passive-motion gliding exercises and should not be entertained in most cases.
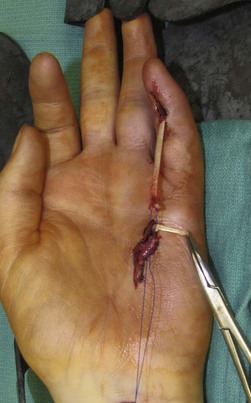
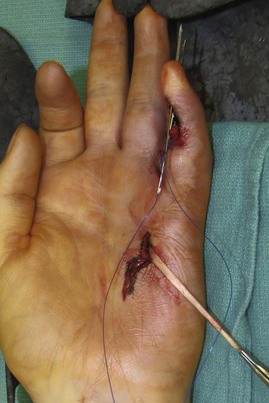
 If insufficient distal FDP tendon is available for direct repair, a pull-through suture technique is used to repair the tendon graft to the palmar cortex of the base of the distal phalanx. A Bunnell-type criss-crossing locking suture using 3-0 Prolene is passed through the distal end of the tendon graft. The palmar proximal aspect of the distal phalanx is gently débrided using a fine rongeur until cancellous bone is encountered. Two Keith needles are drilled obliquely through the base of the distal phalanx to the dorsum of the finger and through the nail plate to emerge distal to the lunula (Fig. 9-23). The two ends of the Bunnell suture are passed through the proximal end of the needle, and the needles are withdrawn on the dorsal surface to bring the sutures onto the dorsum. The sutures are then secured in place with a bolster, or button, on the dorsal aspect of the finger (Fig. 9-24). The elevated periosteum and surrounding soft tissue can be sutured to the end of the tendon using 4-0 Ethibond suture to provide additional support.

Step 3 Pearls
A bone tunnel is not necessary.
Prolene sutures are used because they can slide out easily after healing of the tendon to the bone, which takes about 6 weeks.
Securing the distal end of the tendon graft to the distal phalanx with a bone anchor is an alternative method, but the prominence of the anchor may protrude through the distal phalanx into the nail bed, which will be most problematic.
Step 3 Pitfalls
When drilling the Keith needle through the nail, it is important not to drill the needle into the germinal matrix, which will assuredly cause nail deformity. Rather, the Keith needle should initially run parallel to the distal phalanx before perforating through the bone and should exit the nail at the midnail position.
When tying down the Prolene suture over the nail, the surgeon must observe the tendon sitting securely within the bone trough at the distal phalanx.
Step 4: Proximal Tendon Repair
 The proximal end of the tendon graft is sutured to the distal end of the selected FDP tendon using a Pulvertaft weave and secured with 4-0 Ethibond sutures (Fig. 9-25). Tension of the graft is adjusted such that the fingers are in a natural cascade with the wrist in neutral position.


Postoperative Care and Expected Outcomes
 Three days postoperatively, a modified Duran passive range-of-motion exercise program is begun within the confines of the dorsal blocking splint under the close supervision of a hand therapist.
 Three weeks postoperatively, active range of motion is begun within the confines of the splint.


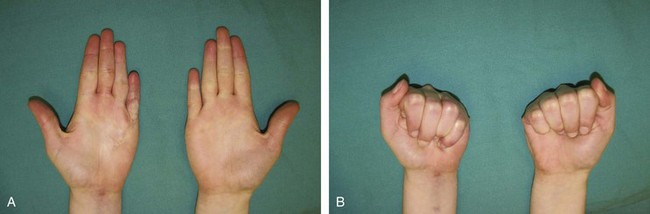
 With this protocol, in the best of hands, about one third of patients achieve good results (greater than 200 degrees of total active motion) (Fig. 9-27A and B). Another one third have fair improvement, and the remainder fail two-stage flexor tendon reconstruction.

Boyes JH, Stark HH. Flexor-tendon grafts in the fingers and thumb: a study of factors influencing results in 1000 cases. J Bone Joint Surg [Am]. 1971;53:1332-1342.
Leversedge FJ, Zelouf D, Williams C, et al. Flexor tendon grafting to the hand: an assessment of the intrasynovial donor tendon—a preliminary single-cohort study. J Hand Surg [Am]. 2000;25:721-730.
Thien TB, Becker JH, Theis JC. Rehabilitation after surgery for flexor tendon injuries in the hand. Cochrane Database Syst Rev 2004;4:CD003979.
Wehbé MA, Mawr B, Hunter JM, et al. Two-stage flexor-tendon reconstruction: ten-year experience. J Bone Joint Surg [Am]. 1986;68:752-763.
[/level-membership-for-surgery-category][not-level-membership-for-surgery-category]
Procedure 9 Staged Flexor Tendon Reconstruction
See Video 6: Staged Flexor Tendon Reconstruction
Indications
Examination/Imaging
Clinical Examination
The patient should be examined to identify specific tendon involvement and reconstructive needs. Patients will present with loss of active distal interphalangeal (DIP) and proximal interphalangeal (PIP) joint flexion if both the FDP and FDS are divided, or loss of only DIP joint flexion if only FDP has been injured. On inspection, the normal finger cascade is lost, with the affected digit in an extended position (see Fig. 9-2).
The metacarpophalangeal (MCP) and interphalangeal (IP) joints should have full passive range of motion, or they will require capsulotomy before tendon reconstruction (Figs. 9-3 and 9-4).
Surgical Anatomy
The lumbrical muscle prevents further proximal retraction of the FDP tendons. For this reason, the proximal juncture of the tendon graft is usually placed in the palm to the FDP, just distal to the lumbrical origin. The median innervated first and second lumbricals are unipennate and arise from the radial and palmar surface of the FDP tendons to the index and long finger. The ulnar innervated third and fourth lumbricals are bipennate and arise from contiguous surfaces of the long/ring finger FDP tendon and ring/small finger FDP tendon, respectively. If the palm is involved in trauma, the proximal juncture is placed in the forearm.
Stage I: Exploration, Pulley Reconstruction, and Placement of Silicone Rod
Exposures
Bruner incisions are designed from the mid-distal phalanx to the distal palm. Incisions are planned such that they incorporate any previous scars (Fig. 9-6).
Thick skin flaps are raised in a plane superficial to the tendon sheath to expose the tendon sheath from the A1 pulley to the DIP joint (Fig. 9-7).
Pearls
If pulley reconstruction is not necessary, two separate incisions may be used: the first for distal palm exposure and the second for exposure of the tendon sheath in the finger.
The neurovascular bundles should be identified outside the zone of injury (related to previous scars) and protected when flaps are raised, as well as for the remainder of the operation.
