Procedure 88 Four-Corner Fusion Using a Circular Plate
 See Video 66: 4-Corner Fusion with a Circular Plate


Examination/Imaging
Clinical Examination


Imaging
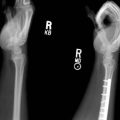
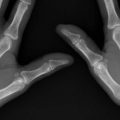
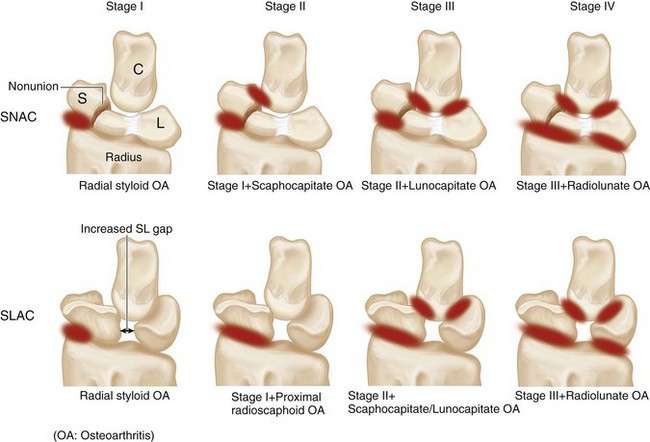
 Standard wrist posteroanterior and lateral views are usually sufficient in SNAC/SLAC wrists. One should be able to determine whether there is arthritis involving the capitate (PRC cannot be done) or arthritis involving the lunate fossa of the radius (both PRC and four-corner fusion cannot be done). If the radiograph shows ulnar translocation of the carpus, it means that the palmar radiocarpal ligaments, especially the radioscaphocapitate, are lax, and a PRC cannot be done.

Surgical Anatomy
 The distal radius has two articular fossae for the scaphoid and lunate. The scaphoid fossa is shaped like a spoon and narrows as it approaches the radial styloid. This results in incongruency between the scaphoid and the scaphoid fossa during positional changes and results in uneven loading of scaphoid fossa, making degenerative changes of the radioscaphoid joint common. On the other hand, the lunate fossa is spherical and remains congruently loaded in all positions of the lunate, making the radiolunate joint highly resistant to degenerative changes.
Exposures
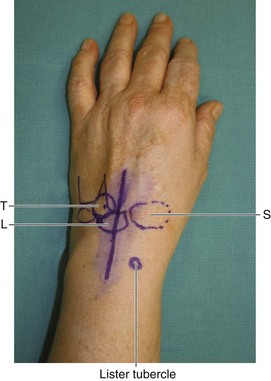
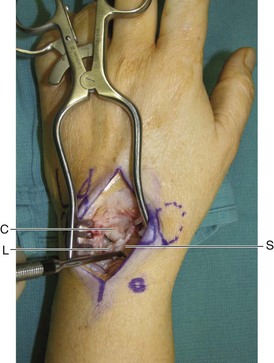
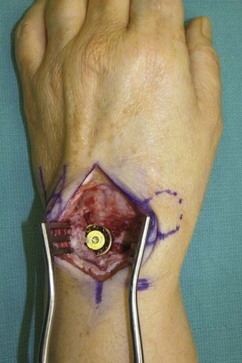
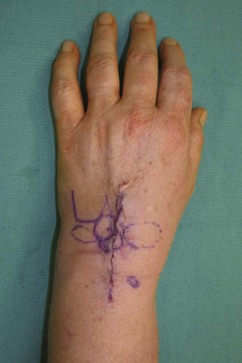
 A 6-cm dorsal longitudinal incision centered over the radiocarpal joint in line with the long finger metacarpal is made (Fig. 88-2). Sharp dissection is carried down to the extensor retinaculum. Skin and subcutaneous tissue flaps are raised on both sides. The third dorsal compartment is identified and opened along its entire length. The extensor pollicis longus (EPL) tendon is left in its sheath and not transposed. One must know the location of the EPL when incising the wrist capsule proximally. The wrist capsule is opened longitudinally and dissection performed to elevate the second and fourth compartments such that the second and fourth compartment tendons are maintained within the compartment. This exposes the scaphoid, lunate, triquetrum, capitate, and hamate.
 Figure 88-3 shows a Freer elevator within the SL interval demonstrating a complete rupture of the SL ligament.
Procedure
Step 1: Scaphoidectomy
 The scapholunate ligament is divided, and a sharp-edged Freer or an Obwegeser periosteal elevator is used to separate the scaphoid from the volar capsule. After adequate detachment of the volar capsule, a rongeur is used to hold the scaphoid and using a twisting motion, the surgeon removes the scaphoid as one piece.
 The cancellous bone within the scaphoid is harvested for bone grafting.
Step 1 Pearls
A 0.062-inch K-wire inserted into the scaphoid to serve as a joystick can make dissection of the scaphoid from the volar capsule easier.
The entire scaphoid is removed in one piece and not in a piecemeal fashion. This ensures that portions of the scaphoid attached to the volar capsule are not left behind.
Step 1 Pitfalls
Care is taken to preserve the radioscaphocapitate and long radiolunate ligaments.
Great care must be taken not to scratch the articular surface of the lunate fossa on the radius when dissecting off the volar capsule from the scaphoid.
The scaphoid is used for harvesting cancellous bone graft only if the scaphoid is healthy, for example in scapholunate dissociation. For scaphoid nonunion, the bone is not good quality, so it is preferable to obtain bone graft from the radius or the iliac crest. Artificial bone graft may also be used, but fusion must be ensured by radiograph before initiating wrist motion.
Step 2: The Lunate Is Stabilized in Neutral Position
 A 0.045-inch K-wire is inserted into the lunate as a joystick and used to correct the dorsally flexed position of the lunate (DISI) and bring it into a neutral position. This is confirmed by fluoroscopic examination. Then an oblique K-wire is passed from the distal radius to the lunate to maintain this position. This K-wire must be placed volarly to avoid the circular plate screws from impinging the wire (Fig. 88-4).
Step 2 Pearls
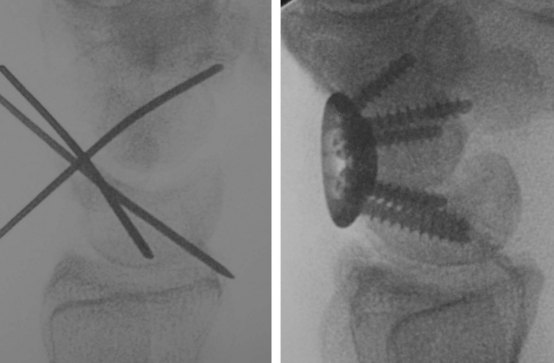
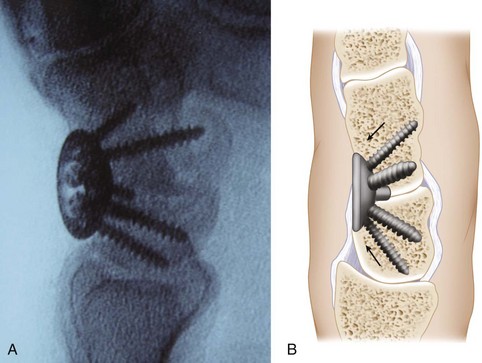
• The correction of the dorsiflexed lunate is the key step in four-corner fusion because the position of remaining three carpal bones is related to the position of the lunate. It is important to stabilize the corrected lunate to the radius before fusion (Fig. 88-4). Otherwise, the lunate may re-displace to a dorsal position after plate fixation (Fig. 88-6).With the lunate in neutral position, the patient’s wrist can move dorsally and volarly with equal ease. If the lunate remains in dorsal posture, wrist flexion will be difficult.
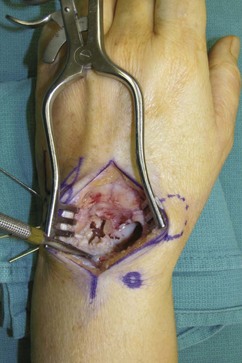
Step 3: Stabilize the Carpal Bones with K-Wires
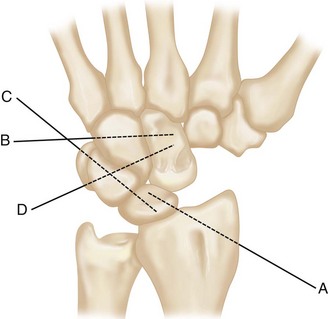
 Additional K-wires are placed from the ulnar wrist into the hamate-capitate (B in Fig. 88-5), the triquetrolunate (C in Fig. 88-5), and the triquetral-hamate-capitate (D in Fig. 88-5) to stabilize all four carpal bones.

Step 4: Ream the Carpal Bones
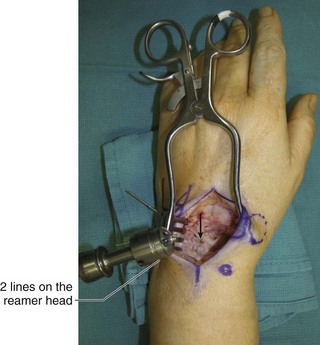
 The reamer is centered over the junction of the four carpal bones (Fig. 88-7). We used Hub Cap Limited Wrist Fusion Plate from Acumed LLC.
 The carpal bones are reamed until the dorsal surface of the carpal bones lies between the two lines on the reamer head. This ensures that the fusion plate will sit sufficiently deep within the carpus (Fig. 88-8).
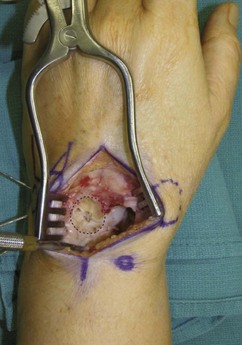
Step 5: Denude the Cartilage between the Four Bones
 The reamer is removed, and the cartilage between the four bones is denuded with a side-cutting bur. Constant irrigation during burring is important to prevent heat-induced necrosis of the bone in the fusion site. The burring must be meticulous to remove all articular surfaces between the four bones (Fig. 88-9).
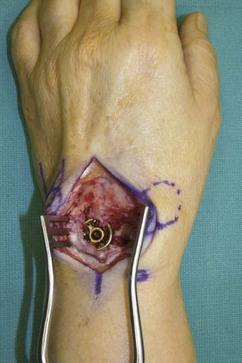
Step 6: Fix the Circular Plate
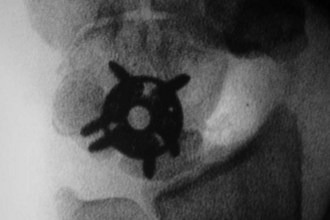
 An appropriate-sized circular plate is placed into the depression, and the circular plate is aligned such that the maximal purchase of all four bones is ensured by the screws. The number of screws and the order of screw placement vary between manufacturers, and the surgeon is advised to check with the manufacturer. We use an Acumed Hub Plate that allows a maximum of seven screws. The single hole slot is directed toward the hamate. The recommended order of screw fixation is hamate, lunate, capitate, and triquetrum. One screw is placed into each bone first, and this is followed by additional screws, if there is space for them (Fig. 88-10).
Step 6 Pearls
The Acumed system uses a 2.0-mm drill bit and 2.7-mm self-tapping screws.
The first screw into the hamate should not be fully tightened to avoid the screw from tipping towards the hamate. Rather, the screw is tightened loosely, followed by placing the lunate screw. Both screws are then tightened sequentially to seat the circular plate securely within the four bones.


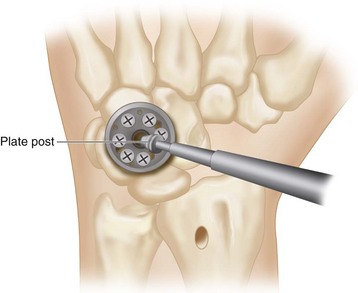
Step 8: Remove the Plate Post and Apply the Screw Cover


Postoperative Care and Expected Outcomes
 Patients are immobilized in a volar short arm plaster splint for 1 week and then fitted with a removable Orthoplast wrist splint to be worn for the next 5 weeks. Patients are started on active finger exercises at 1 week. Wrist motion is not permitted because prior complications such as screw loosening or breakage were related to early motion in patients who started stressing the wrist before the fusion had healed. Wrist motion is not commenced for at least 6 weeks or even longer, until radiographic fusion is seen.
 Patients are permitted to perform light activities of daily living while wearing the splint.

Chung KC, Watt AJ, Kotsis SV. A prospective outcomes study of four-corner wrist arthrodesis using a circular limited wrist fusion plate for stage II scapholunate advanced collapse wrist deformity. Plast Reconstr Surg. 2006;118:433-442.
Merrell GA, McDermott EM, Weiss AP. Four-corner arthrodesis using a circular plate and distal radius bone grafting: a consecutive case series. J Hand Surg [Am]. 2008;26:635-642.
Vance MC, Hernandez JD, Didonna ML, Stern PJ. Complications and outcome of four-corner arthrodesis: circular plate fixation versus traditional techniques. J Hand Surg [Am]. 2005;30:1122-1127.