CHAPTER 8. PERIPHERAL VENOUS CANNULATION
Indications67
Contraindications68
Equipment68
Practical procedure69
Post-procedure care73
Complications73
Drugs, namely opium and Crocus metallorum, were first administered intravenously to dogs by Sir Christopher Wren (1632–1723) in 1656 by use of a quill and bladder. This was first performed in humans by Johann Daniel Major (1634–1693) in 1662. Intravenous indwelling cannulae were popularized in the 19th and 20th centuries and were entirely metallic until the 1960s, which saw the introduction of plastic cannulae inserted both through and over metal stylets.
INTRODUCTION
Peripheral venous cannulation is a basic skill routinely required of doctors on a daily basis, and as such is important to master above virtually any other skill. Try to practise firstly on dummy models and then on patients before you qualify. This should minimize the discomfort for patients and increase your chances of success.
INDICATIONS
• Intravenous fluids.
• Intravenous medication.
• Intravenous electrolyte correction.

CONTRAINDICATIONS
• Lack of consent.
• Cellulitis over the area of presumed cannula insertion.
• Superficial or deep venous thrombosis.
• Ipsilateral mastectomy, i.e. a limb with impaired lymphatic drainage.
• Ipsilateral hemiparesis or contractures.
• Ipsilateral arterio-venous fistula (or potential site of arterio-venous fistula formation in pre-dialysis patients).
EQUIPMENT
• Sterile alcohol swabs.
• Tourniquet.
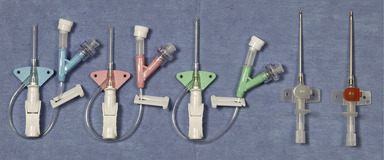
| Colour | Size (gauge) | Flow rate (mL/min) | Use |
|---|---|---|---|
| Blue | 22 | 36 | Patients with small veins (such as the elderly) |
| Pink | 20 | 61 | For routine i.v. fluids and medications |
| Green | 18 | 90 | |
| White | 17 | 140 | Large-bore access for rapid volume replacement (e.g. acute haemorrhage) and peripheral administration of potentially phlebotoxic drugs (e.g. amiodarone) |
| Grey | 16 | 200 | |
| Brown | 14 | 300 |
 Tip Box
A cannula with a smaller lumen will permit better venous flow around the cannula, thus improving haemodilution of the administered drug. Larger-gauge cannulae can also cause venous occlusion and/or intimal damage. Therefore, when intravenous access is required for routine intravenous fluids or medications, insert smaller-gauge cannulae where possible.
PRACTICAL PROCEDURE
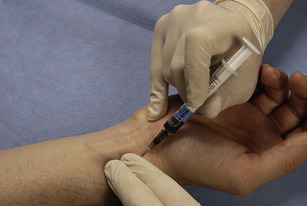
• Explain the procedure to the patient and obtain consent.
• Fill 10 mL of normal saline into the syringe.
• Place the arm on a comfortable surface such as a pillow.
• Place tourniquet on the upper arm sufficiently tight to distend veins but not occlude the artery (check the pulse is palpable below the tourniquet).
• Look and feel for a vein, noting the size and direction of the vein (see Fig. 6.3). Start distally and work proximally towards the antecubital fossa. Conversely, if large-bore access is required (especially in cases of haemodynamic instability), aim for a large vein in the antecubital fossa.
 Tip Box
It is best to avoid placing the cannula at a ‘positional’ site (e.g. at a joint) in patients who are confused or unable to keep the limb still, as lumen patency and thus infusion flow through the cannula is compromised by patient movement in that region.
 Tip Box
For cannulae 16 G or larger local anaesthetic should be administered to the puncture site (it is a lot easier to be allowed a second go if the first attempt was painless!). Local anaesthetic cream can be applied under an occlusive dressing or intradermal lidocaine injected over the proposed venepuncture site. Wait for a few minutes after anaesthetic application then proceed.
• Stretch the skin taut above or below the presumed cannula site to render the vein immobile.
• Warn the patient of a sharp scratch.
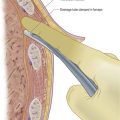
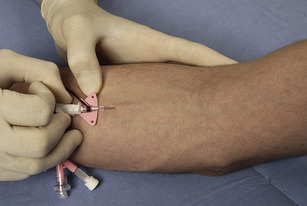
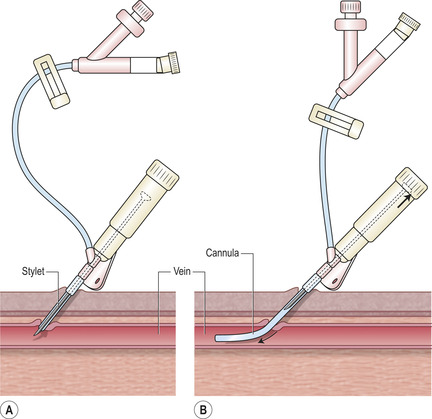
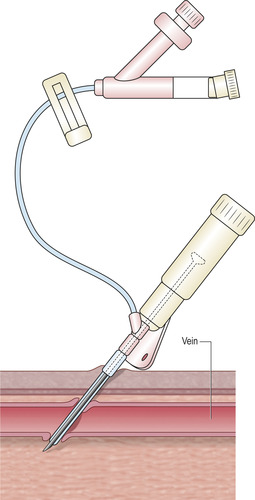
• Gently insert the cannula at a 20–30 degree angle into the vein with the bevel facing upwards and in the direction of venous return (Fig. 8.2).
• You may feel a give as you enter the vein. Look for a flashbak of blood into the cannula (Fig. 8.3).
 Tip Box
If flashback is initially seen but upon withdrawing the stylet slightly blood does not flow into the cannula, the vein may have been transfixed by your initial puncture (Fig. 8.5).
To try to save the situation, pull the cannula back very slowly whilst watching for flashback. When it returns into the vein lumen now try to advance gently, sliding the cannula into the vein. This is often best done with a 2 mL syringe filled with saline attached to the cannula and delicately flushing some saline as the cannula is slowly advanced. If a bleb appears it is better to stop and start afresh.
• Release tourniquet.
• Remove the needle and attach a three-way tap pre-filled with normal saline.
• Clean away any residual blood from the area and place a clear dressing over the cannula site.
• Flush the cannula with 10 mL normal saline.
 Tip Box
Ensure the clear part of the cannula plaster is over the puncture site to ensure irritation and areas of cellulitis or erythema are noted early.
 Tip Box
• If there is any discomfort when the normal saline flush is administered or the cannula does not flush easily, remove the cannula.
• Once under the skin and the stylet has been partially withdrawn from within the plastic cannula, never re-sheath the cannula with the stylet. This risks shearing off the end of the cannula with the stylet under the skin.
• Resistance encountered when sliding the cannula into the vein despite observing flashback may be due to a valve within the vein – more often than not this situation is irretrievable. Try applying traction to the skin with your non-dominant hand whilst sliding in the cannula, but take care that this does not cause discomfort to the patient.
• If you fail the patient will not be very disposed to further multiple attempts. Either ask someone more experienced or prior to subsequent attempts apply local anaesthetics particularly if a large cannula is needed.
POST-PROCEDURE CARE
• Date the cannula on the plaster (most hospitals have a policy of removing a cannula after 48 hours to prevent cannula-related cellulitis).
• Ask the nursing staff to bandage the cannula if the patient is confused and prone to pulling at their lines (but ensure that the site is regularly checked for local infection).
COMPLICATIONS
• Failed cannulation.
• Cannula cellulitis or thrombophlebitis (remove cannula and consider empirical antibiotics and analgesia).
• Air embolism – ensure that the cannula fills with blood prior to attaching the sterile bung or three-way tap.