Procedure 78 Dorsal Plate Fixation and Dorsal Distraction (Bridge) Plating for Distal Radius Fractures
Dorsal Plating of Distal Radius Fractures


Examination/Imaging
Clinical Examination
 Initial examination is usually performed in the emergency department and needs to include mechanism and time of injury, hand dominance, medical comorbidities that may alter treatment, and occupation.
 Assess whether the fracture is an open or closed injury.

 Identify any associated neurovascular and soft tissue injuries.
 Identify whether patient has any sign or symptoms of acute median or ulnar nerve injury.
Imaging
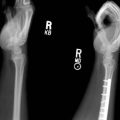
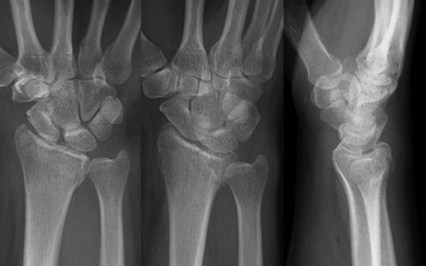
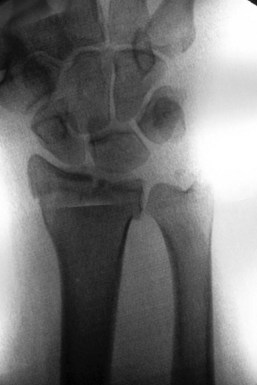
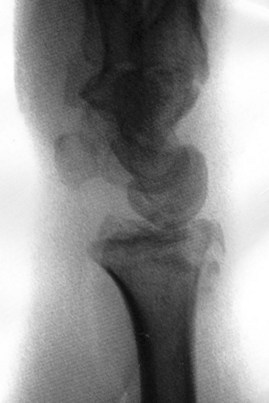
 Initial radiographic evaluation must include posteroanterior, lateral, and oblique views (Fig. 78-1).


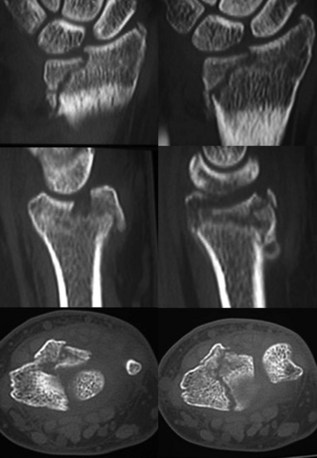
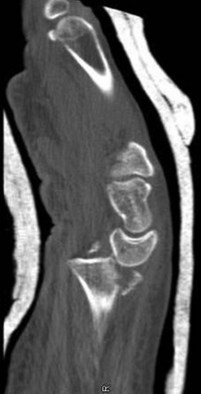
 Computed tomography scan provides excellent delineation of intra-articular extension as well as characterization of fracture comminution for preoperative planning (Fig. 78-2).

 Proximal injuries must be ruled out by physical examination and radiographs of the elbow.
Surgical Anatomy
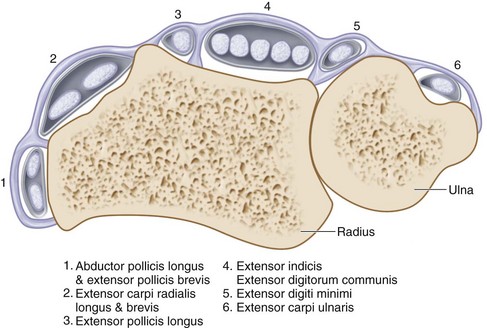
 Knowledge of the anatomic relationships of the extensor retinaculum, six dorsal extensor compartments, and convex dorsoradial cortex is essential for understanding surgical approaches as well as placement of implants on the dorsum of the radius (Fig. 78-3).


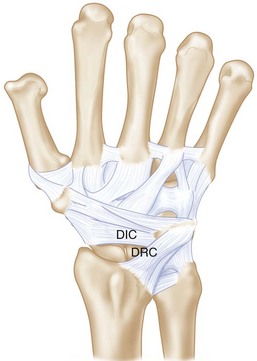
 There are two dorsal ligaments that are intimately associated with the dorsal capsule: the dorsal radiocarpal (DRC) (radiotriquetral) and dorsal intercarpal (DIC) (scaphotriquetral) ligaments (Fig. 78-4).
Exposures
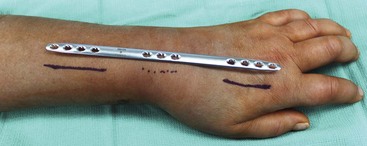
 The dorsal distal radius is approached through a straight, longitudinal incision in line with the third metacarpal and centered just ulnar to the Lister tubercle, between the third and fourth dorsal compartments (Fig. 78-5).
 Care is taken to identify and avoid injury to the superficial branch of the radial nerve.

 The third dorsal compartment is longitudinally incised to mobilize the EPL tendon (Fig. 78-6).


 The distal radius is exposed sharply by elevation of the periosteum.


Pearls
Large, longitudinal veins should be preserved if possible, but crossing veins may be divided.
Full-thickness flaps will contain the dorsal sensory branches of the ulnar and radial nerve and protect them.
Subperiosteal elevation of the fourth compartment minimizes implant contact with the extensor tendons.
Pitfalls
If the distal extension of the incision is past the base of the third metacarpal, the dorsal sensory branches of both the radial and ulnar nerves are at risk.
The EPL tendon is left above the retinaculum at closure to minimize the risk for tendon injury by ischemia or direct contact with an implant.
Care must be exercised not to enter the DRUJ. If the dorsal radioulnar ligament is divided during ulnar dissection, radioulnar instability can result.
The intercarpal ligaments must be protected during capsulotomy.
Procedure
Dorsal Plate Fixation for Distal Radius Fractures
Step 1: Reduction of Dorsally Angulated Fractures
 Once the proximal fracture lines and articular surface are exposed and assessed, all hematoma is evacuated.
 Lister tubercle is removed with a rongeur or small osteotome (Fig. 78-7).


Step 2: Fixation of Dorsally Angulated Fractures
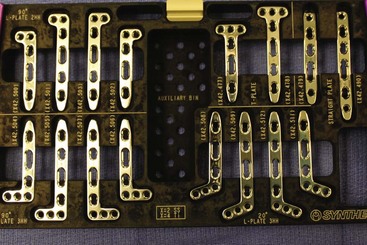
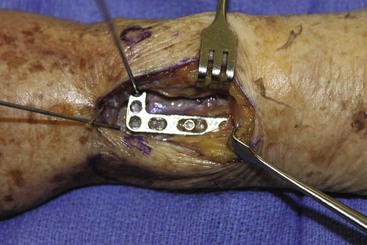
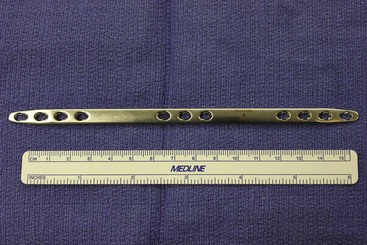
 After satisfactory reduction is performed, a 2.4-mm low-profile dorsal T-plate (Fig. 78-8) can be placed directly over the dorsal surface of the distal radius.


Step 3: Reduction and Fixation of Dorsal Marginal Fractures
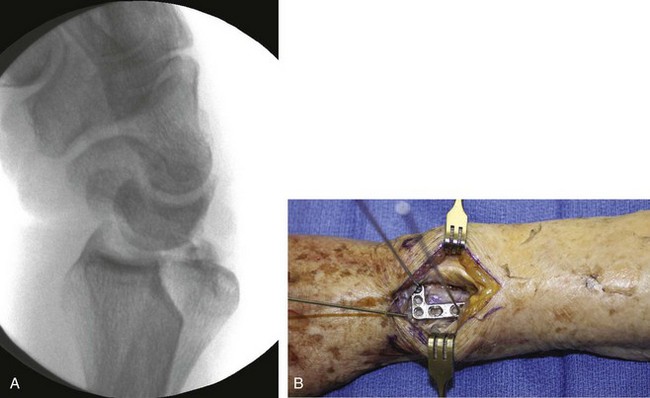
 It is important to assess carpal subluxation and initially restore the radial styloid fragment if present (Fig. 78-9A).
 This reduction is usually accomplished with traction and ulnar deviation of the hand and wrist, and then provisional K-wire fixation (Figs. 78-9B and 78-10).

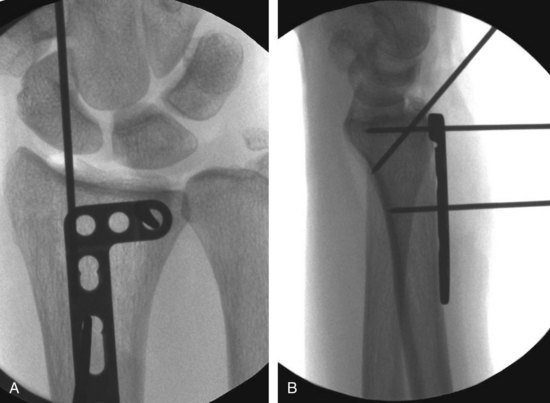
 Preliminary fixation of the plate with a single, bicortical screw placed in the oblong hole will allow for proximal-distal plate adjustments as determined clinically and fluoroscopically (Fig. 78-11).


 If the plate is acting purely as a buttress, distal locking screws are not necessary.

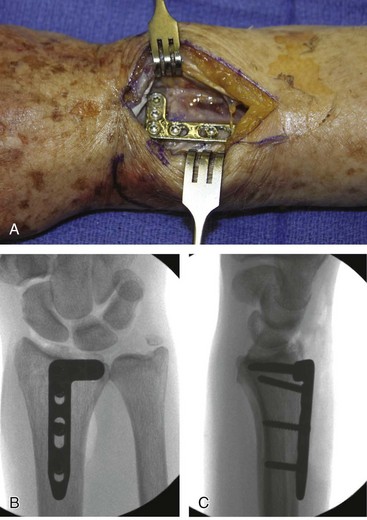
 One or two additional bicortical screws are placed proximally to the proximal extent of the fracture to finalize construct (Figure 78-12).
Step 3 Pitfalls
Failure to recognize styloid component or any volar-ulnar fragments will lead to incongruity of articular surface and radiocarpal arthrosis.
These fractures may be associated with dorsal radiocarpal subluxation, volar ligament injuries, articular surface impaction, and avulsion fractures.
All bicortical fixations should be checked radiographically to ensure that they are not prominent volarly.
Step 4: Reduction and Fixation of Lunate Facet Fractures
 Subchondral collapse of the lunate facet can be addressed with the use of a Freer elevator or dental pick placed into the facet fracture line in the metaphysic.


 For sagittal splits, intrafragmentary compression is possible using a large bone reduction clamp.


 After preliminary reduction is confirmed both by direct visualization and fluoroscopy, an L-shaped 2.4-mm plate is typically used for buttress fixation of the intermediate column and articular surface (see Fig. 78-8).

 The plate is then fixed proximally to the shaft well distally along the L-portion of the plate.


Step 4 Pearls
If there are nonarticular fragments seen along the dorsal aspects of the scaphoid and lunate facet that still have capsular attachments, an effort should be made to save them with their attachments.
Bone grafting metaphyseal defects after elevation of depressed articular fragments is essential to maintain reduction.
Step 5: Assessment of DRUJ Stability and Wound Closure
 After stabilization of the radius, any instability of the DRUJ should be assessed (defined as greater than 8 mm of palmar to dorsal translation of the ulna relative to the radius).


 If no instability is noted, no immobilization is necessary.
 If an arthrotomy has been made, the dorsal capsule should be closed with 3-0 nonabsorbable suture.


Postoperative Care and Expected Outcomes
 A bulky sterile dressing and volar splint, leaving the thumb and fingers free, is applied for postoperative comfort for 7 to 10 days (except in those with DRUJ instability).
 After removal of dressing, active and passive digital range-of-motion exercises are initiated.

 An elastic garment should be used to control postoperative edema.
 Weaning of splint for activities of daily living can be started at 4 weeks.

Dorsal Distraction (Bridge) Plating
Indications
 Highly comminuted, articular distal radius fractures as well as those associated with significant metaphyseal and diaphyseal comminution
 Polytrauma patients to facilitate activities of daily living

 Severe osteoporosis in which fracture fixation is expected to be poor
 Patients who refuse external fixation for psychological or aesthetic concerns
Examination/Imaging

Imaging
 Initial plain radiographic evaluation must include posteroanterior, lateral, and oblique views (Figs. 78-13 and 78-14).
 Ulnar deviation views can be used in patients with suspected scaphoid fractures.
 Proximal injuries must be ruled out with radiographs of the elbow and forearm.
 Computed tomography scan provides excellent delineation of intra-articular extension as well as characterization of fracture comminution for operative planning (Fig. 78-15).
Surgical Anatomy


Exposures
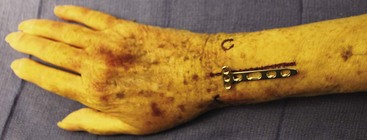
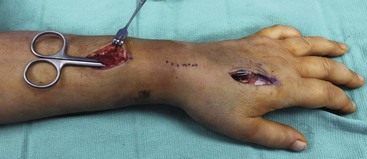
 The exposure involves two or three dorsal incisions and is performed under tourniquet control (Fig. 78-16).


 The interval between the ECRL and ECRB is used to expose the radial diaphysis.


Pearls
Placement of incisions is facilitated with fluoroscopic guidance.
The surgeon holds the distal end of the plate at the index metacarpal neck-shaft junction and identifies the proximal extent of the plate over the radial shaft to ensure placement of three screws proximal to the fracture.
The third incision also allows for exposure of the fracture when necessary, permitting metaphyseal bone grafting and articular reduction.
Procedure
Dorsal Distraction (Bridge) Plating
Step 1: Selection of an Appropriate-Length Plate


Step 2: Retrograde Passage of the Plate
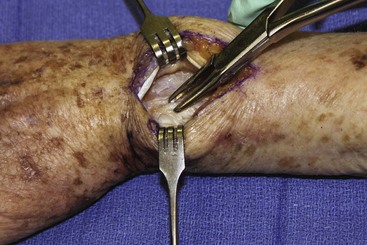
 After exposures have been made, a periosteal elevator or long Metzenbaum scissors is carefully inserted proximal to distal along the floor of the second compartment to create a tunnel between the extensor tendons and the periosteum and joint capsule (Fig. 78-18).

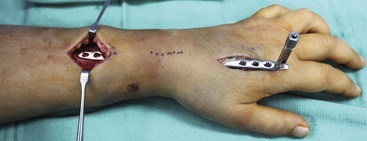
 The plate is then passed from the distal to proximal incision under the index finger extensor tendons (Fig. 78-19).
Step 2 Pearls
Retraction of the ECRB and ECRL in the proximal wound will allow for visualization of the radial shaft and the periosteal elevator so that long scissors can be passed subperiosteally.
The trajectory of the plate is parallel to the radial aspect of the undersurface of the extensor tendons to the index finger.
Step 3: Initial Plate Fixation to the Index Metacarpal
 The fracture is initially reduced with manual traction of the wrist.

 A bicortical screw is placed in the second-to-last hole in the center of the metacarpal shaft.
Step 3 Pearls
Using only a single screw will allow, if necessary, slight adjustments of the plate position for fracture reduction and plate alignment.
To avoid possible rotary displacement of the hand in relation to the shaft, it is important to obtain provisional reduction of both radial inclination and length before securing the plate to the metacarpal shaft.
Step 4: Plate Fixation to the Radial Shaft
 Reapply traction to the arm to restore radial length and confirm alignment with fluoroscopy.


 Three bicortical proximal screws are placed in the shaft to secure the plate.
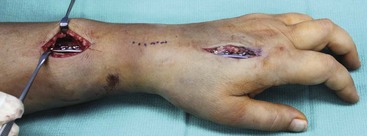
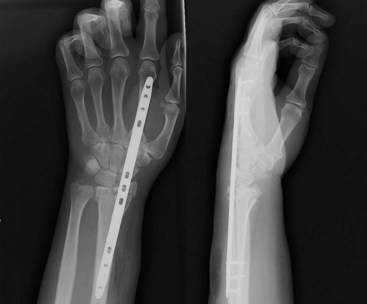
 Two additional bicortical screws are applied to the metacarpal shaft to ensure three distal points of fixation (Fig. 78-20).
 Final radiographic assessment is repeated to ensure maintenance of reduction (Fig. 78-21).
Step 4 Pearls
Assess supination and pronation of the forearm with the plate clamped proximally to the radial shaft to confirm a full range of motion.
It is very helpful to maintain the arm in 45 to 60 degrees of supination while maintaining distraction before the serrated clamp is applied proximally to avoid pronation of the distal fragment.
Once plate placement has been determined with at least one proximal and distal screw, locking screws can be used, particularly in osteopenic bone.
Step 4 Pitfalls
Overdistraction (defined as a radiocarpal space greater than 5 mm) must be avoided to prevent possible permanent loss of finger range of motion as well as the potential development of complex regional pain syndrome.
Extrinsic extensor tightness can also develop with overdistraction; it is vital to ensure full passive digital range of motion after plate fixation.
Step 5: Fixation of the Articular Surface and Diaphyseal Fragments (if Necessary)
 If there are any diaphyseal fragments that are amenable to lag screw fixation to the shaft, this can be performed at this time.


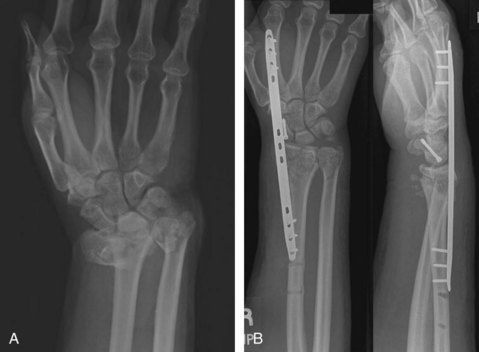
 Case series: Posteroanterior radiograph of another case (Fig. 78-22A)
 Case series: Radiographs of the plate bridging the fracture (Fig. 78-22B).
Step 5 Pearls
It is absolutely essential to address any depressed articular fragments that do not reduce with ligamentotaxis.
Bone grafting for both subchondral and metaphyseal defects that are magnified or created by the distraction is an essential component for long-term maintenance of articular reduction and fracture healing.
K-wires should be left outside or deep to the skin and removed at 6 weeks.
Step 5 Pitfalls
Failure to reduce articular fragments may lead to symptomatic radiocarpal arthrosis.
Use of the nick-and-spread method to insert percutaneous K-wire fixation is imperative to prevent injury to the branches of the superficial radial nerve.
Contraindications to bone grafting include grade III open fractures with gross contamination and soft tissue defects that preclude primary wound closure.
After stabilization of the radius, any instability of the DRUJ should be assessed (defined as greater than 8 mm of palmar to dorsal translation of the ulna relative to the radius).
Large fractures of the ulnar styloid as well as displaced ulnar head fractures should raise suspicions of instability.
If instability is noted, the forearm should be maintained in supination for 3 to 4 weeks.
If no instability is noted, immobilization is unnecessary.
If an arthrotomy has been made, the dorsal capsule should be closed with 3-0 nonabsorbable suture.
Postoperative Care and Expected Outcomes
 A bulky dressing and splint are used postoperatively for pain control for a few days (except in those with DRUJ instability).


 Pronation and supination are encouraged.
 Patients may use the affected extremity for activities of daily living.


Pearls
Patients may return to work with distraction in place if they can maintain their restrictions.
A platform walker for mobilization may be used in polytrauma patients if the fixation is deemed stable enough intraoperatively.
Hardware removal can electively be scheduled for about 8 to 12 weeks after surgery depending on the nature of the fracture and documentation of radiographic union.
Range-of-motion exercises of the wrist and fingers are started immediately after plate removal, and no splinting is required.
Pitfalls
Maintain distraction plate until radiographic osseous healing has occurred (bridging callous seen in both the coronal and sagittal plane).
Judging osseous healing may be difficult to visualize with the 3.5-mm plate.
Early removal may lead to late fracture collapse.
Late removal can lead to possible extensor tendon attrition and rupture and permanent wrist stiffness.
Burke EF, Singer RM. Treatment of comminuted distal radius with the use of an internal distraction plate. Tech Hand Upper Extrem Surg. 1998;2:248-252.
Carter PR, Frederick HA, Georgiann FL. Open reduction and internal fixation of unstable distal radius fractures with a low-profile plate: a multicenter study of 73 fractures. J Hand Surg [Am]. 1998;23:300-307.
Ginn TA, Ruch DS, Yang CC, Hanel DP. Use of a distraction plate for distal radial fractures with metaphyseal and diaphyseal comminution: surgical technique. J Bone Joint Surg [Am]. 2006;88:29-36.
Hanel DP, Lu TS, Weil WM. Bridge plating of distal radius fractures: the Harborview method. Clin Orthop Relat Res. 2006;445:91-99.
Kamath AF, Zurakowski D, Day CS. Low-profile dorsal plating for dorsally angulated distal radius fractures: an outcomes study. J Hand Surg [Am]. 2006;31:1061-1067.
Lozano-Calderón SA, Doornberg J, Ring D. Fractures of the dorsal articular margin of the distal part of the radius with dorsal radiocarpal subluxation. J Bone Joint Surg [Am]. 2006;88:1486-1493.
Papadonikolakis A, Ruch DS. Internal distraction plating of distal radius fractures. Tech Hand Upper Extrem Surg. 2005;9:2-6.
Rozental TD, Beredjiklian PK, Bozentka DJ. Functional outcome and complications following two types of dorsal plating for unstable fractures of the distal part of the radius. J Bone Joint Surg [Am]. 2003;85:1956-1960.
Ruch DS, Ginn TA, Yang CC, et al. Use of a distraction plate for distal radial fractures. J Bone Joint Surg [Am]. 2005;87:945-954.
Simic PM, Robison J, Gardner MJ, et al. Treatment of distal radius fractures with a low-profile dorsal plating system: an outcomes assessment. J Hand Surg [Am]. 2006;31:382-386.