CHAPTER 7. BLOOD CULTURES
Indications63
Sampling contraindicated64
Equipment64
Practical procedure65
Post-procedure investigations65
Following on from Louis Pasteur’s (1822–1895) germ theory it was inevitable that attempts would be made to grow and isolate germs present on or within the body. Pasteur prepared a sterilized culture medium in 1861 from sugar, yeast and ammonium tartrate dissolved in water. However, it was Friedrich August Johannes Löffler (1852–1915) in 1887 who set the scene for further developments, devising horse serum, meat broth and dextrose-based ‘Löffler’s’ medium for cultivation and separation of corynebacteria from other organisms. The German bacteriologist Julius Richard Petri (1852–1921) introduced plates, ‘Petri’ dishes, for bacterial culture in 1887. The process of blood acquisition, modifying culture medium contents, culturing and sub-culturing bacteria for identification was pioneered in the early 20th century. Determination of sensitivity patterns followed with the discovery of antibiotics.
INTRODUCTION
Blood cultures are an essential part of a septic screen. Growth and identification of an organism in blood culture allows the physician to consider initial antibiotic therapy which might be modified once antibiotic sensitivities of the organism are determined. In general it takes about 48 hours for culture and organism identification and a further 24 hours to determine antibiotic sensitivities. Most patients with suspected infection will already be on antibiotics, the results of cultures confirming or refuting the appropriateness of the empirical treatment. The importance of blood culture results cannot be overestimated, and therefore meticulous preparation is required to avoid false positives with sufficient blood to avoid false negatives.
INDICATIONS
SAMPLING CONTRAINDICATED
• Lack of consent.
• Sampling from the following sites to avoid false positive results:
— Cellulitis around intended venepuncture site.
— Superficial or deep venous thrombosis.
— In situ peripheral cannula.
• Sampling from the following sites to prevent local complications:
— Ipsilateral mastectomy, i.e. a limb with impaired lymphatic drainage.
— Ipsilateral arterio-venous fistula.
EQUIPMENT
• 10 mL syringe.
• 3 × sterile alcohol swabs.
• 2 × green needles.
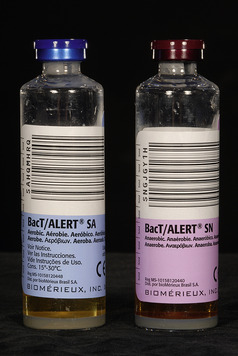
• Blood culture bottles (Fig. 7.1).
• Tourniquet.
• Gloves.
• Cotton wool balls.
• Plaster.
PRACTICAL PROCEDURE
• Explain procedure to patient and obtain consent.
• Place the arm on a comfortable surface such as a pillow.
• Place tourniquet on the upper arm to distend veins.
• Look and feel for a vein, noting the size and direction of the vein. Start in the antecubital fossa and work your way down the arm.
• Aim to select a vein that has not recently been used for venepuncture, is easily located, feels bouncy and refills quickly when pressure is applied.
• Wash your hands and wear gloves.
• Clean the area of skin extensively with sterile alcohol swabs and allow to dry.
• Attach the green needle to the 10 mL syringe.
• Stretch the skin taut a few centimetres above or below the area of presumed venepuncture.
• Warn the patient of a sharp scratch.
• Gently insert the needle into the vein at a 30–45 degree angle with the bevel facing upwards.
• Aspirate 10 mL of blood from the patient. Alternatively use the Vacutainer system (see Chapter 6), ensuring approximately 5 mL blood is inoculated in each culture bottle.
• Remove the tourniquet.
• Remove the needle and immediately place the cotton wool over the venepuncture site and press firmly for 2 minutes.
• Place a plaster over the venepuncture site.
• Remove the tops from the blood culture bottles and place on a flat surface.
• Swab the tops of the culture bottles with sterile alcohol swabs.
• Using a new green needle inoculate each culture bottle with the volume of blood indicated on the bottles. Inoculate the aerobic bottle (blue top) first.
POST-PROCEDURE INVESTIGATIONS
• Label the bottles (including patient details and sample details, i.e. date and time of culture) and send to the microbiology laboratory.
• Ensure to indicate on the microbiology form where the cultures are taken from, i.e. peripheral blood cultures, or blood cultures taken from a line (state site).
 Tip Box
If the patient has a central line (either long- or short-term), obtain blood for cultures from the line using an aseptic technique. Remember to remove the first 10 mL of blood and discard prior to obtaining the sample itself. Flush the line with 10 mL of normal saline post-aspiration to ensure line patency. Note there is still some possibility of picking up contaminants from the line, which result in false positives. Therefore, peripheral blood cultures should always be taken concurrently when taking cultures from an indwelling venous line.
 Tip Box
Always fill the two culture bottles (one for aerobic, another for anaerobic organisms; laboratories may have special bottles available for fungal culture) with the volume of blood required. Modern blood culture methodology relies on automated quantitative detection of carbon dioxide derived from micro-organism metabolism. Insufficient blood will produce less carbon dioxide, which might produce a false–negative result. The chances of obtaining a true-positive blood culture result while reducing the risk of contaminants is also improved by taking two sets of cultures from different sites in close temporal proximity.