CHAPTER 6. VENEPUNCTURE (PERIPHERAL AND FEMORAL)
Indications54
Contraindications54
Peripheral venepuncture equipment54
Practical procedure55
Femoral venepuncture equipment58
Practical procedure59
Post-procedure investigations61
Complications61
Venesection is probably the oldest surgical intervention. It was used therapeutically by Hippocrates (460–377 BC), while Aulus Cornelius Celsus (25 BC–AD 50) gave it a scientific context and described the technique in De Re Medicina. It became a universal remedy in virtually all cultures. It had spectacular results in those with pulmonary oedema secondary to rheumatic heart disease but was less successful in those with asthma, convulsions, etc., where it was equally applied and consequently was the source of controversy as a universal remedy. In Graeco-Arabic medicine (Unani) it was thought to let out putrid humours. This concept was later supplemented by the practice of blood fortification by the administration of iron-containing substances. Such practice persisted well into the 19th century in the western world. Today venesection is largely for investigative rather than therapeutic purposes.
INTRODUCTION
Phlebotomy or venepuncture is a basic clinical skill that is routinely practised by a number of health professionals. Peripheral venepuncture should be performed efficiently with minimal discomfort to the patient. Occasionally peripheral venepuncture may be difficult or contraindicated and femoral venepuncture is indicated.
INDICATIONS
• Routine blood investigations: haematology; biochemistry; immunology.
• Transfusion samples: group and cross-match/group and save.
• Toxicology samples: therapeutic drug monitoring (e.g. gentamicin, vancomycin, phenytoin levels); assays in overdose (e.g. paracetamol).
• Microbiology investigations: blood cultures (covered in a later chapter); serology.
CONTRAINDICATIONS
• Local infection.
• Superficial or deep venous thrombosis.
• Ipsilateral mastectomy, (i.e. a limb with impaired lymphatic drainage).
• Ipsilateral hemiparesis or contractures.
• Ipsilateral arterio-venous fistula.
• Lack of consent.
PERIPHERAL VENEPUNCTURE EQUIPMENT
• Vacutainer® needle or Monovette® needle.
• Vacutainer® barrel or Monovette® attachment.
• Sterile alcohol swabs.
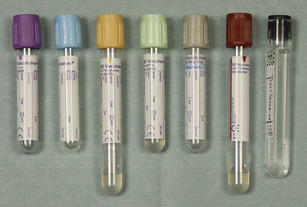
• Blood bottles (Fig. 6.1).
• Cotton wool balls.
• Plaster.
• Tourniquet.
PRACTICAL PROCEDURE
• Explain the procedure to the patient and gain consent.
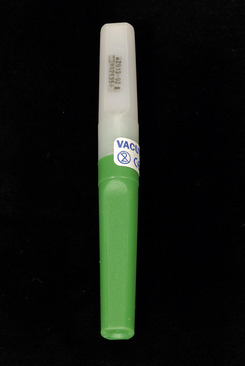
• Check the paper seal is intact on the Vacutainer needle to ensure sterility (Fig. 6.2).
• Break the paper seal and twist the Vacutainer needle into the barrel.
• Place the arm on a comfortable surface such as a pillow.
• Place tourniquet on the upper arm sufficiently tight to distend veins but not occlude the artery (check the pulse is palpable below the tourniquet).
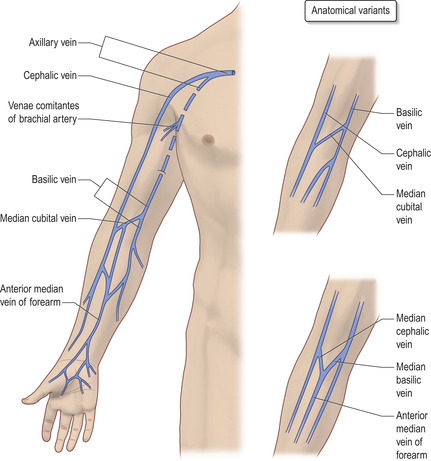
• Look and feel for a vein, noting the size and direction of the vein (Fig. 6.3). Start in the antecubital fossa and work your way down the arm. Aim to select a vein that has not been used recently for venepuncture, is easily located, feels bouncy and refills quickly when pressure is applied.
 Tip Box
If there are unsuitable or difficult to locate veins on one arm:
• Try looking in the other arm.
• Ask the patient to open and close their fist, thereby increasing venous return against the tourniquet and distending the veins.
• Tapping the veins causes venodilatation and might aid finding a suitable site.
• Hang the arm off the side of the bed for a few minutes below the level of the heart.
• If this fails, a GTN patch applied topically will also promote local venodilatation.
• Certain groups of patients who have had previous access difficulties may be able to guide you given their previous hospital experiences, e.g. patients with chronic co-morbidities such as chronic renal failure or intravenous drug users.
• Wash your hands and wear gloves.
• Clean the area of skin with sterile alcohol swabs and allow to dry.
 Tip Box
If taking a sample for blood alcohol concentrations, avoid cleaning with isopropyl alcohol and use soap and water. Although there is little chance of altering blood alcohol concentrations, samples are often taken in a law enforcement context.
• Remove sheath from the Vacutainer needle.
• Stretch the skin a few centimetres above (or below) the area of presumed venepuncture with the thumb of your non-dominant hand so that needle insertion is not deviated by the elasticity of the skin.
• Warn the patient of a sharp scratch.
• Gently insert the needle into the vein at a 30–45 degree angle with the bevel facing upwards.
 Tip Box
When placing the vacutainer needle into the vein don’t have the blood bottle pre-attached to the barrel. The vacuum in the blood bottle will collapse the vein on entry.
• Holding the Vacutainer steady with your hand resting stable against the patient’s arm, insert the blood bottles into the Vacutainer barrel and allow the vacuum in the bottles to fill them up. Try to fill bottles to the indicated mark; laboratories often reject small samples.
• Remove the tourniquet.
• Remove the needle and immediately place the cotton wool over the venepuncture site, pressing firmly for 2 minutes.
 Tip Box
Do not flex the arm after peripheral venepuncture as this predisposes to haematoma formation.
• Gently mix the blood bottle contents by inverting them upside down a few times.
• Having asked the patient if they have a plaster allergy, place a plaster over the venepuncture site.
 Tip Box
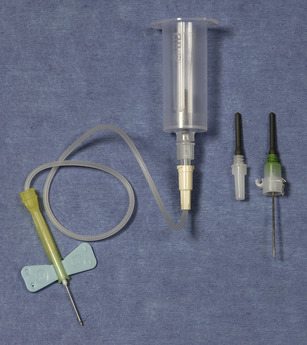
For patients with veins that are small, fragile or in a position that is difficult to access with a Vacutainer, a ‘butterfly needle’ (Fig. 6.4) may be useful. They may also be useful in patients with spasticity (secondary to hemiparesis or contractures). Attach a Vacutainer set (with a different Vacutainer needle attachment for the barrel) or a 10 mL syringe to the distal end of the butterfly needle flexible tubing. Holding the pliable butterfly wings insert the needle into the vein, approaching at a shallow (approximately 20 degree) angle. A small flashback of blood will be seen in the tubing, indicating that the butterfly needle is in the vein and that blood may now be drawn off.
 Tip Box
When using a small-gauge butterfly needle take care not to aspirate too quickly as this can result in haemolysis of the sample.
FEMORAL VENEPUNCTURE EQUIPMENT
PRACTICAL PROCEDURE
• Explain the procedure to the patient and gain consent.
• Ensure you have the correct blood bottles and equipment.
• Assemble the needle to the syringe.
• Ensure the patient is lying flat and comfortably on a bed.
• Wash hands and wear gloves.
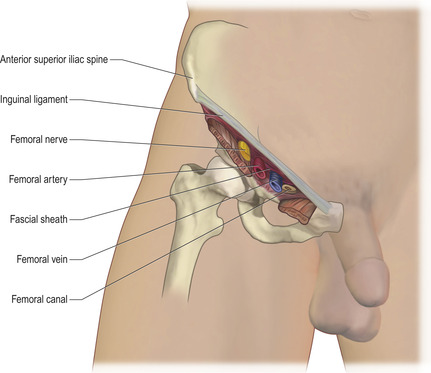
• Locate the femoral pulse in the groin (mid way between the symphysis pubis and anterior iliac tuberosity pushing the artery against the ischium). The femoral artery lies about one finger’s breath lateral to the femoral vein (Fig. 6.5).
 |
| Fig. 6.4 |
• Clean the skin with chlorhexidine solution and allow to dry.
• Warn the patient of a sharp scratch.
• While feeling the femoral pulse with your non-dominant hand insert the needle at a 90 degree angle (i.e. vertically) 2 cm medial to the femoral arterial pulse with the bevel facing upwards.
• The femoral vein is usually punctured at a depth of 2–4 cm, but this varies enormously with adiposity.
• When you have flashback into the needle, pull back the syringe plunger with your dominant hand until you have collected the required volume of blood.
 Tip Box
If while performing femoral vein puncture you accidentally puncture the femoral artery continue to take blood anyway, and upon removing the needle apply firm pressure with a cotton wool ball for at least 5 minutes.
• If there is no blood flashback into the needle, you may have gone too deeply. Gently maintain suction and withdraw the needle slowly until blood flashes back. If there is still no flashback, withdraw the needle further (but not out of the skin) and aim slightly closer to the arterial pulsation. Subsequently re-advance while maintaining suction on the syringe plunger.
 Tip Box
Should the patient experience pain radiating down the leg during femoral venepuncture, this may indicate the needle hitting the femoral nerve and you are too lateral. Remove the needle and re-palpate the femoral artery, aiming medially to this landmark.
• Once blood has been obtained, remove the needle and immediately compress the venepuncture site for 3 minutes with cotten wool.
• Place a plaster over the venepuncture site
POST-PROCEDURE INVESTIGATIONS
• Label bottles.
• Ensure the blood forms are filled out correctly including the details needed for cross-match and group and save samples.
• If the blood sample is known to be ‘high risk’ (suspected or known HIV, AIDS, hepatitis or tropical disease and high-risk groups) attach a Bio Hazard sticker to the sample and sample bag and request form.
COMPLICATIONS
• Failed peripheral venepuncture:
— gain consent to try an alternative vein, e.g. other antecubital fossa, back of hand, feet
— if other sites fail and there is no contraindication, perform femoral venepuncture
— ask someone more experienced. Don’t persist more than three times.
• Local bruising.
• Arterial puncture.
• Superficial vein thrombosis.
• Deep vein thrombosis.
• Erythema and cellulitis at puncture site.
• Haemorrhage at venepuncture site.
• Vasovagal attacks.

