[level-membership-for-surgery-category]
Procedure 55 Metacarpal Shaft Fractures
 See Video 39: Metacarpal Shaft Fractures


Examination/Imaging
Clinical Examination


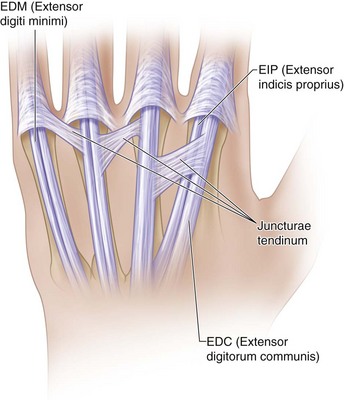
Surgical Anatomy


Exposures
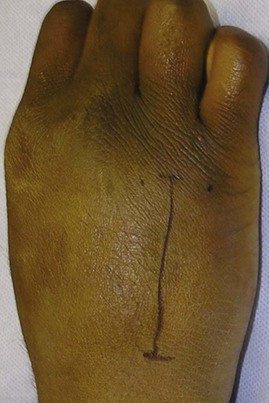
 A longitudinal incision is marked along the dorsum of the metacarpal. The incision is centered over the fracture and equals the length of the plate.
 In open injuries, the open wound is incorporated in the incision and excised as needed.
 For fixation of multiple fractures, two incisions on the dorsum in the second and fourth web space will provide access to adjacent metacarpals and allow decompression of the interosseous compartments if needed. Alternatively, a transverse incision across the back of the hand may be used as an extension of a preexisting traumatic wound (Fig. 55-3).
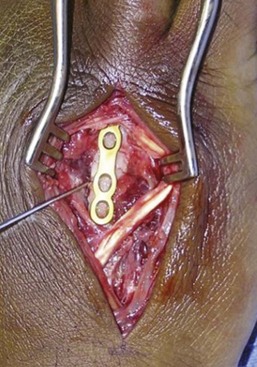
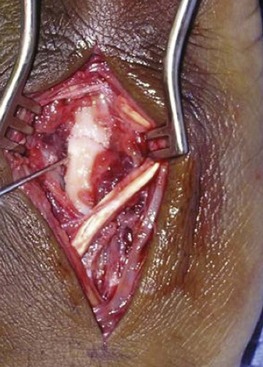
 After spreading dissection, the extensors are exposed and retracted (Fig. 55-4).


Pearls
For plating of adjacent metacarpals, a single skin incision between the metacarpals will allow access to both fractures (Fig. 55-5).
Careful spreading dissection is necessary after skin incision to preserve subcutaneous nerves and veins.
Paratenon around the extensor tendons must be preserved to minimize postoperative tendon adhesions.
Juncturae tendinum between tendons may need to be divided to facilitate retraction of the extensor tendons.
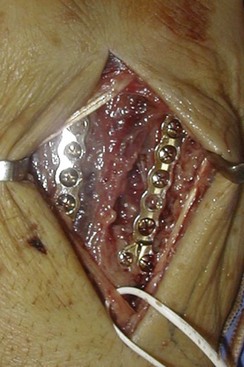
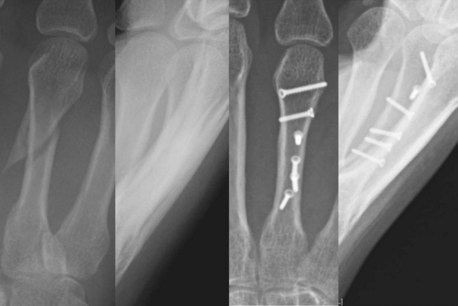
In case of excessive comminution, periosteum around the fracture is left intact, and the implant is secured distally and proximally. Figure 55-6 shows the bridge plating technique used in a comminuted metacarpal fracture due to a gunshot wound.

Procedure
Step 1: Principles and Methods of Fixation
 In oblique and spiral fractures, achieve provisional reduction and stabilize with a K-wire (Fig. 55-7).

 Type of fixation depends on the fracture geometry.
 Transverse fractures are treated with compression plating (Fig. 55-8).


 Long oblique and spiral fractures that are longer than two times the diameter of the bone are stabilized with a series of lag screws. Plating is not necessary (Fig. 55-9).


Step 1 Pitfalls
In a short oblique fracture, the lag screw placement interferes with plate placement. If the fracture is in the coronal plane, the plate is fixed to bone first, and then the lag screw is passed through the plate.
Avoid aggressive countersinking of the near cortex using powered instruments to prevent weakening the cortex.
Placing a screw too close to the fracture line may result in additional comminution. Stay at least two screw head diameters away from the fracture line.
Step 2: Dynamic Compression Plate
 A transverse diaphyseal fracture without comminution is best treated with compression plating.


 The oval holes in the plate enable application of compression as the screws are tightened.


 The remaining screws are then drilled in the center of each hole (neutral position).
Step 2 Pitfalls
Failure to prebend the plate will result in gapping at the fracture site at the opposite surface. If this situation occurs, it can be addressed with insertion of cancellous bone graft into the gap.
Inaccurate drilling of screw holes can result in distraction at the fracture when the screws are fully seated.
Axial compression with eccentric screw placement is not possible if done later in the fixation because the fragments already are fixed rigidly to the plate.
Step 3: Neutralization Plate


Step 4: Completion of Fixation
 Remaining screws are inserted.

 The fingers are moved passively to ensure full range and to confirm rotational alignment.
Step 5: Wound Closure


Additional Steps
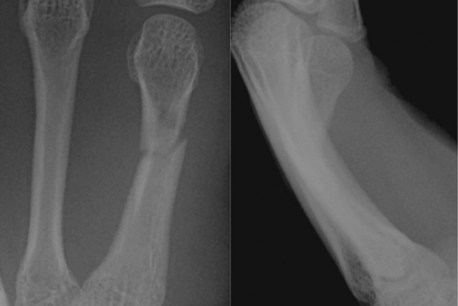
 Transverse pinning of a metacarpal shaft fracture is an alternative treatment for fractures that can be reduced by closed manipulation (Fig. 55-10).
 Fractures are usually angulated with the apex dorsal.

 Reduction is achieved by resolution of the palpable bump and confirmed with an image intensifier.


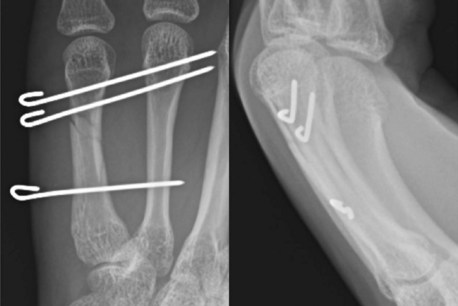
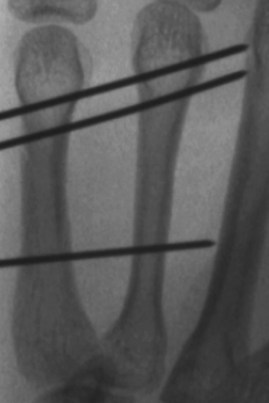
 Two pins are inserted distal to the fracture site, and a third is inserted proximal to the fracture (Fig. 55-11).
 Each K-wire should capture both cortices of the injured and neighboring uninjured metacarpal and abut against the next metacarpal shaft. The K-wire should go through four cortices and stop at the next intact one (Fig. 55-12). This will prevent late migration of the wire and ensure easy retrieval of the wires after 3 weeks.
 Maintenance of reduction and pin placement are confirmed fluoroscopically.
 K-wires are cut short and bent outside the skin for removal in the clinic.
Pearls
Attention to pain and edema control is essential in the early postoperative period.
Splinting with metacarpophalangeal joints in flexion is essential to prevent contracture.
When passing K-wire, it is important to count the number of cortices drilled to avoid incorrect trajectory of the K-wire. It should be confirmed that four cortices are passed and the K-wire stops at the outer cortex of the next intact metacarpal (fifth cortex).
Postoperative Care and Expected Outcomes


Fusetti C, Meyer H, Borisch N, et al. Complications of plate fixation in metacarpal fractures. J Trauma. 2002;52:535-539.
Omokawa S, Fujitani R, Dohi Y, et al. Prospective outcomes of comminuted periarticular metacarpal and phalangeal fractures treated using a titanium plate system. J Hand Surg [Am]. 2008;33:857-863.
Ouellette EA, Freeland AE. Use of the minicondylar plate in metacarpal and phalangeal fractures. Clin Orthop Relat Res. 1996;327:38-46.
Page SM, Stern PJ. Complications and range of motion following plate fixation of metacarpal and phalangeal fractures. J Hand Surg [Am]. 1998;23:827-832.
Soeur JS, Mudgal CS. Plate fixation in closed ipsilateral multiple metacarpal fractures. J Hand Surg [Br]. 2008;33:740-744.
[/level-membership-for-surgery-category][not-level-membership-for-surgery-category]
Procedure 55 Metacarpal Shaft Fractures
See Video 39: Metacarpal Shaft Fractures
Examination/Imaging
Clinical Examination
Surgical Anatomy
Exposures
A longitudinal incision is marked along the dorsum of the metacarpal. The incision is centered over the fracture and equals the length of the plate.
In open injuries, the open wound is incorporated in the incision and excised as needed.
For fixation of multiple fractures, two incisions on the dorsum in the second and fourth web space will provide access to adjacent metacarpals and allow decompression of the interosseous compartments if needed. Alternatively, a transverse incision across the back of the hand may be used as an extension of a preexisting traumatic wound (Fig. 55-3).
After spreading dissection, the extensors are exposed and retracted (Fig. 55-4).
Pearls
For plating of adjacent metacarpals, a single skin incision between the metacarpals will allow access to both fractures (Fig. 55-5).
Careful spreading dissection is necessary after skin incision to preserve subcutaneous nerves and veins.
Paratenon around the extensor tendons must be preserved to minimize postoperative tendon adhesions.
Juncturae tendinum between tendons may need to be divided to facilitate retraction of the extensor tendons.
In case of excessive comminution, periosteum around the fracture is left intact, and the implant is secured distally and proximally. Figure 55-6 shows the bridge plating technique used in a comminuted metacarpal fracture due to a gunshot wound.
Procedure
Step 1: Principles and Methods of Fixation
In oblique and spiral fractures, achieve provisional reduction and stabilize with a K-wire (Fig. 55-7).
Type of fixation depends on the fracture geometry.
Transverse fractures are treated with compression plating (Fig. 55-8).
[/not-level-membership-for-surgery-category]
