Procedure 52 Hemi-Hamate Arthroplasty
Figures 52-1, 52-5, 52-7, and 52-8 through 52-11 borrowed with permission from Williams RMM, Kiefhaber TR, Sommerkamp TG, et al. Proximal interphalangeal fracture/dislocations using a hemi-hamate autograft. J Hand Surg [Am]. 2003;28:856-865.
Indications
 Unstable PIP joint fracture dislocations in which more than 50% of the palmar base of the middle phalanx is fractured. There must be dorsal cortical continuity.
 Comminuted lateral plateau fractures of the base of the middle phalanx.
 Joint salvage after failed treatment of complex fracture-dislocations of the PIP joint.
Examination/Imaging


Surgical Anatomy


Exposures
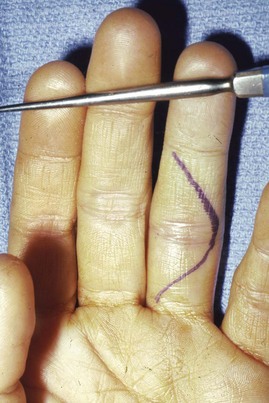
 Exposure of the PIP joint is gained through a palmar V-shaped incision centered over the PIP joint (Fig. 52-2).


 The flexor tendons are retracted to expose the volar plate, which is released from the accessory collateral ligaments at its lateral margins (Fig. 52-3).
 The volar plate is incised transversely from the base of the middle phalanx and reflected proximally (Fig. 52-4).


Pearls
The V-shaped incision extends from the palmodigital crease to the DIP joint flexion crease, with the apex based either radially or ulnarly centered at the PIP joint.
The neurovascular bundles must be visualized, but it is not necessary to mobilize them; they remain protected deep to the lateral digital sheet.
Procedure
Step 1: Preparing the Articular Surface of the Middle Phalanx
 By means of a Penrose drain or moist umbilical tape, the flexor tendons are retracted radially or ulnarly. The PIP joint is hyperextended (“shotgunning”) to expose the fracture site. Loose fragments are débrided (Fig. 52-5).

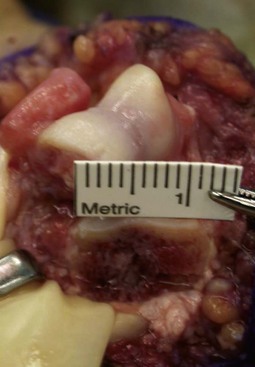
 Measure the bony defect, including the width of the articular surface, the dorsal-palmar height, and the proximal-distal length (Fig. 52-6).
Step 2: Harvesting the Hamate Osteochondral Graft
 Use fluoroscopy to locate the carpometacarpal (CMC) joint at the base of the ring and small finger. Then make a transverse 3-cm incision just proximal to the joint.
 Bluntly mobilize the subcutaneous veins and nerves and retract the extensor tendons.
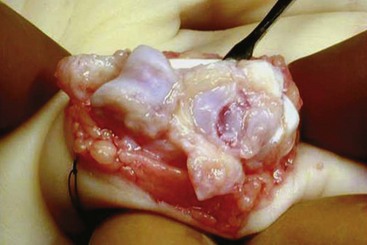
 Make a longitudinal capsulotomy to expose the ring and small CMC joint (Fig. 52-7).

 Make the axial osteotomy (line A) and the sagittal osteotomies (lines B and C), using an osteotome or an oscillating saw just outside the marked line to ensure that the graft is large enough (Fig. 52-8).


Step 2 Pearls
Protect the articular surface of the fourth and fifth metacarpals with a Freer elevator when making the osteotomy.
Err on the side of taking an osteochondral graft 1 to 2 mm larger than measured.
The coronal plane osteotomy using the curved osteotome can be facilitated by making an osseous trough in the hamate just proximal to the osteotomy site.
Step 2 Pitfalls
Failure to leave at least 2 mm of the radial edge of the fourth metacarpal—hamate articulation and 2 mm of the ulnar edge of the fifth metacarpal—hamate joint may lead to CMC joint instability.
Avoid making the coronal osteotomy too obliquely because this might prevent adequate restoration of joint geometry and potentially lead to instability.
The coronal plane osteotomy must be done carefully to avoid fracture of the osteochondral autograft.
Step 3: Graft Fixation
 Contour the graft as needed to fill the defect, giving special attention to reconstructing the concave articular surface. Additional bone graft may be used distally if the hamate graft is too vertical (Fig. 52-9).
 Provisionally secure the autograft with a 0.028-inch K-wire.
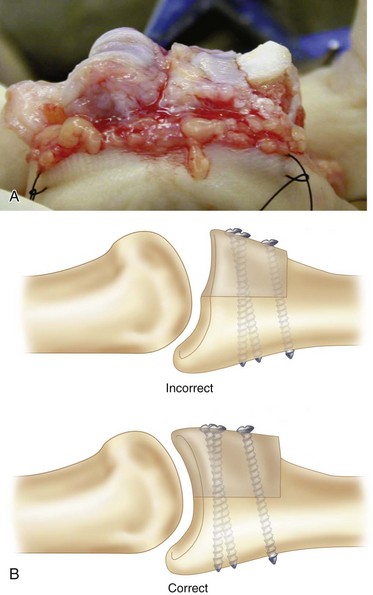
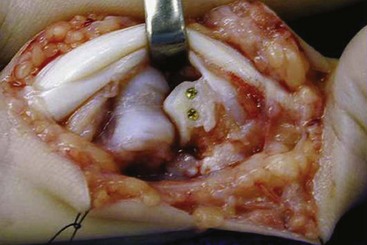
 Secure the graft with two 1.1- or 1.3-mm screws on either side of the provisional K-wire. A third screw placed into the hole is left once the K-wire is removed if the graft is large enough (Fig. 52-10).


Step 3 Pearls
Make every effort to cant the graft into 10 to 15 degrees of extension so as to better restore the cup-shaped contour of the base of the middle phalanx.
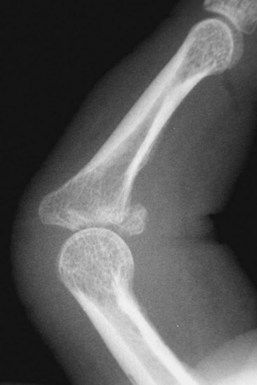
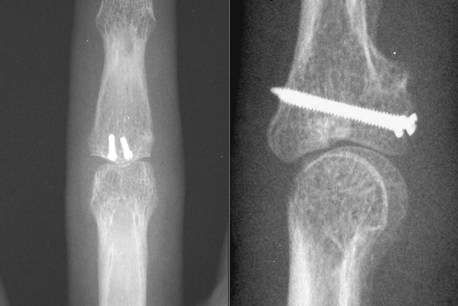
The hamate articular cartilage is thicker than the middle phalanx cartilage, which creates an apparent radiographic stepoff (Fig. 52-11). Direct visualization of the joint will confirm the lack of an articular stepoff.
The joint should remain located throughout a full range of motion. Dorsal subluxation suggests that the graft has been set too “flat,” failing to restore a concave articular surface.
Step 4: Closure
 Reattach the volar plate to the middle phalanx with a 4-0 nonabsorbable suture. The suture can be secured through small drill holes if necessary.
 Reattach the collateral ligaments to the stumps on the middle phalanx.
 Reapproximate the flexor tendon sheath flap over the PIP joint with a 6-0 absorbable suture.


Postoperative Care and Expected Outcomes
 Remove the dressing on postoperative day 3 to 5. Apply an elastic sleeve for edema control and a figure-of-eight splint to prevent PIP joint hyperextension.


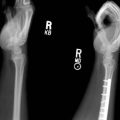
 Obtain radiographs 6 weeks postoperatively to confirm solid graft fixation and concentric joint reduction (see Fig. 52-11). Begin passive range of motion into flexion and correction of an excessive (>20 degrees) PIP flexion contracture with dynamic extension splinting.
 The figure-of-eight splint can be discontinued at 8 weeks.


Calfee RP, Kiefhaber TR, Sommerkamp TG, et al. Hemi-hamate arthroplasty provides functional reconstruction of acute and chronic proximal interphalangeal fracture-dislocations. J Hand Surg [Am]. 2009;34:1232-1241.
Williams RMM, Kiefhaber TR, Sommerkamp TG, et al. Proximal interphalangeal fracture/dislocations using a hemi-hamate autograft. J Hand Surg [Am]. 2003;28:856-865.