Procedure 51 Volar Plate Arthroplasty for Dorsal Fracture-Dislocations of the Proximal Interphalangeal Joint
Indications


Examination/Imaging
Clinical Examination


Imaging
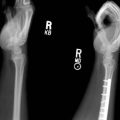
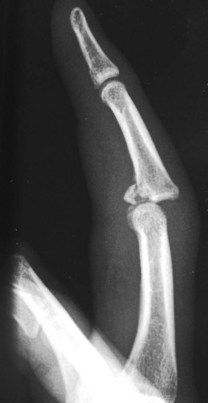
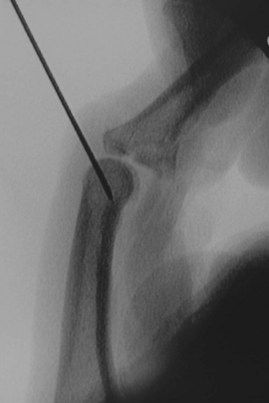
 Films of the digit, including a true lateral radiograph of the affected digit centered on the PIP joint, are required. Persistent subluxation can be recognized when the articular surface of the middle phalanx projects dorsal to a line drawn along the dorsal cortex of the proximal phalanx. Additionally, the joint space should be symmetrical both volarly and dorsally (Fig. 51-1).
Surgical Anatomy
 The PIP is a hinge joint with a 100- to 110-degree arc of motion. Its stability is derived from both the bony architecture of the joint and the surrounding ligamentous structures.


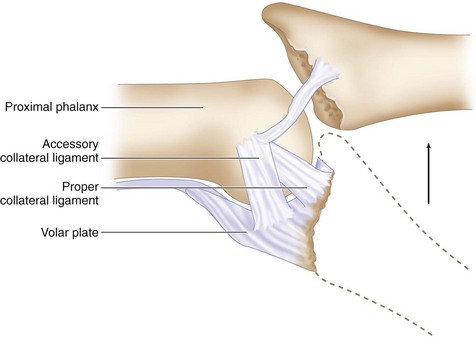
 Because the collateral ligament–volar plate complex inserts on the volar third of the middle phalanx, fractures that involve more than 30% to 40% of the volar articular segment are inherently unstable after reduction. This happens because these ligamentous restraints are attached to the fracture fragment and not to the remaining middle phalanx, which then tends to sublux dorsally. Additionally, a fracture fragment of this size also compromises the inherent bony stability by detaching the volar buttress of the articular surface that cups the proximal phalangeal condyles (Fig. 51-2).

Exposures
 A standard Bruner incision centered at the PIP flexion crease is used to expose the joint (Fig. 51-3).
 Dissection is carried down bluntly, and the radial and ulnar neurovascular bundles are identified and mobilized (Fig. 51-4).

 The flexor tendons can then be bluntly retracted radially and ulnarly to expose the volar plate.


Procedure
Step 1: Incision of the Volar Plate and Joint Exposure
 Incise the volar plate along its lateral margins, freeing it from the accessory collateral ligaments.
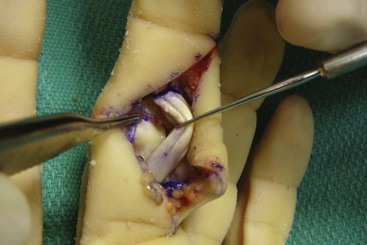
 Next, incise and subperiosteally elevate the volar plate at its distalmost aspect on the base of the middle phalanx. This should create a long, broad flap of volar plate (Fig. 51-5).

Step 1 Pearls
Care must be taken in creating the volar plate flap because this determines the stability of the arthroplasty. The flap should be made as broad as possible because a narrow flap will decrease stability.
The flap must also be symmetrical radially and ulnarly because an asymmetrical flap can lead to angular and rotational deformities.
Step 2: Preparation of the Joint and the Volar Plate
 The joint is then hyperextended nearly 180 degrees (“shotgunning”) to maximize articular visualization.
 The distal end of the volar plate is sharply detached from any fracture fragments.

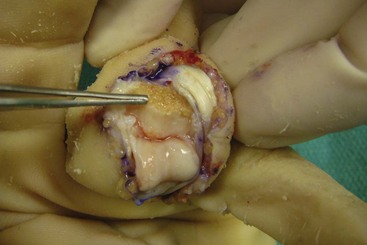
 A shallow transverse trough is then created across the base of the middle phalanx at the juncture of the intact articular cartilage and the fracture defect (Fig. 51-6).


Step 2 Pearls
Similar to creation of the volar plate flap, the trough must be symmetrical in the coronal plane to improve stability and prevent angular deformities.
The depth of the trough at the most dorsal aspect should equal the thickness of the volar plate to provide a smooth transition from articular cartilage to transposed volar plate.
Step 3: Reduction and Fixation
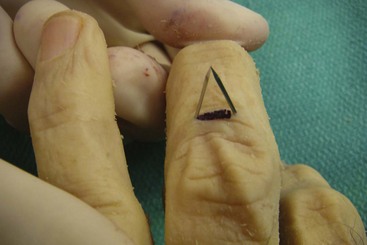
 The free ends of the volar plate sutures are passed through the base of the middle phalanx, using two Keith needles chucked into a wire driver. Volarly, the needles are placed radially and ulnarly in the prepared trough on the middle phalanx, separated by the width of the volar plate. They should also be placed so as to bring the volar plate into the trough—creating a smooth transition from the articular surface to the transposed volar plate. The needles are driven through the middle phalanx to converge centrally on the dorsum of the phalanx distal to the central slip insertion. An incision is made dorsally before pulling the sutures through (Fig. 51-7).


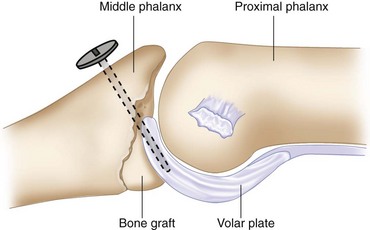
 Bone graft (harvested from the fracture fragments) can then be placed in the defect of the middle phalanx distal to the insertion of the advanced volar plate to provide support if a large defect exists, thus restoring the bony buttress (Fig. 51-8).
Step 3 Pearls
A concentric reduction of the PIP joint must be achieved and should be critically evaluated both visually and radiographically with a true lateral view on a mini C-arm. If this is achieved, the middle phalanx will glide over the proximal phalanx and not hinge open through the arc or motion.
If additional lateral stability is required, the sides of the volar plate can be sutured to the remnants of the collateral ligaments with a 4-0 braided nonabsorbable suture.
If the PIP joint lacks extension, the volar plate may need to be further mobilized. This can be done by lengthening the checkrein ligaments through step-cutting.
The incidence of postoperative distal interphalangeal (DIP) joint contractures can be decreased by flexing the DIP joint while passing the Keith wires to avoid tethering the lateral bands.
Step 4: Extension Block Pinning (Optional)
 The tourniquet is deflated and the incisions closed according to the surgeon’s preference after hemostasis has been achieved.
 A 0.035-inch K-wire is then driven into the dorsal aspect of the proximal phalanx in such a way as to prevent hyperextension of the joint (Fig. 51-9). Alternatively, an articulated PIP external fixator may be used, or a K-wire can be placed across the joint in slight flexion to maintain reduction for 3 weeks.

Postoperative Care and Expected Outcomes


Deitch MA, Keifhaber TR, Comisar BR, Stern PJ. Dorsal fracture dislocations of the proximal interphalangeal joint: Surgical complications and long-term results. J Hand Surg [Am]. 1999;24:914-923.
Dionysian E, Eaton RG. The long-term outcome of volar plate arthroplasty of the proximal interphalangeal joint. J Hand Surg [Am]. 2000;25:429-437.
Durham-Smith G, McCarten GM. Volar plate arthroplasty for closed proximal interphalangeal joint injuries. J Hand Surg [Br]. 1992;17:422-428.
Malerich NM, Eaton RG. The volar plate reconstruction for fracture-dislocation of the proximal interphalangeal joint. Hand Clin. 1994;10:251-260.