CHAPTER 5. PERCUTANEOUS PLEURAL BIOPSY
Contraindications46
Equipment46
The Abrams’ needle47
Site of biopsy47
Practical procedure49
Post-procedure investigations50
Post-procedure care51
Cautions52
Complications52
Suggested reading52
Pleural biopsy, originally an open technique, has been more commonly performed blindly ever since Abrams’ description using a specialized needle in 1958. Prior to Abrams’ development, the original technique used a Franklin modification of the Vim-Silverman needle, which was used for renal biopsy. Despite Cope also describing a novel needle for pleural biopsy in 1958, the Abrams’ needle remains the most popular apparatus. Recently there has been interest in ultrasound-guided biopsies with both modified Abrams’ needles and needles that only require a single pass for multiple biopsies.
 Tip Box
Image guided cutting needle biopsies have a higher yield for malignancy than standard Abrams’ needle pleural biopsy.
(British Thoracic Society guidelines)
INTRODUCTION
Percutaneous pleural biopsy is occasionally performed when other means for reaching a diagnosis of an exudative pleural effusion have not been successful. Pleural aspirate examination coupled with cross-sectional imaging and cytology obtained at bronchoscopy will usually provide sufficient data to make a diagnosis. Percutaneous pleural biopsy is, however, recommended when standard cytology is non-diagnostic. The procedure is particularly useful when granulomatous or malignant disease of the pleura is suspected.
CONTRAINDICATIONS
• Coagulopathy.
• Local sepsis over biopsy site.
• Lack of consent.
EQUIPMENT
• Dressing pack.
• Sterile gown, gloves and drapes.
• Chlorhexidine cleaning solution.
• Lidocaine.
• 1 × 10 mL syringe.
• 1 × 20 mL syringe.
• Orange needle.
• Green needle.
• Skin pen
• Gauze.
• Scalpel.
• Clamped forceps (one for blunt dissection and one for chest drain insertion if required).
• If a chest drain is to be inserted post-biopsy: large-bore chest drain kit, connecting tubing, closed drainage system (with sterile water for underwater seal), suture (e.g. ‘1’ silk).
• Sterile dressing.
• 3 sterile specimen pots (for biochemistry, microscopy culture and sensitivity, cytology) and specimen pots for histology (containing formaldehyde solution).
• Abrams’ needle (Fig. 5.1).
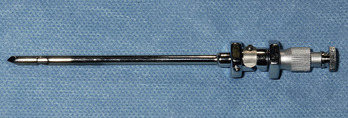 |
| Fig. 5.1 |

THE ABRAMS’ NEEDLE
The Abrams’ needle consists of three separate components (Fig. 5.2):
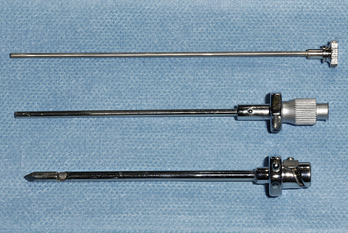
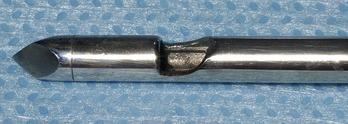
• An outer cannula with a trocar point. The cutting window (Fig. 5.3) is closed by turning the inner tube, thus severing pleural tissue against the sharp cutting edge and catching it in the inner tube.
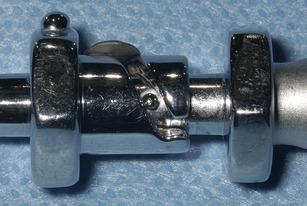
• The catch on the inner cannula runs in the groove on the outer cannula (Fig. 5.4), thus securing the cutting window in either the open or closed position.
• The innermost tube, a blunt obturator.
 Tip Box: Pre-Medication
• Pre-medication with either an intravenous benzodiazepine (immediately pre-procedure) or intramuscular opioid agent (1 hour pre-procedure) is recommended as routine unless a contraindication to its use exists.
— Care should be taken to ensure that the respiratory centre depressant side-effect of sedatives does not complicate the already compromised ventilatory function of patients with conditions such as chronic obstructive pulmonary disease.
— It is therefore prudent to monitor the patient closely having administered the pre-medication, and have the appropriate antidote to hand in the event of respiratory depression (flumazenil and naloxone for benzodiazepines and opiates, respectively).
SITE OF BIOPSY
PRACTICAL PROCEDURE
• Obtain consent.
• Ask a nurse to accompany you in order to open non-sterile equipment and to comfort the patient.
• Before donning the sterile gown and gloves, mark the site of drain insertion with a skin pen.
• Wash hands, wear the sterile gown and gloves and lay out sterile environment and dressing pack.
• Fill the 10 mL syringe with lidocaine via a green needle.
• Clean the area – remember to clean outwards from the proposed site of insertion (spirally from centre to periphery to avoid bringing dirty solution in contact with a previously cleaned area) to keep a clean field.
• Infiltrate local anaesthetic subcutaneously with orange needle.
• Infiltrate local anaesthetic with a green needle into deeper tissues:
— advance the needle just above the superior border of the rib thus avoiding the neurovascular bundle
— advance the needle slowly and infiltrate with anaesthetic until you aspirate pleural fluid. Whilst withdrawing the needle, line the track liberally with local anaesthetic.
• Attach the 20 mL syringe to a green needle, and insert the needle along the anaesthetized track whilst aspirating. Aspirate 20 mL of pleural fluid for diagnostic investigations (outlined below).
• Make a horizontal 2 cm incision in the anaesthetized skin.
• Use the clamped forceps to blunt dissect down through the subcutaneous fat and intercostal muscles to the pleural space, at which point pleural fluid will appear from the dissected track. Blunt dissection (the separation of tissue without incision) is performed by carefully but forcibly inserting the closed forceps into the tissue and subsequently opening them, thus pushing the tissue layers apart (Fig. 5.5). When blunt dissecting skeletal muscle, part the muscle layers in line with the muscle striae. A track should be made large enough to accommodate your finger.
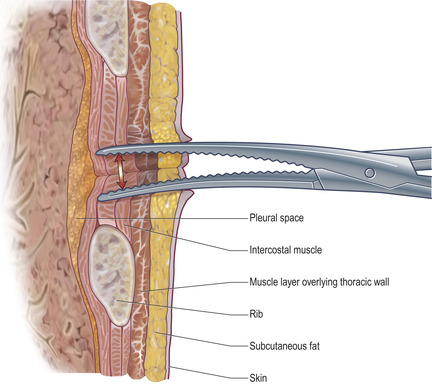 |
| Fig. 5.5 |
• Insert the Abrams’ needle with the outer window open and pointing at 9 o’clock. Push the needle laterally against the chest wall and then slowly pull the needle backwards so that the outer window catches against the pleura.
• Whilst applying this tension against the pleura, rotate the inner needle in order to close the window and lock it in place. Now pull the entire apparatus back, effectively tearing the pleura caught within the needle.
• Place the sample in formaldehyde-containing specimen pots. Macroscopically, pleura appears pearl-like in colour.
• ‘When using an Abrams’ needle, at least four biopsy specimens should be taken from one site’ (British Thoracic Society guidelines). Repeat the biopsies at 6 and 3 o’clock (not at 12 o’clock – this risks injury to the neurovascular bundle above).
• Having completed the biopsies, a chest drain may be inserted directly down the track already created. Grasp the tip of the chest drain with clamped forceps and, placing your finger superiorly in the track to guard against injury to the neurovascular bundle above, introduce the tip of the drain into the pleural cavity (Fig. 5.6).
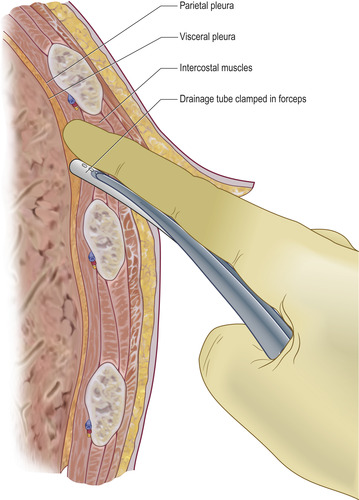
• Once in the pleural cavity, open and remove the clamped forceps and slide the required length of chest drain into the pleural space. Connect to a closed underwater drainage system as described in Chapter 4.
• Document the procedure clearly in the medical notes.
POST-PROCEDURE INVESTIGATIONS
Chest X-ray – to rule out pneumothorax.
• Send effusion for biochemistry, microscopy, culture and sensitivity, cytology and fluid pH (see Chapter 3).
• Send pleural tissue for histology, AAFB smear and culture.
POST-PROCEDURE CARE
CAUTIONS
Patients with proven or suspected mesothelioma should receive prophylactic radiotherapy to the site of biopsy or chest drain insertion. (BTS guidelines)
Up to 40% of patients with mesothelioma may develop seeding at the site of pleural biopsy or chest drain insertion. Local radiotherapy to the site is indicated within 1 month in all patients who have undergone such procedures in whom the final diagnosis is mesothelioma.
COMPLICATIONS
• Pain.
• Haemothorax.
• Haematoma.
• Infection.
• Injury to the intercostal neurovascular bundle.
• Pneumothorax.
SUGGESTED READING
Chakrabarti, B.; Ryland, I.; Sheard, J.; et al., The role of Abrams percutaneous pleural biopsy in the investigation of exudative pleural effusions, Chest 129 (6) (2006) 1549; http://www.chestjournal.org/content/129/6/1549.full.pdf.
Antunes, G.; Neville, E.; Duffy, J.; Ali, N., BTS guidelines for the management of malignant pleural effusions, Thorax 58 (Suppl 2) (2003) ii29; http://thorax.bmj.com/cgi/reprint/58/suppl_2/ii29.pdf.
