Part 5 Common Nursing Care Procedures
MEDICATION ADMINISTRATION
Safety Precautions
1. Take a drug allergy history.
2. Check the following five Rs for correctness:


3. Double-check drug and dosage with another nurse.
4. Always double-check the following:


5. May also double-check the following:


Oral Administration


Intramuscular Administration
Explain procedure to child as developmentally appropriate, and provide atraumatic care.
Follow Safety Precautions for administration of medications (see p. 411).
Select needle and syringe appropriate to the following:


If withdrawing medication from an ampule, use a needle equipped with a filter that removes glass particles; then use a new, nonfilter needle for injection. Replace needle after withdrawing medication from a vial.
Maintain aseptic technique, and follow Standard Precautions.
Provide for sufficient help in restraining the child; children are often uncooperative, and their behavior is usually unpredictable.
Determine the site of injection (see pp. 418-421); make certain that muscle is large enough to accommodate volume and type of medication.


Prepare area for puncture with antiseptic agent, and allow to dry completely.


Remove needle quickly; hold gauze firmly against skin near needle when removing it to avoid pulling on tissue.
Apply firm pressure with dry gauze to the site after injection; massage the site to hasten absorption unless contraindicated (e.g., with iron, dextran).
Clean area of prepping agent with water to decrease absorption of agent in neonate.
Discard syringe and needle in puncture-resistant container near site of use. Do not recap needle.

Subcutaneous and Intradermal Administration
Explain procedure to child as developmentally appropriate, and provide atraumatic care.
Maintain aseptic technique, and follow Standard Precautions.
Follow Safety Precautions for administration of medications (see p. 411).
Any site may be used where there are relatively few sensory nerve endings and large blood vessels and bones are relatively deep.


Subcutaneous and Intradermal Administration (cont’d.)
Subcutaneous Administration
Pinch tissue fold with thumb and index finger.
Using a dartlike motion, insert needle at a 90-degree angle. (Some practitioners use a 45-degree angle on children with little subcutaneous tissue or those who are dehydrated. However, the benefit of using the 45-degree angle rather than the 90-degree angle remains controversial.)
Aspirate for blood. (Some practitioners believe it is not necessary to aspirate before injecting subcutaneously; however, this is not universally accepted. Automatic injector devices do not aspirate before injecting.)
Intradermal Administration


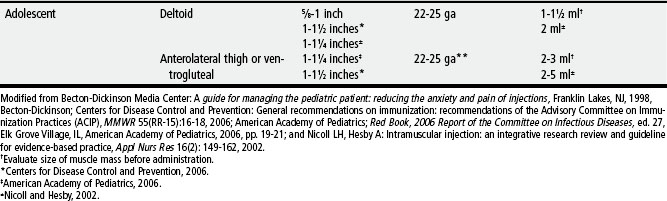
Palpate to locate greater trochanter, anterior superior iliac tubercle (found by flexing thigh at hip and measuring up to 1-2 cm above crease formed in groin), and posterior iliac crest; place palm of hand over greater trochanter, index finger over anterior superior iliac tubercle, and middle finger along crest of ilium posteriorly as far as possible; inject into center of V formed by fingers.
Insert needle perpendicular to site, but angled slightly toward greater trochanter.
Free of important nerves and vascular structures
Easily identified by prominent bony landmarks
Thinner layer of subcutaneous tissue than in dorsogluteal site, thus less chance of depositing drug subcutaneously rather than intramuscularly
Can accommodate larger quantities of fluid (0.5 ml [infant] to 2 ml [child])
Easily accessible if child is supine, prone, or side lying

Locate acromion process; inject only into upper third of muscle that begins about two finger-breadths below acromion but is above axilla.
Insert needle perpendicular to site, but angled slightly toward greate trochanter.
Faster absorption rates than gluteal sites
Easily accessible with minimum removal of clothing
Less pain and fewer local side effects from vaccines as compared with vastus lateralis
Small muscle mass; only limited amounts of drug can be injected (0.5-1 ml).
Small margin of safety with possible damage to radial nerve and axillary nerve (not shown, lies under deltoid at head of humerus)
* Locations of landmarks are indicated by asterisks on illustrations.
Use of Insuflon for Subcutaneous Administration of Insulin
Small indwelling catheter placed in the subcutaneous tissues
The average indwelling time is 3 to 5 days.
The catheter is most often inserted in the abdomen, but the buttocks and other areas can also be used. Topical anesthetic cream is recommended before insertion.
Use needles that are 10 mm (0.39 inches) or shorter for injecting to avoid penetration of the tubing of the catheter.
Using indwelling catheters for up to 4 to 5 days does not affect the absorption of insulin.
The long-term (measured by HbA1c) and short-term glucose control (measured by blood glucose profiles and insulin levels) is not altered.
Intravenous Administration
Explain procedure to the child as developmentally appropriate, and provide atraumatic care.
Use pain prevention interventions before procedure.
Maintain aseptic technique, and follow Standard Precautions.
Follow Safety Precautions for administration of medications. (See p. 411.)
Assess the status of IV infusion to determine that it is functioning properly.
Inspect injection site to make certain the catheter or needle is secure.
Dilute the drug in an amount of solution according to the following:


Monitor until medication has been infused. Medication is not completely administered until solution in tubing has infused also (amount of solution depends on tubing length).
Procedure for Inserting and Taping a Peripheral Intravenous Catheter
Explain procedure to child as developmentally appropriate, and provide atraumatic care.
Verify order and confirm patient identity.
Follow manufacturer’s directions for all devices used.
Wash hands, and observe aseptic technique throughout procedure.
Choose catheter insertion site and an alternative site in case the initial attempt is unsuccessful.


For extremity veins, start with the most distal site, especially if irritating or sclerosing agents are to be used.
Apply a topical analgesic such as EMLA or LMX 4 to two sites.
Prepare insertion site by applying with friction an antiseptic solution.
Allow solution to dry completely, but do not blow, blot dry, or fan the area.
Apply tourniquet when site is ready for catheter insertion.
Stretch the skin taut downward below the point of insertion, upward above the site of insertion, or from underneath level with the point of insertion. This technique helps stabilize veins that roll or move away from the catheter as attempts are made to enter the vein.
Inspect catheter, looking for damage (e.g., bent stylet, shavings on the catheter, frayed catheter tip [follow employer’s policy for reporting defective devices]).
Insert catheter through the skin, bevel up, at a 15- to 30-degree angle, and enter the vein. This direct approach is best for large veins and allows the skin and vein to be entered in one step. The indirect approach for smaller veins enables the catheter to enter the vein from the side at an angle. It is sometimes helpful with short veins to start the catheter below the intended site and advance through the superficial layers of skin so that the advancement of the catheter in the vein is a shorter distance. In infants or children with very small veins, insert the catheter bevel down, which prevents the needle from puncturing the back wall of the vein and provides an earlier flashback of blood as the vein is entered.
Watch for blood return in the flashback chamber. Some 24-gauge catheters provide visualization of the flashback within the catheter, so immediate vein entrance is recognized before the needle punctures the back of the vessel or goes through the other side of the vessel.
Once the flashback is seen, lower the angle between the skin and catheter to 15 degrees. Advance the catheter another 1/16 to 1/8 inch to ensure that both the metal stylet and the catheter are inside the vein. Look closely at the IV catheter before inserting it, and note that the stylet tip is slightly longer than the catheter. It is necessary to have both pieces inside the vein before the catheter is advanced. Holding the stylet steady, push the catheter off the stylet and into the vein until the catheter hub is situated against the skin at the insertion site. Activate safety mechanism if necessary (some safety catheters are passive and activate automatically), remove the stylet, and discard into sharps container. Apply pressure to catheter within the vein to prevent backflow of blood before attachment of tubing.
Collect blood if ordered. Remove the tourniquet. Flush the IV line with NS to check for patency (ease of flushing fluid, lack of resistance while flushing), complaints of pain, or swelling at the site. If line flushes easily, proceed to secure the catheter to the skin.
Connect the T-connector, J-connector, injection cap, or tubing, and reinforce connection with a junction securement device (e.g., Luer-Lok, clasping device, threaded device) to prevent accidental disconnection and subsequent air embolism or blood loss.
Place transparent dressing across catheter hub, up to but not including the junction securement device, and surrounding skin.
Further secure the catheter to the skin using tape or adhesive securement devices (e.g., StatLock). Follow manufacturer’s directions for adhesive anchors.
Place a ¼ to ½-inch strip of clear tape across the width of the transparent dressing and the catheter hub, but avoid the insertion site. This will serve as an anchor tape strip, and all other tape will be affixed to this strip (tape-on-tape method). This strip will not compromise the transparent dressing properties or interfere with visual inspection of the catheter-skin insertion site.
To stabilize the catheter and junction securement device, attach 1 to 1½ inches of clear tape that is ¼ to ½ inch wide, adhesive side up, to the underneath side of the catheter hub and junction securement device at their connection. Wrap the ends of the tape around the connections, and meet on top to form a V shape (sometimes referred to as a chevron); secure the overlapping ends onto the anchor tape strip.
Loop the IV tubing away from the catheter hub and toward the IV fluid source. Secure the looped tubing with a piece of tape on the anchor tape strip. Be certain fingers or toes are visible whenever extremity is used.
Consider use of a commercial protective device (e.g., I.V. House) over the catheter hub and looped tubing. Bending one corner of the tape over and onto itself provides a free tab to lift the tape easily for site visualization.
Nasogastric, Orogastric, or Gastrotomy Tube Administration
Use elixir or suspension preparations of medication (rather than tablets) whenever possible.
Dilute viscous medication or syrup with a small amount of water if possible.
Avoid oily medications because they tend to cling to the sides of the tube.
If administering tablets, crush them to a very fine powder and dissolve drug in a small amount of warm water.
Never crush enteric-coated or sustained-release tablets or capsules.
Do not mix medication with enteral formula unless fluid is restricted. If adding a drug:


Check for correct placement of nasogastric (NG) or orogastric tube.
* Place 5 ml of air in the syringe. Connect the syringe to the tube.


If more than one fourth of the last feeding is still present, return the food to the stomach and wait 30 to 60 minutes. When there is less than one fourth of the amount of food, return the stomach contents and feed the child.
Attach syringe (with adaptable tip but without plunger) to tube.
Unclamp tube, and allow medication to flow by gravity.
Adjust height of container to achieve desired flow rate (e.g., increase height for faster flow).
As soon as syringe is empty, pour 10 ml of water to flush tubing.


If administering more than one drug at the same time, flush the tube between each medication with clear water.
Clamp tube after flushing, unless tube is left open or replace cap on G-tube.
Procedure: Placement of a Nasogastric or Orogastric Tube
1. Place the child supine with the head slightly hyperflexed or in a sniffing position (nose pointed toward ceiling).
2. Measure the tube for approximate length of insertion, and mark the point with a small piece of tape. Two standard methods of measuring length are as follows:


3. Lubricate the tube with sterile water or water-soluble lubricant, and insert through one of the nares or the mouth to the predetermined mark. In older infants and children, the tube is passed through the nose and the position alternated between nostrils. An indwelling tube is almost always placed through the nose. Because most young infants are obligatory nose breathers, insertion through the mouth may be used for intermittent gavage feedings because it causes less distress.
 When using the nose, slip the tube along the base of the nose and direct it straight back toward the occiput.

4. Confirm placement by X-ray if available. Document pH and color of aspirate with initial placement and ongoing placement checks.*
5. Stabilize the tube by holding or taping it to the cheek, not to the forehead because of possible damage to the nostril. To assist in maintaining correct placement, measure and record the amount of tubing extending from the nose or mouth to the distal port when the tube is first positioned. Recheck position before each feeding. A hydrocolloid barrier (DuoDerm or Coloplast) may be placed on the cheeks to protect the skin from tape irritation.
Procedure: NG TUBE Feeding
1. Whenever possible, hold the infant or young child during the feeding to associate the comfort of physical contact with the procedure. When this is not possible, place the infant or child supine or slightly toward the right side with head and chest slightly elevated.


2. Warm the formula to room temperature. Do not microwave.
3. For feedings delivered by mechanical pump, pour formula into bag or syringe, and prime tubing. Connect to patient and set desired rate.
4. For gravity feedings via syringe, pour formula into the barrel of the syringe attached to the feeding tube. To start the flow, give a gentle push with the plunger, but then remove the plunger and allow the fluid to flow into the stomach by gravity. To prevent nausea and regurgitation, the rate of flow should not exceed 5 ml every 5 to 10 minutes in preterm and very small infants and 10 ml/min in older infants and children. The rate is determined by the diameter of the tubing and the height of the reservoir containing the feeding. The rate is regulated by adjusting the height of the syringe. A typical feeding may take 15 to 30 minutes to complete.
5. Flush the tube with sterile water: 1 or 2 ml for small tubes; 5 to 15 ml or more for large ones.
6. Cap or clamp indwelling tubes to prevent loss of feeding. If the tube is to be removed, first pinch it firmly to prevent escape of fluid as the tube is withdrawn, then withdraw the tube quickly.
7. Position the child with the head elevated about 30 degrees and on the right side for at least 1 hour in the same manner as following any infant feeding to minimize the possibility of regurgitation and aspiration. If the child’s condition permits, bubble the child after the feeding.
8. Record the feeding, including the type and amount of residual, the type and amount of formula, and the manner in which it was tolerated. For most infant feedings, any amount of residual fluid aspirated from the stomach is refed to prevent electrolyte imbalance. The amount is subtracted from the prescribed amount of feeding. For example, if the infant or child is to receive 30 ml, and 10 ml is aspirated from the stomach before the feeding, the 10 ml of aspirated stomach contents are refed, plus 20 ml of feeding. Another method in children is that if residual is more than one fourth of the last feeding, the aspirate is returned and rechecked in 30 to 60 minutes. When residual is less than one fourth of last feeding, give scheduled feeding. If high aspirates persist and the child is due for another feeding, notify the practitioner.
9. Between feedings, give infant pacifier to satisfy oral needs.
Procedure: Gastrostomy Tube Feeding
3. Tell the child (even if infant) what you will be doing.
4. Place the child on your lap or reclining in an infant seat. The older child can sit in a chair or on a bed.
5. Use a pacifier for the infant to enjoy sucking during the feeding.
6. Attach the feeding syringe to the gastrostomy tube.
8. Pull back gently on the plunger to see the amount of food left in the child’s stomach.
9. If more than ¼ of the last feeding is still present, return the food to the stomach and wait 30 to 60 minutes. When there is less than ¼ of the amount of food, feed the child.
10. Remove the plunger from the syringe. Hold syringe and tubing below stomach level when filling syringe to prevent excess air getting into stomach.
11. Fill syringe with the right amount of liquid food.
12. A gentle push with the plunger of the syringe may be necessary to start the flow of food; then remove the plunger and allow the food to flow by itself. Do not forcefully push on plunger to speed up the feeding. If the feeding is pushed back into the feeding syringe instead of flowing by gravity, leave the plunger in the barrel of the syringe until the feeding is completed.
13. Do not hold the bottom of the syringe higher than the child’s chin.
14. Continue adding food to the syringe until you have finished the right amount. Do not let the syringe become empty.
15. When the food is at the bottom of the syringe add water (1 to 2 teaspoons [5 to 10 ml] or more depending on the child’s size and the size of the gastrostomy tube) to rinse the tube and keep it from clogging.
16. Clamp the tube and remove the syringe.
17. Gently pull the tube to allow the balloon to rest against the inside of the stomach at the opening.
18. Tape the tube to the skin to prevent it from advancing or allowing stomach contents to leak on the skin.
Procedure: Skin-Level Device Feeding
2. Wash hands with soap and water.
3. Tell the child (even if infant) what you will be doing.
4. Place the child on your lap or reclining in an infant seat. The older child can sit on a chair or bed.
5. Use a pacifier for the infant to enjoy sucking during the feeding.
6. Align the black line on the feeding tube adapter with the black line on the skin-level device.
7. Turn the feeding tube adapter to the right (clockwise) to lock the feeding tube in place and prevent accidental disconnection and leaking.
8. Attach syringe to the tubing.
9. If the stomach seems full and gassy, air can be removed by putting the feeding tube adapter into the skin-level device and opening the safety plug on the skin-level device. If more than one-fourth of the previous feeding comes out, wait 30 minutes before feeding, and try again.
10. Place the desired amount of formula or liquid food in the syringe. This keeps too much air from going into the stomach.
11. A gentle push with the syringe plunger may be necessary to start the flow of food; then remove the plunger and allow the food to flow by itself. Do not forcefully push on plunger to speed up the feeding. If the feeding is pushed back into the feeding syringe instead of flowing by gravity, leave the plunger in the barrel of the syringe until the feeding is completed.
12. Avoid holding the bottom of the syringe higher than the child’s chin.
13. Continue adding formula or food to the syringe until you have finished the right amount. Do not let the syringe become empty.
14. When the formula is at the bottom of the syringe, add 1 to 2 teaspoons (5 to 10 ml) of water to rinse the tube.
15. Remove the tube from the device by unlocking (turn counterclockwise) the adapter and feeding tube.
19. Replace the safety plug on the device.
Care of the Skin-Level Device (G-Button)
Clean around the site each day with mild soap and water. Clean the button with a cotton-tip applicator to remove encrusted formula.
Turn the button around in a complete circle to make sure it is completely cleaned. Dry the area and leave it exposed to air for about 20 minutes so it can dry completely.
If the device is leaking, refer to the Troubleshooting section that follows. A small amount of leakage (less than 1 teaspoon) may occur on occasion, but more than that may lead to problems with the skin around the stoma.
Check the device at least once a week (or more if leakage is noted) by placing a 6-ml syringe on the side port and withdrawing the water from the balloon to make sure it is properly inflated. Keep your hand on the device to prevent it from coming out while the balloon is deflated; it may be necessary to have a helper keep pressure on the button device while doing this. Most skin-level devices have a balloon that requires 5 ml (1 teaspoon) of water; proper inflation maintains the seal and prevents leaking.
Medications can plug the device. Medicines in tablet form should be crushed well and mixed with water or food before putting them in the feeding syringe. Thick liquids can be mixed with warm water to make them thinner. The medicine should be given before the feeding, to make sure the medicine goes into the stomach. If it is not time for a feeding, rinse the tubing with 1 to 2 teaspoons (5 to 10 ml) of water after giving the medicine.
If the child is on continuous feedings, flush the device and tubing with water (1 to 2 teaspoons [5 to 10 ml]) to rinse the tube and keep it from clogging.
Troubleshooting the Skin-Level Device
Once the tube tract has formed (usually in 6 to 12 weeks), the surgeon will approve of changing the tube if it comes out. If the device accidentally comes out, it is not an emergency. Do not throw the device away, and follow these directions.
Examine the device carefully; if the balloon has completely deflated or is partially empty, attach a 6-ml syringe to the port on the side of the button device and try to inflate the balloon.
If the balloon will not inflate and appears to be ruptured, apply a small amount of water-soluble lubricant to the tip of the tube, replace the tube into the stomach hole, and tape it in place.
If the balloon has simply discharged some or all of its water but still inflates, withdraw all the water from the balloon with the 6-ml syringe, apply a small amount of water-soluble lubricant to the tip of the tube, and insert the tube into the stomach hole. Then reinflate the balloon by pushing 5-ml of water into the side port with the 6-ml syringe. The balloon will inflate and hold the tube in place. Remove the syringe after balloon inflation.
If the device comes out and you cannot replace the tube into the stomach hole, place a gastrostomy tube into the opening. Inflate the gastrostomy tube balloon with sterile water (usually the amount is 5 mls), and contact the practitioner in charge of the child’s care.
Skin Care
Keep the skin around the gastrostomy tube or skin-level device clean and dry. A bandage does not have to be put over the area. A cloth diaper or cotton cloth can be wrapped around the child’s abdomen and secured with tape. This will keep the child from playing with the tube. Other ways to keep the tube out of reach are to use one-piece outfits, tube tops, the tops of panty hose, or children’s tights with the legs cut off.
Zinc oxide ointment, Duoderm-CGF (a thin dressing that can be kept on the skin for 7 days), Pro Shield Plus Skin Protectant, or Cavilon No Sting Barrier Film (spray or foam); or any other skin barrier can be used on the skin around the gastrostomy tube or skin-level device.
A single layer 2 × 2 gauze pad may also be placed around the tube or device. It should be changed at least daily or when soiled. These measures will provide protection for the skin in case there is a small leakage of gastric fluid. If the area becomes red or sore, or if drainage continues to be a problem after every feeding, contact the practitioner or an enterostomal therapist for further evaluation.
OXYGEN THERAPY
Methods include use of a mask, hood, nasal cannula, face tent, or oxygen tent.
Method is selected on the basis of the following:


Oxygen is a drug and is administered only in prescribed dose.
Concentration is regulated according to the needs of the child (usually 40% to 50%, or 4- to 6-L flow).
Oxygen is dry; therefore it must be humidified.


Pulse Oximetry
Measures arterial hemoglobin oxygen saturation (SaO2) by passage of two different wavelengths of light through blood-perfused tissues to a photodetector. SaO2 and heart rate are displayed on digital readout.
Attach sensor to earlobe, finger, or toe; make certain light source and photodetector are in opposition.
Avoid sites with restricted blood flow (e.g., distal to a blood pressure cuff or indwelling arterial catheter).
Secure sensor cord self-adhering wrap or tape to avoid interference by patient movement. Shield sensor from bright light. Keep extremity warm (e.g., use a sock over foot or hand if extremity is cool).
Avoid IV dyes; green, purple, or black nail polish; nonopaque synthetic nails; and possibly footprint ink, which may cause erroneous readings.
Change placement of sensor every 4 to 8 hours. Inspect skin at sensor site in children with compromised circulation and oxygenation, and change sensor more frequently if needed to prevent pressure necrosis.


In general, normal range is 95% to 99%, except in preterm infant. A consistent SaO2 less than 95% should be investigated, and an SaO2 of 90% signifies developing hypoxia.
Aerosol Therapy
The purpose is the inhalation of a solution in droplet (particle) form for direct deposition in the tracheobronchial tree.
Aerosols consist of liquid medications (e.g., bronchodilators, steroids, mucolytics, decongestants, antibiotics, antiviral agents) suspended in a particulate form in air.
Aerosol generators propelled by air or air-oxygen mixtures generally fall into three categories:


Deposition of aerosol is maximized by instructing the child to breathe through the mouth with slow, deep inhalations, followed by holding the breath for 5 to 10 seconds, then slow exhalations while in an upright position. A small face mask is more effective for aerosol delivery to the infant and toddler. The medication chamber must be held upright for the aerosol to be nebuziled effectively.
Using an incentive spirometer can help a cooperative child learn this ventilatory pattern.
For infants and young children, activities to produce deep breathing and coughing include feet tapping, tactile stimulation, and crying.
Assessment of breath sounds and work of breathing is performed before and after treatments.
Tracheostomy Care
Tracheostomy Suctioning
The practice of instilling sterile saline in the tracheostomy tube before suctioning is not supported by research and is no longer recommended by many institutions. Suctioning should require no more than 5 seconds. Counting 1, one thousand, 2, one thousand, 3, one thousand, and so on while suctioning is a simple means for monitoring the time. Without a safeguard, the airway may be obstructed for too long. Hyperventilating the child with 100% O2 before and after suctioning (using a bag-valve-mask or increasing the FiO2 ventilator setting) is also performed to prevent hypoxia. Closed tracheal suctioning systems that allow for uninterrupted O2 delivery may also be used. In a closed suction system, a suction catheter is directly attached to the ventilator tubing. This system has several advantages. First, there is no need to disconnect the patient from the ventilator, which allows for better oxygenation. Second, the suction catheter is enclosed in a plastic sheath, which reduces the risk of exposure to the patient’s secretions.
Suctioning, Catheter Length, and Saline
Traditional technique for suctioning ET or tracheostomy tubes recommends advancing a suction catheter into the tube until it meets resistance, then withdrawing it slightly and applying suction. However, studies indicate that this approach causes trauma to the tracheobronchial wall. This trauma can be avoided by inserting the catheter and advancing it to the premeasured depth of just to the tip (especially in infants) or no more than 0.5 cm beyond the tube (Kleiber, Krutzfield, and Rose, 1988).*
It has been common practice to instill a bolus of NS into the tube before suctioning. However, this technique may contribute to lower airway colonization and nosocomial pneumonia through repeated washing of organisms from the tube’s surface into the lower airway (Hagler and Traver, 1994).† The use of saline has been shown to have an adverse effect on SaO2, and it should not be used routinely in patients receiving mechanical ventilation who have a pulmonary infection (Ackerman, 1998). ‡ Although the pediatric research is scarce, routine use of NS with ET tube suctioning should be avoided (Curley and Moloney-Harmon, 2001). §
Positioning for Procedures
Extremity Venipuncture or Injection
Place child on parent’s (or assistant’s) lap, with the child facing toward the parent and in the straddle position.
For venipuncture, place child’s arm on a firm surface such as the treatment table (for support) and on top of a soft cloth or towel.
Have parent or assistant immobilize child’s arm for venipuncture.
Have parent hug the child around the back to hold the child’s free arm, or place child on parent’s lap, with the child facing away from the parent.
To hold the child’s legs still, place them between the parent’s legs. This position is appropriate for an injection into the thigh; for an injection into the arm, place child in parent’s lap, with the child facing sideward.
Place the child’s arm closest to the parent under the parent’s arm, and wrap toward the back.
Have the parent hold the arm receiving the injection against the child’s body.
Femoral Venipuncture
Place infant supine with legs in frog position to provide extensive exposure of the groin.
Restrain legs in frog position with hands while controlling the child’s arm and body movements with downward and inward pressure of forearms.
Cover genitalia to protect the operator and the venipuncture site from contamination if the child urinates during the procedure.
Site is not advisable for long-term venous access in mobile child because of risk of infection and trauma to flexion area.
Ear Access
Place child in parent’s (or assistant’s) lap with the child’s body sideways and the ear to be examined away from the parent.
Place the child’s arm closest to the parent under the parent’s arm and wrap toward the back.
Have the parent hold the other arm against the child’s body and use the free arm to hold the head against the parent’s chest.
To hold the child’s legs still, place them between the parent’s legs.
Lumbar Puncture
Infant
Place infant in sitting position with buttocks extended over the edge of the table and head flexed on chest.
In neonates, use side-lying position with modified head extension to decrease respiratory distress during procedure. Pulse oximetry and heart rate monitoring are advisable.
Child
Place child on side with back close to or extended over the edge of examining table, head flexed, and knees drawn up toward the chest.
Reach over the top of the child, and place one arm behind child’s neck and the other behind the knees.
Stabilize this position by clasping own hands in front of the child’s abdomen.
Take care that excessive pressure does not compromise circulation or breathing and that the nose and mouth are not covered by the restrainer’s body.
Bone Marrow Examination


Urinary Catheterization
Have the parent sit in a chair or on an examining table with a back support. Place the child leaning back in the parent’s lap with the parent’s arms hugging the child’s upper body.
Place the child’s legs in the froglike position, with the parent’s legs over the child’s to stabilize them. In this comfortable position, the perineum is exposed for the procedure.
Place the child supine in bed with legs in the froglike position. Raise head of bed as much as possible while still allowing good visualization of the perineum. A semi-upright position is less stressful to a child.
COLLECTION OF SPECIMENS
Urine
Non–Toilet-Trained Child
For Boys
Place the boy’s penis and scrotum into the bag if possible. If only the penis fits in the bag, put the sticky part of the bag on the scrotum.
Smooth the sticky portion of the bag on the skin, taking care to avoid making any wrinkles.
Remove the top half of the adhesive protector, and smooth the top part on the skin to remove any wrinkles.
Cut a small slit in the diaper, and pull the bag through to allow room for urine to collect and to facilitate checking the contents. To obtain small amounts of urine, use a syringe without a needle to aspirate urine directly from the diaper; if diapers with absorbent gelling material that traps urine are used, place a small gauze dressing, some cotton balls, or a urine collection device inside the diaper to collect urine, and then aspirate the urine with a syringe.
Check the bag frequently, and remove as soon as specimen is available.
Wash the child’s genitalia with warm water after removing the urine collection device.
Urine collected for culture should be tested within 30 minutes, refrigerated, or placed in a sterile container with a preservative.
Toilet-Trained Young Child
Instructions for the Toilet-Trained Child
Clean-catch urine sample (boys and girls)


For boy: Cleanse the tip of the penis with an antiseptic (or instruct parent assisting to cleanse penis). If the child is uncircumcised, pull back the foreskin only as far as it will easily go, then cleanse the tip of the penis with antiseptic. Rinse well after procedure. Make sure the foreskin is pushed back toward the tip after cleaning.
For girl: Spread the child’s labia (lips) with your fingers (or instruct parent assisting to cleanse labia). Cleanse the area with antiseptic. Wipe from front to back (top to bottom). Rinse area with washcloth after completing urine collection.
Open the urine container, being careful not to touch the inside of the cup or lid.
Have the child begin to urinate in the potty chair or toilet.
If child cannot stop the flow of urine, place the urine cup so that you can catch some of the urine.
Have child urinate directly into the cup (or potty hat if more convenient for female).
Label the cup with the child’s first and last name.
Rinse antiseptic off penis or labia with a warm washcloth and water after the child has voided (or instruct child or assistant to cleanse area).
Bladder Catheterization


Catheter
Select a catheter based on the purpose of the procedure, the age and gender of the child, and any history of prior urologic surgery.
When collecting a urine specimen or completing a diagnostic test requiring catheterization for a brief period, use:


When placing an indwelling catheter, use:


1. Assemble necessary equipment.
2. Explain procedure to child and parents.
 Give a careful and thorough explanation of the procedure, according to the developmental level of the child, before preparation of the perineum. Include an explanation of the purpose of the catheterization, and reassure child that it is not punishment.

3. Give instruction on pelvic muscle relaxation whenever possible.
 Young child is taught to blow (using a pinwheel is helpful) and to press the hips against the bed or procedure table during catheterization in order to relax the pelvic and periurethral muscles.
 Older child or adolescent is taught to contract and relax the pelvic muscles, and the relaxation procedure is repeated during catheter insertion. If the youngster vigorously contracts the pelvic muscles when the catheter reaches the striated sphincter (proximal urethra in boys and midurethra in girls), catheter insertion is temporarily stopped. The catheter is neither removed nor advanced; instead the child is assisted to press the hips against the bed or examining table and relax the pelvic muscles. The catheter is then gently advanced into the bladder.
4. Place the infant or child in a supine position with the perineum adequately exposed. Girls may bend the knees and abduct the legs in a froglike position; boys should lie with the penis lying above the upper thighs. For a young child, have the parent sit on the bed or examining table with a back support. Place the child leaning back in the parent’s lap with the parent’s arms hugging the child’s upper body. When the child’s legs are in the frog position, the parent’s legs can be placed over the child’s to stabilize them. In this comfortable position, the perineum is exposed for the procedure and the child is helped to lie still.
5. Put on a pair of sterile gloves.
6. Place a sterile drape over the perineum of girls, ensuring that the vagina, labia, and urethral meatus remain exposed. Most catheter insertion kits provide a sterile drape with a diamond-shaped hole in the middle to assist with this. For boys, the sterile drape is placed over the upper aspect of the thighs.
7. Place 5 ml of sterile lubricating jelly on the sterile drape. During catheterization of an adolescent or child accustomed to the procedure, the catheter may be placed on the sterile drape laid over the perineum. When an anxious child is being catheterized, the catheter should remain on a sterile field that will not be contaminated should the child move during the procedure.
8. Cleanse the perineum of girls, including the labia, vaginal introitus, and urethral meatus. Use a new cotton ball for each wipe, moving in a front-to-back motion along each side of the labia minora, along the sides of the urinary meatus, and finally straight down over the urethral opening. For boys, the entire glans penis is cleansed, in an outward circular fashion, using one cotton ball for each wipe. The foreskin is retracted in the uncircumcised boy to ensure adequate exposure. If the foreskin cannot be easily retracted, particular care is taken to ensure that the glans penis is adequately cleaned before catheter insertion.
9. Wipe the cleanser from the skin using sterile cotton balls.
10. Girls: Spread the labia (if necessary) using one hand in order to clearly visualize the urethral meatus. With the other hand, grasp the catheter and apply a small amount of sterile lubricant from the sterile field onto the tip of the catheter. (It is rarely necessary to spread the labia in infants; instead, locate the urethra, which often appears as a dimple above the hymen.) Gently insert the catheter until urine return is seen. If inserting an indwelling catheter, advance the catheter an additional 1-2 inches before attempting to fill the retention balloon.
11. Boys: Hold the penile shaft just under the glans to prevent the foreskin from contaminating the area. Grasp the catheter with the other hand, and apply a small amount of sterile lubricant from sterile field onto the tip of the catheter. Insert the catheter while gently stretching the penis and lifting it to a 90-degree angle to the body. Resistance may occur when the catheter meets the urethral sphincter. Ask the patient to inhale deeply and advance the catheter at that time. Insert the catheter until urine return occurs; this may take several seconds longer because of the additional lubricant present in the urethra. If inserting an indwelling catheter, advance until urine return is noted, then advance to the bifurcation of the filling port before filling the retention balloon.
12. When catheterizing for specimen collection, allow 15 to 30 ml for urinalysis and urine culture. Drain bladder, and record postvoid urinary volume if collected soon after urination. Cap the specimen, label it, and send it to the laboratory.
13. When inserting an indwelling catheter, inject the recommended amount of sterile water into the side port injection site to fill the balloon.
14. When inserting an indwelling catheter, gently pull the catheter back until resistance is met; this ensures that the retention balloon lies just above the bladder neck. Tape tubing to the leg to avoid pulling, or use a commercially available catheter securement device. Hang drainage apparatus to bed frame (avoid bed rails to prevent pulling on catheter).
Blood
Heel or Finger
Heel lancing has been shown to be more painful than venipuncture; consider venipuncture when the amount of blood from the heel would require much squeezing (e.g., genetic tests).
Puncture should be no deeper than 2 mm. Use of an automatic lancing device is recommended, as this prevents too deep a puncture.
 Obtain necessary equipment, including appropriate specimen container(s).
 Explain procedure to child as developmentally appropriate, and provide atraumatic care.
 Maintain aseptic technique, and follow Standard Precautions.

 Prepare area for puncture with antiseptic agent.

 Perform puncture on heel or finger in proper location with an automatic lancet device:
 Usual site for heel puncture is outer aspects of heel. Boundaries can be marked by an imaginary line extending posteriorly from a point between the fourth and fifth toes and running parallel to the lateral aspect of the heel and another line extending posteriorly from the middle of the great toe and running parallel to the medial aspect of the heel.
 Collect blood sample in appropriate specimen container.
 Apply pressure to puncture site with a dry, sterile gauze pad until bleeding stops.
 Clean area of prepping agent with water to avoid absorption in neonate.

 Discard puncture device in puncture-resistant container near site of use.
 Document site and amount of blood withdrawn as well as type of test performed.


VEIN (VENIPUNCTURE)
Obtain necessary equipment, including appropriate specimen container(s).
Explain procedure to child as developmentally appropriate, and provide atraumatic care.
Maintain aseptic technique, and use Standard Precautions.
Restrain child only as needed to prevent injury.
Prepare area for puncture with antiseptic agent. Allow skin to dry.
Apply tourniquet; alternative tourniquet for neonate is a rubber band.
Insert needle with bevel up; a slight pop may be felt when entering a child’s vein; in small and preterm infants, this may not occur.
Withdraw required amount of blood, and place in appropriate container.
Withdraw needle from site, and apply dry, sterile gauze or cotton ball to site with firm pressure until bleeding stops. If antecubital site is used, keep arm extended to reduce bruising.
Clean area of prepping agent with water to decrease absorption in neonate.
Discard syringe and needle in puncture-resistant container near site of use. Document site and amount of blood withdrawn as well as type of test obtained.
Caring for a Central Venous Catheter
Changing the Injection Cap
1. Gather the equipment you will need.
2. Wash your hands with soap and water.
3. Clamp the tube midway between the skin and the end of the tube or on the reinforced clamping sleeve that is on some catheters; do not clamp a Groshong catheter.
4. With the swab, clean around the tip of the tube below the injection cap.
5. Open the new injection cap package.
6. Remove the used injection cap from the tube, and attach the new injection cap.
7. Remove the clamp from the catheter (not needed with Groshong).


1. Gather the equipment on a clean, dry surface.
3. Gently peel off the edges of the old dressing, using adhesive remover if necessary. Peel off one edge at a time. Another way to remove the dressing is to grasp opposite corners of the plastic film and pull them away from each other to stretch and loosen the film. After the film begins to loosen, grasp the other two corners of the film and pull. This method is easier and more comfortable than pulling the dressing up and off the skin.
CAUTION: Avoid using scissors around a central line dressing.
4. Carefully look at the skin around the tube for redness or drainage.
5. Using each antiseptic swab only once, clean the skin where the tube enters the body. Use a circular motion starting at the tube and moving out about 3 inches from the tube.
6. Loop the tube around the entry site, leaving the injection cap below the dressing.
7. Carefully place the dressing on the child’s skin. Hold the dressing in both hands. When the top of the dressing is on the skin, slowly bring the dressing toward the bottom of the window frame, making sure that it attaches to the skin.
8. Secure the end of the tube with tape to keep it from dangling.
* To test the stomach contents’ pH (acidity), as well as listening with a stethoscope to confirm placement, follow directions for pH testing. At the time of this writing, a pH greater than or equal to 5 obtained on stomach aspirate is confirmation of adequate placement in children. Confirmation of feeding tube placement by X-ray is the only method with 100% accuracy. Ellett MLC, Croffie JMB, Cohen MD, Perkins SM: Gastric tube placement in young children, Clin Nurs Res 14(3): 238-252, 2005.
* Kleiber C, Krutzfield N, Rose EF: Acute histologic changes in tracheobronchial tree associated with different suction catheter insertion techniques, Heart Lung 17:10-14, 1988.
† Hagler DA, Traver GA: Endotracheal saline and suction catheters: sources of lower airway contamination, Am J Crit Care 3(6):444-447, 1994.
‡ Ackerman MH: Instillation of normal saline before suctioning in patients with pulmonary infections: a prospective randomized controlled trial, Am J Crit Care 7(4): 261-266, 1998.
§ Curley MAQ, Moloney-Harmon PA: Critical care nursing of infants and children, ed 2, Philadelphia, 2001, Saunders.