[level-membership-for-surgery-category]
Procedure 47 Lateral Arm Flap for Upper Limb Coverage
Indications
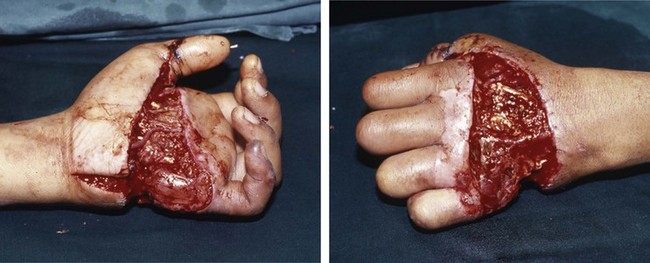
 Procedure is used for soft tissue defects of the hand and wrist. These defects range from a medium size of 3 × 5 cm to a large size of 15 × 20 cm and can include the following:

 Location of these soft tissue defects could be further classified as follows:


Examination/Imaging
Clinical Examination
 Preliminary assessment can be done with inspection of the wound and viewing of the clinical pictures previously taken of the defect. The definitive assessment is performed intraoperatively under anesthesia.
 The recipient defect is assessed to determine the reconstructive requirements.


Surgical Anatomy
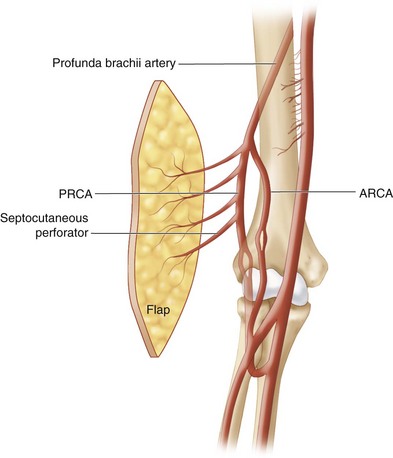
 The flap is from the lateral arm region with extension distal to the lateral humeral epicondyle down the lateral side of the forearm. The vascular pedicle is the posterior radial collateral artery (PRCA), a branch of the profunda brachii artery. One to two veins accompany the PRCA artery. The size of the artery is 1.5 to 2 mm in diameter, and the vein 2 to 3 mm in diameter. The vascular pedicle runs in the lateral intermuscular septum accompanied by the posterior antebrachial cutaneous nerve. Three to four septocutaneous perforators supply the lateral arm skin. The most distal branch of the septal vessel is 3 to 5 cm proximal to the lateral epicondyle. There are also three to four small branches of vessels running deep providing periosteal blood supply to the distal lateral humeral bone. The pedicle length of the flap ranges from 5 to 10 cm depending on the design of the flap (Fig. 47-3).


Positioning
 The patient is positioned supine with the hand and whole upper limb placed on a hand table.
 The whole upper limb, including the shoulder, is prepared.
 A sterile pressure tourniquet is applied to the arm as proximally as possible.
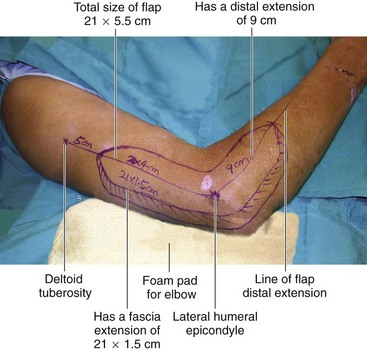
 A foam pad is used to cushion the elbow, taking pressure off the cubital tunnel and its ulnar nerve. (Fig. 47-4 shows design of 21 × 5.5 cm long and narrow flap design, with fascia extension.)

Pearls
In patients with a shorter arm, the sterile pressure tourniquet may occupy too much space, making proximal dissection difficult. A narrow manual rubber tourniquet of about 4 cm width can be used in its place effectively. However, the pressure cannot be regulated and is used only for a short duration for the proximal part of the dissection.
Flexion at the elbow and alternatively internal and external rotation at the shoulder facilitate greater reach in dissection of the flap.
Preparation of the Recipient Site
 Further débridement may be necessary.
 Skeletal fixation, repair, or grafting of deeper tissues is carried out if necessary.
 Assessment of the skin defect and crafting a template is carried out.
 Exposure, preparation, and assessment of the recipient vessels are undertaken.

Pearls
The cephalic vein close to the radial artery and the basilic vein close to the ulnar artery are always prepared and made available. Prepare these superficial veins in addition to the venae comitantes. The venae comitantes of the radial and ulnar artery around the wrist are often small and may not be adequate.
The insertion scheme of the flap should be determined before the pedicle length is measured.
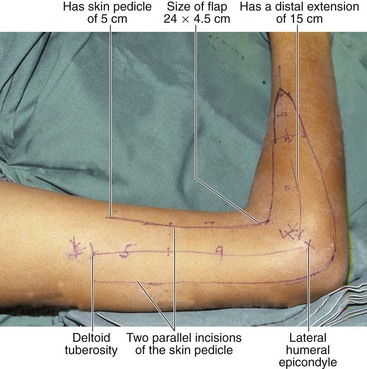
Design of Free Lateral Arm Flap
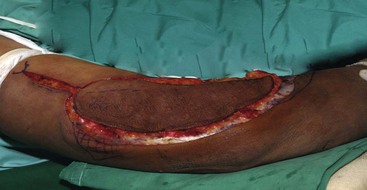
 The flap is designed over the lateral arm along an axis extending from the deltoid tuberosity to the lateral humeral epicondyle, extending distally over the lateral forearm to the radial styloid process.

 Connect the most proximal part of the flap to the deltoid tuberosity (see Fig. 47-4).
Pearls
The size of the flap should be about 10% larger than the recipient defect.
Center the flap over the lateral humeral epicondyle, allowing it to include the thinner lateral forearm skin. This also gives the advantage of providing a longer vascular pedicle. However, the flap should extend at least 5 cm proximal to the lateral humeral epicondyle to capture the distalmost septal perforating branch supplying the skin.
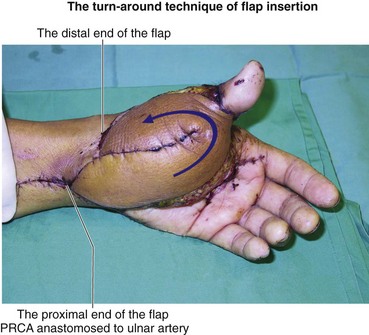
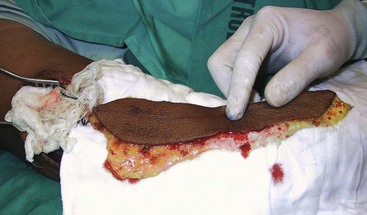
Design a long and narrow flap to facilitate direct closure. For a broad and “square-shaped” recipient defect that is much greater than 6 cm, design a flap of half its width and twice its length. The total area of the flap should remain the same. The flap can be inserted to cover the recipient defect by turning it around at about its midpoint; this is the “turn-around technique of flap insertion.” (Figure 47-5 shows the appearance of flap after the turn-around technique of flap insertion.)
Fascia extension of up to 4 cm over the anterior and posterior margins of the flap is reliable over the entire length of the flap. The extension provides a substantially broader flap and still allows primary closure of the donor site (see Fig. 47-4).
Harvesting of the Free Lateral Arm Flap
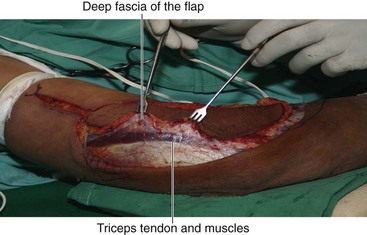
 The flap dissection is performed under exsanguination tourniquet control. Superficial dissection is performed with the skin incision made along the whole perimeter of the flap; proximally, it is extended to the deltoid tuberosity. Sharp dissection is made through the whole thickness of the subcutaneous fat until the deep fascia is reached (Fig. 47-6).
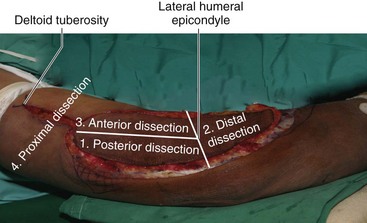
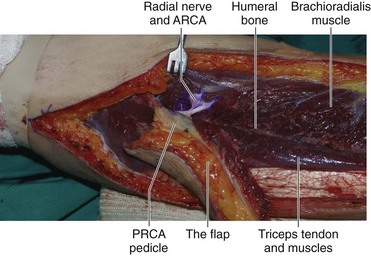
 The deep dissection of the flap harvesting is done in four steps: (1) posterior dissection—elevating the flap from the triceps until reaching the lateral intermuscular septum and exposing the PRCA pedicle; (2) distal dissection—elevating the flap off the forearm extensor muscles; (3) anterior dissection—elevating the flap from the brachioradialis muscle; and (4) proximal dissection—separating and preparing the proximal PRCA pedicle (Fig. 47-7).
Procedure
Step 1: Posterior Dissection
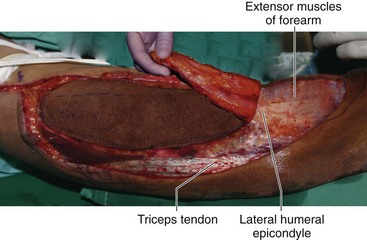
 The posterior dissection extends from the lateral humeral epicondyle to the most proximal extent of the flap.
 The deep fascia is incised, exposing the triceps tendon and muscles.
 The fascia is raised from the triceps tendon and muscles from posterior to anterior (Fig. 47-8).

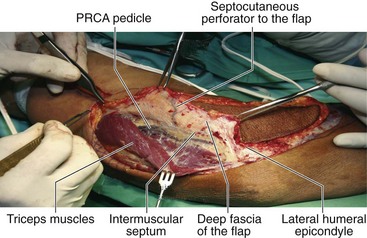
 The fascia is raised until reaching the lateral intermuscular septum, exposing the PRCA pedicle.
 The triceps muscle is separated from the lateral intermuscular septum until the lateral surface of the humeral bone is exposed (Fig. 47-9).
Step 1 Pearls
The septocutaneous perforators have multiple small muscular branches to the triceps muscles. These branches should be carefully ligated and divided.
Placing small sharp retractors between the deep fascia and the triceps muscles helps to create space for an easier dissection.
The distal portion of the PRCA pedicle is more visible in the posterior dissection. The proximal portion of the PRCA pedicle is anterior to the intermuscular septum and is less visible.
Step 2: Distal Dissection


Step 3: Anterior Dissection
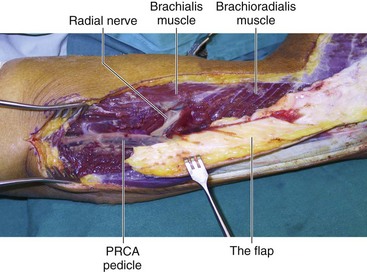
 The anterior dissection extends from the lateral humeral epicondyle to the most proximal extent of the flap.
 Sharp incision is carried through the deep fascia to reach the brachioradialis muscle.
 The deep fascia is dissected away from the muscles from anterior to posterior until the lateral intermuscular septum is reached (Fig. 47-11).
Step 3 Pearls
The muscles are adherent to the deep fascia in the anterior dissection and require careful dissection.
Multiple muscular branches share the same septocutaneous perforators to the skin; these muscular branches have to be carefully ligated and divided.
In the distal portion, the PRCA pedicle is not well visualized in this anterior location. Its presence has to be continually confirmed by looking at it from the earlier posterior dissection.
In the proximal portion, the PRCA is anterior to the intermuscular septum and is easily identified.
Step 4: Proximal Dissection
 The proximal dissection extends from the proximal tip of the flap to the deltoid tuberosity.

 The PRCA pedicle is separated and prepared from the proximal end of the flap to its proximal profunda brachii artery origin (Fig. 47-12).
Step 4 Pearls
Placement of a self-retaining retractor on either side of the lateral muscular septum against the triceps muscle posteriorly and the brachialis muscles anteriorly greatly enhances the exposure.
Following the PRCA from its previous distal dissection ensures its easy identification.
The PRCA pedicle in this proximal dissection lies anterior to the lateral intermuscular septum.
The intermuscular septum is divided transversely just proximal to the flap to further free the PRCA pedicle.
The radial nerve comes into view at the midarm level, running distally and anteriorly, and enters between the brachialis and the brachioradialis muscles.
The ARCA accompanying the radial nerve should be ligated and divided to free the PRCA from tethering to the radial nerve.
The posterior cutaneous nerve of the forearm accompanying the PRCA pedicle should be separated and divided.
Step 5: Division of the Vascular Pedicle


Step 6: Closure of the Donor Wound


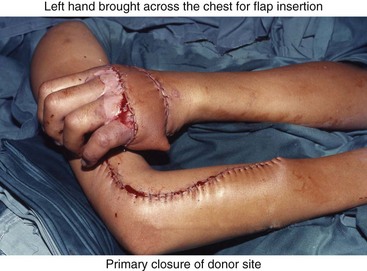
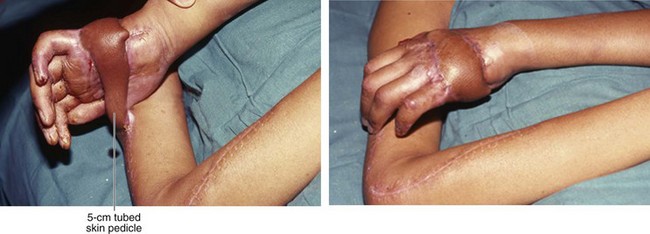
Step 8: Design of the Pedicled Flap


Step 9: Harvesting the Pedicled Flap
 As in the free-flap version, the dissection is performed under exsanguination tourniquet control.


Step 9 Pearls
The step 4 proximal dissection can be less extensive. The dissection is adequate when the PRCA pedicle is sufficiently mobile to allow anterior and posterior movement of the pedicled flap.
The proximal intermuscular septum is not divided, closer dissection of the PRCA pedicle is not necessary, and the posterior cutaneous nerve of the forearm is not divided.
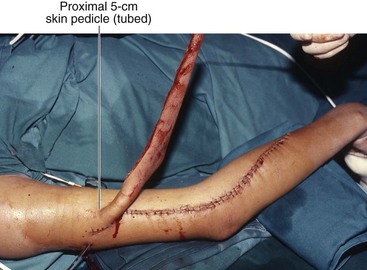
If the proximal skin bridge is not able to be tubed completely, split-thickness skin grafting prevents wound weeping.
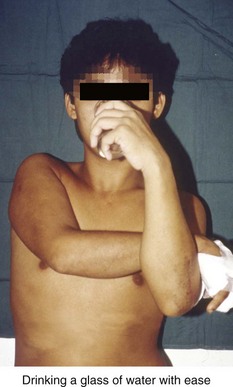
Postoperative Care and Expected Outcomes


Akinci M, Ay S, Kamiloglu S, Ercetin O. Lateral arm free flaps in the defects of the upper limbs—a review of 72 cases. Hand Surg. 2005;10:177-185.
Katsaros J, Tan E, Zoltie N. The use of lateral arm flap I upper limb surgery. J Hand Surg [Am]. 1991;16:598-604.
Ng SW, Teoh LC, Lee YL, Seah WT. Contralateral pedicled lateral arm flap for hand reconstruction. Ann Plast Surg. 2010;64:159-163.
Scheker LR, Kleinert HE, Hanel DP. Lateral arm composite tissue transfer to ipsilateral hand defects. J Hand Surg [Am]. 1987;12:665-672.
[/level-membership-for-surgery-category][not-level-membership-for-surgery-category]
Procedure 47 Lateral Arm Flap for Upper Limb Coverage
Indications
Procedure is used for soft tissue defects of the hand and wrist. These defects range from a medium size of 3 × 5 cm to a large size of 15 × 20 cm and can include the following:
Location of these soft tissue defects could be further classified as follows:
Examination/Imaging
Clinical Examination
Preliminary assessment can be done with inspection of the wound and viewing of the clinical pictures previously taken of the defect. The definitive assessment is performed intraoperatively under anesthesia.
The recipient defect is assessed to determine the reconstructive requirements.
Surgical Anatomy
The flap is from the lateral arm region with extension distal to the lateral humeral epicondyle down the lateral side of the forearm. The vascular pedicle is the posterior radial collateral artery (PRCA), a branch of the profunda brachii artery. One to two veins accompany the PRCA artery. The size of the artery is 1.5 to 2 mm in diameter, and the vein 2 to 3 mm in diameter. The vascular pedicle runs in the lateral intermuscular septum accompanied by the posterior antebrachial cutaneous nerve. Three to four septocutaneous perforators supply the lateral arm skin. The most distal branch of the septal vessel is 3 to 5 cm proximal to the lateral epicondyle. There are also three to four small branches of vessels running deep providing periosteal blood supply to the distal lateral humeral bone. The pedicle length of the flap ranges from 5 to 10 cm depending on the design of the flap (Fig. 47-3).
Positioning
The patient is positioned supine with the hand and whole upper limb placed on a hand table.
The whole upper limb, including the shoulder, is prepared.
A sterile pressure tourniquet is applied to the arm as proximally as possible.
A foam pad is used to cushion the elbow, taking pressure off the cubital tunnel and its ulnar nerve. (Fig. 47-4 shows design of 21 × 5.5 cm long and narrow flap design, with fascia extension.)
Pearls
In patients with a shorter arm, the sterile pressure tourniquet may occupy too much space, making proximal dissection difficult. A narrow manual rubber tourniquet of about 4 cm width can be used in its place effectively. However, the pressure cannot be regulated and is used only for a short duration for the proximal part of the dissection.
Flexion at the elbow and alternatively internal and external rotation at the shoulder facilitate greater reach in dissection of the flap.
