Procedure 46 Pedicled Groin Flap
Indications


Examination/Imaging
Clinical Examination
 Patients should be examined for signs of previous surgery in the groin, including hernia repair, lymph node biopsy, or vein stripping. A higher incidence of thromboembolic and other general complications has been reported in patients older than 50 years with a pedicled groin flap, and an alternative method of coverage may be more suitable in older patients (e.g., a radial forearm flap), provided that the palmar arch is intact and there is no peripheral vascular disease affecting the circulation in the hand.


Surgical Anatomy
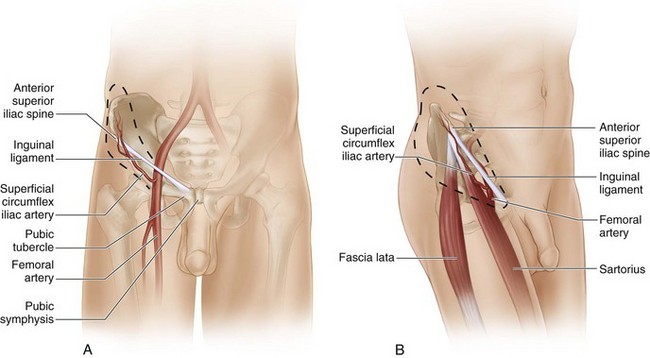
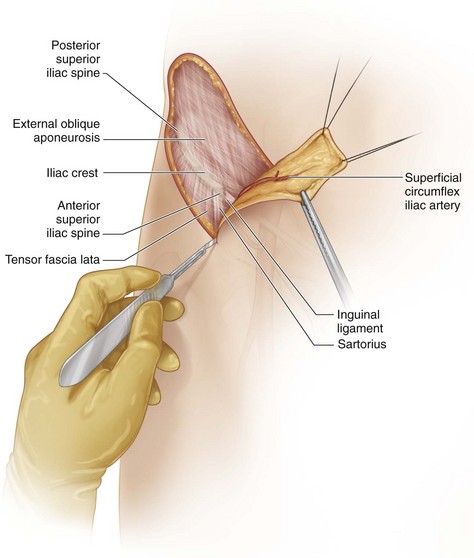
 Vascular basis: The flap is based on the superficial circumflex iliac artery (SCIA). The SCIA is the smallest branch of the femoral artery and arises about 1 inch below the inguinal ligament. It arises directly from the femoral artery in about 70% of cases; in the remainder, a common trunk is shared with the superficial epigastric artery. The SCIA travels obliquely toward the anterior superior iliac spine (ASIS), becoming progressively superficial as it travels from medial to lateral (Fig. 46-2A and B). At the medial border of the sartorius, the SCIA divides into a deep branch (which remains below the deep fascia and enters the sartorius) and a superficial branch (which pierces the deep fascia, becomes superficial, and supplies the overlying skin on its way to the ASIS). The femoral artery can be palpated immediately below the inguinal ligament at the midinguinal point (midway between pubic symphysis and ASIS). A point is marked 1 inch (2 fingerbreadths) below the inguinal ligament along the femoral artery. This represents the origin of the SCIA. A line drawn from this point to the ASIS represents the course of the SCIA and the vascular axis of the flap. Because of the obliquity of the vascular axis, about two thirds of the flap is designed superior to this axis and one third below this axis.

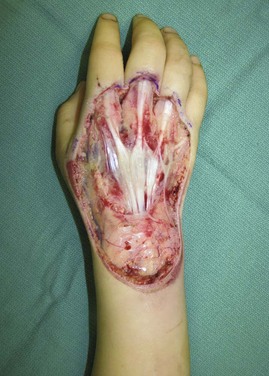
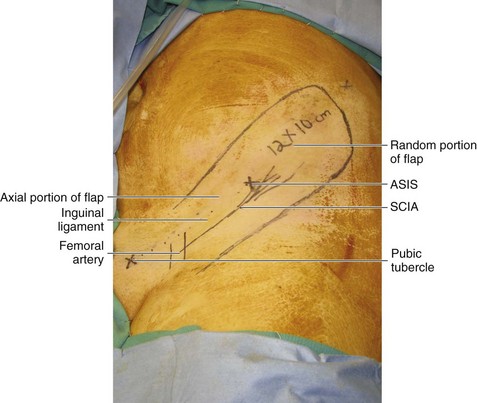
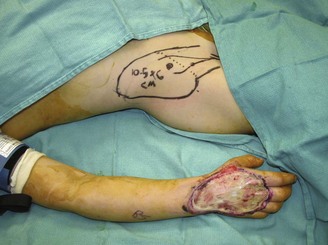
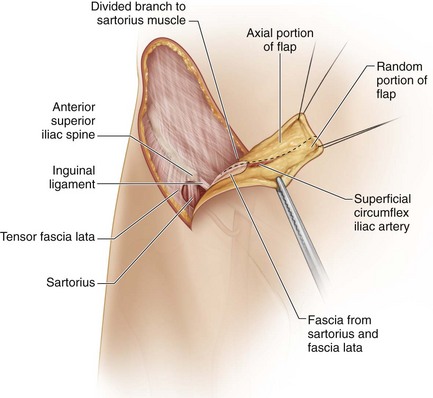
 Flap size: The maximum size of a groin flap is about 13 × 10 cm. This is adequate to resurface most soft tissue defects of the hand and thumb. However, this will not allow tubing of the flap in most cases without further medial dissection (Fig. 46-3).

Exposures

Procedure
Step 1: Elevation of Random Portion of Flap
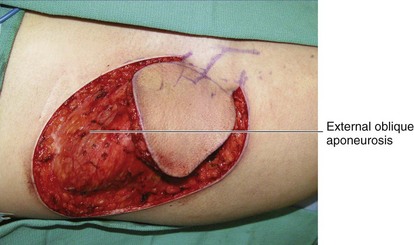
 The superior lateral margin of the flap is incised first. The incision is deepened until the aponeurosis of external oblique muscle is seen (Fig. 46-5).
Step 2

Step 3


Step 5
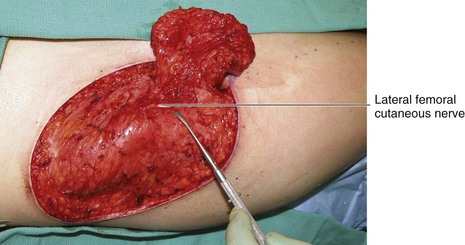
 It is important to identify two structures at this point. The first is the deep (muscle) branch of the SCIA, and the other is the lateral femoral cutaneous nerve.
Step 5 Pearls
The SCIA is superficial to the fascia over the sartorius, and the fascia is included to protect the vessel. Transillumination of the flap can help identify the SCIA. The deep branch of the SCIA arises at the medial border of the sartorius and must be identified and ligated carefully without injuring the SCIA before dissection can proceed medially. This branch before it enters the sartorius is very short; it is better to divide it within the substance of the sartorius to prevent injury to the SCIA (Fig. 46-7).
The lateral femoral cutaneous nerve arises beneath the inguinal ligament and passes close to the medial border of the sartorius. It divides into an anterior branch and a posterior branch that pass over the sartorius muscle and pierce the fascia lata at varying distances below the inguinal ligament. Some of these branches may be initially elevated in the flap as a result of including the sartorius fascia and the fascia lata. However, these branches lie deep to the SCIA and can be dissected away from the undersurface of the flap and preserved. Occasionally, it may not be possible to elevate the flap further without dividing it. If further elevation is deemed necessary, the nerve can be divided and repaired (Fig. 46-8).
Step 6
 The flap is dissected medially to 2 to 3 cm from the medial border of the sartorius after separating the lateral femoral cutaneous nerves and dividing the deep branch of the SCIA.
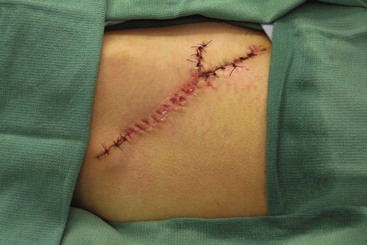
Step 7: Closure of Flap Donor Site
 The flap donor site is closed from medial to lateral in layers using 2-0 or even 0-0 Vicryl and 2-0 nylon. A drain is usually not required if adequate hemostasis was done because the closure is quite tight and compresses the bed. Even a seemingly large, impossible donor wound can be closed primarily (Fig. 46-9).
Step 8: Thinning of Flap
 The portion of the flap lateral to the ASIS can be thinned safely because the vessel is superficial and the flap relies on the subdermal plexus. Keeping excess fat on the random portion of the flap increases the vascular demands of the flap. The fat is parasitic, brings in no additional circulation, and delays revascularization from the bed.
Step 8 Pearls
The flap is thinned to match the thickness of the recipient site.
The fat superficial to Scarpa fascia is excised carefully using blunt-point scissors. The aim is to leave a thin layer of fat below the subdermal plexus. The fat lobules in the deeper layers are large, and, as one approaches the subdermal plexus, the lobules of fat become much smaller.
Step 9: Inset of Flap
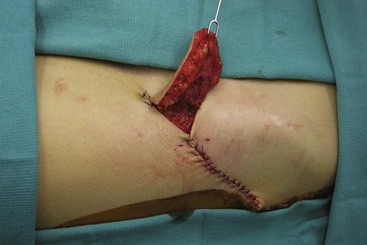
 The flap is inset into the recipient defect using simple 3-0 nylon interrupted sutures (Fig. 46-10).
Step 9 Pitfalls
If areas of the flap appear pale, it has been sutured too tightly, and the offending sutures will need to be removed. Occasionally, the flap may have to be re-inset.
The senior author does not tube the pedicle because the procedure is unnecessarily complicated and the tubing may compress the pedicle. The open area near the pedicle is kept moist with bacitracin ointment and is cleaned twice a day with gauze and then covered with Xeroform gauze.
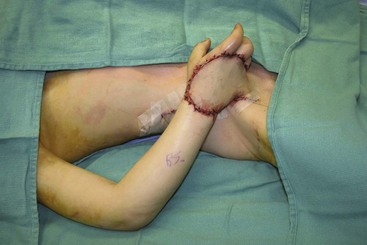
Step 10: Immobilization of the Limb
 The involved upper limb must be immobilized for 2 to 3 days until the patient is comfortable with the flap. This is most critical during the recovery of the patient from anesthesia, when the natural tendency is to take the hand to the mouth to pull the tube out. The surgical team must hold the groin flap arm secure until the patient has emerged from anesthesia.
Step 10 Pitfalls
Ensure that neither the flap nor the pedicle is compressed by the dressing.
In the early phase, the flap must be inspected frequently because change in patient position can lead to a kink in the flap or the tubed segment.
If there is full-thickness marginal necrosis of the flap, it is better to wait for 2 to 3 days until the extent of necrosis is demarcated and the initial postoperative swelling comes down. The patient should then be taken to the operating room, the necrosed portion excised, and the flap advanced and re-inset. Waiting longer only delays healing and risks failure on division of the flap.

Postoperative Care and Expected Outcomes
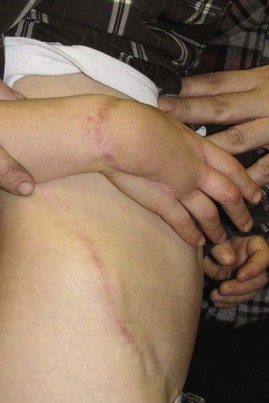
 Patients should be referred early to the hand therapist to promote passive and active range of motion. For a bulky-appearing groin flap, a compression bandage is provided. Surgery for thinning/defatting the flap should be delayed for at least 3 to 6 months. This can be done by liposuction or as an open technique. We find that the open technique is more effective. Instead of raising half the flap and doing it in stages, we make three incisions around the circumference of the flap at about 120 degrees from each other, while maintaining an intact skin bridge between them. This allows thinning of the entire flap in one stage without risking the vascularity of the flap. (Figure 46-12 shows the late result of the patient shown in Figure 46-1.)