CHAPTER 4. CHEST DRAIN INSERTION AND MANAGEMENT
NPSA recommendations34
Indications34
Cautions34
Contraindications35
Equipment35
Choosing the size of chest drain – the guidelines35
Position for drain insertion36
Site of drain insertion36
Practical procedure37
Post-procedure investigations43
Post-procedure care43
Complications43
Suggested reading43
Hippocrates (460–377 BC) first suggested thoracocentesis by making an incision in the chest wall. However, it was not until 1850 when Henry Ingersoll Bowditch (1808–1892) and Morill Wyman (1812–1903) at the Massachusetts General Hospital demonstrated the removal of fluid from the pleural space with the use of a trocar puncturing the chest wall.
INTRODUCTION
NPSA RECOMMENDATIONS
In 2008 the NPSA issued recommendations for chest drain insertion, having received reports of 12 deaths and 15 incidents of serious harm relating to this clinical procedure over a 3-year period. Common themes included inappropriate selection of the site for drain insertion, excessive insertion of the dilator giving rise to trauma, inexperienced doctors and/or poor supervision in performing the procedure, and a lack of familiarity with the Seldinger technique and/or the apparatus used. These short-comings resulted in the puncture of blood vessels with ensuing haemorrhage, or the perforation of major organs including the heart, lungs, liver and spleen.
For these reasons, the NPSA issued the following guidance relating to intercostal chest drain insertion using the modified Seldinger technique.
Drainage tubes should only be inserted by trained staff with relevant competencies and adequate supervision.
Due to the risk of damaging internal organs through poor positioning, the NPSA strongly supports the use of ultrasound when positioning a drain. The BTS also supports ultrasound-guided chest drain insertion.
Where practicable patients will be required to provide written consent prior to the procedure.
Furthermore, the NPSA re-iterated the BTS guidelines on chest drain insertion that are mentioned throughout this chapter.
INDICATIONS
• Pneumothorax:
— in any ventilated patient
— tension pneumothorax after initial needle relief
— persistent or recurrent primary pneumothorax after simple aspiration
— large secondary spontaneous pneumothorax in patients over 50 years.
• Pleural effusion (malignant or complicated parapneumonic effusion).
• Haemothorax.
• Empyema.
• Post-operative (e.g. post-cardiothoracic surgery) – this will not be covered as this should be managed by surgical teams intra-operatively.
CAUTIONS
The following differential diagnoses must be carefully evaluated with radiological guidance prior to considering chest drain insertion:
CONTRAINDICATIONS
Coagulopathy (recent aspirin/clopidogrel, heparin last 12 hours, international normalized ratio (INR) above 1.2, activated partial thromboplastin time ratios (APTRs) above 1.2).
Local sepsis over drain site.
Lack of consent.
EQUIPMENT
• Dressing pack.
Sterile gown, gloves and drapes.
• Chlorhexidine cleaning solution.
• Lidocaine.
• 1 × 20 mL syringe.
• Orange needle.
• Green needle.
• Seldinger chest drain kit, size 10–14 F (including chest tube, guidewire with dilators, introduce needle with port for guidewire, syringe, 3-way tap).
• Connecting tubing.
• Closed drainage system (with sterile water for underwater seal).
• Gauze.
• Scalpel and blade.
• Suture (e.g. ‘1’ silk).
• Clear sterile dressing.
• Skin pen.
• Sleek® adhesive tape.
CHOOSING THE SIZE OF CHEST DRAIN – THE GUIDELINES
An ongoing debate exists as to the optimal size of chest drain. BTS guidelines state that:
Small bore drains are recommended as they are more comfortable than larger bore tubes, but there is no evidence that either is therapeutically superior.
10–14 F catheters are commonly used sizes of drain by physicians, and can be inserted simply using the Seldinger technique. The NPSA estimates that approximately 85–90% of chest drains inserted in clinical practice are done so by the modified Seldinger technique.
The only exception to this recommendation applies to the drainage of acute haemothorax, in which large-bore drains (inserted by blunt dissection, 28–30 F minimum) are advised in order to monitor further blood loss. Given that this situation arises in the context of trauma (managed by the trauma team) rather than the other indications for chest drains (managed by general physicians), blunt dissection will not be covered in this review. Blunt dissection is, however, covered in Chapter 5.
 Tip Box: Pre-Medication
• Pre-medication with either an intravenous benzodiazepine (immediately pre-procedure) or intramuscular opioid agent (1 hour pre-procedure) is recommended as routine unless there is potential for a significant complication (for example, respiratory depression in those with chronic obstructive airways disease).
• It is prudent to monitor the patient closely having administered the pre-medication, and have the appropriate antidote to hand in the event of respiratory depression (flumazenil and naloxone for benzodiazepines and opiates, respectively).
POSITION FOR DRAIN INSERTION
• The patient should be positioned sitting up on the bed and slightly rotated, exposing the axilla with the ipsilateral arm placed behind their head.
• Alternatively, the patient could sit upright and lean on pillows placed on an elevated bedside table.
SITE OF DRAIN INSERTION
The insertion of a chest drain for drainage of a pleural effusion versus a pneumothorax does not differ in technique, but in terms of site of insertion:
• For an effusion the drain should be inserted in the mid-axillary line below the level of the fluid.
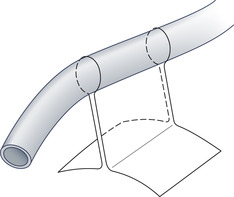
• For a pneumothorax, the drain should be inserted in the mid-axillary line of the ‘safe triangle’ as per BTS guidelines (Fig. 4.1).
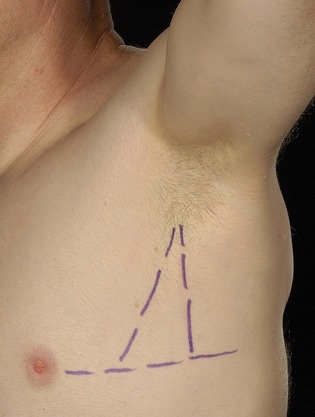
The apex of the safe triangle is just below the axilla, with its borders being the anterior border of the latissimus dorsi muscle, the lateral border of the pectoralis major muscle, and a line extending from the level of the nipple.
PRACTICAL PROCEDURE
• Obtain consent.
• Ask a nurse to accompany you in order to open non-sterile equipment and to comfort the patient.
• Before donning the sterile gown and gloves, mark the site of drain insertion with a skin pen.
• Wash hands, wear the sterile gown and gloves and lay out sterile environment and dressing pack.
• Clean the area – remember to clean outwards from the proposed site of insertion (spirally from centre to periphery to avoid bringing dirty solution in contact with a previously cleaned area) to keep a clean field.
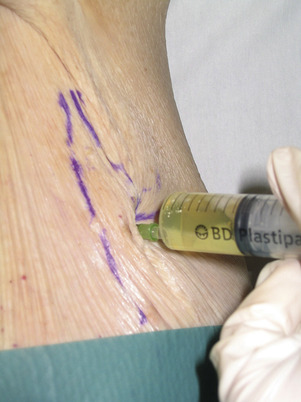
• Infiltrate local anaesthetic subcutaneously with an orange needle.
• Infiltrate local anaesthetic with a green needle into deeper tissues:
— advance the needle vertically just above the superior border of the rib (to avoid the neurovascular bundle, see Fig. 3.5)
— advance the needle slowly and infiltrate with anaesthetic until you aspirate air (pneumothorax) or pleural fluid. Whilst withdrawing the needle, line the track liberally with local anaesthetic (Fig. 4.2).
 Tip Box
A chest drain should not be inserted without further image guidance if free air or fluid cannot be aspirated with a needle at the time of anaesthesia. (BTS guidelines)
• Attach the 5 mL syringe to the introducer needle and insert vertically along the anaesthetized track whilst aspirating.
— Insert the needle bevel up for pneumothoraces, bevel down for effusions.
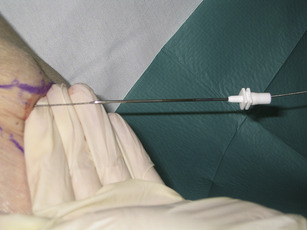
• Having reached the pleural cavity, hold the needle still with your non-dominant hand and remove the syringe with the other. Now pass the guidewire down the introducer needle.
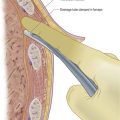
• Ensuring that you do not lose sight of the guidewire at any time, remove the needle over the guidewire (Fig. 4.3).
• Make a small incision (approximately 0.5 cm) in the skin immediately adjacent to the guidewire to enlarge the guidewire’s percutaneous passage.
• Pass the dilator over the guidewire, ensuring that the guidewire appears from the other end of the dilator before it touches the skin (Fig. 4.4).
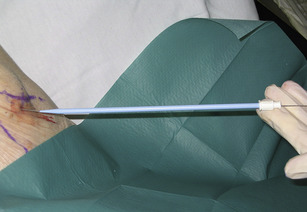
• Whilst holding the guidewire at its tip, insert the dilator through the skin into the pleural cavity using a rotating motion (Fig. 4.5).
— Do not advance the dilator further than the distance that was required to pass the needle in order to aspirate the contents of the pleural cavity at the time of local anaesthetic administration (see NPSA recommendations above).
 Tip Box
Chest drain insertion should be performed without substantial force. (BTS guidelines).
• Whilst holding the guidewire at all times, remove the dilator over the guidewire and cover the puncture site with gauze.
• Estimate the length of tube to be inserted into the pleural cavity by checking the length of tube against the patient’s chest. The tip should be sited at the apex in the case of a pneumothorax, and aimed basally for pleural fluid.
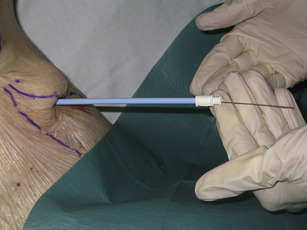
• Pass the drain over the guidewire, ensuring that the guidewire appears from the other end of the drain before it touches the skin.
• Whilst holding the guidewire at its tip, insert the chest drain through the skin.
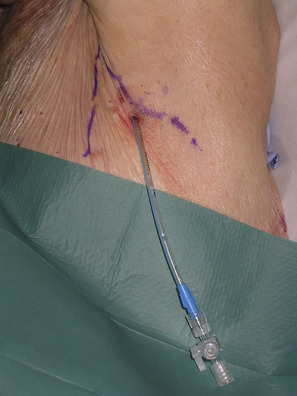
• If draining a pneumothorax, ask the patient to hold their breath. Quickly remove the guidewire and attach the 3-way tap in the ‘closed’ position (Fig. 4.6).
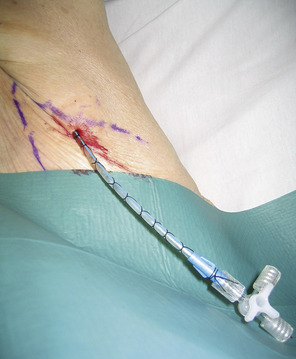
• Secure the drain in position with a single suture.
— Insert a suture next to the drain with equidistant lengths of suture material either side.
— Using the two lengths of suture material, wrap them tightly around the drain in a ‘plaiting’ fashion. Having plaited the suture material for a reasonable length (at least five plaits) tie the sutures off (Fig. 4.7).
 Tip Box
‘Purse string’ sutures must not be used, as they convert a linear wound into a circular one that is painful for the patient and may leave an unsightly scar. (BTS guidelines).
— Overlay an ‘omental tag’ of tape on the plaiting approximately 2 cm from the skin surface (Fig. 4.8). This further secures the drain while allowing the tube to lie away from the thoracic wall.
 |
| Fig. 4.8
(Reproduced from Laws D, Neville E, Duffy J (2003) BTS guidelines for the insertion of a chest drain. Thorax 58:ii53.)
|
— Apply a transparent dressing to the insertion site in order to inspect for leakage or infection. DO NOT apply large amounts of gauze or dressing material or tape to the insertion site – this will hide any signs of local sepsis or leakage.
• Connect the 3-way tap to the tubing of the chest drain bottle and open the tap. Fluid/bubbling should now be observed.
• Document the procedure clearly in the medical notes.
POST-PROCEDURE INVESTIGATIONS
• Chest X-ray – to confirm drain position and therapeutic result.
• If an effusion, send for biochemistry, microscopy, culture and sensitivity, cytology and fluid pH (as described previously, see Chapter 3).
POST-PROCEDURE CARE
• Prescribe oral analgesia.
• In order to avoid the rare complication of re-expansion pulmonary oedema, do not drain off more than 2 L of pleural fluid in 24 hours (e.g. 1 L mane, 1 L nocte).
• The patient should be admitted to a ward where the nursing staff are trained to manage chest drains.
• For the underwater seal, it is imperative that the bottle is kept below the level of the insertion site at all times (to prevent passage of the drainage bottle contents into the pleural cavity). The bottle must also be kept upright, and adequate sterile water should be present in order to submerge the end of the tube.
• Record regularly the amount of drainage/bubbling and the presence of respiratory swing on a dedicated chest drain chart.
COMPLICATIONS
• Pain.
• Bleeding.
• Infection.
• Injury to the intercostal neurovascular bundle.
• Injury to intrathoracic structures and lung parenchyma.
• Pneumothorax.
• Surgical emphysema.
• Re-expansion pulmonary oedema.
SUGGESTED READING
Henry, M.; Arnold, T.; Harvey, J.; et al., BTS guidelines for the management of spontaneous pneumothorax, Thorax 58 (Suppl 2) (2003) ii39; http://thorax.bmj.com/cgi/reprint/58/suppl_2/ii39.
Laws, D.; Neville, E.; Duffy, J., BTS guidelines for the insertion of a chest drain, Thorax 58 (Suppl 2) (2003) ii53; http://www.thorax.bmj.com/cgi/reprint/58/suppl_2/ii53.
NPSA (2008) Risks of chest drain insertion. http://www.npsa.nhs.uk/patientsafety/alerts-and-directives/rapidrr/risks-of-chest-drain-insertion/