CHAPTER 3. PLEURAL ASPIRATION (OF FLUID OR AIR)
Indications23
Contraindications23
British Thoracic Society (BTS) guidelines for managing pneumothoraces24
Tension pneumothorax – emergency management24
Equipment25
Location of site of aspiration26
Practical procedure27
Post-procedure investigations31
Complications31
Suggested reading32
INTRODUCTION
Pleural aspiration of fluid or air is a bedside technique that can be performed for diagnostic and/or therapeutic purposes.
INDICATIONS
• Diagnostic aspiration of pleural fluid.
• Therapeutic aspiration of pleural effusion (better done by placing a drain; see Chapter 4).
• Therapeutic aspiration of simple pneumothorax.
CONTRAINDICATIONS
BRITISH THORACIC SOCIETY (BTS) GUIDELINES FOR MANAGING PNEUMOTHORACES
Pleural aspiration has a role in the management of pneumothoraces if certain criteria are met:
• Primary pneumothorax (no evidence of underlying lung disease):
— if patient is not breathless or there is <2 cm rim of air on chest X-ray, observe and do not proceed to aspiration/drainage
— if patient breathless or >2 cm rim of air on chest X-ray, then aspirate. If unsuccessful, consider repeat aspiration up to a total of 2.5 L. If an air leak persists, insert a chest drain (see Chapter 4).
• Secondary pneumothorax (known underlying lung disease):
— if patient is not breathless, or there is <2 cm rim of air on chest X-ray, or patient is less than 50 years old, consider aspiration
— if patient breathless or > 2 cm rim of air on chest X-ray, then insert a chest drain (see Chapter 4).
TENSION PNEUMOTHORAX – EMERGENCY MANAGEMENT
• This is a medical emergency requiring immediate recognition and treatment. If left untreated the increasing size of the tension pneumothorax compresses the mediastinum, ultimately obstructing venous return to the right heart and causing subsequent haemodynamic collapse and death.
 Tip Box
Tension pneumothorax is a clinical diagnosis that does not require radiological confirmation – this wastes valuable time.
 Tip Box
Do not waste time with local anaesthetic – warn the patient of the procedure and the importance of performing it quickly.
PROCEDURE
• Upon diagnosing a tension pneumothorax, immediately insert a large-bore cannula over the upper border of the third rib in the second anterior intercostal space, mid-clavicular line (Fig. 3.1).

• Upon removing the trocar a ‘hiss’ of air should be heard, signifying decompression of the tension and reversion to a simple pneumothorax.
• The purpose of needle thoracocentesis is to convert a tension pneumothorax into a simple pneumothorax. Inserting the cannula allows air to escape to atmosphere during expiration rather than accumulating and placing the intrathoracic structures under tension. Therefore formal drainage of the residual simple pneumothorax will still be required with an intercostal drain (see Chapter 4).
EQUIPMENT
• Dressing pack.
• Sterile gown, gloves and drapes.
• Chlorhexidine cleaning solution.
• Lidocaine.
• 2 × 10mL syringes.
• Orange needle.
• Skin pen
• Intravenous cannula – orange (14 G) or grey (16 G).
• Gauze.
• Three-way tap with attachable sterile tubing.
• 50 mL syringe.
• 3 × specimen pots, 1 × fluoride oxalate blood vacutainer (glucose), 1 × heparinized (arterial blood gas) syringe.
• Sterile collecting bag.
• Sterile dressing.
LOCATION OF SITE OF ASPIRATION
The aspiration of a pleural effusion versus a simple pneumothorax does not differ in technique, but the site of insertion is influenced by whether it is fluid or air being aspirated.
 Tip Box
Always confirm the side to aspirate with the chest X-ray prior to starting the procedure.
PLEURAL EFFUSION
• Sit the patient upright and leaning forward over an elevated bedside table.
• The site of aspiration should be between the posterior-axillary line and the inferior angle of the scapula (Fig. 3.2).
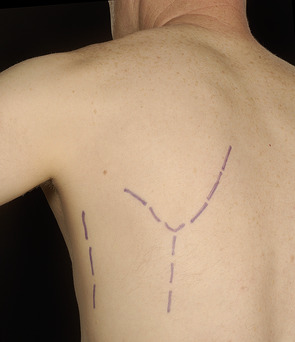
• Alternatively chest percussion should allow detection of the effusion and the needle entered into the pleural space some 2–3 rib spaces below the highest level of the effusion.
 Tip Box
Ideally, all pleural effusions should be aspirated with ultrasound guidance (see Chapter 4, National Patient Safety Agency recommendations), especially if any doubt exists about the level of the effusion detected by percussion or if the level for aspiration is close to the diaphragm (for example, in airways collapse the hemidiaphragm may be elevated). This should be used to place a mark on the skin which would safely allow an intrathoracic needle to reach the body of fluid in the pleural space. It is important that the aspiration should be performed with the patient in the same position as when the site for aspiration was marked – the fluid notoriously moves with change of position!
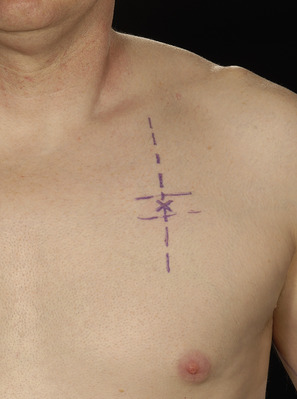
PNEUMOTHORAX
• Sit the patient upright on the bed, supported with pillows behind their head and back.
• The ideal site of aspiration is the second intercostal space in the mid-clavicular line (Fig. 3.3).
PRACTICAL PROCEDURE
PREPARATION
• Obtain consent.
• Ask a nurse to accompany you in order to open non-sterile equipment and to comfort the patient.
• Before donning the sterile gown and gloves, identify and mark the site of aspiration (described above) with a skin pen (if not already done under ultrasound guidance).
• Check and assemble equipment for a therapeutic pleural tap (Fig. 3.4):
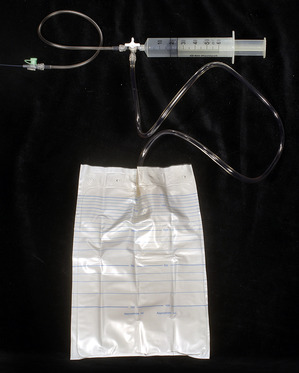 |
| Fig. 3.4
(note: the cannula is connected to the apparatus after it is in situ in the effusion).
|
1. Connect a 50 mL syringe to a three-way tap at the port furthest from the patient.
2. Attach sterile tubing to the port closest to the patient that will receive pleural contents via a cannula.
3. Finally attach sterile tubing to the side-port and, if performing a therapeutic tap of a pleural effusion, connect to a sterile collecting bag.
• Fill the 10 mL syringe with lidocaine via a green needle.
• Clean the area – remember to clean outwards from the proposed site of aspiration (spirally from centre to periphery to avoid bringing dirty solution in contact with a previously cleaned area) to keep a clean field.
• Infiltrate local anaesthetic subcutaneously with an orange needle.
• Infiltrate local anaesthetic liberally with a green needle into deeper tissues:
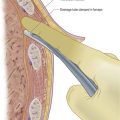
1. Advance the needle into the intercostal space just above the superior border of the lower rib (to avoid the neurovascular bundle sitting beneath the upper rib, Fig. 3.5).
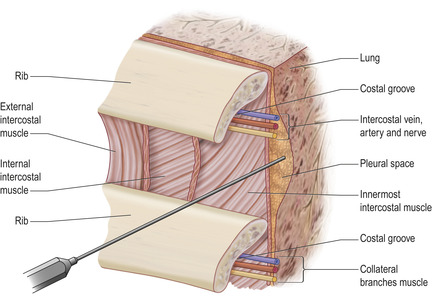
2. Advance the needle slowly and infiltrate with anaesthetic until you aspirate air (pneumothorax) or pleural fluid. Whilst withdrawing the needle, line the track with local anaesthetic.
PROCEDURE: DIAGNOSTIC PLEURAL TAP
• Assemble a 20 mL syringe with a new green needle and simply advance (whilst continually aspirating) along the anaesthetized track. Obtain approximately 20 mL of pleural fluid.
PROCEDURE: THERAPEUTIC TAP OF A PLEURAL EFFUSION OR PNEUMOTHORAX
• Introduce the plastic cannula over its trocar into the thoracic cavity until the hub or wings of the cannula abut the skin surface.
• Whilst holding the cannula in place, remove the trocar and attach the sterile tubing connected to the three-way tap, 50 mL syringe and collecting bag.
• Turn the tap to connect the pleural space with the 50 mL syringe and aspirate 50 mL of air/fluid. Then turn the three-way tap to connect with the syringe the sterile collectiong bag (the three-way tap in this position is closed to the pleural space). You will now be able to syringe out the aspirated effusion into the collecting bag, or syringe out the aspirated gas to atmosphere in the case of a pneumothorax.
• Repeat this step (counting the number of syringe-fulls of air removed if a pneumothorax) until:
— resistance is felt
— a dry tap is achieved
— the patient coughs repeatedly
— 2.5 L of air are aspirated
— 1–1.5 L of pleural fluid are aspirated.
FINISHING OFF
 Tip Box
Use ultrasound guidance in the event of an unsuccessful tap to determine if the effusion is loculated. A radiologically guided drain insertion may be required in this case.
POST-PROCEDURE INVESTIGATIONS
• Biochemistry – protein, lactate dehydrogenase (LDH, standard sterile specimen container); glucose (in fluoride oxalate vacutainer).
• Microscopy, culture and sensitivity (standard sterile specimen container).
• Cytology (standard sterile specimen container).
• Fluid pH (unless debris in fluid, run sample from an arterial blood gas syringe through a blood gas analyser).
• Chest X-ray – to confirm radiological result (if therapeutic procedure) and to rule out iatrogenic pneumothorax.
 Tip Box
Light’s criteria provide a more sensitive tool for diagnosing an exudate. The effusion is an exudate if at least one of the following criteria are met:
1. The pleural fluid:serum protein ratio >0.5.
2. The pleural fluid:serum LDH ratio >0.6.
3. Pleural fluid LDH is greater than two-thirds the upper limit of normal value serum LDH.
COMPLICATIONS
• Bleeding.
• Infection.
• Injury to the intercostal neurovascular bundle.
• Pneumothorax.
• Re-expansion pulmonary oedema (if too much fluid is removed). Do not drain off more than 1–1.5 L of pleural fluid in one aspiration to avoid this complication. If it is known that more than 1.5 L of pleural fluid is to be drained, consider inserting an intercostal chest drain (see chapter 4) rather than a therapeutic tap.
SUGGESTED READING
Henry, M.; Arnold, T.; Harvey, J.; et al., BTS guidelines for the management of spontaneous pneumothorax, Thoax 58 (Suppl 2) (2003) ii39; http://thorax.bmj.com/cgi/reprint/58/suppl_2/ii39.
Maskell, N.A.; Butland, R.J.A., BTS guidelines for the investigation of a unilateral pleural effusion in adults, Thorax 58 (Suppl 2) (2003) ii8; http://thorax.bmj.com/cgi/reprint/58/suppl_2/ii8.pdf.